Thanks to the development of construction technologies, floor coverings can not only be quickly installed, but also given additional protection from wear and tear over several decades of operation.
A super-quick-drying option that compares favorably with its analogues – self-leveling heated floors – has become popular. You can do it yourself in a fairly short time. But a problem often arises - is it possible to make a heated floor under a self-leveling floor? Let's consider all the features of this technology in detail.
Installation of heated and self-leveling floors
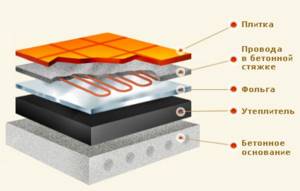
Installation of a heated floor begins with leveling the base for laying pipes. Potholes are filled with cement mortar, and bulges are cut off with a hammer drill. After cleaning the base from dust and pieces of cement, it is primed. A heat reflector is lined on top. Foil works best. The edges of the foil sheets are overlapped one on top of the other; There is an allowance for the walls on the sides. A reinforcing mesh is laid out on top.
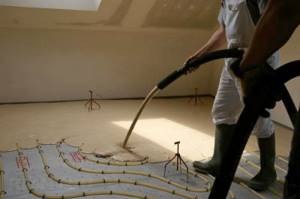
After the preparatory work, the installation of plastic pipes begins. They are laid out in a zigzag so that one end of the system is connected to the heat supply source, and the other to the water inlet into the general heating system.
The distance between the pipes must be at least 10 cm. At bending points, the pipes are fixed with mounting tape using dowel nails.
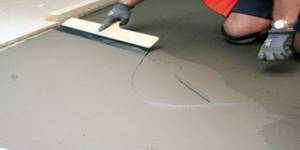
Upon completion of the installation of the water heated floor, it is necessary to make a rough concrete screed. The solution should completely close all gaps, as well as the tops of the pipes. At the end of the work, you need to take a two-day break from work, let the cement set and dry.
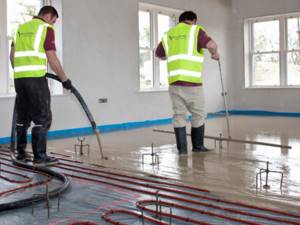
Then a liquid self-leveling mixture is poured over the concrete coating. It should have a creamy consistency, thoroughly mixed.
The self-leveling floor under the warm one is poured starting from the farthest corner of the room. In order for the mixture to be distributed evenly, it is necessary to direct it with a staple. The surface is also treated with a needle roller. Thus, air bubbles are eliminated and any flaws disappear. The self-leveling floor for heated floors is ready 6 hours after pouring.
You should not turn on the heating system immediately after installation.
The structure of the flooring may be damaged. You need to let it dry completely for 2 weeks. After this, the floors can be painted.
Technology for arranging a heating system under a self-leveling floor
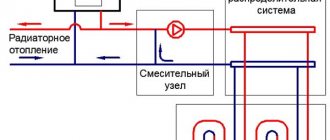
When making a heating system in a residential building, a heated floor can be the only source of heat, which is not recommended, or additional to radiator heating. Installation of a heating system and pouring of floors is carried out in a strict sequence, the knowledge of which is necessary for any owner of country property in Moscow or any other city.
Where to start?
The surface is cleaned, leveled, and cracks are eliminated. In places where there will be a circuit or film of the floor heating system, the following points should be taken into account:
- When laying infrared film, avoid places where heavy or massive objects will stand;
- The distance from the walls must comply with the requirements of building codes;
- If there are heating devices in the room, the heated floor contour should be located at a distance of 20 cm or more from them;
- To minimize heat loss, it is worth making a thermal insulation layer, for which foil sheets secured with tape are suitable.
Installation of heated floors
Infrared floors are laid using grommets, connected with wires and included in an installation with a thermostat. The temperature sensor in the corrugation and the thermostat are synchronized - the elements must warm up, otherwise it is necessary to look for faults.
The cable-type system is laid like a film, but one cable is not allowed to overlap another. In addition, heating can only be started after the self-leveling floor has dried. The temperature sensor cannot be filled. Particular care should be taken to avoid the formation of voids or bubbles in the layer.
Water floors are formed by a pipeline on the surface filled with a solution. According to experts, copper or metal-plastic pipes will last longer than polypropylene pipes.
Selecting a heating system
In order for the created structure to serve for a long time and efficiently fulfill its duties, you need to choose the right type of heating used. In addition to the fact that different heating systems will heat a room with different efficiency, each is installed differently and requires different installation costs. The following options are suitable for pouring self-leveling floors:
- A classic water system, proven over the years and quite effective. However, in combination with filling, this will not be the most rational solution. The diameter of the water tubes is quite large and a lot of mixture will be required for filling. At the same time, it will take a lot of time to fill, since you will have to lay the solution layer by layer.
- Electric heating cable. The optimal solution for obtaining an additional heat source. The cost of the cable is low, the thickness of the poured solution will also be small and the heating efficiency will be high. At the same time, a fairly simple and reliable technology is used, in contrast to designs with water tubes, which can leak over time.
- Infrared and film heating. The most modern type of heating, which has a lot of positive qualities and requires a minimum thickness of the poured solution. However, due to its relative newness. Such heating options will be quite expensive and not everyone can afford it.
The final choice will depend on several parameters: the height of the room, the ability to spend a lot of time on all the work and the budget allocated for repairs.
Creating a foundation with increased strength
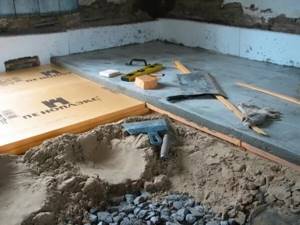
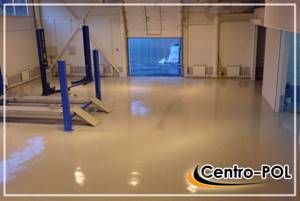
In garages where the floor covering experiences significant loads, as well as in houses built on the ground, it is necessary to create a power screed under the covering with a warm floor system. There are different methods for this, the most common of which looks like this:
- soil is removed to a depth of 300-400 mm;
- filling is made of medium or fine gravel up to 250 mm high;
- a sand cushion with a height of 100 to 150 mm is formed and compacted.
Layers of gravel and sand must be generously moistened with water before compacting with a vibrating machine. After the pillows have dried, a waterproofing material is placed on them.
When working in garages, where it is necessary to guarantee a high load-bearing capacity of the floor, the thickness of the screed under the main layer with a heating system can be significant. At a minimum, for a garage with cars, it is recommended to lay 150-200 mm of mortar. In this case, reinforcement is done with steel mesh. If you are making a heated floor in a garage, then reinforcement will not be deprived.
The problem of creating a reliable, relatively light and durable rough covering in a garage or house on the ground can be solved with the help of highly filled bulk mixtures. This separate class of cement-based compositions is called a thick floor and allows you to create a layer of up to 150-170 mm without additional effort.
Creating a reliable foundation on the ground
Installation of heated self-leveling floors
There are two types of heated self-leveling floors: electric and water. In our country, the first type is more common, largely due to the ease of its installation. At the same time, water self-leveling floors, popular in the West, are more economical, although they are difficult to install and operate: pipes for hot water are laid in the base (a rather labor-intensive and technically difficult task), then a standard screed is made, leveling is done, and the last step is pouring the self-leveling floor .
Both water and electric self-leveling heated floors are installed in the same sequence: first - the “warm floor” system, then - pouring the finishing coating. Let's look at this algorithm in more detail using the example of laying electric heated self-leveling floors. They are installed using a cable that carries heating elements under the coating. These elements are absolutely safe and easily heat floors to a comfortable temperature for humans. They are connected and conducted with special single-core and double-core cables.
The “warm floor” system is controlled through a thermostat connected to the mains. Heating up to 70 degrees is possible, and the floor is protected from fire by a reliable protective shell and insulation. Electric heated floors can be installed in different ways, but the principle by which they are installed is the same. The first step is to make a screed, lay insulation on it, then lay the cable, and install the heating elements. After the screed has completely dried, which usually takes a long time, up to a month, the finishing coating is poured - the self-leveling floor. This is done using standard technology: the finished mixture is poured out and immediately after that it is leveled using a needle roller (this way air bubbles are squeezed out of the coating and it is made homogeneous). Sometimes special chips are placed on the newly poured floor for decoration. The coating takes 12-20 hours to dry. The top of the self-leveling floors is coated with a protective transparent varnish.
Important nuances
In operation, a self-leveling heated floor made on the basis of an electrical system is not much different from conventional electrical appliances that receive power from wall wiring. Before laying the cable in the floor, it is necessary to plan the subsequent arrangement of the furniture (if the floor is installed in the bathroom, take into account the location of the plumbing and washing machine). The cable should be placed in places where it is guaranteed not to be at risk of overheating. Experts consider it advisable to draw and save a diagram of the cable layout in the floor, since in the future, if repairs are necessary, this can help in identifying the damaged area.
Installation work
Before installing a self-leveling floor for a heated floor, it is necessary to carry out a number of preparatory work.
They include:
- installation of a screed, which is needed to level the existing floor covering or its base;
- placement of the insulating layer;
- installation of the heating cable itself.
Fill
Important: Self-leveling mixtures for heated floors can only be used after the installed screed has completely dried. Depending on the layer applied, it may take from a week to a month for complete drying. If you install a heated floor on a wet screed, in the future this will lead to the appearance of cracks in the coating.
Alignment
This coating consists of two main elements. They can be purchased separately by combining them during the preparation of a solution or mixture. To achieve the best result (no lumps and complete homogeneity), it is recommended to use a construction mixer or a regular drill, for which you will need a special attachment. You can also purchase a ready-made composition that can increase the required noise insulation, waterproofing and thermal insulation of the selected room. However, its cost will be several times higher than that set for conventional formulations.
Important: It is better to buy flooring from trusted suppliers or large construction stores. Pay special attention to well-known brands. These points will help you make the right choice and protect you from purchasing low-quality products. A high quality product will be expensive.
Self-leveling mixtures
When purchasing products from one manufacturer or another, it would be a good idea to first familiarize yourself with the composition, which is provided by the company in the form of an insert. Compliance with the instructions is mandatory, even if there is any doubt. Having finished kneading, the composition is poured onto a previously prepared area, after which it is rolled out using a needle roller. It will get rid of air bubbles and make the self-leveling floor under the heated floor uniform.
Installation procedure
If you decide to install a self-leveling heated floor with your own hands, follow this sequence of actions:
- Pouring concrete screed;
- Laying a thermal insulation layer. For this purpose, various insulation materials are used. More often, preference is given to polystyrene foam, penofol or mineral wool. However, it is permissible to use other types of heat insulators;
- Installation of heating elements according to the selected scheme;
- Preparing the mixture for pouring. To do this, the components of the composition are mixed together and thoroughly mixed. When doing the work on your own, you can use a drill with a mixer attachment;
- Pouring the mixture onto a previously prepared base;
- Removing air bubbles from the surface by treating with a needle roller;
- Surface drying. Depending on the composition, it will take up to 24 hours;
- Applying a layer of protective colorless varnish.
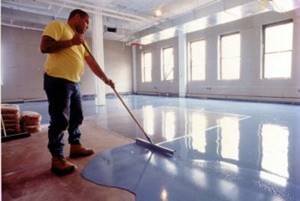
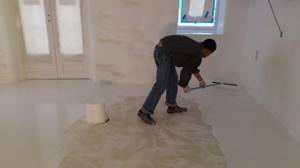
Composition distribution over the surface
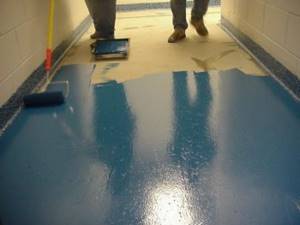
Removing air
Adviсe
To extend the service life of the floor covering being formed, it is worth adhering to certain construction tricks and taking into account a number of technical points. In this case, the warm structure will certainly last a long time, providing coziness and comfort in the home. When starting installation, you should decide in advance on the following points:
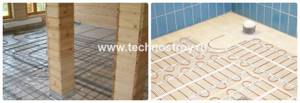
- Placement of furniture. Before starting work, it is worth developing a project in accordance with which the furniture will be placed in the room. The heating circuit is placed at least half a meter from the wall. In this case, you can avoid the negative impact on furniture due to constant heating and cooling and reduce operating costs, since heat transfer in these areas is still minimal;
- Doorways. It is worth refusing to lay the heating circuit through the doorway. When installing the door frame, there is a risk of damaging the pipe. Restoration will be labor-intensive and energy-consuming.
- Places with significant heat dissipation to avoid large temperature fluctuations. This includes areas adjacent to walls, balconies or unheated rooms. In these places, it is necessary to lay thicker insulation compared to the rest of the surface.
Heated self-leveling flooring can be a suitable type of flooring for premises for various purposes. You just need to properly prepare the base and pour the mixture. By taking the advice of professionals and following the manufacturer's recommendations, you can achieve the formation of a strong, even and durable floor covering.
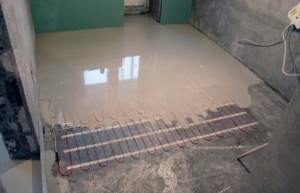
Thermal film
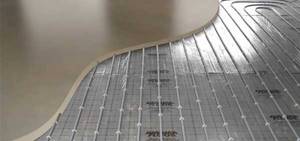
An infrared heated floor is formed from thin heating elements in the form of a film. To install it, there is no need to pour a thick screed. Thermal film is laid over the entire surface of the base and fixed with ordinary tape. The operating parameters of the system are adjusted using a thermostat. With its help, you can set the required temperature of the underfloor heating, set the system to automatically turn on and off in accordance with the specified characteristics.
The self-leveling floor is ideally combined with this system. The only limitation to the installation of this coating is that the solution must be poured in a thin layer so as not to damage the film heating elements.
Types of self-leveling floors
The classification is based on the materials used for the device. Self-leveling floors are divided into polymer concrete and polymer. The first are formed from a mixture consisting of cement, sand and plasticizers. The formed floor covering becomes durable within half an hour. However, its full operation is permissible only after two days.
Polymer floors have high performance characteristics. They, in turn, are divided into types:
- Epoxy. With a small thickness, they have high strength characteristics and resistance to chemical reagents. They are presented in a wide range of colors, which allows you to choose the appropriate option for a specific room. However, such a floor does not tolerate heating above 25 degrees C, which must be taken into account if a heated floor and self-leveling floor are formed;
- Polyurethane. High ductility and adhesion to various types of substrates. They are resistant to vibration. Combined with various types of heating structures;
- Methyl acrylate. Eco-friendly, durable type of flooring. Allows operation in a wide temperature range. It hardens quickly and adheres to the base. Allows installation on various types of heating circuits.
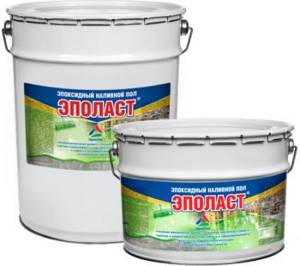
Composition for epoxy self-leveling floor
We install self-leveling heated floors with our own hands
So, let's move on from theoretical solutions to our question to practical actions. And as a step-by-step guide, we will install a water heating system for your floor covering. Of course, first of all you need to take care of preparing the material that will be needed for the work.
- Reflective thermal insulation.
- Metal mesh for reinforcement.
- Mounting tape for fastening pipes.
- Sand and cement for preparing the solution.
- Self-leveling mixture.
- Dowel-nails 6×40 millimeters.
- Hammer and concrete drill with a diameter of 6 millimeters.
As for the tools, here you will need: a hammer drill and a concrete drill, a construction mixer, a trowel, a construction level, a construction rule, a needle roller. Without this minimum tool, you will not be able to carry out work on filling the floor with a self-leveling mixture.
What systems are suitable for self-leveling floors?
There are three main heated floor systems that you can choose when arranging space heating. This:
electric, the main energy resource of which is electricity;
infrared, which works by converting radiation energy into heat;
water, where heat is transferred through heating and further movement of water.
All these systems have both disadvantages and advantages, and you must always choose carefully, taking into account the characteristics of the object that is to be heated.
Electric
High-quality and reliable self-leveling flooring in combination with warm electric floors is one of the most effective solutions when arranging heated flooring. Heating electrodes have a fairly small diameter, which allows the use of a relatively small amount of the mixture from which the corresponding coating is made. This means that installation costs, as well as further repairs and maintenance, will be relatively low.
It should be noted that this type of heated floor is the most popular among residents of post-Soviet countries. This is due to both the moderate cost of the structure and the ease of its installation.
Electric heated floors have a number of significant disadvantages. For example, if any element of the installation fails, then to dismantle and replace it you will need to remove the self-leveling floor at least partially. And these are unnecessary expenses, both financial resources and time.
Infrared
Warm floors, the operating principle of which is based on the use of infrared radiation energy, are characterized as the most productive system when taking into account thermal output. Another important advantage is that the thickness of such a floor is much less than an electric one, and even more so a water one.
This difference significantly affects the cost of installation/dismantling work and the cost of further maintenance.
A significant drawback is the price of the infrared version of heated floors. This is due to the relative newness of the product. Over time, the cost of the product will become more reasonable.
Water
Is it possible to combine a self-leveling floor with heated floors that use water as a coolant? How effective and expedient is this? It turns out that the issue here is quite ambiguous, and when choosing such a heater, all the nuances must be taken into account.
Firstly, the operation and maintenance of such a floor is much cheaper than electric and infrared ones. Secondly, it has high thermal efficiency.
But this is where the advantages end and the disadvantages begin. The fact is that a warm water floor has a rather bulky design. The tubes are quite thick and a large amount of solution is needed to fill them. On the one hand, this increases the cost of the system, on the other - the height of the fill.
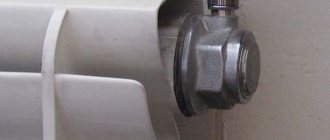
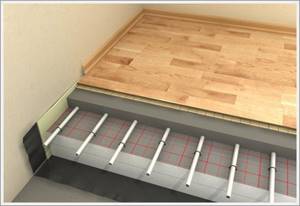
The principle of installing a water-heated floor under tiles
When installing, you need to consider some points, namely:
- thermal insulation material should be laid under the water floor if the apartment is on the first floor or the system is installed above the basement;
- the system will work much more efficiently if special materials with high thermal conductivity are installed on top of the pipeline;
- The pipeline must be laid in a cement screed to protect it from possible mechanical damage.
Preparatory stage. The surface of the main floor should be well prepared for installation of the system. Don't forget to remove the old coating, remove dirt, dust and debris. It is also necessary to level the floor - this is necessary for uniform distribution of heat in the room.
The next step is to perform thermal insulation. A waterproofing film is placed on the floor surface to prevent the penetration of moisture from the lower levels. Then damper tape is glued to the walls of the room.
The size of the layer of thermal insulation material depends on which floor the apartment is located on. If this is not the first floor, then a layer of a few centimeters is quite enough. In the case of the first floor, it is better to lay the material in a layer of 20-25 cm. Any modern material can be used as insulation, be it polystyrene foam, mineral wool or glass wool.
Next, you need to proceed directly to laying the pipes, which is done in one of two main ways:
- Spiral laying. The pipes are arranged in a spiral. The supply and return parts of the pipe are parallel to each other. Thus, the warm pipe compensates for the cooling of the nearby pipe.
- Parallel installation. The pipes are arranged in a “snake” pattern. Most often, this method is used for small rooms.
The pipes are attached to the reinforcing mesh, which is laid on the heat-insulating material. The fastening is an ordinary wire. Pipe laying is carried out in increments of 30 cm. Where there are large heat losses, the increment is reduced to 15 cm. Basically, these are areas near the outer wall and door.
The installation is almost complete, all that remains is to turn on the system. One end of the pipe is attached to the supply manifold, the other to the return manifold. At the end of the work, you should check the functionality of the system by running water under high pressure through the pipes. If the water heated floor works without leaks, you can proceed to the final stage - pouring the screed. After drying, the tiles are laid.
Now you can be sure that your floor will remain warm at any time of the year, despite the fact that tiles were used as a floor covering, which always seems so cold and damp.
Basic care and safety precautions
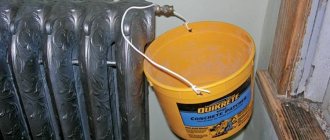
When the mineral-based mixture is mixed with water, an alkaline reaction can be observed. If the prepared solution gets on the body, redness may appear. It is recommended to use protective gloves and goggles when working with the mixture. If it gets into your eyes, rinse them with plenty of water and go to the hospital immediately. It is necessary to adhere to the attached safety instructions when working with such materials
Tools should be used with extreme caution. Children should not be allowed to enter the construction site.
Wet or dry cleaning is carried out without changes. The top layer of the floor covering repels dust, making it extremely easy to clean. For cleaning, you can use both washing vacuum cleaners and steam mops. No special detergents are required.
How to make a self-leveling 3D floor
Technology for creating a self-leveling 3D floor:
- Preparing the base. The concrete base must be cleaned of dust and debris. If there are holes in the concrete, they need to be filled with a mortar of at least M300 grade cement.
- Priming the base. According to the instructions on the package, the primer mixture is mixed with water in the required proportions for at least 2 minutes. Then the base is primed using a roller (if it dries quickly, apply a second layer of primer after 4-5 hours). The primer should dry for a day (it is better to apply it in the morning so as not to wait until the evening the next day), then proceed to the next work.
- Edge insulation. We lay a damper tape 1-2 cm thick along the perimeter of the floor.
- Leveling the base. The floor putty mixture is prepared in accordance with the instructions on the package, and also mixed for at least 2 minutes with a drill with a mixing attachment. The putty is applied with a spatula over the entire area, but, first of all, in the deep places of the base. If the height difference is more than 0.5 cm, it is recommended to fill the base with a rough self-leveling floor. The self-leveling mixture is prepared according to the instructions on the package, poured and leveled first with a spatula, then rolled with a needle roller to remove air bubbles. When applying putty or rough self-leveling flooring, you need to wear wet shoes (soles with spikes) on your shoes so as not to interfere with the mixture’s leveling. After puttying or self-leveling the floor, work must be stopped until the mixture has completely hardened (5-7 days).
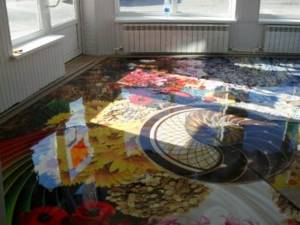
- An image of a self-leveling 3d floor. Order from the printing house an image size that is slightly larger than the size of your room (it’s better to cut off a little extra than to be upset because a couple of centimeters are missing). After the putty or self-leveling subfloor has dried, a film with an image is laid on it. When laying, the film should be carefully smoothed with a dry soft cloth or a soft roller, gradually rolling out the roll. If the film does not hold well, it is better to apply a little glue in front of it when rolling out the roll. In addition to film, you can paint the floor manually, but for this you need to invite an artist. In some cases, when clear edges are required in the picture, the floor is cut with a special tool and the cuts are primed. In cuts, different layers of paint will not overlap each other. You can also use a stencil and spray paint. When using acrylic paints, make sure they are completely dry before applying the next coat to avoid bleeding.
- Applying a transparent lens layer. The transparent layer is applied with a spatula, the laying thickness is at least 0.3 cm. It should harden in 1-2 days, then we proceed to the final coating.
- Finish coating with protective varnish. The varnish is designed to protect the floor surface from mechanical influences. After the first layer of varnish has dried, it is advisable to apply a second one.
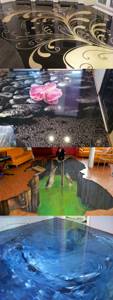
And finally, a few photos of wonderfully executed 3D self-leveling floors.
Advantages of self-leveling floor
This type of flooring has undeniable advantages:
- Formation of a flat floor surface. The coating does not have seams and joints formed when pouring the screed, which acts as a base for most other types of flooring;
- Safety for humans. The mixture used to form the floor surface contains substances that are not harmful to human health. During operation, the self-leveling surface also does not emit toxic substances;
- Hypoallergenic. The surface of a self-leveling floor is smooth and without pores. Therefore, you do not have to be afraid of the accumulation of dirt or dust, which causes allergic reactions in people;
- Attractive appearance. The aesthetic value of such flooring remains consistently high. They are given any desired color. Modern technologies make it possible to create realistic 3D images on the surface, selected for each room depending on its purpose and stylistic design;
- High strength. Such floors can be used under conditions of increased mechanical impact caused by furniture or objects falling on the floor;
- High level of crack resistance. The special composition of the mixture being poured gives it plasticity and prevents shrinkage after hardening;
- Long service life. A floor covering formed according to all the rules will last at least 40 years, maintaining its presentable appearance throughout the entire period of operation;
- Chemical resistance. The self-leveling floor is resistant to a number of aggressive compounds;
- Fire resistance, allowing the formation of such a floor covering in premises for various purposes;
- Moisture resistance, allowing the installation of such flooring in rooms with high levels of humidity.
Floor with a unique pattern
Advantages and disadvantages of quick-hardening floors
Quick-drying coatings have high strength
We can safely say that quick-drying mixtures are the cherished dream of any contractor who wants to quickly and efficiently complete the job, and not wait until the screed hardens properly. There is an opinion that such compositions are not practical, create harmful fumes and have a short service life. However, practice has proven that this is far from the case and these mixtures have the same characteristics and performance indicators as a regular screed, and rapid hardening is achieved through special additives.
Such mixtures are usually sold in paper or plastic bags weighing 20 or 25 kg. A quick-hardening self-leveling floor of 20 kg allows you to eliminate differences in unevenness from 5 millimeters to 20 centimeters, and after just a few hours, you can safely lay any facing covering, from ceramic tiles to laminate, on the finished screed.
The main characteristics of such compositions are:
- high screed strength;
- fast hardening time (2-4 hours);
- high thermal conductivity, which allows the use of self-leveling floors for the installation of heated floors of any type;
- environmentally friendly material, does not contain harmful components and does not emit toxic fumes;
- withstands large temperature changes.
Design Features
Like any system, self-leveling flooring has a number of undeniable advantages and significant disadvantages.
Advantages:
- complete absence of seams;
- such material is capable of leveling any type of surface;
- high fire safety indicators, while the elements used do not emit toxins that could harm the human body;
- long service life, which can amount to decades;
- the absence of seams eliminates the accumulation of dust and fungi;
- it is possible to use detergents containing chemical elements;
- allowed for use in kindergartens and medical institutions, due to the absence of toxic substances;
- Even after a strong impact, cracks will not appear.
Flaws:
- It’s easy to make a self-leveling floor yourself, but it’s difficult to dismantle it;
- a rather small selection of textures and shades compared to other floor coverings;
- filling with polymer will cost several times more than any other coating;
- installation will take a lot of time and money;
- preparatory work requires special care and compliance with all necessary conditions for its implementation;
- repair work is very problematic;
- constant humidity control;
- The surfaces of some types of self-leveling floors may turn yellow over time when exposed to direct sunlight.
Design
Types of self-leveling floor and prices for it in Moscow
The classification of self-leveling floor depends on the elements included in the composition. Thus, there are 2 main types:
- polymer concrete. The mixture is made on the basis of sand, plasticizers and cement. The mixture is laid on the finished base using beacons to facilitate installation. The structure is strengthened by reinforced mesh. Such floors harden after two days;
- polymer. This variety has 3 subspecies;
- epoxy. A combination with an infrared system will bring the greatest effect, due to the need for a fill thickness of 2-3 mm. They are protected from the effects of chemically active compounds and come in many color variations. However, there are also disadvantages: loose fit to the base due to increased density and low elasticity, heating temperature should not exceed 24-25°C;
- polyurethane. Durable, flexible, fits tightly with any base. After hardening, the floor becomes elastic and becomes resistant to vibration. The finished surface is pleasant to walk on. The self-leveling floor of this subtype can be combined with all heating systems;
- methyl methacrylate. An environmentally friendly subtype of flooring, resistant to chemicals, heating temperature range from -65 to +140°C. The poured solution hardens in 2-3 hours and is compatible with all types of heating.
In online stores in Moscow you can order various types of self-leveling floors. Consider popular brands:
- Volma Leveler Comfort. Suitable for installation in bathrooms. Hardens quickly, self-distributing. The average cost is from 300-350 rubles per bag;
- KnaufTribon. It hardens quickly, allowing the floor covering to be laid after just one day. Price from 350-400 rubles per 1 piece;
- Bolars Optim SV-210. Used in industrial enterprises. Fast-hardening, withstands increased loads. Prices start from 360-400 rubles per 1 piece;
- VetonitFastLevel. Used for large rooms, combined with any finishing coating. Cost from 400 rubles per 20 kg bag;
- VetonitFinishLevel. An economical option if necessary to fill a large space with a thin layer. Price from 550 rubles.
We recommend: How to install heated flooring under laminate on a wooden floor?
Self-leveling floors vary in both price and quality. Choose coverage based on your preferences and financial considerations.
Types of heating elements
Various types of heating structures are used to heat floor coverings. Each of them has its own installation and subsequent operation features, which are worth learning about in advance.
- A water circuit within which a heated coolant circulates. The pipeline is laid in the form of a snake or spiral. When performing installation in an apartment in a multi-storey building, difficulties will arise with connecting to central heating. To regulate the degree of heating, a collector unit is installed. Despite the high cost of installation, such a floor has minimal operating costs. When installing it, it will require pouring a sufficiently thick layer of mortar to prevent the pipeline from moving during operation;
- Electric heated floor, formed by laying an electric cable. Installation is carried out according to a certain scheme. The cable can be single- or double-core of varying power. To simplify installation, special bases are often used. Manufacturers offer ready-made electrical mats, in which a cable of a certain power is initially laid with a predetermined pitch. In this case, installation consists of simply laying the finished product on a carefully prepared base. A thin layer of mortar is used to fix the mats. The thermostat included in the system allows you to control the degree of heating of the floor covering;
- Thermal film. Allows you to avoid using a thick screed. Scotch tape is used to secure the thermal film. Maintain the temperature at the specified level.
Installation of floors with ready-made mats
Pipes with circulating coolant
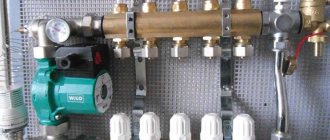
A water heated floor is formed from pipelines that are laid on a prepared base according to a certain pattern - in the shape of a spiral, a snake. The coolant circulates through the installed circuit. Thermal energy is produced using boilers of various types. Also, water heated floors can be connected to existing heating. To regulate the temperature of the coolant, a collector unit is used, to which the supply and return pipes are connected.
Water heated floors are a cost-effective, efficient and reliable type of heating. Its disadvantage is the complexity of installation. To fix the pipelines, it is necessary to pour a thick layer of solution. Also, if there are coolant leaks in one place, the entire system fails.
Choosing a mixture for filling
In addition to the fact that it will be tedious to choose the optimal heating method, when the desired option is selected, you need to decide what the heating element will be filled with. The choice of poured mass also depends on the type of heating system. Most often, a self-leveling heated floor is a combination of a lower layer in which heating elements are located and an external, decorative one.
If your renovation involves laying traditional floor coverings, such as laminate or linoleum, there will not be much difference - any composition designed for operation in conjunction with a heating system will do. However, if you want the fill to act as a topcoat, you will have to be more careful in the selection.
- Polyurethane mixtures are perfect for arranging such a room heating system. They are not afraid of temperature changes, tolerate heat well and have excellent elasticity combined with high strength. However, not very wide design possibilities slightly reduce the attractiveness of this solution.
- Epoxy resins poured as a decorative coating have high strength, but do not tolerate heat above 25 degrees very well. Therefore, in combination with such a coating, infrared film mats that do not directly heat the floor surface will be the best option.
- Methyl acrylate mixtures have very good characteristics in terms of resistance to different temperatures, are durable and beautiful. In addition, they dry in a minimum time - about two hours. However, the choice of decor for them is limited and this can be a disadvantage. At the same time, during pouring, the solution emits a very unpleasant odor, which soon disappears.
The cost of the installation solution also matters. If you need the most economical solution, then you can’t find anything better than a regular cement screed. The cost will be only slightly higher than standard cement mixtures. However, such a floor will not have decorative properties; a finishing coating will have to be laid on top. The remaining options allow you to get a ready-made solution that both heats the room and looks beautiful.

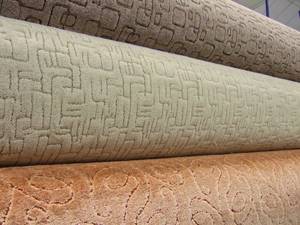
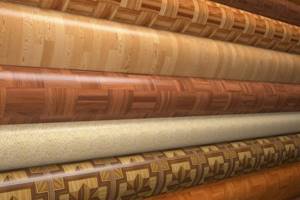
Types of floor coverings
To cover a concrete, slab or wooden floor that is left in rough form after construction, a variety of materials are used, which differ from each other in their characteristics and cost.
Types of flooring:
- linoleum;
- tile;
- parquet;
- laminate;
- self-leveling floor;
- carpet
Linoleum is the most economical and practical flooring material that is used to cover the floor of the entire apartment. If your budget is limited, then linoleum is the optimal solution in terms of price and quality.
Tiles are ceramic coatings that can withstand moisture. Tile floors are installed in the kitchen or bathroom, since these rooms have high humidity.
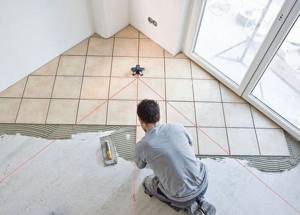
The undoubted advantage of this material is its ease of use and cleaning. Tiled floors are very easy to clean, do not scratch, and can withstand a lot of weight. The tiles to be laid should not be placed in voids, otherwise cracks and breakage of the coating will not be avoided.
Before laying the tiled floor, it is necessary to lay out thermal insulation material (isolon or mineral wool) and secure it with tape.
Parquet is a natural wooden covering that consists of boards and is laid on the floor by fastening the boards to each other through special grooves.
Natural parquet has an almost unlimited service life and provides high heat and sound insulation (which is not a plus for heated floors). Impact-resistant and warm material.
Laminate is an artificial analogue of parquet; it consists of fibreboard, polymer and protective film, on which a pattern is made that resembles natural parquet. The laminate is secured with locking joints or special glue.
Laminate does not require special care, is easy to clean and can be used in any room except the bathroom, since high humidity can quickly destroy the floor covering.
Self-leveling flooring is a fairly new invention, represented by a special liquid solution that is poured onto the surface and leveled with a roller.

The self-leveling floor is a solid coating that has increased resistance to alkalis and acids.
The self-leveling floor can be made in a reflective version, using different colors, which depend on the design of the room.
Carpet is a covering made of natural or artificial pile. Laying carpet is very simple, as it does not require the use of special fastening elements. Carpet is very easy to cut and fit to the size of the room. Care is carried out in the same way as for a regular carpet or rug.