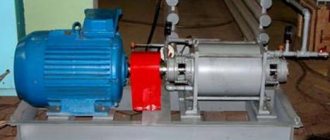
Potapov's vortex heat generator, or VTP for short, was designed specifically to generate thermal energy using just an electric motor and a pump. This device is used primarily as an economical heat source.
Today we will look at the design features of this device, as well as how to make a vortex heat generator with your own hands.
- 1 Operating principle
- 2 What is it used for?
- 3 Tools needed
- 4 Manufacturing technology. Engine
- 5 Install the pump
- 6 Increase productivity
- 7 We insulate the VTP
- 8 Vortex damper
Download the VTG assembly manual in .PDF format
Design and principle of operation
The principle of operation of a cavitation heat generator is the heating effect due to the conversion of mechanical energy into thermal energy. Now let's take a closer look at the cavitation phenomenon itself. When excess pressure is created in a liquid, turbulence occurs, due to the fact that the pressure of the liquid is greater than that of the gas contained in it, gas molecules are released into separate inclusions - the collapse of bubbles. Due to the pressure difference, water tends to compress the gas bubble, which accumulates a large amount of energy on its surface, and the temperature inside reaches about 1000 - 1200ºС.
When cavitation cavities move into the normal pressure zone, the bubbles are destroyed, and the energy from their destruction is released into the surrounding space. Due to this, thermal energy is released, and the liquid is heated by the vortex flow. The operation of heat generators is based on this principle; then consider the principle of operation of the simplest version of a cavitation heater.
The simplest model
Look at Figure 1, here is a device of the simplest cavitation heat generator, which consists of pumping water to the point where the pipeline narrows. When the water flow reaches the nozzle, the liquid pressure increases significantly and the formation of cavitation bubbles begins. When leaving the nozzle, the bubbles release thermal power, and the pressure after passing the nozzle is significantly reduced. In practice, multiple nozzles or tubes may be installed to increase efficiency.
Potapov's ideal heat generator
The ideal installation option is the Potapov heat generator, which has a rotating disk (1) installed opposite the stationary one (6). Cold water is supplied from the pipe located at the bottom (4) of the cavitation chamber (3), and the already heated water is discharged from the top point (5) of the same chamber. An example of such a device is shown in Figure 2 below:
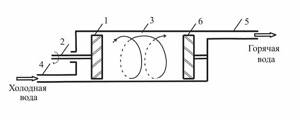
Rice. 2: Potapov cavitation heat generator
But the device was not widely used due to the lack of practical justification for its operation.
The main task of a cavitation heat generator is the formation of gas inclusions, and the quality of heating will depend on their quantity and intensity. In modern industry, there are several types of such heat generators, differing in the principle of producing bubbles in the liquid. The most common are three types:
- Rotary heat generators - the working element rotates due to an electric drive and produces fluid turbulence;
- Tubular - change pressure due to a system of pipes through which water moves;
- Ultrasonic - the heterogeneity of the liquid in such heat generators is created due to low-frequency sound vibrations.
In addition to the above types, there is laser cavitation, but this method has not yet found industrial implementation. Now let's look at each type in more detail.
Rotary heat generator
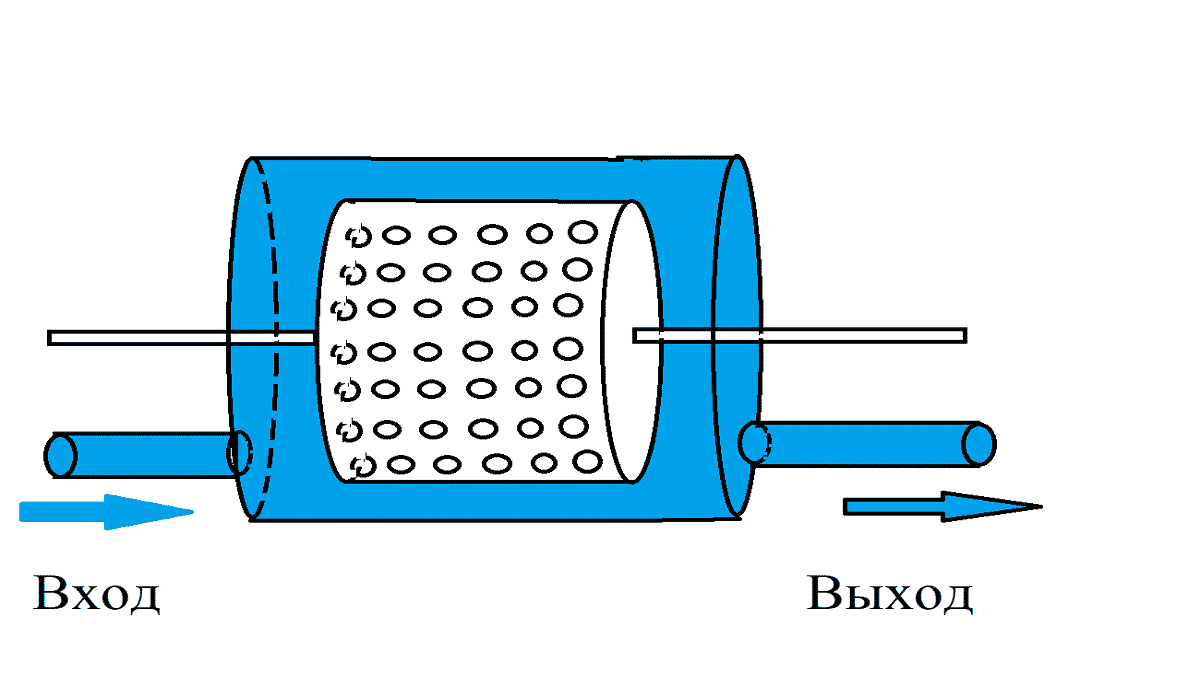
It consists of an electric motor, the shaft of which is connected to a rotor mechanism designed to create turbulence in the liquid. A special feature of the rotor design is the sealed stator, in which heating occurs. The stator itself has a cylindrical cavity inside - a vortex chamber in which the rotor rotates. The rotor of a cavitation heat generator is a cylinder with a set of depressions on the surface; when the cylinder rotates inside the stator, these depressions create heterogeneity in the water and cause cavitation processes to occur.
Rice. 3: Rotary type generator design
The number of recesses and their geometric parameters are determined depending on the model of the vortex heat generator. For optimal heating parameters, the distance between the rotor and stator is about 1.5 mm. This design is not the only one of its kind; over the long history of modernizations and improvements, the rotor-type working element has undergone a lot of transformations.
One of the first effective models of cavitation converters was the Griggs generator, which used a disk rotor with blind holes on the surface. One of the modern analogues of disk cavitation heat generators is shown in Figure 4 below:
Rice. 4: disk heat generator
Despite the simplicity of the design, rotary-type units are quite complex to use, as they require precise calibration, reliable seals and adherence to geometric parameters during operation, which makes their operation difficult. Such cavitation heat generators are characterized by a fairly low service life - 2 - 4 years due to cavitation erosion of the housing and parts. In addition, they create a fairly large noise load during operation of the rotating element. The advantages of this model include high productivity - 25% higher than that of classic heaters.
Tubular
A static heat generator has no rotating elements. The heating process in them occurs due to the movement of water through pipes that taper in length or due to the installation of Laval nozzles. Water is supplied to the working element by a hydrodynamic pump, which creates a mechanical force of the fluid in a narrowing space, and when it passes into a wider cavity, cavitation vortices occur.
Unlike the previous model, tubular heating equipment does not make much noise and does not wear out as quickly. During installation and operation, you do not need to worry about precise balancing, and if the heating elements are destroyed, their replacement and repair will cost much less than rotary models. The disadvantages of tubular heat generators include significantly lower productivity and bulky dimensions.
Ultrasonic
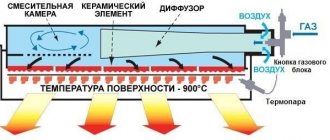
This type of device has a resonator chamber tuned to a certain frequency of sound vibrations. A quartz plate is installed at its input, which produces oscillations when electrical signals are supplied. The vibration of the plate creates a wave effect inside the liquid, which reaches the walls of the resonator chamber and is reflected. During the return movement, the waves encounter direct vibrations and create hydrodynamic cavitation.
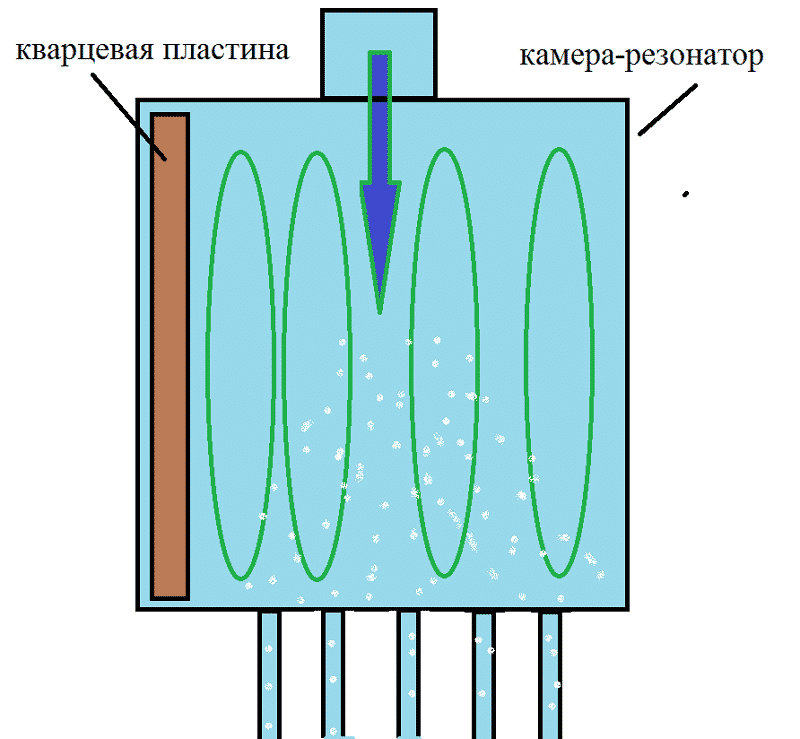
Rice. 5: Operating principle of ultrasonic heat generator
Next, the bubbles are carried away by the water flow through the narrow inlet pipes of the thermal installation. When moving into a wide area, the bubbles collapse, releasing thermal energy. Ultrasonic cavitation generators also have good performance characteristics, since they do not have rotating elements.
Increasing productivity
The pump loses thermal energy, which is the main disadvantage of the vortex generator (at least in its described version). Therefore, it is better to immerse the pump in a special water jacket, so that the heat emanating from it is also beneficial.
The diameter of this jacket should be slightly larger than that of the pump. We can use a piece of pipe for this, according to tradition, or we can make a parallelepiped from sheet steel. Its dimensions must be such that all elements of the generator fit freely into it, and its thickness must be such that it can withstand the operating pressure of the system.
In addition, heat loss can be reduced by installing a special tin casing around the device. The insulator can be any kind of material that can withstand the operating temperature.
- We assemble the following structure: heat generator, pump and connecting pipe.
- We measure their dimensions and select a pipe of the required diameter - so that all the parts fit easily into it.
- We make covers for both sides.
- Next, we make sure that the parts inside the pipe are rigidly fixed, and also that the pump is able to pump coolant through itself.
- We drill an outlet hole and attach a pipe to it.
Note! It is necessary to place the pump as close as possible to this hole!
At the second end of the pipe we weld a flange, through which the cover will be secured to the gasket-seal. You can equip a frame inside the case to make it easier to install all the elements. We assemble the device, check how strong the fastenings are, check the tightness, insert it into the case and close it.
Then we connect the vortex heat generator to all consumers and check it again for leaks. If nothing flows, then you can activate the pump. When opening/closing the tap at the inlet, we adjust the temperature.
You may also be interested in an article on how to make a solar collector with your own hands
Application
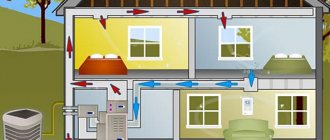
In industry and in everyday life, cavitation heat generators have found implementation in a wide variety of fields of activity. Depending on the tasks assigned, they are used for:
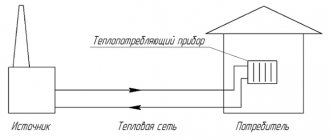
- Heating – inside the installations, mechanical energy is converted into thermal energy, due to which the heated liquid moves through the heating system. It should be noted that cavitation heat generators can heat not only industrial facilities, but also entire villages.
- Heating running water - a cavitation unit is capable of quickly heating liquid, due to which it can easily replace a gas or electric water heater.
- Mixing of liquid substances - due to rarefaction in the layers to obtain small cavities, such units make it possible to achieve the proper quality of mixing of liquids that do not naturally combine due to different densities.
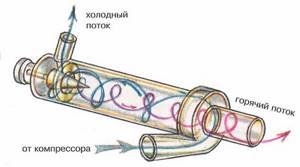
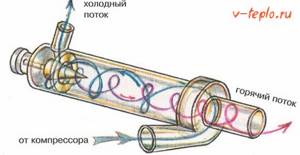
Operating principle
There are various explanations for the reasons for the occurrence of the vortex effect of rotation in the complete absence of movement and magnetic fields.
In this case, the gas acts as a body of rotation due to its rapid movement inside the device. This operating principle differs from the generally accepted standard, where cold and hot air flow separately, because when flows are combined, according to the laws of physics, different pressures are formed, which in our case causes a vortex movement of gases.
Due to the presence of centrifugal force, the air temperature at the outlet is much higher than its inlet temperature, this allows the devices to be used both for heat generation and for effective cooling.
There is another theory of the principle of operation of the heat generator, due to the fact that both vortices rotate with the same angular velocity and direction, the internal vortex angle loses its angular momentum. The decrease in torque transfers kinetic energy to the external vortex, resulting in the formation of separated flows of hot and cold gas. This operating principle is exactly the same as the Peltier effect, in which the device uses electrical pressure (voltage) energy to move heat to one side of a dissimilar metal junction, causing the other side to cool and return the consumed energy to the source.
Advantages of a vortex heat generator
:
- Provides a significant (up to 200 º C) temperature difference between “cold” and “hot” gas, works even at low inlet pressure;
- Operates with efficiency up to 92%, does not require forced cooling;
- Converts the entire inlet flow into one cooling flow. Thanks to this, the possibility of overheating of heating systems is practically eliminated
- The energy generated in a vortex tube in a single flow is used, which contributes to the efficient heating of natural gas with minimal heat loss;
- Provides effective separation of the eddy temperature of the inlet gas at atmospheric pressure and the outlet gas at negative pressure.
Such alternative heating, at almost zero volt consumption, perfectly heats a room of 100 square meters (depending on the modification). Main disadvantages
: This is high cost and rarely used in practice.
Advantages and disadvantages
Compared to other heat generators, cavitation units have a number of advantages and disadvantages.
The advantages of such devices include:
- A much more efficient mechanism for generating thermal energy;
- Consumes significantly less resources than fuel generators;
- Can be used for heating both low-power and large consumers;
- Completely environmentally friendly - does not emit harmful substances into the environment during operation.
The disadvantages of cavitation heat generators include:
- Relatively large dimensions - electric and fuel models have much smaller dimensions, which is important when installed in an already used room;
- Great noise due to the operation of the water pump and the cavitation element itself, which makes it difficult to install in domestic premises;
- Ineffective ratio of power and performance for rooms with a small square footage (up to 60 m 2 it is more profitable to use a gas, liquid fuel or equivalent electrical power with a heating element).
Recommendations for selection
The vortex cavitation heat generator exists in different designs. Today, the most common devices are water-based, that is, liquid acts as a coolant.
But it is also possible to purchase a solid fuel unit, the output of which produces a gaseous mixture of flue gas and air.
The high-performance vortex solid fuel heat generator is distinguished by the ability to burn wood with high humidity (up to 65%). Accordingly, when choosing, the purpose of the unit and the expected load are taken into account, since there are versions with different levels of thermal power. Depending on the size of the object to be served, a suitable device is selected.
In the case of solid fuel equipment, it is important to take into account the rate of fuel consumption, the size of the loading chamber and the type of fuel loading
You can select a vortex heat generator of different types according to the level of thermal power, or you can pay attention to the clause in the accompanying documentation about how much volume is allowed to be heated. The weight and overall dimensions of the equipment are also important.
Review of models of different designs
Watch a video about the product:
If you choose a solid fuel version, then in this case we consider more efficient equipment with a thermal power of 250 to 700 kW. For example, models TVV-R-250, TVV-R-500, TVV-R-700. All of them involve manual loading of fuel. But more powerful versions consume more fuel. If the 250 model consumes 120 kg/hour, then the 700 version consumes about 340 kg/hour. There are much more efficient devices with a thermal power of 2,500 kW. If you plan to use such vortex heat generators, then their price will be noticeably higher.
Recommendations for use
The smaller the overall dimensions of such equipment, the simpler its operation will be. For example, there are completely autonomous devices with automatic control. In this case, the user does not need to participate in the process. But when using some versions of solid fuel heat generators, it is impossible to do without the participation of a trained operator to load fuel, since the unit data assumes manual supply of wood.
Today, there are different versions of such equipment with fully automated execution, including preset temperature conditions. Considering that units of this kind are completely safe, both from the point of view of environmental friendliness and from the point of view of fire safety, there is no need for their constant monitoring.
Thus, to organize a heating system and hot water supply, it is not always necessary to resort to standard solutions. In practice, it turns out that when using thermal installations based on vortex heat generators, significant savings are noted in comparison with other types of heating systems.
As a result, you can get not only high-performance equipment, but also save money during its operation. Despite the rather high cost of such units, their further operation fully pays off, and you won’t have to wait too long for this, since in some cases the payback period reaches 6 months.
DIY CTG
The simplest option for implementation at home is a tubular-type cavitation generator with one or more nozzles for heating water. Therefore, let’s look at an example of manufacturing just such a device; for this you will need:
- Pump – for heating, be sure to choose a heat pump that is not afraid of constant exposure to high temperatures. It should provide a working outlet pressure of 4 - 12 atm.
- 2 pressure gauges and sleeves for their installation - placed on both sides of the nozzle to measure the pressure at the inlet and outlet of the cavitation element.
- Thermometer for measuring the amount of heating of the coolant in the system.
- Valve for removing excess air from a cavitation heat generator. Installed at the highest point of the system.
- Nozzle - must have a bore diameter of 9 to 16 mm; making it smaller is not recommended, since cavitation can already occur in the pump, which will significantly reduce its service life. The shape of the nozzle can be cylindrical, conical or oval; from a practical point of view, any one will suit you.
- Pipes and connecting elements (heating radiators in their absence) are selected in accordance with the task at hand, but the simplest option is plastic pipes for soldering.
- Automatic switching on/off of the cavitation heat generator - as a rule, it is tied to the temperature regime, set to switch off at approximately 80ºC and switch on when it drops below 60ºC. But you can choose the operating mode of the cavitation heat generator yourself.

Rice. 6: cavitation heat generator diagram
Before connecting all the elements, it is advisable to draw a diagram of their location on paper, walls or on the floor. The locations must be placed away from flammable elements or the latter must be removed at a safe distance from the heating system.
Assemble all the elements as shown in the diagram and check for leaks without turning on the generator. Then try the cavitation heat generator in operating mode; the normal increase in liquid temperature is considered to be 3-5ºC in one minute.
Due to high prices for industrial heating equipment, many craftsmen are planning to make an economical vortex heat generator with their own hands.
Such a heat generator is just a slightly modified centrifugal pump. However, in order to assemble such a device yourself, even if you have all the diagrams and drawings, you need to have at least minimal knowledge in this area.
Rotary vortex heat generator
In such equipment, the role of the stator is played by a conventional centrifugal pump. The body, hollow inside and cylindrical in shape, can be represented by a piece of pipe with standard double-sided flange plugs. Inside the structure there is a rotor, which is the main structural element.
The entire surface of the rotor is represented by a certain number of drilled blind holes, the dimensions of which depend on the power indicators of the device.

Vortex generator
The gap from the body to the rotating part must be calculated individually, but, as a rule, the dimensions of such space vary within two millimeters.
It is important to note that the performance of a rotary vortex device is approximately 30% higher than that of a static heat generator, but this type of equipment requires monitoring the condition of all elements, and is also quite noisy.
Principle of operation
Cavitation process. (Click to enlarge)
The coolant (most often water is used) enters the cavitator, where an installed electric motor spins it and dissects it with a screw, resulting in the formation of bubbles with vapor (the same happens when a submarine and a ship are sailing, leaving behind a specific trace).
Moving along the heat generator, they collapse, due to which thermal energy is released. This process is called cavitation.
Based on the words of Potapov, the creator of the cavitation heat generator, the operating principle of this type of device is based on renewable energy. Due to the absence of additional radiation, according to the theory, the efficiency of such a unit can be about 100%, since almost all the energy used is spent on heating water (coolant).
Static cavitation heat generator
This name for a heat generator is very arbitrary, and is due to the absence of rotating elements in the design. The creation of cavitation processes is based on the use of special nozzles, and also depends on the high speed of water movement using powerful centrifugal pumping equipment.
Cavitation heat generator
Thermal static generators are characterized by certain advantages compared to rotary equipment:
- there is no need to carry out the most accurate balancing and adjustment of all used parts;
- preparatory mechanical measures do not involve too precise grinding;
- the absence of moving elements significantly reduces the level of wear of seals;
- The operational life of such equipment is approximately five years.
Among other things, the cavitation heat generator is maintainable, and replacing nozzles that have become unusable will not require large financial costs or the involvement of specialists.
In cavitation-type heat generators, the process of heating water is carried out according to the same principle as in rotary models, but the efficiency indicators of such equipment are somewhat reduced, which is due to design features.
Creating a wireframe and selecting elements
To make a homemade vortex heat generator, to connect it to the heating system, you will need an engine.
And the greater its power, the more it will be able to heat the coolant (that is, it will produce more heat faster and more). However, here it is necessary to focus on the operating and maximum voltage in the network that will be supplied to it after installation.
When choosing a water pump, you need to consider only those options that the engine can spin. At the same time, it must be of a centrifugal type, otherwise there are no restrictions on its choice.
You also need to prepare a frame for the engine. Most often it is a regular iron frame into which iron corners are attached. The dimensions of such a frame will depend, first of all, on the dimensions of the engine itself.
After selecting it, it is necessary to cut the corners of the appropriate length and weld the structure itself, which should allow placing all the elements of the future heat generator.
Next, to mount the electric motor, you need to cut out another corner and weld it to the frame, but this time across. The final touch in preparing the frame is painting, after which you can already attach the power plant and pump.
Tools required to assemble the unit
It is impossible to assemble such a unit from scratch on your own, since its manufacture will require the use of technological equipment that the home craftsman simply does not have. Therefore, they usually assemble with their own hands only a unit that in some way replicates a vortex heat generator. It is called the Potapov device.
However, even to assemble this device you need the following equipment:
- Drill and a set of drills for it;
- Welding machine;
- Grinding machine;
- Keys;
- Fasteners;
- Primer and paint brush.
In addition, you will need to purchase a motor operating from a 220 V network and a fixed base for installing the device itself on it.
Generator manufacturing stages
Assembly of the device begins with connecting a mixing pipe to the pump, the desired pressure type. It is connected using a special flange. There is a hole in the center of the bottom of the pipe through which hot water will be discharged. To control its flow, a braking device is used. It is located in front of the bottom.
But since cold water also circulates in the system, its flow must also be regulated. For this purpose, a disk rectifier is used. When the liquid cools, it is directed to the hot end, where it is mixed with the heated coolant in a special mixer.
Next, they move on to assembling the structure of the vortex heat generator with their own hands. To do this, I use a grinding machine to cut angles from which the main structure is assembled. How to do this can be seen in the drawing below.
There are two ways to assemble the structure:
- Using bolts and nuts;
- Using a welding machine.
In the first case, get ready for the fact that you will have to make holes for fasteners. For this you need a drill. During the assembly process, it is necessary to take into account all dimensions - this will help to obtain a unit with the specified parameters.
The very first stage is the creation of a frame on which the engine is installed. It is assembled from iron corners. The dimensions of the structure depend on the size of the engine. They may differ and are selected for a specific device.
To secure the engine to the assembled frame, you will need another square. It will act as a cross member in the structure. When choosing an engine, experts recommend paying attention to its power. The amount of coolant to be heated depends on this parameter.
Let's watch the video, the stages of assembling the heat generator:
The last stage of assembly is painting the frame and preparing holes for installing the unit. But before you begin installing the pump, you should calculate its power. Otherwise, the engine may not be able to start the unit.
After all the components are prepared, the pump is connected to the hole from which water flows under pressure and the unit is ready for operation. Now, using the second pipe, it is connected to the heating system.
This model is one of the simplest. But if there is a desire to regulate the temperature of the coolant, then install a locking device. Electronic monitoring devices can also be used, but it should be borne in mind that they are quite expensive.
The device is connected to the system as follows. First, it is connected to the hole through which water flows. She is under pressure. The second pipe is used for direct connection to the heating system. To change the temperature of the coolant, there is a locking device behind the pipe. When it is closed, the temperature in the system gradually increases.
Additional nodes can also be used. However, the cost of such equipment is quite high.
Watch the video, the design after manufacturing:
The housing of the future generator can be welded. And any turner will turn the parts for it according to your drawings. It is usually shaped like a cylinder, closed on both sides. There are through holes on the sides of the body. They are needed to connect the unit to the heating system. A jet is placed inside the housing.
The outer cover of the generator is usually made of steel. Then holes are made in it for bolts and a central one, to which a fitting for supplying liquid is subsequently welded.
Expert advice
At first glance, it seems that there is nothing difficult about assembling a heat generator with your own hands using wood. But in reality this task is not so easy. Of course, if you don’t rush and study the issue well, you can cope. But the dimensional accuracy of the machined parts is very important. And the manufacture of the rotor requires special attention. Indeed, if it is machined incorrectly, the unit will begin to operate with a high level of vibration, which will negatively affect all parts. But the bearings suffer the most in such a situation. They will break very quickly.
Only a properly assembled heat generator will work efficiently. Moreover, its efficiency can reach 93%. Therefore, experts advise:
- All parts are made of thick materials;
- Their surfaces must be painted;
- It is worth making several spare caps with different hole sizes at once, so that it is convenient to select the diameter.
After assembly, you need to turn on the generator and note the time it takes to heat the water. And if you are not satisfied with it, then make changes to the design.
How to make
To create a homemade heat generator you will need a grinding machine, an electric drill, and a welding machine.
The process will proceed as follows:
- First you need to cut a piece of a fairly thick pipe, with a total diameter of 10 cm and a length of no more than 65 cm. After this, you need to make an external groove of 2 cm on it and cut a thread.
- Now, from exactly the same pipe, you need to make several rings, 5 cm long, after which an internal thread is cut, but only on one side (that is, a half ring) on each.
- Next you need to take a sheet of metal with a thickness similar to the thickness of the pipe. Make lids out of it. They need to be welded to the rings on the side where they do not have threads.
- Now you need to make central holes in them. In the first, it should correspond to the diameter of the nozzle, and in the second, to the diameter of the pipe. At the same time, on the inside of the cover that will be used with the jet, you need to make a chamfer using a drill. Eventually the injector should come out.
- Now we connect a heat generator to this entire system. The pump hole, from where water is supplied under pressure, must be connected to the pipe located near the nozzle. Connect the second pipe to the entrance to the heating system itself. But connect the output from the latter to the input of the pump.
Installing the pump
Next we must choose the “right” water pump. The range of these tools today is so wide that you can find a model of any strength and size. We only need to pay attention to two things:
- Will the engine be able to spin this pump;
- Is it (the pump) centrifugal?
Next, the pump is installed in the same frame; if necessary, additional fasteners are attached.
The body of a vortex generator is a cylinder, closed on both sides. There should be through holes on the sides through which the device will be connected to the heating system. But the main feature of the design is inside the body: a nozzle is located immediately near the inlet. The nozzle hole must be selected purely individually.
Note! It is desirable that the nozzle hole be half as large as 1/4 of the total diameter of the cylinder. If the hole is smaller, then water will not be able to pass through it in the required quantity and the pump will begin to heat up. Moreover, internal elements will begin to be destroyed by cavitation.
To make the case we will need the following tools:
- Iron pipe with thick walls with a diameter of about 10 cm;
- Couplings for connection;
- Welding;
- Several electrodes;
- Impeller;
- A pair of pipes with threads;
- Electric drill;
- Drill;
- Adjustable wrench.
Now - directly to the manufacturing process.
- To begin with, we cut off a piece of pipe about 50-60 cm long and make an external groove on its surface about half the thickness, 2-2.5 cm. We cut the thread.
- We take two more pieces of the same pipe, each 5 cm long, and make a couple of rings from them.
- Then we take a metal sheet with the same thickness as the pipe, cut out original covers from it, and weld them where the thread was not made.
- We make two holes in the center of the covers - one of them around the circumference of the pipe, the second around the circumference of the nozzle. Inside the cover next to the jet we drill a chamfer so that we get a nozzle.
- We connect the generator to the heating system. We connect the pipe near the nozzle to the pump, but only to the hole from which water flows under pressure. We connect the second pipe to the entrance to the heating system, but the output must be connected to the pump inlet.
The pump will create pressure, which, acting on the water, will force it to pass through the nozzle of our design. In a special chamber, the water will overheat due to active mixing, after which it is supplied directly to the heating circuit. In order to be able to regulate the temperature, the vortex heat generator must be equipped with a special locking device located next to the pipe. If you slightly cover the constipation, the structure will take longer to move water through the chamber, therefore, the temperature will rise because of this. This is how this kind of heater works.
Read about other alternative heating methods here
Peculiarities
A wood-fired power plant is not a new invention, but modern technologies have made it possible to somewhat improve previously developed devices. Moreover, several different technologies are used to generate electricity.
In addition, the concept of “wood-burning” is somewhat inaccurate, since any solid fuel (wood, wood chips, pallets, coal, coke), in general, anything that can burn, is suitable for the operation of such a station.
Let us immediately note that firewood, or rather the process of its combustion, acts only as an energy source that ensures the functioning of the device in which electricity is generated.
The main advantages of such power plants are:
- The ability to use a wide variety of solid fuels and their availability;
- Receive electricity anywhere;
- The use of different technologies makes it possible to obtain electricity with a variety of parameters (sufficient only for regular phone recharging and up to powering industrial equipment);
- It can also act as an alternative if power outages are common, as well as the main source of electricity.
Classic version
As noted, a wood-fired power plant uses several technologies to produce electricity. The classic one among them is steam power, or simply the steam engine.
Everything is simple here - wood or any other fuel, when burned, heats up the water, as a result of which it turns into a gaseous state - steam.
The resulting steam is supplied to the turbine of the generating set, and due to rotation, the generator generates electricity.
Since the steam engine and generator set are connected in a single closed circuit, after passing through the turbine the steam is cooled, fed back into the boiler, and the whole process is repeated.
This power plant scheme is one of the simplest, but it has a number of significant disadvantages, one of which is the danger of explosion.
After water passes into a gaseous state, the pressure in the circuit increases significantly, and if it is not regulated, there is a high probability of rupture of the pipelines.
And although modern systems use a whole set of valves that regulate pressure, the operation of a steam engine still requires constant monitoring.
In addition, ordinary water used in this engine can cause scale to form on the walls of the pipes, which reduces the efficiency of the station (scale impairs heat transfer and reduces the throughput of the pipes).
But now this problem is solved by using distilled water, liquids, purified impurities that precipitate, or special gases.
But on the other hand, this power plant can perform another function - to heat the room.
Everything is simple here - after performing its function (rotation of the turbine), the steam must be cooled so that it turns into a liquid state again, which requires a cooling system or, simply, a radiator.
And if you place this radiator indoors, then in the end we will receive not only electricity from such a station, but also heat.
Thermoelectric generators
Power plants with generators built according to the Peltier principle are quite an interesting option.
Physicist Peltier discovered an effect that boils down to the fact that when electricity is passed through conductors consisting of two dissimilar materials, heat is absorbed at one of the contacts, and heat is released at the other.
Moreover, this effect is the opposite - if the conductor is heated on one side and cooled on the other, then electricity will be generated in it.
It is the opposite effect that is used in wood-fired power plants. When burned, they heat up one half of the plate (it is a thermoelectric generator), consisting of cubes made of different metals, and the second part is cooled (for which heat exchangers are used), as a result of which electricity appears at the terminals of the plate.
But such a generator has several nuances. One of them is that the parameters of the released energy directly depend on the temperature difference at the ends of the plate, therefore, to equalize and stabilize them, it is necessary to use a voltage regulator.
The second nuance is that the energy released is just a side effect; most of the energy when burning wood is simply converted into heat. Because of this, the efficiency of this type of station is not very high.
The advantages of power plants with thermoelectric generators include:
- Long service life (no moving parts);
- At the same time, not only energy is generated, but also heat, which can be used for heating or cooking;
- Quiet operation.
Wood-burning power plants using the Peltier principle are a fairly common option, and they produce both portable devices that can only release electricity to charge low-power consumers (phones, flashlights), and industrial ones that can power powerful units.
How to determine the thermoEMF of a metal?
Thermoelectromotive force occurs in a closed loop when two conditions are met:
- If it consists of at least two conductors made of different materials.
- If all dissimilar sections included in the circuit have different temperatures (at least in the connection area).
In physics, this phenomenon is called the Seebeck effect.
The magnitude of thermoEMF depends on the type of materials and their temperature difference.
It is determined by the formula:
E = k (T1 – T2),
- Where T1 and T2 are the temperature of the conductors;
- K – Seebeck coefficient.
The highest performance is achieved by circuits consisting of dissimilar semiconductors (having p- and n-conductivity). In metals, the Seebeck effect is minor, with the exception of some transition metals and their alloys, such as palladium (Pd) and silver (Ag).
Gas generators
The second type is gas generators. Such a device can be used in several directions, including generating electricity.
It is worth noting here that such a generator itself has nothing to do with electricity, since its main task is to produce flammable gas.
The essence of the operation of such a device is that during the oxidation of solid fuel (its combustion), gases are released, including flammable ones - hydrogen, methane, CO, which can be used for a variety of purposes.
For example, such generators were previously used in cars, where conventional internal combustion engines worked perfectly on the emitted gas.
Due to the constant jitter of the fuel, some motorists and motorcyclists have already begun installing these devices on their cars.
That is, to get a power plant, it is enough to have a gas generator, an internal combustion engine and a regular generator.
What is a heat generator
Equipment of this class is represented by two main types of devices:
- Stator;
- Notorny (vortex).
However, cavitation models also appeared not so long ago, which may in the near future become a worthy replacement for units operating on conventional types of fuel.
The difference between stator and rotor devices is that in the first, the liquid is heated using nozzles located at the inlet and outlet openings of the unit. In the second type of generators, heat is generated during pump rotations, leading to turbulence in the water.
Let's watch the video, the generator in operation, measurements:
In terms of performance, a vortex heat generator assembled by yourself is somewhat superior to a stator one. It has 30% more heat transfer. And although such equipment is presented on the market today in various modifications, differing in rotors and nozzles, the essence of their work does not change. Based on these parameters, it is still better to assemble a heat generator on your own of the vortex type. How to do this will be discussed below.
Representatives of factory-made power plants
Let us note that the indicated options – a thermoelectric generator and a gas generator – are now a priority, therefore ready-made stations are produced for use, both domestic and industrial.
Below are a few of them:
- “Indigirka” stove;
- Tourist stove “BioLite CampStove”;
- Power plant "BioKIBOR";
- Power station "Eco" with gas generator "Cube".
An ordinary household solid fuel stove (made like a Burzhaika stove), equipped with a Peltier thermoelectric generator.
Perfect for summer cottages and small houses, as it is quite compact and can be transported in a car.
The main energy from burning wood is used for heating, but the available generator also allows you to obtain electricity with a voltage of 12 V and a power of 60 W.
BioLite CampStove stove.
It also uses the Peltier principle, but it is even more compact (weighs only 1 kg), which allows you to take it on hiking trips, but the amount of energy generated by the generator is even less, but it will be enough to charge a flashlight or phone.
A thermoelectric generator is also used, but this is an industrial version.
The manufacturer, upon request, can produce a device that provides output electricity with a power of 5 kW to 1 MW. But this affects the size of the station, as well as the amount of fuel consumed.
For example, an installation that produces 100 kW consumes 200 kg of wood per hour.
But the Eco power plant is a gas generator. Its design uses a “Cube” gas generator, a gasoline internal combustion engine and a 15 kW electric generator.
In addition to ready-made industrial solutions, you can separately buy the same Peltier thermoelectric generators, but without a stove, and use it with any heat source.
The design of the electrical part of the heat generator
Four 12705 Peltier elements are used, but any similar ones can be used. Element 12705 is a square 4x4 cm in size, 3 mm thick, produces a current of 5 Amps, a power of 60 Watts. The operation of the Peltier element is based on the fact that if you heat one side and cool the other side, an electric current appears at the output. With a temperature difference of 100 degrees, one element produces 2 watts, that is, 2 volts and 1 ampere. In this installation, four elements provide 8 watts, 7-8 volts, current 0.7-0.8 Amperes. The elements are connected to each other in series plus to minus.

Homemade stations
Also, many craftsmen create homemade stations (usually based on a gas generator), which they then sell.
All this indicates that you can independently make a power plant from available materials and use it for your own purposes.
Next, let's look at how you can make the device yourself.
Based on a thermoelectric generator.
The first option is a power plant based on a Peltier plate. Let us immediately note that a device made at home is only suitable for charging a phone, a flashlight, or for lighting using LED lamps.
For production you will need:
- A metal body that will play the role of a furnace;
- Peltier plate (purchased separately);
- Voltage regulator with installed USB output;
- A heat exchanger or just a fan to provide cooling (you can take a computer cooler).
Making a power plant is very simple:
- We make a stove. We take a metal box (for example, a computer case) and unfold it so that the oven does not have a bottom. We make holes in the walls below for air supply. At the top you can install a grate on which you can place a kettle, etc.
- We mount the plate on the back wall;
- We mount the cooler on top of the plate;
- We connect a voltage regulator to the terminals from the plate, from which we power the cooler, and also draw terminals for connecting consumers.
It works simply: we light the wood, and as the plate heats up, electricity will begin to be generated at its terminals, which will be supplied to the voltage regulator. The cooler will start working from it, providing cooling of the plate.
All that remains is to connect the consumers and monitor the combustion process in the stove (add firewood in a timely manner).
Based on a gas generator.
The second way to make a power plant is to make a gas generator. Such a device is much more difficult to manufacture, but the energy output is much greater.
To make it you will need:
- Cylindrical container (for example, a disassembled gas cylinder). It will play the role of a stove, so hatches should be provided for loading fuel and cleaning solid combustion products, as well as an air supply (a fan will be required for forced supply to ensure a better combustion process) and an outlet for gas;
- A cooling radiator (can be made in the form of a coil) in which the gas will be cooled;
- Container for creating a “Cyclone” type filter;
- Container for creating a fine gas filter;
- Gasoline generator set (but you can just take any gasoline engine, as well as a regular 220 V asynchronous electric motor).
After this, everything must be connected into a single structure. From the boiler, gas should flow to the cooling radiator, and then to the “Cyclone” and a fine filter. And only after that the resulting gas is supplied to the engine.
This is a schematic diagram of the manufacture of a gas generator. Execution can be very different.
For example, it is possible to install a mechanism for forced supply of solid fuel from a bunker, which, by the way, will also be powered by a generator, as well as all kinds of control devices.
When creating a power plant based on the Peltier effect, no special problems will arise, since the circuit is simple. The only thing is that you should take some safety measures, since the fire in such a stove is almost open.
But when creating a gas generator, many nuances should be taken into account, among them is ensuring tightness at all connections of the system through which gas passes.
In order for the internal combustion engine to operate normally, you should take care of high-quality gas purification (the presence of impurities in it is unacceptable).
The gas generator is a bulky design, so it is necessary to choose the right place for it, as well as ensure normal ventilation if it is installed indoors.
Since such power plants are not new, and they have been manufactured by amateurs for a relatively long time, a lot of reviews have accumulated about them.
Basically, they are all positive. Even a homemade stove with a Peltier element is noted to completely cope with the task. As for gas generators, a clear example here is the installation of such devices even on modern cars, which indicates their effectiveness.
Homemade steps
Making such a device yourself is not that difficult. For this you will need:
In industrial models, a metal pipe with thick walls is used as a heater, but providing sufficient power to a homemade device to heat such an element is very difficult and does not make much sense. The induction coil is capable of heating any metal, so the heater can be modified.
A piece of plastic pipe is used as a housing for an induction heater from a welding inverter. It should be slightly larger in diameter than the heating pipes. The length of the heater pipe can be approximately one meter, the internal diameter can vary between 50-80 mm.
To connect the heater to the system, adapters should be installed in the lower and upper parts of the housing. The lower part of the pipe must be covered with a grill, then a filler consisting of small metal particles is placed inside the body. You can get the filler, for example, from wire, rod, narrow metal pipe, etc.
The length of the segments can be varied arbitrarily. Most often, steel wire with a diameter of 6-8 mm is used for this, which is simply cut into small pieces. Some craftsmen recommend cutting it into long rods, about 90 cm, i.e. almost along the length of the heater.
The higher the magnetic resistance of the steel from which the wire is made, the better it will heat up. Depending on the size of these pieces, a protective mesh is selected, which is mounted at the bottom of the housing. The filler is poured or placed in the pipe to the very top. After this, the upper part is also covered with a mesh.
Pros and cons of a wood-fired power plant
A wood-fired power plant is:
- Fuel availability;
- Possibility to get electricity anywhere;
- The parameters of the generated electricity are very different;
- You can make the device yourself.
- Among the shortcomings it is noted:
- Not always high efficiency;
- Cumbersome design;
- In some cases, generating electricity is just a side effect;
- To generate electricity for industrial use, large amounts of fuel must be burned.
In general, the production and use of solid fuel power plants is an option worthy of attention, and it can not only become an alternative to power grids, but also help in places remote from civilization.
Advantages and disadvantages
Like any other device, a cavitation-type heat generator has its positive and negative sides .
Among the advantages are the following indicators:
- availability;
- huge savings;
- does not overheat;
- Efficiency tends to 100% (it is extremely difficult for other types of generators to achieve such indicators);
- availability of equipment, which allows you to assemble the device no worse than the factory one.
The weaknesses of the Potapov generator are considered:
- volumetric dimensions, occupying a large area of the living area;
- high level of engine noise, which makes it extremely difficult to sleep and rest.
The generator used in industry differs from the home version only in dimensions. However, sometimes the power of a home unit is so high that there is no point in installing it in a one-room apartment, otherwise the minimum temperature when the cavitator is operating will be at least 35°C.
The video shows an interesting version of a solid fuel vortex heat generator