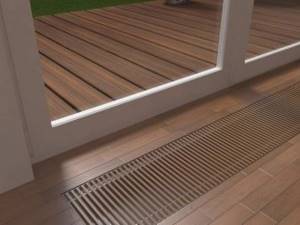
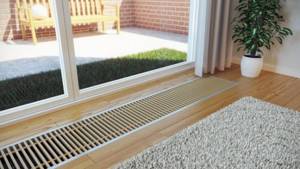
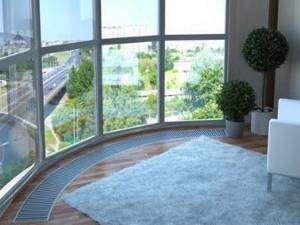
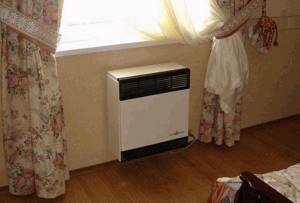
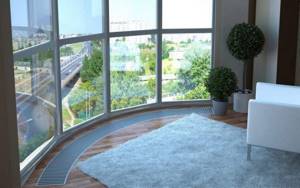
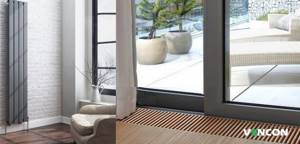
Thermal radiators built into the floor are more often used in non-standard designs. In rooms that have panoramic windows, such batteries perform their functions without obstructing the open space. They not only heat the room, but also create a thermal curtain, preventing cold air from entering from the windows. Such devices are installed in private homes, winter gardens, gyms, offices and other social premises.
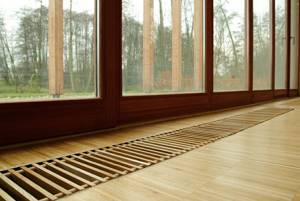
Heating radiators built into the floor
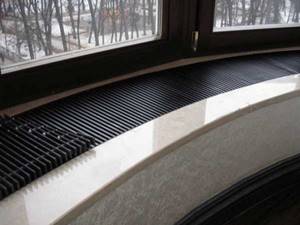
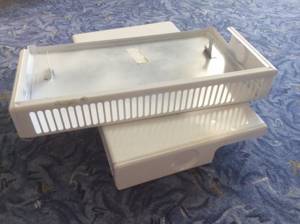
Externally, such a radiator looks like a pencil case, closed on top with a grille. Inside there is a device that directly heats the room. Let's take a closer look at heating radiators built into the floor, their advantages and disadvantages in use.
Advantages and disadvantages
Each type of household heating appliance has its own advantages and disadvantages.
pros
- Power. Trench convectors are not inferior to standard models either in power or heating speed. Some models of such devices have sufficient power to heat large rooms.
- Easy to manage and install. To install a separate model of an in-floor convector, a few rectangular niches or recesses in the floor will be sufficient.
- Multitasking. Such devices can be used both for heating standard living rooms and for heating public spaces. In large rooms such as concert halls, cinemas or studios, placing a conventional radiator or heater may be impractical - they will heat a strictly defined area, and the convection capabilities of the device will not allow them to regulate air flow in large rooms. At the same time, in-floor convectors can be placed throughout the entire area of the room and they will not take up excess free space.
- Safety. When using in-floor converters, you will practically not be able to get burned or injured. All modern models are equipped with special grilles that protect owners from extreme heat and contact with the heating element. This advantage allows the use of such convectors in rooms where children are constantly present - in kindergartens or hospitals.
- Style. Since in-floor convectors do not clutter up free space, they will look good in any style solution. Moreover, there are models of these devices with grilles made of different materials - for example, metal or wood.
- Heat retention and high efficiency. Trench convectors use energy sparingly and are able to maintain a stable room temperature for a long time.
Minuses
- Unfortunately, convectors of this type will be difficult to install in already renovated and finished rooms. For proper installation of such devices, it is recommended to install a screed or raised floor. Please note that all heating devices, including pipes and wiring, should also be placed in the floor.
- Today, not all in-floor convectors are equipped with a built-in fan, which means the need to install an additional thermal insulation substrate.
- All devices operating through convection have to deal with flows of dirt and dust. As a rule, a trench convector in a dusty room quickly becomes clogged and needs to be completely cleaned. Without cleaning, unpleasant odors may appear in the room.
- It is better to entrust the installation of the device to a specialist, since in case of improper installation there is a high chance of drafts near the floor and the appearance of condensation.
- Devices operating on the principle of forced convection can trap warm air currents near the ceiling, which is why the seating area in the room will always be cool.
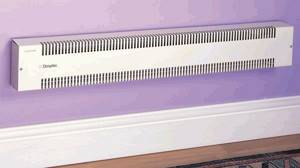
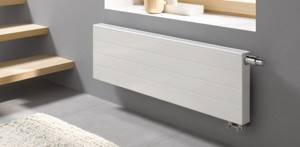
Advantages and disadvantages
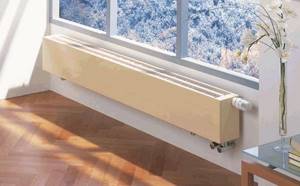
You can choose any model and color of radiator for panoramic windows
The declared advantages of low horizontal radiators are determined by the features of their application already discussed. They appear as follows:
- small sizes, comparable to the dimensions of their baseboard counterparts;
- high heat transfer, which is a distinctive characteristic of most models of floor-standing radiators, with the exception of cast iron samples;
- attractive appearance that does not spoil the interiors of modern premises;
- a wide range of colors, from traditional white to a large palette of different shades.
In addition to gradations of white color, some design solutions use the technique of stylizing wood or stone.
The advantages of heaters include ease of installation due to the method of placement in the window sill. Usually they are installed on legs that are already present on the body of the product, after which the user will only have to connect the pipes to the lower supply. Individual samples are fixed directly on the floor surface or built directly into it. With their help, it is possible to heat large rooms, as well as place them close to the walls, without cluttering up the living space.
The disadvantages of heating batteries of this class include:
- limited methods of laying pipes - the need to be built into a wall or floor;
- the ability to use only one heating method - convection;
- the difficulty of selecting and purchasing a model suitable for specific operating conditions.
The disadvantage of the products is the relatively high cost declared by the manufacturer. It significantly exceeds that of classical battery samples.
How to install?
When starting installation work, you need to correctly calculate not only the power of the equipment, but also the operating pressure in this system. There is also a possibility that a false floor will have to be made where the floor radiator is installed. This will slightly change the height of the room, as well as its area. Next, you need to prepare a niche for a radiator built into the floor. In size it should correspond to the parameters of this design and even slightly exceed them. The niche itself is not constructed in a concrete screed, but in a podium specially made for this purpose. The radiator is secured using anchor bolts.
If the convector is built under the windows, you should not think about connecting it. After all, it can be either left-handed or right-handed. But when installing it near a window, it is necessary that the indentation be no less than ten centimeters, and the distance from the walls to the convector should be no less than twenty centimeters. Next, the strapping of the structure built into the floor is done. It is carried out using polypropylene pipes. They are subsequently filled with concrete or cement screed. Therefore, it is better to use a copper pipeline.
If we talk about the heating system, the installation of which uses radiators hidden under the floor, it is worth noting that it is considered the simplest in terms of installation. Even a person with a minimum of experience can handle the installation of such radiators. When making underfloor water heating, it is imperative to ensure that all energy systems are connected to the right place. All this must be taken into account in the first stages of design. Otherwise, it will be impossible to ensure normal operation of the entire heating system. The only correct solution in this case would be to install an electric convector.
By deciding to install heating devices built into the floor, you can achieve not very expensive and at the same time complete heating of the room. This option will allow you to create a stylish interior in any room. However, before installation, it is imperative to study all the features and subtleties of the installation work, which will subsequently greatly facilitate the work. Only in this case the result will be satisfactory.
For information on installing the Itermic floor-mounted convector, see the following video.
Design Features
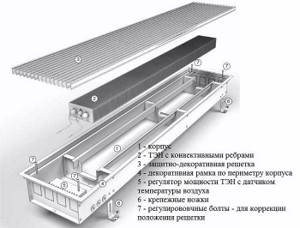
Heating convectors designed for installation in the floor have a simple design. The basis is a heating element to which convective fins are attached.
A protective grille is installed on top. Its surface corresponds to the floor level. All other details are completely hidden. The grate does not heat up above 30°C during operation of the equipment, so there is no risk of getting burned upon contact.
Checking the heating system
Installation of an underfloor convector requires checking the level of readiness of the heating system. It is necessary to check the flow and quality of water in the pipe circuit to which the unit will be connected. The best way to check is to shut off the pipes and drain the coolant.
Necessary tools that will be needed to install an in-floor convector:
- Plumbing keys.
- Building level.
- Cutter.
- Rangefinder.
- Pliers.
- Soldering iron, welding, torch or press tool (depending on the material of the heating system).
- Roulette.
- Hammer.
- Pipe cutter
- Screwdriver for plus and minus.
- Investment thread.
- Gun for polyurethane foam.
- Marker.
- Construction vacuum cleaner.
We have provided a general list of equipment that you may need to install a trench convector. This point is individual for everyone.
Checking the equipment of the convector
It is worth dividing convectors into two groups - with maximum and minimum configuration. Minimum: heat exchanger and box, leveling bolts, fasteners to the floor and, of course, a warranty with instructions. The maximum ones include servo wires, decorative grilles, and taps. Installation of in-floor convectors requires the presence of all components.
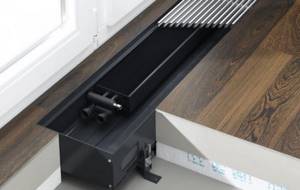
Models with housing
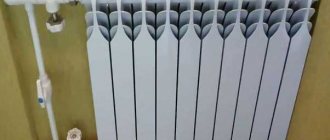
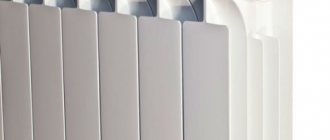
These underfloor radiators are enclosed in a casing made of galvanized steel sheet. To reduce heat loss through metal walls, they are insulated. For the same reason, the battery case is painted dark. Such radiators are equipped with a heat exchanger with thin metal plates to increase the heat transfer area.
READ MORE: How to lay film heated floors under laminate
How to choose heating radiators
One of the leaders on the market - Rifar radiator
After installation, these heating devices are decorated with grilles. Most often they are made of wood or metal. They are painted in different colors, depending on the chosen design solution.
Floor-standing devices have a simpler design, but they do not always fit into the interior of the room.
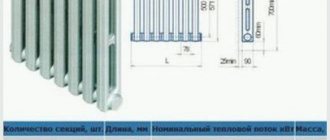
The width of the niche ranges from 2 to 40 cm, length - from 50 cm to 4 m, depth - from 10 to 80 cm.
Floor radiators that are built into the floor are distinguished depending on the temperature of the coolant:
- high temperature. Characterized by parameters – 90/70°C;
- low temperature. The coolant temperature is 55/45°C.

Technical characteristics of copper-aluminum radiators Mars In this case, heating radiators are installed in a specially prepared niche.
Its walls are insulated. The most commonly used is polyester foam. Batteries of this type are mainly located in new buildings, where their installation is provided for in the design documentation. Diagram and principle of operation of a liquid electric radiator
The channel with heating elements is closed with a special grille. It must withstand significant loads that are possible during operation.
Also, the grill must be removable so that the channel can be cleaned of accumulated dust. It can move completely away or collapse.
Installation of heating convectors, taking into account power calculations
Speaking about installation methods, you can find floor and wall models, and the use of one or another coolant divides these devices into mechanisms that operate using water, electricity and gas
It is important to remember that installation of gas-type heating convectors can only be carried out on walls in a vertical position, while water and electrical systems can be installed both on the wall and on the floor (read: “Household convector: principle of operation and installation”)
Construction of a water domestic convector
The installation of heating convectors operating using water used as an energy source is distinguished by the fact that the basis of the design is a heating battery
In this case, special attention should be paid to such a procedure as calculating heating convectors of this type, and in particular, correctly calculating the number of battery sections required for high-quality heating of the air in the room
Another factor that should be considered when choosing this equipment is the material from which the convector is made.
- alloy of copper and aluminum;
- bimetal panels;
- aluminum;
- steel elements.
Copper-aluminum models are the most expensive. The connection diagram for heating convectors made of this material involves the installation of copper connecting parts, which have a very high price.
The use of such devices will be relevant if there is a need to make the design of the heating system lighter. Most often, consumers prefer samples made of aluminum or bimetal, but their installation requires the purchase of special fasteners and kits of installation systems.
It will be much more profitable to install batteries made of steel.
- by means of side fastening;
- using lower fixation to the system.
Installation of electric convectors
Another option for such equipment is electric convectors
These models can be installed and connected by hand, but it is very important to correctly calculate the power of a convector of this type
- the device must be removed from its packaging;
- then the protective film must be removed from the convector;
- Next, you need to decide where the mechanism will be installed.
When calculating the power of a heating convector operating using electricity, as well as connecting it, it is extremely important to follow a large number of recommendations, which, nevertheless, will allow for high-quality installation of the equipment
- the minimum distance from the floor to the convector is 20 – 25 cm;
- the device must be located at least 25 cm from nearby objects, from above and in front - at least 24 - 55 cm;
- the convector should be installed at a distance of 25 cm from the wall, and it should be located at least 35 cm from the ceiling;
- It is strictly not recommended to install the device behind curtains and doors, as well as under openings intended for ventilation.
The installation process for an electric convector is as follows:
- Having unscrewed the fastening bolts, you need to pull out the bracket;
- using a drill, you need to make pre-marked holes intended for fastening the mechanism;
- Next you need to fix the bracket;
- then you need to insert the electric convector into the clamp with its lower part;
- Guys should be placed on the equipment;
- it is necessary to place the upper part of the device into the mounted guy wires;
- after this, all the clamps must be tightly secured, and the fixing bolts must be screwed in;
- The convector operation regulator should be set to off mode and power should be supplied to the device;
- After the LED on the device lights up, the equipment can be switched to operating mode.
If the electric convector used is floor-standing, then its connection is as follows:
- The unit must be turned over and the mounting legs equipped with wheels must be secured to it. Standard bolts can serve as fastening elements;
- After this, the convector can be turned on and set to the desired operating mode.
It is important to remember that the power consumption of the convector is one of the factors that must be taken into account when selecting and installing equipment
How to connect a gas heating convector
Particular attention should be paid to the fact that when deciding how to calculate the power of a gas-type heating convector and how to connect this equipment, it is extremely important to call specialists, since working with gas requires caution and a qualified approach. Otherwise, manual installation can result in extremely unpleasant consequences.
Correct installation of a gas convector should proceed according to the following principle:
How to choose the right radiator for panoramic windows
It is important to consider the type of liner - side or floor
Compliance with the following rules will help you choose radiators correctly for panoramic windows in your apartment:
- Before purchasing, you should decide in advance on the total length, which is measured directly at the installation site. It usually varies from 280 to 600 mm.
- It is important to pay attention to the height of the product, measured in mm.
- You will need to select the type of radiator based on the metal used in it, based on the technical characteristics given in various sources.
- It is important to decide on the type of eyeliner in the apartment and select a suitable product sample for it;
- It would be a good idea to evaluate the design of the models offered by a specific manufacturer by carefully studying the photos presented on the website of the selling company.
Despite the fact that in most cases trade organizations offer one well-known brand (“Kermi”, made in Germany), it would not be a bad idea to familiarize yourself with the various models from this manufacturer.
Compact radiators for panoramic windows, due to the specifics of their application, are not yet in great demand among Russian consumers. However, taking into account the constant improvement of the living conditions of modern people, they are considered promising products that attract the attention of comfort-conscious users.
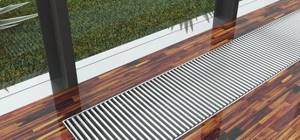
Underfloor heating convectors: what are they?
In a few words, you can describe the device as follows: if you plan to have floor-to-ceiling panoramic windows in your house or apartment, built-in convectors are your option for a heating system.
Because there will simply be nowhere to install traditional radiators and even ordinary convectors.
However, in any case, built-in convectors win, even with standard windows and room layout: high aesthetics of the interior with this system is guaranteed.
Design features
An in-floor convector is a built-in channel in a floor box made of corrosion-resistant steel. Inside the box there is a copper pipeline and an aluminum heat exchanger. The top is covered with a decorative lattice.
These devices, according to their design and operating principle, are divided into two types:
- With natural convection, when due to the difference in density, warm air is replaced by cold air inside the device.
- With forced convection, the device is equipped with a centrifugal or tangential fan. Thanks to this, the air is distributed more evenly across the heat exchangers and warms up faster, which contributes to faster heating of the room.
Photo 1. Diagram of the operation of an in-floor heating convector with natural (left) and forced (right) convection.
Principle of operation
Built-in convectors are installed in the floor around the perimeter of the room, focusing on the lines along the windows. Actually, first of all, they are intended for the installation of this heating system
The principle of operation is based on the fact that low-temperature air naturally falls into the convector from the cold conductor window, warms up in the convector and is pushed into the room by a new flow of cold coming down from the window.
Advantages of products built into the floor
Aesthetics are an indisputable advantage of underfloor heating devices. Agree, much more comfort is created by decorative grilles in the floor, from which warmth emanates, than by bulky radiators.
- This frees up space not occupied by conventional radiators, plus we get free access to the windows and doors of the loggia or balcony.
- The heat from the convector goes exactly where it is coldest - along the windows and doors.
- The room warms up much faster than with a classic heating system.
- The equipment is lightweight and does not create a load on the foundation and floor.
- The temperature of the decorative grille does not exceed +40 °C. It's impossible to get burned.
- The floor convector not only heats the room, but also cools it, replacing the air conditioner.
Flaws
- The need for proper care of the device. We'll look at this in more detail a little later. Let us only note that sometimes you also need to wipe off dust from traditional cast-iron radiators. So this disadvantage is relative.
- Cost - devices are not cheap, especially those equipped with additional equipment.
Attention! Incompatibility with a classic heating system - they cannot be mounted with each other. Without going into technical details: neither one nor the other will work normally
When deciding to equip a room with in-floor convectors, carefully weigh the capabilities of the system in relation to the building that needs to be heated.
Difficult to install - you will need the services of a specialist unless you are a self-taught technical genius.
Bimetallic devices for panoramic windows
This type of radiator belongs to heat supply equipment, the high cost of which best corresponds to the quality.
Bimetallic radiators differ:
- High working pressure.
- Compatible with other metals. In them, aluminum is used only for the manufacture of the shell, which increases the aesthetics of appearance and heat transfer. As for the internal casing, equipped with outlets for connection to the system, it is made of stainless steel or black steel.
According to experts, bimetallic radiators are the best option for systems connected to a centralized heating supply. Their use for supplying heat to private households is unjustified in terms of safety margins and monetary costs.
The height of bimetallic radiators for panoramic windows ranges from 24.5 to 45 centimeters.
In what rooms are floor-mounted radiators installed?
Some models have additional functions, such as condensate drainage, automatic regulation, and programmable climate control.
Trench convector
Such radiators are most in demand in rooms where it is necessary to create a special microclimate:
- in greenhouses;
- in museums;
- in galleries;
- in houses with panoramic windows.
Radius/angular in-floor convector
The versatility and multifunctionality of radiators built into the floor contribute to the fact that they are preferred when organizing heating in both residential and office premises, as well as in commercial premises.
Built-in convectors are sometimes installed in window sills
Design
There is nothing complicated or unusual in the design of in-floor water heating convectors. The “heart” is an aluminum heat exchanger, which, together with a copper pipeline, is placed in a metal casing with plates welded onto it. The hot coolant, continuously circulating, gives off its heat to the metal plates. And they heat the air between them, which rises into the room. Built-in heating radiators have this design.
It should be taken into account that the maximum temperature of the plates (taking into account the fact that the coolant temperature can reach 90°) does not exceed 30°. This makes the use of this type of convector completely safe.
Connection diagrams
There are several ways to put into operation a room heating system of this type.
In each of the schemes, it is necessary to ensure that there are no particles in the pipes, otherwise this will lead to clogging of the underfloor heating structural elements.
Via separate input

With this method, the circulation pump is not allowed to run dry. To do this, install a relay that regulates pressure or flow.
It is also permissible to use an overhead thermostat, which allows you to block the operation of the pump when it crosses the lower temperature threshold.
The most effective option is to install a regulator that adjusts the room heating temperature in accordance with the outside temperature of the room.
Through vertical wiring
The main purpose of such a scheme is the process of restoring the existing radiator system.
By fixing underfloor heating pipes directly to the riser, you can double the amount of heat received. This is explained by the fact that at the same temperature in the supply and return pipes, at the moment of the difference in the heated floor pipes, it will be higher than in the radiator.
If there are 4 risers in a residential building, the coolant from two is in transit, and from the remaining ones, warm water from the central heating system is used.
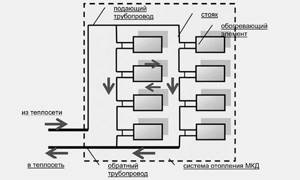
Photo 1. Connection diagram of a water heated floor to a heating system via vertical wiring.
The sequence of actions according to this scheme:
- installation of new heat exchangers in place of previously used radiators;
- parallel fixation of the secondary circuit from the heated floor.
Important! When carrying out the process, it is necessary to use PVC pipes of the same length
Single pipe system
This scheme does not provide for regulation of coolant flow and lowering its temperature.
The heated water floor is connected to the central heating system using a riser. This can be done by replacing the radiator with a heated floor circuit.
The difference in thermal loads between the central heating system and underfloor heating should not be more than 5–10 degrees.
In this case, the room temperature can be controlled using a circulation pump and a thermostat.
If there is no coolant in the riser, the pump operation automatically stops.
To maintain a comfortable temperature in winter, you can use a peak electric boiler in the used circuit. This element will be able to perform this function with the help of a thermostat, provided it is connected to the central heating on one side, and to the heated floor on the other.
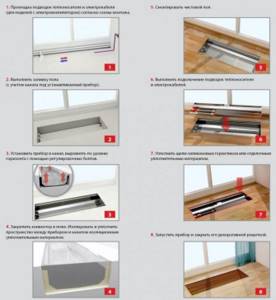
Batteries in the floor: step-by-step instructions
Before direct installation, you need to make sure that you have enough knowledge and experience to install, connect and configure everything correctly. Typically, companies selling heating systems offer their specialists who will do everything with high quality and with a guarantee.
When you want to install, connect and configure the in-floor battery system, you can use the step-by-step instructions:
- Supply coolant (that is, pipes) or stretch a cable for an electric in-floor convector.
- Install a niche channel for the radiator;
- Fill the floor;
- Install the batteries on the floor;
- Adjust its height using special bolts;
- Secure the entire structure, seal, and also isolate the space between the metal box and the walls of the channel;
- Install the finishing floor;
- Connect to the central heating system or electrical network;
- Use silicone sealant to seal all cracks;
- Cover the battery with a grill.
When the installation work is completed, all that remains is to check the serviceability of the heating system inside the floor, and also adjust the heating temperature. When everything is done correctly, you will feel it immediately. If something doesn’t work, then you need to find out what was done wrong. And fix it!
Ideally, installation, connection, configuration and testing are carried out by specially trained specialists. That is, then everything will really work. Plus - it is guaranteed by the manufacturer that, for example, nothing will break in the near future. If you have confidence in your abilities, then you can save a lot by hiring professionals and spend the money on other necessary things.
Built-in radiators without housing
To accommodate convector heaters without a housing, the channels must have appropriate thermal insulation. You can use polyester foam for this. Such channels are usually designed in new buildings specifically to accommodate convectors.
They have a parallelepiped shape and different depths. Floor heating radiators are placed inside such channels.
Built-in radiator without housing
Safety instructions require that the heating device be installed at least ten centimeters from the bottom of the channel, so that the heated fins of the convector do not come into contact with the walls, and free movement of air around them is ensured.
The main requirement for the grate that covers the channel on top is that it is strong enough to support the weight of an adult. Therefore, the supporting part and its frame must be made of steel, and the remaining elements can be made from hard wood even with your own hands. Usually the grating is painted to match the color of the flooring of the apartment or house.
Roll-up grille
Why are heating radiators installed under windows?
When using central heating batteries to heat a room, it is important to correctly place the heating devices so that they have the greatest heat transfer efficiency. There are several reasons for installing heating devices under window openings.

The main reasons for this arrangement are considered to be the physical processes of thermal energy transfer in the room:
- air convection;
- thermal radiation.
The window opening in the structure of the room has a large space equipped with a window block through which outside air enters the room. No matter how much the thermal insulation of the walls is enhanced, the building loses from 25 to 35% of heat through frames and glass. This is a very large indicator of heat loss. In this case, it is through the cracks in the frames that fresh but cooled air enters the room.
Therefore, to keep the room fresh and comfortable, it is more convenient to provide heating for the incoming fresh air. Create a heat shield in the opening, which would ensure normal temperature conditions in the room and its natural circulation throughout the entire apartment or house.
When installing a radiator under a window opening, the heat released heats the air, lifts it to the window sill, where fresh cooled and heated air from the radiator is mixed.
The wall near the window opening freezes especially hard. The large area of glass does not help retain heat, so the wall, reaching half the height of the room, freezes especially hard here. If the load-bearing walls to the right and left of the opening are more powerful, then the thickness of the wall underneath is 10-15 cm less. This means that here the wall will freeze faster, and therefore installing a radiator to heat the masonry with radiation is quite justified.
Features of choice
Before purchasing equipment, you should pay attention to a number of nuances:
- Calculate the installation area, determine the dimensions of the battery.
- Radiators with moisture-resistant housings are suitable for installation in areas with high humidity. And if an in-floor convector is built into the bathroom, it is necessary to equip a drainage system.
- Select the type of unit for air circulation. The use of fans increases noise during operation, the devices raise dust and will require the installation of a power supply, but they will warm up the room much faster.
- The pressure for central systems is within 8-9.5 atmospheres, in autonomous systems no higher than 3 bar - these parameters are taken into account when choosing products. Moreover, some types of equipment support 10 bar working pressure and 16-20 bar testing pressure.
- The number of pipes and the dimensions of the radiator determine the volume of coolant. The average is considered to be 0.7-2 liters.
- The weight of the equipment is calculated only together with the coolant and can be 14-24 kg. This is an important parameter for mounted products.
- The heating limit of the filler is +130 C, but to prevent burns, heating the body no more than +60 C is suitable.
How to calculate power?
Thermal power is calculated by the formula - 1 kW of heat is needed for 10 m2 of area. This is an average figure for houses with high-quality insulation without large windows, in regions with mild winters. A point discrepancy implies a 5-10% increase in power. So, for houses with insulating materials of insufficient thickness, units with a calculated power parameter of plus 15% are suitable; in regions with harsh winters, the reserve will have to be increased by 35-40%. Another 200 W is added for each panoramic window.
Review of manufacturers
Well-proven brands of appliances with natural convection:
- Carrera S. Dimensions 230x1000x90 mm, heat output 260 W, price from $170 (10,800 rubles).
- Verano VK15 of similar sizes with an energy output of 188 W costs from $210 (13,400 rubles).
- Polvax KE with dimensions of 230x1000x90 mm with a heat output of 258 W is considered the optimal choice for small buildings. Price from $170 (RUB 10,800).
Forced convection equipment:
- Polvax device dimensions 300x1000x90 mm, heat output 1127 W, price $260 (17,000 rubles).
- A Carrera device of similar dimensions with a heat output of 904 W will cost $260 (17,000 rubles).
- Kermi brand equipment with dimensions of 310x1250x110 mm and a power of 1722 W can be purchased for $1,100 (RUB 71,500). The equipment has different displacements, additional equipment for setting operating modes, and maintains any heating level for a long time.
Equipment and installation methods
Panel batteries with a side connection do not require any configuration; they already have an internal thread into which a pipe or tap can be installed. But, despite this, as a rule, I sell them with plugs and a Mayevsky tap.
Bottom-connected radiators have two pipes and a socket in their design, so no additional equipment is needed for their installation
As for standard devices with basic installation, when purchasing them it is important to check that the box contains floor mounting, a manual air vent and a plug. Regardless of the type of radiator, when connecting it you cannot do without ball valves and special control valves
Thanks to these parts, the flow is adjusted.
Multipleflexes can be either angular or straight. They are directly connected to the radiator and pipeline made of various materials. Thanks to these accessories, the device can be removed while leaving the station in working order. As for installation methods, they are determined individually, taking into account the material of the pipes. Ball valves are well suited for polypropylene pipes, and fastening is carried out by welding. If the pipeline is made of metal-plastic, then you need to take into account that it may contain press or fitting pipes.
The first type is simply twisted with nuts, and the second is squeezed with special pliers. In addition, the radiator can also be connected using euro cone valves. Usually the installation process does not take much time. First, the tap is disassembled, then the fitting with the union nut is screwed into the battery and joined. To get the job done efficiently, you need to have a special key for an American on hand. Upon completion of installation, all threaded connections must be sealed with a gasket.
Care and operation: better more often and cleaner
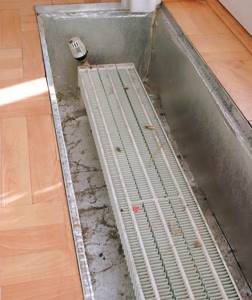
Many manufacturers recommend cleaning convectors twice a year - before the start of the heating season and after it. But it’s better to clean up the boxes a couple of times a month.
Photo 4. Cleaning the built-in convector: the protective grill of the device is lifted, dust is removed using a vacuum cleaner.
Turn off the power supply and stop the coolant supply.
Remove the decorative grille and the electric fan, if equipped.
Carefully lift the heat exchanger and clean the box and all parts with a vacuum cleaner with a narrow attachment, which is available - wipe with a damp cloth made of soft material. Don’t forget to put the protective grill back in place - it is prohibited to operate the device without it.
Don’t forget to put the protective grill back in place—it is prohibited to operate the device without it.
Expert advice
There are quite a few popular options for heat supply using floor products.
- In-floor radiators - the main device is located below the floor line, and on the surface there is only a grille, through which cold air masses penetrate into the convectors, and warm ones rise upward. Such installation is quite labor-intensive, and the liner itself is often hidden, which is extremely undesirable in case of emergency situations.
- The use of fan coil units is a system in which the heat exchangers are blown by built-in fans, which optimally redistribute warm air flows. This design ensures uniform distribution of heat over the entire area of the room, and in addition, completely frees the floor from additional communications, since they are all located above and do not “steal” the usable space of the room.
Floor radiators are still considered little-known devices, although there are quite a few situations where they are truly irreplaceable. The devices are connected in the same way as the simplest radiators; they are practical, ergonomic and energy efficient.
See the following video about the advantages of floor heating radiators.
Installation
Surface preparation
Leveling the base
After cleaning, it is advisable to evaluate the horizontal level of the floor in the room. If the difference is insignificant, then the base is suitable for installation. If the difference is a couple of centimeters, then it is necessary to level the base. Otherwise, the screed will be of different thicknesses, which will cause uneven heating of the floor.
Next, a waterproofing film is laid over the entire area. Damper tape is glued around the perimeter of the room, and it will compensate for linear fluctuations when the temperature of the base changes. The main stage of preparation is the installation of thermal insulation, which allows you to save up to 20% of thermal energy. Mineral wool, polystyrene foam or technical cork can be used as insulation.
The thermal conductivity coefficient of the most common materials is as follows:
- expanded polystyrene - up to 0.042 W/sq.m
- mineral wool – up to 0.056 W/sq.m
- glass wool – up to 0.042 W/sq.m
In practice, foam is most often used because it does not absorb moisture and does not “shrink” over time. There are no requirements regarding the thickness of the thermal insulation layer. It all depends on the capabilities of the room - one can easily be raised by 10 cm, while for the other there is barely enough space to properly lay the heating lines.
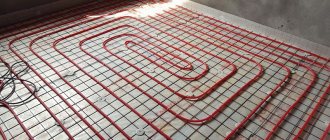
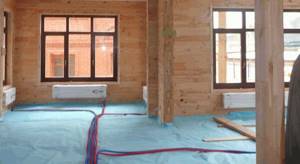
Pipe installation
Installation of heated floors using polymer pipes
Heating mains can be secured in several ways. For example, a reinforcing mesh is laid on the heat-insulating layer, and pipes are screwed to it. This option is also beneficial in that the mesh itself will become a reinforcing layer in the future pour. The lines are fixed approximately every meter. Although this is a very conditional parameter and depends entirely on how well the material will adhere to the base.
We must not forget that the temperature of the pipe will change, so its position will not remain static. Here are a few nuances:
- Do not fix the pipe too tightly to the base. It is better when the stress associated with linear expansion occurs along the entire length, rather than in one specific place.
- The total length of one circuit should not exceed 90 meters. Otherwise, the internal tension will be too great. It is optimal when one section reaches 60 meters in length.
- The length of several circuits in one room should be approximately the same.
Pipe laying options
There are several pipe laying schemes
The layout of the lines is designed to compensate for heat loss, since the coolant loses its temperature with distance. To ensure that the floor warms up evenly, it is not enough to simply lay the pipe. You need to adhere to a certain scheme:
- Snake. The pipe is laid like the movement of a snake. This option is suitable for small rooms, and installation begins from the windows.
- Spiral. In this case, the supply and return parts of the pipe are located nearby. Thanks to this, the floor is heated evenly throughout the room. This option is suitable for large rooms.
The distance between the pipes can be about 10-35 cm, and the minimum distance from the wall is 7 cm. The optimal diameter of a plastic pipe is about 20 mm. Typically, propylene or metal-plastic is used.
The final stage of construction is the arrangement of the screed. You can prepare the mixture yourself or buy a ready-made self-leveling composition - it all depends on the financial capabilities of the homeowners
It is only important that the thickness of the layer is not less than 5 cm. Otherwise, the placement of furniture and interior items in such a room may lead to the destruction of the cement layer. Despite the seeming difficulties of performing the work, more and more owners of houses and apartments are striving to install “warm floors”
This method of providing heat is practical and economically feasible. The costs will soon return in the form of savings on energy purchases.
Despite the seeming difficulties of performing the work, more and more owners of houses and apartments are striving to install “warm floors”. This method of providing heat is practical and economically feasible. The costs will soon return in the form of savings on energy purchases.
Read further:
Selection of heating radiators - useful tips
How to decorate a heating pipe - tips from builders and decorators
A few tips on how to choose a double-circuit gas boiler for your home
Do-it-yourself conventional potbelly stove - useful tips for making
Let's figure out how to properly heat a boiler with coal - tips and useful recommendations
Standards for installing batteries in residential premises
According to building codes and regulations, the battery under the window opening must be installed taking into account the following requirements:
- the heating radiator should be installed at a height of 80-100 mm from the floor;
- relative to the window sill, the radiator is placed 100-120mm lower;
- The battery must be placed at a distance of 30-50 mm relative to the wall;
- the battery should be located in the center of the window opening.
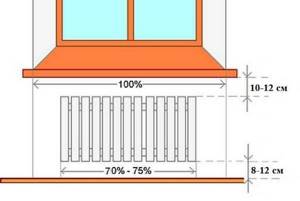
How to properly hang a heating radiator determines how easily you can maintain order in the room and how well it will warm up during the heating season. The distance above the floor level and from the window sill during the heating season ensures natural air convection. As it rises, it cuts off the cold flow from entering the room and creates a heat shield in the window opening. The gap between the floor and the lower edge of the heating radiators makes it possible to carry out cleaning, which is very important for residential premises.
The convector under the window sill should be 3-5 cm lower than it. This ensures air circulation, on the one hand, and on the other hand does not allow dust to accumulate in this space. The central location of the radiators allows the window units to be covered with a flow of warm air, blocking the penetration of cold into the room.
Screens for heating convectors
The screen for a heating convector is a special overlay on the device that improves its aesthetic appeal. Decorative screens are made from different materials: plastic, glass, wood, metal. This panel must have holes for air circulation. They provide efficient heat exchange. If the number of holes is insufficient or their size is small, the heating efficiency is reduced by a maximum of 50%.
When choosing a screen, pay attention to the following important points:
The material from which the element is made. Wooden linings are not recommended for use in rooms with high humidity, and glass screens transmit thermal energy worse. When choosing a plastic cover, give preference to elements made of heat-resistant plastic that do not deform when heated. Metal panels are the most reliable and durable, but they must have a protective powder coating. Depending on the mounting method, screens can be hinged, sliding or attached. The easiest way is to install a hinged or attached structure. The hinged screen has special fastenings that allow it to be hung on the radiator from above. Attachment panels are attached to the niche in which the heating device is installed. Both types can be easily dismantled if necessary. A sliding screen is much more difficult to install because it has doors. But this model provides quick access to the heating device. There are many color options and screen configurations available
It is important that the dimensions of the panel match the dimensions of the heating unit or niche. Most often, white overlays are produced, but there are also models with interesting decor and different color options on sale.
If necessary, the white screen can be painted in the desired color.
When choosing a suitable radiator cover, consider how easy it is to maintain. Please note that in the kitchen, a fine grate will quickly become dirty, and it is not easy to clean it from grease and soot. Plastic covers are simple and easy to use. They are inexpensive and come in a variety of colors.
Design features of built-in radiators
A standard floor radiator in appearance resembles a pencil case covered with a grille on top, inside of which there is a heating device. The built-in battery consists of a heater, a housing and a protective panel that covers the structure. To ensure that the heat is distributed evenly, such radiators are supplemented with fans, placed inside the screed and installed at floor level. The heating process occurs due to convection, for this reason structures of this type are called built-in convectors.
Any battery in the floor under the window works on the same principle. Cold air passes down through the grille, heats up and rises back up. There is a separate category of radiators of this type, during operation of which convection heating occurs naturally. Such devices are considered more efficient because they are able to warm the indoor air faster. Heating grilles are usually made of metal or wood and painted in different colors.
Advantages
The use of floor heating in apartments and especially in private houses has many advantages compared to conventional radiator heating. The first of these, and perhaps the most important, is the most comfortable climate in the house. Uniform heating of the air in the room across the entire surface of the floor almost completely eliminates the risk of colds. The warmth emanating from it prevents your feet from getting too cold.
A warm water floor makes it possible to expand the space of the room by removing radiators from under the windows. This system is completely hidden under the decking, does not take up space, and also allows for full-wall windows.
It can significantly reduce operating costs, since a decrease in temperature of 2 or 3 degrees will not entail any physical discomfort. In addition, the “warm floor” heating system evenly warms the entire room without creating cooled or overheated zones.
The next advantage is the absence of so-called convection currents. The radiator heating system operates in this way - the air is heated, which rises and remains under the ceiling, and when it cools down at the opposite wall, it falls to the floor. This creates a constant air circulation, lifting and transporting a lot of fine dust.
It should be noted that a water-heated floor is an extremely reliable and safe system in terms of operation. A fairly simple design and well-developed technology of creation and installation allow it to serve faithfully for at least 50 years, and this without additional operational maintenance.
Radiators next to windows
An interesting design solution could be radiators located next to panoramic windows. In this case, the radiators evenly heat the room without covering the window. The main disadvantage here is the non-optimal location of the heating radiators.
- In most cases this is the cheapest option
- Wide choice in the location of the radiator, as well as in the choice of radiator model
- Radiators are easy to clean
- The radiator does not block the flow of cold air from the side of the window, as a result of which the temperature near the window may be lower than in the rest of the room
- In some cases, condensation may form on the glass, but this is more likely a matter of insufficient ventilation or poor quality of the glass unit.
Scope of use of floor radiators
First, let's figure out where heating devices that are installed on the floor are used.
It is advisable to use water floor radiators in the following cases:
- In rooms where, for one reason or another, it is not possible to install traditional radiators for wall mounting. This often happens in houses where the walls are made of loose material (aerated concrete, foam concrete) or covered with plasterboard. Even light aluminum appliances cannot be hung on them.
- In shop windows and shopping centers, low floor heating radiators are used for panoramic windows. Such glazing cannot be left without a thermal curtain, because condensation will accumulate on the windows and ice will form.
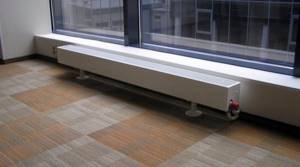
Unlike wall-mounted heating units, floor-standing radiators are installed only on the floor and are not mounted on walls. The height of these devices is less than that of their sectional counterparts. The stand for the unit is rigidly attached to the floor.
Advantages and disadvantages
The advantages of low heating radiators include the following:
- the unit can be mounted anywhere, regardless of the height of the windows;
- a low heating device saves free space in the room;
- Thanks to its stylish design and attractive appearance, the battery does not spoil the interior of the room and fits into any room design;
- can be installed in a room with panoramic windows to create a thermal curtain in front of them;
- during installation, the material and strength of the walls does not matter, because the batteries are not attached to them.

Such heating devices also have disadvantages, they are as follows:
- To connect the battery to the heating system, you need to lay pipes in the floor screed, because they will interfere with the placement of furniture. Hidden installation of pipelines is considered not the best option, because it is more difficult to maintain and repair networks.
- The heat from these heating devices is distributed unevenly, so the unit is not suitable for heating rooms of considerable height. In this case, some areas of the room may not be heated at all.
- Due to the hidden installation of pipelines, the floor screed in the room is made to a certain height, which creates difficulties when attaching radiators.
A significant disadvantage of floor heating units is that they are more expensive than sectional wall-mounted radiators, and they heat the room worse.
Types of floor batteries
All horizontal heating radiators that are mounted on the floor are divided into several types depending on the material used:
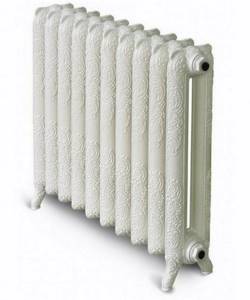
Cast iron batteries were widely used in the last century, but they cannot boast of aesthetic appeal. Their main disadvantage is that the inside of the structure quickly silts up, so it needs to be cleaned regularly (about once every three years). When subjected to mechanical stress, cast iron can crack. The same thing happens with water hammer. Steel radiators are more popular today. They are quite durable and visually attractive. However, steel plate devices often leak in the weld area. The most reliable and beautiful bimetallic units. There is a steel core inside the aluminum body. Thanks to this, the heat transfer of the device is quite high, and optimal strength allows them to be installed in centralized networks with high pressure. Aluminum batteries are the lightest, but they are not designed for high pressure in the network, therefore they are used only in autonomous systems
It is important to carefully select the material of pipes and fittings, because aluminum forms galvanic couples with some metals.
By design, floor-standing units can be panel or sectional. Panel batteries are made only from steel, while sectional batteries are made from bimetal, cast iron or aluminum. In addition, all heating devices come in different heights.
Proper heating of a room with panoramic windows
There are several effective types of heating rooms with panoramic windows. Among them there are both more expensive and affordable options. Let's consider four main types of heating devices:
- One of the most stylish, convenient and efficient types of heating is the use of in-floor convectors.
- Floor-standing convector-type radiators, which are lower in height than conventional radiators.
- Tall batteries are vertical radiators, installed on the side of the glass unit.
- Heating with baseboard convectors.
Next, we propose to dwell in more detail on each type of heating.
Installation
Calculation
So, we have made our choice. How to calculate bimetallic heating radiators according to the parameters of your apartment?
With standard (2.5 - 2.7 meters) ceiling heights, you can use the simplest calculation scheme:
- For 1 square meter of room, 100 watts of heat is taken;
- Depending on the climatic zone, a coefficient from 0.7 (Crimea) to 2.0 (Yakutia) is used;
Low winter temperatures increase the need for heat.
The heat output of the section is estimated on average at 180 watts.
So, for the Moscow region you can use a regional coefficient of 1.2; for a room with an area of 25 meters, 25 * 100 * 1.2 = 3000 watts of heat will be required, which corresponds to 3000/180 = 17 (rounded) sections.
Fastening
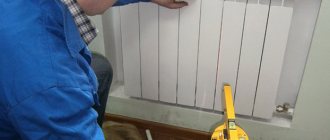
How to hang a bimetallic radiator on the wall?
- Standardly, pin brackets are used for fastening, which are screwed into plastic dowels;
- Instead, you can use pieces of smooth steel reinforcement with a diameter of 10-12 mm, driven into pre-drilled holes of a slightly smaller diameter.
Harness
What components for bimetallic radiators will be needed when installing them yourself?
- Set of radiator plugs (4 pieces, external thread DN25). The diameter of the internal thread of the passage plugs is determined by the number of sections of the device: if there are fewer than 10 of them, a liner with a nominal diameter of DN15 is sufficient, if more, it is better to take plugs with an internal thread of DN20;
- Throttle or thermal head and ball valve with American connectors for connecting to plugs. The throttle will allow you to regulate the heat transfer of the device manually, the thermal head – automatically, depending on the air temperature in the room;
- In the apartment at the top of the riser, the radiator will have to be equipped with a Mayevsky valve to bleed air.
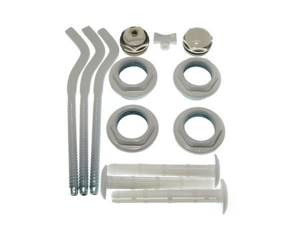
Radiator connection kit.
What pipes should I use for connection? Preferably corrugated stainless steel.
What is this instruction related to?
They have high tensile strength;
- They bend with a minimum radius and do not require precise sizing;
- They are mounted with compression fittings using a pair of adjustable wrenches.
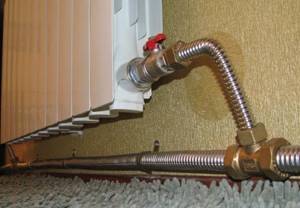
The radiator in the photo is connected with a corrugated stainless pipe.
Assembly Tips
Radiator plugs are sealed with paronite or silicone gaskets - the same ones that are used to build up a bimetallic radiator with additional sections.
Other connections are wound with Tangit Unilok sealant thread or flax with paint.
If the radiator is long (from 10 sections), use a diagonal connection rather than a lateral one. Then you won’t have to guess why bimetallic radiators do not heat along their entire length: with a side connection, the coolant will circulate only through the first sections from the supply line.
A diagonal connection will allow you to heat the maximum number of sections.