“The most important thing is the weather in the house,” and it is impossible to imagine it without high-quality heating. However, the usual wall heaters are not always enough, and you want to literally feel the warmth with your whole body. And if wearing grandma’s woolen socks all day doesn’t seem like the best solution, then why not consider the option of heating the floor itself and how to lay a water-heated floor pipe?
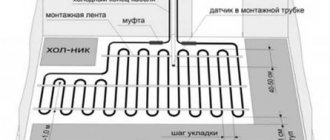
Installation diagrams for water heated floors
The layout of the heated floor pipe can be made using a “snake”, “snail” or a combination.
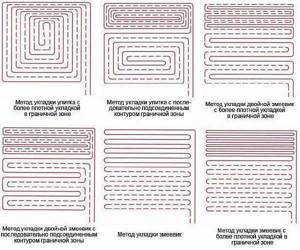
Laying a water circuit with a snake is the simplest. It is carried out in loops. This installation scheme is optimal in a room divided into functional zones in which it is planned to use different temperature regimes.
When the first loop is mounted around the perimeter of the room, and a single snake is launched inside it, then half the area will be sufficiently heated by hot water. In another part of the room, the cooled coolant will circulate. Therefore, it will be cool in it.
Another variation of this scheme is used - a double snake. With it, the supply and return water branches run side by side throughout the room.
The third variation of this scheme is the distribution of turns using an angular snake. It is used in corner rooms when two walls are external.
The coils of the snake can be installed evenly. However, the bends of the water loops in this case will be very curved.
The advantage of the scheme is that the layout of the heated floor pipe with a snake is simple. It is easy to plan and install.
Minuses:
- temperature difference in one room;
- the pipeline bends are excessively sharp, which can lead to kinks if the laying step is small.
Installing a water floor with a snail is also called a “shell” or “spiral”. With this scheme, the supply and return branches are mounted across the entire area of the room and run in a spiral parallel to each other. Installation is carried out from the perimeter of the walls to the middle of the room.
The supply branch in the center of the room ends with a loop. From it, a return line is installed in parallel with your own hands and runs from the middle of the room along its perimeter further to the collector. When there is a cold external wall in the room, a double snail can be laid along it.
Laying heated floor pipes with a snail has the following advantages:
- The room warms up evenly.
- The hydraulic resistance in the system is low.
- Installing a shell requires less material consumption than snakes.
- The bends of the turns are smooth, thanks to this the step between the turns can be made smaller.
The disadvantage of the snail is complex planning and labor-intensive installation.
Not all rooms have a rectangular configuration, and the room may also have two external cold walls. To keep it warm there, you can use combined laying of contours with your own hands.
To make the room warmer along the outer walls, loops of supply pipes are placed there. It is best to mount them almost at an angle of 90º to each other.
System installation options: description and characteristics
Before studying the technology of how to lay a heated floor with a snail, you should familiarize yourself with the features and options for such a design arrangement.
Today, the spiral (snail) method remains the most popular, and it can be reproduced at home without prior preparation.
The advantages of such installation include the following benefits of arranging the structure using a spiral pipe laying method:
- uniform heat distribution throughout the coolant with high-quality heating of the floor covering;
- reduced level of heat loss, ensured by a closed system of coolant circulation throughout the system;
- preventing the formation of so-called heat pits, leading to uneven heat distribution;
- the length of the pipe laying step is adjusted depending on the drawn up project and preliminary calculations of the system;
- the possibility of arranging a double spiral to maximize the use of coolant and reduce heat loss;
- minimal pipe bending guarantees their long service life without the need for repair work.
Experienced craftsmen consider the spiral method of laying heated floors to be the least labor-intensive and most effective solutions.
This economical and efficient option in terms of heat transfer parameters is used for arranging large and small rooms, separate functional areas (next to windows, on the balcony or in the bathroom, near the bed).
Preparatory work
First step
Remove the old screed to the very base. Make sure that surface differences do not exceed 1 cm.
Remove the old screed
Place a layer of waterproofing material on a thoroughly cleaned surface.
Waterproofing
Third step
Attach damper tape around the perimeter of the room. If your system consists of several circuits, the tape must also be laid along the line between these circuits.
Attach damper tape around the perimeter of the room
Fourth step
Insulate the base. Thermal insulation material, as well as the insulation procedure, is selected individually in accordance with the conditions of a particular situation.
So, if the system is used as a supplement to the main heating, it will be enough to lay foil polyethylene.
Insulation with foil polyethylene foam
In most situations, foam plastic or other suitable material is used as a thermal insulation material.
Also available for sale are insulation materials designed specifically for installation in combination with underfloor heating pipes. Their structure already contains channels for laying pipes.
Fifth step
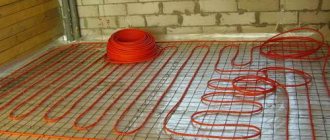
Lay reinforcing mesh over the thermal insulation. It will help increase the strength of the screed with which you fill the pipes.
Place reinforcing mesh over the thermal insulation
In this case, the system pipes can be attached directly to the mesh, eliminating the need to use special clips and strips. In this case, ordinary plastic ties can be used for fastening.
Fastening pipes to the mesh with plastic ties
Pipe laying length
When laying out the pipe, the length of the contour itself is important. If you make a spiral or snake that is too long, the pump simply will not be able to push through the circuit.
Therefore, it is important to follow two rules:
- The length of one circuit should not exceed 80-100 meters. That's right, not tough. That is, if you slightly exceed the length, this does not mean that everything will become bad. It's just better not to do this again.
- It is advisable to make all contours similar in length
To calculate the length, follow the following table:
| Pipe diameter (mm) | Pipe material | Allowable length (meter) |
| 16 | metal-plastic | 80 ÷ 100 |
| 18 | cross-linked polyethylene | 80 ÷ 120 |
| 20 | metal-plastic | 120 ÷ 150 |
Preparatory work
The preparation stage begins with measurements and calculations to determine the power of the system. The location of the room, its area, and the presence of a balcony are taken into account. When the apartment is located on the ground floor, or has an unglazed balcony, heat loss is higher. Therefore, the power of the water floor should be greater.
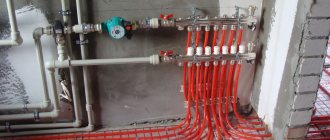
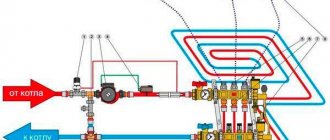
Collector connection
Initially, a niche in the wall is prepared for the collector. The distribution manifold is installed in a special cabinet into which all the necessary piping is supplied. When purchasing a collector, you need to consider the number of possible connections. Shut-off valves, an air vent and the necessary splitters are installed together with the manifold. For proper circulation of water, a pump is installed on the pipeline.
Video - Installation of heated floors. Collector installation
When the installation of the distribution manifold is completed, you can begin preparing the subfloor surface. Completely remove the old floor covering, clean it of small debris and chips. Check the floor level; unevenness in the base must be eliminated. For significant defects, additional leveling with a cement screed may be required.
Collector connection diagram
The choice of a ready-made mechanical or automatic collector model depends on the characteristics of the heating system.
The first type of control module is recommended to be installed for heated floors without a radiator, the second can be used in all other cases.
According to the diagram, the assembly of the distribution comb for heated floors is carried out as follows:
- Installation of the frame. The following can be selected as the installation area for the collector: a prepared niche in the wall or a collector cabinet. It is also possible to mount directly to the wall. However, the location must be strictly horizontal.
- Connection to the boiler. The supply pipeline is located at the bottom, the return pipeline is located at the top. Ball valves must be installed in front of the frame. They will be followed by a pump group.
- Installation of a bypass valve with a temperature limiter. After this, the collector is installed.
- Hydraulic test of the system. Check by connecting to a pump, which helps build up pressure in the heating system.
In a mixing unit, one of the required elements is a two- or three-way valve. This device mixes water flows of different temperatures and redistributes the trajectory of their movement.
If servo drives are used to control the manifold thermostats, then the mixing unit equipment is expanded with a bypass and bypass valve.
Semi-dry floor screed price per square meter with materials
If you decide to hire workers, then with mechanized work such pleasure will cost you from 400 to 59,600 rubles. But the price is determined by two parameters: the cost of work and materials.
Thus, to screed 1 m2 you need to spend 600-700 rubles. In addition, you also need to purchase fiber, which comes out to 20 rubles per m2.
This is an excellent option for obtaining a durable, smooth and high-quality floor. Now you don’t need to spend money on expensive mixtures or wait until the concrete mixture has dried.
Conclusions and useful video on the topic
How not to make a mistake when calculating the optimal step for arranging a circuit at the lowest cost:
How to lay the contour of heated floors, the main methods, their disadvantages and advantages:
Difficulties that you may encounter when choosing pipes for a warm water floor:
The service life of the water heating circuit is about 50 years. However, such high performance is only possible if you adhere to all the rules when laying them.
Typical errors of combined systems
The desire to save money leads to various variations of the proposed schemes. In the process of simplification, sometimes important elements are excluded and the heating system ends up looking like this:
But it’s still wrong to do this because:
- In this scheme there is no decoupling (independence) of the two remaining pumps of boiler 1 and the heated floor circuit 3, because they are connected to the common points of the circuit A and B, between which there is a large hydraulic resistance. In contrast to the circuit with a hydraulic arrow, where there is very little resistance between points A and B (D and C) (that’s why it’s a hydraulic separator).
- In some situations (when all radiators are closed and the heated floor is running), the boiler pump and the underfloor heating pump work sequentially, interfering with each other. This leads to changes in the coolant flow through the boiler heat exchanger.
- In situations where both radiators and underfloor heating are operating, the underfloor heating pump 3, at certain positions of the mixing valve 2, reduces the pressure difference between points A and B and thereby reduces the coolant circulation through the radiator circuit.
- And if boiler 1 stops, underfloor heating pump 3 still drives coolant through the boiler and through the radiator circuit, creating parasitic circulation. And if parasitic circulation through the radiator circuit can be dealt with by installing a check valve (at point A towards the radiators), then parasitic circulation through the boiler cannot be dealt with.
- Because If you did not install the protective thermostat 6, then in emergency situations (for example, a mixing valve is jammed) if too hot coolant (over 55°C) gets into the heated floor pipes, destruction of the floor screed and floor covering may occur. And the pipes won’t say thank you if you apply 80 degrees into them.
- Due to the fact that there is no bypass valve in the heated floor circuit, when all the heated floor loops are closed (automatically or simply with playful hands), the coolant circulation in the circuit stops and pump 3, which, of course, no one turned off (well, they forgot, with whoever it is) works on a closed valve and heats up. Of course, a good circulation pump like Grundfos UPS 25-40(60) can probably work for a year in this mode, but sooner or later it will fail.
A protective (safety) thermostat is always needed.
But you don’t need to install a bypass valve when:
- at least one floor loop will always be open;
- or the circulation pump will be frequency controlled;
- or automatic control of heating circuits can also control the circulation pump, turning it off when all the loops of the heated floor are closed.
Based on the shortcomings of the modified circuit, we urge you not to use it when installing a mixed heating system at home.
The nuances of choosing the optimal step
The degree of efficiency and cost of the entire circuit depends on the correct choice of the pitch between the laid heated floor pipes.
However, its calculation depends on many factors. The standard distance between contours is 100-200 mm.
Variable or constant pitch is also possible:
- If the heating load is less than 50 W per 1 m 2, the circuit pitch will be constant and equal to 200 mm.
- With an increased heating load of 80 W per 1 m2 or more, the distance will be 150 mm.
- In other cases, it is necessary to use a variable step. For example, along the perimeter of one or two external walls, the water circuit will be laid in a smallest increment of 100 mm. Moving to the center of the room, the gaps will gradually increase to 200 mm.
In practice, if you plan to heat underfloor heating economically, a step of 150 mm is used. This indicator is optimal in almost any conditions.
If the heat loss of a building exceeds the heat transfer, it is worth thinking about its effective insulation - in this case, reducing the pitch will not solve the problem.
A detailed algorithm for calculating pipes for heated floors is described in this article.
Materials for heated water floors
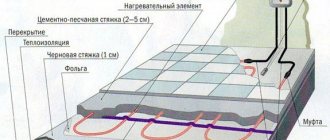
Most often they make a water heated floor in a screed. We will talk about its structure and necessary materials. The diagram of a warm water floor is shown in the photo below.
Scheme of a warm water floor with screed
All work begins with leveling the base: without insulation, heating costs will be too high, and insulation can only be laid on a flat surface. Therefore, the first thing to do is prepare the base - make a rough screed. Next, we will describe step by step the order of work and the materials used in the process:
- A damper tape is also rolled out around the perimeter of the room. This is a strip of thermal insulation material, no more than 1 cm thick. It prevents heat loss from heating the walls. Its second task is to compensate for the thermal expansion that occurs when materials are heated. The tape can be special, or you can also lay thin foam plastic cut into strips (no more than 1 cm thick) or other insulation of the same thickness.
- A layer of heat-insulating materials is laid on the rough screed. For underfloor heating, the best choice is polystyrene foam. Extruded is best. Its density must be at least 35 kg/m&span2;. It is dense enough to withstand the weight of the screed and operating loads, has excellent characteristics and a long service life. Its disadvantage is that it is expensive. Other, cheaper materials (foam plastic, mineral wool, expanded clay) have a lot of disadvantages. If possible, use polystyrene foam. The thickness of thermal insulation depends on many parameters - on the region, characteristics of the foundation material and insulation, and the method of organizing the subfloor. Therefore, it must be calculated in relation to each case.
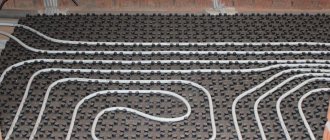
- Next, a reinforcing mesh is often placed in increments of 5 cm. Pipes are also tied to it - with wire or plastic clamps. If expanded polystyrene was used, you can do without reinforcement - you can fasten it with special plastic brackets, which are driven into the material. For other insulation materials, reinforcing mesh is required.
- Beacons are installed on top, after which the screed is poured. Its thickness is less than 3 cm above the level of the pipes.
- Next, the finished floor covering is laid. Any suitable for use in a heated floor system.
These are all the main layers that need to be laid when you make a water-heated floor with your own hands.
Pipes for heated floors and installation schemes
The main element of the system is pipes. Most often they use polymer ones - made of cross-linked polyethylene or metal-plastic. They bend well and have a long service life. Their only obvious drawback is their not very high thermal conductivity. The recently introduced corrugated stainless steel pipes do not have this disadvantage. They bend better, cost no more, but due to their lack of popularity, they are not yet used often.
The diameter of the pipes for heated floors depends on the material, but usually it is 16-20 mm. They are stacked according to several schemes. The most common are spiral and snake; there are several modifications that take into account some of the features of the premises.
Schemes for laying pipes for a warm water floor
Laying with a snake is the simplest, but as the coolant passes through the pipes it gradually cools down and reaches the end of the circuit much colder than it was at the beginning. Therefore, the zone where the coolant enters will be the warmest. This feature is used - installation begins from the coldest zone - along the external walls or under the window.
The double snake and spiral are almost free of this drawback, but they are more difficult to install - you need to draw a diagram on paper so as not to get confused during installation.
Screed
You can use a regular cement-sand mortar based on Portland cement to fill a water-heated floor. The grade of Portland cement should be high - M-400, or better yet M-500. Concrete grade - not lower than M-300.
Semi-dry screed for heated floors
But ordinary “wet” screeds take a very long time to gain their design strength: at least 28 days. You can’t turn on the heated floor all this time: cracks will appear that can even break the pipes. Therefore, so-called semi-dry screeds are increasingly being used - with additives that increase the plasticity of the solution, significantly reducing the amount of water and the time for “aging”. You can add them yourself or look for dry mixtures with the appropriate properties. They cost more, but there is less hassle with them: according to the instructions, add the required amount of water and mix.
It’s quite possible to make a heated water floor with your own hands, but it will take a decent amount of time and a lot of money.
Pipe length calculation
To calculate how much pipe is needed for a warm water floor, use the following formula:
S/ H x 1.1 + D x 2 = L
Latest publications:
- How to store longer in the refrigerator: dill, parsley, lettuce, arugula, spinach and the rest
- 12 ways: How to cool a room or apartment in the heat without air conditioning. Survival tips.
- Why do the side walls of the refrigerator heat up, how to find the problem and what to do
- Why water accumulates under the vegetable drawers in the refrigerator and what to do
- Mini air conditioner Arctic Air: reviews, deception of sellers and principle of operation
In this formula (all values in meters):
- L – Required length of pipes;
- S – Room area;
- H – Pipe spacing;
- D – Distance from the room to the collector.
The coefficient 1.1 in the formula is the required margin of 10%. When laying the floor, there may be unused scraps, incorrectly cut or incorrectly measured pieces of pipe. To take them into account you need to add this 10%.
The distance between the underfloor heating pipes depends on the diameter of the pipes and the heat demand. If you want to do the calculation yourself, you can use this table:
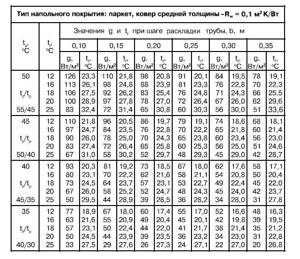
Table of heat transfer of a heated water floor depending on the diameter of the pipes and the laying pitch. An example of calculating the length of pipes for a heated floor
- Room length 4 meters;
- The width of the room is 3.5 meters;
- The distance between the pipes is 20 cm;
- The distance to the collector is 2.5 meters.
We calculate the area of the room: 4 x 3.5 = 14 sq.m.
We substitute the values into the formula and get: 14 / 0.2 x 1.1 + 2.5 x 2 = 82 linear meters of pipes.
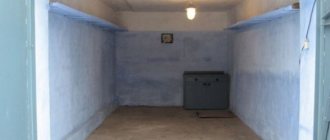
Preparing the soil for the pie
Installing a floor on the ground should begin with cultivating a plot of land. An important point is the presence of groundwater and its depth, because the risk of foundation flooding depends on this. It is better to make drainage, it will remove water from the structure.
Work should begin by removing a layer of earth, 30 - 35 cm below the surface of the future finishing floor. This is done without fail.
Having removed all debris and stones, the soil is compacted and leveled.
Then sand is poured around the entire perimeter, which is also compacted well by adding liquid, and leveled using a level.
In the absence of a large amount of groundwater, bedding material is placed on this layer. Otherwise, it is replaced with geotextiles, which will prevent moisture from penetrating above.
The next layer is crushed stone; it has a low degree of thermal conductivity. Fractions should be small or medium. It should be compacted carefully; it should almost become a monolith.
After this, a layer of cement mixture is poured, it also serves as additional insulation. Its thickness should be 4 - 5 cm, so that the composition does not spread, it must be protected with slats.
We wait until the mixture hardens, moistening it periodically. This screed can be replaced with an alternative option - profiled membranes; this method will significantly reduce the installation time of the floor.
Basic methods of pipe installation
There are only two methods of laying pipes for arranging a heated floor - flooring and concrete. In the first method, ready-made materials are used for the base: polystyrene insulation and modular or slatted panels. There are no wet jobs that require a long drying time, so installation is quick.
When using the second option, the heating network is walled up with a screed. Depending on the thickness of the concrete, the time it takes for it to dry completely is calculated. It will take 28 days to harden and only after that is it possible to install the selected floor covering. This is the most labor-intensive and financially expensive method.
#1: Laying on profile thermal insulation boards
Arranging a warm floor system using this method is the simplest. Polystyrene insulation mats are used as the basis here.
The standard parameters of such slabs are 30*100*3 cm. They have grooves and low posts on which the finishing material is laid.
In this case, pouring a concrete screed is not necessary. If tiles or linoleum are used for flooring, gypsum fiber sheets will initially be laid on the base. The thickness of such plates should be at least 2 cm.
#2: Device using modular and rack panels
In most cases, such panels are used in houses built from wood. Fastening of pipes for arranging a heated floor is carried out on a rough foundation.
The modular system is equipped with chipboard panels 2.2 cm thick, on which the heating lines are laid. These modules are equipped with channels to accommodate aluminum fixing plates. With this installation method, the insulation layer will be located in the wooden floor.
All strips are placed with a distance of 2 cm. Based on the applied pitch between the pipes, strips of the appropriate length (15–30 cm) and width (13–28 cm) are used.
To reduce heat loss, pipe latches are installed on the plates. If linoleum was chosen for the final floor covering, one layer of gypsum fiber boards is laid on the pipes; if laminate or parquet boards are used, they are dispensed with.
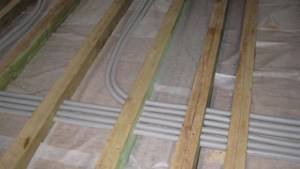
The slatted flooring system is almost identical to the modular one, however, it does not use panels, but strips, the minimum width of which is 2.8 cm.
Laying is done directly on the logs in increments of 40-60 cm, and the distance between the slats is at least 2 cm. For thermal insulation, extruded polystyrene foam or fibrous mineral wool is chosen.
Both methods are more suitable for wooden floors. In other cases, a more complex option with a concrete screed is chosen.
#3: Installation of pipeline with screed
Despite the labor-intensive process, installation of a heating network with a concrete screed is the most popular.
The process consists of the following steps:
- First of all, the base is prepared. Irregularities in the subfloor are eliminated using a hammer drill.
- The first layer is waterproofing material. It is spread in strips so that the edges overlap each other by 20–30 cm. The film should also extend to the base of the walls by 15 cm. The joints are glued with construction tape.
- Thermal insulation is laid over it.
- A damper tape is glued between the future fill and the walls. This action is required to compensate for the expansion of the screed when the floors are heated.
- Laying reinforcing mesh. It helps to increase the strength of the screed.
- Pipes are attached to the fittings according to the chosen pattern using plastic ties.
- A control check of the heated floor system is carried out by filling it with liquid and pressing it.
- Next, the guide beacons are installed.
- The final stage is pouring the cement screed.
For rooms with a large area, the sector division method should be used, with cells no more than 30 m2. For each of them it is necessary to arrange an individual circuit.
If the lower floor is heated, then polystyrene foam with a thickness of 20–50 mm is used as insulation. When there is an unheated basement floor or basement below, the thickness of the thermal insulation should be 50-100 mm. Pouring heated floors with a concrete-sand mixture can be done with or without a reinforcing mesh.
If polystyrene foam boards with connectors for the contours act as insulation, the use of a mesh is not necessary.
When standard thermal insulation material is used, a thin polymer or metal mesh is used to fix the heat-conducting line.
On our website there is a series of articles devoted to the design, installation and connection of water heated floors.
Water circuit installation diagrams
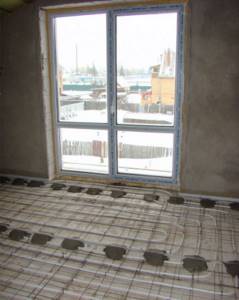
If the installation of warm water floors is carried out using a well-established, traditional technology in a clear sequence, then the installation of a heating pipe can be carried out in various variations. The main goal pursued when installing heated floors is to uniformly heat the entire area of the heated room. Laying a pipeline just the way you want means deliberately creating problem areas throughout the entire structure. The coolant tends to quickly lose temperature as it flows, so the pipes must be laid starting from the walls, then moving towards the entrance to the room or to its center. For this purpose, specially developed optimal schemes for laying the water circuit, each of which has its own characteristics.
The mixing unit and manifold are the beginning of the entire heating system. Water circuits are connected in a clear sequence. The beginning of the pipeline is to the inlet pipe, the end of the pipe is connected to the check valve.
You can install a warm water floor with your own hands, the contour of which will be laid as follows:
- pipe installation according to the snake pattern"
- laying the pipeline according to the snail pattern;
- combined scheme.
When installing heating in corner rooms, a pipe laying scheme is used for enhanced heating.
In each individual case, we can talk about the advantages of one or another scheme. For example: a snail is the simplest circuit. The bend of the pipe here reaches 900, while in a snake the heating pipe will be bent by 1800.
Where heated rooms have a linear slope, it is better to install the pipe according to the “snake” pattern. The pipeline is laid in the direction from the mixing unit towards the slope. Air pockets in this version can be easily removed, which cannot be said about a pipe laid in a snail pattern. In sloping rooms, removing air pockets can be problematic.
For large premises where it is necessary to use several water circuits of the same length for heating, the “snake” pipeline laying scheme is very convenient. Thanks to this installation method, it is possible to achieve balanced operation of the entire heating system.
Heating pipes laid on a prepared base are connected to a manifold that distributes the supply of coolant to the system. The distribution cabinet together with the mixing unit is installed either in the heated room or next to it, which significantly reduces the number of pipes and the consumption of other materials. The bends of the water pipe at the point of connection to the collector are sewn into a special protective box.
In each individual case, a certain order of laying the water pipe should be followed. When working with a snail circuit, the pipe is first laid along the perimeter of the walls, after which a turn follows from the farthest wall. In the opposite direction, the pipe is laid in a spiral, reaching the center of the heated room. For the snake circuit, the water circuit is laid out as follows. The pipe is laid along the perimeter of the walls, after which uniform bends are made in the opposite direction.
The combined installation schemes of heating pipes for heated floors, used in some cases, involve the simultaneous use of both options. One half of the room can be heated by a water circuit laid in a snake pattern, while the other part of the room will be heated by a pipe mounted in a snail pattern.
The role of the collector unit
Not everyone knows that heated floors with a water circuit can function normally without a collector. But even less people know what this looks like in practice.
However, in most cases, a heated floor system is installed in several rooms. In this case, without a collector unit it is impossible to ensure uniform distribution of the coolant.
Installing floor heating without a collector has a number of disadvantages: the coolant can only be supplied at the same temperature as in a general heating system, automatic air outlet is not possible, the same applies to pressure regulation.
Water circuit installation diagrams
Schematically, laying pipes for arranging a liquid circuit can be done in one of the following ways:
- coil;
- double coil;
- snail.
Coil. The method of laying such a contour is the simplest and is performed in loops. This option will be optimal for a room divided into zones with different purposes, for which it will be convenient to use different temperature conditions.
The first loop is installed around the perimeter of the room, then a single snake is inserted inside. Thus, a maximally heated coolant will circulate in one half of the room, while a cooled one will circulate in the other, and accordingly the temperature will be different.
The coil turns can be spaced evenly, but the bends of the water circuits in this case will have strong creases.
The serpentine pipe placement method is ideal for rooms with little heat loss. They are used not only for apartments and private houses, but also for industrial facilities where there is a need to heat all year round
Double coil. In this case, the supply and return circuits are located next to each other throughout the room.
Angle coil. It is used exclusively for corner rooms where there are two external walls.
The advantages of the serpentine shape include simple planning and installation. Disadvantages: temperature changes in one room, pipe bends are quite sharp, so you cannot use a small pitch - this can cause a pipe break.
When laying the contour in the edge zones of the room (floor areas where external walls, windows, doors are located), the pitch should be smaller in comparison with other turns - 100-150 mm
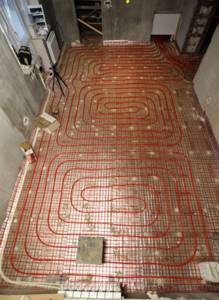
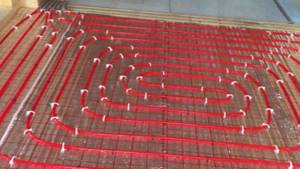
Snail. Using this arrangement, supply and return pipes are installed throughout the room. They are placed parallel to each other and installed starting from the perimeter of the walls and moving to the center of the room.
The supply line in the middle of the room ends in a loop. Next, parallel to it, a return line is installed, which is laid from the center of the room and along its perimeter, moving towards the collector.
The presence of an external wall in the room may require double laying of pipes along it.
Due to the alternation of two lines when laying using the snail method, temperature fluctuations in the supply and return lines can be up to 10 °C
The advantages of this method include: uniform heating of the room; due to smooth bends, the system has little hydraulic resistance, and savings in consumables can reach 15% compared to the serpentine method. However, there are also disadvantages - complex design and installation.
Is it possible to lay a heated floor with a snake?
When laying with a snake, the greatest heat losses are observed due to the fact that heated water is supplied only from one side and loses all energy when it reaches the end of the circuit.
You can observe a hot floor at one end of the room and a gradual decrease in temperature as you move away from the coolant mixing unit.
Another disadvantage of laying using the snake method is the difficulty of installation:
The temperature difference in such a system can be reduced by making a double snake (also called a “meander”). But this will not solve the issue of the complexity of installing the water floor circuit.
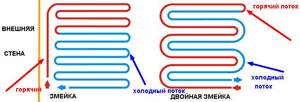
Options for laying heated floors - snake and double snake
The best option would be to combine a snake with another styling method. In this way, the energy distribution can be made more uniform and the temperature difference will not be so noticeable.
Formwork
The formwork can be installed immediately after excavation - then the sand and gravel will be compacted in it. In the example, the formwork is installed using a ready-made “cushion”.
Step-by-step instructions for formwork will be as follows:
- Mark the area using a cord (you can use the markings made when excavating the earth).
- Install wooden pegs around the perimeter (outside the cord) at intervals of 1.5–2 m.
- Install the sides of the formwork between the cord and the pegs - they can be screwed on with self-tapping screws or nailed. The horizontal position of the sides and the consistency of the slope are controlled using a building level.
It makes sense to strengthen the junctions of the boards with the pegs and the corners of the formwork from the outside - using wooden or metal “corners”.
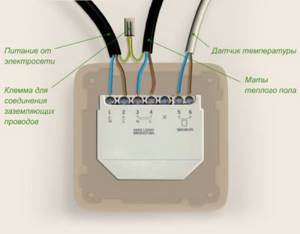
Features of connecting the electrical system
Electric underfloor heating is more often used as inter-seasonal heating and is used when central heating is not yet turned on. Its main advantages include:
- Simplicity and speed of installation;
- No need for “wet” processes;
- Relatively low cost;
- Slight rise in floor level.
Unfortunately, there are also disadvantages:
- Electromagnetic radiation - according to manufacturers, it is within normal limits, but additional shielding will not hurt;
- High cost of operation - electricity is much more expensive than other types of fuel;
- Load on indoor wiring.
What cables can I use?
The main heating element of such a system is a special cable, which is laid on the floor like a snake and attached to the mounting tape. The connection diagram depends on which cable you chose:
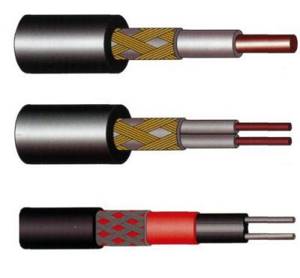
- Single-core resistive is the cheapest and simplest type of cable in design. It is a heating core through which current passes. In this case, most of the electricity is converted into heat. The main feature of this type of cable is the need to connect both ends to the mains, which is not always convenient.
- Self-regulating cable - here it is not the current-carrying conductors that are heated, but special polymer couplings. This cable can rightfully be called the most convenient to use, but also the most expensive.
- Two-core resistive - in addition to the heating core, this cable also contains a conductive one. This will allow you to connect it to the network at only one end, and somewhat reduces the level of the magnetic field.
Please note that laying resistive cables on areas of the floor that will be filled with furniture is strictly prohibited. This will inevitably lead to overheating of the system and failure.
Connecting sensors and thermostats
The distance between turns is determined based on the required specific heating power and cable power. After laying the cable, we install the floor temperature sensor, having previously protected it with a corrugated tube.
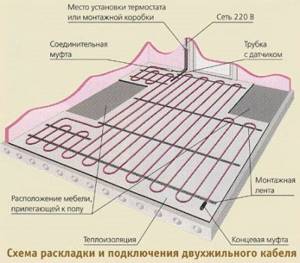
The sensor is installed in the middle between the turns of the cable at a distance of 0.5 m to a meter from the wall. We place a vertical piece of wire connecting the sensor to the thermostat in the groove.
The first voltage supply to the underfloor heating cables should be made only after the concrete has completely dried - no earlier than after 28 days.
We hope that with the help of this material you figured out how to connect everything correctly yourself. If you still have any questions, we suggest you look at our other articles, or, if you don’t want to do everything yourself, seek help from highly qualified specialists.
Brick barn
The technology for building a brick shed repeats the same steps as in previous cases. They make the foundation. Brickwork is laid on it with cement mortar. The roof frame is wooden, the flooring can be of any kind. Such sheds are durable. These are reliable utility rooms that will not harbor mice or insect-like pests if the foundation is poured with concrete. The only thing you need to take into account is the thickness of the walls. To keep the barn dry and warm, the walls must be at least 80 cm wide.
Beautiful neat brick barn decorated with stone mosaicsSource newleaflandscapesuk.co.uk
Are you installing heated floors?
Now everyone can calculate with an accuracy of a few centimeters. Even a layman!

Convenient and familiar
The program does not require special training. I opened it and started drawing the project: nothing complicated!

Accurate calculations
As a result, you will always know how much material you need to buy - a good opportunity to save!
Printout of results
There is no need to rewrite calculations in a notebook. Just print it out!

Your plans are safe
The program saves your calculations even if something happens

Instant project estimate
within half an hour, right on site, after taking measurements, create a plan, sketch out the loops of heated floors and get a preliminary estimate

Anyone can figure it out!
There is no need to study any specialized CAD, which, although it allows a lot, requires lengthy training

Secure storage
Each user is allocated a file storage for storing projects. Access to the storage from any computer using a key

Many layers
The program allows you to lay out objects on an unlimited number of layers, you can turn on/off the display of individual layers
Snail - quick and simple layout of underfloor heating loops
An easy and simple program for calculations when laying heated floors. Useful for both professionals and independent builders. Allows you to significantly speed up planning and save on material
The program allows you to quickly and conveniently draw the loops of a heated floor, while the drawing occurs on a grid, which is set when creating a new project - and after that, the design occurs with reference to this grid, which allows you to avoid arbitrary bends that are impossible when performing work. It comes out quite quickly and accurately - after all, you always hit the right node and don’t need to aim.
In addition to loops, the program has the ability to draw rooms - this is done so that you can quickly calculate the area of the room in which the installation will be done, and also in order to know the amount of substrate that will be used. Substrates come in different types: either metal mesh, plastic, or special options. The snail allows you to estimate upcoming financial costs with sufficient accuracy.
Within half an hour, a specialist, being right on site, will take measurements and build a floor plan , sketch out the loops of heated floors and receive a preliminary estimate - that is, everything is very quickly. There is no need to study any specialized CAD systems, which, although they allow a lot, require a long training - in order to start drawing even primitive heated floors in a bathroom, you need to master this system for more than one year! When creating a loop , the color thickness of the line - important routes are made easily distinguishable. The program provides a dynamic estimate - when calculating the estimate, you can enter the cost of a meter of pipe and immediately see the total amount .
An important function of the program is to print a project on any number of pages. The project can be printed with any detail, after which it will be printed on several pages that can be glued together to create a large diagram. Projects can be stored either locally on the user’s computer or in a cloud service : each user is allocated their own secure file storage for storing their projects. After receiving the registration key, the user will have access to his projects from any computer where this program is installed and where there is Internet access. In the future, it is planned to implement a simple viewer directly from the Internet through the user’s browser or through an Android application.