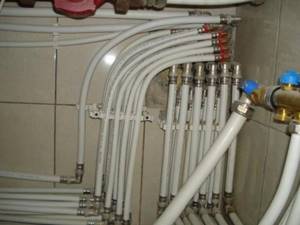
Long service life allows the use of polypropylene water pipes for any type of installation:
- hidden - in the load-bearing structures of the building and underground;
- open - on the surface of the ground, on the floor or on the wall of a living space;
- channelless laying of pipes in the ground;
- laying in mines;
- gasket in boxes.
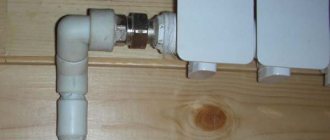
But the work must be carried out in compliance with the requirements of regulatory documents. So, for example, if we talk about laying polypropylene pipes intended for transporting water at elevated temperatures (from +45 degrees), then they should be placed on sliding fasteners that provide the possibility of longitudinal displacement. However, their installation in boxes and channels is allowed.
Helpful advice! Polypropylene water pipes can withstand bending, the value of which does not exceed 10% of the diameter. That is, in fact, they cannot be called flexible. Therefore, polypropylene pipes should be laid in the ground, in a wall or on the surface of the ground in straight sections. And to implement the necessary bends, use the appropriate bends.
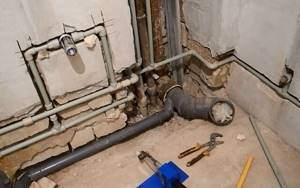
How to hide pipes in the wall
The owners’ desire to install the pipeline in this way is completely justified. The interior of the kitchen, toilet and bathroom will only benefit from this. However, questions may arise about how the walled pipes will behave and how to actually carry out the installation.
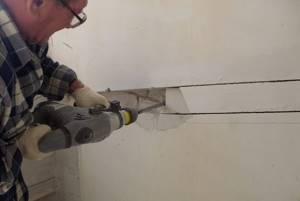
To hide pipes in the wall, grooves are made in it
Let’s immediately cast aside doubts: with the right approach to business, hidden communication will serve for a very long time. But only if the following requirements are met:
- the system should have a minimum number of connections, and it is best if it is monolithic;
- In order not to interfere with the process of natural thermal expansion of propylene, when laying a hot water pipe with your own hands, leave a gap.
Be sure to cover the water supply with a layer of thermal insulation. Mineral wool, glass wool, corrugated cardboard or other insulation are suitable for this. This way you will protect the structure from unwanted fogging. In closed engineering communications, it is very important to provide for unhindered access to valves (taps).
Usually, hatches or special doors are installed in these places.
Features of polymer products
As you know even from a school physics course, when substances are heated, they begin to increase in volume. This is directly related to plastic products, and the high temperature also makes them plastic.
When installing pipelines for cold water, you can not take into account the expansion coefficient (for more details: “Preliminary calculation of the thermal expansion of polypropylene pipes”). At the same time, when arranging a heating structure, this nuance must be taken into account. It is this circumstance that raises doubts among many home craftsmen as to whether it is possible to wall up polypropylene pipes into the wall, which will begin to lengthen and expand when the hot pipeline is started.
This raises a logical question as to whether the finishing materials in which the elements of the engineering system are embedded will be damaged.
Experts assure that metal pipe products that expand slightly can simply be embedded in a layer of material, but in order to hide polypropylene pipes in the wall, you have to fully adhere to the technology of installation work (more details: “Types, properties, installation of propylene pipes with your own hands”) . Otherwise, the finishing of the room will become covered with cracks, and the tile covering will most likely fall off.
Installation method
Marking is a preliminary stage of laying polypropylene pipes in the wall. For this you can use a simple pencil. Next you need to do the following:
- Using a hammer drill (grinder), cut two parallel grooves (slots in the wall). When working with a grinder, it is recommended to use a simple stone disc or a disc with diamond-cut teeth.
- Use a chisel or hammer to remove the material between both markings, thus joining them into one.
- Insert the plumbing structure into the finished grooves, then cover the pipes with cement mortar.
- The final stage of laying polypropylene pipes in the wall involves testing the operation of the newly created system. After filling it with water, check for leaks, sagging or other problems with the water supply system.
If no leaks are found, proceed with finishing. You can use plaster for this. However, the choice of facing material depends on the taste and level of well-being of the homeowner.
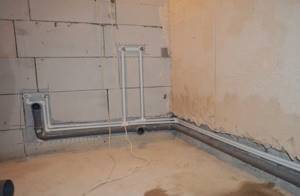
Having laid the pipes in the grooves, you need to secure them and carry out tests
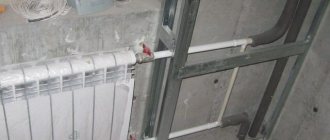
You should know that trenching walls in panel houses is strictly prohibited. This is due to the relatively small thickness of the panels, and chipping will lead to a decrease in their strength. It is permissible to carry out such work only in houses with thick brick walls. Therefore, in modern multi-storey buildings, the laying of polypropylene pipes is carried out by fastening to the wall. Let's look briefly at this issue.
Pros and cons of methods for hiding heating pipes
Plasterboard and laminate structures
Many people choose this method of hiding heating pipes in a new building with laminate, making a box out of it. In this case, the structure turns out to be designed like the floor. If, in addition to heating pipes, there are other communications in the house, it is best to hide them using a false wall made of gypsum plasterboard.
The considered method has a number of disadvantages, for example:
- not suitable for metal-plastic and polypropylene pipes. which are connected by collapsible fittings;
- if the pipe is old, putting the pipe into the box is very risky: a leak that occurs can cause a lot of trouble;
- before hiding stainless, copper and steel pipes behind a decorative box, it is better to cover them with heat-insulating material;
- false wall equipment reduces the space of the room.
But the niche created as a result of the construction of a false wall can be used to advantage. For example, by laying a layer of insulation, you can improve light and sound insulation. You can use this place for a night light or place a stereo system. Using a niche to your advantage, false wall equipment will be a completely justified option for hiding heating pipes.
Hiding highways in the wall, floor
This method of hiding heating pipes in a floor screed or in a wall is not suitable for all pipelines.
Heating pipes in the wall have pros and cons that you need to know before choosing this method of masking the line. The main advantage of the method is that the design of the room will not be disrupted or overloaded with additional details. True, there are also disadvantages. For example, the complexity of installation. If the pipe leaks, the wall will have to be demolished to make repairs.
For a private home, this is a very practical option.
Application of decorative elements
Decorative rosettes for heating pipes are an excellent option for hiding pipes.
Thus, today there are many ways to hide heating pipes in a private house. It is advisable to close the highways at the construction stage. But even after construction you can decorate the pipes. Each method has its own advantages and disadvantages. And which one to give preference depends on the type of pipeline, operating conditions and the chosen room design.
Installation of water supply to the wall
Pre-connect the segments of the future pipeline using electrofitting or polyfusion butt welding. Next, mark the path along the perimeter of the room on the walls.
Important! Install the pipeline with a slight slope. This solution will eliminate the possibility of freezing of the liquid remaining in it even if the room is not heated. We are talking, first of all, about the dacha.
The sequence of stages for laying pipes with your own hands is as follows:
- Drill holes for the dowel-nails. This is done using a drill.
- Attach the mounting clips to the wall.
- Securely secure these fastening elements. To do this, insert dowels into the holes using a hammer and screwdriver.
- Install the pipes and secure them with clips.
It is allowed to bend polypropylene products without preheating at temperatures up to +15 degrees, and installation is recommended to be carried out at a temperature not lower than +5 degrees.
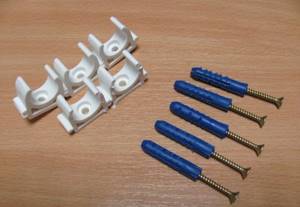
Plastic clips are used to secure pipes to the wall.
Fasteners and other materials
In addition to the pipes themselves, for installation you need to prepare in advance:
- Fastening materials:
- plastic fastening clips or clamps for polypropylene pipes of a given diameter;
- dowel-nails.
- Tools:
- hammer;
- drill;
- crosshead screwdriver;
- scissors or a knife for cutting pipes;
- roulette;
- level;
- marker.
Clips - their meaning and installation details
The clip is made from a special material - nylon. It has such useful properties as high heat resistance and resistance to mechanical stress. Among the technical characteristics of the clip, you need to pay attention to the diameter; it must correspond to the size of the outer diameter of the polypropylene pipe. Installation of clips has its own rules, the implementation of which determines the service life of the finished communication system.
The main issue that is important not to miss is the step size between the clips. If you install the clips too far apart, there is a risk of sagging at the support points.
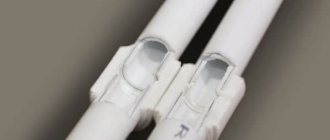
When installing a communication system with two parallel pipes, use a double clip.
In what cases are clamps used?
It is recommended to fasten polypropylene pipes to the wall using clamps in cases where it is necessary to install large-diameter pipes with a fairly heavy weight. The clamps are a design with a screw tie and a rubber internal gasket, which is necessary to compensate for vibration. Thanks to this, they reliably hold the pipe even when strong vibrations occur.
The clamps are equipped with a dowel and a pin. The mount can be made of metal or plastic. When laying polypropylene pipes, it is better to choose clamps from similar raw materials: this way you will ensure the same strength indicators for the entire structure. Installation of fastening material can be rigid or floating:
- Rigid fastening is made by tightening the clamp extremely tightly around the pipes. A rigid coupling is required in areas below the bell. Thanks to rigid fixation, the possibility of displacement of the communication system is eliminated.
- A floating mount indicates that there is a gap between the pipes and the clamp. The fastening is tightened in such a way as to allow free movement of the pipe. The mobility of the fasteners allows the pipes to expand during temperature changes.
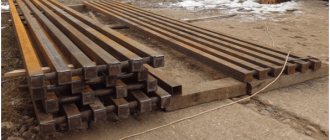
Laying in the ground
According to GOST requirements, the diameter of water pipes laid in the ground must be 32 mm, and their length - 2.4 meters. For simple and quick installation, you need to purchase fittings.
Lay the polypropylene pipe in the ground with your own hands in the following sequence:
- Dig a trench. The regulatory documents say that its depth should be below the freezing level of the soil. For your region, you can find out the specific figure from special tables. The optimal width of the ditch is 0.5 meters.
- Compact the bottom and walls of the trench.
- Make a shock-absorbing cushion by pouring 10 cm of sand.
- Wrap the pipes with a layer of thermal insulation, lay them in the ditch and connect them using fittings.
- Cover the utility lines with sand. The top mark of its layer should be 5 cm higher than the outer surface of the pipeline.
- Cover the area where the water pipe passes with tiles, tiles or broken bricks.
- Fill the trench with the excavated soil.
And don’t forget to create a well near the central highway to install shut-off valves in it. With its help, you can turn off the water in an emergency, as well as connect additional objects to the water supply. The well is usually made of brick or made of reinforced concrete rings.
Methods for preparing (drilling) walls
Before carrying out work, study the electrical wiring diagram (if it is missing, use a search detector) and make sure that the building structures used are not load-bearing.
To lay pipes in the walls, special channels are cut out for them - grooves.
To do this, first mark the water sockets to which plumbing fixtures must be connected, strictly along the vertical and horizontal levels. Then the lines from the riser through which the pipeline must pass are also connected to them at a level.
All angles are made at 90 degrees, strictly observing vertical and horizontal.
Cutting grooves in any walls is a labor-intensive operation associated with a huge amount of dust. For these purposes, professional companies or craftsmen use special wall chasers with a vacuum cleaner that immediately draws in air. Less wealthy specialists cut the grooves with a grinder or immediately knock them out with a hammer drill; with the latter method, the quality of work is below any criticism.
In any case, a hammer drill is used after cutting grooves with a disk tool on both sides of the groove to knock out the building material between them.
The depth of the groove should be such that a free space of 10–20 mm thick remains on top of the laid pipeline for sealing it with building materials. The width of the channel is also taken to be 10 - 20 mm larger than the pipe shell.
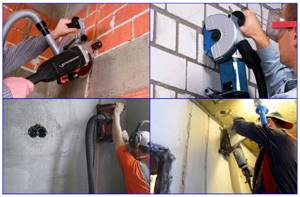
Rice. 4 Grilling walls with a wall chaser and a grinder
How to make wall grooves for pipes yourself, technology and tools . When reading information about whether polypropylene pipes can be walled into a wall, it may also be useful to read the basic requirements for hidden communications, a work plan, a tool for gating walls, as well as instructions for independent work.
Do-it-yourself installation of polypropylene pipes: technology for working with PP pipelines
Have you decided to do a major renovation in your apartment? Then it is worth considering that without replacing the water supply it will be incomplete. Agree, it would be a shame if immediately after the repair one of the pipes leaks, and, what good, you flood your neighbors. An excellent alternative to outdated water supply lines are plastic pipes.
Making plastic wiring for a heating system or water supply in an apartment is quite simple. To install polypropylene pipes with your own hands, you only need a set of special equipment and a minimum of technical skills.
Next, we will tell you what tools are needed for the job and how to use them correctly. In addition, in the article you will find information on how to correctly draw up a wiring diagram for a plastic pipeline, as well as step-by-step instructions for welding polypropylene pipes. To help the home craftsman, we have selected thematic videos.
Determining places for pipe passage through walls and floors
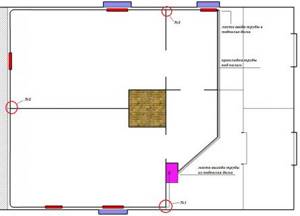
On the plan of the interior of the house, I identified the places where it is necessary to make holes for the polypropylene pipes of the heating system. It turned out that in three partitions it is necessary to make one through hole No. 1, 2 and 3 (the locations of the holes are indicated in the diagram with red circles). The installation of such holes was the first step in starting the installation of a single-pipe heating system.
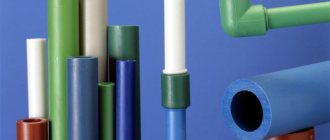
Anatomy of polypropylene pipes
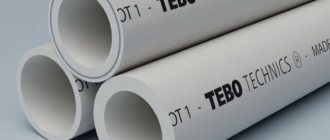
Most polypropylene (PP) pipes are the same at first glance. A more detailed examination of them will allow you to notice differences in material density, internal structure and wall thickness. The scope of application of pipes and the features of their installation depend on these factors.
Classification of PP material
The quality of a polypropylene weld and the operational characteristics of pipes are largely determined by the PP manufacturing technology.
There are the following types of parts, based on the material they are made of:
- PRN . Single-layer products made of homopolypropylene. Used in industrial pipelines and cold water supply systems.
- RRV . Single-layer products made from PP block copolymer. Used for installation of underfloor heating networks and cold pipelines.
- PPR . Single-layer products made from random copolymer PP. They are used in water supply and home heating systems with water temperatures up to +70°C.
- P.P.S. _ Refractory type of pipes with operating temperatures up to +95 °C.
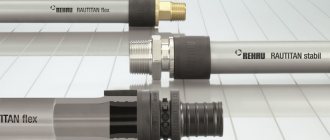
There are also multilayer reinforced PP parts.
They have an additional internal aluminum shell, which dramatically reduces thermal expansion, facilitating wiring installation and operational safety.
The disadvantage of these products is the need to remove the top polymer layer and aluminum to the depth of penetration of the pipe into the fitting before soldering.
We examined in more detail the types of PP pipes by material of manufacture and fittings in our other article.
What does the marking look like?
You can select the required pipes and fittings for plastic wiring in the construction market yourself. You just need to know the labeling symbols.
Which pipes to choose
As mentioned above, we use polypropylene only in autonomous heating systems. Moreover, for a strengthening effect, we take pipes only with reinforcement. And this is due not only to the fact that such a material is more tensile (25 kgf/cm2). Few people know that polypropylene also gives the highest elongation coefficient when heated. So, every meter of your pipe, when heated to 70 degrees, lengthens by six and a half millimeters.
Which reinforcement to choose? Nowadays aluminum and fiberglass are used for these purposes. The foil is simply glued between two layers of polymer. But the fiberglass is welded to the inner and outer shell.
How does such reinforcement help? It significantly reduces pipe elongation at elevated temperatures.
Do you need to overpay for a brand? When buying Valtec or Rehau, you, of course, overpay, but you get really high quality products. And if these are reinforced pipes, then they are made using the highest quality glue and in compliance with all technology requirements.
What diameter should I choose? Let's say right away that for steel pipes they usually talk about the internal diameter, while for polypropylene it is the external diameter. This means that the throughput of such a pipe will be less than the steel one that stood in its place before. Therefore, with such a replacement, the size of polypropylene pipes is taken with an increase of 1-2 steps. That is, 25 mm instead of DN 20, for example.
In addition, experts advise adhering to the following dimensions when designing an autonomous heating system using polypropylene pipes:
- filling with forced circulation – from 25 to 32 mm;
- filling with natural circulation – from 40 to 50 mm;
- connections to radiators – 20 mm.
Advantages and disadvantages of PP
The advantages of PP pipes in the installation of internal heating and water supply are obvious and are confirmed by their undivided dominance in this area.
The properties that make this product a priority for the assembly of intra-house communications are:
- noiselessness;
- impact strength;
- ease;
- corrosion resistance;
- durability;
- tightness of connections;
- cheapness;
- immunity of the internal walls to plaque.
But polypropylene pipes also have negative sides that cause inconvenience during installation:
- lack of flexibility;
- strong relative elongation when heated;
- the need for special tools when connecting individual products.
Specialists who assemble PP pipes every day have long developed ways to compensate for the listed disadvantages, so there are no special alternatives to polypropylene.
Polypropylene and its features
It is not without reason that polypropylene, widely known among the people, has gained such popularity. To a greater extent, this is due not to advertising companies, but to the unique characteristics of the material. To decide whether it is possible to embed PP pipes into a wall, it is useful to consider its main physical, chemical and operational parameters:
- Polypropylene is resistant and neutral to most aggressive chemicals.
- The polypropylene pipe shell has relatively good rigidity and strength, which allows pipes to be laid under the external pressure of building materials.
- PP pipes are installed by soldering at a temperature of 260 °C, and due to the mutual diffusion of materials, a strong and durable connection is obtained. The soldered joint is capable of ensuring tightness throughout the entire life of the pipeline.
- Due to the properties of the material (thermal conductivity coefficient 0.25 W/m °C) and the thickness of the shell, PP pipe has fairly low heat transfer and is superior to other pipe polymers in this indicator.
- The service life of polypropylene in cold water supply networks according to GOST is at least 50 years. In heating and hot water supply lines, the duration of its use depends on the temperature and pressure characteristics of the medium and should not fall below 25 years at a working fluid temperature of no more than 75 ° C (according to SNiP 2.04.01-85).
Features of polypropylene pipes
To install the pipeline, high-quality and reliable material is required. This could be, for example, stainless or galvanized steel. Over time, polypropylene replaced these types from the construction industry. The main reason was the combination of useful properties at a reasonable price.
Polypropylene is suitable for hot and cold water supply and heating. The material is durable and does not require maintenance, so you can safely wall up water pipes into the wall.
The main thing is that their use does not exceed the temperature limit of 95 ° C, when the material loses its resistance to pressure and deforms. In residential water pipes and heating systems, such pipelines operate at lower operating temperatures, so no problems should arise.
The disadvantage of the material is thermal expansion, which can directly affect the integrity of the wall into which the pipes are walled. The expansion coefficient of polypropylene is quite high. The linear increase can be up to 10 mm per meter of pipe at a temperature of 70 °C; accordingly, the diameter of the pipe also increases slightly.
The higher the temperature, the more the expansion coefficient of the pipe increases. Therefore, the laying of heating networks, their correct installation, and the selection of types of pipes that suit the conditions deserve special attention.
Note! Reinforced grades of polypropylene have a lower coefficient of linear expansion. Approximately 3 mm - 3.5 mm per meter. Consequently, when laying hot water supply or heating, reinforced pipes will be more reliable, since they will create less pressure on the wall, and the likelihood of deformation of such pipes is much lower.
Advantages of PP pipes
As is known, polypropylene (granules or light powder) is a product of the polymerization reaction of propylene, carried out using metal catalysts. To obtain pipe products, the raw materials are first melted and then the pipes themselves are formed by extrusion.
At a temperature of 170˚С polypropylene melts, and at 140˚С it softens. This property makes pipes made from it suitable for creating heating systems, as well as hot and cold water supply. But the construction of steam pipelines based on them is not allowed.
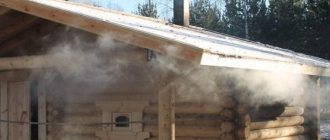
Polypropylene water pipes are resistant to the destructive effects of the corrosion process, so they can be:
- install in rooms with high humidity;
- use in aggressive environments;
- lay underground in places where there is a high groundwater level.
Helpful advice! It is recommended to lay a polypropylene pipeline with your own hands under the condition of maximum possible protection from direct sunlight.
Although this material is perhaps the lightest plastic, it is characterized by high wear resistance. It follows from this that polypropylene water pipes withstand the abrasive effects of sand and exfoliated rust quite well, the penetration of which into the water supply system is not guaranteed even by the use of filters.
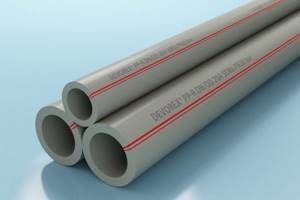
Polypropylene pipes are durable and corrosion resistant
Installation requirements
When laying pipes in the wall, it is recommended to use shock-absorbing materials. For example, energyflex, polyurethane foam. These materials will serve as a gap between the wall and the pipe; accordingly, there will be no pressure on the concrete when the pipe expands.
The fewer connections, the better. Connections are the most vulnerable part of polypropylene systems, least protected from leaks and having low pressure resistance.
Pipes must be selected in accordance with the conditions of further operation.
Based on wall thickness, all PPR pipes are divided into categories from PN10 to PN25.
- PN10 pipes are thin-walled, designed for cold water supply or for heated floors and other low-temperature, low-pressure systems.
- PN16 and PN20 are used for water supply with pressure up to 1.5 MPa and heating systems with pressure not exceeding 0.8 MPa.
- PN25 is reinforced with a layer of fiberglass or aluminum, which increases strength and temperature range. Accordingly, the products can be used in central heating systems at pressures up to 1.5 MPa, and in cold water supply up to 2.5 MPa.
Product Specifications
The main characteristics of pipe products are diameter and wall thickness. Their classification according to these parameters makes it possible to perform calculations to ensure high-quality transportation of liquid. By studying the table below, you can find out the variety of sizes of polypropylene pipes present on the modern market.
| External diameter | Wall thickness PN25 | Wall thickness PN20 | Wall thickness PN16 | Wall thickness PN10 |
| 110 | 18,40 | 18,40 | 15,10 | 10,0 |
| 90 | 15,0 | 15,0 | 12,30 | 8,20 |
| 75 | 12,50 | 12,50 | 10,30 | 6,90 |
| 63 | 10,50 | 10,50 | 8,40 | 5,80 |
| 50 | 8,40 | 8,40 | 6,90 | 4,60 |
| 40 | 6,70 | 6,70 | 5,50 | 3,70 |
| 32 | 5,40 | 5,40 | 4,40 | 3,0 |
| 25 | 4,20 | 4,20 | 3,50 | 2,3 |
| 20 | 3,40 | 3,40 | 2,80 | 1,90 |
| 16 | 2,70 | 2,7 | ________ | ________ |
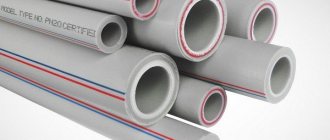
Pipes of category PN20 are products of universal use. The PN10 group includes thin-walled products for underfloor heating and cold water supply systems. PN16 pipes are used in cold water supply and heating systems characterized by low coolant pressure. Products of category PN25 are reinforced with a layer of aluminum foil and can be installed in central heating pipelines. Some manufacturers mark PN10 pipes with a blue longitudinal stripe, and PN20 pipes with a red stripe.
Thin-walled PP pipes are used for underfloor heating
Long service life allows the use of polypropylene water pipes for any type of installation:
- hidden - in the load-bearing structures of the building and underground;
- open - on the surface of the ground, on the floor or on the wall of a living space;
- channelless laying of pipes in the ground;
- laying in mines;
- gasket in boxes.
But the work must be carried out in compliance with the requirements of regulatory documents. So, for example, if we talk about laying polypropylene pipes intended for transporting water at elevated temperatures (from +45 degrees), then they should be placed on sliding fasteners that provide the possibility of longitudinal displacement. However, their installation in boxes and channels is allowed.
Helpful advice! Polypropylene water pipes can withstand bending, the value of which does not exceed 10% of the diameter. That is, in fact, they cannot be called flexible. Therefore, polypropylene pipes should be laid in the ground, in a wall or on the surface of the ground in straight sections. And to implement the necessary bends, use the appropriate bends.
Preparation for installation
The primary task is to draw up an installation drawing of future highways. In fact, the pipeline plan must be carried out taking into account all connections, taps, technological cabinets, shut-off valves. Detailed planning helps to avoid redundant connections and waste of material, since it is determined in advance which parts and in what quantities are needed.
Note! It is better to save the drawn up plan. It may be useful for system maintenance and installation of new communications. For example, for inserting an additional tap.
Walls for hidden installation of pipes will have to be grooved, that is, a channel will have to be cut in the concrete for laying a pipe line. It is advisable to pre-mark the working area in order to make an even and high-quality channel.
It is advisable to take into account that it is not recommended to groove walls in panel houses, since the thickness of the panels is usually small. The most suitable walls are made of thick brick or concrete. They can be tapped without fear.
Next, you need to mark the pipes and fittings to know the welding direction and installation order. If necessary, it is better to trim the products in advance.
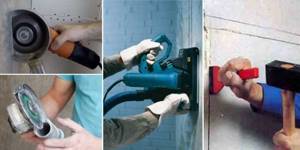
To perform installation work, you need tools designed for polypropylene:
- cutting scissors;
- a shaver for removing reinforcement and a chamfer for leveling the cut surface;
- welding machine with temperatures up to 260 °C;
- wall chaser or grinder for cutting out a cavity in the wall;
- chisel and hammer or punch to remove material between the grooves.
Installation
When the tools are ready, there is a detailed plan for installing pipe lines and markings, you can start working:
- Using a grinder or wall chaser, cut parallel to each other slots on the concrete surface of the wall; the distance between the slots should be slightly greater than the thickness of the polypropylene pipe in the thermal insulation. It is recommended to use a stone disc or a toothed disc coated with diamond.
- Use a hammer drill or chisel to remove concrete between the slots.
- To place technological cabinets, you will have to make a cavity in the wall and install a cabinet with slots for communications in it. This design will facilitate access to shut-off valves or sensors.
- The pipes are welded in advance, after which they are laid in the wall and fixed in the channel with clamps or supports. It is advisable to do most of the welding outside the channel because it is easier than welding in a confined space. Before sealing the grooves, it is recommended to check the system for leaks by running water into it. If no leaks are observed, then you can proceed to the final finishing.
- Before laying the pipes, it is advisable to wrap them in a layer of energyflex, or fill them with polyurethane foam after installation. This will provide space for the pipe to expand.
Note! Before grating begins, if there is any finishing on the wall, it must be removed. It will not be possible to make a channel in tile or wood without ruining them, but the presence of finishing can significantly complicate the work.
Of course, you can lay pipes on top of the walls, and make finishing on top of the main line, but then the free space in the room is reduced, and the cavity formed between the finishing and the wall will have to be filled with insulation. This approach is ineffective, since the finishing material must adhere tightly to the surface.
If you need to hide a ready-made pipeline structure, it is better not to make a blank monolithic wall, but to build a special plasterboard box to ensure free access to the pipes if necessary.
After a test check of the functionality of the pipeline, you can begin finishing the wall; it is better to use drywall for this.
Important installation details
PP pipes are connected using threaded/non-threaded fittings. In turn, threaded products can be:
- one-piece;
- detachable.
It is worth noting that installation is primarily affected by operating conditions.
- All polypropylene parts must be protected from fire.
- In the case of inserting a water meter or storage tank, it is advisable to use detachable threaded elements. However, a permanent connection is acceptable only for flexible hoses.
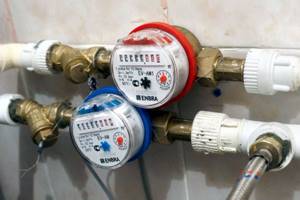
Water meter - The use of deformed or dirty connecting elements is strictly prohibited! Just like cutting threads yourself.
- When connecting flat sections or transitioning a pipeline to a different diameter, couplings are used.
- For turns, special angles are used; bending of pipes is unacceptable.
- Tees are used for branching the main line.
After you have read all the necessary information, you can start working.