Installing a heating system in a private home is the main task of any person who wants a comfortable and safe life. Stove heating is not relevant for a large room, since the efficiency is designed for only 20-30 m2. The radiator system is a significant expense, so savings are the main aspect to pay attention to. Why spend a lot of money on something you can do yourself? Savings on metal parts and fittings amount to about 90% of the market value of finished equipment.
Homemade heating registers
By increasing the heat exchange area and the volumetric component of the coolant, of course, it is easier to achieve the desired temperature in the room.
Therefore, quite a lot of property owners, taking advantage of the lack of control over heat extraction at each specific point, increase heat removal by manufacturing radiators of non-standard designs. In fact, this is prohibited, as it is seen as an irrational approach to energy consumption. In practice, they think less about resources than about their own well-being. The following article will introduce you to options for economical garage heating, the contents of which we recommend that you familiarize yourself with. However, closer to the point.
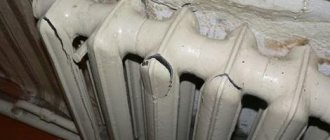
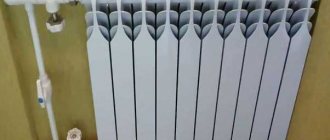
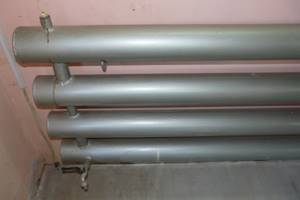
A heating register made by yourself and installed in one of the utility rooms. This is a four-pipe circuit solution with coolant inlet and outlet on one side
Making a heating register with your own hands is a relatively simple task, especially if you have welding skills and have a welding machine at hand. All that remains is to purchase the required quantity of pipes of suitable diameter and sheet metal.
This is interesting: Large diameter pipes: product characteristics
How to make a heating radiator with your own hands (video)
Typically, heating radiators are made in factories on an industrial scale. Not everyone can afford such heating devices, since they are quite expensive, and their purchase is not always justified. You can make a radiator with your own hands. To do this, you need to prepare all the materials and tools, read the step-by-step steps and proceed to the actual manufacture of the device.
This question is most often asked by computer scientists, and not always professional ones. The fact is that many system units have an aluminum radiator installed. It cools the hardware quite normally in a state of not very active operation, but when running many modern games it is no longer able to cope with its work. Therefore, sometimes you need to make a radiator from copper, a more thermally conductive metal. Of course, you can purchase it, but the cost of creating it yourself is much lower. To create a radiator at home, you will first need the material itself - highly thermally conductive metal. In this case it is copper. It is quite difficult to get it. You can contact non-ferrous metal collection points. What is needed is a thin sheet from which the radiator fins will be made. You also need to acquire metal scissors in advance.
To connect copper plates and form a solid sheet on one side, you will need a galvanic bath, for which you need to find a vessel that is resistant to aggressive environments. Before calculating the number of radiator sections, you need to measure the length and height of the area that will need to be cooled. The height or length, depending on whether the plates will be placed vertically or horizontally, must be marked so that the distance between the sections is 2-3 millimeters. Such frequent placement will achieve the best effect. Next, you need to take a thin sheet of copper and cut plates from it. If you are replacing an aluminum radiator with a copper one, it is convenient to cut the copper plates to the size of the aluminum ones. That is, before replacing the radiator, you can create a more advanced object in its likeness. So, the cut copper plates are collected in a stack and on one side are joined together using a galvanic bath. After this, you need to drill holes in all the plates for stringing them.
It is also important to separate the plates with wire, which must have insulation. If everything is done correctly, the plates will be overgrown on one side and you will get a solid plane.
Thus, the radiator base is ready, the plates are well separated. If the radiator was created for a computer, you also need to drill holes corresponding to the system unit. Thus, before choosing a radiator in a store, you should think about whether it would be better to create it yourself? Yes, in appearance it will, of course, be inferior to the factory analogue. However, often factory radiators, especially those produced by small companies that value their reputation, cannot ensure the reliability of a home-made item. And in the case of radiators manufactured under the trademark of a well-known brand, the price is usually radically inflated.
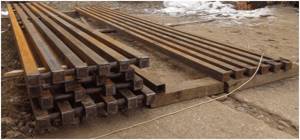
Heating devices are an essential element of any water heating system. They are usually the most expensive part. A good opportunity to save money would be to use homemade radiators. They are made from smooth round steel pipes or from profile pipes. The latter option is somewhat more expensive, but allows you to reduce the depth of the device and get a more aesthetic appearance.
The use of a profile pipe for the manufacture of heating registers has a number of features. When starting to work with your own hands or deciding to buy a “homemade” product, you need to carefully weigh the pros and cons. Studying the basic rules by which heating registers are made from a profile pipe will help you avoid mistakes when working independently and will make it possible to make a competent choice of the necessary parameters.
Useful tips
If the heating system of the house was assembled taking into account the use of forced movement of the coolant, that is, a circulation pump is installed in it, then the home-made device can be installed as desired (vertically or horizontally).
If the coolant in the heating system moves according to natural laws, then the battery must be mounted only horizontally. In this case, there is no need to install an air vent on it (Maevsky tap).
It is impossible to make a high-quality radiator from pipes if you have the skills to operate a welding machine at the beginner level. The seams must be welded well; the safe operation of the device and the entire heating system depends on this.
The thickness of a 100 mm pipe must be at least 3.5 mm.
Two bends can be welded to the ends of the pipes where the metal pancakes were welded. In this case, the holes in the ends are made not in the middle, but with an offset: the input bend (upper) is closer to the upper edge of the pipe, the outlet (lower) closer to the lower edge. It is better to make holes in the pancakes in advance, before welding them to the pipes.
When calculating heat transfer, there is no need to pay attention to the transfer area. It is clear that this figure will be higher for a cast iron radiator. All this is compensated by the high thermal conductivity of steel.
Welding seams need to be cleaned and given a presentable appearance. To do this, scale and smudges are knocked off with a hammer, and the entire surface of the seams is sanded with a grinder.
Disconnecting the first battery section
Take the radiator disassembly key. If you don't find such a key on sale, you can try making it yourself. To do this, you will need a piece of reinforcement with a diameter of 20 mm and a length of at least 60 cm. In order to unscrew the nipple, we need to flatten one of the ends of the reinforcement to such a state that it is wider than 26 mm, but narrower than 32 mm. To do this, take the burner you have, which you used to heat the plugs. Heat a section of reinforcement about 4 cm long at either end. After heating, use a hammer to shape the tip into a flat shape. If necessary, repeat the heating procedure and hammer the reinforcement section again.
The key can also be made from a piece of pipe with a diameter of 20 mm. To do this, give one end of the pipe a flat shape according to the specified dimensions. When using the factory key to disassemble radiators, you do not need additional equipment. If you have a homemade wrench made from fittings or pipes, it is most convenient to twist it using a pipe wrench. It has enough leverage to rip the nipple out of place. Insert the key into the radiator to a depth sufficient to engage the key and nipple tabs.
Next, start unscrewing the nipple in the direction in which you unscrewed the plug.
You can begin to disassemble the radiator both from the side of the blind plugs and from the side of the through plugs. Remember that they have left and right hand threads respectively. If you unscrew the nipple from the side of the blind plug, then you also twist the nipple clockwise, like a plug. Otherwise, you will break the nipple antennae, and then you will only be able to disassemble the battery using a hacksaw.
Make one or one and a half turns. Next, in the same way, make one or one and a half turns at the bottom of the battery. Unscrew each nipple in turn until the section is completely removed.
In order to disconnect more than one section, it is not necessary to unscrew each section in turn. You can go straight to the section you need. To do this, use a radiator dismantling wrench to measure the distance to the desired nipple. Make a mark on the key using chalk or a marker. This will allow you not to miss the desired depth at which you need to insert the key. Next, start unscrewing the nipple in the same way as if you were unscrewing one section
It is important to have a key length of at least 50-60 cm in order to easily reach the desired section of the radiator and remove it
Making registers yourself
Steel registers have a fairly simple design and do not require much skill to create. Almost any person who has experience working with a welding machine can make homemade heating radiators from a profile pipe. Unlike round ones, they are conveniently fixed in place, which makes welding easier.
Required materials and tools
Before starting work, you need to stock up on everything you need. Let us consider in detail what is required for the simplest three-row register.
Materials:
- Profile pipe in accordance with the design parameters. Dimensions can be from 30x30x3 to 80x80x3 mm.
- A round pipe with the same wall thickness with a diameter of 25 or 32 mm depending on the cross-section of the profile pipe.
- Steel sheet 3 mm thick.
- Branch pipes with external or internal threads in accordance with the diameter and type of connection – 2 pcs.
- Steel coupling with internal thread with a diameter of 15 mm and Mayevsky tap.
Tools:
- Welding machine.
- Drill.
- Bulgarian.
- Hammer.
- Marker or metal rod.
- Roulette.
Preparation of materials:
- The profile pipe is cut into pieces of the required length in accordance with the drawing.
- The round pipe is cut into 4 pieces of 10 cm each.
- 6 plugs are cut from sheet metal in accordance with the size and shape of the profile pipe. They should be 3-5 mm smaller than the cross-section of the pipe. This will allow you to neatly hide the weld in the gap.
- The pipes are laid on a flat horizontal surface strictly parallel at a distance of 10 cm. You can use two wooden beams for support. The ends are aligned in one line. Marks are made for the holes at a distance of about 5-10 cm from the edge.
- Using a cutter or drill, the intended holes are cut in accordance with the diameter of the jumpers.
Work order
- The jumpers are fixed in place and secured by welding at 2-3 points.
- Having positioned the structure vertically, the jumpers are finally welded. It is recommended to first make a thin seam at low current, which will allow the gaps to be filled well. Next, a thick main seam is performed at increased current.
- The internal space of the register is cleared of metal debris and slag.
- The plugs are applied, tacked and welded to the ends of the profile pipes.
- Welding seams are processed. The protruding parts are knocked down with a hammer, then each seam is cleaned with a grinder.
- Holes in the register are drilled depending on the selected connection diagram. In this case, it is better to place them not in the center of the ends, but slightly higher or lower.
- Connecting pipes are welded to the holes.
- The seams are cleaned and all holes except one are plugged. The register is filled with water under pressure and the welding quality is checked. The seams must withstand pressure up to 13 atm.
- The outer surface is cleaned, degreased and painted with heat-resistant paint.
- A fitting is welded to the top row and a Mayevsky valve is installed.
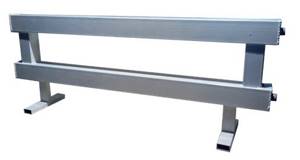
Sometimes supports are welded to the register, but devices without them are more versatile. If necessary, you can always use a stand, but the weight is less and you can still mount it on the wall.
Types of accessory
Depending on which installation method is chosen, there are three types of screens:
- three-sided box with lid (stand);
- flat panel;
- hanging screen.
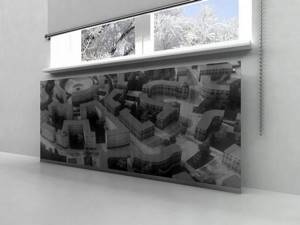
If you need to completely hide the battery, use a design in the form of a closed box with a lid. A radiator in a niche or under a window sill is masked with a shield in the form of a flat panel. If the radiator protrudes from under the window sill, then use a hinged screen consisting of a lid and a flat facade.
When making a decorative shield, you can choose the following materials or combinations thereof:
- metal;
- tree;
- plastic;
- glass;
- MDF boards, chipboard, fiberboard.
A metal shield conducts heat well. A metal product can be given a very sophisticated look using perforation or welding according to the customer’s sketches. But to work with metal yourself, you need skills and equipment.
Wood screens are environmentally friendly and look noble. At the same time, wood is a malleable material, very easy to process. But wooden panels, when exposed to hot air and humidity, are prone to deformation and drying out, so you need to select high-quality, dried wood, and impregnate the finished screen with special products.
Plastic captivates with its availability, rich selection of colors, and ease of processing. But it is short-lived, deforms from high temperatures, and releases substances that are unsafe for humans. Therefore, plastic screens should not be installed where people live.
Tempered glass screens are durable, the glass itself is thick, with already processed edges. You can decorate the glass with almost any design and add LED lighting. Glass screens are classified as elite models and are not cheap.
MDF screens are the most common design option for heating devices. Plates made from the finely dispersed fraction differ little in quality from wood; they are easy to care for and easy to work with. MDF screens are distinguished by a rich color palette, variety of textures and styles.
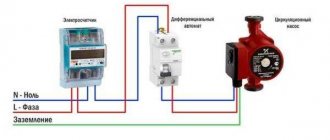
Tying with polypropylene pipes - implementation principle
Recently, polypropylene pipes have become increasingly popular. Of course, the correct connection of heating radiators and piping can be done with any other pipes, but most professionals still recommend choosing these.
For piping, it is most rational to use polypropylene corner ball valves - they are much easier to install, and their cost is relatively low.
Tying with polypropylene pipes is carried out as follows:
a coupling with a union nut is inserted into the multiflex, connecting to any output; pipes are fixed to the wall using pre-attached brackets
It is important that they do not touch the wall, but are located 2-3 cm from its surface. The advantage of polypropylene pipes is that they can be laid in the wall itself, and the edge of the pipe, necessary for piping, is brought out in close proximity to radiator
A variety of fasteners can be used to secure batteries. Most often, professionals use a pin connection for this purpose that is fixed to the wall surface. If you want to hang radiators, use regular brackets for this. A small clarification - panel batteries are (mostly) sold complete with fasteners. But for sectional radiators, the mount must be purchased separately
The advantage of polypropylene pipes is that they can be laid in the wall itself, and the edge of the pipe required for piping is brought out in close proximity to the radiator. A variety of fasteners can be used to secure batteries. Most often, professionals use a pin connection for this purpose that is fixed to the wall surface. If you want to hang radiators, use regular brackets for this. A small clarification - panel batteries are (mostly) sold complete with fasteners. But for sectional radiators, the mount must be purchased separately
We already practically know how to properly connect a heating radiator. The taps are connected as follows:
- initially the crane must be disassembled;
- a fitting with a union nut is screwed into the radiator;
- Using a special wrench, tighten the nut.
To properly perform such a simple, and at the same time, quite important action, you will need to use a special wrench - without it you will not be able to tighten the “American” properly. In addition to this key, during installation and piping of radiators, as well as during how to connect two heating batteries, you will also need:
In addition to this key, during installation and piping of radiators, as well as during how to connect two heating batteries, you will also need:
- seals;
- a set of keys;
- tow;
- thread paste;
- threads for carving.
Tools and materials for installing heating radiators
Raw material base
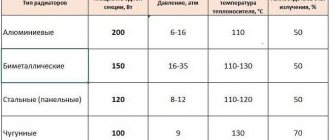
For the production of heating radiators the following are used:
- aluminum alloy (aluminum with the addition of 12% silicon);
- thin sheet steel.
Moreover, each type of device requires a different raw material base:
- for aluminum – only aluminum alloy;
- for bimetallic - steel for the collector and aluminum alloy for the shell;
- for steel panels - only sheet steel of different thicknesses (1.25 mm for panels and 0.5 mm for manifold).
In addition, to assemble radiators you need fasteners, fittings and other accessories.
How to calculate heat transfer?
The required amount of material can be calculated based on the temperature parameters that need to be obtained in the room. At the household level, this step is usually skipped - they make heating registers with their own hands “by eye” according to the principle “the more, the better.”
But it is better to make simple calculations of heat transfer, for which you do not need to be a mathematician. All you need is:
- Calculate the area of the room.
- Learn about the heat transfer properties of steel.
- Select the optimal pipe diameter.
The area of a room is calculated by multiplying its length by its width (S = L*W). However, for more accurate calculations, it is recommended to calculate the volumetric parameter by adding the height (H) value to the calculations.
So, the final calculation formula takes the form:
V = L*W*H
For example, you need to calculate V of a room where the length is 5 m, width is 3 m, height is 2.15 m. The volume of the room is obtained: V = 5*3*2.15 = 30.25 m3. Based on this basic value, further calculations should be made to determine the amount of heat, the size and number of heating registers to make with your own hands.
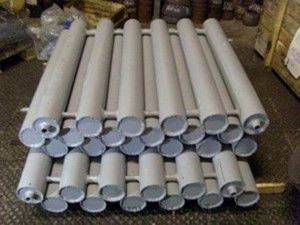
Self-welded heating registers are blocks consisting of six steel pipes with a diameter of over 100 mm. Such batteries, made without proper calculations, can overheat the room being served.
First of all, the required amount of heat per calculated volume of the room is calculated to achieve the required internal temperature (W):
Qп.т = V * k (Tin – Tout),
where V is the volume of the room; k – heat transfer coefficient of the building walls; Tin – temperature inside; Tout – outside temperature.
The amount of heat generated by one register can be calculated using the formula:
Qр = q * L * (1-n),
where: q – heat flow from each horizontal and vertical pipe of the register (approximately 20-30 W/m); L – length of vertical and horizontal pipes of the register (m); n – coefficient of unaccounted heat flows (for metal pipes – 0.1).
The category of unaccounted heat loss also includes the hood in the garage. If the mechanical type is installed, the coefficient n must be increased to at least 0.2.
The number of registers, accordingly, is determined by the formula:
Nр = Qп.т. / Qр
Such a calculation method will most likely be assessed by design specialists as a simplified and crude form. However, this approach still seems to be a more rational action than calculating and making registers with your own hands by eye, without any calculations.
Advantages of homemade radiators
The main advantages of do-it-yourself radiators:
- An opportunity to express yourself, your imagination and give the room an interesting look.
- Independent assessment of heat loss or heat transfer, drawing up an individual installation plan, according to the characteristics and purposes of operation of the residential premises.
- Use of available materials, spare parts and equipment.
In order to make a battery with your own hands, you will need:
- welding machine (not necessarily powerful);
- electrodes;
- sheet of stainless steel of special strength (from 3 mm), size 100x500 mm;
- steel pipes: grade VGP Du-25, 20 cm long; length 2 m, diameter 100x3 mm;
- squeegee brand Du-25, length 100mm x 2 pcs.;
- plug brand DN -25 x 1 pc.;
- grinder with a circle for metal (grinding machine).
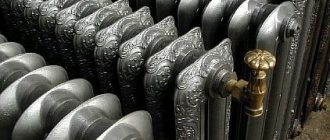
Please note: it is best to use cast iron: although it is heavy, it is much cheaper than, for example, aluminum. The disadvantage of cast iron is its fragility, so you will have to work with it carefully.
Radiator connection diagrams
How well the radiators will heat depends on how the coolant is supplied to them. There are more and less effective options.
Radiators with bottom connection
All heating radiators have two types of connection - side and bottom. There can be no discrepancies with the bottom connection. There are only two pipes - inlet and outlet. Accordingly, coolant is supplied to the radiator on one side and removed from the other.
Bottom connection of heating radiators for single-pipe and two-pipe heating systems
Specifically, where to connect the supply and where the return is connected is written in the installation instructions, which must be available.
Heating radiators with side connection
With a lateral connection, there are many more options: here the supply and return pipelines can be connected into two pipes, respectively, there are four options.
Option #1. Diagonal connection
This connection of heating radiators is considered the most effective, it is taken as a standard and this is how manufacturers test their heating devices and the data in the thermal power passport for such a connection. All other connection types transfer heat less efficiently.
Diagonal diagram for connecting heating radiators with a two-pipe and one-pipe system
This is because when the batteries are connected diagonally, the hot coolant is supplied to the upper inlet on one side, passes through the entire radiator and exits from the opposite, lower side.
Option #2. Unilateral
As the name implies, pipelines are connected on one side - supply from above, return from below. This option is convenient when the riser runs on the side of the heating device, which often happens in apartments, because this type of connection usually predominates. When the coolant is supplied from below, this scheme is used infrequently - it is not very convenient to position the pipes.
Lateral connection for two-pipe and one-pipe systems
With this connection of radiators, the heating efficiency is only slightly lower - by 2%. But this is only if there are few sections in the radiators - no more than 10. With a longer battery, its farthest edge will not heat up well or will remain cold at all. In panel radiators, to solve the problem, flow extenders are installed - tubes that bring the coolant a little further than the middle. The same devices can be installed in aluminum or bimetallic radiators, thereby improving heat transfer.
Option #3. Bottom or saddle connection
Of all the options, saddle connections for heating radiators are the least effective. Losses are approximately 12-14%. But this option is the most inconspicuous - pipes are usually laid on the floor or under it, and this method is the most optimal from an aesthetic point of view. And so that losses do not affect the temperature in the room, you can take a radiator a little more powerful than required.
Saddle connection of heating radiators
In systems with natural circulation, this type of connection should not be made, but if there is a pump, it works well. In some cases, it’s not even worse than the side one. It’s just that at a certain speed of movement of the coolant, vortex flows arise, the entire surface heats up, and heat transfer increases. These phenomena have not yet been fully studied, therefore it is not yet possible to predict the behavior of the coolant.
Size calculation
Making your own pipe heating device is not very difficult. But there is one important point here - to correctly calculate the dimensions of the device. After all, such an indicator as heat transfer will depend on them.
Required indicators
The calculation is not easy, because it requires some criteria for the premises itself. For example: glazing area, number of entrance doors, what windows are installed, whether the floor, walls and ceiling are thermally insulated.
It’s difficult to take all this into account, so there is a simpler option that takes into account only two indicators:
The heating radiator is selected based on the heat transfer per 10 m² equal to 1 kW of thermal energy. The ceiling height should not exceed 2.8 m.
How can this help when assembling a homemade heating device? To do this, you will have to compare it with a conventional cast iron radiator of the MS-140-500 brand. The heat output of one section is 160 W, volume is 1.45 liters. What does this give us?
You can determine exactly how many sections will be needed if you use a cast iron device. The total volume of coolant that will fit in one battery is determined from the number of sections. And knowing this number, you can approximately determine the volume of the pipe radiator.
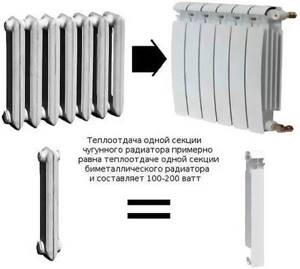
The thing is that the thermal conductivity of steel is 54 W/m*K, and that of cast iron is 46 W/m*K. That is, a small downward error will not have any effect on the quality of heat transfer.
Calculation example
Conventionally, we will assume that an eight-section cast-iron heating device corresponds to the above-described ratio. Its volume is 8x1.45=11.6 liters.
Now we can calculate the length of a pipe with a diameter of 100 mm, which we will use to assemble a homemade battery. The standard cross-sectional area of the pipes is 708.5 mm². We divide the volume by the cross-section, we get the length (we convert liters to mm³): 116000:708.5= 1640 mm. Or 1.64 m.
A slight deviation in both directions will not greatly affect the heat transfer. Therefore, you can choose either 1.6 or 1.7 m.
Features of piping in a 1- and 2-pipe system
Single pipe system:
- The pipes that are connected to the inlet and outlet fittings are always connected to the same vertical riser or horizontal pipe located around the perimeter of a one-story house. If a vertical pipe is created to supply coolant, then one end of it is inserted into the upper fitting of the battery, and the other into the lower one.
- Always install a bypass. It is a tube that connects two pipes that go to the battery inlet and outlet. During normal operation of the radiator, a bypass is not needed. However, in case of repair of the heating device and shut-off valves, the coolant flows through the bypass, that is, the system operates without stopping.
Features of two-pipe systems:
- In this case, the piping is done in such a way that the two battery fittings are connected to different pipes. A pipe that supplies heated liquid is connected to one, and a pipe that removes cooled coolant is connected to the other.
- They provide for the use of a larger number of tees and connecting elements necessary to bypass one pipe to another. The latter are in demand because two pipes often intersect.
- There is no need to install a bypass.
Date: September 25, 2021
What errors may occur during the installation process
Very often, during the installation of heating devices from pipes, workers make technical errors, which can subsequently affect the performance of the system. Here are the most common ones.
If the radiator was installed lower than 7 cm from the floor covering, this can significantly complicate cleaning underneath and will also lead to disruption of heat exchange in the room. But in cases where the radiator hangs further than 15 cm from the floor, significant temperature changes will be felt - your feet will be cold.
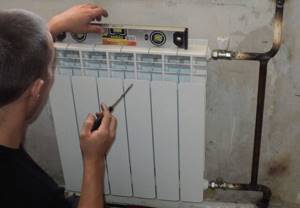
In addition, installing batteries close to the wall can also affect the quality of heat transfer, since the level of heat loss will increase. Installing additional screens or decorative grilles in front of pipe radiators will also reduce their heat transfer.