Choosing a stove: what requirements to follow
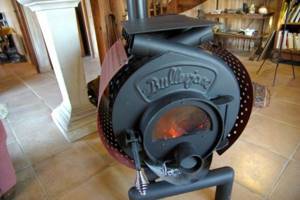
The most common source of heating for sheds and garages is the so-called. potbelly stove. It is compact, does not require expensive materials for its production, and is easy to manufacture.
To make a potbelly stove, you need to be able to work with a welding machine and have 6-18 mm sheets of steel or cast iron. For convenience, a potbelly stove is made from worn-out devices - iron boxes, gas cylinders, etc.
For reference. In addition to a potbelly stove, the garage can be heated with a brick stove assembled from bricks. This design is impractical due to its long-term heating and impressive dimensions.
In addition, it is necessary to arrange a thick metal lining under the brick stove in advance so as not to destroy the floors by temperature
- Area to be heated;
- Regular use of the oven;
- Acceptable budget for the manufacture of autonomous heating.
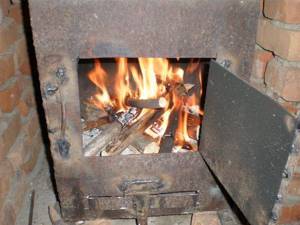
Potbelly stoves are heated by burning wood or coal inside their chambers.
However, there is no need to rush to make such a device if the garage is attached to the house. In this case, you can limit yourself to an analogue powered by electricity or gas.
If the potbelly stove is finally chosen as a firebox, then for safety it should have 10-16 mm walls, and also be located away from the wall between the garage and the house.

How to make a stove with your own hands
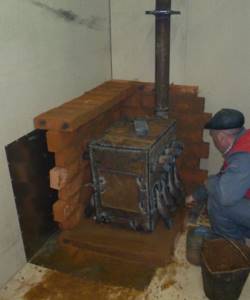
Let's look at the procedure for self-assembling a garage stove using the example of a vertical potbelly stove that runs on solid fuel. First you need to prepare the necessary materials:
- a metal barrel of sufficient size and strength;
- channel;
- fittings;
- pipe with a cross section of 15 cm.
The tools you will need are: hammer, grinder, chisel, welding machine. Before starting work, it is recommended to draw up a drawing of the future structure with the dimensions of all elements indicated on it.

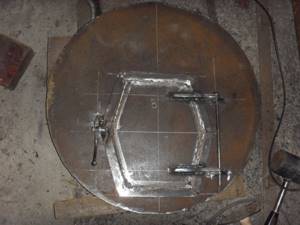
Installation of a firebox and ash pan in a vertical furnace
Sequence of work
- We apply markings indicating the doors for the firebox and ash pan. The firebox should be located higher and larger in size, and the ash pan with this type of stove structure should be located at the very bottom.
- According to the applied markings, we cut them out with a grinder.
- We equip the doors with handles and fasten them back on the hinges; you also need to take care of a reliable mechanism for closing the dampers.
- Approximately 10 cm below the firebox you need to place a grid made of reinforcement. Under it, brackets should be welded to the barrel from the inside.
- We weld the channels to the bottom, which will be the legs of the structure.
- Using a chisel, cut a hole with a diameter of 15 cm in the upper part of the barrel and weld the chimney pipe to it.
- We take the chimney out to the street.
- We carry out finishing work - grinding the body and coating it with heat-resistant paint.
The oven is ready. In a similar way, you can make a potbelly stove from a pipe or sheet metal.
Tips for using a wood stove safely
To ensure that the operation of a potbelly stove does not cause accidents and is safe for health, a number of rules should be followed:
- Do not put more than 3 kg of fuel into the stove.
- Close the firebox door tightly during combustion.
- Empty the ash pan regularly and completely.
- Do not touch the body of the stove while it is running.
- Do not use a potbelly stove if the chimney is clogged.
An open damper may cause a fire.
Also pay attention to the sounds the device makes. A strong hum indicates that the fuel is burning too intensely and the flame is entering the pipe
In this case, it is necessary to reduce the air flow by regulating it with the ash pan door.
Optimal stove design
- Exhaust valve with a cross-section of at least 10 cm;
- Weighing 25-40 kg;
- Dimensions within 70x50x35 cm (plus or minus 10 cm to each value);
- An internal combustion chamber with a volume of 10-12 liters.
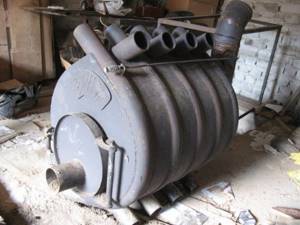
Potbelly stoves come in the form of a box and a cylinder. The latter can be easily rolled from place to place by slightly lifting and turning one side of the structure.
The advantage of a rectangular potbelly stove is that it can be easily fixed for lifting and carrying by two people.
Check it out here too!
DIY illuminated ceiling: 85 photos of the best options! Types of lighting: spots and features of their connection, LED backlight, diode backlight, “starry sky”
Assembling a shower cabin with your own hands: assembling the tray, preparing and installing the walls, installing the portal. All stages of assembly with photos
How to make ventilation with your own hands - we ensure freshness in the house, create comfort yourself (photo + video)
Furnace design and composition
On the Internet there are various photos of a DIY garage oven.
Despite this openness, it is difficult to figure out what elements the furnace design has. But you need to know these details:
- Firebox;
- Firebox door;
- Blower;
- Blower door;
- Chamber for laying stones (relevant in the bathhouse);
- Grate bars;
- Pipe valve.
There is only one condition - the walls should not be thinner than 6 mm. The following materials are welcome:
- Steel (preferably heat-resistant);
- Cast iron.
For reference. A thin-walled potbelly stove wears out quickly, but it heats up quickly. In addition, such structures are lightweight.
Check it out here too!
How to make an arch from plasterboard: we make an interior arch according to photo instructions. 120 photos of arches in the interior- How to make a balcony with your own hands - tips on how to make a balcony in an apartment beautiful. Step-by-step guide to the use of modern building materials + 70 photos of the best design options
Installing a compartment door with your own hands - step-by-step instructions for installing sliding doors and tips on choosing fittings (110 photos + video)
Furnace categories
There are different stoves and stoves, and the corresponding difference is explained by the composition of their material, shape and even the principle of heating.
Today the most popular models are:
- Brick;
- Metal;
- Oily;
- Rocket;
- Steam.
The opposite situation is when heating devices operate on the same type of fuel and have a similar internal combustion system, but are made of different materials - metal, brick, etc.
Gas furnaces for the garage: the most popular options
You can use gas equipment to heat your garage. Such a device can have different designs, which determine the operating conditions and the level of heat transfer. To ensure its functionality, it is not necessary to connect to the central highway. It is enough to purchase liquefied gas in cylinders. We invite you to get acquainted with the main varieties.
Replaceable cylinders are used to connect gas equipmentPHOTO: sanatatur.ru
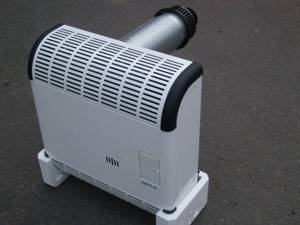
Convection heaters
Such devices are equipped inside with a ceramic or steel heat exchanger, heated to the desired temperature using an open flame. After this, this element releases heat to the surrounding space through natural air convection. Cold air enters the oven through special openings from below, and heated to a high temperature is released from above into the surrounding space.
Gas convectors require quite a lot of time to heat the interior of a garage. But then they maintain a comfortable temperature well for a long time.
The best option for long-term heating of the garage PHOTO: poluchi-teplo.ru
The main advantages of such devices include:
- combustion of fuel in a closed chamber;
- efficient gas consumption;
- safe operation due to the absence of combustion products escaping into the internal space. Such equipment is usually mounted on the wall and connected to a coaxial chimney.
Manufacturers offer models equipped with an additional fan that provides forced air exchange. Such devices are characterized by increased productivity and are able to heat a large area. However, they are energy dependent.
Infrared catalytic and ceramic
Infrared gas equipment is significantly more efficient than its electric counterparts. Catalytic heating is provided due to the effect of catalysis. The gas is oxidized on the platinum-coated heating surface. The element itself warms up to 200ºС.
The catalyst included in the device promotes complete combustion of the substance. The output produces carbon dioxide and water. The devices are safe to use due to the subsequent neutralization of 95% of combustion products. The reaction requires less oxygen to proceed than in other cases. However, such devices have a short service life. The service life is only 2–2.5 thousand hours.
Ceramic devices heat up special elements, which then begin to warm up the surrounding air. They are equipped with an oxygen and gas leak sensor. They have fire protection. Depending on the design, they can heat 4-40 m². Such stoves place increased demands on the quality of installed ventilation. If you don’t have one, you should make a choice in favor of devices of a different type.
The heating area depends on the selected stove model PHOTO: i.diymall.co
Gas fireplaces
Such stoves can be a good option for heating a garage. They are able to warm up a room of a certain area. Powerful models allow you to create comfortable conditions on 200 m². During operation, gas fireplaces do not create much noise. They have a fairly high efficiency: 80-85%. For comparison, wood-burning analogues have only 15-20%.
Manufacturers offer mobile gas fireplaces that, if necessary, can be moved from one place to another. A remote control method is often available and it is possible to maintain the temperature in a given range. Such ovens are quite expensive.
The garage can be cozy PHOTO: thewoodwhisperer.com
Thermal gas guns
Of the existing types of gas equipment, it is heat guns that are able to warm up the garage premises in a minimum time. Depending on the design, such devices are either equipped with a fan or operate solely due to the draft created by the burned gas. The first involves connecting to the mains and has more power.
Combustion chambers in heat guns are divided into open and closed. In the first case, there is a possibility of a small amount of combustion products entering the internal space. During operation, the devices create a fairly powerful heat flow, which inevitably leads to an increase in the concentration of dust in the air.
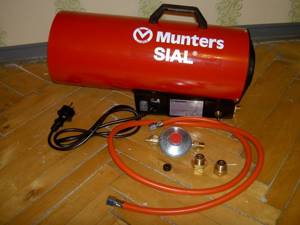
To warm up the internal space, you just need to connect the cylinderPHOTO: ad-cd.net
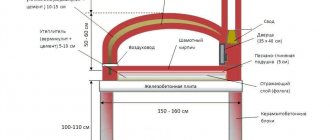
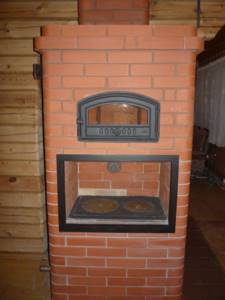
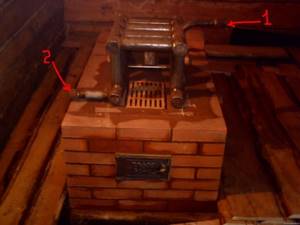
Brick kilns
A brick heating center is not the most convenient option, but if you reduce the area of the structure to 2x3 m, you can save the useful area of the garage.
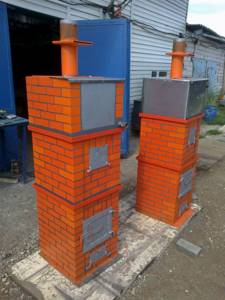
The optimal place to organize a brick oven is the back wall or corner of the garage. Here you will have to make a hole for the chimney. It is also necessary to place an iron lining under the stove so that the high temperature does not wear out the foundation.
Check it out here too!
Do-it-yourself countertop installation: selection, installation and fastening of the countertop. 155 photos of the best ideas and tips for their use- Curtains for the kitchen: ideas for combination (design photo)
- Do-it-yourself canopy - beautiful ideas, best projects and tips on how to build a canopy with your own hands (90 photos and videos)
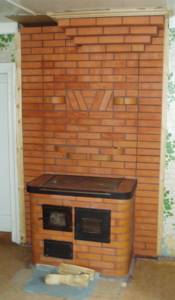
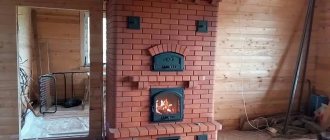
Despite their large dimensions and long heating time, brick stoves are in demand due to their reliability and durability.
About brick garage ovens
The second conclusion from the above is that a brick stove is not suitable for heating a garage:
- The heat output of brick kilns is about 0.5 kW per 1 sq. m of their surface. If you calculate what size stove is needed in the garage, it turns out that only it will stand there, and the car will have to be left outside.
- For a long life, a brick oven also needs comfort: an even microclimate in the room and humidity within sanitary standards. In the garage, the clay masonry mortar will soon become limp and the stove will “float”: the clay mortar does not set like cement, but dries out, and unfired clay is hygroscopic.
- Convection from a brick oven is quite sluggish. There is no question of any warm hat; the heated air will move towards the walls and cool, descending along them, before it heats anything.
- The brick oven takes a long time, 1-1.5 hours, to warm up. A private owner will have to heat it ahead of time (what if you need to enter the garage suddenly?), but in a production garage, don’t expect labor productivity at the beginning of the shift. And then, most likely, too. Paying someone extra for the duties of a stoker is an extra expense that can be avoided if the stove heats up quickly.
However, a brick is needed to fully heat a garage. As an additional heat accumulator, which will be discussed later.
Oil furnaces
As the name suggests, these stoves produce heat by burning oil. Basically, their design involves installing one container above another for complete combustion of oil fumes. The containers themselves are connected by a pipe.
The advantages of oil furnaces include:
- Environmentally friendly (oil fumes do not harm the atmosphere, as smoke does);
- Compactness (the design of an oil stove is more complex than that of a potbelly stove, but still it takes up little space);
- Fast heating;
- Easy maintenance (oil does not leave behind soot, like firewood does);
- Durability (due to the fact that the oil does not leave waste, the furnace walls are less subject to chemical reactions).

The disadvantages of an oil furnace include operation using scarce fuel - waste oil. The latter has to be obtained from service stations, manufacturing plants, or from friends.
What should a stove be like in a garage: device power requirements
The design of most garages does not include the installation of a heating system. At the same time, low temperatures in winter not only create discomfort for car owners, but are also undesirable for vehicles. As practice shows, the use of traditional portable electric heating devices is ineffective and costs a pretty penny in electricity bills. Solving the problem is quite simple - you need to build a stove in the garage with your own hands, choosing the best option.
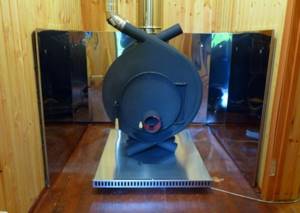
An antique stove will look great in any garage
The problem of heating a garage is based on two points:
- lack of effective thermal insulation;
- the square-cube law, which implies the ratio of the size of the surface of a body to its volume.
The mentioned law is reflected in the form of heat loss. To heat one cubic meter of a room with a small area, much more heat is required than when heating a spacious building. For example, to heat a two-story house, a device with a power of 10 kW is sufficient, and for a garage of standard sizes you will need a device with a heat output of 2.5 kW.
To maintain a temperature of 16°C in the garage, you can install a 2 kW unit, and for a temperature of 8°C intended for storing a car, a 1.2 kW unit is sufficient. Accordingly, to warm up the entire area, significantly more thermal energy will be required, so it is better to heat not the entire room, but the so-called workplace.
How to make a stove in the garage: maximum placement efficiency and insulation system
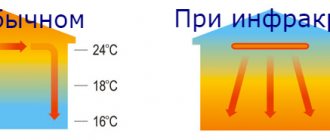
The air heated by a heating furnace for a garage should be concentrated in the center of the room, spreading around so that a small layer of cool air is formed between the walls and ceiling. Thus, the vehicle and its owner will remain in a comfortable temperature zone, and heat consumption will be significantly reduced. The so-called heat cap is formed due to natural convection: a strong flow of warm air rises upward, where it collides with a cold dense layer.
The appearance of a garage stove is not as important as its energy efficiency, but a beautiful design will not go amiss
Helpful advice! According to the rules (regarding car parking) regulated by document SP 113.13330.2012, the optimal temperature for storing a car should be no lower than 5°C, and during repair work - 18°C.
Thanks to the physical process of convection, which consists of spreading currents of warm air, almost the entire garage is efficiently heated. You can get this result even with a homemade garage oven with low power.
The insulation system plays an important role in the heating process and heat preservation. One of the tricks that builders of garage cooperatives use is the dense arrangement of neighboring structures, which allows for maximum heat retention. In individual buildings, various available materials, for example, fiberboard, can be used for external insulation.
Insulating the inside of a metal garage can be problematic, since a dew point appears at the point of contact between the materials, where condensation accumulates. As a result, this can lead to rapid wear of both the base material and the insulation. Therefore, it is necessary to maintain an air cushion between the main and additional walls of 30-50 mm, retreating from the floor by approximately 60 mm.
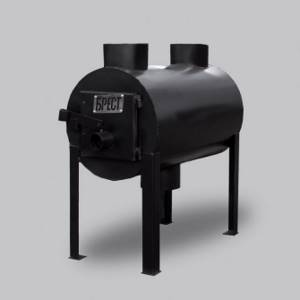
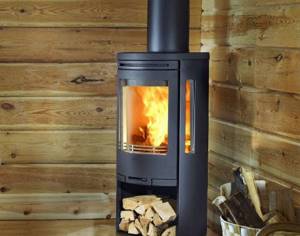
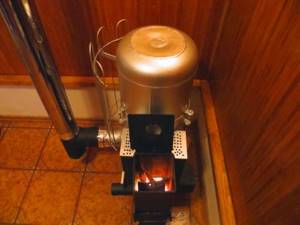
A pipe garage stove is the cheapest option
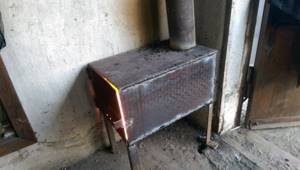
Metal furnaces
Metal stoves are the most popular option for heating a garage. This is because these units have many advantages:
- Compactness;
- Light weight;
- High heating level;
- Easy to install (does not require foundation preparation);
- Suitability for cooking.
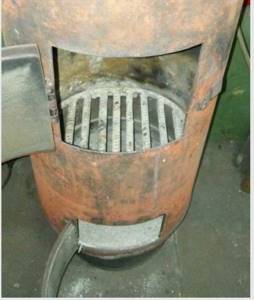
Potbelly stoves are also distinguished by their simplicity of design:
- Firebox for storing firewood;
- Grate bars (grid for creating traction);
- Ash pan for collecting ash;
- Chimney for removing smoke.
You will have to make such a stove for a wood-burning garage with your own hands from worn out tin or cast iron structures. However, the market offers ready-made and used potbelly stoves at attractive prices.
The only drawback of a potbelly stove is its heating using solid fuel. The latter is not always easy to obtain; it burns quickly and produces exhaust.
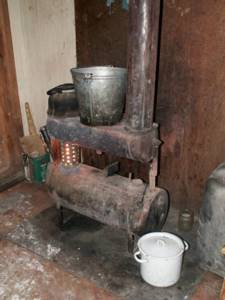
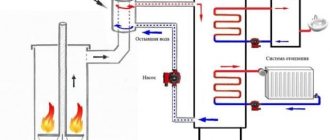
For reference. To fully heat the entire area of the garage, pipes with radiators can be connected to the potbelly stove. However, such a system requires proper circulation of smoke or coolant.
Potbelly stoves - proven and simple designs
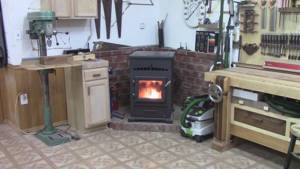
Potbelly stoves were a hit of the 20s of the last century. At that time, these stoves competed with brick stoves and were installed everywhere, even in apartments. Later, with the advent of centralized heating, they lost their relevance, but are used in garages, dachas, and for heating utility or outbuildings.
Sheet metal
Potbelly stoves from a cylinder, barrel or pipe
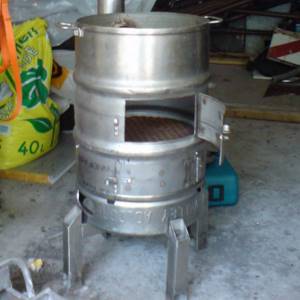
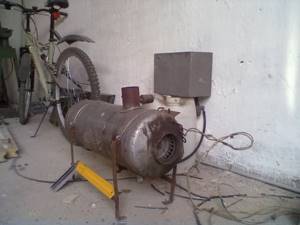
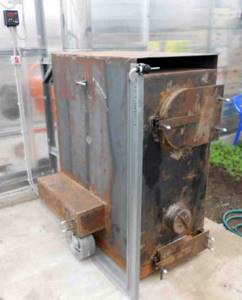
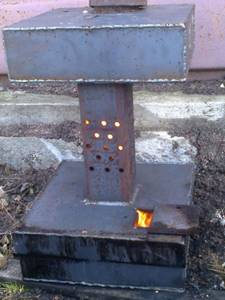
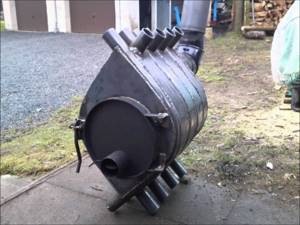
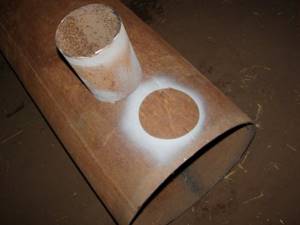
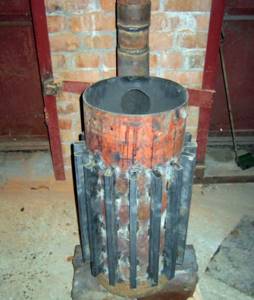
The most suitable material for making a potbelly stove for a garage is propane cylinders or a pipe with a thick wall. Barrels are also suitable, but you need to look for ones that are not very large in volume and have a thick wall. In any option, the minimum wall thickness is 2-3 mm, the optimal is 5 mm. Such a stove will serve for many years.
By design they are vertical and horizontal. It is more convenient to burn horizontally with firewood - longer logs will fit. It’s easier to make one extended upward, but the firebox is small in size, so you’ll have to cut the wood finely.

A potbelly stove for a garage can be made from a cylinder or pipe with a thick wall
Vertical
First, how to make a vertical stove for a garage from a cylinder or pipe. Divide the selected segment into two unequal parts. Below is a smaller one for collecting ash, above is the main one for storing firewood. The following is the order of work:
- Cut out the doors. Small at the bottom, solid at the top. We use the cut pieces as doors, so we don’t throw them away.
- We weld the grates in the chosen place. Usually this is steel reinforcement cut into pieces of the required length with a thickness of 12-16 mm. The reinforcement installation step is about 2 cm.
How to make grate bars
Overall, that's it. All that remains is to assemble the chimney and you can test a new stove for the garage.
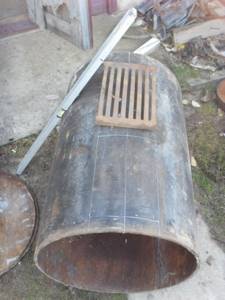
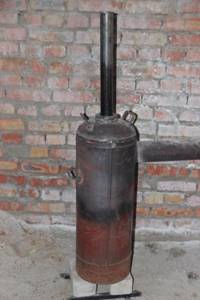
Horizontal
If the housing is located horizontally, the ash box is usually welded from below. It can be welded to the required dimensions from sheet steel or a piece of channel of a suitable size can be used. Holes are made in the part of the body that will be directed downwards. It’s better to cut something like grate bars.
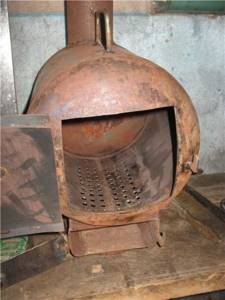
How to make a potbelly stove for a garage from a gas cylinder
Then in the upper part of the body we make a pipe for the chimney. To do this, you can weld a cut piece from a pipe of a suitable diameter. After the piece of pipe is installed and the seam is checked, the metal inside the ring is cut out.
Next you can make the legs. The best fit is pieces of a corner, to which small pieces of metal are attached from below so that they stand stable.
The next step is installing the doors. You can cut a piece of metal onto the ash pan, attach hinges and a lock. There are no special problems here. The gaps around the edges do not interfere - combustion air will flow through them.
There will be no difficulties if you are making a door from metal - welding the hinges is not a problem. Only here, in order to be able to at least slightly regulate the combustion, the door needs to be made a little larger - so that the perimeter of the opening is closed.
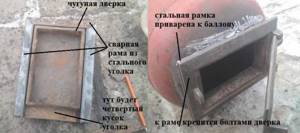
How to install stove casting on a metal stove
It is problematic to install furnace casting. Suddenly someone wants to have not a steel door, but a cast iron one. Then you need to weld a frame from a steel corner, attach the casting to it with bolts, and weld this entire structure to the body.
From two barrels
Anyone who has used a potbelly stove knows that very hard radiation comes from its body. Often the walls become heated to a red glow. Then it is impossible to be near her. The problem is solved with an interesting design: two barrels of different diameters, inserted one into the other. The gaps between the walls are filled with pebbles, clay mixed with sand (calcined over a fire, then filled in only after it has cooled). The inner barrel acts as a firebox, and the outer one is just the body.
This stove will take longer to heat up. It will not immediately begin to give off heat, but it will be more comfortable in the garage and after the fuel burns out, it will warm the room for another couple of hours - releasing the heat accumulated in the bookmark.
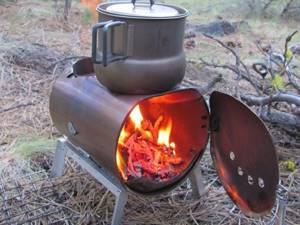
Rocket stoves
These garage heating systems consist of two pipes - horizontal and vertical.
Both elements are welded to each other, but you can limit yourself to one curved pipe. The horizontal pipe is used to store fuel, the vertical pipe is used to exhaust smoke.
The rocket stove has several positive features:
- Simplicity of design;
- Can be used as a stove for heating food;
- One bookmark burns for 5-6 hours.
However, if you are planning to make a rocket stove by hand, you must also know its disadvantages:
- The need to use thick-walled metal during manufacturing (if the rocket stove will be used in the garage);
- Inability to regulate combustion;
- Strong heating of metal walls;
- Powerful fiery exhaust;
- Impossibility of installation in certain places.
Regarding the last point, it is worth noting that the rocket stove can be small in size. This design is easy to weld from channels, profile pipes or round pipes.
A small rocket stove can be used on a camping trip, but in the garage its heating level will be average.
Buying or making your own?
A wood-burning stove in a garage is an indispensable attribute for heating a small room in which a lot of things are stored. Most people can afford to hire a builder to easily install the furnace, but this is notoriously expensive.
A commercial stove is a quick and, in most cases, safe way to heat a garage. In case of a breakdown, the device can always be returned for repair under warranty, but with a homemade stove you will have to deal with it yourself.
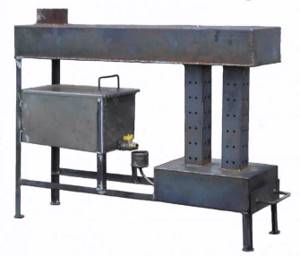
Scheme of operation of a solid fuel furnace.
Often a purchased stove is installed free of charge: many supplier companies have a policy of free installation of equipment upon purchase.
Garage owners and, at the same time, experienced welders have created the optimal option for manufacturing a stove, which does not require large investments and time-consuming efforts. You can construct such a stove yourself, without the help of specialists.
To make it, you need to evaluate the size of the room and choose the right stove option. It is also necessary to observe the necessary safety rules during its construction and further operation. The room in which the stove will be built must have good ventilation - forced or natural.
It should be noted that any stove that runs on solid fuel materials can be made independently, therefore, if desired, as well as having time, it is recommended to start creating it yourself.
This can be done if the owner has previously worked with an angle grinder and a welding machine. If you do not have this experience, you may end up with an unsafe and ineffective stove.
Steam ovens
Sometimes craftsmen do not ask themselves how to make a stove for a garage with their own hands, but convert ready-made units into steam boilers.
Such devices are complex because they operate using different types of fuel and must heat water in order for it to heat the room.
The design of a steam furnace is:
- Steam boiler;
- Steam turbine;
- Reduction-cooling unit.
The corresponding models are suitable mainly for arranging baths. In garages, environmental exhaust is not so in demand. In addition, to heat the steam you need to use a lot of water, which is very cold in winter.
Pros and cons of the solution
We have formulated the conditions. Now let's see to what extent a brick oven for a garage satisfies them.
Advantages
- A brick oven is undoubtedly capable of providing an acceptable temperature: by adjusting the dampers and the blower, you can limit the rate of combustion of wood or coal. If it is necessary to increase the room temperature to a more comfortable one, you just need to add fuel and ensure air flow into the firebox.
- A brick stove for a garage differs favorably from steel and cast iron in that after lighting it cools down much longer: the high specific heat capacity of the brick is combined with the solid mass of the structure.
- The rated thermal power depends linearly on the size of the firebox. The lower the requirements for heat transfer, the smaller the final dimensions of the furnace will be. No problem.
- If you do all the work yourself, the costs will not exceed 10-15 thousand rubles. You will only have to buy bricks, some cement and cast iron. Compared to most alternatives, the costs look quite modest.
- Operating costs will also not be ruinous: after mains gas, wood and coal remain the cheapest sources of heat.

Comparative cost of heat obtained in different ways.
Flaws
- A brick stove for a garage is really good because it takes a long time to cool down after lighting. But it also takes a long time to heat up. It will not quickly heat the room to a comfortable temperature.
- There is no need to talk about complete autonomy. A brick stove needs daily lighting: otherwise the temperature in the room will drop below acceptable levels.
- When the flow of air through the ashboard is limited, the efficiency of the stove drops sharply: the products of incomplete combustion are carried into the chimney by draft. However, this is a problem with all cheap stoves: only gas generator boilers, which are clearly more complex and more expensive than the reasonable maximum for a small garage, lack it.
- The minimum amount of expenses means masonry from suboptimal materials. If building bricks can cost 6-7 rubles apiece, then the optimal refractory (fireclay) brick for lining a firebox will cost 4-6 times more. An attempt to make the stove more beautiful by laying stove facing bricks will increase costs even more.
Choosing a stove depending on the fuel consumed
The stove can heat a garage by burning various raw materials. The more of the latter the user can afford, the more relevant it is to purchase a specific stove.

Modern autonomous heating units operate by burning:
- Liquid fuel – diesel fuel, diesel, oil, kerosene;
- Solid fuel - coal, firewood, sawdust, briquettes;
- The volatile fuel is gas.
There are also electric ovens. They are comfortable and safe. However, high power costs make these models unpopular.
Furnaces running on liquid fuel are more environmentally friendly compared to their solid fuel counterparts.
The safest option for the atmosphere is a DIY gas stove for the garage.
For such a design, you need to purchase cylinders with liquefied gas, which is explosive. Therefore, it is necessary to organize additional storage space for the corresponding containers.
You can also connect the gas line to the gas furnace. But such a system itself is complex and requires many permissions from higher authorities.
Waste oil furnace
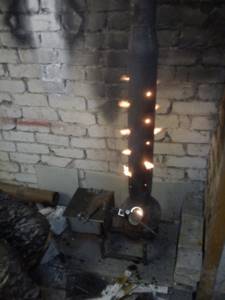
The simplest garage stove that runs on waste oil is well known to everyone. And, although its drawing is not difficult to find in RuNet, just in case we will present it again:
As you can see, such a heater is simple to manufacture, but there are some nuances during operation. The main enemy of such stoves is water, which, due to various circumstances, gets into the used oil. A very small amount of it causes strong pops in the perforated afterburner (a vertical pipe with holes), which can lead to a fire. It turns out that before use, the fuel must be settled to separate the water.
The second drawback of the heater is the pungent odor during the ignition and warm-up stages. Otherwise, the use of the miracle stove, as it is called on specialized forums, does not cause any particular complaints. It heats up quite well. But on the same forums, craftsmen have long proposed a more reliable and efficient design. And not such a fire hazard. The principle by which such an oil stove operates is shown in the figure:
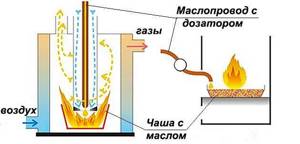
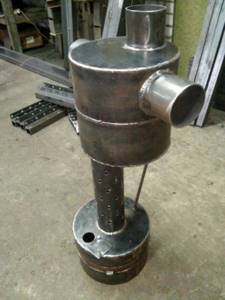
The fuel burns in a metal bowl located at the bottom of a vertical pipe (or gas cylinder). It is fed into the bowl in drops from a dosing device. Thanks to this scheme, if necessary, a liquid fuel stove can also burn diesel fuel; you just need to adjust the air supply and dosage. Some of the oil vapor burns out inside a vertical perforated pipe - an afterburner when secondary air is supplied. The furnace structure is shown in the drawing:
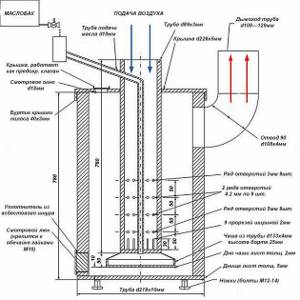
As a body, you can use a thick-walled steel pipe or a propane cylinder. The range of the remaining metal is indicated in the drawing; we will not list it again
Instead, let’s focus on the method of air supply; it can be of two types:
- natural, due to chimney draft;
- forced pumping by a fan.
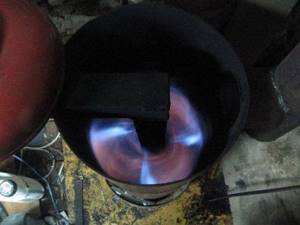
A homemade drip stove made from a pipe can also operate at low draft if there is no way to raise the chimney higher. This is facilitated by installing a fan that forces air inside the afterburner. Then, looking into the operating furnace from above, we can observe the following picture:
The method is considered more effective and quite reliable, tested by more than one garage owner. If desired, such a diesel stove is enclosed in a water jacket, turning into a hot water boiler. This will allow you to install radiator heating in the garage and significantly increase comfort during long stays indoors in winter. The warning for oil heaters is the same as for wood heaters: if there is a high-rise residential building in the immediate vicinity, you will have to return to the idea of heating with electricity.
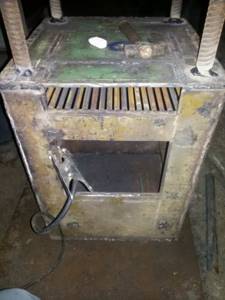
Photos of do-it-yourself garage ovens
Read here - How to make a shower room with your own hands: practical ideas on how to build and tips on how to decorate a shower room (video + 105 photos)