0
5077
24.08.2013
Making a stove with a water heating boiler
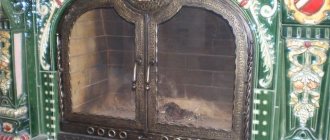
No one will doubt that in a Russian bath the greatest comfort is achieved if a wood-burning stove with crackling wood, a pleasant spirit and amazing heat from a live fire is installed. The only bad thing is that sometimes too much firewood is required in order to light the bathhouse and enjoy the cleansing process. A water heating boiler, which is built directly into the stove, can significantly speed up the heating of the room and the preparation of the bath. This tandem significantly increases the efficiency of a wood-burning stove and saves time and wood. The main idea is that a built-in boiler, even with small dimensions, provides enormous heat transfer. Now let's talk about how to implement such an improvement in a wood-burning stove using improvised means in a short time.
Features of the boiler structure
The requirements for boilers by owners of private houses are simple:
- He must be economical.
- Possess a very high level of heat transfer.
- It's inexpensive.
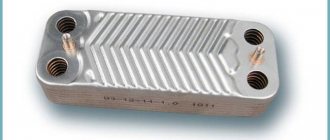
Taking into account the fact that gas boilers and gas pipeline connections to the house cost a lot of money, and subsequent payments for gas will not bring any savings, many private houses are installed with wood-burning devices. The most effective type of heater is a water boiler, which can not only heat a small country house or cottage, but also supply it with hot water.
A homemade boiler made from cast iron batteries is an excellent alternative to industrial units, which are expensive but save little.
Its structure is such that a water boiler is built into a conventional stove, which increases its heat output many times, thereby reducing the cost of firewood and heating the room almost instantly.
Boiler made of cast iron heating radiators?
Pot into the cauldron - This is already a relic of the past. There are such boilers in operation with a gas burner device. Mostly, residents have already gotten rid of them and installed good modern wall or floor mounts. Much more convenient to use.
As I understand it, a good modern boiler means an imported one, stuffed with electronics, with a closed combustion chamber, forced coolant circulation, and forced smoke removal.
Please note the following points:
1) the boiler is connected to electricity. In our store, in addition to such a boiler, there is an expensive uninterruptible power supply and a pair of batteries.
2) the cost of annual maintenance of such a boiler will be significantly higher than a conventional one. Look at rygaz prices for mandatory maintenance of gas equipment. They call such boilers high-tech and charge 4 times more for maintenance.
If it is possible to install a heating system with gravitational circulation of coolant. then I'm all for her.
Regarding the boiler, in my opinion, it is better to buy a used boiler for the required type of solid or liquid fuel for this couple of years.
From my own experience: I bought an AOGV-11.6 with Eurosit-630 automation for 1000 (one thousand) rubles on Avito. I connected it to gas. The thermostat did not turn on beyond the second position. Moreover, I switched the burner to the lowest gas flow. And the old universal boiler KS-16 (16 kW) was heated with coal and wood this winter. Heated area 110m2. Ceiling height is 2.7m. The walls are silicate brick, 1.5 bricks + 50mm foam insulation. Voronezh region center. The chimney is attached, external, i.e. the heat from the flue gases is shamelessly not used for heating in any way. The power of the coal-fired boiler was excessive for this area even on the days of maximum frost this winter (-24 degrees C). This is confirmed by the fact that the 11.6 kW gas boiler easily and effortlessly coped with heating the house on those days when I did not light the solid fuel boiler.
I do not recommend buying a solid fuel boiler with a large power reserve for the reason that for normal coal combustion a certain layer of fuel is required in the firebox of the boiler. The greater the power, the larger the firebox and therefore for stable combustion it is necessary to add more fuel, which in turn leads to excessive fuel consumption and overheating of the room, since there is simply nowhere to take the heat. Therefore, 30 kW per 200 m2, in my opinion, is unnecessary, especially for Crimea.
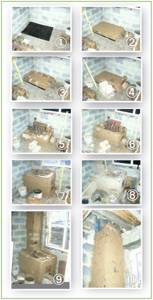
Preparatory work
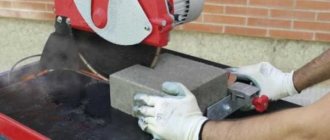
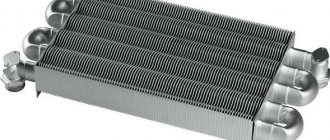
Finding old Soviet cast iron batteries is not a problem today. Dozens of them are demolished when residents of apartment buildings change their heating to more modern models, or when old buildings are demolished. The best option for manufacturing the structure would be cast iron radiators M-140.
One battery section holds up to 1.5 liters of water. The number of sections directly depends on the area the heating boiler made from a cast iron battery must heat. For example, for a house with an area of 100 m2, 12 sections with a total capacity of 18 liters and a size of 3 m2 will be required.
Before starting to manufacture the boiler, all sections of the radiator must be thoroughly washed to remove scale and dirt accumulated over many years of operation. To do this, you can pour a 6% solution of hydrochloric acid inside and hold it there for a while until it eats away all the deposits. After this, the solution is drained and each section is thoroughly washed with water.
This procedure should be carried out slowly, taking all precautions. You must wear protective gloves on your hands and a respirator on your face. After all sections have gone through the cleaning process, you can begin to assemble the boiler from a cast iron battery with your own hands.
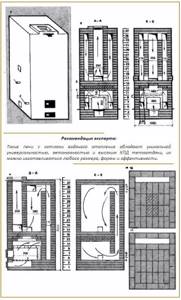
Laying bricks for a furnace with a water boiler
Laying bricks for a furnace with a water boiler is carried out as follows:
- A reinforced concrete foundation is laid.
- Clay-sand mortar is used for masonry. It is best to soak the clay and sand overnight. Lumps of clay and sand are ground. The next day, both components are mixed in the ratio: 1 portion of clay to two portions of sand.
- A layer of waterproofing in the form of roofing material is laid on top of the foundation.
- The layer of mortar is distributed evenly and level over the waterproofing, after which you can begin laying the first layer of brick.
- The outline of the blower is formed first and a door is installed for it. Next, on top of several layers of brickwork, a grate is placed separating the firebox and the ash pit, in which the ash will accumulate.
- When forming the firebox, the size of the water boiler with the required gaps between its outer walls and the brickwork around the perimeter of the firebox is taken into account. Along the contour of the first row of bricks in the firebox, a side is formed for installing the corner. It is on the corners that the boiler will be fixed. Openings must be left in the side walls of the firebox for the return and supply pipes to exit.
- The walls of the chimney are removed with the obligatory formation of channels to dissipate excess heat and discharge ash and fumes.
- To top it off, a chimney is laid out. Upon completion of all work, you can connect the heating system to the boiler and check its operation.
Scheme of laying bricks for a furnace with a water boiler
Assembly of the structure
Assembling the radiators together is not difficult, but you should first purchase new intersection gaskets or use instead an asbestos cord impregnated with graphite powder, previously diluted in drying oil.
Since the temperature inside the boiler can exceed +600 degrees, it is worth taking care of the gaskets in advance. The tightness of the entire structure depends on their quality and strength.
The radiator assembly sequence is as follows:
- Nipples equipped with right and left threads are screwed into each section.
- Asbestos cords are wound around them.
- The sections are connected in pairs by alternately tightening the nipples. It is important to make the same number of turns with the key so as not to cause distortion.
- All sections of the cast iron radiator are connected in the same way.
- The return and supply pipes should be connected diagonally, closing unused holes with plugs.
On one side of the riser there should be a right-hand thread, and on the other, a left-hand thread. If this does not work out, then you need to screw on the nipple and the coupling with the drive on it.
Oil radiator from MS-140 battery
As a rule, oil heaters are used as additional heat sources if the central heating “cannot cope” in full. Sometimes they are used to heat small rooms where heating is not installed.
In this case, knowing how to make an oil radiator from a cast iron battery, you can save a lot on both the purchase of a new device and its operation.
Depending on the power required from the heater, its manufacture may require from 1 to 4 heating elements. As a rule, one or two heating elements are enough to use such an oil radiator in everyday life. To work you will need:
- Classic cast iron battery, for example, brand MS-140.
- Heating element of suitable power.
- Technical oil, but according to craftsmen, the best option would be to use electrical oil, which is poured into transformers. It is resistant to high temperatures and therefore safer. The only drawback of transformer oil is its high cost.
The modern market of thermal technologies offers heating elements specially adapted to work in the MS-140 cast iron radiator. It is better to look for and buy a ready-made device than to try to calculate on your own what power, shape and size of the device will be required.
It is very easy to make an oil cooler by following the steps in the right sequence:
- The heating element is installed in the lower manifold of the cast iron battery from the end part.
- The rear wall of the structure is grounded.
- Move the oil drain hose and ball valve downwards. This is important because if the media drains, the heavy battery case filled with oil may be difficult to tilt.
- A plug is placed on the upper end hole above the heating element, and the hole above the tap is closed with a plug with a Mayevsky tap.
When heated, oil expands greatly and will require space inside the cast iron radiator, so fill the container only 80-85%.
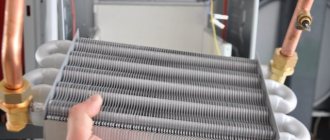
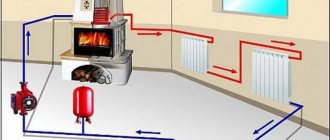
Location of the boiler in the furnace
It is important not only how the radiators are assembled and connected to the heating system, but also their place in the stove. In order for the device to work for a long time and efficiently, the boiler made from a cast iron radiator (the video shows how to do this) should be installed not in the firebox where wood or coal is burning, which means there is an open fire, but behind it in the smoke duct.
This will protect the device and extend its service life, and heating with gases that are formed during fuel combustion is no worse than with an open fire.
Cast iron is a fairly fragile metal, so it will not withstand impacts, excess pressure, or too high a temperature. When installing the boiler from the radiator into the furnace, you need to ensure that the pipe at the outlet runs perpendicular to the floor, and the return runs under the floor and the foundation of the structure.
After the boiler is installed, you can begin laying the walls of the stove, having first checked it for leaks. To do this, you need to run water through the system under pressure.
Installation of a stove with a built-in boiler
The best option for a bathhouse would be a stove, into which a specially prepared water boiler is obviously installed, even at the construction stage. In this case, the furnace acquires its own specific design features, which significantly increases the efficiency of the entire system and its compactness.
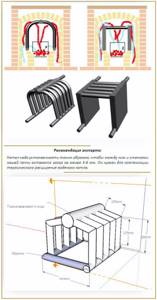
Installation of such a furnace has the highest heat transfer efficiency
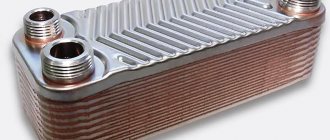
DIY boiler made of brick and cast iron radiator
Often, homemade boilers are better than those manufactured industrially.
This is due to the fact that not every design can be adjusted to the existing heating system, but you can make a boiler from a cast-iron battery that matches it in its parameters quite easily.
The requirements for boilers by owners of private houses are simple:
- He must be economical.
- Possess a very high level of heat transfer.
- It's inexpensive.
Taking into account the fact that gas boilers and gas pipeline connections to the house cost a lot of money, and subsequent payments for gas will not bring any savings, many private houses are installed with wood-burning devices. The most effective type of heater is a water boiler, which can not only heat a small country house or cottage, but also supply it with hot water.
A homemade boiler made from cast iron batteries is an excellent alternative to industrial units, which are expensive but save little.
Its structure is such that a water boiler is built into a conventional stove, which increases its heat output many times, thereby reducing the cost of firewood and heating the room almost instantly.
Finding old Soviet cast iron batteries is not a problem today. Dozens of them are demolished when residents of apartment buildings change their heating to more modern models, or when old buildings are demolished. The best option for manufacturing the structure would be cast iron radiators M-140.
One battery section holds up to 1.5 liters of water. The number of sections directly depends on the area the heating boiler made from a cast iron battery must heat. For example, for a house with an area of 100 m2, 12 sections with a total capacity of 18 liters and a size of 3 m2 will be required.
Before starting to manufacture the boiler, all sections of the radiator must be thoroughly washed to remove scale and dirt accumulated over many years of operation. To do this, you can pour a 6% solution of hydrochloric acid inside and hold it there for a while until it eats away all the deposits. After this, the solution is drained and each section is thoroughly washed with water.
This procedure should be carried out slowly, taking all precautions. You must wear protective gloves on your hands and a respirator on your face. After all sections have gone through the cleaning process, you can begin to assemble the boiler from a cast iron battery with your own hands.
Assembling the radiators together is not difficult, but you should first purchase new intersection gaskets or use instead an asbestos cord impregnated with graphite powder, previously diluted in drying oil.
Since the temperature inside the boiler can exceed +600 degrees, it is worth taking care of the gaskets in advance. The tightness of the entire structure depends on their quality and strength.
The radiator assembly sequence is as follows:
- Nipples equipped with right and left threads are screwed into each section.
- Asbestos cords are wound around them.
- The sections are connected in pairs by alternately tightening the nipples. It is important to make the same number of turns with the key so as not to cause distortion.
- All sections of the cast iron radiator are connected in the same way.
- The return and supply pipes should be connected diagonally, closing unused holes with plugs.
On one side of the riser there should be a right-hand thread, and on the other, a left-hand thread. If this does not work out, then you need to screw on the nipple and the coupling with the drive on it.
It is important not only how the radiators are assembled and connected to the heating system, but also their place in the stove. In order for the device to work for a long time and efficiently, the boiler made from a cast iron radiator (the video shows how to do this) should be installed not in the firebox where wood or coal is burning, which means there is an open fire, but behind it in the smoke duct.
This will protect the device and extend its service life, and heating with gases that are formed during fuel combustion is no worse than with an open fire.
Cast iron is a fairly fragile metal, so it will not withstand impacts, excess pressure, or too high a temperature. When installing the boiler from the radiator into the furnace, you need to ensure that the pipe at the outlet runs perpendicular to the floor, and the return runs under the floor and the foundation of the structure.
After the boiler is installed, you can begin laying the walls of the stove, having first checked it for leaks. To do this, you need to run water through the system under pressure.
You can build a stove yourself, following the sequence of actions.
- The first step is to lay the foundation of the structure, made of reinforced concrete.
- For masonry, the best solution would be a mixture of two portions of sand and a portion of clay. To mix them better, experienced builders recommend soaking the materials in water and leaving them overnight. During this period, they will mix well without additional effort on the part of the owner.
- When the foundation is ready, it should be covered with waterproofing, for which you can use roofing felt.
- A layer of mortar is placed on top of the waterproofing, the uniformity of which is best checked with a plumb line.
- The first masonry should form a ash pit, above which a grate is installed, separating it from the firebox. The grate is attached through 2-3 masonry above the ash pit.
- In the process of forming the firebox, a place is immediately prepared for the boiler from cast iron batteries, taking into account the gaps between it and the outer wall of the stove . To do this, a side of bricks is laid around the perimeter, onto which the corners are attached. It is on them that the boiler will be installed.
- When carrying out masonry, you need to take care in advance of the places where the supply and return pipes will exit.
- The next stage is laying the chimney. During this work, special channels are formed to discharge burning and combustion waste through them.
After finishing the chimney laying, the entire stove must be checked for quality of work, for which it is flooded.
You should never fire a stove if there is no coolant in the boiler. This may damage the system. You can think through and build a structure that will work both as a heating system and as a stove for cooking.
After completing all the steps step by step, it is quite possible to build a stove with a water boiler from cast iron batteries with your own hands.
I want to make a brick boiler (type KIK 17 Kuznetsova I.V.), I want to use MS-140 cast iron batteries as a register (heat exchanger). I would like to hear opinions on this idea. Maybe someone has already done something similar, please share your experience.
“.. I am tormented by vague doubts. “Will ordinary radiators withstand such a mockery in the form of such a temperature difference (fire-water)? . What are intersection seals made of? Neither rubber nor flax can withstand an open flame.
cr00el wrote: I want to use MS-140 cast iron batteries as a register (heat exchanger).
. will flow to anyone at the joints
2cr00el Cheap and cheerful - Boiler made of cast iron battery. And to prevent the gaskets between sections from burning, asbestos cord impregnated with graphite powder diluted in natural drying oil was used as a sealing material.
We come only when people need us.
- And when you are not needed?
- Then we are gone. We don't exist. We don't exist for you
Naturally, the radiators will have to be completely rebuilt, the gaskets changed, for example, to paranitic ones (these are used in internal combustion engines, and there the conditions will be worse), and the asbestos cord according to the recipe " > . Has anyone other than the author of this article done this?
I think it's a cool idea. Execution is no worse! In the summer, you will have to make an extension to the house, about 7*4, where you need to squeeze in a boiler room, a toilet, a bathhouse (instead of a bathroom, I don’t see the point in it) and a living room. I’m still walking like a hedgehog in the fog, and I want it and I’m hunting. The time has come to separate from the cauldron. As expected - let's dance from the stove! I flew with natural gas (194t rubles is too much for me). Firewood remains! And the boiler will be either brick or pyrolysis! maybe this idea will come in handy!
You don't have to do this. How will you clean out the soot? And the volume of brickwork is large - hence the losses to the environment. What kind of fuel will you have and how much power do you need?
Yes, it’s probably not worth installing a brick boiler in a separate boiler room, the losses will not be in the environment in the boiler room. It will be hot in the boiler room.
cr00el wrote: the losses will not be in the environment in the boiler room
When calculating this is called into the environment. But why bother with a homemade product (and such a one) if you can buy a boiler (or order a normal one)?
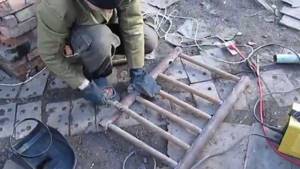
Is it possible to boil all sections? Will cast iron be cooked with a regular electrode?
No, it won’t boil, there are special electrodes for cast iron. In general, local welders, and professional ones at that, don’t even dare to cook cast iron. Once it was necessary to weld the bed of an old lathe, somehow I found a welder who agreed to do it, but apparently for the sake of sport. About a year later the seam burst.
I've already gone through this. I sculpted the boiler according to Kuznetsov. I worked for a month until the heat exchanger from the batteries clogged. I had to disassemble the boiler and clean it in the winter. And the gaskets won’t burn out; the water cools there
cr00el wrote: . Once it was necessary to weld the bed of an old lathe, somehow I found a welder who agreed to do it, but apparently for the sake of sport. About a year later the seam burst.
There are different cast irons in the radiator and frame, there are no problems with malleable cast irons when boiling at 1-2-3. And the battery. Somehow I sculpted a temporary transition 2″ to 1/2 internal, welded a cast iron fitting from an old battery to a steel thread, using a cast iron electrode with a copper wire added to the weld pool, it was still a mess, welded, and held, and did not leak, but it was difficult. If you really need to connect cast iron, then not by welding but by soldering with hard solder on copper or by locking. By the way, large boilers are assembled from sections like battery ones, a ring of annealed copper and some kind of sealant that looks very similar to graphite is used as a gasket.
Manufacturing
To make a battery yourself, you need to have at least the slightest skills in handling the equipment necessary for welding and cutting metal. At the same time, the size of the heating device directly depends on the required power.
Power calculation
Since liquid is used as a coolant, the calculation is made using a special formula, based on the total area of the device and the degree of thermal conductivity of the material used in the manufacture of pipes. The best and easiest way is to use an ordinary cast iron battery as an example.
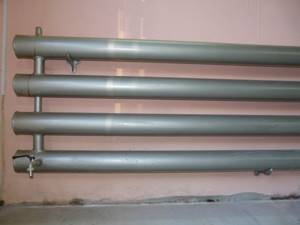
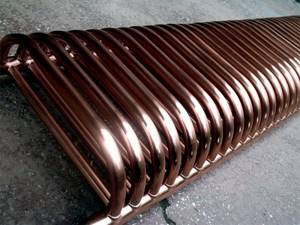
Homemade garage heater from a radiator with taps for draining water and venting air
If the power of the cast iron section is usually 160 W, and it holds 1.45 liters of liquid, a radiator consisting of ten sections can be replaced with several pipes that can hold ten times the amount of water.
According to the existing standard, for every 1 m² of living space there should be 1 kW of heating device power.
Advice: increase the average heat transfer rate if the thermal insulation of the house leaves much to be desired.
In the photo - welding parts into one structure
Preparation
- 2 m of steel pipe with a thickness of at least 3.5 mm and Ø 120 mm;
- steel sheet of the same thickness for plugs;
- pipe used in plumbing systems;
- threaded elements for connecting pipes (pipes) Ø 25 mm – 2 pcs.;
- reinforcement to impart rigidity to the structure;
- to connect the device to the system - threaded connections.
Ideally, all these materials can be found in your dacha or garage, then you will only have to spend money on electrodes and electricity. If this is not available, you can go to scrap metal collection points, where the price is much lower than the store price.
Advice: if you plan to constantly use the device in a residential area, it is more advisable to purchase new pipes.
The main thing is not to buy pipes larger than 120 mm in diameter. This can not only increase the volume of coolant, which, in theory, should increase heat transfer, but also increase the load on the boiler. And this is already fraught with additional costs for heating.
Homemade copper heating radiators for residential premises