Operating principle of the Pompeii furnace
We are accustomed to pizza - an open-faced pie with a variety of fillings; it is easily baked both in fast food establishments and by every housewife in the home kitchen. And we take with distrust the stories of friends who have visited Italy about the incredible taste of Italian pizza, that pizza is baked only in pizzerias according to unchangeable traditions passed down from generation to generation.
The mortar for laying a stove for a summer cottage must be both plastic and viscous, but not liquid. In addition, it should not crumble.
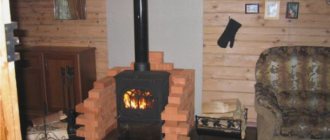
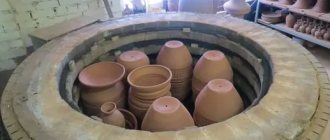
Pizza in such an oven is baked for 60-90 seconds at a temperature of 350-400⁰C. The oven is heated with wood that does not emit tar or soot when burning (olive, cherry, alder), which gives the baked goods a special aroma. It can also be used in other dishes, from homemade bread to stews. All this led to the fact that the Pompeii stove became, along with a barbecue, a desirable attribute of a summer house and country house. It is possible to build it with your own hands if you have some skills and understand the principle of its operation.
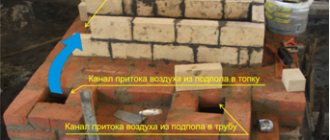
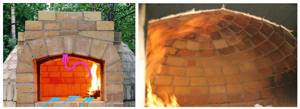
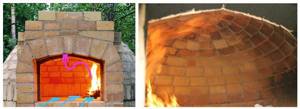
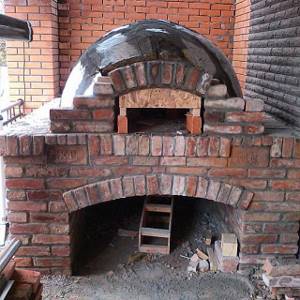
The Pompeian stove has a dome shape, the diameter of its hearth is about 1 m, the height of the dome is half the diameter of the hearth (maybe a little less if you are making a so-called “Neapolitan” stove), the entrance to the combustion chamber is also semicircular, its height is approximately 60% of dome height, the chimney is located in front, on the entrance side. The fire is lit right on the hearth, closer to the wall, and the pizza prepared for baking is placed here. Cold air enters from below through the entrance, heats up from burning wood, rises to the dome, goes around it and evenly and quickly heats the entire internal space, walls and under the stove. Then he goes down to the entrance and goes from there into the chimney.
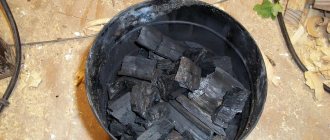
Kindling after completion of work
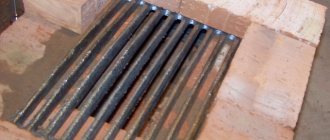
After completion of the work and removal of the auxiliary frames, testing of the furnace begins. It is carried out in 5 stages:
- 2 kg of straw and 1.5 kg of paper are placed in the oven. All this is set on fire and left until completely burned.
- Next, take 2.5 kg of straw and 0.5 kg of brushwood. Likewise - until complete combustion. 4 kg of wood chips are burned.
- Logs are laid and burned.
- The furnace is being tested as usual.
If all stages have been completed successfully, you can begin operating the furnace.
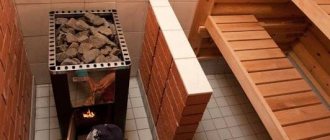
When baking pizza, you don't need a base - it's placed in the oven, and the smell of smoke adds a unique aroma. If meat is being cooked, the coals are raked to the side and a metal grate is inserted through the arch. The meat is located on it. Thanks to its properties and purpose for cooking, dishes turn out juicy, with a bright taste and aroma.
DIY assembly
The first step is to prepare a solid foundation. It is better to do this in the summer, when there is minimal rain. But precipitation cannot be completely excluded, so a waterproofing film will not be superfluous.
Markings are made at the location of the entire structure and a pit is dug. Its depth should not be less than 350 mm. A formwork made of wooden boards is assembled along the walls of the pit, which is then covered with plastic film. It will become the basis of the waterproofing cushion.
A small amount of medium-fraction crushed stone is poured on top of the polyethylene, and a layer of sand no more than 100 mm thick is added on top. All this is covered with film on top. The waterproofing pad is poured with prepared concrete.
As soon as the level of the solution reaches the edge of the formwork, reinforcement is made. After this, the foundation must be left alone for 3 weeks. During this time it will finally settle down.
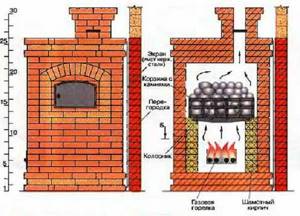
Drawing of a Pompeii oven
Pedestal with table top
This oven element is easiest to assemble from cinder blocks. They are inexpensive and easy to process. The height of the pedestal is selected taking into account the height of the user. It should be sufficient for comfortable work. The minimum value is 800 mm.
The shape of this element should be U or H-shaped. With a side length of 1200 mm, there will be 3 cinder blocks on each side of the base.
Initially, the pedestal is assembled without using a solution. The blocks are connected to each other using wire. Then their position relative to the foundation is verified using a building level and other measuring instruments. If everything is in order, then cement mortar is poured into the holes of the blocks.
After three days you can assemble the tabletop. This work consists of the following stages:
- Assembly of formwork up to 150 mm high.
- Covering the bottom with waterproofing material.
- Assembly of a reinforced frame on waterproofing with a cell pitch of 50 mm.
- Pouring concrete into the formwork and leveling it.
Creating a dome
After the tabletop has hardened, markings under the dome need to be applied to its surface. The diameter of the circle must correspond to the selected project.
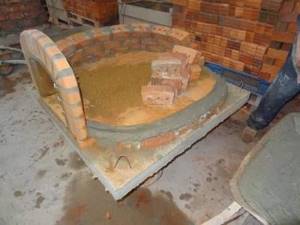
According to the markings, taking into account the order, the base is laid out. Fireclay bricks are used for it. This is the so-called hearth. At this stage you need to be extremely careful. The slightest mistake will lead to the ineffectiveness of the entire structure.
The hearth is laid out without the use of cement. This is necessary to identify bricks that will subsequently be cut.
Before the final installation of the hearth, the surface of the base is laid out with silicate tiles. When it is securely fixed, the treated brick is laid on top using mortar. Then you can begin building the dome.
This is useful: how to prepare mortar for laying bricks. The Pompeian stove will be an excellent decoration for the yard
It is recommended to carry out all work on the further construction of the furnace using cardboard templates. The laying of the dome begins from the entrance to its rear part. The distance between the bricks increases with each subsequent row. It needs to be fixed with wedges. Templates must be used until the dome is completely completed. To create an external arch, it is recommended to use a plywood template.
The creation of the Pompeian oven is completed by thermal insulation and plastering. Calcium silicate slabs are usually used as a thermal insulation layer, but if necessary, mineral wool can be used.
Clay or plaster is used for facing work. If there is no canopy over the stove, then double plastering is required.
Now the structure needs to be tested. During the first warm-up, it is allowed to use no more than 2 kg of fuel. It should be paper or straw. For the second start, you can use 500 g of brushwood. The third heating will require 4 kg of pellets. From the fourth kindling you can use ordinary firewood.
How to make a Pompeii oven with your own hands:
Chimney
The manufacture of a chimney can be made from bricks or by installing a pipe. The material used is ceramic or metal. When using bricks, it is not necessary to use fire-resistant material. Due to the low temperature, the use of ordinary bricks is allowed.
The shape of the chimney does not matter, and the height depends on the location of the stove. If it is located under a canopy, then the pipe is led outside it. If there is open space, the length of the pipe can be reduced.
Preparatory stage
I would like to immediately say a few important points:
- A modern pizza oven can be electric or gas, but it is in a wood-burning oven that it works best;
- It is a mistake to think that a Pompeii clay oven can be built with your own hands without much expense. The base of the structure is laid out of refractory brick, which is quite expensive, and only then coated with clay;
- Building such a stove with your own hands is a long process, it will take at least 2-3 months. It is better to build in the warm season;
- It is advisable to ensure that the stove stands under a canopy.
Tool
Tile cutter, preferably with water cooling, the price of the cheapest one starts from 3,000 rubles;
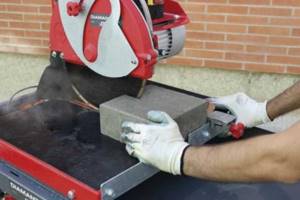
Without a real tile cutter, working with fire bricks is very difficult.
- Grinder with discs for stone and metal;
- Concrete mixer or trough for mixing the solution;
- Electric drill with mixer attachment;
- Rubber hammer and mason's hammer;
- Trowel>;
- Protective equipment - respirator, goggles, gloves.
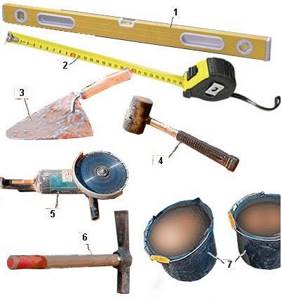
Standard set of mason's tools.
Material
Fireclay bricks (fireproof) - for a home stove with a diameter of up to 1100 mm you need 250–300 pieces of fireclay bricks;
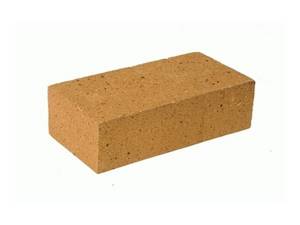
It is impossible to build a Pompeian stove without fireclay bricks.
- Cinder block or ordinary red brick - needed for laying out a podium under the stove;
- Mortar “SHA-28” is a special fire-resistant mortar for laying stoves;
- Fittings - with a diameter of 8 - 10 mm;
- Portland cement - grade M500;
- Mineral wool - slabs 50 mm thick, medium or high density;
- Calcium silicate plate, for example “Super Isol” or “Silca”. Instead, you can use perlite or expanded clay;
- Waterproof plywood or OSB;
- Gravel;
- Sand>;
- The chimney pipe is stainless steel or ceramic;
- Planed board - for formwork, approximate section 200x30 mm or 250x30 mm;
- Polyethylene 150–200 microns thick.
For amateurs, it is better to work with ready-made stove solution.
Characteristics of a home stove
It is not necessary to look for high-precision drawings for such a stove; here it is enough to know the basic parameters and structure: the internal diameter of a home brick stove ranges from 800 to 1100 mm.
There are 2 types of Pompeian stoves “Tuscan” and “Neapolitan”:
A small Tuscan oven is sufficient for home use.
- The Tuscan oven has a dome of regular spherical shape, the height of the dome is equal to the radius of the base (hearth). In addition to pizza, you can bake bread and prepare a whole range of dishes that are familiar to us, so it is better to choose this particular model;
- The Neapolitan oven differs from the Tuscan model in the height of the dome; it is 80% of the radius of the hearth. This model is aimed specifically at making pizza.
The Neapolitan oven model cooks pizza faster.
The entrance to the furnace is made arched or semi-arched, the height of the entrance is 0.6 (60%) of the height of the dome. According to the rules, the width of the entrance should be equal to the radius of the dome, but sometimes it is made a little smaller; this does not affect the temperature conditions.
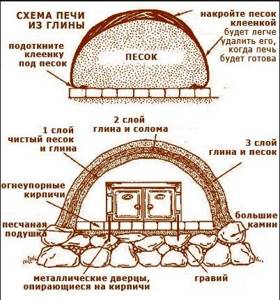
The roof of the Pompeii oven is made of several layers:
- Fireclay brick;
- Fireclay clay or mortar for laying stoves - mortar, up to 30 mm thick;
- Thermal insulation - mineral wool thickness from 50 mm;
- Insulating solution based on perlite or expanded clay, thickness 50–70 mm;
- Cement-sand coating or putty for exterior work, thickness 10–20 mm;
- If desired, you can arrange a decorative layer on top of the protective coating, for example, cover the dome with mosaic tiles.
The bottom of the Pompeian oven is lined with refractory bricks. The layer of brick below must be thermally insulated.
In this type of oven, the air moves in a circle.
How much will it cost?
A DIY Pompeian stove is a fairly expensive design, even if you decide to carry out all the work yourself. This is due to the high cost of the materials from which it is made. Since the design of a tandoor consists of several components, it is easiest to calculate the cost of each of them.
The price consists of purchased materials, and does not include construction waste and materials that can be found near the house (clay and sand):
- A bag of cement – 250 rubles;
- Cinder blocks will cost about 300 rubles;
- Fireclay bricks in the amount of 350 pieces will cost 17,000 rubles;
- Thermal insulation will cost 500 rubles;
- A cutting disc for stone costs about 250 rubles;
- Polyethylene for waterproofing will cost about 200 rubles.
In total, the construction of the entire structure, provided that fireclay bricks are used to lay the dome, will cost approximately 18,500 rubles .
How does it work?
It is important to understand the furnace structure before moving on to the construction phase. The operating efficiency of the equipment depends on the technical features
Temperature changes in the oven are self-regulated due to cyclic changes in gases, which is a characteristic feature and is perfect for baking baked goods and pizza. The dome of the structure is one of the main elements in the organization of work, accumulating heat energy emanating from the fire. During the combustion of solid fuel, two gas flows interact in the dome cavity:
- The first is convection. The flow is directed from the firebox.
- The second is reflected. Gas streams reflected from the walls of the dome itself.
Construction
To enlarge, click
The main distinguishing feature of the Pompeii oven is the presence of a hemispherical vault. The advantage of this arch is the uniform distribution of the temperature of the burning fire over the entire surface of the Neapolitan stove.
To build a Neapolitan stove, you must follow a certain algorithm of actions; it consists of four main steps.
Let's look at the construction diagram of a Pompeian oven:
- Like all structures, the construction of the Pompeii furnace must begin from its base (foundation).
Please note: the foundation of the Pompeii furnace must be strong, since the overall structure will weigh almost seven hundred kilograms. The main part of the foundation of a Neapolitan oven should be a slab, which is made of reinforced concrete.
- The stand rises to a height convenient for you and is placed on the already made base of the Pompeian stove. The stand is usually made of brick, but can be made of metal materials. The Pompeian stove stand can be used to store firewood (if you use this type of fuel resource).
- When you have made a stand, a table is installed on it. The material from which the table is made is concrete.
Take note: the thickness of the Neapolitan oven table should be just over twenty centimeters. This thickness is needed so that the table can support the rest of the structure of the Pompeian furnace.
The thermal insulation layer contains a concrete mixture. Also contains perlite. Perlite is a rock that is of volcanic origin, comes in the form of sand, and is used in the construction of various structures.
- The wood-burning Pompeian oven itself for preparing various types of baked goods is made of bricks. The brick material must withstand high temperatures for the Neapolitan oven to function properly.
It is worth noting: it is necessary to carry out calculations to determine the ratio between sand and clay in order to make a material that will perform these functions. Otherwise, the Pompeii furnace will be unsuitable for operational use.
- Thermal insulation is necessary, since the oven quickly reaches its temperature in a short period of time, and the cooling of the Neapolitan oven takes a rather long period, which allows you to cook pizza and other baked goods at different temperatures.
Operating principle of the Pompeii furnace
The efficiency of the Italian pizza oven is due to the technical design features.
Principle of operation
When solid fuel burns, two streams of hot gases arise inside the dome:
- Convection flow that comes from the firebox itself.
- The reflected flow comes from the walls of the dome.
It is also noteworthy that the temperature in the Pompeii oven is self-regulating.
Movement of cold and hot flows
The hotter the wood burns in the stove, the greater the amount of gases released. Rushing upward in a powerful stream, they block the flow of oxygen in the section of the pipe mouth. Consequently, the intensity of combustion decreases, and hence the temperature decreases.
When the temperature drops, the flow of hot gases also weakens, again opening up access to oxygen.
This cyclical process helps regulate the optimal temperature in the oven necessary for cooking bread, pies, pizza and any other food.
As can be seen from the figure, it is the dome that is the main element of the furnace, accumulating thermal energy from the fire.
Having analyzed the operating principle and design of the furnace, we can summarize and highlight the main pros and cons of the Pompeii furnace design.
Benefits include:
- Fast heating. Already 30 minutes after kindling, raw food can be loaded into such an oven for cooking. While the heating time of a classic Russian stove is at least 2 hours.
- Good heat dissipation. Even after the wood has burned, the heat in the Pompeii stove continues to be maintained for several hours, allowing food to be “stewed.”
- The compact dimensions of the unit allow the stove to fit seamlessly into almost any summer cottage.
- Stylish appearance.
Stylish appearance
The disadvantages of the Pompeian stove include:
- Complexity of design. Unlike the traditional laying of a brick stove for a summer residence, skill will be required here to correctly lay out the dome, which is an integral attribute of the unit.
- High cost of materials.
- The need to build a strong foundation, since the stove is not light in weight.
Tips for use
The main thing is to prevent sudden heating of the new structure. After all, fresh masonry still contains a large amount of moisture, and sudden heating can provoke a significant release of steam, which can tear the masonry.
The new Pompeian wood-burning stove has a natural drying period that lasts up to a year. It can be accelerated a little by carrying out regular fires. Start with a small amount of fuel raw material, gradually increasing this volume.
The newly erected device heats up to the set high temperature in three hours. In the future, this will take about 60 minutes.
The optimal raw material for the firebox is olive or cherry wood, as they practically do not smoke. Along with timber, shavings are also used for heating.
The combustion process in the oven must be maintained continuously, even if the dish is not being cooked in it. Directly during operation, the temperature is raised to 400 degrees.
Baking pizza does not require any additional substrate. This process occurs on the surface of the hearth. You can also cook grilled dishes in this oven. To do this, you need to rake the coals to the mouth and place a grate over them.
Design Features
Thanks to the special internal structure of the oven, it heats up quickly and retains heat for a long time. Historians claim that the Pompeian oven appeared on the Iberian Peninsula and was initially used specifically for preparing an open cheese pie, where the structure was not needed to heat the room.
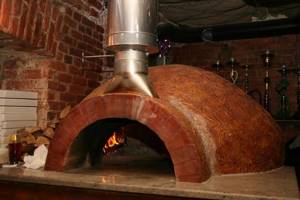
Decoration of a Pompeii oven
Later it spread throughout the world. It is also called Neapolitan, Italian oven, tandoor.
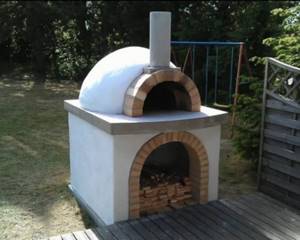
The Pompeian oven will not only be an ideal design for preparing pizza, pies and bread, but will also decorate any countryside area. In combination with a gazebo or barbecue, it becomes a real landscape decoration, becoming a favorite vacation spot for the whole family.
Stove in the yard
Basically, such a stove is installed in suburban areas on the street, in a barbecue area, in an outdoor garden, but if desired and some technical modifications are made, a Pompeii stove can be built in the house. To do this, of course, you will have to provide not only a reliable, solid foundation, but also a chimney.
In this article we will look at the classic option for building an Italian oven in the open air. Before proceeding with the step-by-step instructions, I would like to warn you that laying a Pompeian stove is a very difficult and expensive undertaking.
But if you do everything correctly, then such an oven will delight you for decades, giving you an authentic look to your dacha and helping you prepare delicious homemade baked goods. Thanks to our clear and simple instructions, even a beginner can master the laying of a Pompeian stove with his own hands.
The structure of the Pompeian stove is somewhat similar to the design of the ancient Slavic stove.
Construction of a Pompeii furnace
But, unlike a traditional Russian stove, it heats up much faster. You can cook pies in it literally 30 minutes after heating, while a Russian oven will take at least 3-4 hours before reaching the optimal temperature for cooking.
This heating rate in the Pompeii furnace is achieved due to the lower thermal mass. The layer of brick that is heated is only 12 cm. Within 45 minutes after kindling, the temperature in this oven reaches 260 degrees, and after an hour - 370 degrees.
How is the temperature distributed in a Pompeian oven?
| In 30 minutes | In 45 minutes | In 60 minutes | In 90 minutes | |
| Outer part of the vault | 150 | 260 | 370 | 370 |
| Inner part of the vault | 315 | 370 | 370 | 370 |
The peculiarity and main advantage of the Pompeian oven is that you can cook almost any dish in it in a short time. Thanks to the high temperature that is reached inside the vault, pizza and bread are perfectly baked in it. Smoke adds a special piquancy to baked goods.
Main components of the design of furnace equipment
There are many options for constructing a Pompeian stove, which differ in building materials, dimensions, components, and design. We will use instructions with general recommendations and the traditional sequence of work.
Structural elements of the equipment:
- The foundation, which is a solid slab made of reinforced concrete, 10-20 cm thick.
- Pedestal for the stove. It is made from cinder blocks measuring 20x20x40 cm each. Stand parameters: width and length 120 cm, height – 80 cm. The tabletop is a monolithic reinforced concrete slab 10 cm thick. Fireclay brick acts as a layer that provides thermal insulation between the stand and the structure of the equipment.
- Bake. Its internal diameter is 84 cm, which means that the vault of the dome, in accordance with the accepted proportions, is 42 cm. At the same time, we will carry out thermal insulation work, laying the first layer of double-thick mineral wool, and the second of a cement mixture with perlite additives. Instead of the latter, you can use vermiculite or expanded clay.
We build it ourselves
If we take a strict approach to the issue of baking pizza, then no factory equipment can give a truly “real” result. This means that lovers of Neapolitan or Diabola will have to build a pizza oven with their own hands.
Foundation
The total mass of the finished structure is quite large. Even installing any brick oven outdoors requires a solid foundation in the form of a foundation. Our Italian stove will rest on a solid reinforced foundation with a crushed stone cushion.
To dig a pit you need to know the dimensions of the future furnace. As with any other construction, you will need a drawing. The layout of the furnace is quite simple, so the drawing shows only the dimensions of the structure. The pit should have linear dimensions slightly larger than the dimensions of the furnace podium.
Good to know: Is it worth using a gas heater in the country, which model to choose
A pillow is installed at a depth of 40 cm. To do this, a layer of crushed stone is poured and compacted tightly. Then, the rest of the foundation is filled with mortar, for the preparation of which cement and sand are used. This is an ordinary solution with a ratio of 1 and 4, which fills the space limited by the formwork. A reinforcing mesh should be placed on the surface of the pillow and throughout the entire layer of mortar.
After raising the foundation to the desired level, you need to check the horizon and leave it for several days for the solution to dry completely. To ensure that moisture evaporates evenly over the entire depth and cracks do not form, the new foundation is covered with a film.
Stand and table top
It is too early to design the firebox, as it will be located low and inconvenient to work with. In addition, you can create a functional addition to the stove - a compartment for storing firewood. A stand will be formed on the surface of the foundation. It plays a load-bearing role and determines the height of the furnace. When building independently, the height is selected according to your height. The walls of the stand are formed of strong concrete blocks; there is no front wall. A kind of niche is formed for storing firewood.
Creating walls
The height of the table top is usually 10 cm. This layer of mortar should have two layers of reinforcing mesh. There is a gap of 5 cm between them. After pouring, the tabletop is covered with film and dries for several days. Now you have a base that can support a wood-burning pizza oven.
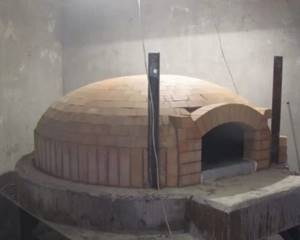
Walls and dome
To build any wood-burning stove, you need to stock up on refractory bricks. The inner surface of the firebox, where the highest temperature is observed, is lined with fireclay bricks. Clay mortar with good adhesion can be purchased at the store in the form of a dry mixture. Preparing the solution yourself will take a lot of time, since you will first have to select a type of clay suitable for its fat content, grind it and mix it with sand.
At the first stage, the arch of the vault is laid out. It is necessary to prepare a wooden template that will hold the arch until the solution hardens.
Creating an arch of the desired shape
After this, we begin the construction of the dome. A row of bricks is laid out around the circumference on the tabletop. To form a dome, many craftsmen advise making a wooden internal frame.
Appearance of the finished structure
But there is a more convenient and practical way. Sand is poured into the space limited by the first row of bricks. A pile of compacted sand is given the desired shape. It can be used to lay out the dome, and then the sand can be removed through the firebox inlet.
Creating a firebox shape using sand
The wood-burning pizza oven body is plastered with clay mortar. Clay can withstand temperature and will prevent heat from escaping from the firebox through possible cracks.
Good to know: Tiled stoves-fireplaces, a new wave of popularity of antique finishes
Chimney
The design of the chimney in a Pompeian stove is quite simple, but at the same time it has one feature. The pipe protrudes forward, towards the entrance to the firebox. Since the stove model is outdoor, there is no need to build a high channel. It is enough just to ensure that the smoke escapes outside.
Construction work has been completed
Having completed all stages of construction, the oven should be left for several days. Despite the fact that the solution dries quickly on the outside, moisture will remain throughout its entire depth for a long time.
Preparatory work: collection and delivery of material
Straw was also needed for construction. But after reading a number of articles and literature, it was possible to make it from pine needles. The author cut spruce branches, it just has long needles, and he also placed these branches in the greenhouse. The branches were drying for almost a month, it seemed like it was hot in the greenhouse, but the needles didn’t even turn yellow at all, but retained a wonderful fresh green tint. Still, the author did not wait until the needles were completely dry, and plucked them from the branches; it was difficult, since the needles had not reached dryness. While the branches were drying, the stove stand was poured. A trench 2 bayonets deep was also dug, right down to the clay.
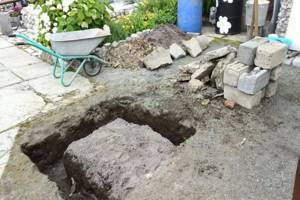
The dimensions of the trench for the stove turned out to be 120x120 cm, and the width of the trench was bayonet wide.
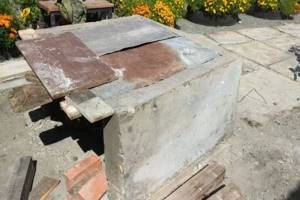
For the formwork I used old interior doors and boards were placed on top of the doors - the resulting structure was 90 cm high. After that it was filled with concrete. A week later, having already placed hemp prepared to size under the boards with iron, the slab was poured, an ordinary slab (without expanded clay).
Financial and economic aspect of building a Pompeian oven with your own hands
What is the reason for the relatively high price of such a stove?
- The Pompeian stove is made of fireclay bricks, which cost an order of magnitude more than usual.
- The design of the stove is quite heavy, and for ease of use it must be raised to a height of 80-100 cm. To do this, you will have to lay out a brick stand on which the stove itself will be built, which means you need to think about a good foundation.
To slightly reduce the cost of building a stove, any materials available on the farm are suitable for the stand: blocks, ceilings, old bricks, etc.
Building a pizza oven
Another disadvantage is the lengthy process of laying a Pompeian stove. A rather complex design, which requires the presence of a foundation, a pedestal, the stove itself, and a large countertop, indicates that the whole process will take at least a month.
In addition, you will need significant technological breaks to harden the concrete for the foundation, etc.
If you come to the dacha only for the weekend, then the entire masonry process can be rationally distributed into several stages, calculating that the technological break for “setting” the materials occurs during your absence.
Traditionally, the Pompeian oven has the following layout:
- solid foundation;
- pedestal for the stove;
- bake.
Pompeian pizza oven
The oven itself, in turn, consists of four parts:
- base (furnace bottom);
- dome (vault);
- entrance arch;
- chimney.
The base (pedestal) is made of small cinder blocks, 20*20*40 cm each.
The tabletop is a monolithic slab made of reinforced concrete 10 cm thick.
Tabletop
Unlike a traditional stone stove, here the chimney is located at the front. This determines one of the main differences in the design. The fire rises up along the dome, heating the vault. Thanks to this, heating is carried out simultaneously from above and below, which contributes to fast cooking.
The Pompeian stove has undergone many changes over the many years of its existence, and today you can find several of its varieties.
Neapolitan oven
There are Tuscan and Neapolitan ovens. The Tuscan stove has a higher arch and is more versatile in use. You can bake not only pies in it, but also cook stews, meat, and soups.
The Neapolitan oven is traditionally used for baking pizza and has a small dome that is approximately 80% of the total dome height.
Tuscan oven with a higher arch
As for the shape and size of the stove, the most optimal design is the one with an internal diameter of 80-110 cm. It is not recommended to make the stove smaller than this.
The spherical arch of the oven serves for maximum heating and heat accumulation, and the arched entrance is used for storing firewood and the food itself.
The size of the oven may vary, but in any case, strict proportions should be adhered to: the height of the arch should be approximately equal to 60% of the total height of the dome.
The width of the entrance for storing firewood should be equal to the total height of the dome.
Multilayer dome of a Pompeii oven
The vault itself has several layers:
- the internal surface is made of fireclay bricks;
- clay coating;
- 1st layer of basalt wool (thermal insulating);
- 2nd layer of perlite;
- Facing layer made of cement mortar.
In this case, the thickness of each layer should be approximately the same size, 5-10 cm. The more heat-insulating layer is laid, the longer the oven will cool down.
The facing layer can be made from any moisture-proof and water-repellent materials, since its main purpose is protection from precipitation. If the stove is being baked in the house, then this protection can be omitted.
In addition, the facing layer also performs a decorative function, so you can make it to your taste: decorative plaster, painting, mosaic, etc.
Conclusion
In order to delight your household and your guests with delicious pizza, as well as pleasant gatherings near a warm fire, every enterprising owner can build a Pompeii pizza oven in his own garden with his own hands. This structure can be made of brick, and if you want to save money, it can be built from clay material. The main thing is that the entire system is manufactured in accordance with technology and basic rules.
What kind of Pompeian stove will you make?
From brick From clay
Design diagram
- Foundation.
- Pedestal.
- Tabletop.
- Entrance arch.
- Under.
- Dome.
- Smoke exhaust.
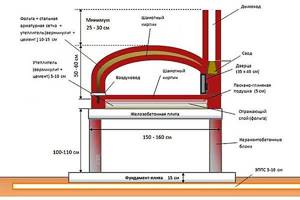
Photo 1. Detailed diagram of the Pompeii pizza oven with explanations and dimensions.
When laying the foundation, it should be taken into account that the furnace will weigh at least 700 kg. The base must be strong and level to ensure the durability of the entire structure.
The stove pedestal is a continuation of the foundation and raises the structure itself to a height of about 1 m.
The tabletop is a working area. It is placed on a pedestal and formed under the (bottom) of the oven chamber. The tray must be perfectly level, since the pizza is baked directly on it without any equipment.
Important! The hearth material must be safe in composition for cooking. An entrance arch and a stove dome are formed around the bottom in compliance with the proportions of the specific scheme
A rectangular hole is left at the top of the ceiling to connect the chimney
An entrance arch and a furnace dome are formed around the bottom in compliance with the proportions of the specific scheme. A rectangular hole is left at the top of the ceiling to connect the chimney.
Materials for building Italian stoves
The construction chamber is made of fireclay bricks. You can also take fireproof stone. Fireclay sand and clay are used for mortar; cement mixtures are not suitable.
Attention! To form the dome and hearth, the use of ordinary bricks is not allowed. Otherwise, the chamber will crack and the masonry will begin to collapse
The foundation is a reinforced concrete slab laid on a bed of sand and crushed stone.
To build a pedestal on the foundation, ordinary clay bricks or silicate blocks can be used. As a rule, the pedestal has a niche for storing firewood or dishes.
The countertop can also be made of brick and stone, but it is better if it is monolithic. To do this, use a ready-made slab or pour a mortar reinforced with reinforcement into the formwork yourself. The recommended tabletop thickness is 100 mm.
A layer of hydro- and thermal insulation is required between the bottom of the stove and its countertop to avoid heat loss and destruction. Separation is carried out using a calcium silicate pad, expanded clay filler or perlite sand.
The outer part of the oven also requires insulation, which consists of several layers:
- Heat-resistant plaster over brickwork.
- Basalt mineral wool.
- Decorative moisture-resistant finishing with a special mixture, stone, tile.
The chimney of a pizza oven is made of brick, metal, asbestos in the form of a pipe or box.
When constructing a furnace vault, hinged and radial spherical templates made of plywood, lumber and metal parts are used. Without stencils, the dome will not turn out semicircular.
Important! If the stove is planned to be installed outdoors, a canopy is required to protect the structure from precipitation
Option made from clay (without brick)
Making a Pompeii oven from clay, without using bricks, is a simple process. The foundation and tabletop are made in the same way as in the case of the classical design, but the model is made from coarse sand (screenings). A clay dome is laid on top of it.
Pompeii made of clay
Device
It is best to use special clay; you can purchase it at a construction warehouse. How to properly make an Italian design from clay is well shown in this video:
A Pompeii clay oven is installed with your own hands in the same order as when constructed from other materials. After the dome is installed, a chimney is made - any materials can be used for its construction, including ordinary brick.
Expert opinion
Nikolay Davydov
Stove maker with 15 years of experience
As in the case of a brick Pompeian stove, waterproofing and thermal insulation are required, which will ensure a long service life, as well as cladding, which will protect the structure from irritating factors (rain, hail, snow).
The Pompeii clay pizza oven is a simple design to construct - anyone can make one like this.
Features and characteristics of pizza ovens
Pizza is one of the most famous culinary dishes in the world.
Its history begins around the seventeenth century, at which time special chefs appeared who prepared culinary dishes for peasants in Italy. Subsequently, the dish received the status of the national dish of Italy.
Today in every city you can find several pizzerias that attract people with a wide variety of recipes with an incredibly wide range of all kinds of ingredients and toppings.
As a rule, the entire cooking process takes place in front of visitors, which has a positive effect on the process of waiting for a flavorful dish and encourages visitors to buy flavorful pizza. Therefore, furnaces are indispensable equipment.
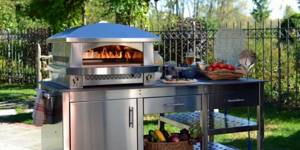
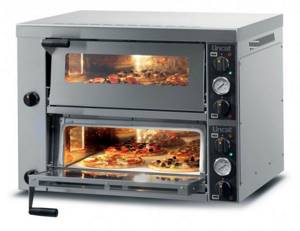
A pizza oven is highly professional heating equipment used by Italian restaurants, pizzerias, and fast food outlets to prepare pizza.
Despite its narrowly targeted name, it is widely used for baking baked goods, frying eggs, and finishing semi-finished products.
A special feature of this type of equipment is a stone tray that accumulates heat and maintains a constant high temperature (up to +500°C) inside the chamber. The pizza preparation process takes place directly on this hearth, which takes no more than 7 minutes.

Pizza ovens can be divided into two main categories:
- Homemade. Used in everyday life, intended to meet family needs;
- Professional. It is used in catering establishments. It is characterized by increased productivity, design complexity and high cost. They are designed to allow you to cook several pizzas at once.
The standard equipment of the furnace includes:
- an oven that can accommodate up to four standard-sized pancakes;
- heat flow intensity regulator with a temperature in the range of 100-500°C;
- safety thermostat that turns off all heating elements if overheating is likely.
Doors with a viewing window made of tempered glass and internal lighting allow you to keep an eye on the cooking process and control its readiness. Having a thermometer will make it possible to accurately set the temperature inside the chamber. The units are made partly from stainless and galvanized steel.

Pizza ovens are today used in such establishments as:
- canteens;
- restaurants;
- bakeries;
- cafe.
Choosing a stove is not an easy task and requires taking into account several important factors.
If you are betting on the originality and authenticity of the product being produced, then the best solution would be a wood-burning brick oven.
This equipment came to us from antiquity. It ensures the preparation of pizza with the highest taste and excellent aroma.
Hearth and conveyor ovens allow you to prepare a mass product, but are characterized by higher productivity than their wood-burning counterparts.
The choice of equipment is also influenced by the capacity of the device, its overall dimensions, the type of energy supply (electricity, gas, firewood), the number of cameras, and, of course, cost.
https://youtube.com/watch?v=ofuQaJkhYec
First of all, in order to choose the right pizza oven, you should understand why it is needed.
Of course, in the primary version it is clear why, of course, to bake pizza.
But as I hope you have already understood, you can bake it in different ways, and as a result, you will end up with a different taste of the prepared pizza.
So, if your establishment will have seating, work for visitors, you will have a large bar counter, and you want to additionally make baking pizza in the oven an element of the surroundings, then this is definitely a wood-burning pizza oven.
Moreover, thanks to the different sizes of wood-burning pizza ovens, you can choose the ideal option specifically for your establishment.
Hearth pizza ovens, unlike conveyor ovens, cost significantly less, so they can be recommended as an initial option for a small pizzeria or pizza delivery.
Conveyor pizza ovens can be recommended if the budget is not very limited, and you also plan to recruit unqualified personnel for the work, since baking in conveyor pizza ovens is the simplest and does not require any professional knowledge and skills.
More about mini ovens
The author of the article was once invited to a pizza picnic. But, as it turned out, there was no trace of a special oven there. The hostess and her friends were completely sure that the pizza was fried over coals in a frying pan. What should I do?
Among the dishes there were 3 glazed clay dishes, two identical large ones and one smaller one. I had to think twice and even point my finger at the calculator to determine when the pizza would arrive. Then the workpiece was placed on a smaller dish, it was placed in a larger one and covered with another. Meanwhile, the fire had burned down to coals, they were cleared away, a makeshift stove was placed on the fire and covered with coals.
Pizza pot oven
After the calculated time had elapsed (heating inside from 300 to 400 degrees for 5-6 minutes), the pizza was removed and eaten. It turned out so-so, it took a long time to warm up to 300 degrees. But it turned out to be a revelation for the ladies; they weren’t even offended and took note.
And after some time, the “inventor” was surprised to learn from them that a similar mini-pizza oven, it turns out, had been mass-produced by Earthfire in South Africa for a long time, see fig. It costs a lot on sale, about 2000 rubles, and requires fairly high culinary skills. However, it is completely energy independent and will come in very handy at a picnic with pizza.
Recommendations for performing construction work
- First, you need to draw a circle with a diameter of about 100 cm. Its outer edge is trimmed with pieces of brick, and inside this ring, heat-insulating material is poured, namely expanded clay, penoizol or broken glass. Then the surface of the table is carefully extended using concrete. Stone tiles are used as finishing.
- To lay out the hearth, fireclay bricks, cut at the edges, are used. All cracks are carefully filled with solution, after which the circle is leveled.
- Next, the construction of the dome begins. First you need to determine the entrance and install a frame made of foam, metal or wood here. After this, rows of bricks are laid out in a checkerboard pattern. At this stage, you need to make sure that the tilt towards the center of the combustion chamber is noticeable. For this purpose, wedges made of wood or brick are used. When the masonry is ready, foreign objects must be removed.
- Simultaneously with the creation of the dome, the formation of the chimney of the Pompeii oven takes place. This element is installed externally. For its construction, brick or metal sandwich pipe is used. The height of such a part should be 2 m, and the diameter should be about 170 mm. After proper drying, the furnace roof is covered with heat-insulating material.
How to make a camp stove with your own hands
In order for a finished Pompeii stove to last a long time, all safety regulations must be followed. So, during the construction process you need to use a respirator and goggles. In addition, you should select high-quality materials, prepare an appropriate solution and adhere to the procedure.