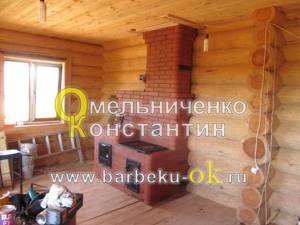
Interior of a village house with a stove
The method of designing the stove structure depends on the chosen design trend. Finishing materials will determine its appearance.
Tile
If you want to create a luxurious atmosphere in a rustic kitchen, the stove can be refined using tiles - special ceramic or clay heat-resistant tiles created specifically for finishing stoves. The unique shape of the tiles makes them easy to install, and the unique pattern will allow you to create a delightful design, unlike others. In the 19th century in Rus', tiled stoves were in fashion among the upper strata of society and were considered an indicator of prosperity and luxury.
Ceramic tiles heat up quickly and retain heat for a long time
A more affordable option for designing a stove structure is to use tiles. It can be of any shape, rectangular, square or imitate various natural fibers.
Tiles will help create a unique stove design
Design of a stove in a private house, decorated with tiles
When choosing tiles, you need to choose fire-resistant samples that can easily withstand high temperatures and have a dense structure. Thanks to these properties, they will last a long time and will not require cosmetic repairs.
Very often, tiling is carried out only in the part where the fire is ignited and maintained.
Stone
Upgrading the surface of a Russian stove with stone allows you to get a unique rustic interior with an antique accent. This option is quite labor-intensive and requires significant financial investments. But by spending time and money, you will get a unique design that will delight more than one generation of your family.
A stone stove will become the main highlight in the house
Plaster
When designing the kitchen of a private house in rustic, Provence, country or Russian styles, plastering with clay mortar is an excellent way to finish the stove. After it hardens, heat-resistant paint is applied to the surface. With its help, the stove can be decorated with an original ornament, ideas for which are suggested in the following photos.
Decorative plaster gives a Russian stove a special charm. It will help you recreate any pattern you like on its surface. The following selection of photos will convince you of this and inspire you to create an extraordinary design.
The rustic style almost never completely went out of style. Even having their own huge dacha, stuffed with ultra-modern equipment and perfect, economical heating devices, people strive to build something on their site in the old style - a small gazebo or sauna. But many, having acquired a country house, want to completely transform it, turning it into something like an old Russian hut with a real stove.
Disadvantages of the furnace design
- The design of the stove requires some skills in laying double-circuit stoves and reading drawings, accuracy when performing work and installing stove accessories. Laying a stove and installing fittings is quite a labor-intensive task.
- The stove is heavy and, therefore, you need to prepare a good and strong foundation for its installation in advance.
- The stove is more suitable for permanent residences due to its high heat capacity. Keeps warm for a long time. Very slight temperature changes throughout the day.
DIY Russian stove
We must pay tribute to the courage of some enterprising people, but making arrangements for the bed and cooking surface with your own hands is quite a bold decision. The fact is that no matter how intelligible the design diagram may look on paper, it is quite difficult to translate it into reality. Still, there are recommendations for determined people.
Tools for work
What tools will you need: a container for mixing the solution; measuring strip to determine the width of the masonry joints; construction level is a must! Without it, it is guaranteed that the structure will have a tilt, and it will be impossible to eliminate it after finishing the masonry; rule (with its help the surface of the foundation is leveled - a one-time operation); a plumb line (also an extremely important device, used to clarify the vertical curvature in any desired place); ordering - a special device for multi-level stove masonry; Master OK; A pick-nose hammer is a hand tool that allows you to chop solid brick into pieces instead of cutting with a grinder.
Materials and equipment elements
When creating a Russian stove with a stove bench and stove, you will need additional elements, thanks to which you will achieve the desired functionality:
- hardened brick (recommended M-200) in the amount of 1850-1900 pcs.;
- fatty pure clay 245-250 kg;
- purified sand 295-310 kg;
The number of bricks, sand and clay are given in quantities calculated for a model 2.3 long, 2.0 m high, 1.6 m wide.
- grate;
- combustion, cleaning and blower doors;
- firebox damper;
- smoke valve;
- hob;
- steel sheet, steel angle, water heating tank - depending on the situation and depending on the project.
The number of doors and grates is determined based on the nuances of the project.
Layer order
In competently compiled working drawings, the Russian arrangement with a stove bench and stove is represented by each level separately. Otherwise, it will be impossible to fold the stove due to the complexity of its internal (not visible from the outside) structure.
- Typical example:
- Row 1. The layer is laid without screed directly on the floor waterproofing. Heated brick is suitable, since there will be no exposure to high temperatures;
- Row 2. Along the edges of the future hearth, bricks are placed on edge, and if non-solid bricks are used, in the next row they must be covered with solid ones;
- row 3. Similar to the previous one. It is also recommended to install a blower door here;
- row 4. Placed in the same way as the 2nd;
In this row, be sure to leave room for a cleaning channel.
- row 5. Channel cleaning continues. Make a base for future arched vaults;
- Row 6. The cleaning channel begins to narrow. The grate is installed;
Grate bars are cast iron or steel grates through which air flows with improved draft. They allow oxygen to pass through and retain the ash residue from burning fuel.
- rows 7th, 8th. A steel sheet is placed here. It is also necessary to secure the wire to secure the fire door. The hearth laying is complete;
- Row 9. Sand bedding is made. Bricks along the entire row of the future hearth are installed on the edge.
- rows 10, 11. Same as the previous one. A hob is installed on top. It is best to lay halved bricks on the edge of the hearth;
- rows 12th, 14th, 16th. Just like the previous ones.
It is recommended to start raising the arch on the 15th row.
- rows 17th, 18th. A knitting metal wire is laid between them. On these rows the vault narrows;
- rows from 19 to 21. Work on the bed is being completed;
- row 22. At this level the rise of the high begins. At this stage, the stove masonry is very complex and responsible;
- rows from 23 to 31. A pipe channel is formed. Blowers and valves are placed in the right places.
To summarize, we note the availability of masonry stoves with a stove bench and a cooking panel. It is possible to carry out your plans with your own hands, although it will require a high concentration of attention, thoroughness and repeated clarifications in the calculations. Be sure to enlist the support of an experienced specialist - if not with practical actions, then at least with useful advice from him.
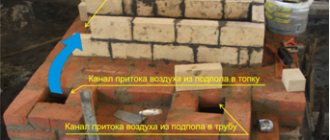
We increase the efficiency of the Russian stove due to the lower heating
As I already drew your attention to earlier, the lower flood in the Russian stove is a modern modification. A chimney channel runs into the lower part of a modern Russian stove, which serves to heat the lower part of the stove
This is a huge contribution to reducing the amount of fuel burned. Moreover, if you heat a Russian stove with a stove bench only through the main firebox, then your feet will simply be cold and you will have to walk around the house in warm shoes. But the lower heating of the Russian stove solves this problem easily and simply! This is how it looks in the photo of a Russian stove with a bottom flood.
Thus, we double the area of the heating source! Therefore, to heat the same room to the desired temperature, you will need half as much wood as if you had a classic Russian stove
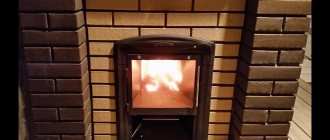
. Well, now let's turn to solving the second problem - fast cooking. This solution follows from the first thesis.
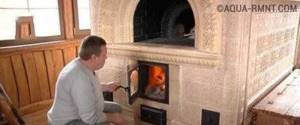
A Russian oven with a stove is the best solution for cooking in such an oven. After all, it’s worth throwing a few firewood into the lower flood, and within 15 minutes the stove of the Russian stove will be hot enough to heat water or heat up food. Unlike the classic version, when you want the wood in the hearth of a Russian stove to burn out, only coals remain. This will take at least an hour. And such a Russian stove with a stove
- the most effective solution in 2021!
Russian stove for a summer residence
.
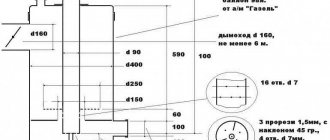
Now let's talk about sizes. I specifically want to post a photo where we are designing the dimensions of a Russian stove with a hob
. This is a photograph of the same Russian stove No. 180,
If you take any version of the Russian stove with a stove bench
- then such a design in depth (due to the couch) has a dimension of at least 2.5 m! It’s not easy to imagine a country house with dimensions of 5x5, that is, 25 squares, where 3.5 squares are occupied by a stove, because there is already not much space... and most importantly, a huge amount of brick and firewood goes into the stove, which is not always affordable for the owners of small houses. In our case, the customer and I came to the conclusion to completely abandon the couch, which would take up a lot of space.
The size of my Russian stove with hob and heating element
came out: 7 bricks x 6.5 bricks, or 1.7 meters x 1.6, which is quite acceptable for any small house.
Of course, my work is only a private solution for a specific customer. Here, for example, is another one of my Russian stoves with a stove bench and a stove, and a lower heating
.
I built this stove at the beginning of 2010, and I don’t have a photo of the stove bench, but the structure turned out to be huge. I hope you like my work, but the price for such a Russian stove will be much higher due to the large volume of work. Russian stove No. 182
If you are interested in my approach to work, then I am always ready to help solve any of your problems in the field of laying Russian stoves
, especially since there are not many stove makers in St. Petersburg with such real experience and their own photographs.
And there are many factors: firstly, this is not the most common task. For example, over the course of the entire year, 10-12 people may contact me with a request to lay a Russian stove with a stove
.
And many people by the price of a Russian
stove.
The price of work on a Russian stove
ranges from 180,000 - 350,000, the same range of materials, depending on the volume and type of brick.
In order to give any assessment of my work and the necessary materials, I need to fully understand the task. To do this, call me directly, I will identify all your needs, describe all the parameters for myself and be able to draw up an estimate for your Russian stove.
What materials will be needed for construction?
- red brick – 750 pcs.;
- fireclay clay;
- sand;
- felt or asbestos fiber for insulation;
- roofing felt on the bottom layer also for heat and waterproofing;
- fasteners;
- metal corner, sheet and steel wire;
- grate – 2 pcs.;
- doors for the combustion chamber and ash pan – 2 pcs.;
- damper – 1 pc.;
- valve – 1 pc.
... and tools:
- building level;
- spatulas;
- Master OK;
- drill with a mixer attachment for mixing the solution;
- buckets;
- sieve for sifting clay and sand.
Don’t forget about the tools: spatula, trowel, drill with mixer. Additionally, have buckets or tanks and a sieve on hand. To ensure the oven is level, use a level.
List of materials
Brickwork is a classic option for a furnace, as the material heats up evenly and slowly.
- single red brick M-200 – 1600 pcs;
- fireclay brick Ш-8 – 250 pcs;
- wedge-shaped fireclay brick Ш-44 – 100 pcs;
- smoke valve 26x26 centimeters – 2 pcs;
- smoke valve 13x26 centimeters – 3 pcs;
- damper (dimensions are determined by location) – 1 piece;
- two-burner hob (dimensions are determined as you go) – 1 piece;
- grate 20x28 centimeters – 5 pcs;
- combustion door 21x25 centimeters – 1 piece;
- blower door 14x25 centimeters – 1 piece;
- cleaning door 7x13 centimeters – 2 pcs;
- steel corner 60x60x5 millimeters - 1.5 m;
- steel strip 50x5 millimeters - 20 m;
- fireclay clay – 100 kg;
- sand, ordinary clay - the amount is determined according to the need for the material.
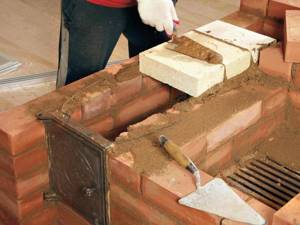
Masonry of a Russian stove
Before work, it is important to study the designs of Russian stoves. There are different options, so the masonry scheme may differ
The drawings cannot be changed - the specified order must be strictly followed.
Complete tightness is important for the safety of the structure. This is ensured by the following points:
- Use quality stone. There shouldn't be any cracks.
- The seams between the rows are 0.5-0.8 cm thick.
- Do not coat the inner walls with clay - soot will be deposited on them, and therefore thermal conductivity will decrease.
- Different departments differ in the thickness of the masonry from ¼ of the thickness of the brick to its full length.
- If the brick is ceramic, then it needs to be soaked to prevent moisture from being absorbed from the mortar.
Building a furnace
The complete diagram of the Russian stove is shown in the figure below, with a list of positions. To what is described above there is an addition - a choke. This is a gas-air heat exchanger: the smoke circulation through the wall heats the air that is taken in below. The vent of the choke opens into the room above, then there is a damper, and behind it the mouth of the choke opens into the chimney above the view.
In summer, the damper is open, and the air flow in the air vent removes excess heat from the flue gases, providing good ventilation of the room. In winter, the damper is closed; heated air enters the room and warms it.
The air vent is the simplest and most reliable way to get bottom heating from the stove without overly complicating its design.
- Podpeche;
- Undercoat;
- Six;
- Dushnik;
- Chelo;
- Gate valve;
- Chimney;
- Roof;
- flap;
- Mouth;
- Cutting;
- Warm stove;
- Hot stoves;
- Threshold;
- Backfill;
- Furnace vault;
- Crucible;
- Cheek;
- Porsok;
- Podpechek;
- Arch support;
- Arch of pharynx;
- Hilo;
- Estuary arch;
- Masonry ledge;
- Choke channel;
- The mouth of the chimney.
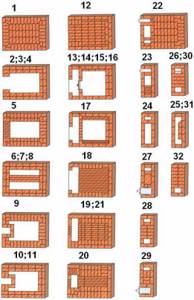
What is order?
The oven is laid out in horizontal layers of bricks – in rows. A set of instructions for laying each row is the order. Sometimes rows are called orders (first order, lay out orders, etc.). This is, generally speaking, incorrect.
For each type of oven, the order, of course, will be different. Modern orders are accompanied by drawings. You can start building a furnace only if its order is absolutely clear.
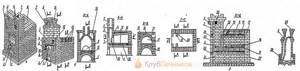
Smoke circulation - advantages and disadvantages of different systems
The smoke circulation system increases efficiency - gases, when moving from the firebox through channels and chambers, give off heat to the walls
It is important to maintain the ratio between the volume of the firebox and the internal surface of the smoke circulation. If there is an excess area of gas channels, the temperature drops so much that condensation appears
A small internal area reduces efficiency - hot gases fly into the pipe.
The cross-section, number and location of smoke circulations determine their internal area. It is better to fold the channels in multiples of the size of the brick; they should ensure the free passage of gases. The cross-section must correspond to the thermal performance of the furnace: it smokes when the cross-section is insufficient and does not heat up well when it is excessive. A cross section of 170–250 cm2 is used when the heat transfer of furnaces is 3 thousand kcal or less, from 3 to 5 thousand kcal – up to 300 cm2.
Smoke circulation systems can have channels (one or more) or be channelless.
Various types of smoke circulation: a – multi-turn vertical; b – multi-turn horizontal; c – single-turn vertical; d – multi-channel single-turn; d – channelless.
As part of a single-turn system, there is one lift channel and the same or several parallel down channels. Parallel channels have low resistance to gases, the furnace array heats up more evenly. The single-turn system has a disadvantage, which manifests itself in significantly greater heating of the upper part than the lower one. In small stoves it is compensated by significant heating of the firebox walls. For large furnaces, a scheme is used in which hot gases flow through channels from below, thus ensuring normal heating of the room.
A multi-turn system consists of vertical or horizontal channels arranged in series. The first drawback of such a system is that the gases have to experience considerable resistance in numerous turns. The second drawback is the strikingly unequal heating of the walls of the first and last channel, which often causes cracking of the masonry. Vertical channels provide good heat transfer, horizontal channels provide draft, which helps with pipes of insufficient height.
Fire safety requires that the top of the furnace floor be 40 cm from the ceiling of combustible materials. The section of the chimney from the furnace to the cutting in the ceiling is called a neck; its smallest height is three rows of bricks. The neck is a place for installing valves or views, which are closed at the end of combustion. If such devices are installed lower, a lot of heat is lost. Gases are released outside through a chimney, the design of which will be discussed below.
obustroen.ru
Why are Russian stoves so popular?
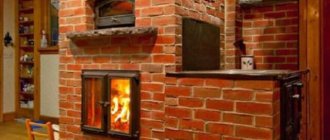
The incredible “survivability” of the Russian stove lies in its functionality - it is used both as a cooking unit and as a heating unit, and the latter, contrary to popular belief, is by no means a primary function. In its simplest form, the design is a very deep fireplace, essentially a large firebox with a chimney.
Russian stove of traditional design
Thanks to the thick walls and massive roof, the heat-storing ability of the Russian stove can be the envy of any other solid fuel unit. The same factor also plays into the benefits of efficiency. The structure can remain warm throughout the day, so it does not require a lot of firewood to maintain the temperature within a comfortable range. Here it is impossible not to mention the extremely convenient design with a bed or bed.
The design of the Russian stove is also unique in terms of creating culinary masterpieces. The wide temperature gradient of the firebox is very convenient to use during cooking. If it is necessary to obtain rapid heating, the cast iron with its contents is moved closer to the hearth. If it is necessary to reduce the intensity of boiling, then it is moved to the periphery, closer to the sides. By the way, the Russian stove has a unique ability that no other heating and cooking unit has. The walls and roof of the furnace, heated to a high temperature, are able to maintain a very high temperature even after the fuel has completely burned out. The infrared rays emitted by the surface allow you to bake or simmer foods for a long time, obtaining an incomparable taste and a golden, appetizing crust. The advantage of this method of cooking also lies in the fact that it does not come into contact with either fire or a gaseous environment, so there can be no talk of any carcinogens.
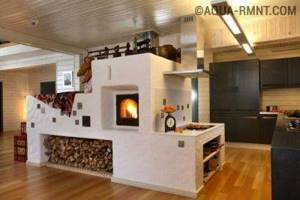
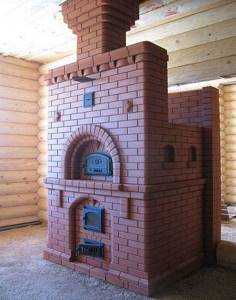
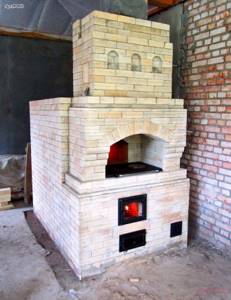
Today, the Russian stove is an extremely functional heating device with a hob, water heater and a place to relax
Modern heating devices can be classified according to the presence of one of the following characteristics:
- The presence of a slab and a flood. The hob is built directly into the body of the stove, creating a so-called hearth, which was made blind in the canonical model.
- Placement of a fireplace on the back side of the stove, which opens into the adjacent room. The practicality of this method is extremely high, since with two heating devices there is no need to construct separate chimneys and foundation slabs.
- Attached to the stove is a coarse or trestle bed. They still, as before, increase the comfort and convenience of the heating device, although the dimensions of modern stove beds cannot be compared with the dimensions of traditional stoves, which were designed for 3-4 people.
The integration of the stove into the array of the Russian stove not only expanded its cooking capabilities, but also made it possible to heat the side heating shield and the lower part of the structure. Based on this factor, units with side heating are distinguished, which are used to heat the next room, as well as heat generators with bottom heating. The presence of a flood in the latter makes it possible to warm up the walls that are below the level of the hearth. Due to increased heat transfer, it becomes possible to heat a room of increased area without the need to expand the dimensions of the device.
Bottom heating significantly increases thermal performance
Advantages and disadvantages (table)
| pros | Minuses |
| High efficiency - from 50 to 70%. | The ability to operate only on fuels that do not require increased air flow. It will not be possible to convert it to gas or fuel oil. |
| Safe design. | Cumbersome design. Additional load on the floor - it can only be installed on the first floor. |
| Undemanding to materials - when building a furnace, you can only get by with brick, sand and clay. | After cooling, the unit requires a long warm-up. |
| Uniform heat transfer. | Ineffective smoke circulation - due to miscalculations in construction, the heating device may smoke. |
| Durability. | Inconvenience when cleaning the firebox from ash. |
| Possibility of heating the adjacent room. | |
| Convenience and comfort of a bed. | |
| The surface of the bed can emit infrared energy for a long time, which has an excellent therapeutic effect. |
In addition, a Russian stove will require the owner to be able to handle a grip, a frying pan, pots and cast iron, and not every modern woman will like this. If you are ready to put up with minor inconveniences, then this literally fabulous unit will be able to thank the owner not only with warmth and delicious food, but also with healthy sleep, as well as wonderful healing procedures.
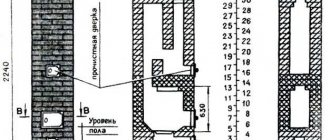
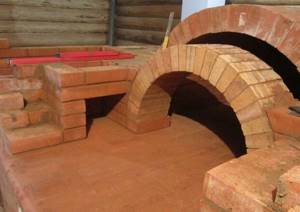
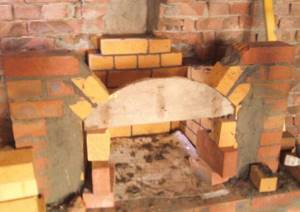
Basic rules for laying a vault
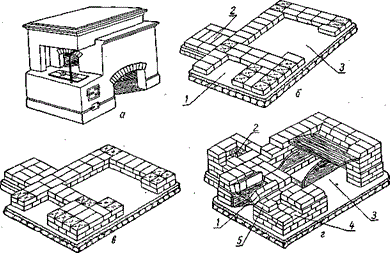
Laying of the furnace of an improved (with a stove in a hearth) Russian stove: a - general view of the stove; b - 1st row, c - 2nd row; d - 7th row; 1, 3 — pads; 2—1st row of main chimney; 4—stove ash pan; 5—stops.
A carefully executed vault is the main condition for the strength of the entire structure of a Russian stove. Therefore, when laying a vault, you must follow the following rules. Firstly, in the transverse direction from one heel to the other, all seams must be tied. Under no circumstances should there be a single untied seam. Secondly, in the highest part of the arch - in the middle of the arch - seams are not allowed. All masonry elements in the vault must be laid out so that the middle of the vault is covered with a row of bricks.
Thirdly, for the arch it is necessary to use a thicker clay solution. And then the seams are gradually made thinner from the upper plane to the lower generatrix of the arch. Fourthly, the key bricks must be pressed forcefully into a thick layer of clay mortar, which is laid on the planes of the key bricks. And, fifthly, the circles and formwork should be removed only after the clay solution has completely dried.
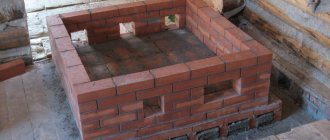
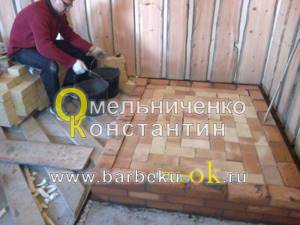
Laying 1-4 rows of Russian stove order
Laying should begin from the left front corner. First, place a 3/4 brick with the butt facing out. 12 full-size bricks with a seam of approximately 13 millimeters are added to it. In order to create a wall ledge in the fourth row, the widened seam must be maintained in the previous three. The left side of the stove is completed by laying two quadruple bricks, thus creating a second corner. The back side of the structure is laid out in two rows with brick spoons. The third corner is laid, as in the previous case, from two quadruple bricks. The right side is laid in the same way as the left.
On the second row, spoons cover the pokes on the left and right sides of the first row. On the back side there remains a row of stitches. In each corner there are two not full-size bricks laid out in spoons. On full-length products of the front part of the initial row, three-quadruple stitches are laid, bandaging the seams. After this, the masonry is checked using the rule. The third row is laid out similarly to the first.
To obtain the fourth row, the brace is pulled along the edge. The masonry is laid along it, starting from the first corner, while the position of the bricks is similar to the second row. To check horizontality, use a level.
Laying 7-10 rows
The seventh row is laid out in the same way as the fifth, squeezing the butts of the side walls under the heel. The eighth row is formed according to the same principle as the sixth. This is where the creation of the foundation for the pole begins, which includes three rows of full-size interlocking bricks. The countdown starts from the frontal plane of the unit.
The ninth row repeats the location and shape of the bricks of the seventh row. The base of the pole continues to be laid out on it. It is formed above the arch of the substructure, forming a continuous lining. When laying out a Russian stove with flooding, the order must be followed exactly, otherwise the design will turn out to be unreliable.
The corners of the tenth row are laid out from 3/4 bricks, the sides from full-size spoons, and the back from full-size bonded bricks. The front part of the structure is laid with three rows of full-size bricks deep. As a result, each row should have 7 bricks laid flat. As a result, a special plane is formed - a sixth. The space created between the back wall and the pole must be filled with gravel, sand and clay.
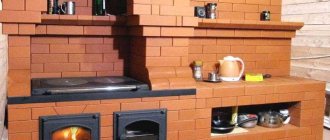
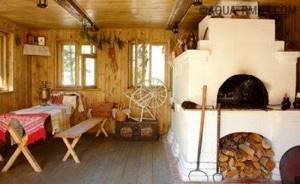
Stove with a stove bench - Russian classic
Today, large and comfortable structures on which you can “warm your bones” are varied in both shape and design. Here are a few samples that you can make yourself if you wish:
This variety of design is dictated by the desire of the owners to decorate the interior and make it unique.
Brief description of the design
Many people do not know how to properly build a Russian stove with a stove bench, because they do not know either the basic elements or the details of the masonry.
The main elements that must be present in every design. In different regions, the names of parts may differ (for example, podpechka - podpechek)
The furnace is the main, large chamber, which serves both for stacking firewood and for baking pies. The upper part of the furnace - the arch - heats up and transfers heat to the stove bench.
In front of the furnace there is a hearth - a small compartment where it is convenient to place baking sheets and pots. Here they also carry out manipulations to place firewood on the blade. Sometimes a small niche is placed under the pole - a sub-pole.
The mouth is a hole leading into the furnace.
The under is an important part of the furnace, its lower plane, slightly inclined towards the mouth. The smoothest polished oven surface.
The oven is a niche under the stove, which is used for drying logs, storing large utensils, grips, shovels, and brooms.
Overpipe - a chamber between the furnace and the pipe, located above the hearth.
View - a damper that blocks the chimney after the wood burns out.
A bed is a large horizontal surface for resting or drying.
A samovar is a hole into which the samovar pipe was previously inserted.
Often a smaller structure with a cast iron hob is attached to a large stove. It can be heated in the summer to cook dinner
If additional heating of the house or outbuildings (veranda) is required, a hot water boiler is built into the furnace body and the wiring is made to the required rooms.
Pros and cons of the structure
The Russian stove has many advantages over modern heating devices, which is why it is still popular, especially in country houses and dachas.
Advantages of the structure:
- efficiency - if you build a complex furnace, the efficiency reaches 70-80%;
- low cost of materials and work of stove makers;
- some models are heated not only with wood, but also with other types of solid fuel;
- multifunctionality - heating, cooking, relaxation included;
- requires attention once a day;
- Dry heat from bricks has a beneficial effect on health.
If construction rules are followed, safety is guaranteed.
A brick structure usually lasts at least 30 years. Structures built by craftsmen live much longer - 100 years or more without major repairs
But there are also disadvantages due to which building owners refuse to install a stove. Fuel must be prepared in advance, dried and selected. Modern electric and solid fuel boilers operate more efficiently, take up less space and do not require constant attention.
A Russian stove can only be installed in a separate private house; it is not suitable for heating apartment buildings, much less multi-storey buildings.
Before you calculate and assemble a Russian stove with a stove bench, you must determine its dimensions and installation location. Be prepared for the design to take up a lot of space.
Disadvantages include regular cleaning of the stove from ash and soot.
Laying order and arrangement
The laying of a Russian stove is carried out using the following order as a basis:
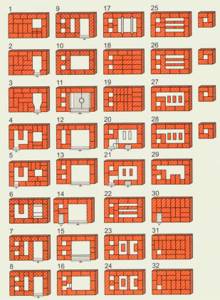
| Row No. | The order of the masonry of a Russian stove with flooding |
| 1 | The brick is laid solid: first they form the outer perimeter, and then fill the inner part |
| 2 | Form the bases of cleaning channels, furnace walls, ash pans |
| 3 | The masonry of the second row is repeated, with the difference that the seams are covered with entire blocks. Fix the blower door and cleaning chamber in the masonry. To do this, use steel wire, one end of which is attached to the door frames, and the other is placed in the seam between the bricks |
| 4 | Completely repeats the pattern of the third row (in dressing) |
| 5 | Continuing the formation of channels, laying the grate and installing the combustion door |
| 6 | Laying out the firebox with fireclay bricks and installing a water heater |
| 7,8,9,10 | Repeats the pattern of the sixth row |
| 11 | The furnace firebox is framed with a corner and the hob is mounted |
| 12,13,14 | Formation of the furnace chamber and the base of the chimney |
| 15,16, 17 | Formation of the furnace chamber, extension of the chimney channel |
| 18 | Formation of the arched vault of the furnace |
| 19; 20 | Extension of furnace walls |
| 21,22 | Formation of the overlap, the beginning of the narrowing of the overtube |
| 23 | A cleaning door is installed in the chimney |
| 24 | Installation of a valve for adjusting draft |
| 25,26 | Cover the space above the damper |
| 27, 28, 29 | Combine the overpipe with the chimney channel |
| 30,31,32 | The furnace flue channel is formed |
Example of a finished design
Example 2
Design and diagram of a classic Russian stove
If you look at the drawing of a Russian stove, you can see that it has the following main elements:
- oven - in this place firewood is stored and dried;
- cooking chamber - it is used for preparing food;
- hearth - has the shape of a niche where you can put hot pans and pots that have been removed from the oven;
- cold stove - a place to store dishes;
- choke - a hole leading into the chimney;
- view - is a door that completely covers the chimney;
- a bed - its size allows household members to rest, sleep, and warm up on it (for more details: “Bake a bed with your own hands - how to do it right”).
On average, the size of a Russian stove is as follows:
- width – 142 centimeters;
- height – 213 centimeters;
- the distance between the floor covering and the bed is about 180 centimeters.
Building a stove with your own hands, taking into account all the nuances
What is included in the “Project of a Russian heating stove with a stove, a stove bench and a heating pad”
- Three-dimensional image of the furnace from different angles.
- Laying orders.
- All necessary cuts.
- Dimensions of the furnace in plan and a document with the dimensions of the furnace vertically.
- The project includes a list of materials for the construction of the furnace.
- Additionally, I will prepare a cost estimate (estimate) for materials at average prices in St. Petersburg.
If necessary, I will make additional cuts and show you the required dimensions. I can also provide technical supervision of the work.
How to decorate a Russian stove in the house
To ensure that the Russian stove not only serves as a functional element, but also decorates the interior, a caring owner will pay attention to its appearance
Methods for whitewashing a stove
Whitewashing is the easiest and cheapest way to maintain a stove. In peasant houses, the hearth was usually whitened annually. Now, in addition to recipes inherited from ancestors based on chalk or slaked lime, many specialized compositions of a new generation are available. To prevent the chalk coating from staining your hands and clothes, the solution is made with skim milk containing casein. You can add ready-made wood glue or liquid glass.
Plastering and painting
The stove is plastered with a solution based on fireclay clay, which is not afraid of heating. Now special dry mixtures with a pre-selected composition are available for sale. After the finished layer has naturally dried for 3-5 days, the oven is lit and the coating is checked for defects.
First, the plaster is completely painted white. Then, using colored tints, designs are applied, the choice of which is limited only by the taste of the master. If you don’t have the ability to draw, printed stencils or a template printed on a printer will help.
Decorating the stove with tiles
Tiles are ceramic parts specially designed for decorating the surface of stoves. The tiles have a special box-shaped projection (rumpa) on the inside. An artistic layer of heat-resistant glaze is applied on the outside. Their installation must be provided for at the masonry stage in order to mount them to each other and to the surface.
Decorating the stove with tiles
Finishing with such elements belongs to the realm of art rather than construction.
Finishing a Russian stove with tiles
Ceramic tiles are quite suitable for external cladding of oven walls, because they are resistant to heat. To lay tiles on a vertical plane of the wall, nails are inserted into the masonry joints, each part is glued onto the mortar separately, leaving a wide joint to compensate for thermal expansion. The seams are rubbed with elastic mastic.
Materials
Brick
The masonry of the Russian stove is made from.
The brick must be well fired and of the highest quality - dense, smooth. A burnt brick (with a dark interior if broken) is absolutely unusable. Hollow brick is also not suitable: heat will not spread well throughout the body of the stove, its interior will overheat and the whole stove will soon begin to fall apart. You need to select the bricks for the hearth especially carefully: they must be even, smooth, and exactly the same height. In the old days, stove makers selected hearth bricks from purchased lots and stored them separately. Nowadays, the underside can be ironed after laying with a grinder with a bowl-shaped circle. In theory, this will not make the oven worse, but there is no experimental data.
The lining of the stove and the top row of the stove bench can be made of face bricks and lime mortar. Then the floors will never fail, and finishing the stove will not cause difficulties - masonry on clay with widened seams (see
below) although heat-resistant, it is not very strong and smooth, and the plaster and tiles do not hold up well on it
Solution
Not quite normal for a Russian stove; What is important here is the combination of heat resistance, high heat capacity and TKR equal to brick. The composition of the solution is as follows:
- Carefully sifted the fattest clay you can find - 3 parts by volume.
- Sifted and calcined river sand – 3-5 parts by volume.
- Pure water – 1 part by volume.
The solution should also be very fatty - thick, viscous. His condition is checked with two boards; A ball of fresh solution the size of a tennis ball is squeezed between them. A thin solution will crack immediately; average at about 1/3 compression, and good at half compression. A solution that is too soft and fluid is also not suitable; sand must be added to it, but not more than 2:1 relative to clay.
Good clay for laying stoves was once a serious problem. Now the structure of the Russian stove is being simplified: ready-made dry mixtures for laying stoves and, separately, fatty clay are on sale.
When drying, the greasy solution often cracks. In this case, the cracks are covered with a medium or thin clay mortar, but in no case with lime, gypsum or cement.
How does a heating stove work on two floors?
To fully understand how a stove works in a two-story house, you can pay attention to the photo. If the house is made of brickwork, then the stove can be installed on steel beams, which were initially built into the walls of the building. When installing beams, you need to use spacers that will soften the effect of weight on the walls and thereby prevent their deformation
The space between the beams is filled with ordinary mortar, but clay mortar is used to reliably cement the furnaces
When installing beams, you need to use spacers that will soften the effect of weight on the walls and thereby prevent their deformation. The space between the beams is filled with ordinary mortar, but clay mortar is used to reliably cement the furnaces.
When installing stoves for heating a cottage, it is necessary to maintain the independence of the systems: each stove in a two-story cottage must be able to operate separately from the other. If desired, a fireplace can be installed into the erected structure, which will add an additional dose of comfort. If you choose a heating and cooking option as the main stove, located on the lower floor, then this design will provide the house with everything necessary.
Construction Technology Tips
The construction of a Russian heating stove is a serious matter. It will be very difficult for a homeowner without experience in the stove business, so we recommend stocking up on time and patience. We published detailed instructions for preparing the mortar and laying it in an article about building a fireplace; we advise beginners to familiarize themselves with the specified material.
Here we will give general recommendations regarding the Russian home stove:
- Even the mini version of the heater weighs over 2 tons. The foundation slab must be supported on a stable soil horizon; the depth can be determined by the occurrence of the existing foundation of the dwelling.
- In the finished building, the “sole” must be arranged separately from the foundation of the house, retreating at least 10 cm. At the stage of construction of the cottage, the foundations, on the contrary, are combined - a common formwork is set up and concrete is poured.
- You need quality bricks and mortar, not a gully clay mixture. The correct geometry of the stones will make your work much easier - uneven bricks will have to be filed down.
- Soak the red brick in the bucket for 2-3 minutes, as shown in the photo. Do not immerse the refractory in water, just rinse it to remove dust.
- It is allowed to lay the furnace and firebox from ceramic bricks, as our ancestors did. But remember: such cameras are afraid of accidental overheating; the material begins to crumble and crumble.
- A bed built on a loose base is also afraid of temperature fluctuations. This is why it is recommended to fill the void above the vault with clay mortar. If you fill the cavity with sand, small cracks may appear on the roof. No sooner had the stove been built than repairs needed to be done.
- The refractory masonry is not tied to the ceramic; cardboard is inserted to provide a gap between the two walls. Horizontal seams are laid with kaolin non-combustible wool.
- The pipe does not have to be made of brick all the way to the top. Lighten the structure - after cutting, install a sandwich - a chimney that goes out onto the roof, as shown in the photo.
Finally, a few words about how to properly heat a new stove.
After drying the stove for 2-3 days (in summer), first build a small fire on the top damper. When the pipe warms up, start heating the furnace little by little, then the lower chamber. Increase the amount of firewood slowly, do not rush. The task is to uniformly heat the furnace body for final drying. Date: September 25, 2021