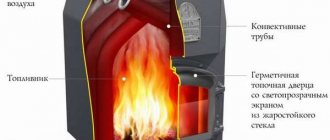
Alexander Batsulin
Born in Moscow on September 7, 1976.
Graduated from the Faculty of Chemistry of Moscow State University with a degree in Chemical Kinetics. He has been involved in the furnace business since 2000. Interests: construction and design of stoves for heating individual houses. Traditional timber construction. Tel. 8 (915) 169 1733 8 (950) 259-6401 e-mail: sashbats (a) mail.ru The evolution of the design of improved Russian Teplushka stoves based on my experience.
I had the opportunity to build and operate quite a few Teplushka stoves. Having built the first such stove and observed it in operation, I literally fell in love with Teplushki. In my opinion, in terms of functionality, this is the best type of stove for a rural home. The spacious cooking chamber (furnace) allows you to cook, bake bread, dry mushrooms, berries and herbs on a significant scale and for a long time after heating. While maintaining all the advantages of an ordinary Russian stove, Teplushka warms up from bottom to top, and when one firebox is fired (unlike Russian stoves with flooding). Not a small volume of masonry - the only plus - ensures a constant temperature in the house with one firebox per day.
Laying stoves of this type is quite an exciting undertaking. The first Teplushki built by me were made based on the drawings of I.S. Podgorodnikov, although they differed from them in details. Conventionally, we can call these stoves the “first generation of Teplushki”. Tracking the work of all completed Russian stove projects made it possible to identify some shortcomings.
These are primarily cracks in the side and rear walls of the oven. Cracks in the side walls are the result of overheating. At the hearth level there are the hottest places - gases from the furnace enter the lower chamber, there is no lining. Next are cracks in the back wall. This is the problem with almost all Russian stoves made using traditional technology, i.e. with filling (or filling with GPS) pockets between the outer walls of the furnace and the roof. The fact is that the roof of a Russian stove (like Teplushka) expands and rises when heated. Pressure is transmitted through the backfill to the side walls and pushes them apart. If you heat a Russian stove with the stove bench uncovered (so that the vault can be seen from the outside), then this expansion is noticeable to the naked eye - cracks (approx. 0.5 mm) appear between the rows of bricks along the vault. When the oven cools down they close. The described shortcomings did not have fatal consequences - all furnaces still work perfectly, however, ways were outlined for further improvement of the designs.
“Second generation” can be called designs that have been modified to eliminate these shortcomings. Lining was added to the side walls of the lower chamber. To relieve pressure from the roof, I began to cover the Russian stove bed at the corners, which also improved the maintainability of the stove, especially if additional heat removal elements were installed on top of the stove bed. It became possible even to sort through the roof, if necessary, without dismantling the entire furnace.
After observing the behavior of red brick in the furnaces of Russian furnaces, it was decided to make it entirely from fireclay bricks. Accordingly, the front and back walls of the furnace are also lined with fireclay. The rear wall became double - lining the outer contour and a free-standing internal fireclay lining. But the smoke collector rested on the front wall of the furnace, moreover, it remained tied to the side walls of the red masonry, and this is not very good, since they heat up differently, and theoretically this can lead to cracks, especially if the pipe is offset from the center of the smoke collector . The furnace design was confidently approaching a dual-circuit design.
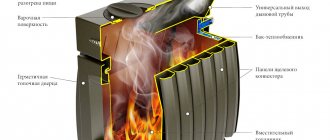
Here it is appropriate to recall the Western (North American) concept of building stoves. It assumes that the furnace is completely double - internal fireclay and external (cladding) contours. In the Russian stove tradition, only the firebox of the stove was lined; the rest of the convective system was single-layer. Currently, more and more progressive stove makers are striving to make double-circuit stoves - just look at the relevant forums. Firstly, it prevents cracks in the masonry and allows you to use not only stove bricks for cladding. Secondly, double-circuit stoves release heat more evenly throughout the hours of the day (they have greater thermal inertia), which is a significant advantage when installing a stove in a house for permanent residence.
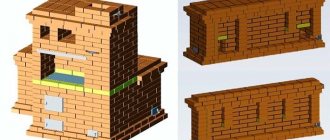
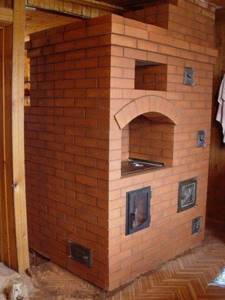
“Third generation” is Teplushka with a completely independent fireclay core. I present to your attention a photo report on the laying of such a stove.
Types of furnace designs
No matter how much time has passed since the appearance of the first stove designs and no matter how far home heating technologies have come, the stone stove still does not lose its relevance. Compared to other types of heating (electricity, gas), it is more economical. At the same time, thick stone walls allow you to retain heat for another day after the firewood burns out.
According to their purpose, furnaces are divided into the following types:
- heating;
- cooking;
- multifunctional;
- combined.
- The heating design is perhaps the simplest and most common. As the name implies, the function of such a stove is aimed only at heating.
Basically, such a stove is chosen for dachas where there is electricity and a stove is used for cooking. Or home owners want to create a special country coziness with the help of a fireplace stove. The design of such a furnace consists of:
- combustion chamber, which is purchased ready-made or lined with fireclay bricks;
- an ash pit where ashes are collected;
- chimney.
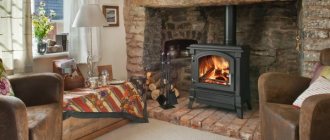
This type of design also includes a fireplace with an open or closed firebox. It is used not only for decorative purposes, but also allows you to effectively heat a room of 15-20 square meters. meters.
Depending on the selected material, wall thickness, masonry scheme, heating stoves may have different heat output.
The most popular type of stove is the one-brick design. This allows the walls to be heated to 60C. The famous Dutch ovens are laid out according to this pattern.
In terms of dimensions, the heating stove can be wide and flat, or it can have an elongated rectangular shape. It all depends on the area of the room, the style of the interior and the personal preferences of the owners.
For cladding such a stove, tiles, decorative plaster, and decorative stone are usually used.
Brick heating stoves in the form of a three-sided prism look very stylish and original, but a beginner cannot implement this option, since it requires a lot of experience. The greatest difficulty is in cutting the bricks and the requirements for maintaining an angle of strictly 60.
Round stoves, which are laid out according to the design of the famous Russian furnace engineer V.E. Grum-Grizhimailo, also look beautiful and unusual. The furnace operates on the principle of free movement of gases. To ensure tightness, the outside of the structure is covered with sheet metal. Such a stove can heat a large country mansion and will become a real decoration for any home.
- Cooking stove. It is advisable to choose this option for a dacha where the owners visit only in the summer. In this case, heating the house is not needed, and if you equip the structure with an additional water tank, it will serve not only for cooking, but will also create comfortable living conditions.
Often this option is installed in country cottages where gas and electric heating are provided, but in order to save resources, owners sometimes use a brick oven.
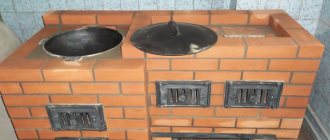
The design of the stove consists of a brick body, inside of which there is a combustion chamber, an ash pan, and a chimney. There is a metal plate on top (an oven can be built in).
- A heating and cooking stove is already a multifunctional design.
This is a more difficult project to implement, as it consists of:
- combustion chamber;
- chimney;
- ash pan;
- hob;
- oven.
The stove looks massive and is usually chosen for dachas where there is no other heating option.
In our country, heating and cooking stoves are the most popular, allowing you to heat the house and prepare a delicious dinner for the whole family.
It can be additionally equipped with a drying chamber, where you can make preparations for the summer: mushrooms, berries, fruits. In cold and damp weather, you can quickly and safely dry clothes and shoes in this chamber.
Oven with drying chamber
By the way, ovens with drying chambers were first invented in the countries of Northern Scandinavia, where hunters and fishermen needed to dry clothes and boots in one night.
Many schemes of heating and cooking stoves have additional devices in the form of a comfortable bench, drying for firewood, an oven, and a water-heating tank.
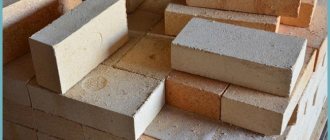
Materials for laying the furnace
The fireclay core of the furnace is laid using Plitonit Ogneupor mortar. The external masonry of the brick kiln is made of cement-clay mortar: cement: fireclay clay: sand = 1: 2: 7. Consumption of materials for laying a stove without a pipe:
- Red brick…………..1070 pcs.
- Fireclay brick……………400 pcs.
- Wedge brick Ш-47……..40 pcs.
- Plitonite Ou, 20 kg……………5 mshk.
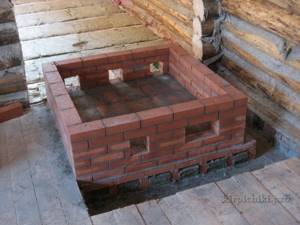
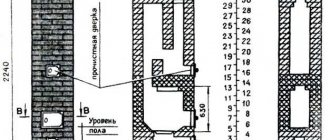
The first rows of the outer masonry of the furnace. Openings for blower and cleaning doors. The size of the stove in plan is 5.5 x 5.5 bricks or 1.4 x 1.4 m. To prevent heat loss, trenches are installed in the foundation under the stove.
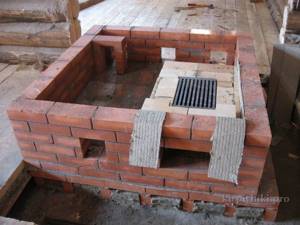
Turning up the overflow channel and starting to lay the firebox of the furnace. The firebox belongs to the internal circuit and is separated from the external masonry by spacers made of basalt cardboard.
The lining of the walls of the lower heating chamber (inner fireclay core) is separated from the outer masonry of the furnace by basalt cardboard.
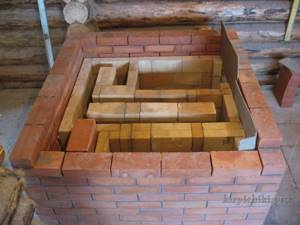
Heat storage columns on which to rest under the stoves. On this row they are connected for subsequent laying of the furnace hearth.

Beam covering of the fire door opening.
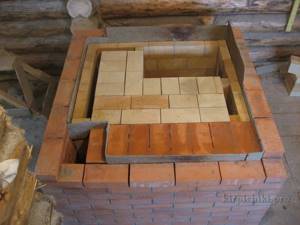
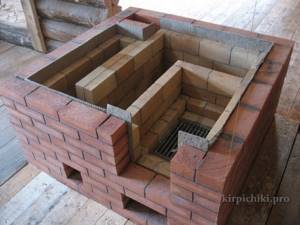
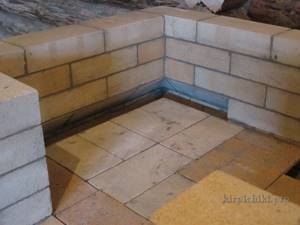
Bottom of the furnace, second row. The bottom of the furnace is laid in two rows. On the sides there are openings for the passage of flue gases into the lower heating chamber. The stove hearth is laid with red brick for aesthetic reasons.
The internal lining of the firebox is separated by basalt cardboard.
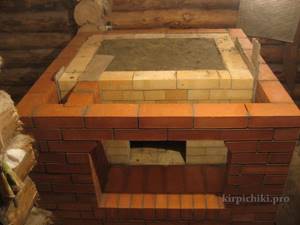
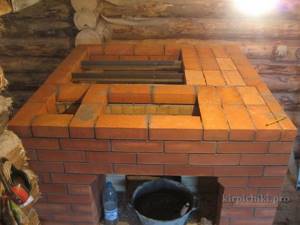
The stove, hearth and firebox are finished. The bricks of the external masonry of the pillar are laid on edge in order to combine the levels of the internal and external masonry. The firebox lining is narrowed at the hearth level to increase its area. The transfer channel remains single-layer, but this is not critical, because the temperature in it will not rise above 300-350 C. If desired, it can be sanitized with a stainless insert of rectangular or oval cross-section.
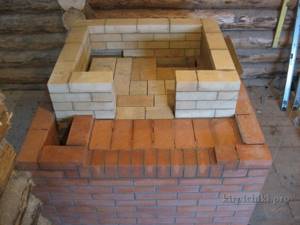
Masonry of the furnace of the Russian Teplushka stove. Spoon fireclay masonry rests only on the inner masonry. The firebox lining is not clamped.
A hole for the passage of gases into the lower chamber. Transition from edge-on masonry to spoon masonry.
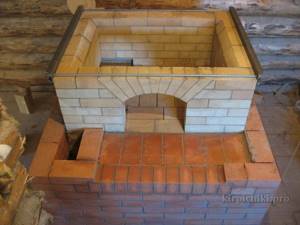
The arch of the mouth of the furnace, the heels of the arch and the tightening bandage. In previous versions of Teplushki, the heels of the vault were released from the outer walls of the masonry.

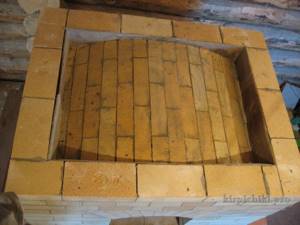
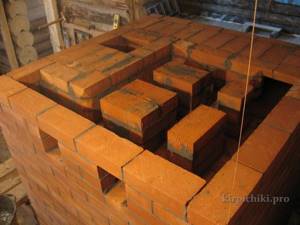
The furnace roof is made of sh-47 wedge brick. Basalt cardboard is laid at the ends of the vault to seal and compensate for longitudinal expansion.
Russian teplushka stove: assembled fireclay core.
View from the adjacent room.
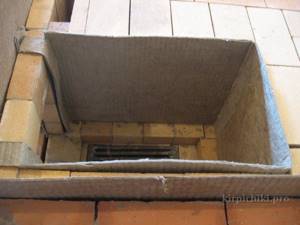
Concrete is poured on top of the furnace roof for the heat capacity. Basalt cardboard is laid along the inner perimeter of the masonry - this will make the filling independent and prevent the walls from expanding.
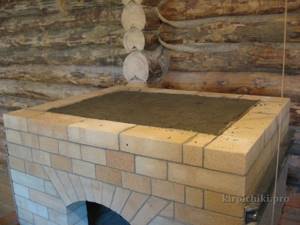
The concrete is poured, the solution must be very thick so that it does not wet the basalt cardboard gaskets and does not spread under its own weight. Those. so that there is a gap between the concrete and the masonry.
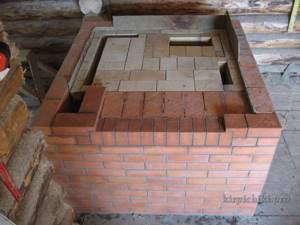
Furnace lining. Grooves are made under the tie bars. In the background, the templates were circled for laying the vault, the heel bricks and the first bricks of the vault.
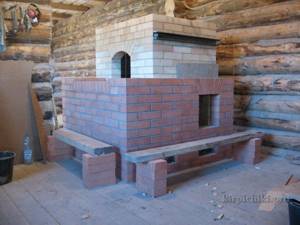
Furnace lining, the hearth window is blocked at the corner.
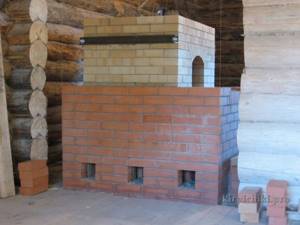
Covering the furnace. To increase rigidity, the corners are connected in pairs; when installing them, a gap is left for linear expansion. The far wall of the smoke collector rests on the corner L100.
Upper heating chamber. Its design can be different and depends on the location of the pipe. Valves will be installed on this row.
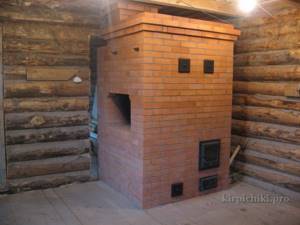
The stove is folded. how to heat the Russian Teplushka stove here.

The chimney in the attic floor is equipped with an additional valve.
19.01.2012
Author: A. Batsulin
Features of operation
If the housekeeper stove operates in the proper mode, this will ensure its long service life and efficient performance of its main task.
The stove is not designed for simultaneous operation of both fireboxes. The firebox door must be closed when not in use. You should not allow ash to accumulate; it is better to make it a rule to clean the ash pan before each kindling.
To cook food, you do not need to wait for the wood to burn completely, but you should not start immediately after kindling. You need to wait until the oven warms up, this usually takes about 10 minutes. Another rule that applies to all stoves is to periodically check the condition of the masonry for the absence of cracks and crevices. If these recommendations are followed, Podgorodnikov’s stove will provide high-quality heating for a small house.
Principles for preparing a site for a swimming pool in a country house
In most summer cottages, two types of pools are used: frame or inflatable. They have certain advantages:
- reasonable price;
- ease of assembly and cleaning;
- ease of water replacement;
- Possibility to install in a small area.
The disadvantages include the need to assemble the pool for the winter and the possibility of tearing the film from which it is made. Although the film is made quite durable, it can be damaged due to uneven ground on which the tank stands, branches, stones, etc. Therefore, before installing a pool in the country, it is necessary to prepare a site for it: a flat surface will protect the material from tears and provide uniform filling with water.
It’s easy to make a pool deck with your own hands. The main thing is that it meets the following requirements:
- flat, without slopes and elevation changes, holes and bumps;
- smooth;
- without stones, debris, branches;
- located at a distance (at least 5 m) from residential buildings and preferably at a lower level so that when water is drained, it does not flow towards the house;
- at a distance of at least 3 m from fruit trees and bushes so that leaves fall into the water to a minimum.