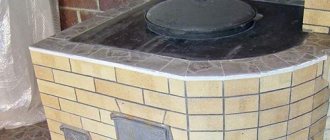
For those who like to eat over an open fire, the optimal solution is a brick cauldron oven built on a plot of land or a summer house. You can make the structure yourself, significantly reducing financial costs, or ordering the work from a craftsman. Before starting assembly, you should prepare the site for construction and accurately calculate the volume of building materials required.
You need to decide in advance
There are three important questions that you need to ask yourself before building a stove for a cauldron:
- What is the diameter of the cauldron? You need the circumference of the cauldron almost under the handles. This will determine the size of the stove, firebox and chimney cross-section.
- Do you plan to use any other dishes or smaller cauldrons for this oven?
- Decide on a budget.
After reading this article, you will be able to independently calculate the approximate costs of such a stove.
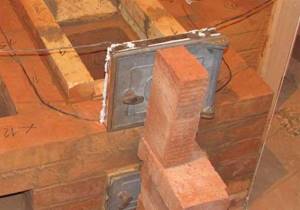
You will also need to more accurately select the location of the stove - it is important that the chimney does not fall into the beams and that all fire safety requirements are met.
Alternative in choice
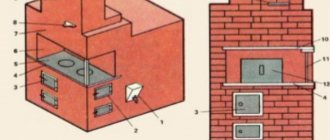
With all the variety of methods for independent design, there is an alternative, which consists in the fact that some manufacturers are engaged in the manufacture of models designed for installing cauldrons. Such ovens are equipped with a top plate with replaceable rings, which allow the installation of cauldrons of various sizes. They are made of thick sheet metal and are ready for use.
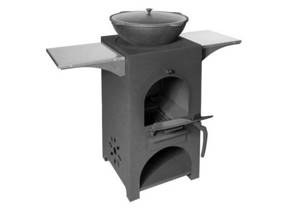
Factory-made stove
A factory portable oven can be installed in any suitable location. The opportunity to cook food outdoors always means cheerful groups of friends. The emotional mood depends on the hospitality of the owner, and the technical part of the issue depends on his level of skill and the part of his soul that he put into creating and arranging a cozy corner.
Good to know: Long-burning wood stoves with a water circuit
Material and tools
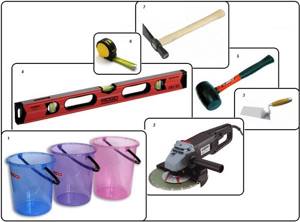
Required tools: stove hammer, trowel or trowel, shovel, building level, square, cord, tape measure, container for the mixture. A grinder makes cutting bricks very easy. The mixer attachment for the hammer drill will make it easier to mix the masonry mixture. A rubber mallet is convenient for setting bricks.
To lay bricks you will need a stove mixture; we do not recommend making it yourself either for a beginner or for an experienced stove maker - it will turn out worse than ready-made.
Use a high-quality ready-made baking mixture.
Pay attention to the following properties:
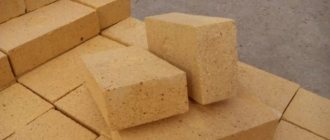
- For furnaces where fireclay bricks will be used, a heat-resistant mixture will be required.
- Good water resistance.
- Can be used for dry bricks.
- Good ductility.
At the beginning of work, determine your laying speed. This will help you knead the mixture no more than necessary.
For bricks you will need: fire-resistant fireclay and solid ceramic of plastic molding (clinker can be used as a replacement).
When ordering a brick, you will have to accept that some of the brick will be unusable: damage on the road, chips and other flaws on the outer surface. Therefore, take with a margin of 10-20%.
First of all, before laying, select a brick without flaws - it will work as a facing one.
You will also need an asbestos cord, it will go into thermal gaps, and wire for attaching doors and dampers.
For a simple oven you will need:
- Stove bricks 169 pcs;
- Fireproof brick 57 pcs;
- Fire door;
- Blower door;
- Chimney outlet;
- Plate with rings;
- Annealed or nichrome wire 3 mm with a total length of 9 m.
For a special oven:
- Kiln brick 344 pcs;
- Fireproof brick 231 pcs;
- Fire door;
- Blower door;
- Chimney outlet;
- Plate with rings;
- Annealed or nichrome wire 3 mm with a total length of 9 m.
Selecting materials for building a barbecue
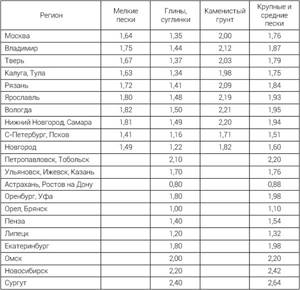
Sand
To prepare the concrete mixture, river and quarry sand is used, and only gully sand is used for masonry clay mortar. River sand grains are constantly ground down by water and have a smooth, rounded surface that does not adhere well to clay .
Before adding to the masonry mortar, sand is first cleaned of impurities by sifting and washed with a stream of water.
Brick
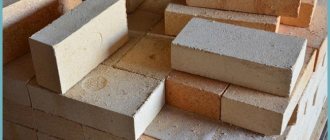
For the lower rows of masonry, first grade refractory ceramic bricks are used, red in color, without cracks, with a clear sound when tapped. It is advisable not to buy unburned second grade and overburnt brown ones.
The firebox itself is made of fireclay refractory bricks, which withstand the test of fire. The arch and vault are made of wedge bricks or ordinary red brick . Sand-lime brick is not used for laying furnaces due to its high hygroscopicity.
Solution
It is made from clay with the addition of sand. The amount of sand is adjusted depending on the fat content of the clay. For laying the lower rows and the facing layer, add cement to the mortar at the rate of 1 kg per bucket of finished mortar .
Before preparing the solution, the clay is kneaded for two weeks to ensure complete swelling and soaking. It needs to be stirred every day. After this period, it is mixed with sand.
If you don’t have time for such procedures, you can purchase ready-made dry mortar mixtures on the construction market, which are used in stove construction. Descriptions and characteristics of the mixtures along with photos can be found in store catalogs.
How to make a foundation
A brick oven is a heavy structure, and the masonry will not tolerate distortions at the base. This means we need a foundation.
The stove foundation cannot be connected to the general foundation of the house.
Laying the foundation is a preparatory work. Keep in mind in your plans that concrete needs time to gain strength. The foundation must be ready 25-30 days before the start of laying the furnace.
Sequence of foundation work:
- Marking the foundation. Usually done with a cord stretched on pegs. The foundation itself should protrude 5-7 cm beyond the dimensions of the stove.
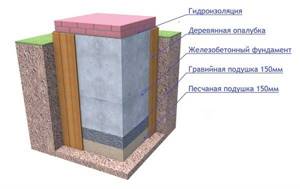
- The pit is dug below the freezing level by 40 cm. For the convenience of working in the pit, its size needs to be made 0.5 meters larger around the perimeter.
- A compacted sand cushion 20 cm thick is made at the bottom of the pit.
- Roofing material is laid on a cushion to suit the size of the foundation, with a margin (glue the seams and joints with hot bitumen or mastic).
- A panel formwork is built on top of the waterproofing, with a height slightly greater than the planned height of the concrete part of the foundation (minimum height above the ground 40 cm).
- Reinforcement piping is being done. Not necessary for light stoves.
- Filled with concrete.
- On top of the concrete after drying (5-8 days) you need to put waterproofing (roofing material with taped seams).
- If the height of the foundation is not enough (for example, up to the floor), then use brickwork. Waterproofing is also applied over the brickwork.
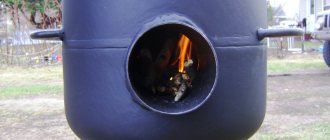
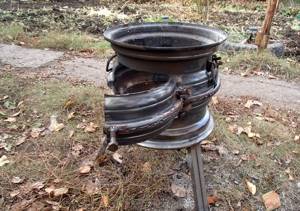
Product made from wheel rims
Aesthetics are not always important in stove design. There are cases when the bet is made only on the functionality of the device. An example of folk art is a device consisting of two wheels. The disc septum is usually shifted to one side. The lower disk is positioned so that its partition is as low as possible. At the top disk it is completely removed.
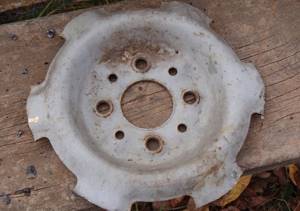
Cut disc part
The discs are aligned coaxially and connected by welding. The lower partition plays the role of a grate. The cavity of the two disks is the firebox. All that remains is to cut a hole in the side for the door, weld the handles and legs, and you can use the homemade device.
Simple and clear design
Brickwork
The main work of creating a stove is laying bricks. By following a few rules, it will be easier for you to make a good cauldron stove the first time.
First : the corners of the stove must be strictly vertical. Use a plumb line, it is more accurate than a bubble level. The laser level is even more accurate, but expensive and inconvenient to rearrange at 4 angles.
Second : always prepare everything before you start laying. Your brick must be selected, sawn and fitted in place, and fittings must be prepared for the row that you will be laying.
Third : the brick must be wet. Important: not all kiln mixtures are suitable for wet bricks.
Fourth : start with the corners and joints. These are critical places and mistakes are expensive.
Fifth : remember that the masonry mixture hardens. The masonry mixture really hardens. And you need to lay the row quickly.
Sixth : observe the thickness of the seams. For oven bricks - 5 mm, for refractory bricks - 3 mm. Not more. For the chimney pipe, the seam can be increased to 10 mm.
Seventh : the row must be strictly horizontal.
Eighth : mandatory ligation of vertical seams.
It is not recommended to lay more than 1 row in 4 hours.
Ninth : Maintain order.
You can watch the stove maker at work with explanations in this video:
After laying the stove, you need to dry it.
Natural drying will take 5-7 days. Open all doors, remove rings from the stove. If the stove is located indoors, open the windows and vents.
Heat drying will take 7-14 days. You can start using it after natural drying:
- 1 heating per day;
- Load no more than 2 kg of firewood into the firebox;
- Allow the stove to cool, do not block the chimney.
When the stove is dried, white smoke saturated with steam stops coming out of the chimney.
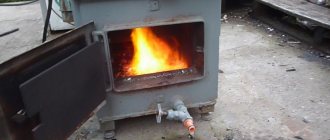
Making a stove for a cauldron from sheet steel
This is also one of the simplest options for making a stove, which will require:
- the cauldron itself to measure the diameter of the combustion chamber;
- welding, electrodes for it;
- steel sheets - the thicker they are, the better for the structure;
- hammer;
- corners for making handles and supports;
- electric drill;
- Bulgarian.
Note! Work should be done outdoors, near a source of electricity. At the same time, safety rules must also be followed.
Step 1. Measure the circumference of the cauldron - according to the obtained size, further work will be carried out.
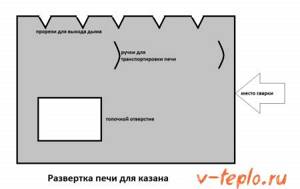
Step 2. Using a grinder, cut a rectangle from a sheet of steel, the length of which would be equal to the circumference of the cauldron. Make a hole in the rectangle.
Step 3. In the upper part of the future structure, mark and make several vertical slits so that the smoke can subsequently escape freely. Next, cut a rectangular hole at the bottom for loading firewood.
Step 4. Roll the sheet into a cylinder. To do this, use the appropriate form, wrap the steel around it and achieve extreme precision with a hammer, or (if possible) use special sheet bending equipment.
Step 5. Cut out supports and handles for the structure from the corners.
Step 6. Using welding, connect the sheet into a cylinder, then weld the bottom, handles and support elements to the structure. Although the latter can be screwed using ordinary bolts, having previously made holes in the steel.
Note! To protect the stove from corrosion, paint it with heat-resistant paint in several layers. That's it, you can put the cauldron in, load the fuel and start the fire!
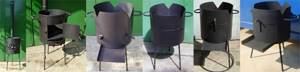
Let's improve the design
For this purpose, we equip the stove with a chimney pipe, grate, ash pan and doors. The manufacturing procedure is the same as described above, but you will have to add a few points.
Step 1. Cut not only the firebox hole, but also another, smaller one located below, for the blower. At the top, cut a third hole for the chimney.
Step 2. Install a grate between the combustion and blower cutouts by welding supports - pieces of corners - inside the housing. To make a simple grate, you can use steel wire - fold the pieces of the required length and connect them together by welding. There is no need to attach the grate to the supports.
Step 3. Weld the chimney to the corresponding hole in the housing. It is important that the height of the chimney exceeds human height, otherwise smoke will get into the eyes.
Step 4. Equip the chimney with a spark arrester - a tin can with numerous holes made in it.
Step 5. You can cut the doors from the same sheet steel, although you can purchase ready-made ones.
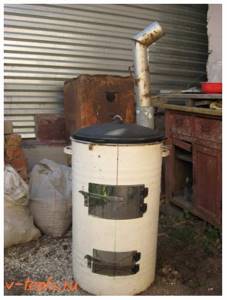
As a result, you will get this kind of stove for a cauldron with your own hands, which is convenient to clean from soot and where it is convenient to load fuel. Smoky gases will be discharged into the chimney, and draft adjustment will be carried out by the blower door. Although it is not so convenient to transport such a structure, since it is larger.
Order
Ordering - masonry diagrams for your future stove for each row. We recommend redrawing the row on a separate sheet. During operation, the circuit always gets dirty and, if this is not done, it will be difficult to make out anything on the circuit by the middle of the oven.
Important: It is convenient that the bricks are the same size. But furnace casting is not. When laying, you need to try on the parts you purchased to avoid unnecessary problems with fitting.
Simplified
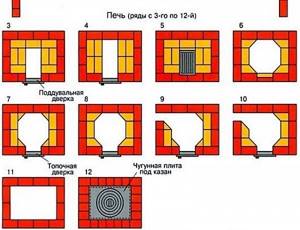
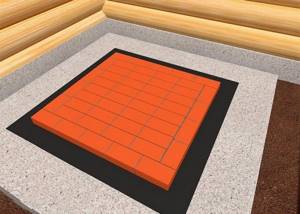
A simple and uncomplicated stove for a novice stove maker. A small amount of brick is required, a light foundation is a choice for those who do not want to spend money right away. Thanks to the ring plate, it can also be used with other cookware.
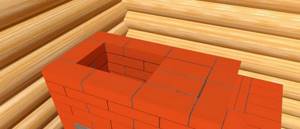
The first 2 rows are solid from oven bricks, with bandaged seams.
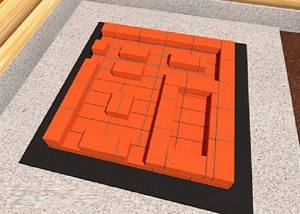
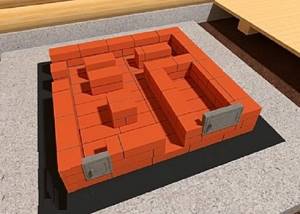
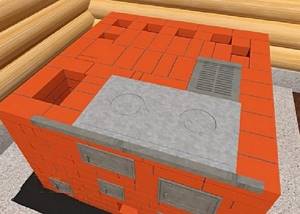
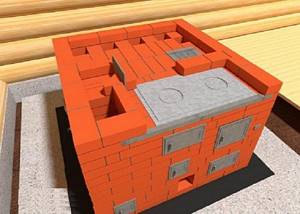
Special
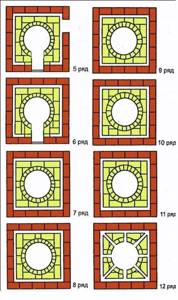
Invented for proper flow of heat around the spherical bottom of the cauldron. Saves fuel, provides proper heating - the best choice. More labor intensive, but it will pay off in the taste of the dishes.
The first 3 rows are solid from oven bricks, with bandaged seams.
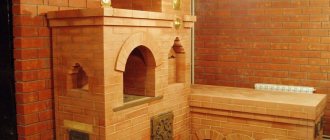
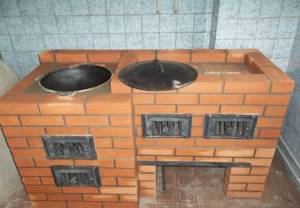
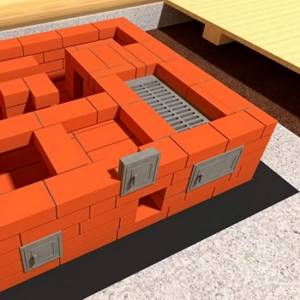
Outdoor complex - do-it-yourself Russian oven and barbecue
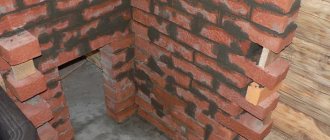
After preparing a solid foundation, you should begin laying out. For the first row it is recommended to use burnt brick. The corners are made of ¾ brick, which is cut using a grinder with a diamond blade. This is necessary for the connection.
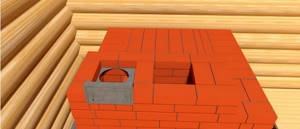
The construction of walls begins from the second row. It is also necessary to form an ash pan.
The next row on the left is laid out without mortar. The cleaning doors and the blower are attached to the front using a wire, which is fixed with a solution.
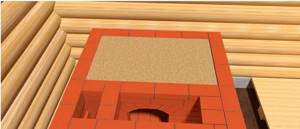
The bottom channels overlap during the laying out of the fourth row.
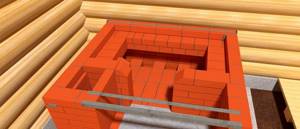
The firebox grate is installed on the fifth row. It should be noted that the interior is laid out using refractory bricks, without the use of cement mortar.
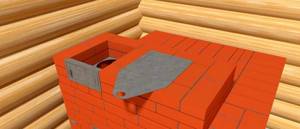
Then on the left side there will be a water heating tank. Laying out the firebox also continues.
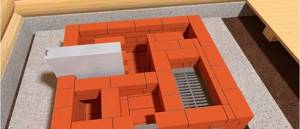
The grate is installed on the seventh row. The right wall needs to be strengthened by laying steel strips in the seam.
The next two rows continue to lay channels and walls. The walls of the firebox are also attached using wire.

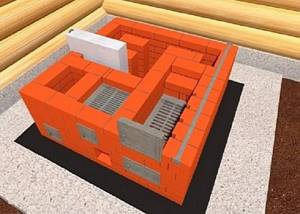
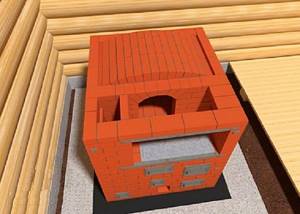
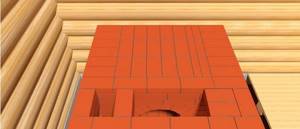
In the process of laying out the tenth row, the arches of two fireboxes are connected. The bottom of the furnace is overlapped.
In the next row, you need to fix a metal corner 3x3 cm in front, and fix the hob on top. The first firebox is closed with a grate.
Refractory bricks are used to lay the side walls of the tiles, as well as the front walls of the furnace. A chimney is formed on the left side.
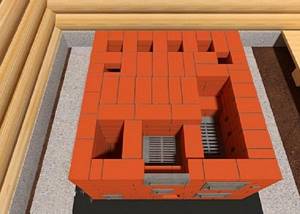
The next step is to make a wooden arch template. From the thirteenth to sixteenth rows, walls are erected, and it is also necessary to block the mouth of the crucible.
The furnace arch should narrow starting from the seventeenth row, but the chimney, on the contrary, should expand. The rear wall is reinforced with a steel tie.
At the next stage, the front wall is laid out and the crucible is closed.
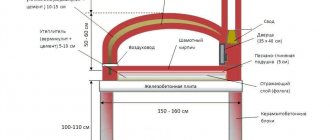
To lay out the roof of the furnace, you need to make formwork from rectangular frames, on which semicircular plywood parts will rest. The front wall must be reinforced with a screed.

Fill the furnace with sand and compact it to preserve heat.
The next row is to shut off the furnace and begin narrowing the over-pipe.
In the process of laying out the next two rows, it is necessary to continue narrowing the overpipe and also form a chimney.
Use the flap to close the over-pipe on the twenty-fourth row.
The next two rows need to gradually connect the overpipe to the chimney.
The further number of chimney rows depends on preference and the height of the canopy. A pipe is installed outside.
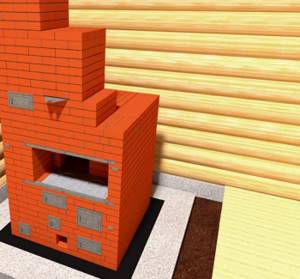
After installing the pipe outside the roof, you can light the finished Russian stove for the first time. You can install a mobile grill in it and cook kebabs.
This concludes my review of making brick stoves. I think with step-by-step instructions there will be no problems with the construction of the structure.
By the way! Using the same principle, you can make an outdoor barbecue. We will look at these in more detail in future issues.
Author of the publication
offline 4 years
Furnace fittings
For a simple or special oven you will need:
- Fire door;
- Blower door;
- Grate;
- Cast iron stove;
- Pipe exit.
All metal parts in the oven expand when heated, which can lead to destruction of the masonry if a gap of at least 5 mm is not provided. Where necessary, the gap is filled with asbestos cord or similar soft refractory.
Door fastening
The dampers and outlet for the chimney are attached in the same way.
We will look at one of the possible ways of attaching to a wire. The method, although labor-intensive, is reliable (they talk about 20 years of service or more) and, importantly, affordable.
You will need 4 holes with a diameter of 5 mm in the door frame in the corners. If they are not there, drill them.
The wire twists freely. The length of such twists is 1.5-2 bricks, rarely more. All twists need to be beaten lightly with a hammer to create a loose braid.
Before embedding into the masonry, wrap the frame with 5-10 mm soft refractory.
For reliability, the wire can be embedded in 2-3 rows.
Until the top twists are secured in the masonry, they are temporarily clamped with a stack of bricks.
Following the drying time of the rows, reach the top wire braids and seal them in the same way.
Grate installation
The grate is placed freely in place, maintaining thermal gaps of at least 5 mm on all sides.
Do not overdo it with the gap: the grate should not fall through any movement.
The seat for the grate is usually cut out in the bricks of the row so that the grate does not protrude above the surface of the firebox.
Plate
We can say that the stove is the face of the oven. This is also a cauldron mount. Therefore, you need to do it carefully and firmly.
For cauldron stoves, the stove burner should be located in the center of the firebox.
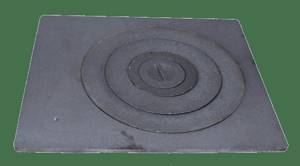
A cast iron slab will expand when heated and it is prohibited to wall it up in masonry. A gap of at least 5 mm must be maintained around the perimeter of the stove. There is no need to fill this gap with any compound. To securely fasten the slab, you will need a special clay-asbestos composition.
Chimney
For both stoves we suggest abandoning the brick pipe. Using metal pipes, sandwich pipes and modern heat-resistant and heat-insulating materials, you can significantly reduce the labor intensity of constructing a stove.
The use of metal pipes for the chimney and modern heat-insulating materials makes the construction of the stove easier.
The cross-section of the smoke pipe should be 140*200 mm for a stove for a cauldron up to 12 liters and 200*200 if you are using a 20-liter cauldron.
When using round pipes, the cross-section should not be less than the specified area.
The chimney must be equipped with a smoke fungus to protect against precipitation and a spark arrester.
We have collected all fire safety restrictions for chimneys in a separate article. Be especially careful about the passage of the chimney through the ceiling and walls and the distance to flammable surfaces.