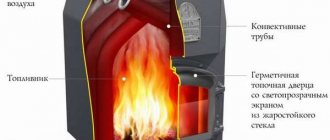
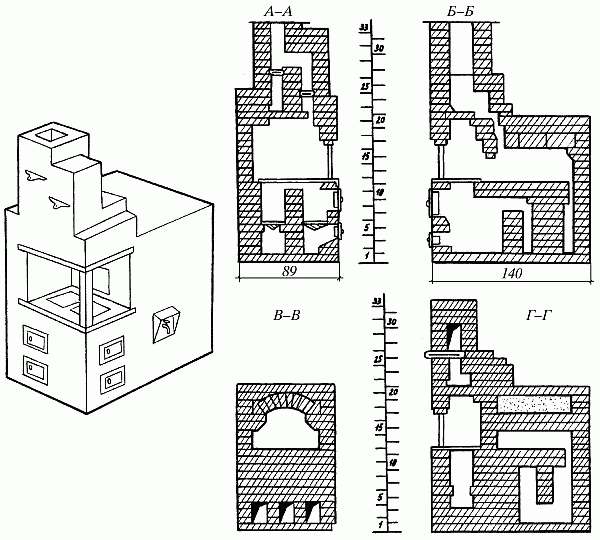
Furnace structure
Such ovens are not made large in size. The height is up to 2 m, and the width is maximum 1 m. Such heaters can be installed in small rooms. If desired, the oven can be equipped with an additional device - a water heating tank.
Before starting work, it is important to understand the design of the furnace itself and its structure:
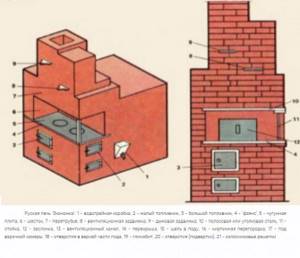
- unit base. There are two combustion compartments equipped in an asymmetrical pattern. Each has its own compartment for collecting ash, a ash pit, and a grate. One firebox is the main one, and the second one performs secondary functions. Holes for storing firewood and a blower are placed on adjacent walls, but perpendicular to each other;
- in the first row of bricks, 4 inspection grooves are equipped to clean the chimney of the combustion compartment;
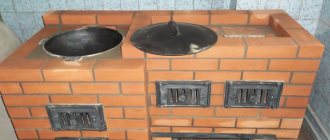
- The lower part of the stove is equipped with a hob located above 2 fireboxes. For better heating of the burners, a channel is laid between the fireboxes for the passage of gases. Such walls are laid out in half a brick, so the bottom of the “Housekeeper” heats up and transfers heat into the room;
- The auxiliary firebox is used during the warm period for cooking food during the warm season.
Sectional view of the housekeeper:
Subtleties of choice
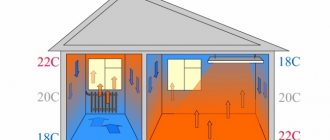
For many years now, the question of which stove is better - metal or brick - has been relevant for owners of suburban buildings. When constructing a structure of the second type, it will have to be equipped with heaters. With their help, at the beginning of the kindling, the level of heat transfer will be maximum, which will allow you to quickly create a comfortable temperature in the room.
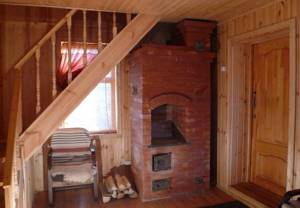
Placing the stove under the stairs
For home owners who want to choose a stove for their summer house with the condition that the room is used only in the summer, preference should be given to designs with thin walls. In them, the masonry is usually made of a quarter of a brick.
Recently, more and more you can find such a combination of a heating system for a country house, where the stove is equipped with a fireplace. In this case, they first light the fireplace, warming up the rooms, and only then install the stove, which can maintain heat in a small house for 12 hours.
Good to know: Why iron stoves heat a room faster than brick stoves
In order to clearly understand which stove ideally suits your requirements, before purchasing you should take into account a number of design features of all the models under consideration.
That is why, in order to decide which stove to choose, you need to know the answers to a number of the following questions:
- Preferred product shape.
- Main material of the product.
- What type of fuel is the cheapest in a particular region.
- Will I have to cook food on the stove?
- Desired wall thickness of the structure.
- Preferred channel system inside the oven.
- How the chimney will be built.
Stove and fireplace in one design
If you plan to purchase a stove for a wood-burning cottage, then it must meet the following parameters:
- Ease and simplicity of operation and maintenance.
- Have good heat dissipation among competitors.
- The structure must be made of high-quality materials, which will increase its strength and durability.
- A wood-burning stove should maintain a comfortable room temperature for as long as possible.
- With a high level of quality, the cost of the design should be minimal.
- A wood stove should work not only on logs, but also on wood waste and fuel briquettes.
According to these criteria, you can make a truly right choice, which the owner is unlikely to regret in the future.
Principle of operation
This device works simply:
- put firewood in the firebox and light the stove. Before this, the blowers and air dampers of the chimney are opened;
- heated gases enter the first chamber and pass through the connecting channel into the auxiliary firebox;
- heat flows to the 2-burner cooktop;
- through special openings, gases enter the common chimney channel;
- the flows mix, give off most of the heat to the brick walls and are released into the atmosphere.
The stove hearth is open in front and along the side walls. Thanks to this operating principle, such devices have a number of advantages, the main ones being a high level of performance and fuel economy. Especially in the summer, when only the small combustion chamber is used for cooking.
Characteristics
Regarding appearance, the classic and economical stoves are quite similar. The laying process is also not much different. The whole secret is in the design and choice of materials that will reduce heat loss to a minimum. The modified furnace consists of several chambers connected by a common channel. Thanks to this feature, heat is not lost, but is concentrated below. The cooking chamber is equipped with a damper and can be used for cooking. There is a pole open on both sides, along the contour of which a frame called “faience” is made from a metal corner.
It is located on the lower and upper parts. To strengthen the building and provide protection from destruction, it can be reinforced with pipes or a metal frame. As a result, such a furnace rationally consumes thermal energy and requires a small amount of fuel. Any raw material for heating is suitable - the main thing is that it is solid. If all rules are followed, heating will occur evenly and smoothly, which will eliminate cracks in bricks and burning out of clay.
Construction technology
For construction, it is important to find good drawings of the “Ekonomki” stove and an ordering diagram, or better yet, get acquainted with the recommendations of experienced stove makers and watch the entire work process.
Dimensions
We take as a basis the dimensions of our stove:
- width – 890 mm;
- depth – 1400 mm;
- height – 2250 mm.
The dividing partition between the fireboxes is made with 3 cavities for the passage of gases, measuring 100/200 mm. The hob is heated by gases, so you can dry berries, fruits or mushrooms on it and cook food.
Materials and tools
For work we will prepare:
- pick and hammer;
- Master OK;
- a trough for soaking clay and preparing a solution;
- steel square for marking the corners of the furnace;
- plumb line, level;
- measuring instrument;
- large file for cleaning edges;
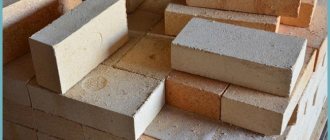
- up to 1300 ceramic bricks;
- 2000 kg of sand;
- 2500 kg of clay;
- air valve, 4 doors
Having prepared the tools and materials, we move on to the main work.
Description of the masonry
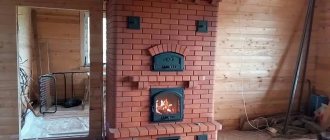
Photo of the arrangement of the “Housekeeper” stove:
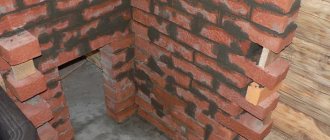
A DIY wood-burning stove is made taking into account the ordering scheme and construction stages.
| Row No. | Description of work |
| 1,2 | We lay out 1 row on a solution of clay and sand. We lay the brick flat, maintaining the correct position and thickness of the entire row. The entire design of the furnace depends on this. We lay the second row according to the diagram, begin to lay the ash pan channels and the ash pan. |
| 3 | We wrap the frame of the ash door of the main fuel compartment with asbestos cord and install them at the mounting points. We fix them with bricks and mortar. We install the frame and door of the ash pan of the small firebox. |
| 4 | We install and secure the ash door for the small combustion compartment on the other side of the stove. |
| 5 | We trim the edges of the inner row of bricks to install the grate. We carry out the laying according to the diagram. |
| 6 | We install the grate. It is important to provide a gap of 4 mm to the brick and fill it with asbestos cord. Such a device serves as a thermal gap. |
| 7-10 | We carry out the laying according to the diagram. On the bricks of the 10th row, we select grooves for installing the hob. |
| 11-14 | On the 11th row, we fill the gaps with asbestos and install a hob with 2 burners. We carry out all work in order. |
| 15 | Bricks are cut at an acute angle. The formation of the roof of the brewing compartment begins. We install special ties on the sides to secure the structure. |
| 16 | We continue to install the couplers and form the mouth of the furnace. |
| 17 | We make a transition channel between the combustion compartments for the passage of heated gases. |
All further rows are carried out strictly according to the ordering scheme and according to the drawing of the furnace. We determine and install an air damper on the chimney, making sure to seal the connection with a cord made of fire-resistant material.

Important! To bring the chimney to the roof, it is better to use sandwich pipes, connecting them to a brick pipe at the level of the floor slab. They are equipped with a layer of thermal insulation and do not heat up the surfaces of the walls. The internal pipes, made of stainless steel, are smooth. A layer of soot will not be able to settle on them.
All further work is carried out similarly to the process of drying and first firing of brick stoves. This work will take 3-4 days, but will allow you to check the stove for defects and smoke, eliminate faults and gradually dry the brick surfaces from moisture.
But before that, we open all the channels in the lower part of the furnace and combustion compartments and remove construction debris. We check the draft level in the chimney. If the torch flame does not draw into the firebox when the vent and air damper doors are open, this means that the chimney is clogged and needs to be cleaned. Only after achieving a normal level of traction can you start drying the “Housekeeper”.
Recommendations for use
The stove does not require maintenance. To avoid undesirable consequences, you must follow the rules for using a mini-oven:
- You cannot fire two fireboxes at the same time. In this case, the ash and combustion doors of the unused firebox must be tightly closed;
- Do not use flammable liquids such as gasoline or kerosene for kindling;
- keep the heater damper closed. If there is a need to open it, then first you need to open the ventilation duct valve;
- monitor the amount of ash. Remove it in a timely manner, otherwise there will be no fuel savings, because it will absorb heat and the heating of the rooms will deteriorate. It is better to do this procedure at least twice a week;
- you need to let the fuel warm up well for ten minutes, and only then start cooking food in the oven;
- It is not very practical to use paper for kindling - it burns quickly. It’s better to put wood chips or birch bark in the oven;
- Check periodically for any cracks in your stove. If any are found, they need to be repaired. If the damage is significant, then major repairs will have to be made. A clear indicator of a problem is a decrease in the heating temperature produced by the stove. The house has become colder - inspect the stove;
- It is preferable to carry out repairs in the warm season, when the stove is not used for heating;
- Before burning fuel, you need to close the doors of the ash pit and fireboxes;
- you need to clean the chimney in a timely manner;
- It’s better to start heating the stove during the day, then by the evening the whole room will warm up;
- It is preferable that the fuel be dry. And to ensure that it is not exposed to moisture and water and does not become damp, store it in a specially designated place. It should be dry and closed;
- It is desirable that the logs are approximately the same thickness and length. This is necessary because thin ones burn too quickly, and thick ones, on the contrary. The house will not be heated well enough in this way;
- stack the logs not randomly, but in a certain order. First, rake the coals with a poker closer to the door. Place a log across it. Then thinner firewood is laid obliquely, and thicker firewood is laid on top of it.
Drying
For drying, we put a maximum of 2 kg of firewood in the combustion chamber, light it, and after burning, remove all the ash and remnants of firewood from the firebox and ash pans. After the surfaces have completely cooled, we repeat the work. So we carry out up to 3 drying operations per day for 3-4 days.
When burning wood for the first time, the stove will smoke heavily. Don’t be alarmed, this will evaporate moisture from the ceramic and burn off dirt and grease from the surfaces of the hob and other metal parts. All doors and windows in the room must be open.
On the second day, we begin to examine all surfaces for defects and places where smoke can pass through. If detected, these places are cleared of mortar and sealed with fireproof sealant and fireclay clay solution.
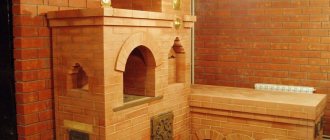
Do-it-yourself housekeeper oven
The “Housekeeper” stove is one of the most popular stove models that you can fold yourself. The oven is built from bricks, and this article can introduce you to the technology of its construction.
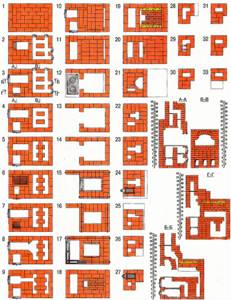
The article is accompanied by orders - layers of masonry, row by row. Three-dimensional drawings are placed in the album “Orders of the Housekeeper's stove 3D”, flat ones - in the album “Orders of the Housekeeper's stove 2D”.
Preparing for work
A detailed description of the “Ekonomka” stove is often found in construction magazines. It is also in books, for example, in the book of P.I. Voropaya "How to fold a stove"). The stove is quite compact (900×1400 mm) and has 2 heating chambers with bottom heating. It requires approximately 750 bricks. If you build a stove yourself, guided by the book of P.I. Voropaya, we can say that the description of the orders is not entirely accurate. You can see the list of inconsistencies below:
- some rows of bricks were inaccurately displayed on the sections (for example, the brick above the mouth in the 18th row lies flat, and on the B-B section it stands on its edge);
- in the 21st row there is no brick shown, so there is a hole above the slab through which air is sucked in;
- in rows 21 and 22 there is no hole for exhaust, but in row 23 it suddenly appears;
Therefore, when laying a stove yourself, you should pay attention to these inaccuracies. The masonry work should begin with sorting the bricks. It is better to prepare even, smooth bricks for fireboxes and for the vault. It is better to put aside bricks that have any defects for cutting. Before laying, the brick must be processed - chamfered along all front edges.
Then start preparing the clay - soak it and rub it through a sieve. It is better to do this ahead of time, as it is easier to grind liquid clay. To obtain the solution, you can use a drill (power 600 W) with a mixer.
Then you should sift the sand. For mortar and soaking bricks, you need to prepare buckets (for mortar - ordinary ones, for soaking bricks - with high walls or just a tank). Next you need to work on the valves and fire doors - grind off the burrs, bend and rivet the door locks. You can rivet clasps onto doors from strip iron. For rivets, use the correct size nails. Also take care of the future installation of doors - unravel the asbestos cord into strands of 5 threads.
Masonry
Furnace technicians advise spreading the solution by hand. This is usually done in order to feel with your hand any stones that may be in the clay. But this recommendation applies to untreated clay. If the clay is ground, then it is better to apply the solution and level it with a trowel, and finally with a notched trowel. In this case, your seam will be thin and even. Recommendations about a thin seam are correct only for orders without oven appliances. In the same rows where there is a stove door, the seam should be 5 mm or slightly more, since the height of the stove appliances is a multiple of 7 mm (the height of the brick plus the seam). This is due to the fact that if the seam is made thinner, the stove door will protrude above the bricks of its row. And the thinner the seam, the more noticeable it will be.
The optimal thickness of the solution and the required height of the spatula teeth can be determined experimentally. To do this, use a cutting disc to gradually increase the depth of the spatula grooves in order to obtain the desired result.
For simple brickwork, it is more convenient to use liquid mortar and bricks that have been well soaked before. The straightness and horizontality of the masonry is regulated by the level. In rows with outlets, you need to use a solution of a thicker consistency, since the brick “rides” with a liquid solution.
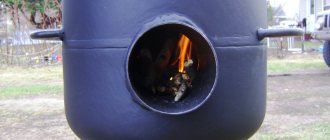
Firebox
To test fire the stove, fill the firebox completely with dry wood, open the firebox door, the ash pan door and the ash pan doors. The air damper is also open.
We light the firewood, after the large logs begin to burn normally, close the doors and ash pans and check the performance of our homemade “Housekeeper”. Do not use firewood with a humidity level above 20% - this will lead to frequent cleaning of the chimney from a thick layer of soot.
To clean the pipe, use a cable with a brush attached. By passing one end into the chimney. Having brought it outside in the firebox, simply stretch the brush along the entire length of the pipe. But before this operation, we recommend removing or covering things and furniture with film. This operation will have to be performed at least once every 30 days.
When doing work with your own hands, treat it with full responsibility. Comfort and coziness in your home depends on this.
Photos, drawings, useful video
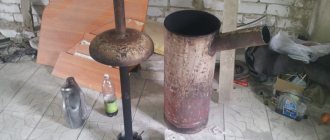
How to weld a metal stove for a garage with your own hands from metal? Blueprints.
And here is a video about making a stove for a garage with your own hands.
Providing comfortable conditions in the garage requires some effort, patience and expense. It should be remembered that it is very important not only to make it possible to heat the room, but also to maintain the safety of being in it.
On a hike, a tent becomes a shelter from bad weather . It protects from moisture and wind, but in cold weather even a good sleeping bag will not save you from the cold.
Therefore, lovers of nomadic holidays come up with various mobile heating systems.
What are they made of?
The materials and tools required to build a housekeeper stove are as follows:
- grate;
- doors for combustion chambers;
- ash doors;
- cast iron platform with two burners;
- chimney damper;
- valve for the ventilation channel;
- fire brick;
- electric drill and removable construction mixer;
- Master OK;
- buckets;
- sieve;
- putty knife;
- level.
In addition to the basic materials, you will also need:
For construction you will need sheet steel.
- wire;
- round steel, sheet;
- nuts, washers, nails;
- flood sheets;
- asbestos pipes.
Return to contents