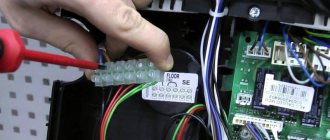
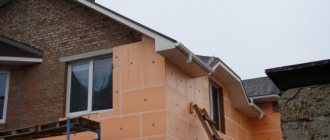
Walls play a major role in interior design. It is important that they are smooth and tastefully finished, then they, together with furniture and decorative elements, make up a complete design.
The interior looks impeccable when complex places in the decoration are done with high quality
But it often turns out that finishing the wall behind the battery is relegated to the background, and they remember it when it is already clearly noticeable that unfinished batteries are spoiling the whole picture.
Decorating the walls behind the radiators. Think small
It turns out that when people make renovations in their apartments, they completely forget that finishing the walls behind the radiators is just as important as finishing the main walls. And after finishing the work, they realize that the batteries are, in fact, unfinished, the wall behind them is ugly, and of course it needs to be brought into appropriate shape.
Why is this happening? Here are some reasons:
- the heating radiator covers part of the wall, so there is no need to do anything behind it;
- there will be long curtains from the eaves to the floor and the radiators will not be visible at all;
- Decorative screens will be hung on the batteries.
It’s hard to disagree with these points, because they are absolutely fair. But not every family is able to plan all future renovations, as they say, on a turnkey basis, and many little things are figured out along the way. For example, after the repair is completed, it becomes clear:
- Probably in this room with such wallpaper, blinds or short curtains to the window sill, and not to the floor, would be better suited;
- the room is relatively small in area, and if you hang decorative screens on radiators, they will look very bulky and steal the space in the room.
So it turns out that the primary vision regarding batteries has changed. It turns out there will be no long curtains or decorative screens. So what then? A terrible unfinished wall behind the radiators, which in the absence of curtains is very visible? By the way, there are houses where there are 2 windows in the rooms. So 2 scary walls will be visible?
What is the difficulty, you ask? Just think, a small piece of wall, it can be done in a couple of days. However, this is, at first glance, an erroneous opinion. If the wall behind the radiators is really crooked or has potholes, then you can’t just stick wallpaper on it; most likely it will have to be leveled at the very least, which means you’ll have to tinker with primer, plaster, and putty. Read my detailed article about preparing walls for wallpaper. After gluing the wallpaper, you need to remember to cut out and secure the baseboards, which under the radiators are solid external and internal corners. The worst thing is that if your main repairs have already been completed, then the apartment is relatively clean. And just imagine, in a mini-version you will actually have to repeat the entire renovation from start to finish with a small piece of the wall.
True, I can reassure you a little, since there are certain assumptions that will still allow you to reduce the time. So let's begin. In parallel, I will take into account the time spent on such repairs.
Box
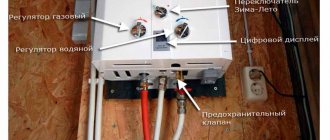
When performing modern, high-quality repairs, we hide heating pipes in the wall. This installation option requires careful calculation and drawing up a detailed diagram. If the heating network is hidden at the stage of building a house, then the task is not difficult to complete.
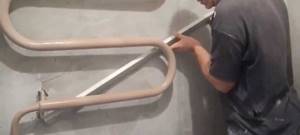
But, with an already existing pipeline stretched along the walls, they do this. In addition to false walls, it can be sewn up with a box. At the same time, a frame is assembled from wooden boards or a profile, which is subsequently sheathed with various materials suitable for the design. Neither the construction nor the covering of the frame present any particular difficulties.
And not into the wall, then the advantages of this option speak for themselves. The structure is not difficult to build with little financial investment. Another clear advantage of such a building is the ability to quickly get to units for repair work.
We recommend: Why heating radiators make noise in an apartment: causes and solutions
If they hide the highway under a box without openings, then this also does not pose a big problem, so this building can be easily dismantled and then returned to its original place. And one more important nuance cannot be ignored. When the heating line is hidden under a box, such a building acts as a decorative detail that can be decorated to your liking.
Isolate or do without it
Transferring heating pipes into the wall involves the use of insulation.
Many people ask a completely justified question: “Why is this insulation needed when transferring pipes under plaster?” The answer is simple, otherwise the heat will go into the walls to warm up. Mostly heat is lost in the walls that are in contact with the street. In internal walls, the problem of heat loss is not large, since heat will still pass into the room, but its amount will be slightly less.
When transferring the heating pipeline into the wall, not only thermal insulation is carried out. This creates an obstacle to the formation of condensation. After all, any moisture is favorable soil for the development of fungus.
It is also important to note that insulation when moving heating pipes performs another important function. It protects the highway from mechanical influence.
When choosing an insulation option when moving a pipeline, it is important to take into account that each of the proposed materials has its own pros and cons. For example, polyurethane foam must be taken with the smallest thermal expansion index; in the case of polyurethane foam, it is necessary to take material that exactly matches the size of the system, etc.
How to secure a pipeline
Laying heating pipes into the wall is done using various devices. Let's consider several options:
- sliding;
- hard.
An immovable support for the pipeline holds the structure tightly. With this installation, the contour cannot move. And when installed with sliding fasteners, it can move a little. When pulling the line, it is recommended to alternate these two types of fasteners.
Types of fasteners that are used when laying networks under plaster:
- These are fairly simple devices in which fixation is carried out by tightening the bolt.
- Clip. These devices also have a simple design. The advantage of this device is that fixation is performed with one click.
- Plastic tightening clamps. Unlike metal analogues, such pipeline laying devices are equipped with only one fastening point.
- Dowel - hook. These options are recommended for laying the system on a flat surface. Such a screw is tightened or carefully hammered into the prepared place.
- Crab - systems. These mechanisms are used when fixing the pipeline to the walls, and for fastening lines to each other.
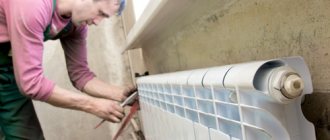
Removing the heating battery
The first thing to do is remove the heating battery. Although a jumper (bypass) is installed in front of it, and by turning off the taps, you can dismantle it yourself, you still need to take one point into account. If the heating in the apartment is not turned on, then you can remove it yourself, but if the heating has already been turned on, then who knows what condition your ball valves that shut off the radiator are in. What if they become thinner over time? In this case, removing it yourself can turn into a big disaster for both you and your neighbors, and it would be better to call a professional.
It is necessary to prepare the site for future repairs, purchase the necessary materials and tools. Plus, call a technician to remove the battery and don’t forget to include time for the technician’s work itself. We plan for 1 day for everything.
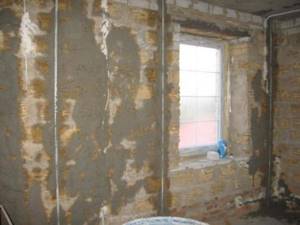
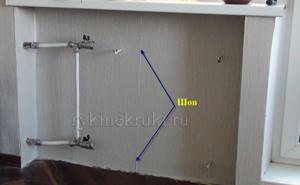
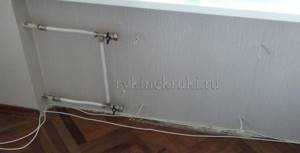
After the wizard’s work, we will see the following possible picture:
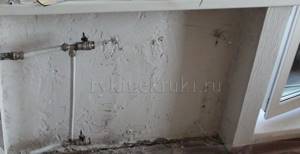
Primary treatment of the wall behind the battery
The picture above clearly shows that the wall behind the battery has not been treated. If you are removing the battery for the first time, then most likely there will not be a white wall at all, but a gray dusty wall, with old, stubborn paint. It is clear that you cannot immediately put wallpaper on such a wall. If you are planning not to glue wallpaper, but to cover the wall with a decorative panel, as can be clearly seen in the pictures in the article Correct installation of a central heating battery in an apartment, then in any case, the wall needs to be treated at least in order to remove the smells of old walls and old repair (advice from my personal experience).
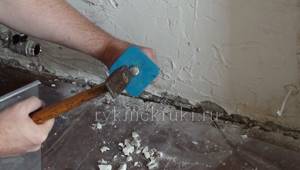
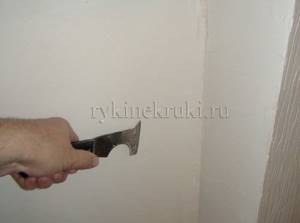
So where to start? We begin to knock off the extra bumps on the wall, the remains of the old putty and paint with a hammer and chisel. We especially go through those places where we need to attach the baseboard. Planned time about 1 hour:
Then you must remove all debris and prime the wall (see the section Primer of walls).
We prime the wall 2 times. The priming itself takes 10 minutes, but the drying time for each layer is 1.5 hours.
Total: cleaning + priming the wall + drying time is about 4 hours.
How to hide a heating system in an apartment - let's look at the methods
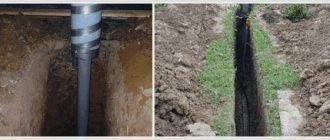
Heating pipes can be hidden in panel walls in several ways. And for this room there are not so many of them. The first option in panel houses is the use of grooves, and the second way is the construction of false walls. Each of the options has pros and cons, and you need to make a decision for yourself after studying these methods in detail.
A heating pipe can be hidden in the wall of a panel house when a new circuit is being assembled, or repair work is being carried out in an already functioning structure. As a rule, the wall of a panel house and the heating main are placed in different planes.
And when it is necessary to bring them into one plane, recesses are cut in the panel walls and the heating line is placed there. When doing this, you need to pay attention to the following points:
- Before starting work in a panel house, the riser is blocked. There is no need to rush when performing these actions. And you should definitely make sure that the work is planned on the right riser.
- If the depth of the canal exceeds half the septal thickness, then the best option would be to abandon the planned actions. So, for example, a bathroom in a panel house is a separate concrete block system. And the thickness of such panel walls will not be enough for this task.
- The dimensions of the grooves in panel walls should not run end to end, and they should not infringe on the contour. The recesses must be made taking into account the system fasteners, its volume and the insulating layer.
- Before covering the system in the wall of a panel house, otherwise condensation will form on the surface of the pipe.
- Before fastening the structure to the wall of a panel house, you need to determine its main locations. These include joints and zones of change in direction of the coolant.
To facilitate the work of chiselling a wall in a panel house, it is recommended to use a grinder. First, markings should be made, and then along the corresponding lines, indentations are made to a certain level of depth.
ADVICE! When working with an angle grinder, not only a lot of noise arises, but also dust. Modern tools have a big plus - the function of connecting to a construction vacuum cleaner, and this prevents the appearance of dust.
According to existing rules, the communication network in the wall of a panel house must be located in an area of unobstructed access. Only those areas where the possibility of an accident is zero are left directly closed.
How to plaster behind a battery
Next, you need to level the wall. From our initial picture it is clear that the wall will have to be plastered. It is in this place that you can breathe a sigh of relief once: there is no need to plaster on the beacons! Even if you lie a little and make a slight curvature, this will definitely not be visible under the batteries. Therefore, we take the plaster and begin to level the wall by eye. I have a separate section on How to plaster walls.
We take about 3 hours to prepare the plaster solution and the work itself (for a non-professional):
And now an important point that many people forget about. The plaster takes a long time to dry. From 2 to 7 days. (if we want to do everything using the right technology, of course). It all depends on the thickness of the plaster layer, the time of year, and the dampness of the room itself. But we still take the average time of 4 days. A sign of complete drying of the plaster, for example, gypsum Rotband, will be a change in the color of the wall from cream to snow-white, as can be seen in the following picture:
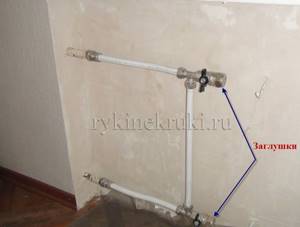
Yes, I almost forgot. If you are making repairs during the heating season, then I highly recommend that you install plugs immediately after removing the battery for your own safety. It is important to read about this here.
Nuances of internal plastering
So, we have looked at the basic technology for applying plaster, however, as mentioned above, when carrying out renovations in a home, you will have to deal with a number of other nuances, so below we will present the main ones.
Scheme of plastering a doorway
Finishing door and window openings
When finishing any room, the first problem that novice craftsmen have to face is finishing the slopes.
In reality, there is nothing complicated about this:
- First of all, before you plaster the doorway, you need to install the door.
- Then, a perforated corner should be installed on the outer, upper side of the slope, checking its position with a building level.
- After this, plaster is applied according to the same principle that we discussed above, i.e. First the spraying is done, and then the covering layer. You can level the surface of the opening using a small tool or a special device in the form of a stick with a cutout.
- After completing the upper slope, vertical corners are installed and the sidewalls are finished in the same way.
Window slopes are finished in the same way.
Plastering a shell wall
Finishing porous surfaces
Often, home craftsmen are faced with the need to finish porous surfaces, such as cinder block or shell rock, which raises a number of questions. In reality, the technology for finishing these materials does not have any special features.
The only thing is that before you start applying the solution, the surface must be well moistened with water. Otherwise, finishing is carried out in the sequence described above.
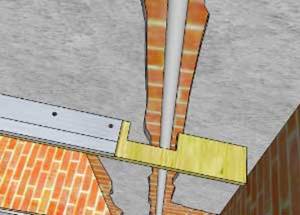
Plastering the surface behind the pipe
Plastering hard-to-reach places
Often, when performing repairs, there is a need to plaster hard-to-reach surfaces, for example, the area behind pipes, where it is impossible to install plaster beacons and level the surface with the rule. The solution to this problem is quite simple - you need to make a device from a sheet of plywood and the rules.
Plywood or other sheet material should be screwed to the rule, after cutting out a cutout for the pipe. Thus, the rule can be pulled along the beacons and at the same time level the remote area. The space under the pipe can be filled with plaster using a spatula.

Heat-resistant mixture
Plastering stoves and chimneys
Another problem area that can cause difficulties when finishing is the stove or chimney. The process of applying plaster to such surfaces is no different from finishing walls, but there are a number of requirements for the plaster mortar.
At one time, clay-based solutions were used for plastering stoves and chimneys, but now there are special heat-resistant plasters on the market that can withstand temperatures of up to 1000 degrees Celsius. These are the ones that need to be used when performing such work.
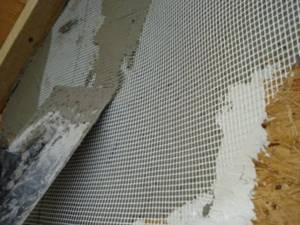
Plastering technoplex
Plastering walls insulated with Technoplex
Recently, such thermal insulation material as technoplex has become widespread.
Plastering walls insulated in this way has the following nuances:
- Finishing is done with universal glue for installing insulation systems.
- Beacons are not used, since the installation of technoplexes itself involves leveling the walls.
- A fiberglass reinforcing mesh is glued over the insulation. The glue is applied to the mesh in a layer of about 3 mm.
- After the first layer has dried, the surface is covered with a final thin layer of glue, which completely levels it.
These are, perhaps, all the main difficulties that you may encounter when plastering your home yourself.
Plastering OSB boards
Plastering OSB boards
The need for this operation usually arises when finishing frame houses. Plaster cannot be applied to OSB in the usual way, as the coating will quickly begin to crumble. Therefore, the best option is to finish the surface with polystyrene foam, which will serve as insulation, and then perform plastering using Technoplex finishing technology.
In addition, there is another method of plastering - OSB boards are pre-coated with bituminized cardboard, after which a reinforcing mesh is glued to them with a special adhesive, using the technology described above.
How to putty behind the battery
As soon as you have a snow-white wall, you need to prime it once (we take 2 hours to dilute the primer, apply it, and dry it) and immediately proceed to putty. Here you can also do it simpler than we did when puttingtying large walls. It is not at all necessary to buy a dry mixture and prepare it. You can get by with ready-made putty. This will save a lot of time:

The putty is applied in a thin layer. I think you can do it in 1.5 hours:
The drying time of the putty is 1 day. The second time, I think, there is no need to putty.
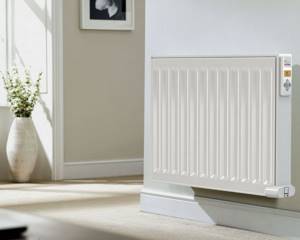
Where does the heat go?
Heating devices in buildings are installed under the windows.
The goal is to warm the air inside and create a thermal curtain that prevents the penetration of cold from the street.
Heat spreads from a heated object to a cold one.
The wall temperature is lower than that of the radiator.
In the cold season, the surface behind it heats up to 35-40 °C.
Instead of heating the air inside a warehouse or office, some of the energy is used to heat the external walls.
How to sand the walls behind the battery
Now here is another important nuance. After puttying, if we follow the correct technology, we must sand the wall. But don’t forget that sanding with sandpaper is a sea of dust. But the main repairs have already been done. Therefore, here you can go for simplification, as in the case of plaster without beacons. We will not sand the wall with sandpaper. We'll just take a sharp spatula and cut off all the extra putty microtubercles. There will be minimal dust, and the wall will still be quite smooth. Even if the wall doesn’t turn out to be perfect, then for the case of batteries, as they say, it will work. Work for 0.5 hours:
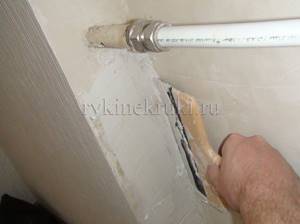
Plaster
It is very difficult to apply the solution onto a plane. For the work you will need a thin metal strip, 3 - 5 centimeters wide and 10 - 15 centimeters longer than the radiator. The plaster or putty is diluted a little thicker than usual so that it does not flow off the narrow strip of metal. The solution is applied to the edge of the strip along its entire length, and the strip itself with the applied mixture is passed through the space behind the battery, at an angle of forty-five degrees. The process is very similar to working with the rule - plastering must be done according to the same principle.
When the solution is applied to the entire area behind the heating device, the mixture must be given time to dry, and then, using the same metal strip, sand the surface by attaching sandpaper to it.
How to glue wallpaper behind a radiator
Now we prime the wall for the last time (again 2 hours including drying) and you can start wallpapering:
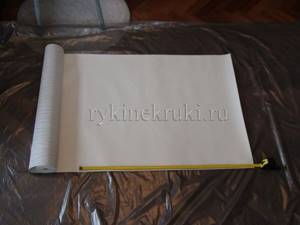
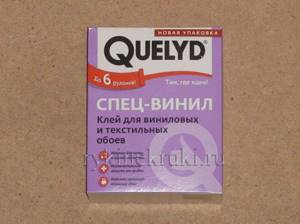
We select the glue that is suitable for this type of wallpaper. For example, in the picture, you see vinyl wallpaper on a paper base. The following glue will work with them:
Prepare the glue according to the instructions and glue the wallpaper. We take 0.5 days for pasting, taking into account the preparation of glue, marking of rolls and pasting. There is an important comment about gluing the panels. You need to glue one sheet on one side of the niche under the battery, and start gluing the second sheet on the other side of the niche. This is done so that the seam is exactly at the center of the battery, and not somewhere where it will be clearly visible, since our battery does not cover the entire niche:
If the niche is long, then we start gluing the canvas on one side, the next one is butted to it, but on the other side of the niche we also glue one canvas:
How to disconnect a cast iron radiator from metal pipes
As a rule, in old cast iron batteries the pipe connections are as follows. At the water inlet and outlet of the radiator, cast iron adapter couplings are installed - futorka. The external thread of the fitting allows it to be screwed into the hole of the last section. The thread cut into the inner hole of the fitting is designed to connect a 1/2-inch metal pipe. After the fitting, a metal pressure washer is located on the thread of the metal pipe.
In old houses with cast iron radiators, as a rule, there are no taps for regulating the water supply and a shut-off valve. All shut-off valves are usually located in one place at the outlet and water inlet of the gas boiler, or in the basement if we are talking about an old apartment building connected to a central heating system.
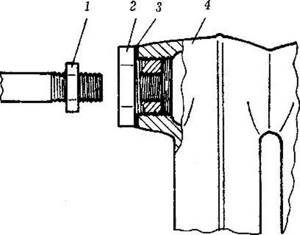
Connection diagram for a cast iron heating radiator.
In the figure the numbers indicate:
1 – pressure washer (lock nut);
2 – transition coupling (futorka);
3 – gasket under the futor;
4 – base of the cast iron section.
After making sure that the water supply to the radiator is shut off, using 2 adjustable wrenches, initially release the pressure washer on the pipe, approximately 4-5 cm. After this, placing a container under the battery to collect water, unscrew the fitting from the radiator section, which will move along the thread on the pipe towards the released washer. In this case, it is advisable to count and remember the number of revolutions, since the installation of the radiator will be reverse sequential.
How to attach the plinth behind the battery
After pasting the wallpaper, you can immediately begin marking the baseboard, where possible wires will be hidden. The main problem here is that the corners are solid. You will definitely need a miter box and a saw. But I have a very detailed article on this topic, so just take a look at it: How to Attach Baseboards. Allow 0.5 days for the baseboard. You need to measure everything, saw off all the corners correctly, then drill the wall with a hammer drill in the right places, drill the baseboard itself and attach it to the wall.
Installation of a heating battery
So, everything is ready, and you can invite a specialist to hang the battery in place. Now, if you can probably remove the battery yourself, then it’s better to trust a specialist to hang it back up. I highly recommend not doing this yourself. If you don’t twist pipes every day or wind flax on threads, then you don’t have this skill. You don’t know how much flax you need to screw on and with what force you need to tighten the nuts, but this work is very important:
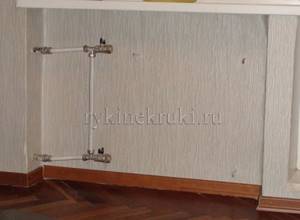
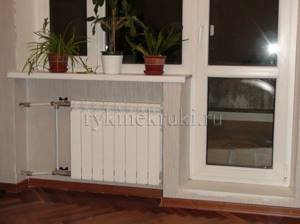
Well, everything is ready, you can place the flowers on the windowsill and admire your work:
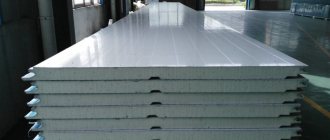
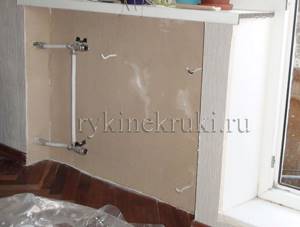
Sheathing with plasterboard
The resulting structure is sheathed with sheets of plasterboard, cut to the required sizes. Drywall is cut using a utility knife according to previously made marks. To do this, cut through the cardboard on both sides and break off the desired part. Irregularities along the edges are smoothed out with a plane or the same knife.
The covering is done in this way: a sheet is placed on the resulting frame and a self-tapping screw is screwed in using a screwdriver, slightly pressing the head into the surface.
Subsequently, the corners of the box are reinforced with plaster corners, and the surface itself is puttied and finished in accordance with the plans.
The opening itself is closed with decorative grilles.