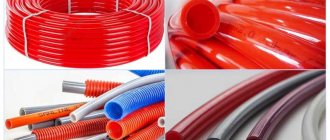
Types and form of release
There are four main types of perlite for thermal insulation. The material differs in the shape of the inlet and the method of application. Each type of insulation has its own advantages and technical characteristics.
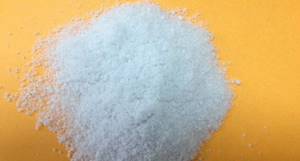
Backfill insulation
The material is perlite sand, which is used to fill voids between the wall and the finish or interlayers in brickwork. This insulation allows you to completely fill all the cracks and openings, providing reliable thermal insulation.
Perlite sand is often used to level floors. It is quite light and does not create any additional load on the structures. Therefore, it can be used for any buildings. Insulation with fine-grained bulk perlite can reduce the level of heat loss by more than 40 percent.
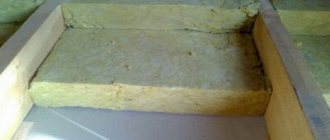
Plates
Perlite thermal insulation material in the form of slabs is one of the most popular construction products. This type of insulation is convenient for the construction of various large structures.
To give the material the necessary qualities in the manufacture of slabs, different types of binders are used - cement, clay, liquid glass, lime, bitumen or polymers. Formed perlite is mainly used for internal insulation. This is due to the high hygroscopicity of the material. For external insulation, reliable waterproofing is required.
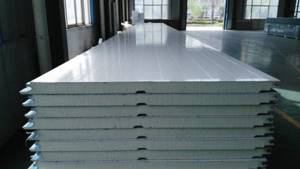
Perlite slabs
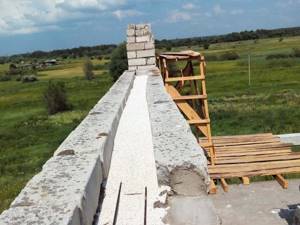
Perlite concrete slabs are especially popular. In addition to expanded perlite, they contain sand, water and Portland cement. The strength of the material depends on the ratio of the components. Ready-made perlite concrete blocks are large in size and light in weight. One product can replace three bricks. The use of such material allows not only to ensure structural strength, but also to reduce heat losses.
Roofing models
Bitumen-perlite is widely used for insulation and waterproofing of roofs. This roofing material allows you to create a reliable and fairly durable protective coating. Its thermal conductivity is only 0.067 Watt/m°C.
Bitumen perlite has high technical characteristics. Due to its flexibility, the material can be easily applied in layers to any roof structure. Perlite insulation based on bitumen is a non-flammable and safe to use thermal insulation product with high wear resistance.
Dry materials
Perlite is widely used in dry construction mixtures. It is added to improve the characteristics of gypsum, lime or cement compositions. This material is widely used in the preparation of grout for joints, putty and adhesive solutions. Quite often, dry self-leveling perlite mixtures are used when arranging floors.
Perlite plaster is in particular demand. Its technical characteristics far exceed conventional surface finishing compounds. Regardless of the degree of grain, perlite plaster is lightweight, which is especially appreciated when arranging facades.
The material is fire-resistant, does not rot and tolerates the lowest air temperatures well. Perlite plaster has high adhesion and is suitable for all types of surfaces. With the help of such finishing, you can create high-quality sound insulation and retain heat inside the room for a long time.
Perlite, advantages and disadvantages
Another type of wall insulation is perlite, or rather materials based on it.
This can be either blocks, bulk materials, or seemingly ordinary plaster. Perlite is a volcanic glass that contains molecular water in a bound state.
During the production process, such a composition is exposed to a temperature of 800 degrees, due to which a high level of porosity is achieved.
The advantages of perlite include:
- light weight;
- low level of thermal conductivity;
- soundproofing;
- good absorbent properties;
- hygroscopicity.
IMPORTANT!
Perlite is considered a completely natural and safe material, because it does not emit any harmful compounds during operation.
It is also worth paying attention to some of the disadvantages of using this insulation, although there are few of them:
- When working with perlite, there is a possibility of causing harm to the body, because... fine aluminosilicate dust is released when cutting blocks or mixing a solution;
- if the humidity level in the material rises to 10%, then this promises a loss of its properties by 90%. The material requires that the wall pie be equipped with a layer of waterproofing;
- Finding such insulation on sale is very problematic;
- On the market there are often counterfeits of this type of insulation, which are difficult to distinguish from the original.
The use of perlite sand in structures with high vibration is prohibited.
Specifications
Perlite insulation technology
You can provide good thermal insulation using perlite yourself. The technology for insulation with such bulk material is quite simple.
Wall insulation
Perlite is backfilled for brick and block structures. Preparation for insulation is carried out at the stage of wall construction.
The process of filling the thermal insulation material occurs as follows:
- all openings and holes through which perlite sand can spill out are sealed;
- the material is poured into the space between the wall masonry parts;
- The insulation is lightly compacted by tapping.
Wall insulation with perlite
Bulk material can also be used to backfill between masonry and interior finishing. For this method of insulation, only dry perlite is suitable.
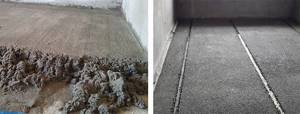
Floor insulation
For thermal insulation of floors with a monolithic hard coating, perlite sand with a grain size of no more than 6 millimeters is used. The process of laying the material is quite simple:
- pour perlite sand from bags onto the base of the floor;
- with the help of special slats, bulk material is evenly distributed over the surface;
- all pipelines are immersed in a uniformly laid composition;
- The floor surface is covered with slabs.
To insulate floors covered with wood, compaction of the material is not required. Perlite sand is simply poured into the openings between the wooden elements of the floor base. Thermal insulation is reinforced with fiberboard or fiberglass. Sometimes cement is used for these purposes. The entire insulated surface is sprinkled with a dry solution, and water is sprayed on top.
Perlite is a modern thermal insulation material with unique properties. With its help, you can provide good sound insulation and reliably insulate the structure of the house.
Perlite - what is it and what are its properties. Perlite (a word borrowed from French) is a rock of volcanic origin. When magma reaches the surface due to its rapid cooling, volcanic glass (obsidian) is formed, and as a result of the passage of groundwater through it, perlite (obsidian hydroxide) is obtained.
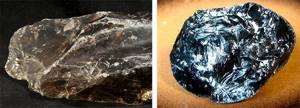
This natural material is divided into two groups: perlite, which contains up to 1% water, and obsidian hydroxide, in which the amount of water can reach up to 4÷6%. In addition to water, perlite contains oxides of aluminum, potassium, sodium, iron, calcium; silicon dioxide and other chemical elements. Volcanic perlite is a porous material that can be black, green, red-brown, brown or white in color. According to their texture, perlite rocks are divided into: massive, banded, pumice-like and brecciated. If perlite contains obsidian, it is called obsidian; if feldspar, then spherulitic; and if the material is homogeneous in composition, then it is called resin stone.
Thermal insulating perlite plasters
The use of a material based on expanded perlite fractions helps reduce thermal conductivity by up to 50%. The weight of the structure is also reduced. In addition, plaster based on perlite sand makes the surface more attractive . Due to the presence of perlite in the mixture, properties such as fire resistance and noise absorption are improved.
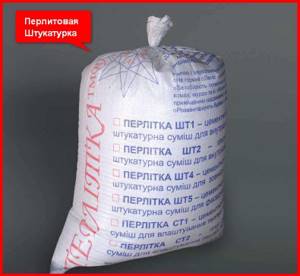
Perlite-based plaster is versatile, because it can be applied to the surfaces of different materials - brick, concrete, metal, wood and slag concrete. Another advantage is the ability to paint the plaster layer without preliminary surface treatment. The same applies to wallpapering. Thanks to the roughness, finishing materials adhere well to the plaster.
In addition to perlite, the mixture includes cement, water, and air-entraining additives. The ratio of components varies significantly, but expanded sand is always taken in the same quantity. Possible options for the ratio of cement and perlite: 1:4, 1:5, 1:6, 1:8.
We study all known varieties
There are only 4 forms of release of this heat insulator: backfill (it is also called sand), slabs (outside identical to extruded polystyrene), roofing models and dry repair mixtures. These varieties have certain properties that you need to know.
Backfill insulation
The first form factor of Perlite sand to appear is a loose heat insulator
. The main task of this material during the construction of houses is to soften the structure (it is lighter than a conventional cement-sand mixture) and increase its insulating qualities. In most cases, this layer is used for backfilling floors and interfloor layers. It is also often used to fill empty spaces in wall masonry. Less commonly, it is used in combination (or instead) with warm plaster.
The most functional and functional form is slabs
According to official statistics, about 60% of all perlite sand produced on earth is used to create insulation boards. They are obtained as a result of hydraulic pressing, as a result of which they are quite convenient to use. The binder differs depending on the individual type (bitumen, lime, polymer compounds, cement, liquid glass, etc.).

This category of materials has very high hygroscopicity. Due to this, it is mostly used for interior decoration. Still, when laying an additional waterproof layer, it can also be used for finishing on the outside. However, this is not very justified from an economic point of view.
Roofing models
From the name, it is clear that such analogues are used mainly for roofing. For this task, in other words, bitumen perlite is used. This kind of material provides an excellent opportunity to create a layer of insulation of various shapes, due to which it is sometimes used for buildings of original design.
Main! There is no need to heat it before applying this coating!
The average thermal conductivity standard for this variety is 0.067 W (m*C), which is considered the most ideal result. This indicator makes it possible to use this coating even in the north. It is also necessary to emphasize the non-flammability of this heat insulator, which ensures the overall safety of the building.
Dry repair mixtures based on Perlite sand
As a result of mixing cement and perlite, a very productive dry mixture for construction work is obtained. The solution is prepared very simply - it is very easy to add water (in other words, no additional additives, such as ASG or gypsum, are required). For the most part, this composition is used to fill cavities in brickwork, grout seams and cracks, and also create a layer of plaster with very high thermal insulation characteristics. At the same time, it makes it possible to easily straighten the surface.
Insulation - bulk perlite thermal insulation, segments, slabs, plaster
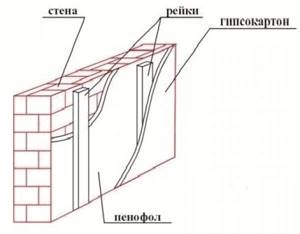
wall pie
To better understand the further installation process, it is worth getting acquainted with the structure of the wall pie, which consists of various layers of material. The sequence of layers is indicated in the direction from the inside of the wall to the outside:
- interior finishing materials;
- panel osv;
- penofol;
- frame racks;
- windproof material;
- sheathing;
- exterior finishing.
Wall pie is indicated for the frame type of house. For other types of structures, some materials can be excluded or added as necessary.
It is worth paying attention to the need to provide a vapor barrier layer in the wall of the cake. Opinions on this matter differ, but in most cases, vapor barrier is not used for insulation from inside the room.
Wall pie device
If penofol is used for external insulation, then a vapor barrier layer is necessary, because the material tends to allow vapor to pass through only in one direction (except for type C).
Advantages and disadvantages
Perlite has a round shape and a characteristic shine, which makes it quite similar to pearls. Using such material as insulation has many advantages:
environmental friendliness of the material; fire safety; resistance to sudden temperature changes, which is very important for external insulation; lightness of the material; lack of odor and toxicity; relatively low cost; durability.
What does perlite look like?
The material is resistant to aggressive compounds and is not subject to corrosion or rotting. Loose insulation does not attract insects and rodents and is able to tightly fill voids, which allows you to achieve a fairly high level of sound insulation.
The disadvantage of using perlite as insulation is often considered to be the formation of dust during installation, which can be harmful to health. But this problem can be solved with the help of protective equipment.
Design and drawings
If you don't like plain wallpaper, you can find any pattern theme. There are a lot of such wall covering options today.
Every day, brands develop different prints to attract the attention of customers: this allows you to choose wallpaper taking into account your preferences and your budget.
Vegetable
Since the color green is associated with nature, plant patterns are considered completely natural. Relief patterns look beautiful on a green background: for example, embossed leaves. They seem almost invisible at first glance, but they change the perception of the overall picture. Girls love beautiful floral patterns. The surface of the green wall covering can be covered with exquisite orchids, small daisies or luxurious roses.
Geometric patterns
A universal option that never loses its relevance is simple geometric patterns. It can be small polka dots, large circles, stripes or checkered patterns. Bright shades can serve as additional tones here. The main thing is that they blend organically with other details in your interior.
Monograms
Lace patterns with monograms go with almost any interior details and design ideas. If they are made in silver tones, the wallpaper will look luxurious.
Photo wallpaper
If beautiful textures aren't enough for you, you can check out the beautiful paintings that adorn the walls. Photo wallpaper with a green base looks interesting and bright. Most often they depict landscapes (for example, images of a forest, river or mountain path)
The image can be classic or three-dimensional, changing the perception of space
Most often they depict landscapes (for example, images of a forest, river or mountain path). The image can be classic or three-dimensional, changing the perception of space.
Insulation of coatings with slabs: mineral wool or perlite on bitumen mastic in one layer
LOCAL RESOURCE GIVEN GESN 12-01-013-03
| Name | Unit |
| Insulation of coatings with slabs: mineral wool or perlite on bitumen mastic in one layer | 100 m2 of insulated covering |
| Scope of work | |
| 01. Preparing the base. 02. Primer of the base. 03. Laying slabs on bitumen mastic. 04. Preparing the primer. |
PRICE VALUES
The price list shows the direct costs of the work for the period of March 2014
for the city of Moscow, which are calculated on the basis of
2014 standards with additions 1
by applying indices to the prices of the resources used.
2000
federal prices .
The following indices and hourly rates from the “Union of Cost Estimating Engineers” were used: Index to the cost of materials: 7.485
Index to the cost of machines:
11.643
Hourly rates used: The monthly wage at a given hourly rate is indicated in parentheses.
Hourly rate 1st category: 130.23 rubles. per hour ( 22,920
) rub.
per month. Hourly rate 2nd category: 141.21 rubles. per hour ( 24,853
) rub.
per month. Hourly rate 3rd category: 154.46 rubles. per hour ( 27,185
) rub.
per month. Hourly rate 4 categories: 174.34 rubles. per hour ( 30,684
) rub.
per month. Hourly rate 5th category: 200.84 rubles. per hour ( 35,348
) rub.
per month. Hourly rate 6th grade: 233.96 rubles. per hour ( 41,177
) rub. per month.
By clicking on this link, you can see this standard calculated in 2000 prices. The basis for applying the composition and consumption of materials, machines and labor costs are GESN-2001
LABOR COSTS
| № | Name | Unit Change | Labor costs |
| 1 | Labor costs of construction workers Grade 3.9 | person-hour | 45,54 |
| 2 | Labor costs for drivers (for reference, included in the price of the EV) | person-hour | 0,55 |
| Total labor costs for workers | person-hour | 45,54 | |
| Workers' compensation = 45.54 x 172.35 | Rub. | 7 848,91 | |
| Payroll for drivers = 124.27 (for calculating invoices and profits) | Rub. | 124,27 |
Work schedule. Automatic construction according to estimates.
OPERATION OF MACHINES AND MECHANISMS
| № | Cipher | Name | Unit Change | Consumption | St. unit.Rub. | TotalRub. |
| 1 | 020129 | Tower cranes when working on other types of construction 8 t | mach.-h | 0,35 | 1005,96 | 352,09 |
| 2 | 021141 | Truck-mounted cranes when working on other types of construction 10 t | mach.-h | 0,2 | 1303,9 | 260,78 |
| 3 | 121011 | Mobile bitumen boilers 400 l | mach.-h | 1,84 | 349,29 | 642,69 |
| 4 | 400001 | Flatbed vehicles, load capacity up to 5 tons | mach.-h | 0,28 | 1014,92 | 284,18 |
| Total | Rub. | 1 539,74 |
CONSUMPTION OF MATERIALS
| № | Cipher | Name | Unit Change | Consumption | St. unit.Rub. | TotalRub. |
| 1 | 101-0078 | Petroleum construction roofing bitumen grades BNK-45/190, BNK-45/180 | T | 0,025 | 11452,05 | 286,30 |
| 2 | 101-0322 | Kerosene for technical purposes grades KT-1, KT-2 | T | 0,058 | 19512,65 | 1 131,73 |
| 3 | 101-0594 | Hot bitumen roofing mastic | T | 0,201 | 25374,15 | 5 100,20 |
| 4 | 104-0004 | Mineral wool slabs with synthetic binder M-125 (GOST 9573-82) | m3 | 6,18 | 3967,05 | 24 516,37 |
| Total | Rub. | 31 034,61 |
TOTAL BY RESOURCES: 32,574.35 RUB.
TOTAL PRICE: RUB 40,423.26.
You can see this standard calculated in 2000 prices. by following this link
The price is compiled according to the standards of GESN-2001 as amended in 2014 with additions 1
in prices
of March 2014.
To determine intermediate and final price values, the DefSmeta program was used
Estimate for the construction of a house, renovation and decoration of apartments - DefSmeta
Rental
The program provides an assistant who will turn the preparation of estimates into a game.
How electricity heats the floor in a wooden house
- single heating cable;
- heating mats (analogue of a cable fixed to the base in the form of a mat);
- infrared film 0.5 mm thick (carbon strips between parallel power buses);
- carbon rods (analogous to film without a film base).
Each method is designed for its own type of coating and has certain advantages and disadvantages. If the floor covering is ceramic tiles or porcelain stoneware and similar materials, it is better to use a single heating cable or heating mats. For floors covered with carpet, laminate, parquet, etc., it is better to use carbon or film heated flooring. This coating effectively transmits infrared rays, heating the entire floor area
For all types of underfloor heating, it is important to determine whether it will be the main or auxiliary heating in the house
It is more advisable to use warm electric floors based on a heating cable or mat on the first floors of the house, taking into account their installation under a cement screed, on which the flooring is then laid. However, warm electric flooring can be done without a cement-concrete screed. The snake cable or mats are laid on top of a metallized reflector lying on a base made of a layer of thermal insulation. Floorboards and flooring are laid on top.
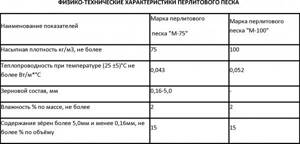
Characteristics of Perlite sand in the form of sand
Important characteristics are also positive qualities
It is necessary to emphasize the main positive qualities that perlite sand
heat insulator:
- Light weight. Despite the fact that mountain and volcanic rocks act as the initial raw materials, Perlite sand turns out to be quite light (this occurs due to thermal processing). As a result, there is no need to build a particularly reliable frame.
- Very high temperature resistance. It will withstand temperature changes from -220 to +900 degrees. Thanks to this, it can be freely used for insulation from the outside, even in the extreme north.
Main! In this nuance, he wins over all his rivals. No other heat insulator can boast of a permissible amplitude of more than 1100 degrees.
- Environmentally friendly. Even when heated, this material does not emit any toxic substances or carcinogens.
- Chemical neutrality to most acids and alkalis. This eliminates the possibility of corrosion and other unpleasant formations. It is also necessary to note that it is completely hypoallergenic.
- High sound absorption properties, which are achieved due to low bulk density. As a result, when using this heat insulator, there is no need to lay an additional layer of sound insulation.
- Does not change its initial shape during heating. Due to this, Perlite sand is often used in underfloor heating systems.
- Greater efficiency. In general, stating the specifics presented above, we can emphasize the impressive efficiency of this material. Despite the fact that it is not in great demand (relative to Extruded Polystyrene and Mineral Wool), its use seems very sensible. At the same time, the price of this material is approximately in the range.
Where is similar material used?
Such an impressive list of good qualities predetermined the wide scope of use of this heat insulator:
- External plastering of buildings. This is where resistance to frost comes into play.
- Any internal work that is associated with equalizing and increasing thermal conductivity parameters.
- Finishing inside the roof.
- Thermal insulation of pipelines (also for hot water supply).
- Heated floor systems.
The above shows only much broader areas of construction. The substance itself, called Perlite sand, is used in medicine, metallurgy, energy, agriculture, oil refining and even the food industry.
Perlite: a new word in the insulation market
Perlite is considered a universal material used as insulation for walls and floors. This is volcanic acid glass. The raw material can be obtained by sharp heating to 1100 degrees, when it swells. The fractional composition is different. Various components are added to the raw material to improve heat and sound insulation properties.
Today this insulation is considered one of the most effective in the world. Thanks to its special properties, the product is used not only in construction, but also in other areas. The largest producer of perlite is the USA.
Expanded perlite
Perlite, as a rock, is practically not used in construction. It acquires its unique properties only as a result of heat treatment, namely, heating at temperatures from 900 to 1100 degrees Celsius. At the same time, it swells, increases in size by 5–15 times and breaks up into small, round particles, which are called expanded perlite. Heat treatment is carried out in 1÷2 stages: it all depends on the amount of water in obsidian hydroxide. If its content is high, at the first stage, excess liquid is removed, keeping the material at temperatures of 300÷400˚C.
Foamed perlite is powder (particles less than 0.14 mm in size), sand (fraction size less than 5 mm) or crushed stone (granules 5÷20 mm in size). The density of sand is 50÷200 kg/mᶟ, and crushed stone is about 500 kg/mᶟ. The color varies from snow-white to grayish-white.
Due to its properties, expanded perlite is used in construction, the metallurgical industry, oil refining, the food industry and agriculture.
Operational life
Perlite chips have excellent performance qualities. It has been performing its functions for many years, maintaining its original condition without losing its visual appeal.
The service life of perlite is unlimited, unless it is damaged mechanically.
Perlite has high physical and technical properties, which is why it is so in demand; it is the best among thermal insulation materials.
When purchasing, you need to be vigilant - it is not so easy to find expanded perlite chips on the market and unscrupulous sellers can pass off a fake as real perlite.
Characteristics and properties of the material
Perlite is a rock of volcanic origin. Natural material itself has no particular value for construction. In appearance it resembles ordinary crushed stone. What makes perlite unique is its special heat treatment.
In order for the rock to have the necessary technical characteristics, it is heated to a temperature of 1100 degrees. Under the influence of high conditions, the pores of the material explode - swelling. As a result, perlite breaks down into many particles of different fractions.
Treated perlite has the following technical characteristics:
- fire resistance;
- bulk density (depending on the size of the material fractions) – from 45 to 500 kg/m3;
- thermal conductivity level – from 0.043 to 0.053 Watt/mK;
- ability to withstand temperatures from – 200 to 900 degrees;
- the porosity rate is 70 - 90 percent.
Expanded perlite is a lightweight material with good sound and heat insulation qualities. The finished construction product can have different fraction sizes - from 1 to 10 millimeters. Despite its high hygroscopicity, perlite is able to absorb and release moisture without changing its original characteristics.
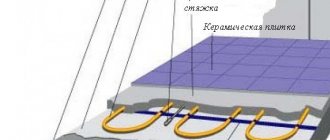
Water floor installation technology
This will require making a concrete pad on the ground base on which a layer of thermal insulation will be laid. To ensure the strength of the base of the future warm water floor, taking into account its volumetric expansion, at least one layer of reinforcing metal grating with a rod thickness of at least 5 millimeters is used.
The floor heating pipes are routed along this grid. The material used to make them is usually stitched polypropylene. The wiring diagram can be in the form of a “snake”, “snail”, “spiral”, or combinations thereof. But, in general, the laying step is from 100 to 300 millimeters. Practical ways to fix pipe bends laid in a “snake” or “spiral” can be:
- standard pipe fastening brackets;
- special plastic “rails” with grooves securing the pipe;
- snap brackets;
- layer of fixing profile.
It should be taken into account that there are also limits on the length of one ring of such a pipe, and in order to prevent heat losses and reduce pressure in the general heating system, they cannot be exceeded. As a rule, the diameter of the pipe laid in the circuit is also important.
pipe with a diameter of 20 millimeters.
For a more reliable floor structure, another layer of reinforcing grid can be laid on top of the pipes, similar to that lying under the pipes of floor heating circuits. Then a layer of cement-concrete substrate is placed on top for the coating, as described above. After the layer has hardened, which lasts up to 30 calendar days, the warm water floor can be started slowly. The floor surface can be decorated with floor coverings. Parquet, various types of laminate, tiles, linoleums, etc. are quite appropriate.
As a rule, installing a heated water floor is much faster, since it does not require holding time to set and strengthen the concrete base of such a floor. In the design set of such a water floor heating solution, the use of foamed polystyrene or dense foam is mandatory. These materials are laid on top of the base for fastening the heating tubes. They serve as the base for the floor covering. To obtain the required temperature in the room, the different thermal conductivities of flooring materials should be taken into account in advance.
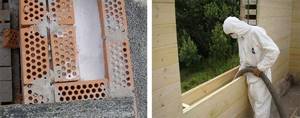
How to insulate a house using perlite
Perlite is used as insulation in the form of sand (bulk insulation); component in thermal insulation products and dry ready-made building mixtures.
Perlite sand as insulation for walls
Perlite sand for arranging thermal insulation of a house is an excellent material with which you can not only effectively insulate a home (heat loss is reduced by 50%), but also significantly lighten the structure of the building.
We begin installing thermal insulation from foamed perlite after part of the load-bearing wall (internal) and external brickwork (4-5 rows) have already been erected. We pour coarse expanded perlite sand (with a granule size of about 6 mm), previously dust-free, into the gap between these two walls and compact it thoroughly (the volume should decrease by 10%). We fill the sand manually or using a sandblasting machine. We repeat this operation several times until the walls are completely erected. By the way, in terms of heat-saving properties, a perlite layer about 3 cm thick corresponds to a 25 cm thick brick wall. When building panel houses, we pour sand between the sheathing sheets (internal and external).
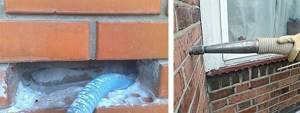
If you are insulating an old house with voids in the walls, then backfilling with sand can be done in two ways:
- carefully pull out several bricks from the wall and pour perlite through the resulting hole;
- drill a hole in the wall (diameter 30÷40 mm) and through it, using a special installation, inject heat-insulating material.
Perlite sand is a universal non-combustible building material that has a number of advantages:
- excellent sound, noise and heat insulation properties (and can be used to insulate walls made of any material);
- environmental friendliness;
- lightness (by weight);
- resistance to temperature changes;
- durability.
Advice! You should not use perlite sand, which is a very moisture-intensive material, as insulation in places with high humidity.
The only disadvantage of sand is that it is very dusty: therefore, it is recommended to slightly moisten it before use.
Floor insulation with perlite
For thermal insulation of floors, we use expanded perlite, which is poured onto the cement-sand base of the floor and leveled according to building regulations. The height of the thermal insulation layer of sand is the desired thickness plus 20% additional volume for shrinkage.
Important! The recommended minimum thickness of the perlite layer is at least 1 cm
We embed uneven areas and pipelines in a layer of bulk material, and lay slabs and flooring on top. If there is no basement under the house, then in order for moisture to accumulate and be removed, we place drainage pipes and absorbent pads under the perlite.
Another effective way to insulate a concrete floor can be to lay a kind of “pie”: we install a perlite screed between two layers of concrete. First, prepare a perlite solution with the following components:
- cement – 1 mᶟ;
- perlite – 3 mᶟ (grade M75 or M100);
- sand – 2.2 mᶟ;
- water – 1.5 mᶟ;
- plasticizers – 3÷3.5 l.
Stir all the components of the mixture until water comes to the surface: this is a sure sign that the solution (perlite screed) is ready for use.
Advice! Since perlite is a very light material, it is recommended to carry out all work with this material indoors so that the wind does not in any way interfere with the work process.
After the perlite screed is applied to the concrete base, we leave it to harden. After 1 week we get an excellent thermal insulation layer for the floor that will last for many years. We lay a second layer of concrete on top of it.
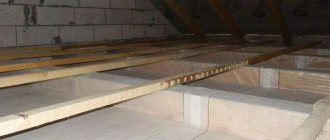
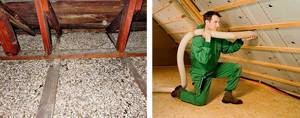
Roof insulation
If you do not intend to equip a living space in the attic, then it will be quite enough to insulate only the attic floor with expanded perlite. Otherwise, we pour perlite between the beams of the roof slope into boxes that are specially made for this purpose; then compact the sand thoroughly. The work does not require specific skills or knowledge.
Also, for thermal insulation of sloping roofs, perlite is used, which is treated with bitumen in the factory. We add a solvent to this bituminized perlite and get an adhesive solution, with which you can create a durable thermal insulation layer.
Laying methods
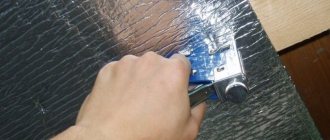
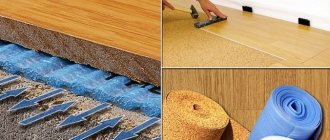
Let's consider which side is the correct way to lay the insulation with foil on the floor.
Heat-saving properties depend on how correctly the insulation is installed.
Foil reflects infrared radiation, therefore, the metallized layer must be laid so that it faces the inside of the room.
Insulation of concrete floor
Place the casing with the foil side down
Most often, the rolled material is fixed to the concrete base using a special glue made on the basis of rubber.
Installation sequence:
- We prepare the surface. We level the slab so that there is no large difference in height. We seal all cracks and cracks with cement mortar.
- We spread the material on the floor with the foil layer facing up and cut it to the required length. We move the strip aside and apply glue to the place where it is laid. Let it sit for a few minutes according to the instructions for the glue. We lay and press the material well. We place the strips close to each other.
- We secure the joints with foil tape, which is sold in hardware stores.
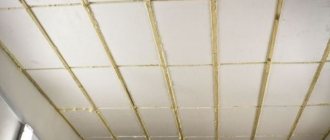
For additional insulation of cold floors, wooden logs can be laid on top, the space between which is filled with slab insulation. Floorboards or sheet material (OSB, fiberboard, chipboard) are placed on top of it. For an interesting comparison of foil materials, watch this video:
https://youtube.com/watch?v=RgKvM3-JFRU
Wood floor insulation
It is most convenient to lay the material on an adhesive layer
It is most convenient to lay foil insulation on a wooden floor, which has a bottom self-adhesive layer.
If you bought material without an adhesive base, then you need to fix it with staples using a construction stapler or with double-sided tape.
Laying sequence:
- We remove the baseboards, remove debris and dust using a vacuum cleaner.
- If the boards have uneven surfaces, we sand them with a special machine and, if necessary, sand them (remove the top layer of the board).
- We seal all existing cracks with wood putty.
- We prime with an antiseptic composition.
- We measure the room, cut the roll, and lay it up with foil. It can be easily cut to size using sharp sewing scissors.
- Lay out the strips end to end. We wait a day for the material to settle and straighten out. If the heat insulator has a self-adhesive base, gradually remove the protective film and press it tightly to the surface. We lay the next strip end-to-end.
- We fix the joints of the strips with foil tape.
Foil insulation for heated floors
When laying insulation under heated floors, lay the material with the foil facing up so that it reflects heat into the room
The base for heated floors must be flat without differences in height or defects. All errors must be eliminated.
Stages of laying thermal insulation with a layer of foil:
- We lay out the foil material in strips end to end, and glue the joints with special tape.
- We install a system of electric or water heated floors on top.
- We lay hydro- and vapor barrier material. It will prevent concrete from leaking onto the floor heating elements.
- We fill the screed with a thickness of 30-50 mm, depending on the type of heating elements and the functional purpose of the room.
Insulation under floating screed
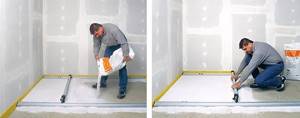
Having bought a two-layer material, you don’t have to bother with the question of which side to lay the insulation on
It is characterized by the fact that the slab is not rigidly fastened to the concrete screed; thermal insulation is laid between them.
Installation sequence:
- We prepare the base and eliminate all defects.
- We plaster the lower part of the walls.
- We stick damper tape around the perimeter of the walls; its height should be equal to the thickness of the floor: from the slab to the floor covering.
- We prime the base in two layers. Apply the next layer after the previous one has dried.
- We lay thermal insulating foil boards with the foil facing up. We use a metallized coating that is resistant to cement mortar. We lay the slabs strictly in a horizontal plane, close to each other. Uneven laying of insulation boards contributes to the formation of cracks in the concrete solution.
- We glue the joints of the plates with tape.
- We pour the concrete screed.
Lightweight and durable insulation with a layer of foil is becoming increasingly popular among consumers and professional builders due to its high heat retention and ease of installation. For more information about isolation, watch this video:
We looked at how to properly lay foil material for high-quality floor insulation. Thermal insulating material is always laid with foil on the outside; if you lay it the other way around, it will not retain heat fully.
Thermal insulation of walls
Perlite sand is used as backfill thermal insulation in layered enclosing structures:
- in the layers between internal and external wall masonry;
- between wall masonry and interior decoration;
- in wall structures made of hollow small-piece products;
- in all voids of wall masonry;
- as a substitute for quartz sand in cement screeds for roofs and floors
In this case, it is possible to reduce heat loss by 50% or more.
To maintain heat inside the house, as well as to protect the room from the penetration of cold, it is best to use perlite. To do this, it needs to be poured into the cavity between the walls. In this case, perlite insulation is poured directly from the bag (or through a hopper) into the wall from above at any convenient interval (no more than 6 m). By the time the window sill is installed, the cavities under the door and window openings should already be filled. If necessary, you can pour perlite, wait until it “settles down” and add more. All openings that may be in the wall and through which perlite insulation can spill out must be closed by the time the insulation is poured. Copper, galvanized steel or fiberglass can be used to construct drainage systems. At the same time, the perlite insulation must remain dry.
Perlite filling of the cavity between the load-bearing and facing masonry is poured in layers after laying 3-4 rows of bricks. In order to avoid shrinkage, the backfill layer is filled to approximately 10%. Waterproofing gaskets are placed at working breaks in the insulation. If necessary, the insulating layer can be made of any required thickness. Since construction is a long-term process, when working with perlite insulation, the cavities between the walls should be protected from rain.
Having high heat-protective properties, expanded perlite does not age and is not destroyed by pests of animal and plant origin. It is worth noting that perlite backfills are used to insulate walls made of wooden and frame structures. Such insulating gaskets do not burn, and therefore increase the fire safety of houses.
Insulation Features
Insulation can be laid in different ways, it all depends on the type of material. If you need to fill it up, then this should be done directly from the bag. In this case, a convenient interval must be observed. You need to check the material to ensure it is dry. If there are cracks or holes in the walls, they need to be sealed so that the perlite does not spill out.
Wall cavities located under windows and doorways are subject to insulation. If necessary, the material is compacted. Insulation is also required between the exterior masonry and the interior finishing.
PERLITE IN CONSTRUCTION
Dry building mixtures based on perlite.
The main area of application of perlite now is the production of dry construction mixtures, where perlite acts as a heat-insulating filler. Perlite plasters based on perlite have won their strong place in the thermal insulation of houses, thermal insulation of ceilings and heated floors. A layer of external perlite plaster of 5-10 cm allows you to solve the problem of insulation of both new and old buildings and structures. At the same time, unlike foam plastic and mineral wool, perlite plaster does not emit harmful substances and retains its structure and performance characteristics.
Poured perlite floor
To make this type of floor, you need to mix M-100 grade perlite, M-400 grade cement and water. When the mixture is ready, it must be poured onto the floor with a thickness of 5 cm to 30 cm. If you are pouring the floor in the basement, we first recommend laying a waterproofing pad (hydrozol).
This type of floor is made of 2 layers of concrete, laying a perlite heat insulator between them. By the way, the latter was not chosen as insulation by chance. After all, perlite is an ultra-light, environmentally friendly material with very low thermal conductivity.
So, to prepare a perlite heat insulator, it is necessary to combine perlite, cement and water, mix thoroughly, while achieving “plasticity” of the mixture. This mixture must be laid in a several-centimeter layer on the concrete floor. The heat insulator should dry out within a week, after which concrete or ceramic tiles are laid on it. Accordingly, perlite with hydrophobic and dust-absorbing properties is best suited for floor insulation. A floor of this type can be used not only at home, but also during the installation of baths.
Floating floor
If you have chosen an electrically heated floor to insulate the room, then you cannot do without a “floating floor”. This type of floor compensates for the thermal deformation of the concrete floor due to its heating and cooling, and is therefore optimal.
As you know, objects have the ability to expand when heated. So, when heating and cooling modes constantly alternate in a concrete floor, pressure is formed, as a result of which such a floor can crack. To avoid this, it is necessary to use the “compensator” principle. Namely: perlite is poured onto an old concrete floor, floor slabs or other so-called “subfloor” that no longer needs to be leveled. If the concrete layer is higher than 10 cm, then the perlite backfill must be compacted. After this, chipboard is laid around the perimeter of the room where the heated floor is laid
Please note that the height of the chipboard must match the height of the concrete floor that is being poured. After this, the cord of the heating element is laid on the perlite and the entire surface is filled with concrete mortar.
After 3-7 days, when the concrete has dried, the chipboard must be removed from the cracks between the wall and the floor.
Perlite is also used to insulate a monolithic floor with a hard surface. To do this, perlite is poured onto the base and distributed with leveling slats so that the thickness of the perlite sand exceeds the desired thickness by 20% (minimum laying thickness is 1 cm). If pipes or other uneven components need to be placed in the floor, they can easily be placed in this bulk insulation material. After this, the entire surface is covered with slabs, on top of which a monolithic floor is made.
If this type of floor is not installed in a basement, then it is recommended to use drainage pipes to collect and eliminate moisture, and an absorbent protective pad under the layer, such as kraft paper (not film).
If you are dealing with a wooden floor, then expanded perlite is laid without compaction. Since perlite is a non-flammable material, this significantly increases the fire safety of the room.
If during work there is a need to reduce dust and insulate the top layer of perlite, it can be sprinkled with cement and then moistened a little with water. Another way to insulate the perlite layer can be to cover it with diffusely open materials, such as corrugated cardboard, kraft paper, chipboard, etc. To increase the load-bearing properties of bulk, heat-insulating material, perlite granules can be treated with wax. This compacted perlite forms a durable insulating layer for a dry screed floor.
Features of heated floors in a wooden house
Accordingly, all layers of the “pie” will be laid on the support beams: subfloor, vapor and waterproofing layers, finishing treatment for laying the floor covering and the cladding itself.
Naturally, among all these layers there will be a heating system. The underfloor heating system is laid on top of the rough base with an emphasis on preparing various protective and insulating layers for the system elements. To install a warm floor in a wooden house with your own hands, you can use one of the following methods:
- A combination of dry and concrete screed. This is a universal technology that involves laying two types of screed at once, which allows it to withstand heavy loads on the floor. It can be used for a wide variety of heating systems. The dry bulk part of the screed allows for increased hardness and strength to protect the heating elements of the heating system.
- Liquid screed over existing floors. This is perhaps the most difficult method, as it requires careful preparation of the wooden beams. Concrete screed is highly valued due to its thermal insulation properties and increased heating efficiency of the entire system as a whole. It is most advantageous to use such a base in rooms with high humidity, cold and heavy flooring.
- Free installation with ventilation gap. It is used exclusively for heating equipment as an auxiliary system in relation to the main heating of the house. In combination with ventilation gaps, a powerful heating system cannot be used; additional holes as air outlets will reduce the efficiency of the system.
- Application of reflective plates. This option is a compromise if you cannot do without pouring a concrete screed. The plates are used to reflect the flow of thermal energy, increasing heating efficiency.
Scope of application
The unique properties of perlite have found their application not only in construction, but also in many industrial sectors, such as oil refining, metallurgy, energy or agriculture. The rock is also successfully used in medicine and food production.
In the construction industry, foamed perlite is mainly used as an effective heat insulator. In its original form, bulk material is used to insulate internal and external walls, floors, attics and ceilings between floors.
As a component, porous lightweight perlite is widely used in the insulation of roofs, walls, ceilings, chimneys and pipelines.
Where is the best place to insulate?
This material is suitable for insulating walls both from the inside and outside.
Before deciding on which side it is better to use such material, it is better to weigh the pros and cons.
It is generally believed that using insulation on the inside of walls is not recommended due to a reduction in living space, the risk of the formation of fungal microorganisms and mold, the accumulation of large amounts of moisture, etc.
In the case of penofol, there is no reduction in area , but certain classes of material allow moisture to pass through only in one direction - this should be taken into account during installation.
IMPORTANT!
Considering the properties of this material, we can conclude that penofol is best used for internal insulation. In addition, on the outside of the building, penofol is not able to provide the required level of thermal insulation properties.
Main advantages
Perlite, like other materials, has its pros and cons. But despite the shortcomings, it is an integral part of any construction.
The following advantages of perlite as insulation can be highlighted:
- Lightness, which allows you to place it inside any frame structure without increasing its strength.
- Resistance to fairly sudden temperature changes allows it to be used outdoors in various weather conditions. Can withstand -220 to 900℃.
- Environmental safety, lack of toxicity in any operating conditions.
- It is not an allergen for the animal world or people.
- Resistant to most acid and alkaline compounds.
- Not subject to corrosive processes.
- Thanks to the density formed between the particles of the material during laying of the layers, a high level of sound insulation of the entire structure is achieved. Therefore, there is no need to use an additional layer of insulation of a different origin.
- Absolutely not subject to deformation from exposure to high temperatures at household levels. Ideal for installing indoor floor heating systems.
- Average price range in comparison with materials used for similar work.
- It is highly efficient, rational and ergonomic in its use.
It would be appropriate to note that it is inappropriate to use perlite in rooms with constantly increased humidity by more than 10% or in conditions of a consistently humid climate. It is not resistant to these influences.
When working with this material, you need to be aware that aluminosilicate dust is released during active handling. Very small particles of it can harm the human body if they get on the mucous membrane. Therefore, during the process of mechanical sawing of blocks and mixing the solution, it is necessary to use precautions and protect exposed areas of the body.
Perlite insulation
Perlite insulation