Special moisture-resistant plasters
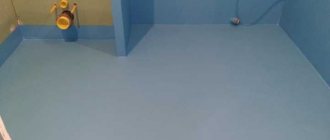
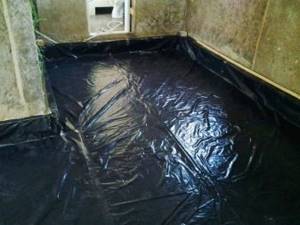
Waterproofing a dry screed can also be done using special plasters, which are diluted to a thick consistency (such as condensed milk) with water and applied with a spatula to a previously prepared surface. In addition to sand and cement, such plasters contain polymers that reduce the level of moisture absorption. After drying, a coating is formed that is resistant to mechanical stress and deformation.
Execution of work:
- Prepare the surface and apply an insulating compound prepared according to the instructions.
- It takes about 15 minutes to dry the first layer.
- The second layer is applied in the opposite direction to the previous one, and then also allowed to dry.
- The third and, if necessary, the fourth layer is applied in the same way.
- The surface must be moistened within 24 hours. Complete drying takes up to two weeks, depending on the mixture used. During this period, the surface does not need to be subjected to mechanical stress.
This type of floor waterproofing after screeding is inexpensive and easy to apply. The main disadvantage is that the composition takes a long time to dry.
Application
The use of waterproofing materials is quite popular today. They are used not only to protect the floor, but also the foundation during the construction of buildings. In some cases, walls are also waterproofed in private wooden houses.
Waterproofing is also necessary in the following places:
- In bathroom. Constant use of a shower or washbasin results in high humidity on the floor, which needs careful protection.
- In an apartment on the first floor. The peculiarity of these premises is that under them there is often a basement, which is in no way insulated from moisture. Condensation constantly forms in it, which penetrates to the first floors through concrete layers.
- Waterproofing the floor on the balcony before insulation. This option is optional and depends only on the materials used for this. If you plan to equip a warm balcony with a wooden floor, then it is necessary to insulate it.
Theoretically, in a wooden house, hydro- and vapor barrier can be used in almost any room.
But it is also important to consider the type of floor that will be formed in the building. If tiles are laid on concrete in the kitchen, then this material will serve well even in conditions of constantly high humidity.
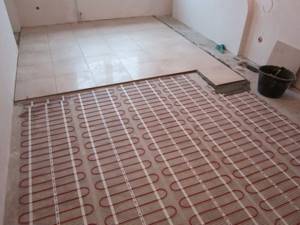
Wiring arrangement
How to make heated floors correctly, system selection and installation
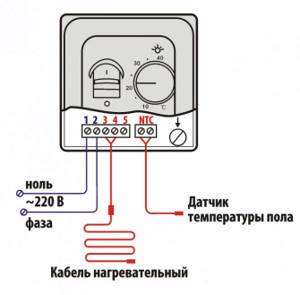
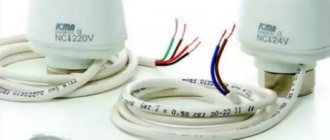
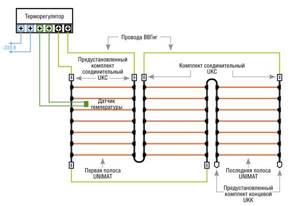
Temperature sensor connection diagram.
When installing, you need to route the wires from the center to the joints of the walls and floor, which will eliminate the possibility of pressure from the finishing coating on them. The wiring must be placed under the thermal film, for which it is necessary to equip holes through which the wires should be passed, and they must be fixed with tape. The wires must be connected to the terminals in parallel. At the ends of the wire, you need to remove the insulation by twisting the ends and inserting them through the holes in the clamp, after which you need to fasten them using the clamping method. The fastening area must be protected and secured with tape to the floor system.
A well-insulated temperature sensor must be connected to the underside of the film, in the central part of the second section. This is an oversized thermometer with a head made in the form of a polymer element. To install the sensor and route it to the temperature controller, it is necessary to make holes. If it is necessary to place the wire in a bent state in the film, you need to arrange a smooth turn, which will avoid cable breakage.
Now you can start installing the thermostat. It is recommended to connect this device permanently, but it can also be mounted via a socket.
It is preferable to lay the main wiring along the junction of the wall and floor.
You can connect the thermostat by connecting a temperature sensor to two contacts on one side, on the other side you need to fix the wires from the floor, while you need to insert the power supply wiring into the two contacts located in the center. The ground wires do not need to be connected to the contact by connecting them to the terminal.
The final launch of the system should occur after testing. A high-quality film is indicated by the absence of sparks and overheating of individual elements.
If no defects were found, at the next stage you can cover the floor with a massive layer of polyethylene (80 microns or more), the material will protect the system from exposure to water, and during operation the film will reduce wear on the system. The film layer must be positioned so that its sheets overlap. Now you can proceed to laying the finishing coating.
If you decide to choose laminate for this, it is important to purchase a material that can be used in tandem with the heating system. Otherwise, the decorative coating may manifest itself quite unexpectedly.
Features of electric floor heating
It is a well-known fact from basic physics: warm air in a room tends to rise to the top, while at the same time it remains cold below. Such changes negatively affect a person’s well-being. You can get a cold and feel uncomfortable. The body will be healthy only when the feet are warm.
Installation of an electric heated floor promotes uniform heat distribution, proper heat exchange and the creation of the necessary microclimate in the room. The creation technology is simple, well developed by companies specializing in underfloor heating installation services. It is used for all types of premises. This type of floor is safe to use and does not require maintenance during system operation.
When creating an electric heated floor, you must adhere to 5 prerequisites:
- it must occupy at least 70% of the area of the room in which it is installed;
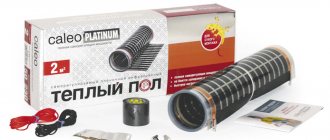
- when installing, you need to use a resistive one, preferably a two-core heating cable, always shielded, infrared film or special electrical mats;
- high-quality insulation must be selected and laid correctly;
- the screed must be made of sand-cement in compliance with the required proportions; it must be no more than 50 mm thick;
- As a final floor covering after installing the electrical system, you can use ceramic tiles, natural and artificial stones, laminate, carpet, parquet and other materials that will match the installed electrical system.
Penetrating waterproofing
How to install heated floors Review of methods for installing heated floors
This method of waterproofing is considered the most effective. It changes the structure of concrete: during the reaction, crystalline insoluble formations are formed in it, which seem to seal the pores of the concrete without damaging its structure, so that moisture does not penetrate into it. In addition, the compositions used for this effect increase the resistance of floors to chemical attack. They are produced in dry or liquid form.
Execution of work:
- First, prepare the surface - you need to not only clean it and eliminate cracks, but also moisten it abundantly, but so that water does not leak onto the lower floor. Waterproofing screeds on the ground cannot be done in this way.
- The dry mixture is diluted according to the instructions.
- Before applying the composition, the base is wetted again.
- Apply the first layer of product. Then wait the time specified in the instructions and apply it a second time, after first moistening the surface again.
- The waterproofing is covered with a film or regularly moistened for two weeks until drying is complete.
For effective protection against moisture, waterproofing over the screed is recommended. This is especially true in rooms where there is an increased risk of flooding - the bathroom, toilet, kitchen. In living rooms, double waterproofing does not make sense.
These methods described above are the most popular. But there are other compositions - for example, liquid rubber, bulk mixtures. The choice is influenced not only by the preferences of homeowners, but also by their financial capabilities and operating conditions of the premises. Waterproofing after the screed and before it is carried out for a high level of protection against water penetration - this is not required in all rooms. And waterproofing before the screed is carried out in any case, even in living rooms, since when laying the screed, water can seep into the neighbors.
The durability of the screed depends on how correctly the waterproofing technique was followed. Therefore, if you are not confident in your own knowledge and experience, it is better to seek help from professionals. The screed is very capricious - when exposed to moisture, concrete begins to deteriorate, minor cracks appear in it, which grow over time. As a result, the floor covering suffers from this. There is only one way to correct the situation - start making repairs again. So waterproofing must be done according to all the rules, not forgetting even about seemingly insignificant little things. Protective screed for waterproofing requires a significant investment of time and effort, but the base for the floor covering is of high quality and durable.
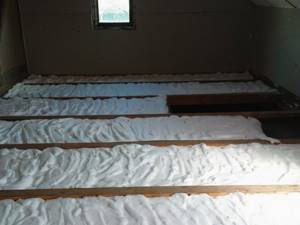
What thermal insulation to use for additional floor insulation
Insulation must occur directly in the thickness of the sandwich of the heating system - that is why it is necessary to use a material that will not only be energy efficient, but also safe for humans. It is necessary to make sure that the material will withstand depressurization of communications, fires and other emergency situations.
Now let's look at the numbers. Floor insulation under a heated floor and membranes for insulation imply the use of several main insulation materials - RAUF brick, polystyrene foam, foam concrete, ecological wool, aerated concrete, timber, isover and others. Polystyrene foam, ecowool, and isover have a low coefficient of thermal conductivity. Timber and aerated concrete have an average thermal conductivity coefficient. Foam concrete has a high thermal conductivity coefficient and RAUF brick has the highest.
To organize a membrane for insulation, foam plastic and so-called foil-type insulation materials are most often used. Mineral wool is often used for these purposes. The choice of insulation should first of all be based on the thermal conductivity coefficient - it should be low, and only then on the basis of fire resistance, sound insulation, and moisture resistance. Before purchasing insulation, you need to familiarize yourself with its characteristics and choose the option that will meet the required indicators.
See also: The cat tore off the wallpaper in the hallway, how to decorate it
Warm floor under tiles
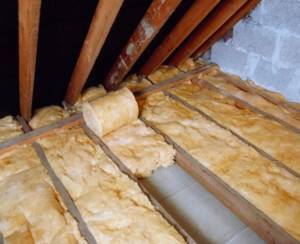
Mineral wool for insulation of heated floors
Insulation membranes are often carried out using mineral wool - it has high rigidity and good flexibility, which allows it to effectively fill the entire existing space. Mineral wool also has a fundamental disadvantage - it is vulnerable to water. In cases where the mineral mats have already absorbed a large amount of moisture, they become unusable because they no longer retain their thermal insulation qualities. But there is a solution that will allow you to preserve mineral wool for many years, even in damp rooms. It consists of creating waterproofing on one layer of the heating system sandwich, which becomes the protection of the main insulation. By the way, you can use not only classic mineral wool, but also fiberglass, as well as the so-called basalt mineral wool.
Classic heated floors have become common not only in private homes, but also in apartments
Expanded polystyrene for insulation of heated floors
Membranes for insulation can be used using sheets or slabs of polystyrene foam - this building material greatly facilitates the process of installing heated floors. The thickness of this material can vary from thirty to one hundred and twenty millimeters. By the way, it is thickness that seems to be the main characteristic of absolutely any insulation. Expanded polystyrene also includes the so-called penoplex - it is produced through the extrusion of classic polystyrene fiber.
The thickness of foam or polystyrene thermal insulation should be one hundred millimeters. If the house is located in a mild or southern climate, then the thickness of the above materials is 70 millimeters. Thus, the more severe the climate, the thicker the layer of thermal insulation should be. A layer of polystyrene foam insulation is carefully hidden under a layer of any suitable coating, for example, under a layer of cement. The other side of the coin in the case of polystyrene foam is the low strength of this material. Due to the latter circumstance, when using polystyrene foam, the sandwich of the heating system is often strengthened. Often, simple polystyrene foam is used for additional insulation.
Membranes for floor insulation - important notes
Additional floor insulation - the final stage
Cork thermal insulation for warm floor insulation
Floor insulation under insulation membranes using cork materials is also used relatively often. To create additional insulation, a cork pre-coated with wax is often used. Compared to polystyrene foam and its derivatives, cork is initially inferior to them in terms of thermal savings. The significant disadvantages of cork as thermal insulation are that it is vulnerable to water and mold. Nevertheless, cork thermal insulation can significantly reduce the level of heat loss.
Many materials are suitable for additional floor insulation
Mats for insulation of heated floors
Insulation membranes are a delicate instrument. Additional insulation is also carried out using so-called profile mats, which allow pipes to be secured without additional fasteners. The mats are equipped with special lugs. Profile mats can effectively reduce heat loss and also provide vapor insulation.
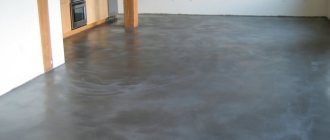
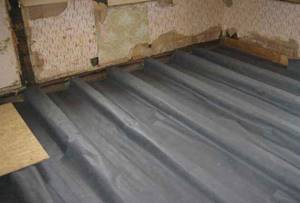
Waterproofing screed
What is the best way to lay heated floors on plywood and under plywood
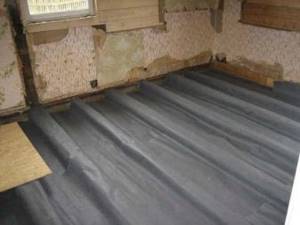
screed waterproofing
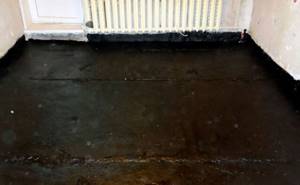
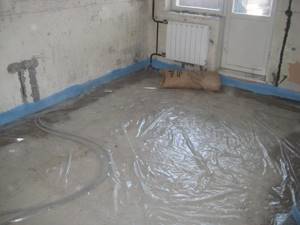
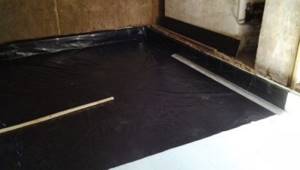
Concrete or cement-sand screed is used in those places where it is necessary to hide surface defects and create a flat, hard platform on which flooring or waterproofing can be laid. The strength of the screed depends on its thickness and the grade of cement or concrete. The waterproofing coating can be laid either on the subfloor along the screed or on top of the main layer of the screed. Before making a cement screed on the floor, the surface of the floor slabs is thoroughly cleaned and electrical wiring in a wooden house is primed to ensure reliable adhesion of cement and concrete. After the screed has dried, coating or penetrating waterproofing can be applied followed by laying the floor covering. Penetrating waterproofing eliminates dusting of the cement screed. and the surface acquires hydrophobic properties. There is another method of waterproofing - this is when a waterproofing carpet is made of rolled materials under a screed. That is, before pouring the cement screed. The waterproofing layer does not allow the solution and moisture to penetrate to the lower floors, the walls and interfloor ceilings will remain dry. In addition, it ensures proper drying of the screed; moisture will only evaporate upward. Liquid two-component waterproofing is the most practical solution for protecting screeds from moisture for small spaces; it is applied with a brush to the surface of the screed and after drying, floor coverings (ceramic tiles, linoleum, laminate, etc.) can be laid on it. Waterproofing in the form of putty (hydrospar), it can be used for waterproofing floors under ceramic tiles and cement screed, swimming pools and the external part of the foundation. The screed can be protected from moisture by using various types of waterproofing materials. Their choice will depend on the place of use, it will be the floor of a bathroom or the roof of a house, as well as on their cost and installation time.
Which side should I lay waterproofing to protect the insulation?
When arranging a floor, the most important component of this activity is the creation of a reliable vapor barrier for the floor structure, in general, and the heat insulator used in it, in particular. This is necessarily dictated by the following: during the operation of the floor structure, steam penetrates into the underground space, and it can do this both from above, through the floor finishing material, and from below, through the interfloor ceiling. Taking into account the temperature difference in the room and the interfloor span, steam eventually turns into droplets of moisture, which settle on the back side of the floor covering or thermal insulation material, leading to their destruction and creating conditions for the development of various microorganisms. So, installing a high-quality vapor barrier allows you to prevent this, but only if you correctly decide which side to lay the waterproofing so that it allows steam to pass through, but does not allow moisture to come into contact with the floor covering.
Types of materials
For steam protection, polyethylene, aluminum laminated and polypropylene films are mainly used. The first of them is an inexpensive, quite effective and therefore very popular vapor barrier, which has only one drawback - low strength. However, recently reinforced perforated and non-perforated film has become available to us, which has quite serious strength indicators. At the same time, the perforated film has micro-holes that increase its vapor permeability. Simply put, it allows a small amount of steam to pass through, and therefore, if such a film is used in rooms with high humidity, it is usually included in the waterproofing system. Moreover, in this case, it matters which side to lay the waterproofing in order to prevent steam from penetrating to the insulation. In the case of non-perforated films, there is no such problem, because they have a low vapor permeability rate and do not allow even finely dispersed steam to pass through.
The second type of films is laminated with aluminum, i.e. foil. Their main advantage is that in addition to the ability to create a barrier to steam, they can reflect thermal energy. This means that there is no special need to create and, as a result, protect the heat-insulating layer. That is why foil films are used in floor structures of rooms with high humidity and air temperature, including saunas, bathrooms, swimming pools and even kitchens. Polypropylene film is more durable than polyethylene film. In some cases, such a film is “equipped” with an anti-condensation layer, which reduces the vapor permeability of the material and eliminates the possibility of condensation forming on the inner surface of the film. This film can be placed on either side of the insulation, but if there is no anti-condensation layer, condensation may appear on the side near the insulation.
Correctly laying the film on the insulation
So which side should the waterproofing be laid to the insulation? If you are using a film, one side of which will be smooth and the other rough, then place the smooth side on the insulation, and the rough side up towards the floor covering. In this case, the steam will not penetrate down to the insulation, but will remain at the top, and if there is effective ventilation of the underground space, it will quickly evaporate. If you use foil films, then lay them with the aluminum side up. It will also not allow steam to pass through and will reflect thermal energy. If you used polypropylene film, then we lay it with the laminated side down and the woven side up. But there are exceptions. For example, a material such as Izospan V is very popular today. Which side of the waterproofing is laid against the insulation if it is used? It's the other way around, i.e. We place the rough side on the insulation, and the smooth side upward, towards the floor covering. In this regard, we recommend that, even after reading this material, you always carefully study the instructions of their manufacturers. In addition, do not forget about the main purpose of the films listed above - to prevent steam from penetrating into the insulation. This means that they must be laid between the finished floor and the insulation. At the same time, we must not forget that steam can penetrate from below, through the subfloor or interfloor ceilings, which means that another, lower layer of vapor barrier, on which the insulation is laid, will be quite relevant. The latter option is especially relevant when it comes to the first floors of wooden houses, in which the floors are laid on the ground or are located above a damp basement.
Laying film on the subfloor
Laying a vapor barrier film on a plank subfloor is done as follows. First, we clean the floor from debris and dust, after which we unroll the roll of film so that its strip overlaps the wall to a height of 15-20 cm. We unroll and cut the second strip in exactly the same way and fasten it to the first using mounting tape or tape. Next, we fix the film on the joists using galvanized nails or a stapler. After this, we lay insulation on the film, the layer thickness of which should be at least 50 mm. The thermal insulation material must fit tightly to the waterproofing film. After this, we cover the insulation with a second layer of film, similar to how we laid it on the subfloor. Well, the last step is to lay the finished floor covering, not forgetting to create a small ventilation gap between it and the vapor barrier film.
Additional nuances
Before laying waterproofing film on the subfloor, take care to protect the wood or screed from moisture. To do this, it is quite acceptable to treat the base with coating or plaster waterproofing, for which it is necessary to use the appropriate compounds. It is recommended to apply several layers of waterproofing at once, and each subsequent layer is applied after the previous one has partially dried, which takes an average of 3-4 hours. There is no need to wait for the waterproofing layer to dry completely, because... this may cause the next layer to fail to adhere to the previous one. But it is recommended to lay the vapor barrier film after the last layer has completely dried.
[content-egg module=GdeSlon template=compare]
When laying the main tier of film, you must adhere to the following rule: it must run strictly along the entire roof eaves, certainly with a sag of 10–20 mm relative to the rafter structure.
Selection and installation of film for waterproofing underfloor heating
Steam and waterproofing of underfloor heating are necessary to protect the heating system and the finishing coating from the harmful effects of moisture. Waterproofing under a heated floor can be made of durable polyethylene film, a special fabric, or in the form of a cement mortar with a special composition. Waterproofing allows you to reliably protect the subfloor when the preparation of the subfloor is done properly.
Materials and technologies used
It is not recommended to use bitumen waterproofing with underfloor heating
The main quality that a hydro- or vapor barrier layer should have is tightness. This is achieved by carefully laying the material and ensuring its safe operation. To do this, it is necessary to make a flat surface of the rough screed on which the film or other material is laid.
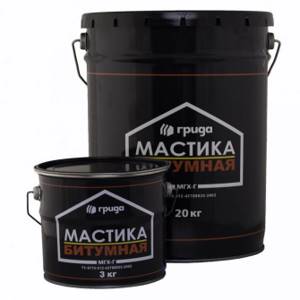
When installing a heated floor, experts do not recommend using bitumen mastics to provide waterproofing, because when heated, the mastic releases substances harmful to the human body and an unpleasant odor may appear.
When installing infrared and cable electric floors, a monolithic self-leveling waterproofing system should be considered the most effective and reliable. In this case, a silicone membrane mixture is used, which, when hardened on a concrete base, forms a monolithic, integral layer of waterproofing. Also, bitumen mastic can sometimes be used as waterproofing for infrared heating, which is applied on top of the finishing screed. An important condition that manufacturers of infrared heated floors require is the absence of direct contact between the system elements and the bitumen substance.
Taking into account the experience and existing practice of arranging hydro- and vapor barriers, we can highlight the most common methods and materials for forming a protective layer, namely:
- Reinforced film for waterproofing
Polyethylene or polyvinyl chloride film. To properly lay the waterproofing film, it is necessary to overlap about 10-15 cm, and glue the joints with special tape. Some types of film may have a heat-reflecting layer. The use of this waterproofing material is possible when installing water or infrared heating. It is also worth noting that the protective film can be reinforced or non-reinforced;
- Polypropylene fabrics. Some types of such fabric have a foil layer, which also serves as a heat-reflecting base (for example, Izospan). Polypropylene fabric is successfully used for hydro- and vapor barrier of all types of heated floors;
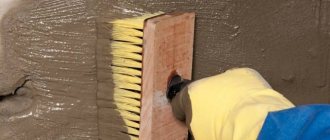
- Waterproofing based on cement-polymer mortar. This type involves the preparation of a mixture, which is subsequently applied to a concrete base. This type of waterproofing has proven itself well when installing water heating. To make it, you need to purchase a special dry mixture for waterproofing and dilute it with water according to the instructions. Outwardly, it resembles ordinary plaster, but it contains polymers, which add the necessary properties. It is most convenient to apply the mixture with a spatula.
The type of preferred hydro- and vapor barrier does not affect the choice of finishing materials during installation of a heated floor.
How to make hydro- and vapor barrier
Hydro- and vapor barrier of the base for a heated floor is easy to do with your own hands.
Preparation for a complex of such work begins with cleaning the surface of the rough screed. This can be conveniently done using an industrial vacuum cleaner. Whatever underfloor heating system it is decided to install, the base for it must be strong, solid and clean. The required set of tools should consist of:
- Construction knife or scissors;
- Marker and ruler;
- Putty knife;
- Paint roller.
At the next stage, a vapor or waterproofing film is laid. The overlapping areas of individual sheets must be securely taped with tape or adhesive tape. Some types of hydro- and vapor barrier materials require laying sheets end-to-end, for example, Izospan FX. This material is also popular when arranging a water heating system.
It is important that the film is not damaged during the formation of the reinforcing layer
Preparing the base for laying an infrared electric heated floor is carried out in the same sequence as a water one. Hydro and vapor barrier films are laid according to the same principle.
Is it necessary to install waterproofing material?
A mandatory stage of installing a water floor is laying waterproofing material. Waterproofing is laid on the rough base in front of the thermal insulation layer .
When the water circuit operates, the entire heating structure heats up. The area of contact between the warm bottom layer of the cake and the cold base becomes covered with condensation. When exposed to moisture, the insulation is destroyed and mold and mildew form on it. Dampness contributes to the appearance of unpleasant odors and toxic fumes.
To eliminate the effects of high humidity, you will have to remove the entire screed and change the thermal insulation layer.
Reference
A waterproofing layer is necessary to prevent the formation of condensation and ensure a long period of operation of the heating system.
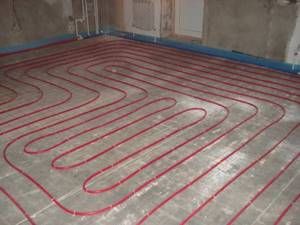
Types and design differences of heated floors
Heated floor connection diagram.
In the first century AD in Korea, there was a tradition of arranging warm stone floors “ondol”, inside of which chimneys from a wood-burning stove were located.
Modern designs for heating a room with thermal radiation from the floor surface are made in the form of a pipe with hot water or in the form of an electric cable mounted into the floor. The use of infrared radiation makes it possible not to mount the energy carrier inside the screed, but to lay it under the top floor covering (linoleum, laminate, carpet).
Installation of the heating element (pipe, cable) is carried out in a screed (cement-sand mortar or self-leveling floor). The layer of laid screed together with the heater forms a large-area floor radiator, which is capable of heating the entire space of the room.
For long-term functioning as a floor substrate, the screed must be laid on a flat surface and reinforced (with reinforcement or reinforcing mesh). The screed material can expand and contract when heated and cooled. To prevent cracks from appearing as a result of expansion and contraction of the heating layer material, a damper is installed around the perimeter (between the wall and the screed with the heater). The damper tape is a foamed polymer; it not only dampens expansion, but also isolates the gaps between the floor and the wall.
A screed with wire (or pipes) is never laid directly on the ground or floor beam. To fill it, the lower layers of the heated floor structure are laid.
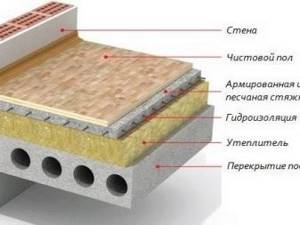
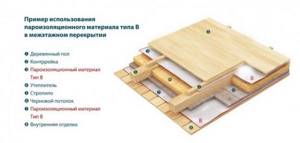
Floor construction
Floor coverings inside wooden houses can be made of various materials. It all depends on the capabilities and desires of the owner. But they all always have approximately the same structure, which involves the installation of several layers.
An approximate floor plan consists of the following elements:
- Rough floor. This part is made from first grade wooden logs and boards. Bulk surfaces in the form of sand, concrete screed, etc. can also serve as such a base.
- Waterproofing layer. It prevents moisture from penetrating from below, protecting the rest of the structure from it.
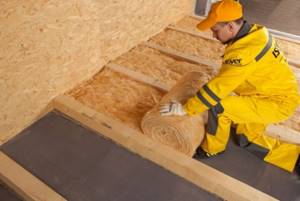
- Thermal insulation. It is located mainly between the finished floor supports (joists). For such purposes, mineral, basalt or stone wool is used. If the subfloor is durable, then bulk insulation (for example, expanded clay) can be used as a heat insulator.
- Vapor barrier. This layer also protects the internal structure of the cake. But it no longer allows the steam that accumulates inside the room to penetrate.
- Finishing layer. They also use a variety of finishing materials from natural boards to plywood with parquet or laminate.
Please note that the sequence of layers must be strictly observed. If you accidentally change materials for vapor and waterproofing, this can lead to the accumulation of moisture already under the floor covering. In such conditions, the floor will last for several years and will simply rot.
If the base for the floor is concrete, then for some materials only one waterproofing film is used. This is especially true for parquet boards or laminates, which are laid on insulation and plastic film.
How to waterproof a bathroom
How to waterproof a bathroom
Subconsciously, we are accustomed to attributing many of the troubles that arise to force majeure, despite the fact that in most cases such events arise mainly due to our own oversight. Timely waterproofing of the floor in the bathroom and toilet is just one of the key measures that can protect your budget in cases of annoying leaks. This is especially true for apartments in multi-storey buildings, where subsequent repairs to the neighbors’ homes below in the event of a water leak can cost a very decent amount.
Methods for waterproofing floors
Today's construction market offers a wide range of high-quality waterproofing materials from domestic and foreign manufacturers. But when choosing, first of all, you need to focus on the purpose and type of waterproofing that suits your requirements, since various modifications differ significantly in cost.
Work related to waterproofing bathrooms is carried out in two classical ways: coating or pasting. The second option, which involves the use of roll-film waterproofing materials, is rarely used today in major renovations of city apartments, since it has some disadvantages along with complex execution techniques. This method is especially not suitable for bathrooms with a raised threshold (such are still found), since roll waterproofing raises the floor level by approximately 3-5 mm, depending on the type of roll; installation of ebb sills on the balcony. Therefore, based on the ratio of work efficiency - price - quality, coating waterproofing mastic is most suitable for bathroom floors, which will be discussed later.
A short guide to underfloor heating
Warm floors are a reasonable and logical solution for heating an apartment or private house. Their system is based on the physical property of air - hot air naturally rises and warms the entire space. The idea behind underfloor heating is to save energy and therefore money. In addition to savings on your electric bills, many companies that sell and install these systems offer discounts for veterans, as well as potential tax breaks at both the local and federal levels, which can further reduce utility costs.
Warm floors are a system that has a flexible set of designs that are best suited for use in a private home. There are three types of warm heat on the market today, two of which are the most common. Air, electric and water heated systems are used depending on the application. Most companies offering these products also offer free installation. The systems are designed to save money and energy, but the amount of actual savings depends on the structure of the heated floor itself and its size.
Warm air heating systems are usually not used in residential premises due to the disadvantages of forced air heating systems. Air cannot hold much heat, so efficiency does not increase significantly by installing this system in a home environment. The moving air also carries allergens, which can cause irritation and discomfort in people who are sensitive to them. If the power of the heated floor is not enough, then remember that insulation membranes allow you to make the house as warm as possible.
Electric underfloor heating systems are used on concrete bases - they work more efficiently with thicker concrete. Electrical current is directed to conductive mats within the floor, resulting in heat being conducted across the entire surface of the floor. Concrete can be “charged” - it will retain heat while the system is not running, but it is recommended to maintain a constant temperature. Electric heated floors can be installed on the ground floor - usually used at home. Electrical systems do not rely on air “movement” and therefore do not increase the movement of allergens within the home.
Hydronic systems are the most common and cost-effective option for home use, especially due to the relative ease of installation as well as lower energy costs. In this system, heated water is pumped through a pipe in the floor structure, heating the surface. The water heater is used in combination with a pump and tubing located inside the floor. The diffusion of heat from the tube causes the surface on top to heat up. Hydronic underfloor heating systems are the most cost-effective because they use the least amount of energy and provide high energy efficiency compared to conventional heating systems.
Conventional heating systems heat air and then force it to circulate throughout the home, which is inefficient compared to overall energy costs. Underfloor heating systems are designed to save money and energy while keeping heating costs low. In addition, they allow you to maintain and increase the comfort of those inside the house. Now we know what a heated floor is, and also why insulation membranes are often required - a thin tool. Always remember that when purchasing a heated floor system, you should choose the one that best suits your needs...
Warm floors will make the room comfortable and cozy
Using roofing felt for foundation waterproofing
Why do they put roofing felt on the foundation?
Many people wonder whether roofing felt is really necessary. If during the construction of a house you do not provide high-quality waterproofing of the foundation, over time you may encounter the problem of excessive humidity and dampness in the premises. As a result, fungus will appear on the walls, and the foundation will gradually begin to collapse. This can lead to subsidence of the building and the appearance of cracks on load-bearing surfaces.
There are various ways to insulate a foundation:
Most often, insulation is made using roll-type materials. For this purpose, roofing felt is usually used.
What roofing felt is used for insulation?
Two categories of roofing felt are produced. roofing and lining. The main difference between them is the density of the material. The density of the lining roofing felt is 300 g/sq.m. m, while the roofing material is denser - about 350 g/km. m.
For foundation waterproofing, ordinary smooth rolled material of the RPP brand is usually used. It is not difficult to understand the markings. The first letter “P” stands for “roofing material”. The second letter can be “P”, that is, “lining”, or “K”, that is, roofing. The last letter indicates the type of topping - fine-grained, flake, etc. The number indicates the density of the base.
Horizontal and vertical insulation
Foundation waterproofing with roofing felt can be horizontal or vertical. How to install each of them is described below:
- Horizontal waterproofing - consists of gluing roofing felt to the foundation cushion with bitumen mastic. This method protects the foundation strip and basement walls from moisture penetrating from below. Waterproofing is carried out by making a margin of 15 to 20 cm. After the installation of the foundation is completed, the edges of the roofing material are turned up and attached to the wall.
- Vertical waterproofing - with its help, the foundation and basement are protected from moisture from the sides. Roofing felt is attached to concrete using mastic. In some cases, the surface is first coated with a bitumen primer and then mastic is applied. With this type of waterproofing, an overlap of 10 cm is made on the sides. To make the insulation especially reliable, you can use several layers of roofing material.
The video will tell you about the features of horizontal waterproofing with roofing felt:
DIY foundation waterproofing technology
Roll laying of roofing felt on the foundation is carried out in the following sequence:
- The foundation surface is cleaned of dirt, cracks are sealed and leveled. To improve adhesion, concrete is coated with a special solution.
- Mastic is applied to the foundation in several layers.
- Sheets of roofing felt are heated with a burner and glued to the mastic. The overlap should be at least 10 cm. The edges of the sheets are smeared with bitumen or mastic and glued together.
- Then the roofing material is heated again and lubricated with mastic. If you do not have a burner to soften the material, it is better to use a mastic with high astringency.
- To increase the degree of protection from moisture, several more layers of roofing material are laid.
- When the composition has completely hardened, the foundation is covered with soil, trying not to disturb the insulation. To protect the structure from damage, press brickwork or special shields are used.
Insulation of basements and plinths with roofing felt is carried out in a similar way. However, please note that the premises must be dry. Care should be taken to ensure free air flow so that excess moisture evaporates.
about the project
StroyRes.NET is an online magazine about building materials. Here you will find their description and physical and chemical properties. We cover applications with practical lessons, and also cover production, delivery and storage of materials.
How to lay it correctly?
The waterproofing layer involves not only the insulation itself, but also intermediate materials that form the frame and thermal insulation.
Laying such structures involves performing several preparatory operations:
- First of all, you should inspect the old base for damage. If the floor is made of wood, it is important to remove rot and sagging boards. But waterproofing is best done on a concrete slab, especially if the surface is on the ground floor. The floors between floors must be checked for strength and quality.
- If the surface is ready for decorative finishing, then the base should be treated with special strengthening solutions. For wood, impregnations are used that increase resistance to burning and rotting. Floors without screed are treated with strengthening primers.
- When the surface is ready, the subfloor should be formed. In some cases, it is built directly on the ground. But this approach will not allow the wood to last long. Therefore, it is better to use concrete screeds as rough foundations, on which logs for finished wooden structures are laid.
Arranging a protective “pie” consists of the following sequential actions:
- The procedure begins with waterproofing the subfloor. To do this, the film is rolled out over the entire surface, placing it between the lags. It is important to fasten it in such a way that there is no tension. If the width of the sheet is not enough, it is joined to another, forming an overlap of at least 20 cm. When everything is fine, the material is attached to the base using adhesive tape, staples or special nails.
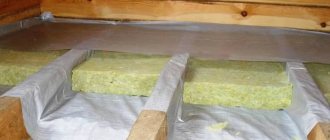
- Insulation is installed on top of the film. Its fastening is carried out differently depending on the selected substance. If wooden logs are used, then mineral wool is inserted between them. It should fit tightly between them without forming gaps.
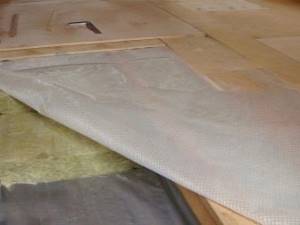
- At this stage, a vapor barrier membrane is spread on top of the insulation. It is also joined using an overlap. All joints are glued with tape to prevent moisture from penetrating through them.
The procedure ends with the installation of the decorative floor. As you can see, installing a water vapor barrier is not very complicated.
It is only important to use high-quality protective materials and follow the sequence of their installation.
To learn how to install roll waterproofing, watch the video.
Creating high-quality waterproofing in your own home (private) is one of the most important stages in arranging floors. The article will discuss what type of subfloor waterproofing is and how it should be applied so that the room is protected from the influence of such dangerous moisture.
Why do you need waterproofing of a heated floor?
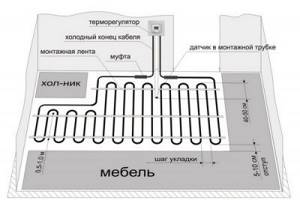
Diagram of an electric heated floor.
Nevertheless, even those who will do electric heating should know that waterproofing under a heated floor is an indispensable condition for its long-term operation. Of course, no breakdown of the electric floor will lead to flooding of the neighbors, but the insulation will serve as protection for the coolant itself, protecting it from vapors coming from the ceiling located below.
However, waterproofing issues should be of greater concern to owners of water-heated floors, since it cannot be said with 100% certainty that the heating system pipeline will never collapse. So, the main argument for waterproofing a water-heated floor is concern for the property of neighbors living below. Those who live in separate houses can say that their floors do not need it at all. Wrong opinion!
Purpose of additional travel
Floor insulation under a warm floor and membranes for insulation can effectively solve two important problems:
- Excessive heat loss through the ceilings
- Uneven heat distribution due to the presence of curved heating elements
It should be noted that bare floor insulation is always insufficient - when organizing such heating, the floor will return thermal energy extremely unevenly. Floor insulation, which is done using a membrane for insulating the floor in an additional manner, allows you to use the capabilities of a subfloor heated floor much more effectively.

The finished floor will have to be dismantled
Waterproofing under underfloor heating device features
The army of people who want to provide greater comfort in the home through underfloor heating systems is growing steadily. They not only take comfort to a completely different level, but also provide economical energy consumption compared to conventional heaters. However, their installation in rooms such as a bathroom or bathroom requires additional measures. These include waterproofing.
I don’t even want to imagine what consequences a break in water supply or sewer lines could have. Today, when flexible hoses are widely used to connect to water mains, from washing machines to toilet flushers, this problem is especially relevant. The reason may be not only their possibly low quality, but also the connections themselves, which are often performed in violation of operational standards: the hoses are bent, twisted, unnaturally turned out, which is why they quickly fail.
And it’s not just that waterproofing is necessary when there are neighbors below. Probably not everyone knows how detrimental moisture affects concrete. Moisture that accumulates in “wet” rooms, as a rule, contains salts of certain acids and alkali. Once on the floor, it penetrates through problem areas of the floor covering - cracks or joints, into the screed, is absorbed into it and gradually destroys it. It only takes a few years for the concrete layer to completely crumble.
Waterproofing materials for heated floors
Typically, there are mainly two requirements for materials:
- waterproof;
- resistance to biological corrosion, that is, to the destructive effects of mold.
But at the same time, they must have sufficient elasticity to withstand thermal deformation loads. Since there is a high temperature, waterproofing for underfloor heating is selected with special care.
If chosen incorrectly, it will lose its waterproof qualities over time.
As a rule, manufacturers of heating systems themselves recommend types of waterproofing. Nevertheless, let us note some of them.
Films made of polyethylene or polyvinyl chloride
Films used for heated floors are equipped with thermo-reflective layers. The edges are preheated and joined, the joints are insulated with adhesive tape.
Cement-polymer
A freshly prepared mass of elastic coating material is applied to the surface using a spatula or roller. The joints between walls and floors must be laid with special tape. The resulting coating is durable and absolutely waterproof, and has excellent adhesion to concrete. Particularly noteworthy is its elasticity, a quality so necessary for waterproofing heated floors and floors in new buildings, which allows it to stretch and contract in unison with changes in temperature conditions and slight subsidence of the structure. It is also heat resistant and will withstand heating of the floor surface up to 30-40°C.
The most reliable protection against water is considered to be by pouring a waterproof continuous layer - cast. Modern technologies involve the use of liquid silicone membranes, characterized by high adhesion and elasticity.
The need for waterproofing
Everything is quite obvious here. Such a measure will direct heat upward, preventing it from passing through the ceilings. Quite often, many people forget about installing waterproofing under a warm water floor, but its necessity is explained by several reasons:
- It is imperative to install waterproofing under a warm water floor, since leaks in the pipes in which the coolant moves can cause damage to the base. And if the apartment is not located on the first floor, the neighbors living below you will suffer from the flood;
- Under water and electric floors, a waterproofing layer is necessary to separate the insulating material from the concrete floor. Changes in temperature and cold emanating from the base will cause condensation to appear, negatively affecting the layer of insulating material;
- in rooms on the first floor or located on the ground, it is recommended to lay waterproofing between the ground and the screed to create protection from capillary moisture. The second solution to the problem is to lay waterproofing between the insulation layer and the rough screed.
When using insulation material that is vulnerable to water from any side, experts advise laying it between two waterproofing layers in the following situations:
- The underfloor heating system is being installed, but there is a possibility of leaks;
- the installation of the floor is carried out using the wet method, and the insulation must be protected from the water that is in the solution;
- the floor is installed in a bathroom or other room with high humidity, and there is a possibility of water penetrating through the floor coverings.
As a rule, in underfloor heating systems, the underlay acts as a waterproofing layer for the insulation on top. For example, foamed polyethylene with a foil surface is responsible for reducing heat loss, uniformity of its distribution, and protects the insulating layer from moisture.
Many people are interested in whether waterproofing is necessary under a heated floor in principle, and whether in wet rooms there is a need to lay waterproofing on top of a heated floor - corrosion can begin from water leaks, and in the case of an electrical system there is a possibility of a short circuit.
Such worries are groundless, since heating elements and coolant pipes are created in such a way that they can be mounted under a screed, which creates an aggressive environment before final drying.
Preparing waterproofing for a warm water floor
Installation of a heated water floor is carried out in several stages, one of which is surface preparation.
During operation of the system, hydrophobic elements can absorb moisture coming from the premises located below or from the ground. On the cold cement layer, when interacting with hot pipes, condensation forms, which negatively affects the entire structure. To protect pipelines, insulation, and floor coverings from aggressive environments, a reliable waterproofing system is needed.
Gravel-sand cushion
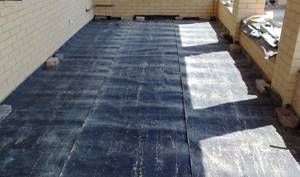
Prevents capillary rise of moisture from the soil. At the first stage of arrangement, the fertile layer is removed and the soil is leveled. Crushed stone (fraction no more than 50 mm) is poured over the entire area in a layer of 20 cm (if groundwater is close to 50 cm) and compacted. Having covered the area with sand, spill it with water and roll it to shrink with a roller. In order to protect the rolled materials from damage by crushed stone, geotextiles are laid on the “cushion”, then polystyrene or penoplex. Having completed the waterproofing, proceed to screed the floor.
When installing a plank floor, when the logs are laid directly on the ground, roofing felt is laid under the base, and the wood is impregnated with resin.
Protective membranes
In appearance they are similar to ordinary garden film, but have increased resistance to chemicals. Flat films for waterproofing are the most durable, dark gray or black. Perforated vapor-permeable film has cells in the form of cones. When laid on the surface with the cells facing down, it creates cracks that facilitate the removal of water vapor from the concrete of the warm water floor.
A warm water floor can be insulated from moisture by a regular polyethylene film, which is spread over the entire area with allowance for the walls. At the joints it is laid with an overlap of 10 cm and taped with tape. Foil penofol, laid as a heat reflector, also helps to cut off moisture vapor rising from below.
Surface preparation
After clearing the subfloor of debris, determine its unevenness. If the difference in height of the earthen base exceeds 5 mm, you can achieve a flat surface:
- making a rough screed with concrete M100 - M200 with a thickness of 5 - 10 cm;
- scattering expanded clay sand or screening in a layer of 10 cm.
Reinforcement is carried out if there are filled-in holes and trenches at the construction site. In apartments of multi-storey buildings and rooms above basements, a sand-concrete screed is laid on the floor slabs.
Ignoring these requirements can lead to airing of the system, increased hydraulic resistance, and deterioration of heat transfer.
Liquid mastic materials
Coating bitumen (or rubber) mastics are applied in several layers using a roller or brush. Their ability to fill any unevenness is convenient when there are a large number of pipe bends in the circuit. Synthetic resins, as a component of bitumen-polymer waterproofing, are durable and easy to use.
Concrete slabs can be treated with an impregnating solution for better adhesion. The ease of use and effectiveness of penetrating waterproofing have made this type the most popular among builders. The use of several methods of waterproofing in a house “on the ground”: a gravel-sand cushion, a layer of insulation, a vapor-proof film, allows you to extend the life of the heated floor and save on heating.
In city apartments, in order to avoid leaks to the lower floors, it is appropriate to use double waterproofing: under the screed and on top of it using roll and coating materials. On the first floors, a combination of penetrating, coating and roll waterproofing is used.
Type of waterproofing underfloor heating
There is more than one type of water insulation. All differ in their composition, operating principle and effectiveness. For example:
- Rolled waterproofing is the cheapest and most common option for insulation materials. Roofing felt, a thick film, is used as protection. Waterproofing is applied by gluing to the surface through heating using an open flame (burner) or a hair dryer;
- water-based mastic - provides the best protection of the surface from liquid ingress. Experts recommend purchasing mastic for repair work in multi-story buildings, for high-quality protection against leaks due to loss of integrity of the water circuit.
In order to prevent leaks, the DHW circuit of the heating system is also placed in a special corrugation, which ensures that after the integrity of the pipe is damaged, the liquid will not begin to flood the neighbors of the lower floors.