0
6671
02.09.2013
Water heated floors without screed are installed in rooms where pouring concrete with concrete is difficult or impossible, for example, in houses with wooden floors, with a small room height that is not designed for the installation of conventional heated floors, or in rooms where delivery of concrete is impossible.
Advantages of a water-heated floor without a concrete screed:
- Lightweight design, allowing it to be installed on any floor;
- The small thickness of the floor does not make large changes to the useful height of the room;
- Possibility of laying the finishing coating immediately after installing the heated floor, no need to wait for the concrete to mature;
- Minimum requirements for the basis. This can be either concrete or wooden flooring.
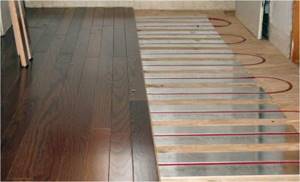
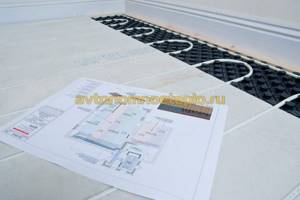
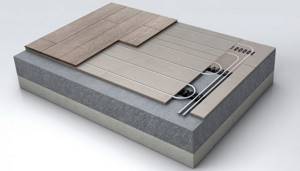
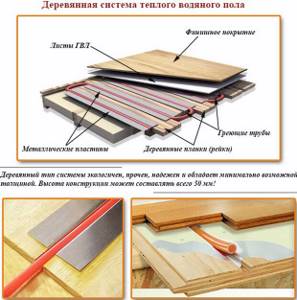
Water heated floor under laminate
Warm floors are increasingly appearing in new houses and apartments and are becoming the same necessary heating system along with radiators.
Moreover, heated floors can completely replace a traditional heating system. They heat the space more efficiently, create a comfortable indoor microclimate and have a beneficial effect on human health. In this article we will present the most economical option for a water-heated floor on which laminate can be laid. It was made without pouring a concrete screed, which makes the work much easier.
This method is great for a frame house, where many do not understand how to make water-heated floors. It is also suitable for apartments with individual heating
The costs of arranging this water floor will be minimal, and you can lay it yourself, with your own hands, from ordinary building materials that are sold in every store.
Necessary materials
Since this version of a water-heated floor was designed for a frame house, and the finishing coating was a laminate, we will begin the selection of materials with the rough flooring.
For this you will need edged boards. As a rule, a board with a thickness of 50 mm is used. You can also use tongue-and-groove ones, but then the cost of the material will increase significantly.
At your discretion, you can install other materials, such as plywood, chipboard or Green Board.
You will also have to buy 20 mm thick edged boards. This thickness is determined by the diameter of the metal-plastic pipes. In our case, their diameter is 16 mm. If the diameter is larger, the thickness of the board will increase.
The boards must be dried and, most importantly, have the same thickness. The thing is that the laminate will lie on them, and the difference in height for the laminate should not exceed 2 mm.
Next, you will need the heating element of the water heated floors.
Metal-plastic pipes with a diameter of 16 mm are perfect as a cheap option. They bend well, and their length is practically unlimited, so there will be minimal connections in this system.
More expensive pipes made from cross-linked polyethylene are also sold. Another name for them is PEX pipes.
We will also need foil for our water heated floor. It will evenly distribute heat from the pipes over the surface. Foil should be 50 microns thick or more.
For more convenient temperature adjustment, use a thermostatic valve. It also reduces or increases the flow of water in the pipe, but in automatic mode.
Thus, we will need the following materials:
- Subfloor boards 50 mm thick,
- Edged boards 20 mm thick,
- Metal-plastic pipe D16,
- Foil 50 microns,
- Valve.
After purchasing and preparing the materials, you can proceed directly to laying water-heated floors and laminate flooring.
We will consider the entire process step by step and provide any necessary comments.
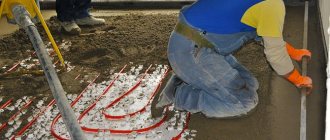
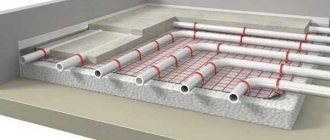
1. The very first step is laying the subfloor. Everything is quite simple here. Rough boards in a frame house are laid perpendicularly on the joists and fixed with self-tapping screws.
First, one edge of the board is made semicircular to wrap the metal-plastic pipe.
These boards are attached to the rough base perpendicularly every 20 mm. This creates grooves for subsequent pipe laying.
It is cut into strips with a width equal to two distances between the pipes and carefully inserted into the grooves formed by the boards.
Foil is needed to distribute heat and uniformly heat the surface.
6. The final stage will be laying the laminate
Before doing this, it is important that the water heated floor system works for a couple of days and you are confident in its reliability
Thus, without large investments, you can get heated floors, which in their characteristics are in no way inferior to factory ones.
For those who doubt this design, it must be said that it is quite simple and there is practically nothing to break here.
Selection of materials
Before laying heating water circuits in a wooden house, it is necessary to insulate the floors. Therefore, you will have to choose 3 groups of components:
- type of insulation;
- pipe material;
- plate material.
Among the common and affordable insulation materials, mineral (basalt) wool is best suited for thermal insulation of wooden structures. It is permeable to water vapor, due to which it combines well with wood, gives it the ability to “breathe” and does not cause rot. Another thing is that when laying mineral wool, it is necessary to ensure the release and removal of these vapors, otherwise it will get wet through and stop serving as a heat insulator.
Mineral wool and shaped polystyrene foam boards
Advice. To insulate the covering of the first floor, it is better to use basalt fiber with a density of 40-80 kg/m³ and a thickness of at least 150 mm, and in the northern regions - 200 mm or more. Mineral wool with a thickness of 50-100 mm will be used for the interfloor ceiling. Its task is not to allow heat intended for the upper rooms to pass into the premises of the first floor and to serve as sound insulation.
Polymer insulation - foam plastic, foamed polyethylene and extruded polystyrene foam - practically do not allow moisture to pass through. Therefore, they must be used wisely, otherwise the wood in places of contact with the polymer will turn black and rot. The minimum thickness of materials for thermal insulation of the floors of the first floor is 100 mm; it is enough to put 20-30 mm in the ceiling.
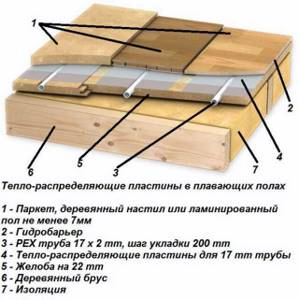
For heated floors without screed, installed on wooden joists, the following types of pipes with a diameter of 16 and 20 mm are used:
- made of cross-linked polyethylene with an anti-diffusion layer that does not allow oxygen to pass through;
- metal-plastic;
- copper.
The most popular pipes for heated floors are polymer
High-quality polyethylene pipes (for example, from the Rehau brand) are no cheaper than metal-plastic and are not inferior to it in terms of performance properties. Hence the conclusion: there is no fundamental difference between these types of polymer pipelines; they are equally good for heated floors.
Copper pipes are much more expensive than plastic ones, and installing them is more difficult and takes longer. But, from the point of view of heat transfer, copper has no equal, and therefore is successfully used for underfloor heating of any buildings. An important point: do not use copper heating circuits together with aluminum heat distribution plates; these metals are absolutely not friendly with each other.
Since the thermal conductivity of aluminum is higher than that of steel, plates made of this material are more preferable (excluding copper piping). But keep in mind that high-quality aluminum distributors are 1.5–4 times more expensive than galvanized ones.
Note. Prices for aluminum and galvanized plates from different manufacturers vary widely and cannot be compared because they are made from metals of different thicknesses. Hence the advice: try to purchase thick-walled products, they are able to accumulate and transmit more thermal energy.
Corrugated stainless steel is also an excellent option.
Of recently emerged materials, flexible corrugated stainless steel pipes are of interest. They are durable, can be installed without welding or soldering, transfer heat well and can be used in lightweight flooring systems.
Calculation of the pipe length in each circuit, laying pitch and surface temperature is presented in a separate publication. Familiarize yourself with the methodology in order to accurately determine the amount of materials.
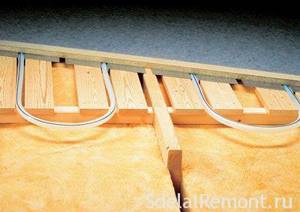
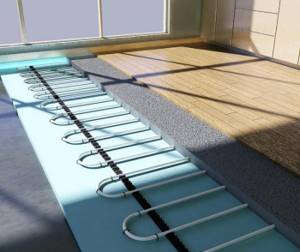
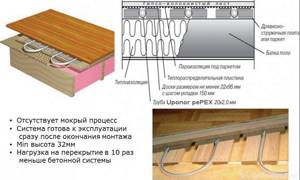
Installation using Uponor technology
The technique has become widespread as the simplest and most affordable. Mineral wool serves as a thermal insulation material; you can use pipes and plates at your discretion and financial capabilities. The essence of the method is to lay wooden boards 20 mm thick on logs at intervals of 2 cm for the further installation of a water-heated floor, as shown in the diagram:
A ventilation gap is created between the thermal insulation and the base boards (not visible on the diagram)
Note. A similar scheme can be used in any residential buildings where wooden floors are laid on joists, including on top of concrete foundations.
To make heated floors using this technology with your own hands, you will need the usual set of plumbing and carpentry tools, as well as special scissors for cutting polymer pipes. When installing underfloor heating on the ceiling of the first floor (above the ground or an unheated basement), perform the work in this order:
- Nail cranial bars with a cross section of 25 x 25 mm flush with the bottom edge of the beams. Lay subfloors made of 20 mm thick boards on top of them, as shown in the drawing below.
- Cover the subfloor and joists with waterproofing membrane (technically called diffusion membrane), waterproof side down. Maintain an overlap between the panels of at least 10 cm and carefully seal the joints with double-sided tape.
- Place mineral wool slabs on top of the waterproofing so that they do not wrinkle, otherwise the basalt fiber will partially lose its thermal insulation properties. The thickness of the insulation should be at least 5 cm less than the height of the log in order to provide a ventilation gap between the surface of the wool and the future wooden flooring to remove moisture.
- Place vapor barrier film over the joists. The polyethylene must be pulled up and secured to the wood with a stapler so that it does not sag in the gaps between the beams.
- Nail 2 cm thick boards across the joists, 30 mm away from the wall. Depending on the pipe laying pitch (15 or 20 cm), leave 20 mm wide gaps between the boards for heat distribution plates.
- Insert metal plates into the slots and arrange the heating circuit pipes over them, placing them in the Ω-shaped grooves. To rotate the pipe, shorten the ends of the boards by 10-15 cm in this place.
- Run the ends of the pipes along the walls to the heated floor comb, connect them and check the tightness of the system. Lay the final floor covering.
Please note: when installing an insulated floor, the membrane and vapor barrier are swapped - the polyethylene film is laid from below.
The method of laying a water-heated floor over wooden joists is shown in detail in the video:
Work on the interfloor floors is carried out in the same order, only the subfloor boards can be nailed directly to the joists from below. By the way, instead of wood, you can use OSB boards here, while simultaneously hemming the ceiling of the first floor.
Important! Do not confuse the diffusion membrane with the vapor barrier film, otherwise the mineral wool will become saturated with water and cease to be an insulator. The waterproofing at the bottom of the “pie” protects the cotton wool from getting wet from the outside, and the top film prevents water vapor from penetrating. In floors, everything is the other way around - the vapor barrier is laid from below, the membrane - from above. To remove moisture from the insulation, use a 5 cm ventilation opening and vents made in the walls of a wooden house.
Along with its simplicity and low cost, this method of installing water heated floors has one drawback - the pipes can only be laid in a “snake” pattern, which is why the rooms of a wooden house have to be divided into several heating circuits in order to achieve uniform heating.
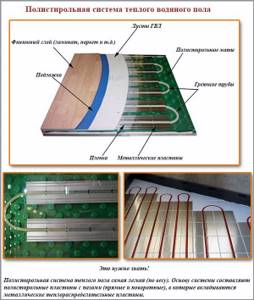
Installation Guide for Polystyrene System
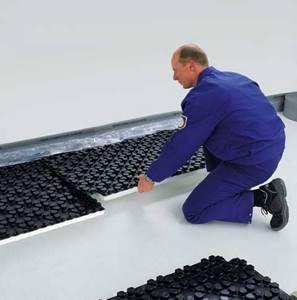
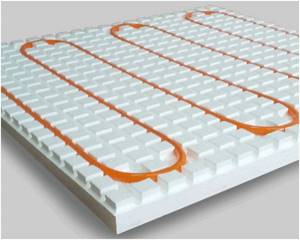
This method of laying underfloor heating circuits allows you to complete the work much faster and easier, since it involves the use of two-layer polystyrene foam boards with guides in the form of protruding bosses. Polystyrene of different densities is used to make the plates - the top layer is more durable, the bottom layer is soft.
It is quite simple to make piping for heating floors according to this scheme
The technique is suitable for any floors with a flat surface, for example, made of OSB plywood (as in houses made of SIP panels). Warm water floors on a flat wooden surface are made using the following technology:
- Cover the joists with OSB sheets and fasten them with galvanized self-tapping screws. If work is carried out on a wooden floor of the first floor, then mineral wool insulation should be laid between the beams, as described in the previous section. The thickness of the polystyrene system is not enough to fully insulate the building from below.
- Attach damper tape to the walls around the perimeter of the room.
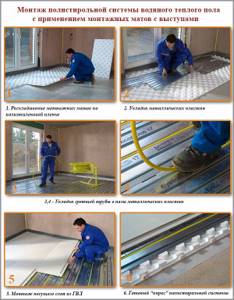
- Place polystyrene foam boards on the finished surface, fastening them together with locks.
- Install the dissipative plates in accordance with the layout and spacing of the pipelines, fixing them between the bosses. Unwinding the pipe from the coil, insert it into the recesses of the plates.
- Cover the heating circuits with plastic film, overlapping and gluing the sheets.
- Mount the base of the floor from gypsum fiber sheets (GVL), where you will subsequently lay the finishing coating (a popular option is laminate).
Details of the work are shown in the video from the Russian manufacturer of polystyrene foam systems -:
Advice. Before laying the finishing coating, connect the main lines from the circuits to the manifold of the distribution and mixing unit and conduct a leak test (pressure test) with a pressure of 4 bar.
The advantages of shaped insulation for warm water floors are obvious - simplicity and speed of installation work, the ability to lay out pipes not only in a “snake”, but also in a snail. There are also disadvantages:
- high price;
- the material can bend under heavy mechanical loads;
- Due to the gaps between the bosses, a small part of the heat is wasted on useless heating of the air under the floor covering.
Other pipe laying methods
Other products can serve as the basis for heating loops, into which metal plates can be inserted:
- expanded polystyrene boards with ready-made grooves;
- factory kits made of wooden products with cutouts for laying pipelines;
- polystyrene sheets with a density of 35 kg/m³, where the recesses are cut out with your own hands using a special thermal knife.
In addition to polystyrene foam with bosses, polymer slabs with ready-made recesses are also available in the retail chain. This option is suitable both for installation on a flat surface and inside the ceiling flush with the joists, as shown in the diagram:
Thermal insulation boards can be placed in the gaps between the joists
Note. The disadvantages of this option are the need to cut grooves in the joists for the passage of tubes and fastening the polymer at the corners so that it does not adhere to the wood. Therefore, it is better to place slabs with recesses on a base made of OSB plywood or leveled boards.
A set of wooden elements (left) and polystyrene foam with grooves for pipes (right)
A big plus of wooden sets for water underfloor heating is the ability of the coating to carry a large load from bulky furniture without deformation. Products with cutouts for plates are mounted on beams along with insulation, as described above (Uponor brand technology). A stacked wooden heated floor has only one drawback - the high price of materials.
Homeowners with time can save money on a polystyrene system by purchasing a thermal groove cutter and regular high-density foam. The technology is simple: insulation boards are laid out on a leveled surface, after which you need to burn out the pipeline route in them in accordance with the diagram. All that remains is to install heat distributors and insert pipes into them.
Burning grooves in polystyrene with a thermal knife
Water floor under laminate
In this article we will tell you how to properly carry out this procedure yourself and consider the advantages of using a water coating.
Features of laying under laminate
Laying a water floor under a laminate has its drawbacks. This is due to certain properties of the material:
- Deformation. The fact is that laminate can become deformed due to temperature changes. To avoid this, it is necessary to choose the appropriate coating. So, for a water floor you need a moisture-resistant laminate that is protected from mechanical stress. The coating grade should not be less than 32, and the thermal resistance should not exceed 0.15 m² K/W. Thus, you will ensure a long service life of the coating.
Thus, water heated floors under laminate are an acceptable solution, but you will need to choose high-quality material and follow certain rules during work and operation.
Please note that the instructions indicate what type of heating the laminate can be used for. For a water floor, you cannot use a coating designed for electric heating.
Water floor heating efficiency
Using laminate to maintain room temperature is not a good choice. If you make a mistake when purchasing a coating, you risk not only significantly reducing its service life, but also causing harm to your health. But if you still decide to use laminate, you will need to follow certain rules during work.
In general, a water-heated floor under a laminate can provide acceptable heating for the entire room. The coating heats up quite quickly and holds the temperature well. At the same time, the thickness of the floor is small, especially in comparison with tiles.
In addition, if you wish, you can easily install a parquet board or solid wood. An average heating temperature of about 28 °C will be enough to maintain comfort in the room.
In addition to choosing the right material, you will also need to follow certain rules during work. In addition, it is necessary to adhere to the order of work established by the manufacturer:
We recommend using the help of a professional construction team. Although installing laminate flooring looks simple, there are certain nuances that beginners often do not take into account. Because of this, squeaks may appear when walking or the structure may shrink.
The installation of heated floors under laminate does not forgive mistakes, so installation must be taken extremely seriously.
The installation diagram for a heated floor is as follows.
How to fill a water floor
To lay laminate flooring you need a perfectly flat surface.
There are quite a lot of leveling methods, but not all of them are suitable for heated floors.
A possible cause of squeaking while walking may be an improperly leveled base before installing the covering.
When choosing a mixture for filling the surface, the following nuances must be taken into account:
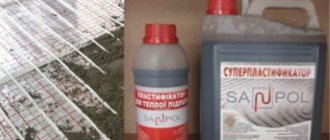
- Thermal load. During a sudden change in temperature, the cement mixture can crack and become unusable. So for the screed you will need to use special additives - plasticizers.
- Smooth coating. Laminate is extremely demanding on the surface. Many beginners try to level the base using tile adhesives. But over time, this layer lags behind the screed, which significantly reduces the service life of the coating.
- Thermal conductivity. For acceptable heating of the room, the cement mortar must have an increased thermal conductivity. This factor greatly influences the effectiveness of using laminate or parquet.
All these nuances explain why it is often recommended to use ready-made mixtures for laying laminate flooring. After all, it is almost impossible to make such a solution with your own hands so that it meets all the stated technical characteristics.
Possible installation errors
As you can see, a heated floor under a laminate on a concrete floor is, although not the best solution, but quite justified. If you follow the recommendations and rules, you will create a high-quality coating that will last a long time.
Stages of laying a water floor on a polystyrene base
Polystyrene slabs have a base thickness of 3 cm, when to insulate the subfloor it is necessary to lay a thicker layer of insulating material, additional polystyrene foam slabs are used.
Before installing thermal insulation on the subfloor, it should be leveled, differences should be eliminated, and debris should be removed. The polystyrene base can be laid out according to a special plan. To lay insulation, different types of plates are used: with grooves, rotating, straight. The size of the polystyrene plates is calculated at a pitch of 15 cm; there are plates at a pitch of 30 cm. The plates are equipped with a special lock for fastening.
Some types of slabs have protrusions, making it possible to create a more complex contour pattern. But in order not to get confused while laying pipes, it is better to make markings in advance with a marker.
Metal plates are laid on the insulating material and pipes are installed in the grooves, following the plan. You can put a substrate on top, then a finishing coating: parquet or laminate. Other materials can be used, but then additional rules must be followed. So, before installing a warm floor under the tiles, first make a dry screed - lay multi-layer plywood, plasterboard or chipboard sheets.
Slatted wood system
This design, which is used to create a dry screed for a warm water floor, is classified as a wooden system. The supporting role here belongs to slats made from boards. The usual thickness of the material is 20 mm, with a humidity of no more than 10%.
If the selected pipe pitch is 15 cm, then the width of the strips of boards should be 130 mm. With a step of 200 mm - 180 mm, 300 mm - 280 mm.
The strips will be used for the support system for the water heated floor pipeline. Laying can also be done on logs or an old wooden base. If you make logs, the thickness of the entire structure will be reduced by about 20 mm.
The diagram for a slatted wooden system is as follows:
- The surface is completely cleaned of debris and, if necessary, high-quality leveling is carried out. For each linear meter of floor, a deviation in height of 2 mm is allowed.
- Polyethylene serves as a layer of steam and waterproofing for the dry method of installing heated floors.
- The damper tape, which is attached to the walls in the room around the perimeter, should not be left aside.
- After distributing the wooden planks over the base, they are fastened using self-tapping screws. Laying should be done across exposed joists or support boards. Everything must comply with the established pipeline spacing plan. When the pipes are distributed over the surface, they are covered with support strips. We must not forget about the gap between them, which should be 20 mm. If possible, the planks should be rounded in those areas where there is a bend in the water-heated floor pipe.
- The support plates are attached using self-tapping screws to the wood strips. Uniform heating of the subfloor will be achieved when the surface is 80% covered with planks.
- For acoustic protection, a polyethylene film is laid over the resulting structure. During heating or cooling of the coolant, no extraneous noise will appear in the pipes.
- After this, you can lay the gypsum fiber sheets, preferably in two layers, and fasten them together with self-tapping screws. This layer will serve as the basis for further installation of the floor covering.
Modular system
A warm water floor without screed can be installed using a wooden modular flooring. In this case, the pipes are laid out in special slots. Grooves are cut into the thickness of the square slabs. Most often they are made from chipboard.
This installation option is designed for solid wood bases and joists. Chipboard slabs with slots for pipes are laid out on the floor surface and connected using grooves. They are provided in the design of the modules. This type of base for installing water pipes is the easiest and fastest to install.
Pipe installation is carried out according to established technology. First you need to prepare and clean the base. Then waterproofing is laid on it. The modules are laid out on top. This method does not require calculations and drawing up a plan. Factory modules already have a pipe groove system. Wooden slabs simply need to be laid out on the floor and connected using the lock provided by the manufacturer.
Next, metal slats are laid out on them and pipes are laid. Two layers of thin gypsum fiber sheets are also laid out on top. After this, the final coating is performed. For self-installation, you should choose modular designs.
Recommendations for laying screed under heated floors
In order for the screed under a warm floor to turn out to be of high quality, you need to take into account some features and installation rules:
- When installing a heating system, before pouring the solution, it is imperative to clean the surface from construction debris, dust and dirt, otherwise the solution, having hardened, may peel off completely from the base.
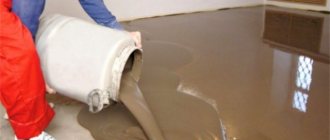
- Laying the screed starts from the walls opposite to the entrance. Small holes (4-5 cm) are made in the screed. This will ensure a strong connection of the new screed with the lower base, as well as quick drying of the surface.
- The optimal thickness of the concrete screed is 3-5 cm.
The optimal thickness of the screed for heated floors is from 3 to 5 cm
If you make a layer thicker than 5 cm, the floor will heat up too slowly, and if it is thinner than 3 cm, the coating may overheat and crack. In the case when a thinner screed is needed, say 2 cm, you need to add a plasticizer to the solution or use self-leveling mixtures.
Self-leveling screed
- To prevent the floor from deforming and cracking under the influence of thermal expansion, it is recommended to use expansion joints along the walls and near the doors by laying an expansion strip of polyurethane foam.
- When installing a dry screed, the backfill must be completely dry. To ensure a dense consistency of the screed, the particle size should not be more than 5 mm. There should be no empty space left between the gypsum board sheets and the backfill used.
The first start-up of the heating system (one month from the date of pouring the screed) is carried out in two stages:
- the first stage is a gradual increase in temperature in the system from a minimum value to a maximum value (during the first 7 days);
- the second stage is a gradual decrease in temperature in the heating system from maximum to minimum (over the next 7 days).
Compliance with the above recommendations for laying screed, proper testing and proper launch of the underfloor heating system will allow you to enjoy a smooth and warm floor covering for many years.
Types of electric floor
According to the heating element used, the classification includes several types of electrical structure.
Cable design
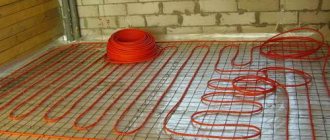
Cable floor
When installing a cable circuit, heating occurs through the flow of current to it. The cable is placed on a tie.
For full heating you will have to wait a little more than 1 hour. To carry out repair work and troubleshoot the system, it is necessary to dismantle the laminated floor covering and damage the screed.
Heat mats (thermomats)
Thermal mats consist of fiberglass. Cables are attached to it in the shape of a snake. Installation of heating does not require installation of a screed.
It is most effective to secure the mats to the base using tile adhesive. The price for installing mats is approximately 30% higher compared to cables.
Heating mats under laminate are easier to install. Simply lay the mesh with wire over the surface of the rough base.
Infrared floor
In this design, the heating element is a special film. It does not require the use of screeds or glue.
During installation, the film is simply placed on the subfloor. The infrared layer heats not only the flooring, but also the furniture. The thickness of the system is minimal, so it can be organized indoors without compromising the height.

Infrared design
Procedure for installing pipes on polystyrene mats
It’s easy to make a warm water floor without a screed with your own hands. First, the rough surface is cleared of construction debris. If necessary, the base must be leveled.
A polyethylene film is laid out on the prepared surface. Its thickness must be at least 200 microns. Waterproofing sheets made of polyethylene are laid out overlapping (10-15 cm). The joints must be firmly secured with tape.
A damper tape is laid out around the perimeter of the room. It compensates for possible expansion of the system when heated. Then polystyrene mats are laid out. If their thickness is small, the joints need to be coated with glue. Metal slats are placed between the protrusions. Pipes are inserted into their grooves. Another layer of waterproofing is laid on top of them.
Then you need to lay out 2 layers of gypsum fiber sheets. The joints of the first layer should not intersect with the previous layer. The thickness of this flooring should be 1 cm. The joints should be coated with PVA glue. The layers must be fastened with self-tapping screws
It is important not to damage the pipes
After this, the finishing coating is installed. You need to lay a special underlay under the laminate. When installing tiles, you should choose the right adhesive. It must be acrylic based.
Installation of floors on wooden slats
In accordance with the created plan, slats are cut out and laid on the floor surface. They are fixed using self-tapping screws. The pipe is laid out across the support boards of a wooden base or joist.
To install a water heated floor without a concrete screed, you will need to mark the pipes on a wooden base according to the plan. They can be mounted in the form of a “snake” or “snail”. The first option is simpler. On both sides of the marking, the place for the wire is covered with slats. The gap between them should be about 2 cm.
In places where the pipe is rounded, the strips also need to be rounded. Metal plates are laid between the slats. They are fixed to a wooden base using self-tapping screws. The plates cannot be placed everywhere. The minimum number of them in a room should be 80% of the area. Pipes are inserted into the grooves of the metal plates without fixation.
After this, the heating element is covered with waterproofing around the entire perimeter of the room. The membrane can also reduce noise when heating pipes. You will also need to lay two layers of gypsum fiber board sheets on top. After installing them, you can install the finishing floor covering.
Types of dry laying of water floor pipes
Dry floor installation is a general concept, which means several installation methods that differ in efficiency, materials used, and complexity of the work.
The most popular dry laying methods are:
- Mats for water floors are laid on a flat base and have special bosses for laying the water circuit. A gypsum fiber board or sheet of plywood is laid on top of the mats. The selected floor covering is laid on top.
- Wooden floor. In wooden floorboards, a place for the water circuit is cut out with a milling cutter. After laying the pipes in the prepared furrows, the top is covered with plywood. The type of installation is used for finishing with laminate, parquet boards or other types of flooring using wood.
- Installation of a dry floor, without cement screed. The essence of this method is that the space from the rough to the finishing layer is filled with small granules of slag or other material with high heat-conducting characteristics. Dry concrete-free laying technologies do not require a large amount of drying time. In the West, according to various sources, from 60 to 70% of sexes are “flooded” in this way.
Before choosing the required installation method, you should determine how effective a particular method will be in each specific case.
It is necessary to take into account efficiency, heat transfer level and other technical characteristics
The effectiveness of water floors without screed
The efficiency of water underfloor heating without screed is influenced by the type of installation chosen. According to the study, floors using special mats have the highest efficiency. In this case, special heat-reflecting plates are used, which increases the efficiency of the water circuit.
In the case of using dry mixtures in which the water circuit is mounted, the efficiency is no more than 50%. Research has shown that the heating system heats the air between the subfloor and the gypsum fiber board well. And since air is a good insulator, the surface of the gypsum fiber board heats up quite weakly.

Dry or wet floor – which is better?
There are several compelling arguments encouraging a dry installation method for warm water floors:
- Fast installation speed.
- Lower costs.
- Lower requirements for the load-bearing capacity of the floor.
- Possibility of doing the work yourself.
At the same time, a dry-installed water underfloor heating system has its disadvantages:
- Low heat transfer.
- Restrictions due to the use of flooring.
Before choosing a dry or wet screed method, in each specific case you will need to consider the following nuances:
- Technical features of the building. Dry screed is performed in rooms where the creation of dampness is unacceptable. In this case, cases of leakage of the composition to the neighbors below are excluded, since there is completely no water in the mixture.
- Deadlines. According to statistics, installing a water heated floor using a dry method is usually decided by those who do not have the time to wait more than a month for the cement screed to harden.
Despite the existing disadvantages, dry screed is very popular. Its use is justified when installation time is limited. The height of the ceilings does not allow the use of traditional methods of pouring screed, and it is also planned to carry out the work independently.
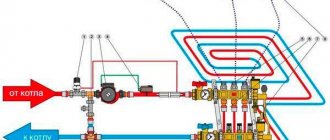
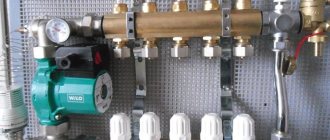
Installation of underfloor heating
Water heating is installed both as the main and as an additional source of heating. If the cottage has radiator heating, then a liquid floor line is provided in cold areas. It is connected to the battery. Options for connecting the liquid circuit may vary.
- A bypass with a three-way mixer is installed on the supply circuit. The hot coolant is supplied to both the radiator and the “warm floor”.
- A more economical way is to use chilled water, which circulates in the return circuit. Its temperature is not less than 50 0C. It is fed into the floor line.
- If a “warm floor” is used without main radiator heating, then a boiler is installed. A pipe is led from it to the supply manifold; it has outlets for the floor circuit. A circulation pump and a three-way mixer with a control device are installed on the collector. The other end of the pipe is connected to the return manifold. A pipe comes from it that supplies water to the boiler.
The floor liquid line can be laid without the use of a concrete screed. A contour is created for the pipeline. It can be made of polystyrene boards or wooden boards. Heat distribution plates are used to direct heat upward towards the floor.
YouTube responded with an error: The request cannot be completed because you have exceeded your quota.
- Related Posts
- How to choose a pump for underfloor heating?
- How to install underfloor heating in a house?
- How does a flow meter for a heated floor collector work?
- How to set up a programmable thermostat for heated floors?
- How to lay a heated floor on the ground?
- What kind of warm floor to lay under a parquet board?
Warm floor without screed under laminate cable and mats
Laminate is a wood-based floor covering that itself is not very cold. But in winter it also cools down greatly, bringing discomfort to apartment residents. Therefore, floor insulation under laminate
- a fairly popular solution.
There is an opinion that it is impossible to make a heated floor with this coating. This is wrong. Due to the low thermal conductivity, the heat-insulating substrate and the composition of the coating itself, it is more difficult to achieve a high temperature on it than, for example, on tiles. But if the heated floor is installed correctly, it will not damage the laminate
and will be able to heat it to a comfortable temperature.
Electric heated floors without screed under laminate
Various types of underfloor heating are used with laminate, including electric ones. If you do not want to spend a lot of time installing them, purchase varieties for installation without screed - in tile adhesive. Such heating systems are easy to install, and they are ready for use quickly - after the glue has completely dried (check with the manufacturers of the adhesive solution for the exact timing; usually the glue dries in about 14 days).
The Energy company offers two such varieties:
Energy Universal is a universal heating cable that is attached to a mounting tape and filled with either tile adhesive or screed. The reduced power of the cable (10 W/lm) allows it to be used with coatings with poor thermal conductivity, which includes laminate. In this case, the coating will not overheat, and the heat will be distributed evenly. Model power – 100 W/sq.m.
Energy Universal is a two-core cable that is convenient to connect, since its other end does not need to be returned to the power supply.
Energy Light is a single-core heating mat that can also be used with laminate floors. The mat is convenient because the cable is already attached to the mesh, and the mesh itself is attached to the base using adhesive tape. Therefore, when installing it, you skip several stages at once: calculating the laying step, attaching the mounting tape to the floor and fixing the cable in it.
What you need to know before installing heated floors under laminate
1. Specific power of underfloor heating – no more than 100 W/sq.m
At too high temperatures, laminate, like any wooden covering, can dry out and become deformed, causing it to begin to “walk” and look unsightly. To prevent this from happening, choose heating systems that are not too powerful.
2. Maximum heating temperature +26 °C
For the same reason, and also because of the harmful fumes of formaldehyde, which can be released when some types of laminate are heated strongly (from +30°C), it should not be heated above +26°C. Use only class E1 and E0 coatings with heated floors (the class indicates the formaldehyde content in the composition) and be sure to set the thermostat to no more than +26°C.
3. Look at the coating markings
There should be a mark on the packaging of the coating stating that it can be used with heated floors, as well as the maximum heating temperature. Check the composition of the product - it should be as natural as possible.
4. Only for floor heating
Since the heating systems used for this flooring material have low power, they will not be able to fully heat the room. They are used only to create warmth underfoot.
5. The optimal thickness of the tile adhesive layer (screed) is 10-20 mm
If the thickness is higher, the coating simply will not be able to warm up. If it is lower, the cable may overheat.
6. The thickness of the coating itself is no more than 25 mm
According to manufacturers' instructions, if the cable is thicker, it may overheat and fail. Fortunately, the thickness of the laminate rarely exceeds 10-12 mm.
7. Use a thermostat
This device will help you control the heating temperature of the coating, turn off the heated floor if it is exceeded and will not allow the cable to fail.
On our website you can buy heated floors under laminate for installation without screed. Warranty for Energy heated floors is 20 years.
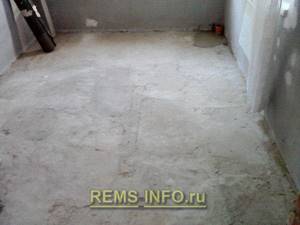
Calculation of materials for installing a warm floor screed.
We started with calculations. I calculated that with a thickness of warm screed of 60 mm, for a room of 12 square meters, you will need:
A roll of thin roofing felt was perfect for waterproofing.
I spread it with an overlap of 10 cm and an overlap of 12-14 cm on the walls.
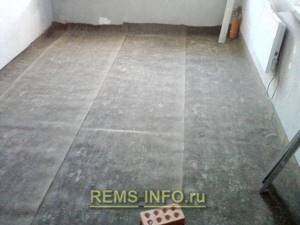
But I couldn’t figure out how to glue the beacons to the roofing felt. Instead, I used the wedging method. Those. I drove a wooden wedge between the end of the profile and the wall. This method turned out to be quite reliable and fully justified itself. I set the beacon profiles to the level and left a distance between them, 50 cm less than the length of the rule.
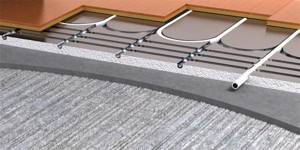
Polystyrene underfloor heating system
Let's start with the fact that no special preparation is required to install a polystyrene heated floor system. The plates can be mounted on a ready-made concrete base, on a plank or wooden covering. Due to the lightness of the structure itself, the polystyrene system can be installed in frame and panel houses. The design in this case looks like this:
polystyrene plates consist of special heat distribution elements - lamellas made of aluminum and galvanized steel. The pipes of the main heating circuit are installed directly in the grooves. The basis of the entire design is to create the necessary rigidity, which is achieved through the use of a finishing coating made from gypsum fiber board sheets. The sheets of the finishing layer are laid in a checkerboard pattern.
The plates used in the work can be of two types: regular, foam and extruded. The thickness of the slabs required for heated floors is only 10-40 mm. Heating circuit pipes are installed into the thickness of the slabs, which are covered with polystyrene mats on top. Thanks to special grooves and bosses, the plates and sheets are securely fixed to each other. Polystyrene mats have mounting fasteners on the sides, thanks to which individual elements are fastened into a single, integral field.
Don't forget about metal plates (aluminum or galvanized iron). For this system, such plates are the main element of heat exchange, transferring heat from the heating circuit to the floor surface. With the help of the plates, heat is distributed evenly over the entire floor area.
Is it possible to save on materials?
A full set of components will cost owners a significant amount. You can always find options that will cost less money on work. But not every solution gives an equally effective result.
- Internal heating branches located on top of the insulation. Then it is not recommended to use products that look like an inverted letter omega;
- Making cutouts in boards yourself. Aluminum foil is being rolled out along the length of the grooves; it will replace the plates;
- Production of metal plates in-house with metalworking equipment;
- To lay pipes in ditches, make wooden grooves yourself.
Only the last 2 points contribute to real savings without compromising the quality of the created system. Sheet bending machines can be used to make plates from any metal; it’s just that the shape of the profile will end up being slightly different from the usual ones.
The use of infrared film heaters also gives results. But in this case, only electricity is used for heating.

You can always find options that will cost less money on work.
Arguments for choosing a dry heated floor
In addition to the fact that dry heated flooring can be laid in different buildings, it also has several additional advantages over concrete screed.
Here's a comparative example:
- The weight of the entire dry floor screed structure is several times less than that of cement mortar, so its use does not create a significant load on the floor beams.
- In the absence of a concrete screed, which takes about 1 month to dry, a dry heated floor can be put into operation immediately after installation.
- Installation work is carried out twice as fast as when pouring cement mortar.
- The thickness of the screed is several times less than that of a wet floor, so its installation will not in any way affect the height of the ceilings of small buildings.
- Installation of a water system with a concrete screed will require a minimum of 2 days, installation of a dry installation will take one day.
- Due to the fact that the dry floor system is made of special heat-conducting products, the room is heated several times faster.
- By following the instructions, you can install the flooring yourself, without resorting to the services of specialists.
- Unlike a wet floor, installation of a dry structure can be done several times, which is so convenient when changing place of residence.
And also a dry water heated floor does not deform due to temperature changes in the coolant and has good noise and heat insulation.
But, despite these advantages, when choosing dry styling you need to pay attention to the following indicators:
- The heating system is exposed to the negative effects of moisture.
- Large household items cannot be erected on the structure of the flooring system.
If you lose sight of these indicators, deformation and mold of the system elements will occur. Therefore, unlike a wet floor, a floor screed without a special waterproofing layer is not recommended for use in wet rooms.
Wood flooring systems
Wooden systems are quite popular, due to their environmental friendliness, affordability and ease of installation. A convenient option for most users is modular dry heated floors, which include OSB or chipboard blocks. The blocks have special channels designed for pipe installation. A wooden dry water heated floor is easy to install, and its elements are standardized.
High-quality processed wood is used as inter-tube boards. The dimensions of the boards may vary, but standard products have a cross-section of 21x120 mm or 28x120 mm. You need to select the sizes of blocks or boards depending on the distance between the pipes. In any case, the materials will be laid on top of the logs in such a way that the existing grooves allow pipes to be laid according to the chosen pattern.
A wooden system of dry heated floors can be laid in different ways, but there is always a certain number of requirements for the base:
The main methods for arranging a wooden dry heated floor are as follows:
Comparison of heated floors with and without screed
Laying a water-heated floor without a screed has a number of advantages over the usual type of installation. The speed of creating a heating system in this case increases significantly. Dry installation is lightweight. This allows you to significantly increase the service life of interfloor ceilings.
The thickness of the finished structure is only 3.5-6 cm. This allows the use of a similar heating system for different rooms. You can install such a system yourself. In this case, you do not need to exert much physical effort or have deep knowledge and skills in carrying out such work. This is one of the simplest types of water pipe installation.
Materials for dry installation can withstand temperature changes and are also characterized by high heat and sound insulation. If necessary, the water floor system can be easily dismantled.
Considering reviews of a warm water field without a screed, it should also be said about its disadvantages. Since there will be no screed on top, the heat will not be evenly distributed over the floor surface. Because of this, it is necessary to reduce the laying step between pipes. As a result, you will need to purchase more pipes and coolant. The pump should also be more powerful.
At the same time, wooden structures, unlike concrete, differ in thermal insulation properties. This will require more energy when heating. Also, the materials used in installation are resistant to moisture.
Recommendations for the selection and installation of pipes
Water heated floor installation diagram
You need to perform an individual calculation and determine the optimal pipe laying parameters for each individual room.
The easiest way to perform the calculation is to use a specialized program - this will give you the opportunity to save time and effort.
It is quite difficult to calculate the required power for each individual circuit solely using formulas. Such a calculation requires taking into account many parameters. In this case, the slightest mistake can lead to extremely unfavorable consequences.
Calculation of a heated floor system
To calculate the system you need to know the following parameters:
heating boiler power.
The listed parameters will allow you to calculate the optimal length of the pipes to be laid, as well as the appropriate spacing for their placement to ensure the required level of heat transfer.
You must also choose a suitable pipe laying route. Remember: as water passes through the pipes, it gradually loses heat. Therefore, the distribution of system elements must be carried out taking into account a number of important nuances, namely:
The most commonly used pitch for laying underfloor heating pipes is 300 mm. In places with increased heat losses, the pipe spacing can be reduced to 150 mm.
Additionally, you need to calculate such an indicator as the hydraulic resistance of the pipes. This value increases in parallel with the length of the contour and each bend.
It is desirable that the resistance of the pipes in the circuits connected to the common collector be the same. To do this, you need to divide especially large contours into several smaller contours. Particularly large in this case include circuits whose pipe length exceeds 100 m.
Also, experts strongly do not recommend heating several rooms with one circuit. Attic floors, glazed verandas, balconies, etc. the rooms must be heated by a separate system circuit. Otherwise, the heating efficiency will be significantly reduced.
Is there an alternative to concrete screed?
We usually associate laying a water circuit for a heated floor with installing a new concrete screed. Is it really necessary to solve this difficult task at home, to engage in labor-intensive and large-scale work? Logically, in order to protect the heating system pipes laid on the floor from damage and give the entire structure the necessary rigidity and strength, it is necessary to create a strong and massive cast structure. If you are the owner of a private house and just yesterday you had a housewarming party, there are no questions. The best option for installing a warm water floor would be to pour a new screed.
The situation looks completely different in situations where you want to install a similar heating system on the upper floors of a private house or in a city apartment.
You should also take into account the fact that the new screed will significantly reduce the height of the ceilings in living rooms.
The listed factors become an obstacle to the implementation of the technological possibility of installing heating in your home according to the “warm floor” scheme. However, in this case, there is a successful, convenient and practical option - an alternative to traditional technology. Water heated floors without screed are a fairly common technology today, which has recently become quite widespread. The engineering solution is to use ready-made materials that are placed into a kind of pie through which the heating circuit pipes pass. In a professional environment, such systems-structures are called floor (dry).
This technology is very well suited for residential premises that are not designed for laying a new screed. Usually these are inter-apartment floors and attic floors. Flooring systems are versatile and can be used in almost any situation.
Types of structures
Installation of a water heated floor without screed can begin if the foundation for it is prepared. It may include:
- Tree. Special modules that have special pipe channels. The size of the channels must completely coincide with the selected step for laying the warm water floor pipeline. Most often, modules for heated floors without screed are made of OSB or chipboard.
- Polystyrene. Presented in the form of slabs with a standard size of 1.5*0.5 meters. They have special fasteners designed for high-quality fixation of pipes with the selected pitch. The plates themselves are attached to each other using a locking connection.
Attention should also be paid to the pipes that will be used in the above structures. In addition to the especially popular polyethylene or metal profiles, copper or stainless steel pipes, which are more expensive, can be purchased. It is easier and more convenient to work with pipes made of cross-linked polyethylene, which have excellent performance characteristics. Among their advantages is the ability to withstand aggressive environments. Using this material, the service life of a heated floor can reach several decades. The main thing is that the installation technology, as well as operating conditions, are fully observed here.
Most often, pipes are purchased in coils. At the same time, it is worth paying attention that it is better not to stretch the loops, as the pipe may collapse in a separate area. It is best to systematically unwind it while laying it on the base.
Warm floor on wooden logs. Method seven
He is also the last one...
We have given you here enough options for how to install a heated water floor on a wooden base, so that you can decide and choose the method that is suitable for you. But we cannot ignore another excellent option, which today is perhaps the most modern. It consists of ready-made solutions from companies that produce materials and equipment directly for heated floors, which can be purchased in the store. Don’t take this as an advertisement; for the sake of convenience, let’s give an example of one that specializes in the production of materials for heated floors. Now let's look at an example of installing a water-heated floor without a concrete screed from materials offered to us by the above-mentioned company.
First you need to prepare the surface for the future heated floor. The logs are installed in the same way, boards are laid on them, and chipboard or OSB is placed on top of the boards. If there is an unheated basement or room under the floor, you can lay a 5 cm layer of any insulation between the joists. Next, on the finished, flat floor, we lay the already familiar profile heat-insulating mats over the entire area of the room.
They are easy to install and have special locks on the edges with which they are connected to each other.
Next, special heat distribution plates are laid.
The selection of plates is carried out taking into account the selected pipe pitch. The plates are inserted between the bosses of the mats along the path of the pipe. The advantage of this method is the ability to lay the pipe “snail” without any problems (read about all the methods of laying the pipe at the link). There are no difficulties in installing the plates. They have notches with which, without any tool, you can easily break off a plate of the required length.
Thus, approximately 90% of the entire area is covered with metal.
Next, a pipe is inserted into the plates, it fits tightly there, there is no need to secure it additionally. Again, nothing complicated, you just need your hands,
After laying the pipe, we pressurize the system and continue installation.
Special waterproofing is laid
and at the final stage, special gypsum fiber boards are laid, having grooves along the edges, with the help of which they fit tightly to each other.
Gypsum, as mentioned above, has good thermal conductivity. Next, we lay the selected floor covering on the gypsum fiber.
The options presented here cover all methods of installing a water-heated floor without a concrete screed that exist today. The most important points during installation are good insulation and mandatory pressure testing of the system after the finished installation of the pipe, because it will be a shame if the floor leaks after the first start-up. We'll have to take everything back apart. However, we have provided all the links to the information you are interested in at the beginning of the article.
There are several technologies for installing a warm water floor, however, a dry system, without the use of cement screed, has many advantages:
- ease of installation - you can do it yourself, without involving specialists;
Wooden water-heated floor system without screed
However, there is one significant drawback: such structures are easily subject to deformation under the influence of moisture. In order to exclude this, you need to pay special attention to the waterproofing system.
Warm floor on wooden logs. Method three
This installation option, like the previous two, begins with a raised floor, waterproofing and insulation. Instead of a raised floor, you can use metal corners or slats on which the insulation is laid.
Only use a hard heat insulator, for example extruded polystyrene foam; mineral wool will not work in this case, as it will fall between the corners.
Next, we use boards 50 mm thick and 15 or 20 cm wide, depending on the selected pipe pitch. The boards are sent to the sawmill, as in the second option, for planing and leveling in thickness. You also need to ask the carpenters to make a 2x2 cm cutout on each board along the entire length of the board. This cutout will be intended for laying the pipe.
The boards are laid out close to each other, and you should get something like this:
On the planned bends of the pipe in the board, you need to make roundings, as shown in the photo in method No. 2. Also, in the area of the wall where it is planned to lay the return line to the collector, you need to leave room for it.
And if the area of the room is large, this means that there will be 2-3, or even 4 circuits. Then you need to leave even more space, taking into account the number of pipes.
Now, heat distribution plates are inserted into the cutouts to distribute heat evenly. You can also save money on heat distribution plates by replacing them with galvanized iron sheets. Only the sheets need to be bent correctly. The figure below shows a diagram of a regular curved sheet of iron.
The whole point is that the bend is tucked into the grooves of the boards and the width of the sheet covers the entire width of one board. And so on for each board, along the entire length. Since the length of the sheet iron will not be sufficient for the entire length of the board, sheets of bent iron will have to be joined. Pay attention to the joint location so that the corners of the metal do not stick out relative to each other, otherwise damage may occur when inserting the pipe into it. One side of the bent metal has an angle of less than 90 degrees, it has a special tongue that provides rigidity and holds the pipe in place. Therefore, when using this method, there is no need to additionally secure the pipe with plates. This material is bent using a special machine. Many organizations and individual entrepreneurs are engaged in this.
Having covered the entire area of the room with galvanized sheet iron, we proceed to laying the pipe. There is nothing complicated here, you just need to be careful. If all dimensions are met, the pipe fits into its seat without “fanaticism” and sits there securely.
The next step will be the installation of chipboard, OSB or other suitable material and flooring.
This version of a water heated floor without a concrete screed is more successful than the second and especially the first. We have already discussed the first, but the second is more attractive because the board used is quite thick and, when paired with chipboard, the floor will definitely not sag even under significant loads.
About the pros and cons of “dry” floor systems
In conclusion, I would like to note the advantages of a heated floor without screed, which can attract owners of private wooden houses:
- The design is lightweight, reliable and efficient at the same time.
- Unlike heating circuits embedded in screeds, in such a system it is easy to detect a leak and eliminate it.
- The thickness of the “pie” protruding above the upper cut of the log is from 20 to 50 mm.
- Water floors with dissipative plates made of steel or aluminum are not able to accumulate heat and are practically devoid of inertia. Accordingly, they quickly warm up rooms and quickly respond to automation commands and changes in coolant flow in the loops.
- Speed of installation due to the absence of “wet” processes and hardening of the solution. How lightweight heated floors are installed in a short time is shown in the next video:
The only drawback that forces home inventors to play tricks with aluminum foil is the price of steel products, especially when combined with shaped polystyrene foam. You can get around this nuance like this: install warm floors in all rooms one by one, depending on the availability of financial opportunities. First you need to insulate the ceiling and install a comb, and then gradually install the pipework, starting with the rooms where residents live permanently.
When may a dry floor heating system be necessary?
There are a number of factors that make it impossible or very difficult to make a concrete screed for a warm water floor:
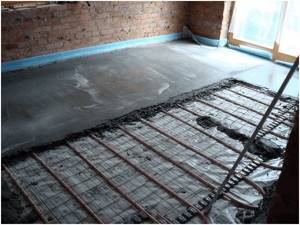
Installation of water heated floors with concrete screed
- weak floors that cannot withstand heavy loads;
- limited height of the room, which does not allow an additional 10 cm to be removed;
- the inability to organize concrete mixing indoors - for example, it is difficult to deliver a concrete mixing unit to an apartment on a high floor;
- if you have no experience in preparing cement mortar, but have a desire to do all the work yourself, with your own hands;
- when the time frame for construction or repairs is limited.
Detailed description of the installation process
As with any repair work, before starting to lay a heated floor with water elements, a preliminary preparatory stage is required.
Choosing a laying technology
To decide whether it is possible to lay a heated floor under a laminate, you need to clarify the individual parameters of the room and take into account the following nuances:
- The maximum length of the circuit should not exceed 100 meters, otherwise the pump will not have enough power to pump water in such a volume.
- If it is necessary to divide the water heating system into several circuits, it is necessary to ensure that one circuit has no more than 40 m2 of area. The shorter each of the contours is, the better.
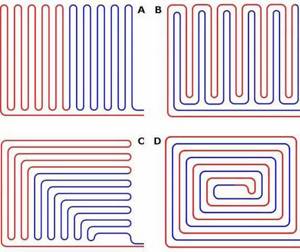
Often, several schemes for laying heating elements are used:
- snail;
- snake;
- corner snake;
- double snake.