Home > Good to know > Heating and cooking stoves
Heating and cooking stoves have been used for cooking since ancient times, since it was the most technologically advanced method, unlike a regular fire. With good kindling, the food in the oven turned out to be incredibly tasty - boiled, steamed, fried, stewed or simply reheated.
Over time, people have learned to more technologically combine the useful functionality of heating and cooking in one element. Due to the special design of the chimney, the stove could warm the entire hut, giving precious warmth in cold weather.
One of these options for combined stove appliances was the heating and cooking stove, which, despite the abundance of similar equipment on the modern market, still does not lose its relevance.
Rules for choosing a cooking stove
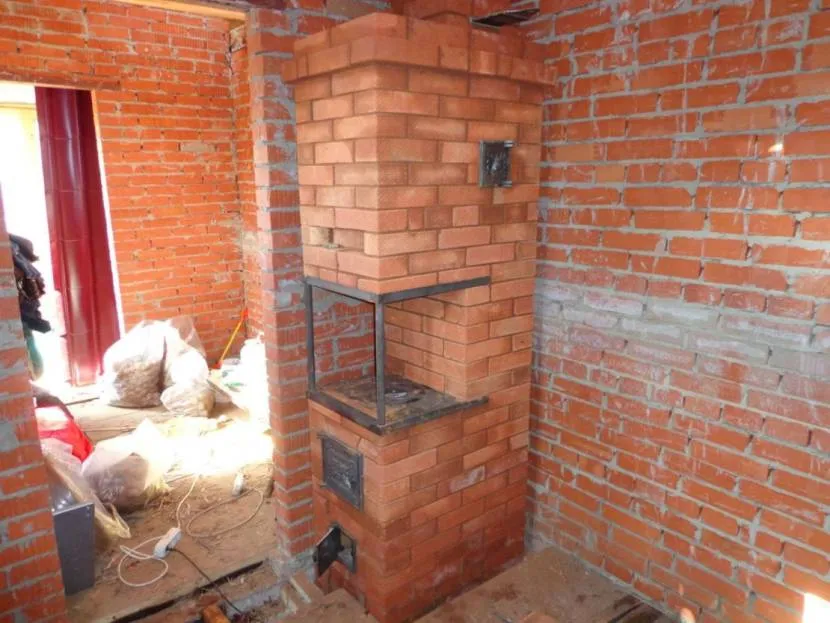
Creating a brick oven, additionally equipped with a hob, is a long and labor-intensive process that must be carried out evenly and carefully only by experienced specialists. Only professionals will be able to put together a functional structure. Such a device will effectively heat the premises and provide the opportunity to prepare delicious dishes.
There are different designs of brick stoves for houses with order. The designs differ in size, appearance, and internal structure. They are created small and large, focusing on the area of the house. The provisions of SNiP 41-01-2003 are also taken into account. The rules from it must be followed when selecting a place for furnaces and determining the necessary set of works for additional thermal insulation of the building. Otherwise, problems arise with government agencies that control the fire safety of residential buildings.
Modern stove designs are developed using computer programs Source pro2-bar-s3-cdn-cf5.myportfolio.com
Proven stove designs allow you to create efficient heating and cooking structures from bricks. Moreover, each of them will have its own operational characteristics. Therefore, when making a final decision, be sure to pay attention to a number of important points:
- The size of the stove, in which, regardless of design, the front and rear walls will necessarily give off more heat compared to the side surfaces.
- Features of installing a brick structure. For faster and more efficient heating of a specific room, the side wall of the stove should face towards this room. At the same time, its hob must be located in the kitchen space.
- Heat transfer, which is selected taking into account the area of the heated room. Additionally, the location of the room is also taken into account.
On a note! Lighting and heating a large stove requires a lot of solid fuel and time. Therefore, this design is never chosen for heating a small room.
The dimensions of the stove are always chosen according to the dimensions of the room Source build-experts.ru
The efficiency of any brick heating structure depends on the thermal insulation of the house.
If the insulation of the building is done efficiently, then a small stove will be enough to heat it. After all, reliably thermally insulated building structures will retain heat well in the building. At the same time, high-quality insulation is an insurmountable barrier to the cold outside.
General recommendations for choosing building materials
You should only take on the construction of a Swedish stove with your own hands if you already have at least some initial masonry experience. This is a rather complex design and should not be chosen as the first experiment.
If you have basic bricklaying skills and have already dealt with installing stoves, then our detailed step-by-step instructions will allow you to master this process. Follow the instructions exactly and build each row in accordance with the indicated diagram.
Do-it-yourself Swedish oven
As mentioned above, the Swedish oven requires a very careful and careful approach. Unlike a traditional Russian or Dutch oven, used brick is not suitable for it. The efficiency and productivity of the Swede directly depends on the quality of the material. It is better to take fireclay or red brick.
Important! It is unacceptable to use silicate or hollow bricks to build a furnace.
You should also pay attention to the choice of solution. To build a firebox, it is necessary to mix a solution of special fireclay clay, which can withstand high temperatures. The clay should be smooth and of medium fat content.
To check whether the kneading is done correctly, take a thin layer of clay and apply it to a vertical surface. It should not drain and the consistency should resemble thick sour cream. Under no circumstances should there be any lumps or unmixed solution in the mixture.
Ordinary clay is suitable for lining a heating structure. If you make a fuel ignition chamber out of it, it will crack and the integrity of the stove may be at risk.
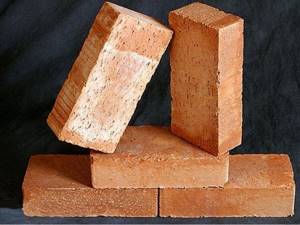
Fireclay brick
Separately, it should be said about the foundation for a Swedish stove. Given its heavy weight, the base must be made strong. It takes at least three weeks for the concrete monolith to harden. If you hurry and start laying on a fresh, not completely hardened foundation, then the heavy weight may cause the stove to become deformed.
One of the weak points of the Swede is the fire door. If you take a budget door from a stamped sheet, it will quickly become loose and fail. Therefore, it is necessary to take a cast door with a mustache, which will need to be securely walled up during laying.
You can vary the size of the stove and oven within 5-10 cm, but the thickness of the oven is of great importance. If you cook the oven yourself, use steel, which does not conduct heat well. If you take thin roofing iron, then such an oven will cool down quickly.
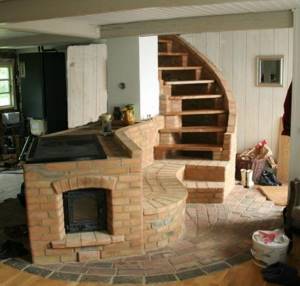
Stove models
When existing brick stove designs are considered, attention is paid to the features of each design. After all, you can fold the device with a complex or simpler internal configuration of smoke exhaust channels. The final decision is always made on an individual basis. That is why it is recommended to contact specialists in order to avoid mistakes at the initial stage.
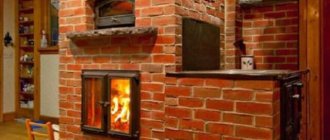
A brick heating and cooking stove can be manufactured in the following options:
- T-shaped and have a massive structure.
This stove is often placed in the middle of a large room. This arrangement allows you to divide the room into separate zones. In addition, a T-shaped stove can be placed between two or even three rooms. This location option will allow you to effectively heat 2 or 3 rooms at once.
T-shaped brick heating stove Source remontnik.ru
On a note! The T-shaped model is an ideal option for a medium-sized private residential building.
- A narrow design in which the hob protrudes from one side.
These types of stoves take up less space in the premises. At the same time, they have a simple design and are installed to heat a maximum of two rooms.
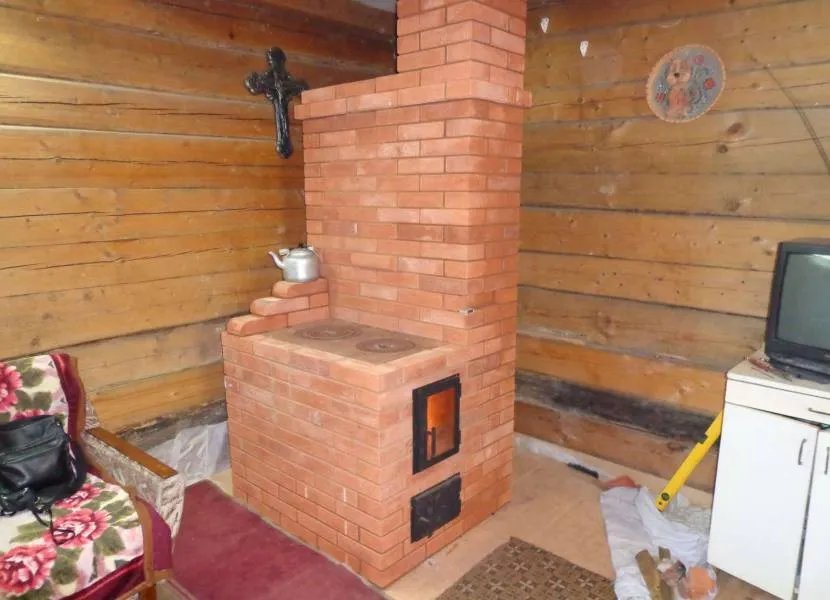
A brick stove in which the hob protrudes from the left side Source iz-kirpicha.su
On a note! Narrow stoves with a protruding part are often heated with dry branches, created in country houses and placed between the kitchen and living room.
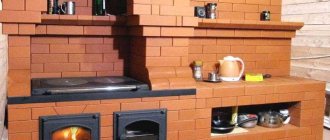
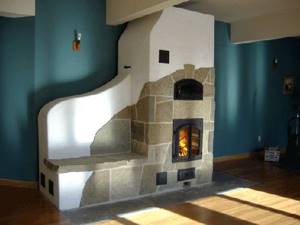
- Heated protruding bed, aesthetic appearance and medium size.
Such brick stoves for a home with a hob are smaller than full-fledged Russian heating structures. At the same time, they provide owners with the opportunity to use a large number of functions. Usually in these stoves the hob is located in a built-in chamber. It is convenient to prepare a variety of dishes here.
Some models have an additional built-in camera. It will allow you to bake homemade bread. There are also options with an upper chamber, intended, for example, for heating dishes or drying vegetables.
Stoves with a stove bench and hob are equipped with doors that are entirely made of cast iron or have glass filling. The size of this element can be large, which will allow the structure to be used even as a fireplace. At the same time, any family member will always be able to relax in a warm bed, since the design of such stoves includes a bed, under which there are channels for flue gases.
Brick stove with heated stove bench Source pechiexpert.ru
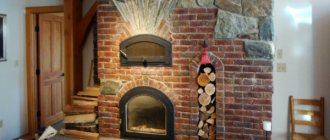
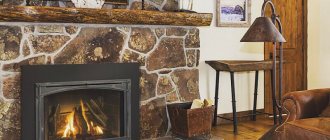
- Open or closed fireplace fireplace.
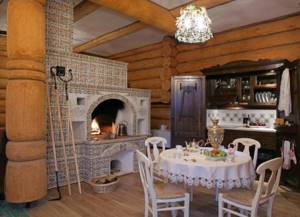
This brick heating and cooking stove can be placed in the middle of a residential building. With this arrangement, the fireplace will be located, for example, in the bedroom or living room, and the hob will be in the kitchen. If the stove is placed in the middle of the house, then the entire floor will be filled with heat from the structure. Even the rooms located behind the rear stove wall will be heated.
Modern versions of stoves are most often designs that are simultaneously equipped with a “summer” operation and the ability to work exclusively in warm weather. This device will allow you to save fuel by using only the stove in the summer. At the same time, in warm weather the entire structure will not heat up completely. Therefore, the premises will have a comfortable atmosphere. After all, people in the rooms of the house will not have to endure the heat of the stove in the summer.
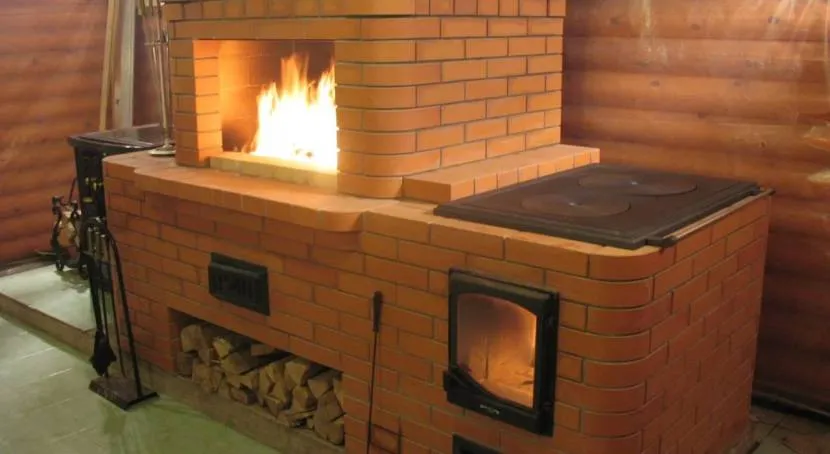
Original stove with fireplace insert and hob Source dompech.ru
A little bit of history
In our country, the Swedish stove is quite popular as a fairly efficient and economical heating design. It can be used both for heating the house and for cooking and heating water.

Swedish stove in a country house
In terms of performance, it is in no way inferior to the classic Russian stove, which from time immemorial has been used in our country for heating the house and cooking. But in terms of fuel efficiency and small dimensions, it can leave the Russian stove far behind.
Therefore, if you are now wondering what design to use to heat your home, pay attention to the technical details of this stove and carefully study its advantages.
As the name suggests, this stove model was invented in Sweden. Some sources indicate that the new masonry technology was brought by Peter I to Russia, while others claim that it was invented much later.
Swedish stone oven
One way or another, the Swede was designed by Swedish engineers in accordance with all the requirements and subtleties of the local climate. This model is very similar in design to a Dutch oven, but its main difference is the presence of a wall, which allows you to place the heating structure in two rooms at once.
Considering the cold and damp climate most of the year, the oven had to not only heat, but also dry clothes overnight, because in the morning hunters and fishermen, who were the majority of the local population, needed to start work again and, in order not to get sick, clothes should should be well dried and warmed up.
Another remarkable difference of the Swedish stove is the combination of two functions: heating the room and cooking. The large cooking surface allows you to prepare dinner for the whole family and heat water. And in the oven, which is usually equipped with a Swede, you can bake bread.
Swede between kitchen and living room
In addition, the unique shape of the firebox - in the form of a bell - allows you to burn fuel efficiently and maintain the smoldering of wood for a long time, which increases the efficiency of the stove.
A small Swedish stove with a hob and oven is designed to be placed in the wall between the kitchen and living room. This type of placement is traditionally used in the northern countries.
Due to this arrangement, the kitchen quickly warms up, it is convenient for the housewife to prepare food, and the residual heat that is generated for cooking effectively warms up the entire room. Thus, with one stack of firewood you solve two problems at once: the house will be both warm and satisfying.
Swede with a bed
In the old days, such stoves were equipped with additional sunbeds that protected them from the cold at night. Now in modern homes you can find small and compact Swedish stoves with an oven and hob, which are both a functional design and a stylish interior decoration.
Today on sale you can find a wide variety of Swedish stoves of various designs: with a water circuit, with an oven, with a hob.
Example of a Swedish oven with two ovens
Or you can build it with your own hands, having basic experience in laying a stove.
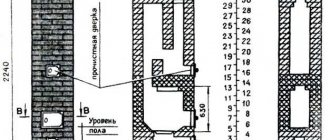
Swedish order
Before you correctly assemble the stove and the brick stove itself, you need to thoroughly understand the order of the entire heating and cooking structure being created. At the same time, the Swedish fireplace stove is popular among homeowners and stove makers in Russia. Its design was developed by A. Ryazankin.
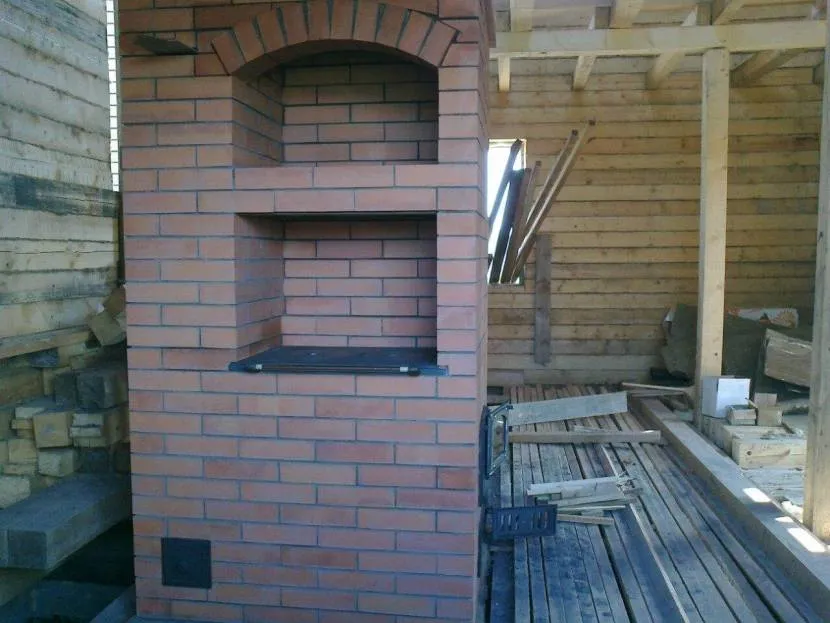
One of the variants of the “Swedish” stove heating design Source 2stiralki.ru
See also: Catalog of companies that specialize in the design and installation of fireplaces and stoves
The Swedish fireplace stove, designed by Ryazankin, has a simple layout. This compact heating and cooking design heats up quickly and features an oven. In addition, the design of the stove allows it to function like a fireplace. This option is great for heating 2 rooms. Although in fact there are a huge number of modifications of the Swedes.
Most professionals are familiar with the Ryazankin stove design. Therefore, they will always help and tell you how to lay a brick stove in a country house step by step for beginners. The order itself looks like this:
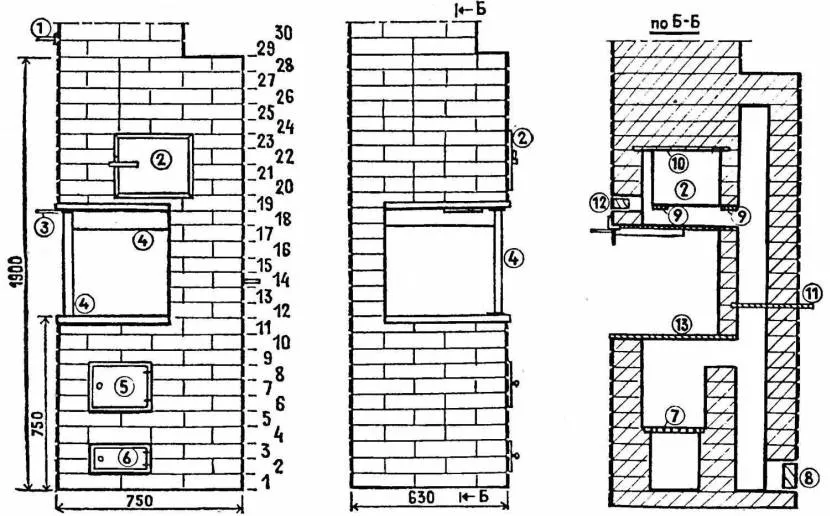
- The base of the furnace structure is the first row of bricks made of 34 elements.
It is created on a pre-prepared foundation, which is pre-coated with 2 layers of roofing felt or other similar waterproofing.
For any of the options in the Swedish stove, the 1st row consists of brick blocks tightly laid together Source 1-teplodom.ru
The use of a large amount of brick implies its dense installation. In other words, a specialist creates a kind of slab from it, in which there will be no smoke exhaust holes or any chambers. This so-called stove base will increase the reliability of the entire structure. However, it is laid out exactly along the horizon within the previously designated angles on the waterproofing.
On a note! A specialist first carries out dry, step-by-step laying of a brick stove for a home. Only after this does a professional use a mortar to fix the bricks.
- For the subsequent, second row, use 30.5 bricks.
They are also placed close to each other. In other words, they create a continuous plane. Where the fireplace will be, the craftsman attaches metal brackets. They are usually made from reinforcement. They are necessary so that in the future it will be possible to secure the fireplace grate by welding.
One of the options for a fireplace grate attached to pre-installed brackets Source kuznia-diadi-vani.narod.ru
On a note! If a specialist uses a grid with brackets in his work, then he fixes it on the masonry while creating the second row.
- To lay the third row you need 19 bricks.
They begin to create combustion walls and channels for the movement of combustion products. At the same time, do not forget to leave openings where doors will later be installed to ventilate and clean the interior of the stove.
On a note! The master always provides a minimum of 17 cm between the oven and the smoke channel, which will be formed in the vertical direction.
The cleaning and venting doors are also installed at this stage of work. They are attached using wire by twisting it. In this case, such fasteners are embedded between brick rows.
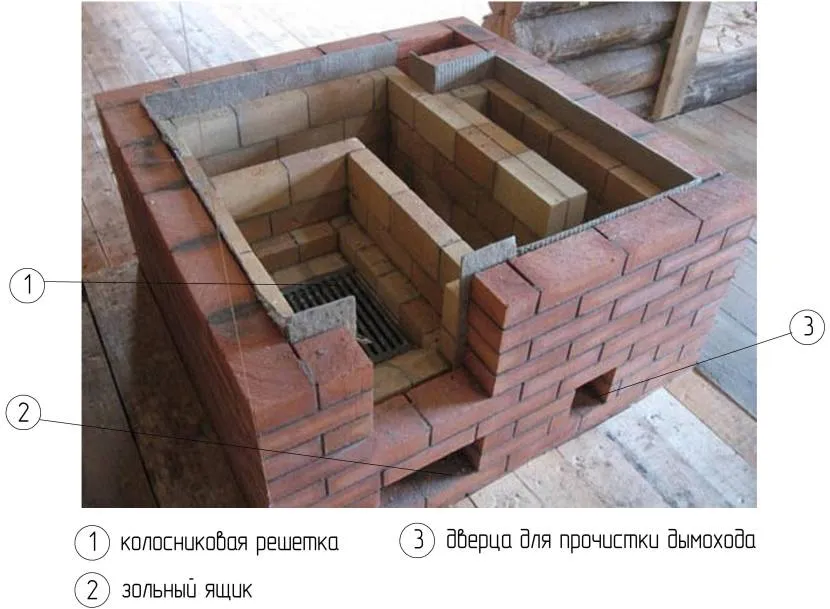
Cleaning and blowing chamber (position 2 and 3) in the furnace masonry, where the corresponding doors are subsequently installed Source ahbanya.ru
- Laying the fourth row when installing a stove is carried out using 18 bricks.
With their help, all cleaning and blower doors are thoroughly secured. In this case, the seams between the rows may turn out wider, because there is still wire here.
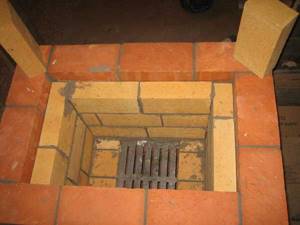
- For the next, fifth row, use 24 brick blocks.
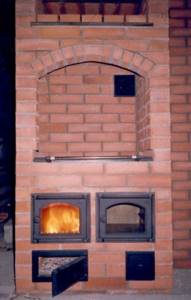
When a specialist places them above the blower chamber, then he first makes grooves in them. They are needed to secure the grate. At the same time, the master prepares a place for the oven. It is usually a metal box. To mount it, the height of the front bricks must be 2.5 cm.
Important! The installation of a stove in a private house made of brick with a stove is carried out using heat-resistant fireclay blocks. They are used for laying out firebox walls.
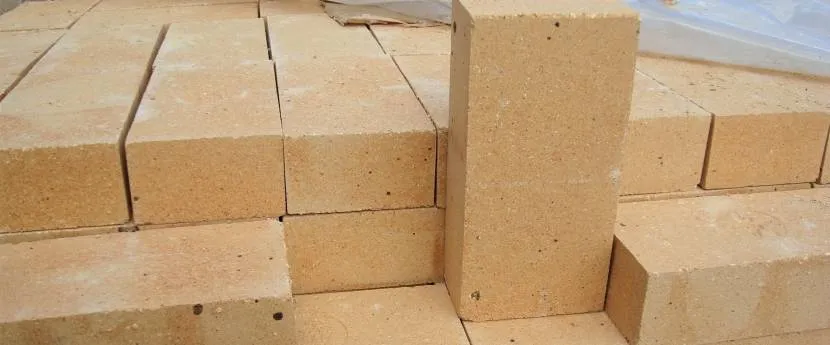
Kiln fireclay bricks Source taldom.favoright.ru
On a note! The oven metal box is installed in its place only after it is lined with asbestos. The material creates a gap that will allow the material to expand when heated and maintain its integrity.
Useful tips for laying swedes
- During the entire laying process, try to monitor the thickness of the seam. It should be 5 mm.
Seam between firebox and masonry
- To prevent the brick from absorbing moisture from the mortar during laying, it is recommended to wet it before construction work. It is enough to dip it in water for at least 1 minute so that it absorbs a sufficient amount of moisture.
- Do not forget to check the vertical and horizontal evenness of the masonry. To do this, use a building level and a plumb line. Use corners to check the evenness of the corners of the oven.
- After laying the stove, wait 2 weeks until it dries well. If you build a stove in the summer, it will dry out naturally. In cold weather, use a fan.
- Any furnace master will tell you that the less metal in the furnace, the better.
Leave a gap between the seams
But for hanging masonry you cannot do without metal corners, because arched vaults are not suitable here (Swedish vaults are distinguished by their compactness). The only condition that must be observed is that you cannot do anything close to the iron or place the iron on bare brick. In all places where it is planned to join metal parts with brick, a layer of mortar of 5-6 mm should be laid.
- When laying the hob on a brick, it is necessary to lay a layer of clay mortar on it. This will protect the brick from heating.

Swedish stove
By following our detailed instructions, you will definitely be able to arrange the oven correctly. A useful video will help you clearly understand the masonry scheme.
Video description
You can clearly see one of the options for arranging a Swedish stove without a fireplace compartment in the following video:
- The next, tenth row is created with bricks in the amount of 17.5 pieces.
They cover the front part of the place where the oven will be. The blocks are mounted directly on metal strips. Their installation allows you to combine the space above the firebox and oven. In this case, cutouts are first made at the top of the bricks used. They will allow you to subsequently lay the cast iron hob.
On a note! At the same stage, a place is designed where in the future a small door will be installed, allowing the upper part of the fireplace chamber to be cleaned.
- For the next, eleventh row, use 18.5 bricks.
From these they begin to build the walls of the brewing compartment, where there is already a cast iron panel. The brick blocks laid on the right should close the gap between the fixed cooking plate and the already created wall. At the same time, the blocks that are used to create the back wall of the fireplace chamber are pushed forward 4 cm and then pulled together. This allows you to continue creating the inclined surface.
Arrangement of heating and cooking furnaces
In recent years, they have increasingly resorted to using ordering in the construction of heating and cooking stoves. This is due to the widespread use of traditional heating systems in most private homes. A couple of hundred years ago, a well-built stove was a mandatory element for any house in the village, providing warmth and comfort in the house.
With the help of such a unit, it was possible not only to solve heating problems, but also to provide conditions for cooking. At the same time, such a device could also serve as a place to sleep. For this reason, the interest in skilled stove makers who were hired to build stoves is understandable.
Video description
Another option for creating a stove is shown in the video:
- Further, in the twelfth row, exactly 18 bricks are used.
With their help, the door of the cleaning compartment is closed and the formation of the rear wall of the fireplace chamber continues.
- At the next stage - for the thirteenth row, 19 bricks are used.
When using blocks in a fireplace compartment, they are pulled out and cut away. The same row allows you to raise the walls of the open hob.
- Also 19 bricks are used in the next, twentieth row.
They begin to form a shelf above the fireplace insert. To do this, each brick is pushed 3 cm not only forward, but also to the side. The result is an overhanging row over the firebox.
- Further, in the twenty-first row, 20.5 bricks are used.
With their help, the walls of the cooking compartment are completed and the construction of the fireplace mantel continues.
- Then, in the twenty-second row, 15.5 bricks are laid.
They are reinforced with a steel angle above the cooking chamber. Metal strips are also used above this compartment. They are installed in the middle and rear part, the so-called ceiling of the cooking chamber. The elements are needed to subsequently cover the entire tier.
Classification of heating and cooking stoves
Furnaces of this type are divided by material. They come in both brick and metal. In addition, there is their classification according to the method of application:
- stationary structures - they are built or placed at the place of use once and for all without the possibility of changing location;
- transportable stoves – can be transported by means of transport in a non-disassembled form;
- mobile structures - have a compact size and can be collapsible. Available for transportation in the luggage compartment, and even in bags. They can work without special equipment.
The cooking surface plays an important role in the functions of the stove. On the one hand, it must be designed so that heat loss is minimal, but, on the other hand, it must heat the dishes as much as possible
The best option for constructing the surface is cast iron. A solid stove will be used to heat food, and cooking and frying will be done on a burner with removable inserts.
Briefly about the main thing
A brick heating and cooking stove, installed by professionals, may additionally have a fireplace section, a heated bench, a chamber for drying vegetables and other useful compartments. Today, many projects of such structures for private houses have been created. Moreover, they have a T-shape, wide or narrow design.
The stove is selected depending on the area of the room and the entire residential building. Its location is also taken into account. After all, it can be located at the corner, in the middle or against the wall of the room.
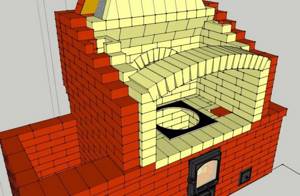
One of the interesting options is the Swedish stove-fireplace, designed by Ryazankin. This is a small but functional design. During the laying of each row, from 5 to 36 bricks are used.
Ratings 0
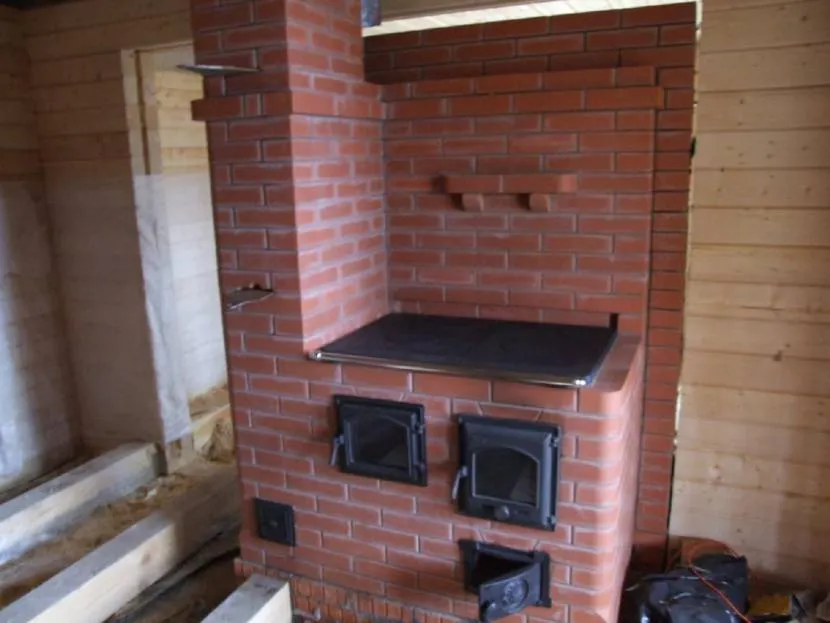
Operating principle and design of the Swedish oven
The compact dimensions of the stove (1020x885x2030mm) allow it to be placed in a small country house or dacha. But despite its small size, these dimensions of a Swedish stove are enough to effectively heat a room of 30-35 square meters.
Depending on the type and type of Swede, the designs will vary. So, for example, to equip a Swede with a sunbed, it is necessary to equip horizontal channels with a winter/summer mode. Thanks to a special valve, which is installed in a straight vertical channel, it is possible to block the latter.
In winter, such a valve closes, and the heat moves in a large circle, warming up the entire stove along with the sunbed. And in the summer, the damper opens a direct outlet for warm air into a vertical pipe through which the gases escape outside. This makes it possible to use only the hob and oven without heating the room.
Swedish stove
The “Dutch” design was taken as the basis for the Swedish stove. This model was already very popular, but it did not allow for effective heating of the room, and the fuel consumption was too high.
Taking into account the harsh climate of Scandinavia, the developers improved the “Dutch” model and added a hob with an oven. Thus, elements were added not only for cooking, but also for heating water and drying clothes.
Whatever the design of the stove - with a sunbed, with an oven or just a stove - the principle of its operation will be the same: channel, like the “Dutch”.
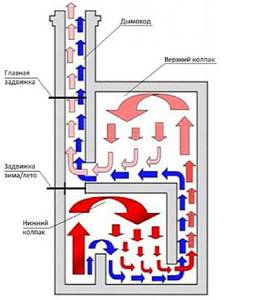
Swedish: scheme
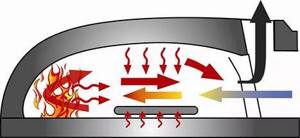
The metal oven is located on the side of the firebox and is designed to directly transfer heat into the room. But cooking and baking is not the main function of the oven.
After lighting the wood, it warms up in literally 5 minutes. The figure shows why the oven heats up so quickly.

Swedish design
Before going down, combustion products heat the oven in the top and sides. On the other hand, the stove is heated by the firebox. The stove warms up from the firebox, heating the room itself.
The upper part was originally designed for the purpose of drying clothes; it is heated by the stove and the ducts running behind it. The channels, going around the entire oven, go into vertical channels and transfer heat to things that are hung out to dry.
How the Swedish oven works
The design of the Swedish stove is the result of improved engineering. Unlike Russian and Dutch stoves, it has a more complex device with high efficiency. It has significantly greater thermal power and heat transfer.
If we take the same amount of material and fold the “Dutch”, we will get a power of 2500 kcal/hour, while the Swede will produce all 3500 kcal/hour. In this case, it will be enough to lay only 2 portions of firewood per day to keep the house warm.
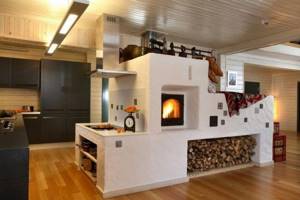
Swedish woman in a modern interior
If in Scandinavia the Swedes were traditionally installed between the kitchen and the bedroom so that on a cold winter night it would warm the room, today in stylish and modern houses you can increasingly find a stone structure that stands between the living room and the kitchen.
At the same time, it performs a double function: it serves for cooking and is the main decorative decoration of the living room. On one side it can be equipped with an oven, and on the other with an open fireplace, decorated with an openwork forged damper.
Swede with fireplace
The high efficiency and efficiency of the stove is due to a complex smoke exhaust system, which allows rational use of the heat generated by burning wood. One of the undeniable advantages of the design is the ability to create winter and summer versions of the stove.
The fact is that each type has its own smoke path. This makes it possible to cook food in summer without heating the room.
Many summer residents are familiar with the situation when, at the beginning of the heating season, when lighting the stove, the room begins to smoke. There is also a separate smoke exhaust system, which allows you to effectively use the stove with different functions in both winter and summer.
What metal to use
Before the manufacture of the furnace, it is imperative to inspect the metal for defects - corrosion, cracks, bulges. If they exist, they must be processed by grinding, welding, and stamping.
The reliability and strength of the stove is given by the material from which it is assembled. Suitable metals for the thematic problem include:
- Ordinary steel;
- Heat-resistant steel;
- Cast iron.
If the stove is made from a ready-made container, then sometimes a can or fire extinguisher acts as the latter. The most durable material is steel. But this indicator (strength) also depends on thickness. If it is 10-18 mm, then the stove will last a long time.
If you have a large amount of cast iron, you will have to make a heavy stove with walls 6-25 mm thick. Despite their enormous weight, the corresponding structures heat up quickly and retain heat for a long time. In other words, cast iron stoves have good efficiency.
Furnace projects
Before you start considering either typical classic stove designs, or more exotic project options, you first need to talk about ready-made projects that can be found in large quantities on the Internet. If, for example, you order a project for a specific location, but the cost will be more than 1000 rubles, while a ready-made design on the Internet will cost no more than 100 rubles. But don’t rush, because in any case, in pursuit of savings, you shouldn’t forget about the mandatory requirements for building a stove.
"Slow" ovens for cooking
Cooking ovens not intended for long-term operation, the so-called slow ones, are used mainly in the camping version. At the same time, there is no need to talk about efficiency, because in this case, it does not play any role, because the pot cannot be boiled at a high efficiency. In this case, the main things for the stove will be its mobility, compactness, relatively low weight and the ability to ignite with fresh raw fuel.
Industrial manufacturers currently produce a large number of stoves similar to the tourist wood chip stove. There are also supercharged stoves that run on two AA batteries. Despite the fairly large variety and assortment of such stoves, fishermen and hunters are increasingly building their own versions of stoves, for which ordinary tin cans or mugs of different diameters are taken.
Professional tourists, who are accustomed to covering 20 or even more kilometers a day, used to use for such purposes a military-type mini-cooking stove, which at that time was included in the supply of some communications hardware in the USSR. This stove is convenient because the pan for the pot can also be used as skewers.
Such a stove is already complete, for long-term burning. In order to cook a whole pot of soup from the finished concentrate, sometimes only 2 tablets of dry fuel or a small pinch of wood chips were enough. There were cases when they even used foot wraps, but the smell was unbearable.
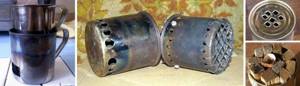
In the West, another type of design is common, which is a collapsible stove, the design of which includes 1 or 2 sheets of tin. Such a stove takes up virtually no space while camping, which is very important, and at the same time it weighs as little as possible. For a small half, the universal sheet needs to be rolled into a cylinder, and for a large half, add the left sheet.
If you systematically use a stove made from a tin can, it will burn out only after about 3-4 days. This is very convenient, since it is a whole weekend, even with a reserve. If you are planning a longer trip, you will need to take additional side inserts with you.
Basic concepts for making your own brick kiln
To lay the furnace, you can contact specialists. But to save money, you can make a brick oven with your own hands. This will not be difficult even for a beginner, as it does not require special knowledge.
First you need to choose the type of stove, then find a masonry diagram. There are many DIY brick oven designs on the Internet for every taste.
After the scheme has been found, it is necessary to make a foundation. It should be slightly larger than the oven itself on each side.
The chimney is also made of brick. After completing the laying of the stove, you can line it with finishing materials to give it a beautiful look.
It is also very important to choose the correct installation location. If the stove has a cooking function, it is better to install it so that the cooking part is in the kitchen and the heating part in the living room.
Problems when building a mini-oven with your own hands
Amateur stove makers, due to inexperience, make mistakes, which then lead to problems. Let's look at the most common cases:
- Laying stoves with deviations from the design. As a result, there is no normal draft in the smoke ducts, and the walls heat up unevenly. The solution to the problem will be to disassemble the stove and lay it according to proven schemes.
- Laying stoves “by eye”, without using a level, frame, plumb lines, or rules. The device warps, the center of gravity shifts, and during operation the device collapses faster.
- Incorrect preparation of the solution. The masonry is cracking and crumbling. A temporary solution to the problem is to purchase a factory-made mixture and seal the cracks with a new solution. If the masonry cracks constantly and deeply, the stove will have to be moved.
- Firebox of a freshly built and wet device. This will lead to cracking of the masonry, which will need to be covered with mortar.
How often should you light the stove?
Taking into account how often fuel has to be loaded, all units belong to one of the groups listed below:
- periodic action. Firewood or coal is added from time to time. The combustion temperature can reach 1000 0C. To avoid fire and premature destruction of the structure, the wall thickness should start from ¾ brick;
- continuous burning. Heat is not accumulated. The density of the walls does not exceed ½ stone. The firebox is of shaft type. In the standard version, firewood smolders for up to a day. Energy is released evenly, in relatively small portions.
The second type of firebox requires large volumes of oxygen to operate. They are recommended for homes with permanent residence. At dachas and cottages used only on weekends, it is better to choose designs with periodic action.
In relation to the previously discussed types of equipment, the following must be indicated:
- Russian stove. During the cold season it is heated continuously. The body should not cool down. Otherwise, condensation will accumulate in the channels. The brick gets wet and cracks during subsequent ignition. In the summer months, by moving the valves, the fumes from the firebox are directed directly into the chimney. There is no heating effect;
- Dutch. After ignition, it warms up in a few minutes. But it cools down just as quickly if you don’t close the view in time. Recommended operating mode: continuous smoldering;
- Swede. In winter, it cannot be cooled completely due to accumulating condensation. The masonry can completely collapse within a few months;
- bell-shaped Operation in any mode is allowed. Warm up in a few minutes.