What is extruded polystyrene foam?
Not everyone clearly understands what polystyrene foam actually is. In general, this is nothing more than ordinary and well-known foam plastic, used in everyday practice, mainly for packaging fragile items. This is a durable, lightweight, heat-saving, biodegradable and almost insoluble material obtained by filling styrene granules with gas and then heating them.
When exposed to temperature, the granules “swell” until they occupy the entire volume available to them and sinter together.
Extruded or extruded polystyrene foam is distinguished by a special manufacturing technology. For ordinary polystyrene foam, polystyrene granules are simply heated with water vapor, while to obtain EPS, several processes are used at once: the granules are mixed and heated, a foaming agent is introduced, and then extruded under high pressure, i.e. pushed through the molding hole.
This technology provides greater uniformity and, therefore, greater strength of EPS compared to foam plastic.
Pros and cons of EPS
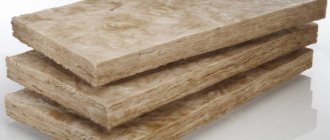
Expanded polystyrene insulation at the lower level of the building confidently competes with the more familiar mineral wool. The latter loses its effectiveness when wet, so it is not advisable to use it underground. Expanded polystyrene will absorb less than 1% of its total volume during a whole month of direct contact with water (for example, with groundwater that becomes active in the spring). In addition, this material does not rot, is not susceptible to chemical influences and can withstand up to a thousand freezes without deforming or losing its properties.
The main positive quality of extruded polystyrene foam, which is extremely important for thermal insulation of foundations - low thermal conductivity - is explained by its unique closed-porous structure. Expanded polystyrene is, in fact, a cluster of closed cells filled with gas. Together they form a kind of air cushion that does not release heat from the inside and does not let in cold from the outside. That is, EPS ideally meets the requirements that high-quality insulation must meet.
The density of expanded polystyrene significantly exceeds the “ceiling” required to insulate the basement and basement (up to 35 kilograms per cubic meter).
Finally, the clear benefits for consumers are:
- light weight of the material;
- ease of cutting;
- ease of installation, ensured by connecting tenons and grooves along the edges of the slabs;
- resulting from the previous point, the ideal joining of the plates, so that the cold will not penetrate between them.
Expanded polystyrene also has its negative sides. The main one is the flammability of the material. Treatment with a protective compound will help solve this problem.
When and in what order to insulate?
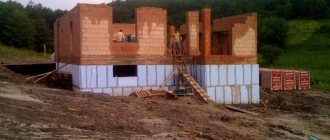
The foundation is insulated with extruded polystyrene foam both during the construction process and when the house is already ready. You don’t need to be a professional to do everything yourself - EPS processing methods do not require any special skills.
Thermal insulation of the basement floor requires strict adherence to a certain procedure:
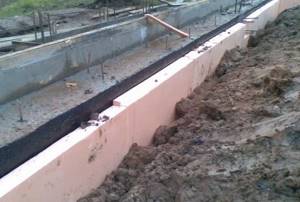
- foundation preparation;
- installation of waterproofing material;
- laying insulation;
- installation of a protective layer;
- final finishing of the base;
- backfilling the trench;
- installation of a blind area.
We provide protection to the insulation
If the work is carried out in a region with loose, soft soil without the inclusion of stones, then this point can be skipped.
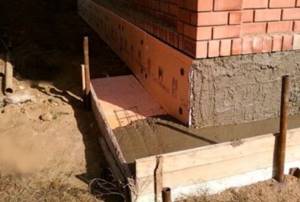
If the soil contains stones, then when buried, they may well damage the soft polystyrene foam - because of this, the thermal insulation will become less effective. To prevent this, you need to provide the material with reliable protection. The easiest way to do this is with regular cement plaster. It is enough to lay it in a layer of 5-10 millimeters to reliably protect the polystyrene foam from mechanical influences.
After applying the plaster, you need to let it dry. Experts say that the optimal formula for determining drying time is 1 day per 1 millimeter of thickness. Of course, it is worth considering the humidity and temperature of the surrounding air. But after 10 days you can confidently bury the trench dug at the beginning of the work.
Do-it-yourself insulation of the foundation with extruded polystyrene foam is completed. Now you can be sure that your home will always be warm and cozy.
In addition to polystyrene foam you will need:
- mastic or roofing felt;
- gravel;
- glue;
- mushroom dowels;
- putty or polyurethane foam;
- level;
- notched spatula;
- cement mortar;
- sand;
- reinforcing mesh;
- roller
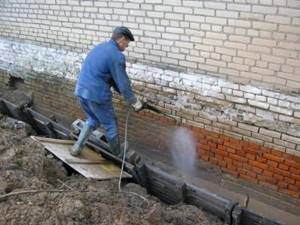
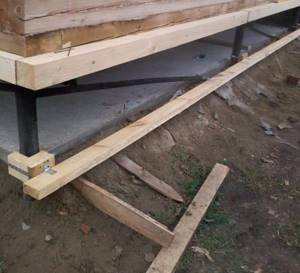
When all the materials have been prepared, a trench is dug along the perimeter of the foundation. You need to dig to the freezing level, that is, to a depth of 1.5-2 m. To make it convenient to work in the trench, its width should be 0.8-1 m. Of course, soil excavation is carried out exclusively by hand, since equipment can damage the foundation. The walls of the base must be thoroughly cleaned of soil, unevenness and cracks must be repaired with mortar.
Materials and products used during installation
To perform foundation insulation work you will need:
- polystyrene foam sheets. To determine the amount of extruded polystyrene foam, it is necessary to measure the area of the foundation and, according to these indicators, purchase the required amount of foam;
- water-based mastic. Also, many recommend using roofing felt to create reliable waterproofing;
- crushed stone and sand to create a pillow;
- special glue for fixing the insulation;
- dowel - nails for fastening polystyrene foam sheets;
- polyurethane foam for sealing joints and eliminating holes;
- level for creating smooth surfaces;
- spatula with teeth for applying glue;
- reinforcing mesh to create durable structures;
- prepared concrete for pouring.
Only after all the necessary materials have been purchased and the tools have been prepared can you begin installation work. Using EPS is simple and accessible to every happy owner of a summer house.
General information about materials or the role of insulation in the arrangement of the foundation
First, let's understand the terms. Expanded polystyrene is commonly called a lightweight cellular material created on the basis of styrene.
Now there are 2 types of this popular material most widely represented on the market:
- Well-known polystyrene foam in technical language is called cellular polystyrene foam. This material was developed in the first half of the last century and is now one of the most popular insulation materials;
- Extruded polystyrene foam has the same base, but is produced using a different technology. Its characteristics are an order of magnitude higher, but the price of its extruded counterpart is at least 2 to 3 times higher than the cost of good polystyrene foam.
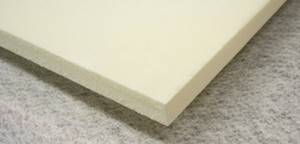
Standard sheet of extruded polystyrene foam.
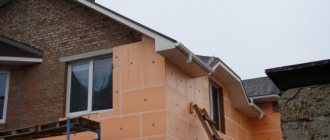
Foundation insulation technology
Insulation of the house
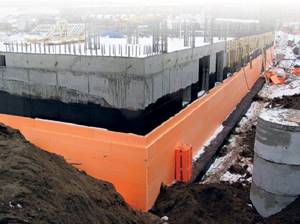
The insulation process consists of the following stages: waterproofing the surface, fastening polystyrene foam, exterior finishing of the foundation. After excavating the earth, you need to wait until the base dries well, and only then begin to insulate the walls.
Step 1. Surface waterproofing
Waterproofing the foundation with liquid rubber
Coating waterproofing with a layer of 4 mm is applied to dry, even foundation walls. Mastic should be used without organic solvents, preferably polymer or water based. The mixture is applied with a roller, trying to fill the pores and small cracks in the concrete well. You can use only roofing felt for waterproofing or combine both materials: apply roofing felt on top of the mastic and glue the joints with the same mixture.
The moisture-proof layer must completely cover the entire surface of the base and base and have no gaps.
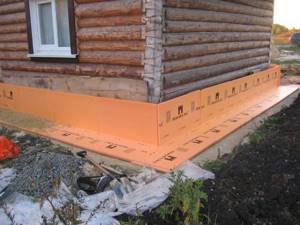
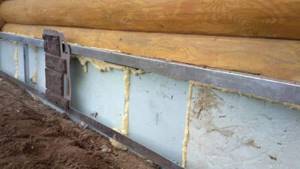
Step 2. Attaching polystyrene foam
When the mastic has dried, you can proceed to the main stage. Take the first sheet of insulation and apply glue on the back side either in longitudinal stripes or dotted, the main thing is that the glue is in the center of the sheet and along the edges. 1-2 minutes after application, the sheet is applied to the foundation, its position is checked by level and pressed firmly. The slabs are attached to the foundation only with glue, so as not to disturb the integrity of the base, and on the base the slabs are additionally strengthened with mushroom dowels.
Applying glue to polystyrene foam. Spot application of glue. Attaching a dowel-fungus. Attaching a dowel-fungus. Attaching polystyrene foam with dowels.
The next sheet must be attached to the side close to the first so that the joints are as tight as possible. Be sure to check the level of the location of each fragment - this will prevent the formation of distortions. Laying is done from the bottom up, with vertical seams recommended to be shifted half a sheet to the side. When the first layer is completely fixed, proceed to the second. Everything is repeated in exactly the same way, only the joints of the upper layer should not coincide with the joints of the lower layer - the slabs must be laid offset. Finally, carefully inspect the layer of thermal insulation and, if cracks are identified in the seams, fill them with foam.
When insulating the base, the sheets are laid immediately on the glue, and the dowels are used after 2-3 days, when the glue has already dried. Each slab is fixed at the corners and in the center; To save money, fasteners can be placed at the seams.
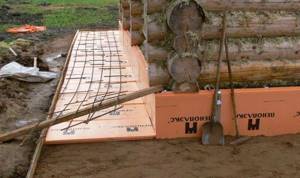
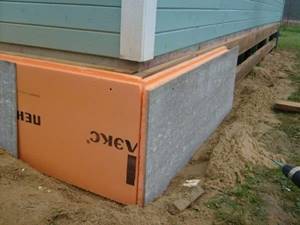
Step 3. Plastering the foundation
To protect polystyrene foam boards, another layer is needed, for example, plaster. The basement part can be covered with siding or lined with porcelain stoneware. First, fiberglass mesh is secured over the slabs using dowels with large heads. At the joints, it is necessary to lay the reinforcing material with an overlap of 10 cm. It is recommended to stretch the mesh well so that folds do not form, which will lead to cracking of the plaster layer.
Calculation of the optimal thickness and amount of material
If it has been decided to insulate the foundation of a house with polystyrene foam, you first need to find out the optimal thickness of the material and its required quantity.
The first step is to determine the purpose of the work:
- reduction of heat loss in the room;
- basement insulation;
- converting a basement into a living room.
The required thickness also depends on:
- climate;
- operation and purpose of the building;
- measures to protect against moisture condensation;
- energy saving.
The most important characteristic for foundation insulation is its thermal conductivity. The lower this value, the better the heat is retained. Thermal conductivity can be defined as the amount of thermal energy that passes through a material with an area of 1 m² if the surface temperature difference is 1 °C. This value is measured in W/m²*°C. To calculate the required insulation thickness, you need to know one more value - heat transfer resistance. It is measured in m²*°C/W. To calculate it, you can use the following formula: R=d/k, where d is the thickness of the wall, K is the thermal conductivity coefficient, and R is the required thickness of polystyrene foam.
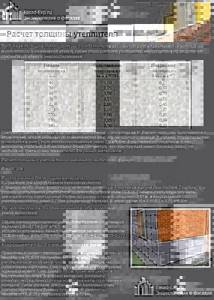
Table. Calculation of thermal insulation thickness.
Thermal insulation thickness, mm Heat transfer resistance, m2*°C/W Thermal conductivity coefficient, W/m2*°C
| 40 | 1 | 0,83 |
| 50 | 1,25 | 0,68 |
| 60 | 1,50 | 0,58 |
| 70 | 1,75 | 0,51 |
| 80 | 2,00 | 0,45 |
| 100 | 2,50 | 0,37 |
| 120 | 3,00 | 0,31 |
| 130 | 3,25 | 0,39 |
| 140 | 3,50 | 0,27 |
Important! Correct calculation of thermal conductivity will help improve the efficiency of the heating system and save a lot of money. There is no need to immediately buy too thick slabs, as their cost is higher. It is more profitable to calculate the optimal option in advance.
Calculation of insulation thickness
The required amount of polystyrene foam can be calculated by multiplying the height by the perimeter of the house and dividing the resulting value by its area. The final result will help you find out how much polystyrene foam you need in sheets. To work, you will also need glue, the consumption of which depends on the manufacturer and is indicated on the packaging.

How much insulation is needed?
Penoplex prices
Penoplex
Preparatory stage
Expanded polystyrene PSB-S
First you need to calculate how many insulation boards will be needed for the foundation. The dimensions of a standard polystyrene foam board are 600x1200 mm, thickness from 20 to 100 mm. For the foundation of a residential building, slabs 50 mm thick are usually used, laid in two layers. To find out how many slabs will be needed, the total length of the foundation is multiplied by its height and divided by 0.72 - the area of one sheet of polystyrene foam.
For example, if a 2 m high foundation is insulated in a 10x8 m house, the thermal insulation area is equal to 72 square meters. Dividing it by 0.72, we get the number of sheets - 100 pieces. Since the insulation will be carried out in two layers, it is necessary to buy 200 slabs 50 mm thick.
This, however, is a very average calculation, based on the fact that the insulation thickness will be exactly 100 mm. But this value can be greater - it all depends on the climatic conditions of the region, the foundation material, and the type of insulation.
There is a special system for calculating thickness, which requires knowing the R index - this is a constant value of the required heat transfer resistance established by SNiP for each region. You can check it with your local architecture department, or take it from the table below:
City (region) R – required heat transfer resistance m2×°K/W
| Moscow | 3.28 |
| Krasnodar | 2.44 |
| Sochi | 1.79 |
| Rostov-on-Don | 2.75 |
| Saint Petersburg | 3.23 |
| Krasnoyarsk | 4.84 |
| Voronezh | 3.12 |
| Yakutsk | 5.28 |
| Irkutsk | 4.05 |
| Volgograd | 2.91 |
| Astrakhan | 2.76 |
| Ekaterinburg | 3.65 |
| Nizhny Novgorod | 3.36 |
| Vladivostok | 3.25 |
| Magadan | 4.33 |
| Chelyabinsk | 3.64 |
| Tver | 3.31 |
| Novosibirsk | 3.93 |
| Samara | 3.33 |
| Permian | 3.64 |
| Ufa | 3.48 |
| Kazan | 3.45 |
| Omsk | 3.82 |
Vertical installation method
Foundation insulation scheme
Foundation insulation options
The vertical option is suitable for both houses that are still under construction and those that are in operation. It is best to use it for a house under construction. This method consists of the following steps.
Step 1. The surface must first be dug up, cleaned of soil, debris, including construction debris, mold, dust and grease stains.
Excavation
Step 2. Then it is leveled with cement mortar and waterproofing is carried out without using solvent-based mastic. This is necessary in order to avoid the foundation getting wet from groundwater.
Prices for bitumen mastic
Bitumen mastic
Preparation for installation of insulation
Foundation waterproofing
Step 3. Contact glue is diluted and, while it is maturing, the lower boundary of the installation is marked on the working surface. The slabs can be buried a little.

Rules for fixing polystyrene foam and polystyrene foam
Step 4. The glue is applied in strips around the perimeter and in the center, after a minute the slab must be pressed to the base and held in this position for several seconds. If necessary, align it and attach the next one, inserting it into the groove. It is better to use a level to prevent distortions. If a second layer is needed, it is positioned so as to overlap the seams of the previous one. This arrangement of the plates contributes to better insulation.

How to insulate a foundation
Rules for bandaging foam at corners
Step 5. The part of the foundation that will remain underground is no longer strengthened in any way - then it will still be pressed down by soil.
Step 6. After the glue has dried, the slabs are attached to the remaining surface using dowel nails. They are driven into the surface by 4 cm.
How to insulate a foundation with polystyrene foam
Insulation of the foundation with penoplex
An example of foundation insulation with two layers of penoplex
Insulation of the blind area together with insulation of the foundation
Video - Procedure for insulating the foundation with polystyrene foam
Basic properties of the material
Foam plastic has a long service life . According to experts, polystyrene foam board can not collapse for 60–80 years.
Also contributing to its long service life is the fact that it is not susceptible to rotting as a result of the biological influence of microorganisms on it, but if the material is not protected with special materials or chemical solutions, then mold can grow on its surface.
The disadvantage of polystyrene foam for the foundation is that rodents love to live , but with proper installation, this phenomenon can be minimized.
The material is also easy to cut using almost any sharp tool, and this is also important when working with insulation, as it allows you to work with it quite comfortably.
Tip: proportional to the density of the foam, its thermal insulation characteristics increase, and moisture absorption rates decrease. When choosing polystyrene for insulation, you need to remember this and, if possible, use a denser one.
Horizontal installation method
Slab foundation insulation scheme
Horizontal insulation is used for slab and strip foundations, for which polystyrene foam up to 10 cm thick is used.
Step 1. First, the site is cleared of soil, leveling the bottom, the last few centimeters are removed manually.
Step 2. The base is covered with sand, which needs to be compacted.
Step 3. Temporary formwork is performed, which is filled with a layer of concrete without reinforcement.
Step 4. Then, when it hardens, laying the slabs begins.
Step 5. A thick film is placed on top as waterproofing, which is glued with tape.
Step 6. Formwork is made, then reinforcement is made and the foundation is poured.
Step 7. When the formwork hardens, it is removed and additional thermal insulation of the side walls is performed.

Installed insulation
Video - Monolithic slab foundation. Insulation and waterproofing
Video - Monolithic slab - technology
Installation of blind area
Insulation of the foundation cannot be considered complete without final insulation of the base and arrangement of the blind area. The latter is a narrow path along the perimeter of the building, concreted or covered with asphalt. Its width varies depending on the extension of the roof, the minimum is 600 mm. The sloping surface protects the foundation from rain and melt water flows. In addition, the blind area insulates the soil along the house, which is especially important for regions with cold climates.
Insulation of the blind area
In frosty winters and clayey soil prone to uneven freezing, for additional insulation it is advisable to equip the blind area with extruded polystyrene foam slabs. The strength and elasticity of this material fully corresponds to the functions assigned to the blind area.
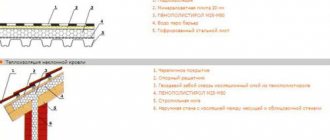
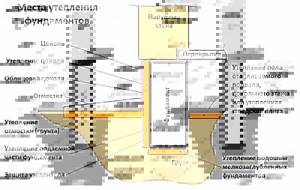
Insulation of various types of foundations with polystyrene foam
Insulation of a shallow strip foundation
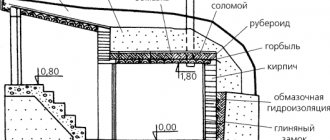
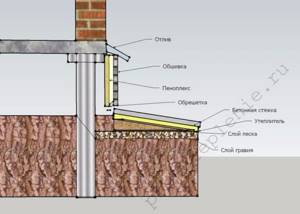
The main elements of a shallow foundation are shown in the figure.
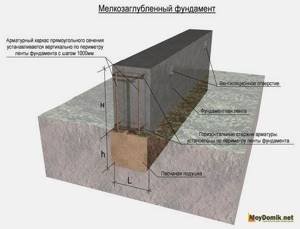
The peculiarity of the design is that the freezing limit is much lower than the foundation laid. Thus, insulation of a strip foundation with polystyrene foam should be carried out over the foundation area outside the building, and over the floor area inside. This is the only way to achieve high-quality insulation and a significant reduction in heat loss.

Foundation depth
To insulate a shallow foundation, you do not need to dig a deep trench. It is enough to “dig out” the foundation. After all, there is no point in digging to the point where the soil freezes. And the width may be smaller, sufficient for installing polystyrene foam boards.
Further work is performed according to the same principle as described above.
2. Insulation of slab foundations with polystyrene foam
Insulation of a slab foundation with polystyrene foam. A slab-type foundation is called floating because a house built on it seems to float on it, like on a raft. It is used where eroded, weak or bulk soils predominate.
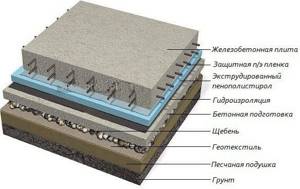
The insulation of a slab foundation with polystyrene foam is similar in technology to the insulation of a shallow strip foundation. That is, you need to perform vertical insulation of the slab with polystyrene foam. To do this, install several layers of expanded polystyrene with a total thickness of 100-150 mm. along the perimeter of the slab. It should be noted that the depth of the slab rarely exceeds 200 mm. This is due to the fact that as the thickness of the slab increases, the load on the soil increases, thus the house sags. But the main advantage of this type of foundation is reduced to nothing. Next, horizontal insulation is performed. This is due to the fact that the main direction of heat loss is the horizontal surface of the slab, the place where it meets the ground. Related article: Do-it-yourself wooden tool box
The sequence of layers is shown in the diagram.
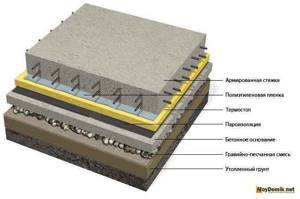
Insulation of slab foundations with polystyrene foam
It is worth noting that high-quality insulation of a slab foundation with polystyrene foam is possible only at the stage of its construction. Otherwise, you will have to perform insulation from the inside, and this approach to insulation has several disadvantages, which will be discussed below.
3. Insulation of the pile foundation with polystyrene foam
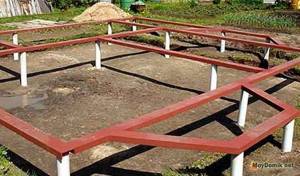
Insulation of a pile foundation with polystyrene foam. A feature of a pile foundation is the use of piles that are driven into the ground to a depth of more than 1 m. A grillage made of reinforced concrete, wood or metal is placed on the piles. Consequently, insulation of a pile-screw foundation with polystyrene foam is carried out by insulating the grillage. The principle of the device: polystyrene foam is laid starting from the lower level of the grillage to the first row of bricks or timber.

Insulation of a pile foundation with polystyrene foam
4, Columnar
How to insulate the outside of such a house foundation? Let's look at the workflow using the example of using penoplex. By the way, this is the answer to the question of what is the best way to insulate a columnar base from the outside.
First, a trench is built around the entire perimeter of the house, the bottom of which has a slope from the foundation walls to ensure the removal of ground moisture. The surface of the supporting structure is cleared of soil, uneven areas are smoothed out, and chips are repaired with cement mortar. Then the foundation is dried, all its elements are covered with two layers of bitumen mastic to protect the concrete from the negative effects of a damp environment. The insulation is glued to the bitumen layer with a special glue applied to the slabs pointwise. The work is carried out from the lower section, the gap areas should be minimal, they are then filled with polyurethane foam. Many people are interested in whether it is necessary to arrange a second layer of penoplex? Yes, if you want reliable protection from cold air.
How to choose the right materials
Despite the existing abundance of thermal insulation materials, only one can cope with the loads arising under the base of the foundation. This is extruded polystyrene foam, which is produced for this purpose in two variations:
- in the form of L-blocks;
- in the form of standard rectangular slabs.
Let's look at the difference between them.
L-blocks
These are L-shaped blocks that are used when installing insulated slab foundations as permanent formwork. The corner configuration is obtained by gluing together the ends of two laminated EPS (XPS) boards under pressure. The glue used is polymer based on polyurethane.
The outer surface of the L-block - in particular the shelf, which will be above the ground and will form the base part of the foundation, is protected by a chrysotile cement sheet (flat slate) glued to it. This coating not only protects the insulation from accidental damage, but also allows the finishing of the base without preliminary preparation of the base.
L-blocks are manufactured by the well-known Russian company TechnoNIKOL, under the CARBON ECO SP brand (100 cm thick, which is suitable for gas silicate houses), and the Kirov foam manufacturer STYPLEX. With the help of such blocks, you can assemble the formwork for a warm foundation slab yourself, and it will only take a couple of days. At the same time, there is no need to spend money on lumber for formwork, so it turns out profitable.
The average size of an L-block is 1200 mm in length, 600 mm in width, and 450 mm in height (base part), which is quite convenient for work. The thickness can be more than 100 mm, but this is for heavily loaded foundation slabs. In order to select the correct size of permanent formwork blocks and know exactly the required quantity, you need to have a design of the entire house, or at least separate drawings of the foundation.
L-blocks are connected to each other using a tongue-and-groove method, which eliminates the need to use mechanical fasteners. The joints are sealed with polyurethane-based sealant.
Expanded polystyrene in slabs
If L-blocks are specifically designed for insulating a slab foundation and when purchased, it is impossible to confuse them with something, then dealing with polystyrene foam slabs is somewhat more difficult for an ignorant person.
There are two types of expanded polystyrene, the properties of which depend on the manufacturing technology:
- Pressless. A blowing agent (inert solvents with a low boiling point) is added to the thermoplastic and heated until softened. The gas released during this process foams the polymer. Polystyrene, which performs the function of a thermoplastic, is easily and odorlessly welded, painted, and glued. And most importantly, it has high chemical resistance. However, this option also has significant disadvantages: low resistance to increased temperatures, relative fragility and the ability to crack. Therefore, this version of polystyrene, which we usually call polystyrene foam, is used exclusively for insulating vertical foundation surfaces. It cannot withstand the load under the base of the slab.
- Press (extrusion). Here, during production, the emulsion polymerization method is used, in which the masses are processed by casting with a preliminary reduction in viscosity by rolling. It is emulsion polystyrene that is used for molding plates using the press method (extrusion). The main goal is to obtain a mass with a reduced density, for which either a vacuum is used or the content of the blowing agent is increased. To perform extrusion, the mass of polystyrene must be homogeneous and evenly heated to 180 degrees. Having given the products their shape, they are cooled in baths filled with warm water or ethylene glycol. Cooling is carried out to a temperature that allows further processing, but not too high so that the slabs can be deformed (about +92 degrees).
Expert opinion Vitaly Kudryashov builder, aspiring author
Ask a Question
Important: Pressless polystyrene, which is called polystyrene foam, and pressed (extruded) polystyrene are very different in mechanical properties due to the different structure of the cells in the polymer. In the first, as a result of sintering of individual grains among themselves, a rather loose structure is formed - hence the weak mechanical strength. In press foam, the structure consists of durable thin layers of polymer that form a single whole.
In construction, pressless polystyrene is labeled as PPS or PSB-S, plus numbers nearby indicating the density in kg/m³. For cut slabs (type “P”), so that they can be used to insulate the foundation of a house from the outside, the density must be at least 25 kg/m³. That is, a grade from PPP 25 and above.
Extruded EPPS boards produced by thermomechanical molding are classified as “T” type. Since their structure is more durable, this type of polystyrene foam can be used to insulate foundations from a density of 20 kg/m³ (PPS20). This brand is used mainly for vertical insulation of basement or basement walls and blind areas.
Expert opinion Vitaly Kudryashov builder, aspiring author
Ask a Question
Important: For installation under the base of the foundation, where the material is subject to heavy loads, you need to take grade PPS 30 and higher. The maximum density for unpressed polystyrene foam is 35 kg/m³, for extruded polystyrene – 45 kg/m³.
The most convenient format for laying under the slab, which is offered by all EPS manufacturers, is 2400*600 mm. With the highest possible density, slabs (type 45) have the following set of physical and mechanical characteristics:
| Properties | Indicators of EPPS-45 |
| Elastic modulus | 18000 kPa |
| Compressive strength at linear deformation 2% | 167 kPa |
| Bending strength | 700 kPa |
| Thermal conductivity | 0.031 W*m*S |
| Heat capacity | 1.53 kJ*kg*S |
| Vapor permeability | 0.015 mg*m*h*Pa |
| Water absorption | 0.4% for 30 days |
| Fire resistance class | G4 |
| Life time | 50 years |
We insulate the strip foundation
The insulation process depends on the type of foundation. First of all, let's look at how the thermal insulation of the most common strip foundation is performed.
I should immediately note that the strip foundation of the house must be insulated from the outside. Only this arrangement of the insulation will allow you to achieve maximum effect. In addition, external insulation allows you to protect the base from various negative environmental influences, including moisture.
The technology for insulating a strip foundation includes several basic steps:
Stages of insulating a strip base with penoplex
Preparation of materials
So, to insulate the foundation, in addition to penoplex, you need to prepare the following materials:
- waterproofing for the foundation;
- drainage pipes;
- geotextiles;
- acrylic adhesive for penoplex.
The thickness of the penoplex for insulating the foundation should be at least 80 - 100 mm. If the slabs are thinner, they should be installed in two layers.
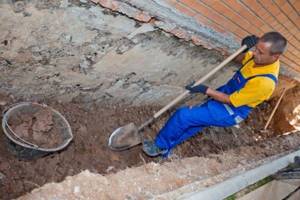
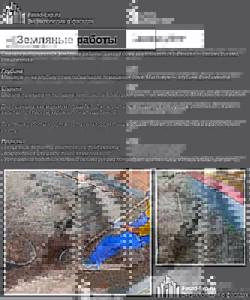
Digging out the foundation
Excavation work
The best time to insulate the foundation is at the stage of building a house. This will avoid doing a lot of unnecessary labor-intensive work.
If you have to insulate a house that has already been in use, you must perform the following excavation work:
- First of all, you need to dig a trench around the perimeter of the house to the full depth of the foundation. The width of the trench should be at least a meter and a half. After digging out the foundation, it must be allowed to dry ;
- While the foundation dries out, drainage should be done around the perimeter of the house. It is especially necessary if groundwater is close or if your region is characterized by heavy floods.
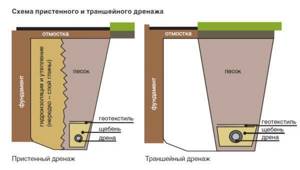
Drainage diagram
Drainage needs to be installed at the level of the foundation sand cushion. To do this, at a distance of about half a meter from the foundation, along the perimeter of the house, you need to dig a trench to a depth of 40 centimeters.
The bottom of the trench should be covered with a layer of sand ten centimeters thick, and then with a layer of crushed stone of the same thickness. After this, the trench needs to be covered with geotextile with a fold over its edges, as shown in the photo below.
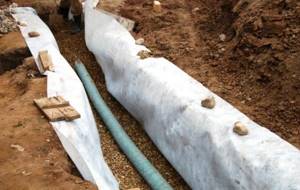
Laying drainage pipes
Next, drainage pipes need to be laid in the trench. Keep in mind that it is necessary to ensure a pipe slope of at least 2 cm per meter. After this, the trench must be filled with crushed stone and the edges of the geotextile must be folded so that they wrap around the pipe.
Drainage pipes should be diverted to a storm drain.
It is necessary to insulate the foundation in dry weather. It is best to carry out work in late spring or summer.
This completes the excavation work.
Foundation preparation
Now you need to prepare the foundation walls for insulation.
To do this you need to do the following:
- after the foundation has dried, it must be thoroughly cleaned of soil residues, as well as broken pieces of concrete, etc. To do this, you can use a metal brush;
Cleaning the foundation from dirt
- If there are protruding parts on the foundation walls that could break the insulation, they need to be knocked down. The smoother the surface, the more durable the thermal insulation will be;
- Next you need to waterproof the foundation using bitumen mastic. You can apply mastic using a paint roller.
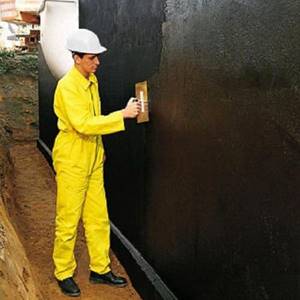
Applying mastic to the foundation
The coating layer should be 2-4 mm. Try to fill all the depressions, cracks, etc. with mastic so that a continuous waterproofing layer is formed.
This completes the preparation of the foundation. Now, before attaching the insulation, you just need to wait until the mastic has completely dried.
Foundation thermal insulation
So, all the preparatory operations have been completed, now we insulate the foundation with penoplex.
This work is carried out as follows:
- glue should be applied to the back side of the penoplex. It is best to use acrylic foam adhesive. The composition is applied around the perimeter of the slab, as well as in the center;
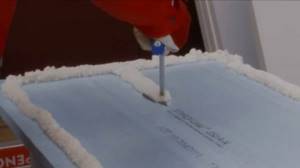
In the photo - applying glue to penoplex
- then the penoplex needs to be glued to the surface of the foundation. Start working from the corner and glue the sheets in rows from bottom to top. Try to place the sheets as close to each other as possible. Some types of extruded polystyrene foam are connected to each other using a tongue/groove system;
We begin excavation work and leveling of the foundation
First of all, you will have to arm yourself with a shovel and expose the foundation. This is perhaps the most difficult part of the job.
The depth of the trench should allow working with the lower layer of the foundation. And the width ensures the convenience of working in it.
After completing the excavation work, it is advisable to leave the foundation and plinth open for 24-48 hours (in hot, dry weather, 10-12 hours is enough). The stuck soil should dry out - then it will be easier to remove. Taking a coarse synthetic brush in your hands, walk over the entire surface, removing not only the soil, but also crumbled concrete (this often happens during long-term use).
After this, you need to level the working surface. Expanded polystyrene is a sheet material. Therefore, applying it to a surface with protrusions will not work - the sheets will not fit tightly to each other, forming cracks.
For leveling, a regular solution is suitable. You should take high-quality cement (grade M400 or higher) and sand in a ratio of 1:4. Having diluted them with water to the consistency of thick sour cream, the solution must be applied to the surface, eliminating all irregularities. If a very thick layer is needed for leveling, then the solution will have to be applied in several passes, giving each layer 2-3 days to dry. When applying a thick layer at a time, there is a high risk that it will simply slide off.
After completing the leveling, it is advisable to allow the solution not only to set, but also to dry completely - 28 days . But if this is not possible, you need to wait at least 10-14 days for most of the moisture to evaporate. Otherwise, in winter, the temperature of the foundation will drop below zero and the water will freeze, which contributes to the rapid destruction of concrete.
Insulation of a pile foundation
Now let's look at how to insulate a foundation on stilts. In essence, this operation consists of arranging a “warm” base.
The insulation technology in this case also includes several stages:
Stages of foundation insulation
Preparation of materials
To insulate a pile or columnar foundation, you will need the following materials:
- boards and beams for assembling the sheathing;
- polyurethane foam;
- antiseptic impregnation for wood;
- material for covering the sheathing - this can be plinth panels, aceid or other suitable covering.
Insulation scheme for a columnar foundation and blind area
Arrangement of the blind area
You can start work by arranging a blind area, which is performed as follows:
- along the perimeter of the house you need to dig a trench about forty centimeters deep and a meter and a half wide;
- then the bottom of the trench must be covered with a layer of sand about 10 centimeters, and it must be compacted thoroughly;
- then fill in the same layer of crushed stone and compact it too;
- a trench should be dug along the outer edge of the blind area and drainage should be made according to the scheme described above;
- after that, lay waterproofing, for example, roofing felt, on the crushed stone. As in the previous case, the joints need to be glued with bitumen mastic;
- then penoplex is laid on top of the waterproofing, and then the screed is poured.
This completes the installation of the base.
An example of attaching a sheathing to a pole
Frame assembly and insulation
First of all, you need to make the crate with your own hands. I must say that there are quite a lot of options for its manufacture.
Most often, the sheathing is done like this:
- Boards or beams are attached to the posts around the perimeter of the house. If the piles are metal, you can weld planks to them and secure the boards with bolts. Also, bars are often attached to the piles using clamps. The boards are attached to these bars using self-tapping screws. In some cases, the sheathing is attached directly to the walls. In any case, the sheathing should be positioned vertically. Keep in mind that all wooden structural elements, including the foundation grillage, must be treated with antiseptic impregnation;
- then the horizontal boards need to be connected to each other by vertical posts;
Penoplex can be fixed to the inside of the frame
- Now you need to secure the penoplex to the frame. For these purposes, you can use ordinary nails, the only thing is that washers should be placed under the heads so that the penoplex is securely attached to the foundation;
- The gaps between the plates must be filled with adhesive foam or even regular foam.
If the house is built on heaving soil, a gap of about 10-15 centimeters must be left between the base (sheathing) and the blind area.
At this point, the insulation of the pile foundation with penoplex is completed.
Aceid sheathing
Base covering
The final stage is covering the frame. To do this, you can use plinth panels. They are attached to the sheathing or walls of the house with screws that are screwed directly through the foam.
The only thing is that a starting strip will first be installed along the perimeter of the sheathing from below, into which the lower edge of the panels is inserted. The foam is on top and the upper edge of the panels is covered with a shimmer.
In the case of finishing the base with aceid, the sheets are attached to the sheathing using nails. Subsequent finishing of the aceid can be done with decorative stone, tiles or other material.
Protecting the foundation from moisture
The next step will be to protect the foundation from moisture.
Precipitation, groundwater - all this leads to the fact that with constant contact with wet soil, concrete will absorb moisture. As mentioned above, this can cause rapid destruction of the foundation. To prevent this from happening, you need high-quality waterproofing. Some experts recommend using mastic - it reliably closes the pores of concrete, preventing moisture from entering. But working with it is not very convenient - you need to constantly heat the container, and application takes quite a lot of time.
Therefore, many people prefer to use waterproofing or construction polyethylene. The first is carefully melted with a gas burner, after which it is glued to a flat surface. The second is fixed using reliable solvent-free glue. In any case, waterproofing work should be carried out carefully. It is advisable to make an overlap of at least 10-15 centimeters. The edges of roofing felt are fused, while those of polyethylene are glued with wide tape.
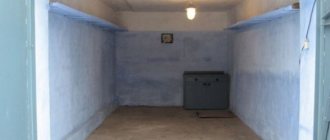
Technology of insulating the foundation with polystyrene foam from the inside
Insulating the foundation from the inside with polystyrene foam is more preferable than insulating with polystyrene foam. This is due to the fact that the sufficient thickness of polystyrene foam to insulate the foundation from the inside is 30 mm. And, therefore, its presence does not take up much useful space.
However, carrying out work inside the basement has a significant drawback: due to the shift in the dew point, the foundation is still exposed to temperature changes, which means that the possibility of its deformation cannot be ruled out.

The procedure for internal insulation of the foundation:
- all defects on the surface are eliminated;
- the cracks widen to a V-shape. Then they are treated with a primer and sealed with sand-cement mortar;
- the entire surface is treated with a primer.
- Installation of polystyrene foam is carried out using an adhesive mixture or adhesive foam. The sheet must be fixed with an “umbrella” (if glued to foam, then umbrellas are also attached while it hardens, after which they are removed, this is done in order to prevent deformation of the polystyrene foam boards during the foam swelling process).
- the sheet is protected with a metal mesh from rodents;
- carry out finishing.
When installing insulation from inside the room, you need to ensure high-quality ventilation to avoid condensation.
Quite simple technology and relatively inexpensive materials will allow you to take the first step towards the implementation of energy-saving technologies.
Insulation with permanent formwork
In accordance with the current SNiP and SP 50, the process of installing permanent formwork begins with preparing the construction site on which it is planned to place block or panel material.
The algorithm of actions is as follows:
- a layer of waterproofing material is laid on the prepared base;
- installation of the structure begins from one of the corner sections. The first block row is strung on reinforcing bars installed vertically in a sand and gravel bed;
- As soon as the initial layer is laid out, the block grooves are filled with reinforcement of the required diameter, located longitudinally along the entire perimeter. They are fixed to vertical rods using knitting wire. At the joint areas, the reinforcement is laid with an overlap. The correct placement of blocks vertically is controlled by a level every three to four rows;
- communication pipes are passed through special holes;
- concrete solution is poured, the level of which should reach the middle of the outer block row;
- the use of insulated formwork for a monolithic foundation allows you to create a kind of “expanded polystyrene - concrete monolith - expanded polystyrene” panel.