Purpose of crimping
Installation work on installing a water heated floor must necessarily be completed with verification measures called pressure testing. To implement them, there is a certain sequence of actions, a prerequisite for which is the creation of excess pressure in the system. This allows you to check all connections and the pipeline as a whole for leaks. Independent implementation of such testing requires care and responsibility. As a result, it is often possible to detect a number of defects that need to be corrected before the screed is installed. In addition, the overall efficiency of the water circuit is checked.
There are three ways to test the performance of a finished circuit:
- Putting the water circuit into hot water operating mode for a certain time.
- Check by filling the heated floor with coolant in a cold state.
- Air pressure testing.
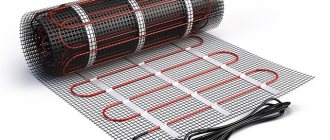
How to start an electric heated floor with your own hands
Setting up this floor has some features:
- It is prohibited to install furniture in places where cables bend: this section of the floor will warm up more slowly and its durability will decrease. For a tiled floor, this condition is less important than for a parquet floor, since the latter has lower thermal conductivity.
- The space under the cables must be filled with foamed foil insulation, laying the coating with the foil layer inside: as a result, faster heating is achieved. This is an important factor if the coating is not parquet, but tiles, which have a lower heat capacity.
- It is necessary to turn on the electric heated floor through the thermostat, having first adjusted it to the required heating temperature. If after 6-8 hours of testing the temperature of the external surface of the cables is within 60 °C, then you can cover the floor with a screed or install tiles.
- Filling is carried out after all the connecting elements are hidden in the baseboards or other insulating elements of the coating. The startup time of this heating system is highly dependent on voltage fluctuations in the network.
You can begin using any heated floor laid in a screed 28 days after completion of installation.
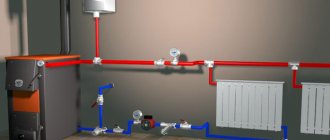
A water heated floor is a specific system, and a person unfamiliar with it has a lot of questions regarding startup and operation. Even such a seemingly simple process as pouring coolant is far from simple in the case of a water heated floor. And you also need pressure testing, draining the system and flushing it. Read about all these operations and how to carry them out below.
Water use
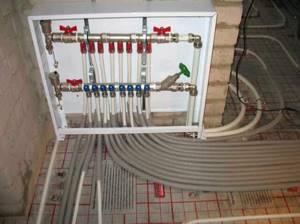
Before starting self-pressure testing of the heated floor, a collector box is installed, followed by connecting the assembled heating water circuits. Next, water is poured into the system using the supply pipe. During this procedure, it is necessary to close the caps on the return manifold by loosening the supply valve.
As the pipes are filled with water, air is gradually displaced. This is accompanied by a characteristic hissing, because. the gas exits through an automatic air vent. Next, open the return valve to bleed air. If we are talking about several circuits, then the described process is repeated on each of them until the air is completely displaced from the system. Upon completion, the water supply valve at the inlet to the collector must be closed.
Next, open the valve located in front of the return line:
- When testing a heated floor before pouring by setting operating temperatures when opening the valve, it is important to observe gradualness. The initial temperature of the coolant in the system should be at +20 degrees. After a certain pause (3-4 hours), the temperature can be increased slightly (by 5 degrees). In this case, it is important to carefully monitor the condition of the joining areas, external surfaces of pipes and connections.
- If leaks are detected, water is drained from the system and repairs begin. Then the coolant supply is resumed. Once the design temperature is reached, the system is left in this state for 2-3 days. During this time, visual observations of pipes and components continue: if faults are no longer detected, the temperature must be reduced. Filling the screed is allowed only after the circuit has cooled.
- The second method involves creating excess pressure. Having completely filled the pipes with cold coolant, you need to create such a pressure level in the heated floor system so that it exceeds the working one by 1.5–2 times. The water circuit is left in this position for a couple of days. This time is quite enough for water to seep into areas of pipeline defects or joints. The detected problems can be eliminated after emptying the system, after which the test is repeated.
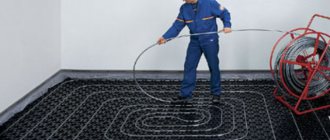
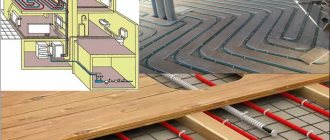
Installation of water heated floor
Before you begin laying the heated floor system itself, you should prepare the surface for it. It should be clean and not have sudden changes in floor level.
Then the following stages of work are carried out:
- A film is laid on the floor, which serves as waterproofing. Its joints are taped with tape. It is folded along the walls and secured with a special tape.
- You can put a layer of heat-insulating material on the film, the thickness of which depends on where the heated floor is installed. For example, on the first floor, if there is a basement below, you can use high-density insulation, which will help significantly reduce heat loss. But if there is no need for serious thermal insulation, then it will be enough to use ordinary foil, which will reflect heat.
- Then the pipes are laid according to the pattern that was chosen in advance. The optimal distance for them is 25-30 cm from each other. They can be attached either using special profiles or using plastic clamps directly to the reinforcing mesh, which should be placed on top of them. It is possible to use special insulation, on which means for fixing the pipes are already formed in the form of protrusions. It is very comfortable.
- The ends of the pipes of each circuit are connected to the manifold using fittings. The collector is installed in a special box that can be mounted into the wall.
- After laying the pipes, you can install beacon profiles and fill them with an even layer of cement screed, preferably at least 3 cm thick. A prerequisite is the presence of a reinforcing mesh, which will not allow the screed to collapse over time due to temperature changes. The mesh is mounted directly on the underfloor heating pipes.
- After the screed has dried, you can lay any finishing coating on it.
Air crimping
Air testing is carried out in cases where it is impossible to use water for this purpose for some reason.
How does this happen:
- The leak test begins with closing all taps, including the Mayevsky tap. If an automatic air vent is used, it must be dismantled by plugging the seat with a solid insert.
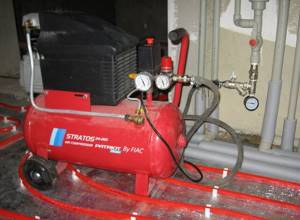
- Air blower connection. Its role can be played by a car pump with a pressure gauge or a compressor. The connection of the connecting hose is carried out using a fitting and a tap installed further. It is necessary to create such a pressure in the system that it exceeds the operating value by 2-3 times.
- The creation of excess pressure in underfloor heating pipes at a level of 4 to 5 atm occurs only in the water circuit. The gap between the collector and the boiler is not intended for this due to the real threat of damage to the boiler. As a rule, heating equipment is able to withstand pressure of no more than 3 atm. To test this section of the pipeline, autonomous pressure testing is carried out, creating an acceptable maximum.
- After reaching the required pressure, the tap must be turned off, pausing for a day. Throughout this time, carefully monitor the pressure gauge readings. It is important to understand what pressure should be in heated floors: only a slight decrease is allowed (no more than 0.5 atm) due to cooling of the air. The fact is that the injection process is accompanied by some heating.
- To detect connecting areas with poor tightness, all joints are covered with a soap solution. Glass cleaning liquid has proven itself well in this role. If bubbles are detected, it is concluded that the connections are insufficiently dense. If after tightening the problem does not go away, replace the gaskets.
If pressure testing of the heated floor with air does not reveal any malfunctions, the system can be left under pressure while the screed is being installed.
Which type of crimping is preferable?
It is preferable to pressurize the system with air. Why? If you pressurize the system with water in the summer and it will remain under pressure until the cold weather, and you cannot start the system in a timely manner for some reason, then with the onset of cold weather there is an obvious risk of defrosting the heating system. It doesn't matter whether it's underfloor heating or radiators. With air there is no danger: you can press it and forget it. This especially applies to heated floors, because if water can be drained from the radiator system at any time and quickly without problems, then it will not be possible to drain it from the heated floor.
Which way is better
When deciding how to pressurize a heated floor, several considerations should be taken into account. When using metal-plastic pipes to organize the water circuit, it is recommended to use cold water injection as a test until the pressure gauge reaches 6 bar. The circuit is left in this position for a day. If the pressure has not dropped during this time, the pipeline can be covered with a screed. At the same time, the pressure gauge readings remain unchanged during the concrete work.
On pipes made of modern cross-linked polyethylene, the instructions require creating a double level of excess pressure (minimum 6 bar). It is worth noting that cross-linked polyethylene pipes cope with their task quite well. Half an hour after the pressure drops, it is restored to its previous levels. Usually this procedure is repeated twice. Next, the pressure is fixed at the original level, leaving the system for 24 hours. If the next day the pressure drop is recorded within 1.5 bar, the pressure testing of the heated cross-linked polyethylene floor is considered successful.
In some situations, it is recommended to complete test control with cold water by checking the system at the maximum coolant temperature. In this case, you need to carefully inspect all components and connections until the temperature reaches the desired value. The circuit should remain in this state for several days. If necessary, all joints are tightened. If there are no leaks, you need to wait for the circuit to cool completely, and only then start screeding.
When choosing between the air and water methods of crimping a water-heated floor, most experts choose the second method. There is an opinion that when testing in the summer, there is a real danger that the screed will not dry before the onset of cold weather. Since the circuit is filled with water, it can shrink, with all the ensuing consequences. An aerial inspection is much safer in this regard: it does not depend on the implementation time.
How to pressurize a heated floor?
Pressure testing is carried out before pouring the heated floor screed.
Pressure in the system can be created using water (hydraulic pressure testing), as well as air (pneumatic).
Pressure testing of heated floors with water.
Pressure testing from the water supply system.
Before pressure testing, close all valves and flow meters of the underfloor heating manifold. Connect a hose of suitable diameter and strength to the supply manifold. The other end of the hose must be connected to the water supply system of the house. All connections must be securely fastened.
Note! When the underfloor heating system is filled with water, the automatic air vent must be closed (if equipped), since dust and debris that is necessarily found in the pipe can render it unusable. Also, if a boiler is already built into the system, then it needs to be protected from test work; it is better to test it separately later (since the pressure during pressure testing of a heated floor reaches 6 atmospheres, and the operating pressure of boilers does not exceed 3 atmospheres). To do this, you need to close both shut-off ball valves on the supply and return, going directly from the boiler and to the boiler.
Open the water supply valve, open the nearest flow meter or primary circuit valve (depending on the type of collector), then begin to slowly open the drain valve. At this moment, a hissing sound of air escaping will be heard. At this point, the drain valve should also have a hose on, the end of which should be inserted into a container to collect water, which will pour out as the circuit fills with water. And so, as soon as air stops flowing from the first circuit, we immediately open the second circuit, while the first must be closed so as not to pour excess water and so that the second circuit can be pumped faster. When the second circuit has been pumped, immediately open the third, fourth, fifth... Don’t forget to close the previous ones. When all the air from the heated floor circuits has been forced out, you need to close both water supply and drain valves, and open the valves going to each circuit.
This considered option is not the best for pressure testing, since the pressure in the water supply system does not exceed 3 bar, and for high-quality pressure testing, a pressure of 6 bar is required. Therefore, we will consider three more options that allow you to increase the optimal water pressure in the system.
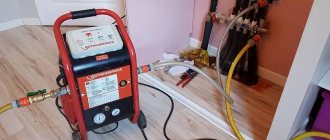
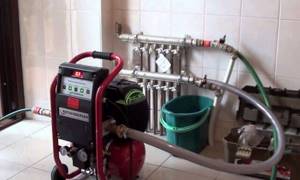
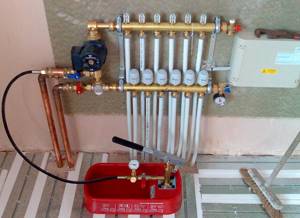
With the help of a professional crimper
To check the heating system, professional pressure testers, both manual and electric, are available for sale.
Manual pressure tester for heating system
Electric heating system pressure tester
There is no difference which one to use, both will perform their task perfectly. The only thing is that their prices vary significantly. Using a hand-held device will not be difficult. Simply connect the hose from it to the heated floor system, pour water into the bath of the pressure tester and start pumping, opening and closing the valves according to the first option, periodically adding water to the bath. The electric pressure tester will need to be connected to the water supply system or if it is possible to draw water from any suitable clean water container. Detailed operating instructions are included with each device. Since there are many types of them, we will not consider them here.
During the construction or renovation process, every prudent owner, if possible, tries to save the family budget without sacrificing the quality of the final result, so he considers it irrational to buy an expensive manual or electric crimper just to use it once. Therefore, we will give you a couple more ways to complete this task, because the important thing here is to raise the required pressure in the pipes, but how this will be done does not matter.
Pressure testing using a garden sprayer.
Attention! Before you start working with any sprayer, check its operating pressure on the body or in the passport and under no circumstances exceed it.
A metal garden sprayer is best for this. We pour water into it, connect the hose from the sprayer to the supply valve. In order not to turn off the taps many times and not to fill the sprayer with water, since its capacity is only enough for one pipe circuit, you must first do the steps that we described in pressure testing from the water supply system, and then use this method, because you All that remains is to create a pressure of 4-6 atmospheres, for which the volume of one tank will be quite sufficient.
We connect the hose from the sprayer to the inlet supply valve and begin pumping until the pressure reaches 4-6 atmospheres. To avoid pumping manually, you can use any compressor by connecting it instead of the excess pressure relief valve on the sprayer.
Here it is important to constantly monitor the pressure and not exceed those recommended by the sprayer manufacturer. If you are not sure that you can handle it, it is better not to do this, but use the following method.
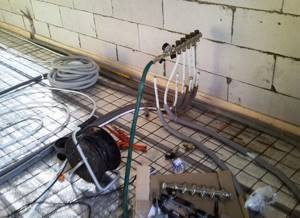
Pressure testing using a deep-well vibration pump.
Vibration pumps like “trickle” and “baby” are capable of creating pressure up to 6 atmospheres, so they will do a good job of pressure testing your system.
This method, in our opinion, is easier to implement than the previous one, since all that is required is to place the pump in a container with a sufficient volume of water, with a hose well secured to it and connected to the manifold. It’s better to work here together, one opens the taps and gives commands, the other turns the pump on and off.
The principle of filling the circuits with water is the same as in the first option. That is, they opened the valves and then turned on the pump. Just do not close the circuit valve before opening the next valve, otherwise you will most likely have a hose come off either from the pump or from the manifold. The return hose can be taken out into the same container where the pump is located. As soon as all the air has left the contours of the heated floor... Then remember everything that will be written until the end of the paragraph, the procedure itself is important... As soon as all the air has left, close the return valve, look at the pressure gauge as the pressure rises to 6 atm. (This moment is very short), close the supply valve and at the same time turn off the pump.
Recommendations from experts
When filling heated floors with water at high pressure, there is a real danger of pipes jumping out of their seats. This usually happens in places where mounting tape was used. To avoid such situations, it is necessary to first install the beacons for the screed, securing them with small piles of mortar to be sure. This will allow you to acquire an additional holding frame after the mixture has hardened. If the contour was attached to the mesh, then there is no need for additional strengthening measures. Before laying the solution, it is recommended to rinse the pipes to remove possible contamination with clean running water. It is better to repeat the washing several times: the signal to stop the procedure is that the water coming out will be completely clean.
How to drain water from circuits
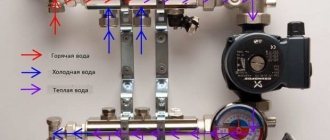
The peculiarity of a water heated floor is that, when installed correctly, it does not have a lower point and there is no tap there either. Therefore, to drain the system you will have to use a compressor. It is connected to the input (supply) manifold (do not confuse it, exactly to the input). If your collector assembly is factory-assembled, then it has special devices that prevent the coolant from flowing back. And if you connect the compressor to the “return” manifold, the coolant will not drain, but you may damage the unit.
So, on the supply manifold, at the special valve for filling water, remove the air vent, and, screwing the adapter in its place, connect the compressor output. On the return manifold, connect a hose to the drain valve, which is discharged into a bucket or into the sewer.
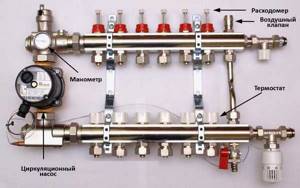
What do the collector elements look like that will need to be manipulated when draining/filling coolant?
Leave the shut-off valves of only one heated floor loop open. Turn on the compressor, water begins to come out under pressure (hold the drain hose). Leave the compressor on until airborne droplets begin to flow. Then turn it off, close the valves of the drained circuit, open the shut-off valves of the next circuit and turn on the compressor again. So, opening the shut-off valves one by one, drain the water from all circuits.
Since the length of the contours can be significant, a significant amount of liquid remains on the walls. It needs to be removed again. That is, repeat the procedure after a few hours. Only then can we say that the underfloor heating fluid has been completely drained.
First launch - what to pay attention to
The test run for crimping a heated floor is carried out according to the following scheme:
- They close the system. To do this, close the valve in front of the collector. Take turns starting the pump first, then the boiler, but not at full power. Already during this stage, the quality of the assembled structure is assessed and the first cracks are identified - the result of insufficient qualifications or low-quality parts.
- Open the floor hinge. The main thing is to wait until it warms up completely and only after the difference between the temperature values reaches 5-7 degrees, open the second, third and other taps. That is, with each new start of the circuit, air is released.
- Set the water supply temperature to 50-70 degrees, it is permissible to take the average value. With mixed heating, the temperature of the circuits is set on thermostats.
- To complete the crimping work, everything is kept in working order for some time. Depending on the quality of the material and the faults found (they are corrected even at later stages), this time can vary from several hours to a whole day. But to ensure safety, it is not recommended to neglect the check, since after filling the floors, it will be quite difficult to change the pipes without causing much damage.
If there are no pressure drops or other malfunctions, the crimping process is completed and the floors begin to tighten.
Pressure testing of the heated floor must be carried out before pouring the concrete screed or laying the finished floor (if the system is wooden)!
The pressure in the system drops, port
The pressure is monitored using a pressure gauge installed on the circulation pump. Typically, the working pressure in a heated floor system = 1.5 atm.
If at the beginning of operation the pressure begins to drop, then it is possible that air is escaping from the expansion tank. As the water heats up in the boiler, the pressure increases. When the pressure rises to the maximum norm, a release occurs through the safety valve, pumping in water, and the air is gradually displaced.
Leaks in the water floor
Another reason for pressure drop is pipe rupture. This can be noticed not only by a decrease in pressure, but also by wet spots on the floor. Determining a leak can take a long time, but the first place to look for leaks is in areas where the floor was recently drilled. It happens that when installing suspended ceilings on the floor below, they get caught in a heated floor loop and make a hole in it.
A thermal imager will help you accurately determine the location of the break under the screed. After identifying the leak area, they begin to dismantle the flooring and concrete.
- Before starting pipe repairs, shut off the coolant and drain it from the system if necessary (if it runs out of a hole in the pipe).
- The damaged area is cut, the edges of the pipes are trimmed so that they are even.
- To connect the ends, crimp couplings are used (press-on connection). Compression of the fitting is done using manual or electric pressing pliers.
- The restored area is then sealed against contact with concrete. Can be wrapped in polyethylene and tape.
- Upon completion of the repair work, the integrity of the connection is checked - the system is tested for tightness by pressure testing with water or air (if the coolant is drained). The pipes are left under a pressure of 5 atm for several hours. If the pressure has not dropped, then the leak repair can be considered successful.
This repair method is suitable for both cross-linked polyethylene and metal-plastic pipes.