Nowadays, many people prefer to install a “warm floor” system in their home.
The following installation options are available: mounting the system into a layer of screed and laying the electric floor on top of the screed under the tiles.
This is especially true as an option for insulating a bathroom.
You can apply a heated floor to the wall in the bathroom, which will save you from the need to install a coil and bring additional comfort. For example, this is very convenient if you live in a Khrushchev-era building and a wall in some room borders the street.
Types of heated floors
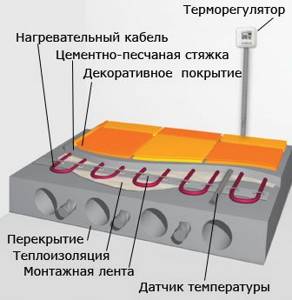
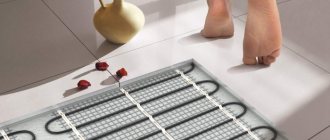
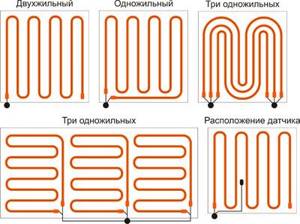
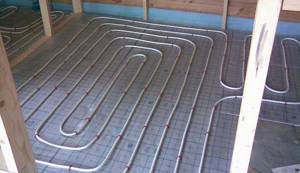
Model of an electric heated floor device.
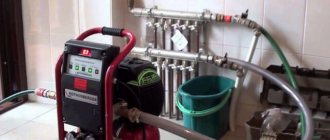
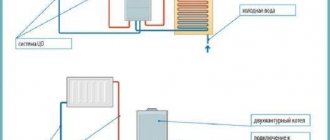
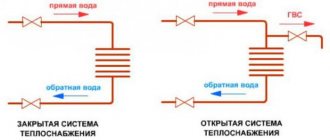
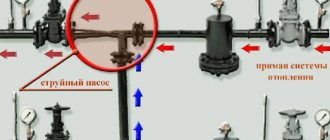
- water heated floor. Such a system is connected to heating, and its operation is carried out by a special circular pump. A water floor cannot be installed in an apartment or a private house, as it is not safe;
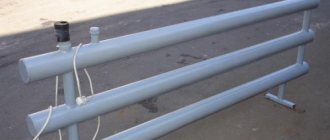
- electric heated floor. To operate this system, a special electrical cable is required that is connected to the home electrical network. This option, of course, is more expensive than a water-heated floor, and during its operation it will significantly increase your costs for electricity. But there are also undoubted advantages: you can regulate the power and turn off the entire system if necessary. You can even install special switches programmed to maintain a certain temperature. This type of system is suitable for installation on a bathroom wall due to its flexibility;
- film heated floor or infrared. This system creates the most comfortable conditions due to the uniform heating of the rooms, it does not overheat the room and is optimal in terms of humidity. This system can be used for any surface: be it tiles, for example, for bathroom walls, be it laminate, carpet and other materials. In addition, film flooring is very economical to operate, as it does not require high energy consumption.
Finishing nuances
Remember that due to the built-in heating system, decorative finishing materials. Applied to the walls, they will be used less. For example, wallpaper on a wall that has an electrical system built into it may fall off after a few months. And if the heating is built into the walls of the bathroom, you need to be especially careful in choosing the adhesive composition so that after the first season the tiles do not crumble. Only plasterboard material can instill peace of mind regarding finishing - nothing happens to it.
So, all that remains is to decide whether there is a need to heat the walls and choose the right system.
What should you not forget?
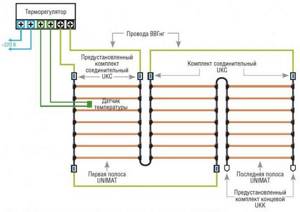
Electric heated floor diagram.
When you install electric underfloor heating as wall heating, the process itself is not very different from how to install a cable system on the floor. There are some difficulties: for example, it is not very easy to attach the cable suspended, for which you need to stock up on a large number of dowels in advance. There is another option for solving this complexity: a metal mesh is pre-attached to the wall, and the cable of the “warm floor” system is tied to it.
The next difficulty awaiting you is plastering the walls. Ordinary plaster is not suitable, as it will crumble when exposed to heat, which will inevitably cause the tile itself to fall off. Therefore, do not take risks and immediately use a special tile adhesive and plaster the wall with it, although this is very difficult, because the adhesive is not designed for vertical surfaces. Having coped with this task, you will protect yourself from the tiles falling off.
A mesh may appear on the surface of the tile due to temperature changes when turning the “warm floor” system on and off. To avoid this trouble, when buying a tile, check in advance whether it will fit the electrical cable, or try to avoid sudden and frequent temperature changes.
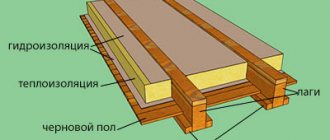
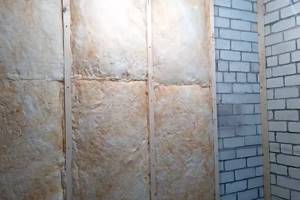
Insulation with mineral wool under wallpaper
Required materials and cost
Basalt slabs are often used for finishing houses and residential premises. Known for its insulating properties:
- Retains heat perfectly.
- Does not freeze even in severe frosts.
- Completely safe for humans.
- Not subject to rotting.
- Not flammable and does not ignite from an open flame.
- Does not emit pungent, unpleasant odors.
- Does not wrinkle over time.
- Produced by many brands and sold at relatively affordable prices.
One drawback is the thickness of this material and the need to hide it under thin plasterboard slabs. In total, such finishing can eat up from 4 to 10 or more centimeters near each wall. Not everyone will agree to sacrifice free space.
Installation features
Another advantage of mineral wool is that old coatings can be left on interior floors, but only if the surface is fairly flat. If not, it is advisable to level it using special plaster.
- The work area is prepared, nails and dirt are removed, mold is treated with special compounds.
- Metal or wooden guides are placed at equal distances. It is advisable to give preference to steel or aluminum profiles. They take up less space and are easier to attach.
- Layers of mineral wool are laid between them - it is sold in cut layers, which greatly simplifies installation.
- Basalt sheets are fixed using special plates located on the guides. Moisture insulation, represented by a thin woven film, is placed.
- Drywall or chipboard is mounted on top, but the latter is much less common.
- The seams are treated with plaster, leveled and smoothed.
- After drying, any wallpaper can be glued to the surface.
You can learn more about the features of installing mineral wool in this video:
So where to start?
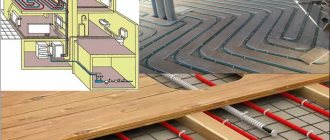
Laying scheme for heated floors.
There are 2 options: you can use an insulating layer both on the outside and on the inside.
Even when designing a “warm floor” system, you should pay special attention to calculating the temperature regime of the outer wall. It depends on whether an insulating layer is needed, if so, where and how thick. If you use such a layer from the outside, then this shifts the freezing point into the thickness of the insulation. Thanks to this, it is possible to use non-frost-resistant materials when constructing enclosing structures. But there is also a drawback to this solution: a lot of thermal energy, in addition to the cost of heating the premises directly, is spent on warming up these same enclosing structures.
If you decide to place the insulating layer on the side of the room, that is, on the inside, this shifts the freezing point of the wall towards the inner edge. In this case, the use of frost-resistant materials for walls and fast, low-inertia adjustment of average media temperatures is required. If these 2 rules are not followed, there is a risk of the wall completely freezing and condensation appearing on it.
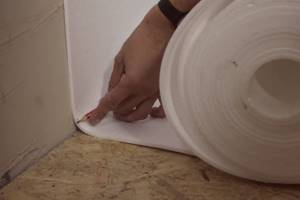
Insulation of walls under wallpaper with roll coverings
What will you need?
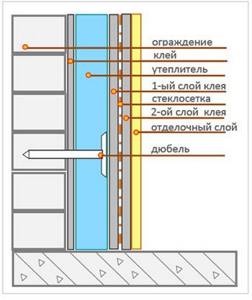
One of the most popular and widespread solutions. They are made from polystyrene. Both sides are treated with a protective coating suitable for further finishing. 0.5 cm thick, so they save space well. They provide excellent protection from the cold and resist the formation of fungus and mold. They do not require constant replacement and can easily survive several repairs.
When installed correctly, they do not peel off and help hide minor irregularities. Available only in white.
How to install correctly?
One unpleasant drawback that such roll insulation under wallpaper has is that it is advisable to glue them on flat surfaces. Therefore, installation is carried out in several stages:
- The walls are cleaned of old wallpaper and mold. Dowels, nails and other objects and fasteners are removed from them.
- A primer is applied, and specialized plaster of various colors is used for leveling.
- It takes from several hours to a couple of days to dry.
- Rolled insulation is most often attached to glue for heavy wallpaper (the surface and insulated wallpaper are coated with it), but can also be hung on tile adhesive.
- Each strip is placed adjacent to the previous one. The contact points are sealed with tape or other adhesive tape.
- Allow 72 hours to dry.
Installation features can also be found in this video:
How to avoid the most common mistakes?
Sectional diagram of a cable electric heated floor.
- It is advisable to plaster the wall in preparation in 2 stages. The first stage is applying a layer of plaster over the frame made of reinforcement (wire) used to secure the pipes. When this first layer has become strong, a plaster mesh should be attached to it and a second plaster layer (finishing) should be applied to it;
- Next, it is necessary to apply a layer of “Strobe” mesh to the finishing layer (you can replace it with elastic similar paper). This is necessary to prevent cracking of the leveling layer;
- when working with cement-lime mortar, remember that its thickness should be no more than 20-30 mm above the metal-plastic pipe;
- Before you start work on the “electric heated floor” system, it is better to install distribution and installation boxes for wiring (low-current and electrical) in advance. The wiring itself should be done after the top layer is completely plastered;
- when you apply plaster layers, the pipes should be pressed with one and a half working pressure;
- supply of coolant to the pipes is possible only when the layers of plaster have completely dried;
- In order to avoid mechanical damage to pipelines in the future, it is better to immediately carry out its executive diagram with the binding of the pipe axes.
Features of installation of a rod-based IR heating system
Rod heating elements are installed similarly to film ones. Due to higher surface temperatures, the distance between adjacent rods should not be less than 100-150 mm. The difference in the installation of rod and film heating elements is that the sheet with rod heaters is more rigid. However, the rods themselves make it possible to increase the electrical power passed through them, so such systems are suitable for installation in large rooms. Their use is limited by the power of thermal safety automatics installed in the house. Rod IR elements do not need to be turned on for a long time, so it is advisable to install thermostats for them.
How and where to use heated floors?
If we talk about the “warm floor” system as a method of insulating walls, then it can be used not only in bathrooms. For example, water heated floors can be used in rooms without free floor space. These can be not only bathrooms, but also a garage, workshop or swimming pool. If there is little furniture and wall-mounted equipment in the room, then heated floors can be used for bedrooms, classrooms, offices, and corridors. If there is high floor humidity in the room, it is not advisable to use a water floor system due to high energy costs. This applies directly to bathrooms, laundries, and swimming pools.
Even if you encounter difficulties, once you overcome them, you will enjoy the results of your work with pride and comfort!
Working anti-mold products
If fungus appears in the bathroom, how can you remove it without damaging the surface? Use special fungicidal preparations: they not only disinfect and kill existing fungi, but also prevent the formation of new ones.
A selection of folk remedies for eliminating fungus in the bathroom
You can eliminate mold in the bathroom using improvised means, which are found in almost every apartment:
Vinegar. A jar of essence is inexpensive and very effective. However, you should work with aggressive liquid carefully: wear rubber gloves and a respirator. Pour vinegar into the spray bottle.
- Apply to the affected area, extending 10-15 cm beyond it.
- Leave for 5-10 minutes.
- Remove mold with a brush or rag.
- Wipe the treated surface with a clean cloth or rinse with water.
Laying technologies
Upon completion of the calculation of all components of the system and selection of a suitable scheme, they proceed to the preparation of building materials, additional equipment and tools. After this, they proceed directly to installation. Sometimes elements of such floors are laid on polystyrene slabs placed in a certain order on a rough base. In addition, the following methods can be used for these purposes:
- placing polypropylene pipes directly on a concrete base;
- installation of the system in the grooves of wooden slabs remaining after the installation of the flooring;
- laying on a pre-filled screed base.
It is possible to better retain heat on a plane laid on slabs by using a foil backing with the working side laid towards the floor. According to the instructions, during installation, the joining areas of individual elements are sealed with special tape.