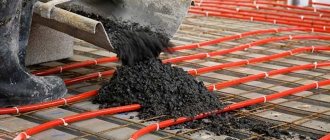
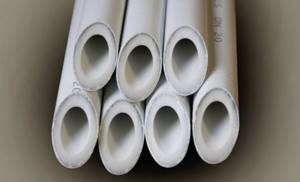
The main task of a heated floor system is to distribute thermal energy in a room by circulating it through a hot water pipeline, which is laid under the floor covering. The most common case is the supply of heated water to pipes, but it is possible to use an antifreeze solution or ethylene glycol. Copper or metal-plastic pipes are used for heated floors.
Metal-plastic pipes are durable and flexible, so they are often used for heated floors.
Requirements for a heated floor system
Water heating under the floor covering has a number of important advantages that allow you to heat the room evenly and with as little energy consumption as possible. To achieve maximum effect, accurate selection of pipes for the entire installation area and a rational layout of their installation are necessary.
The choice of suitable pipes for heated floors is associated with certain requirements that apply to them:
- excellent heat dissipation;
- good strength;
- durability;
- low expansion coefficient;
- minimum possible bending radius;
- environmental friendliness.
The amount of thermal energy entering the room depends on the heat transfer of the pipe used. The strength requirement is the next most important.
Note! The more durable the pipeline is, the higher the operating temperature and pressure it can withstand.
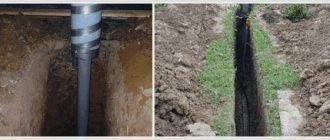
For heated floors, the pipes are laid in a concrete screed, which makes it difficult to replace or repair parts if necessary. For this reason, the pipeline must remain operational for as long as possible.
The heated floor has a multi-layer structure, so the pipes must be resistant to heavy loads
Taking into account the expansion of pipes under the influence of high pressure and temperature is necessary to prevent damage to the floor covering or concrete screed. The bending radius of products affects the minimization of the risk of damage to the pipeline when changing the direction of the elements. In the event of an accident or breakdown, the material of pipes for heated floors should not cause harm to the environment and human health.
Selection options
Pipes for water heated floors used to create the system must meet certain characteristics. Without taking them into account, installation is difficult, and the system may not meet expectations. The choice of pipe for a warm floor is carried out after determining the power of the system. This is necessary in order to navigate the diameter, which correlates with the coolant flow through the system.
When choosing a pipe for a water heated floor, use the following parameters:
- The material from which the pipelines are made. The physical and mechanical characteristics of the system, installation features and the possibility of use in specific conditions depend on it.
- Diameter. The speed of movement of the coolant depends on it, as well as the hydraulic resistance, which directly affects the choice of pump. The diameter of the pipe for underfloor heating, which is most often used in practice, is 16, 20, 25, 32 mm. In most cases, 16 or 20 mm is sufficient.
- Operating temperature of the coolant. This parameter is important not only for thermal calculations, but also for determining the suitability of the pipe. Each type of pipeline has operating and short-term maximum temperatures at which its characteristics do not change.
- Maximum pressure. Since heated floors are used not only in private homes, but also in multi-storey buildings, in some cases high pressure is required for operation. Typically, in private houses, pipelines should be designed for a pressure of up to 6 bar, and in multi-storey houses it is better to use pipes with a maximum pressure of 10 bar. In addition to the material itself, the pressure depends on the wall thickness - 2.0, 3.0, 3.5 mm.
If most of the described characteristics depend on the parameters and features of the system, then the choice of a specific material is more influenced by the preferences of the installers or the customer, as well as the price factor. Since most of the parameters described are directly influenced by the material, when choosing, you need to focus on it first.
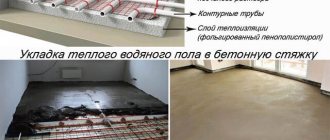
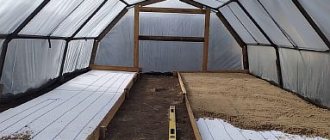
Heated floor structure
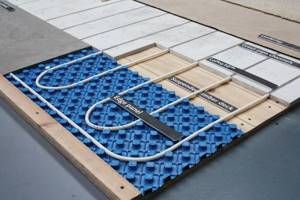
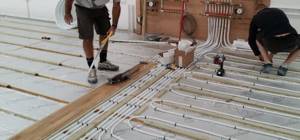
The warm floor has a multi-layer structure. At the initial stage of arranging the system, it is leveled and a material with waterproofing properties is placed on the base. A damper tape is fixed along the walls adjacent to the floor. Next, the entire surface of the base is covered with heat-insulating material and pipes are laid on it, through which water will circulate. At the last stage, the load-bearing layer is poured and the floor covering is laid.
According to standards, the height difference in the room should not be more than 5 mm. If the floor is not leveled, then during operation problems may arise with heat transfer, airing of the system, or hydraulic resistance may increase.
The waterproofing layer protects the floor from condensation. To do this, you can use plastic film. The damper tape is necessary to balance the expansion of the screed when heated. Thermal insulation will avoid heat loss. The final filling of the screed is carried out with special building mixtures or solutions.
The pipes are laid on a layer of waterproofing material to protect the floor from condensation
The recommended length of laid pipes is 50-60 m and no more than 80-90 m. If these values are exceeded, a collector must be installed. If the room contains 2 circuits, then the collector must have 2 outputs.
Installation Tools
- Pipe bender or spring jig.
- A cutter (a tool that resembles pliers) helps to make a clear, strictly perpendicular cut without dents or bevels. If it is not possible to purchase a cutter, use a sharp construction knife, but under no circumstances a hacksaw (it leaves a torn cut with many burrs).
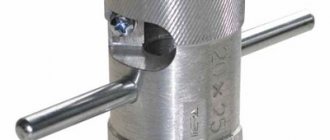
- Calibrator (a cross-shaped tool with ends of different sizes for different diameters).
- Open-end wrenches.
- Sandpaper.
- Press jaws. Easy and quick installation with press fittings. Special pressing pliers are used to crimp them. There is also an electric press tool (a gearbox increases the pressing force to several tons), it is classified as professional equipment and is expensive.
Water-heated floors in a private home are the best option for creating a comfortable indoor microclimate.
Do-it-yourself water-heated floor – design and installation features. What kind of warm floor is suitable for laminate, read in this topic.
Using metal-plastic pipes for heated floors
Metal-plastic pipes are the most common and affordable option for installing heated floors.
Important! These products have a layered structure and combine the best qualities of metal and polymer.
The inner layer of the metal-plastic pipe is made of polymer, which protects the pipeline from corrosion and scale and thereby extends its service life. The intermediate layer is aluminum. It allows you to keep its shape well and withstand significant temperatures. The outer layer is also made of polymer, which protects the aluminum from all kinds of damage from the external environment. The layers are connected with special glue.
For heated floors, metal-plastic pipes are convenient because they are produced in coils of 25-50 m. Coils of greater length can be made to order. The optimal pipe length is 60-80 meters.
Which pipes cannot be hidden in a screed?
When laying heating pipes in a screed, all criteria must be taken into account so that the device lasts a long period. It is not recommended to use vapor-permeable products. Also, overly rigid products are not used, which can cause difficulties during the installation process. It is not recommended to use metal pipes and plastic products for screeding. The metal is subject to corrosion and will last a short period. Plastic is not designed to withstand stress and may crack.
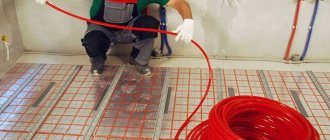
Laying and fastening of metal-plastic pipes
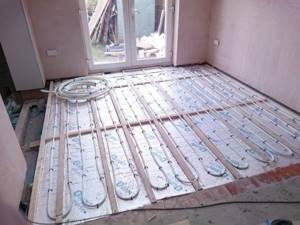
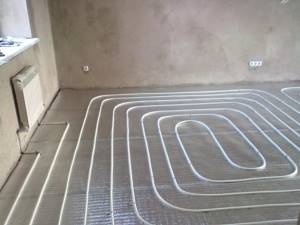
For heated floors, metal-plastic pipes can be laid in a snake (parallel method) or spirally. In the first option, it is advisable to start laying from the side of the windows and walls facing the outside of the room, since the temperature will be highest at the beginning of the pipeline. This method is suitable for small spaces.
Pipes can be fixed to the floor using plastic clips or clamps
Spiral laying involves parallel arrangement of supply and return pipes, which helps compensate for the cooling of one of them by heating the other. This method is applicable for rooms with a large area.
When making a heated floor from metal-plastic pipes, the standard laying step is 10, 15 and 20 cm. Under some conditions, this may increase to 25, 30 or 35 cm. There is a large heat loss near windows and doors, which requires reducing the step to 15 cm .
Fastening metal-plastic pipes can be done in several ways. A reinforcing mesh is placed on the heat-insulating layer, to which the products are connected with wire. It also serves as a marking for the reinforcing element of the future screed. Typically, the pipe fastening step is 1 meter. The wire should not be pulled too tightly to prevent deformation due to the difference in thermal expansion between it and the pipe.
Advantages and disadvantages
Consumers and professional craftsmen include the following advantages of metal-plastic channels:
- Good resistance to high temperatures, which resulted in their use in water floors.
- Easy and convenient to install, easier to work with.
- The plasticity of the material, the ability to maintain a given shape, pipes are easy to bend even by hand, which allows them to be laid in various configurations.
- Resistant to all types of corrosion.
- Much lower linear elongation.
- Lack of oxygen diffusion.

The disadvantages include:
- The difference in the coefficient of thermal expansion between polyethylene and aluminum, which over time leads to stratification of the channels.
- Significant bending radius, which is why creases occur if installed inaccurately.
- Loosening of fitting connections due to regular fluctuations in ambient temperature.
Important points about installing heated floors
The optimal diameters of metal-plastic pipes are 16, 20 and 25 mm. Several factors influence the choice of sizes. A thicker pipe causes the floor to rise, increasing the pressure in the riser. Installation of products must be carried out according to the diagram. To bend metal-plastic pipes, a spring of a suitable diameter or a pipe bender is used.
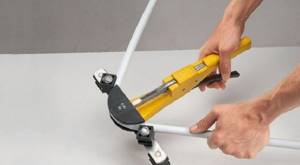
When laying pipes, it is important to prevent their deformation, so it is better to use a pipe bender for bending
All elements of the system are preliminarily checked for deformation. The pipes are fixed to the surface of the screed with plastic fasteners. When connecting to the riser, the connections are well sealed. A test run of the heated floor is also required.
Note! If the system, while in test mode, is able to function for several days under pressure without leaks, then it is assembled with high quality.
After turning it off and cooling, the finishing screed is laid. The need for the number of metal-plastic pipes depends on the area of the room, the nature of the floor covering, and the required climate. There is no need to heat areas where furniture, household appliances, refrigerators, etc. are installed. This measure will reduce the cost of installing heated floors.
Connectors for metal-plastic
Let's look at an example of how metal-plastic pipes and connectors are installed. In some cases, pipes need to be joined together, and this knowledge can be useful.
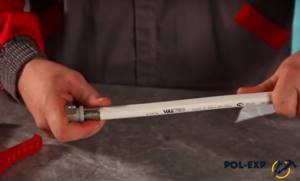
Step 1. You should unwind the required amount of metal-plastic pipe and straighten it.
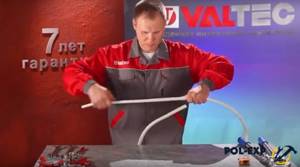
The pipe section is straightened
Step 2. Next, you need to measure the desired size and make a mark with a marker.
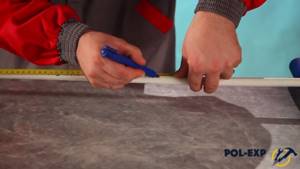
A mark is made with a marker
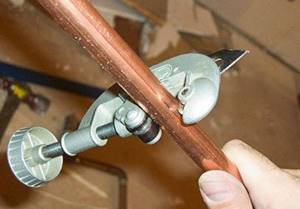
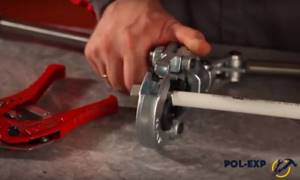
Step 3. To cut pipes, use a special tool - a pipe cutter. With its help, the pipe must be cut at the intended location.
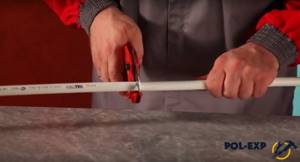
Application of pipe cutter
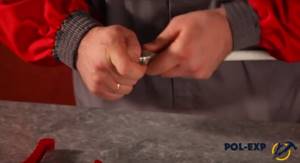
Step 4. Using a special calibrator, you need to give the inside of the pipe a strictly round shape by chamfering it.
Chamfering
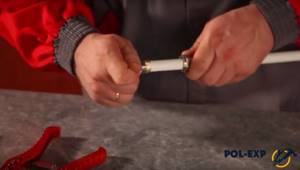
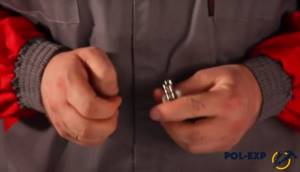
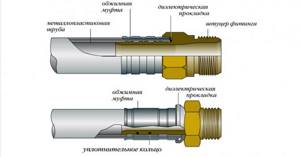
Step 5. Connections are made using so-called crimp or press fittings. For the first option, the rubber sealing rings should be located as tightly as possible and without any bumps in special grooves on the fitting. You need to make sure of this. An electrically insulating Teflon washer should be installed directly on the fitting itself.
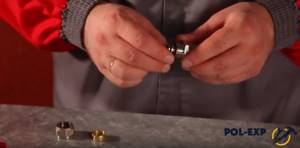
Press fitting
Step 6. You need to put the union nut on the pipe itself, without connecting it to the fitting, then put the “cracker”, and then, turning the pipe a little, you need to put it on the fitting itself.
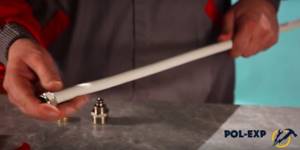
The nut is put on the pipe
Installation of a metal-plastic pipe
Step 7. Next, you need to tighten the union nut by hand, and then tighten it to the required number of turns using two open-end wrenches.
Tightening the union nut
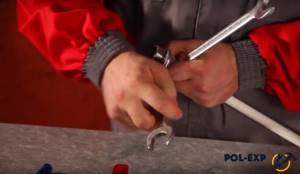
The nut is tightened with a wrench
Press fittings are installed differently.
Step 1. You need to check the presence of seals and a dielectric gasket on the fitting.
Checking the fitting
Step 2. Next, the pipe must be put on the fitting so that it appears in the round hole at the base of the sleeve.
The pipe is put on the fitting
Step 3. Next you need to crimp the connectors using hand pliers. The side of the sleeve must fit into a special groove in the pliers.
Crimping connectors using hand pliers
Step 4. Next, you need to close the “clip” of the pliers until the lock clicks into place. The crimping is repeated after changing the crimping axis to remove pinches.
Next, you need to close the “clip” of the pliers until the lock snaps into place.
Video - Working with connectors
Copper pipes for heated floors
A copper pipe for underfloor heating is ideal for installing such a system, however, its cost is quite high. Such products have a significant margin of strength and durability, and together with excellent heat dissipation and bending radius, their use becomes the most suitable option.
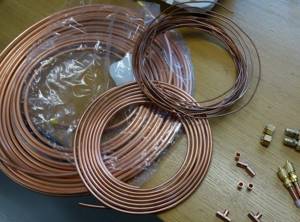
Copper pipes are superior in strength and reliability to metal-plastic pipes, so this is the best option for installing a warm water floor
A heated floor system made of copper pipes will effectively perform its tasks for decades. Copper processing is possible at any temperature. The pressure the pipes withstand during operation is up to 200 atm, and the temperature is 100 °C. Such indicators indicate the high resistance of the metal to all kinds of repeated temperature changes. Copper pipe can be frozen and heated without damaging it.
An important characteristic of copper is its absolute harmlessness. The pipes have bactericidal properties and are easy to install due to their plasticity and ease of bending.
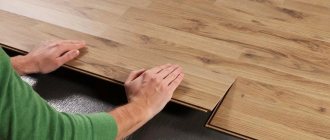
Copper pipes can be laid under any floor covering: laminate, tile, parquet and other materials.
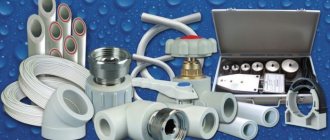
Materials for system installation
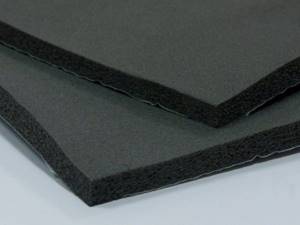
Thermal insulation will prevent heat from dissipating downwards.
In addition to metal-plastic for a heated floor, you will need:
- Hydro- and thermal insulation material will help keep the room warm, rather than heating the neighbors below. We purchase expanded polystyrene or polystyrene as a heat insulator. Polyethylene film is most often used to protect coatings and materials from moisture.
- To strengthen the concrete screed you will need a reinforcing mesh.
- The damper tape is glued along the perimeter of the walls and serves as an expansion joint when the screed expands under the influence of heat. Protects the base of the floor from deformation and cracking.
- Clamps in the form of an anchor for fastening pipes.
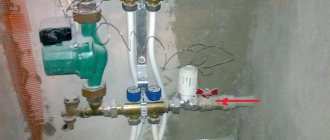
- If not all rooms in the house have a heated floor system, you need to buy a mixing unit.
- The collector distributes the supply of hot water to the various circuits of the system. For the secrets of installing a metal-plastic water circuit, watch this video:
If the circuits in the system are of different lengths, then a coolant flow regulator must be installed on the collector. At the same time, we take into account that a long circuit takes longer to heat up than a short circuit, so you need to regulate the pressure and degree of heating.
Do-it-yourself installation of a heated floor from copper pipes
If the basis for a heated floor system is a copper pipe, then it is worth knowing some of the nuances of its installation. The temperature of the water that will be supplied to the pipes is approximately 30-50 °C. A heat pump, low-temperature boiler, solar collector, or geothermal water can be used as a generator.

Copper pipes bend easily, this allows the use of a laying pattern with a large number of bends
In a floor heating system, copper pipes are laid in a snake or spiral.
Note! The snake installation method makes the heat distribution somewhat uneven, but this solves the problem of cold areas of the room (near windows, doors).
A more uniform heat distribution is ensured by double worm type installation. In this case, near the ends of the pipes with a lower temperature, the ends where the water is hotter should be located. This is the most rational way.
The plasticity of copper pipes and the absence of the need for additional components allows for quick installation. Currently, some floor heating systems use copper pipes with a plastic coating, which increases the tightness and reliability of the joints.
Installing heated floors using metal-plastic or copper pipes requires certain knowledge, professional tools and equipment. Independent work must be carried out with extreme caution and compliance with all recommendations.
Metal-plastic pipes for installing heated floors are an economical, reliable material. A significant advantage is the ease of installation of heated floors made of metal-plastic pipes and the accessibility of the work.
But before you start arranging the system, you should know the secrets of choosing the material and the subtleties of the technology for laying metal-plastic products.
Material Quantity Calculations
Warm floor Rehau water heating Rehau, features, reviews, installation recommendations
After the work on selecting pipes has been completed, it is necessary to calculate how many of them will be required for installing the pipeline.
The first preparatory step is to draw the installation diagram on graph paper. At the same time, it is necessary to keep all the dimensions of the room to scale, taking into account large-sized furniture and equipment that is not planned to be moved. It is not recommended to lay pipes under permanently installed objects.
Typically, specialists use the type of pipeline laying in the form of a “snake” or “spiral”.
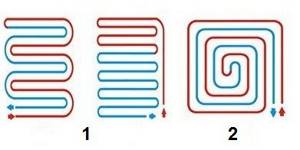
Under No. 1 are methods for laying pipes with a snake, under No. 2 is a method for laying pipes for a water heated floor in a spiral.
The first method is the easiest, it is easier to design and install. However, during operation, the problem of uneven heating of the floor may arise, since the water moving through the pipes gradually cools down, approaching the far part of the insert.
Laying pipes in a spiral contributes to a more uniform distribution of coolant temperature, since water rushes from the insert to the central part of the room, and back to the collector. The number of sharp pipe bends is minimized here, which makes it possible to use material with a significant bend radius, but elastic pipes will have to be additionally secured.
The distance from the walls should be from 15 to 20 centimeters, and adjacent sections of pipes should be at a distance of about 35 cm from each other. This will ensure more uniform heating of the floor. You should expect that a pipe with a diameter of 16 mm will warm up the space on both sides of itself to a distance of up to 15 cm, and the minimum permissible distance between sections of the pipeline depends on the material from which it is made, as well as the bending radius of the pipes.
Calculating the length of the entire structure is quite simple - you need to measure its total length according to the drawing and multiply by the scale.
Types of pipes for heated floors
The pipe material from which the “warm floor” system is equipped determines the efficiency and durability of underfloor heating. The choice of one material or another for pipe products depends not only on the preferences of the owners, but also on the standards that apply to such structures. They must meet performance characteristics, withstand thermal loads and cope with high-pressure applications. Most often, pipes made of metal (copper and stainless steel) or metal-plastic are used for installation.
Note! Cross-linked polyethylene, i.e. a polymer that is “stitched” at the molecular level, which significantly strengthens the strength of the pipe, is nevertheless not suitable for installing heated floors. Pipes made of this material have a high expansion coefficient and bending angle. Consequently, the use of a structure hidden under a layer of concrete is fraught with accidents.
Metal pipes
Advantages of metal pipes:
- do not collapse from the inside, do not become overgrown with scale;
- do not wear out for more than 50 years;
- have the highest thermal conductivity;
- high performance characteristics – max 300 °C, carrier pressure up to 400 atmospheres;
- are not damaged from the outside.
The disadvantage is their high cost, expensive fittings and the need to hire a competent specialist for installation.
Metal-plastic
Metal-plastic pipes are the most popular. Metal-plastic, due to the peculiarities of its structure, combines the positive aspects of polymer and metal pipes, i.e., on the one hand, it is not subject to corrosion, is resistant to stress and is quite durable, on the other hand, due to its light weight and elasticity, it is easy to install and transport.
Polyethylene pipes
For heated floors, two types of polyethylene are used - cross-linked PEX and specialized PERT. The term "sewn" does not mean the presence of any seams. It is not sheets of material that are stitched together, but its molecules. “Crosslinking” refers to physical or chemical processing methods that change the molecular structure of polyethylene.
As a result of cross-linking, new molecular bonds appear in polyethylene, making it stronger and more reliable.
Due to this procedure, the strength and flexibility of the material increases significantly, and the temperature of the transported medium increases (40 o C is the maximum for untreated polyethylene and 95 o C for cross-linked polyethylene). So that cross-linked polyethylene (as well as its properties) can be distinguished, it has different designations, depending on the type of processing:
- PE-Xa: heat treatment using peroxides. As a result, the cross-linking strength is 75%.
- PE-Xc: electron bombardment and strength increased by 60% (irradiation, i.e. physical impact).
- PE-Xb: wet silane treatment with catalyst. Stitching - 65%.
- PE-Xd: Nitrogen treatment is the rarest technology available today.
For heated floors, cross-linked polyethylene with a cross-linking strength of 65% to 80% is used. It is clear that the more durable the material used, the better, but as this indicator increases, the price also increases. However, it is recommended to use PE-Xa or PE-Xc cross-linked polyethylene for underfloor heating, as it has the most suitable characteristics. Moreover, the PE-Xc pipe is preferable, since when bombarded with electrons, cross-linking occurs evenly, but with chemical methods of exposure, the outer layers of the material acquire greater strength, and with deepening, the degree of processing decreases.
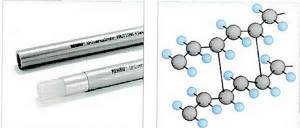
The best pipes for water floors - PERT
Actually, this material has one drawback - high elasticity. This leads to the fact that although the pipe bends well, it must be rigidly tied to the frame, otherwise it will return to its original shape. That is, such installation is not the easiest. Many companies produce special backing mats that perform two functions at once: they serve to improve thermal insulation and have a fixation system in which cross-linked polyethylene pipes are well secured. This installation method is much faster and easier. And the result in any case is high reliability, durability and a relatively low price. In addition, at any speed of coolant movement, the system remains silent. So PEX pipe for underfloor heating is a good choice and is recommended by many professionals.
There is another polyethylene pipe that has better characteristics - PE-RT (perth). Moreover, these characteristics are not acquired, like those of cross-linked polyethylene, but “innate” - the molecular structure of this material is such that it has high flexibility and tolerates elevated temperatures and pressure well. Therefore, a PERT pipe for underfloor heating is the best choice: the performance of PEX pipes depends on the quality of chemical treatment (PEX-a and PEX-b), and in this material they are constant. There is only one advantage of PEX-a pipes - the presence of molecular memory, which is why it is easier to connect them (use regular compression fittings) and you can restore the original shape after bending. How to do this, watch the video where a Rehau pipe for heated floors is tested.
It is also worth noting that a polyethylene pipe for underfloor heating of any type must necessarily have an oxygen-proof barrier made from a layer of EVOH film (this name must be present on the pipe marking). Only in this case will the metal parts of the system be protected from oxidation and the heating will be durable. That is, it turns out that for heating both PERT pipes and PERT pipes must be five-layer.
It is often difficult to decide which pipes to use for a warm water floor, which ones are better and why - similar characteristics, many varieties that are difficult for a non-specialist to understand. The difference between PE-Rt and PE-X pipes, between them and metal-plastic products, their features and signs of good quality pipes is described in the video.
Advantages of metal-plastic for the “warm floor” system
The advantages of metal-plastic lie in the combination of the qualities of metal and polymer:
- Easy to install and small bend angle.
- Thanks to the internal aluminum layer, the metal-plastic pipe holds the bend independently, without the need for a large number of fasteners.
- The elasticity of the pipe material allows the structure to be laid in any configuration in one piece.
- The expansion is insignificant and can be neglected.
- Good heat dissipation.
- Service life and anti-corrosion resistance are comparable to polymer materials. Exceeds the service life of steel pipes.
- Compared to metal pipes, light weight, affordable price, easy installation.
Note! All the advantages of metal-plastic pipes can only be appreciated by purchasing a quality product from a trusted manufacturer.
Trying to save on material is not the best choice for a structure that is planned to be walled in concrete for decades.
approximate price
Metal-polymer pipes are sold in cuts and coils. The cost is determined by the quality of the polymer, the cross-section size and the manufacturer.
Thus, metal-plastic products from the Italian company ICMA - 16 * 2 mm (PE/AL/PE-RT) cost 33 rubles per meter. Valtec products (Russia) 16*2 mm with PEX-B can be purchased for 60 rubles. Bends from the Italian company Uni-Fit PEX-b/PEX-c measuring 20*2 mm will cost 175 rubles.
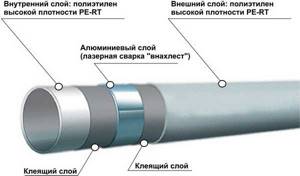
Characteristics of metal-plastic pipe products
A metal-plastic pipe is a combination of layers of polyethylene, metal and special glue.
Each layer has its own function of resisting loads and contributing to the strength of the metal-plastic pipe.
Its structure can be schematically described as follows:
- The inner layer is cross-linked polyethylene. A material that is characterized as chemically inert, resistant to mechanical stress, and environmentally friendly. The structure of polyethylene ensures impeccable smoothness of the inner wall, which prevents the deposition of salts or dirt.
- First layer of glue. The difference between high-quality metal-plastic and inexpensive analogues lies in the glue used, which increases the cost of the production process.
- Aluminum layer. The thickness of the metal varies from 0.2 mm to 2.5 mm. For heated floors, pipe material with a diameter of 16 mm is used, which has a minimum foil thickness.
- Second layer of glue.
- Outer layer. Depending on the material chosen, it can be cross-linked or regular polyethylene. Cross-linked polymer makes pipes stronger, but also more expensive.
Note! You can check the quality of gluing the layers by heating the pipe in the cut. At the boiling point of water, a cheap pipe delaminates, which becomes visually noticeable.
We install heated floors
The installation of a heated floor begins with drawing up a project.
In addition to the metal-plastic pipe, the following materials are needed:
- Insulation and waterproofing. You will need a backing under the screed to protect against possible leakage and retain heat.
- Mesh to strengthen the screed.
- Collector.
- Fasteners.
- Damper tape around the perimeter of the room. It serves as a buffer between the floating floor and the wall. On large areas, the tape is embedded as a screed separator between the heating circuits.
Before purchasing a metal-plastic pipe, you should calculate its length. Why do we draw a laying plan on paper indicating the dimensions.
Design Features
Any warm floor reduces the height of the room.
It has undeniable advantages over central radiator heating:
- independence from seasonal connection;
- no difference in air temperature at the bottom and top of the room, which occurs when batteries are used;
- precise heating control.
An electric floor is easy to install; the contour can have frequent bends and small radii. Does not require insertion into general communications. Heats the floor evenly over the entire area. Requires caution during operation.
“Water” - simple installation, but with large radii, requires connection to a collector or pipeline. Due to the higher price of electricity compared to water, it is more economical to operate than electric. This largely explains its high popularity.
The general structure of a water floor is quite simple and consists of a system of metal or plastic pipes through which hot water moves. The structure itself is laid in a concrete-cement screed, and control is carried out using a heat-regulating manifold and auxiliary sensors.
The design of the heated floor has 7 basic elements:
- Overlap (base) - if the floor needs to be laid on open ground, you need to make a rough screed.
- Waterproofing - can be done by covering the surface with oilcloth or coating it with mastic.
- Thermal insulation - made using mineral wool or expanded polystyrene. It is better to give preference to cheaper and lighter foam.
- Aluminum mesh for reinforcement - strengthens the supporting structure.
- Pipes.
- Concrete screed.
- Finish floor covering.
For laying heated floors, pipes made of the following materials are used:
Metal-plastic
An inexpensive pipe option, characterized by good thermal conductivity, ease of connection and rust resistance.
Polyethylene
Affordable and flexible conductors with good heat dissipation, the only disadvantage of which is the need for additional fixation.
Polypropylene
Using such pipes is not the best idea, since they are not flexible enough.
The most suitable and durable type of contours. However, it is not the most popular due to the high price and labor-intensive installation.
Methods for connecting metal-plastic pipes
The connecting installation of metal-plastic bends is carried out using two types of fittings:
- Compression.
- Press.
When laying flexible pipes they are generally not required. But when connecting to collectors and a number of other cases, you cannot do without them.
The compression method is much simpler and does not require tools other than an adjustable wrench.
Press fittings connect more reliably, but this connection is permanent.
Laying methods
To properly install a heated floor, you need to carefully and strictly follow the technological instructions and recommendations. Direct installation should begin by connecting the pipe section to the control unit. Next, the main line is located according to the chosen scheme, in one piece, without additional connections (the principle of a one-pipe heating system).
In order for the total load to be correctly distributed along the entire length of the line, and the contours not to shift, you need to choose the optimal type of fastening of the pipe to the base.
The following methods are distinguished:
- wire to reinforced mesh;
- fastening tape to the insulation layer;
- construction clip.
The laid and fixed pipeline must be connected to the collector. The connection is made by connecting the free end of the pipe to the control device.
Next, pressure testing is carried out, that is, testing for faults in the system. In the first stage, under significantly increased pressure (0.7 MPa), hot water is released into the main line. The most efficient program is installed for the collector. The tests are carried out within half an hour. During this time, the water pressure should not decrease by more than 0.07 MPa. The second stage of crimping lasts for at least a couple of hours, but under low pressure (1 MPa). As a result of the test, this indicator should not fall by more than 0.025 MPa.
Having received positive test results, you can begin pouring the screed with concrete mortar, where it is recommended to add sand to increase the density.
Laying scheme
Laying a water pipeline for a warm water floor is carried out in one of the following ways:
Classic "snail"
It is a spiral in which hot and cold circuits run parallel to each other, evenly distributing heat on the surface.
This layout has a number of undeniable advantages:
- low hydraulic resistance;
- smooth angular bending;
- possibility of saving material.
Disadvantages include:
- complexity of drafting;
- complexity of installation.
Select a contour laying scheme
- It is much easier to lay pipes in a “snake” pattern, but do not forget about the “zoning” feature of this scheme.
- The “snail” (spiral) layout is more labor-intensive and takes more time, but it will ensure a uniform flow of heat into the room.
If none of these options fit into the dimensions of the room, you need to use a universal scheme.
- Draw the selected installation scheme on the drawing.
Measure the total length of the contours and multiply the resulting figure by the scale index. For example, the total length of the pipeline in the drawing on a scale of 1: 20 was 50 cm. To get the real number, you need to multiply the length by 20, that is, by the number of times the drawing is reduced.
The next stage is determining the distance between the contours of the heated floor (laying step). When making calculations, it is important to take into account the inverse dependence of the laying step on the general climate of the room: the cooler the room, the wider the contours need to be laid out in order to increase the heating density.
The distance between the pipes also depends on their diameter. Several average values have been calculated for this indicator. They are the most convenient to use in practice.
Minimum laying pitch for pipes:
- 10-15 cm – diameter 16 mm;
- 15-20 cm – with a diameter of 20 mm;
- 20-30 cm – with a diameter of 25 mm or more.
Having completed the basic calculations, you need to determine the required quantity and purchase additional consumables:
- insulation for thermal insulation - foam mats or mineral wool;
- waterproofing film - there is a wide range of high-quality polyethylene coatings on the market;
- damper tape - a kind of backup seal used to better secure the screed;
- reinforcing mesh with medium cells;
- a set of fasteners - special clamps or clamps that allow you to securely fasten the circuits.
You will also need a manifold, auxiliary manifold sensors (if necessary), a manifold mixer, fittings, finishing coating - carpet, laminate, linoleum or tile (depending on individual preferences).
You should also purchase the following tool:
- unwinder - a device for unwinding rolls of insulation, film or reinforced mesh;
- pipe cutter – selected taking into account the pipe material;
- drill;
- screwdriver;
- soldering iron;
- a wrench (preferably an adjustable one).
After the materials and tools have been purchased, you can proceed to the actual installation of the structure. Successful installation of floor contours depends on following instructions and recommendations. However, it is necessary to take into account some construction subtleties that allow you to perform the work more efficiently.
A few words about crimpers and materials
Pressing tools can be purchased at almost any store that sells building materials, as they are used for a number of construction jobs and are not in short supply. They will help with the installation of almost any pipeline; they may have removable nozzles. They are compact and easy to use.
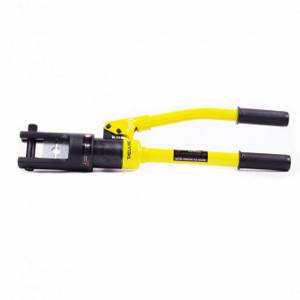
Hydraulic crimper
Materials for arranging water floors must be of high quality and reliable - the service life of the system will directly depend on this. It is also important to pre-calculate the material consumption. According to information received from experienced craftsmen, a 100 m bay is sufficient for 20 m2 of area. Calculations are made based on data on the area of the heated area.
Advice! It is better to refuse to buy materials and tools made in China.
Water heated floor
Nuances of installing heated floors
Installing a water floor system with your own hands is not difficult.
The main thing is to carefully follow the technology:
- dismantle old flooring;
- if necessary, restore the ceiling or fill the internal screed;
- insulate the base and secure the thermal insulation layer with damper tape;
- cover the surface with waterproofing film and secure it with wide adhesive tape;
- put the fittings;
- install the collector and connect the pipe to it;
- lay the pipeline according to the chosen scheme, strictly observing the calculated laying step;
- fix the contours using a special fastening;
- fully connect and test the heating system;
- if everything is done correctly, fill the screed with concrete;
- apply a decorative coating.
Installation does not take much time (except for the drying time of the screed). The above algorithm is absolutely universal and accessible to everyone.
However, there are a number of nuances:
- The laying pitch varies depending on the rigidity of the pipe. Accordingly, for plastic polyethylene and metal-plastic structures it is less than for solid propylene and copper.
- To make the pipeline more reliable, it can be reinforced with self-tapping screws screwed into the base.
- To avoid leaks, it is necessary, if possible, to minimize the number of joints and strengthen the connection with metalwork.
- If the contours overlap with the damper tape, then these places need to be reinforced with a protective coupling.
- It is more rational to fill the screed along the beacons. Then the base for the decorative flooring will be much smoother.
- Collectors and sensors are installed depending on the type of residential premises. In apartments, a special wall niche is adapted for them. In private homes, thermostats are installed in the basements.
Flaws
Like all other systems, water floors have disadvantages:
- complexity of installation;
- installation of a water pump is required to increase water pressure in horizontal pipes;
- reducing the height of the room due to several layers required for the installation of such a system;
- are not suitable for use in apartments, since such a system reduces the water pressure in the risers. For more information about the advantages and disadvantages of this design, watch this video:
Most often, a water floor is used for heating private houses, in which case it is fully justified in terms of durability and economic benefits.
It is best to involve specialists who will perform all the work, strictly adhering to installation technology. They will help you correctly calculate the consumption of materials and pipe laying pitch.