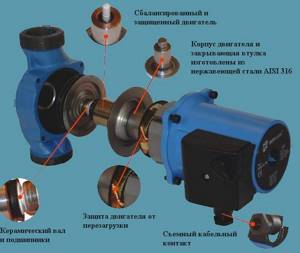
Two main characteristics of a circulation pump
With a long list of technical characteristics of heat pumps, there are two main ones. This is the diameter of the connection pipes and the power of the “accelerator”. These two numbers are considered decisive and are indicated in the name.
Connection pipe diameter
The most important parameter for pump installation, especially with already installed heating systems. This is a numerical value indicated in millimeters and indicating the diameter of the heating pipes that can be connected to the inlet/outlet pipes.
Please note that for connection to the body pipes, taps are made with threaded threads.
Power
Power in heating systems is the ability to raise water to a certain height or pump pressure.
In the marking of Grundfos pumps, the power is indicated in meters multiplied by 10 or atmospheres multiplied by 100. That is, Grundfos with the ability to raise water by 5 meters (pressure 5 meters), the marking will receive the figure 50 or 0.5 atm. (atmospheres).
Example: Circulation pump Wilo Star 30/2, means that the diameter of the connection pipes is 30 mm, the pressure is 2 meters.
In Wilo markings, power is indicated simply in meters.
Example: Grundfos UPS 25 40 (130 mm), means that the diameter of the connection pipes is 25 mm (1/2 inch), the pressure is 4 meters. 130 is the installation length.
Distinctive features of circulation pumps
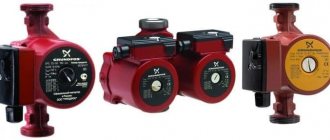
Each modern model has its own special technical characteristics of the Grundfos circulation pump. Thanks to timely familiarization with the properties and parameters of a particular model, you will save your time, which could be spent searching for and checking similar equipment purchased in a store. Grundfos is a famous Danish company that manufactures pumps.
The most attractive thing about Grundfos models is their small size and relatively light weight. These parameters of the Grundfos pump will simplify the process of installation and placement in a room of any size.
Installing a circulation pump in a heating system near living rooms will not create any inconvenience. Consumption of a small amount of electric current during operation determines the efficiency of heating. In addition, the developers offer some pump models that do not require special installation. It will not be difficult to install pumps from Grundfos yourself. Because especially for such cases, you can easily find detailed video instructions on the Internet with step-by-step pump installation
Source
Basic rules for pump installation
When installing an electric pump for heating, you must remember to follow a number of important rules:
The electric pump for heating the house is connected according to the following algorithm:
Knowing how to install an additional pump in the heating system, you can easily carry out this procedure yourself. Positive changes in the use of a heating system with an embedded pump are noticeable in the first days of operation.
It is better to buy a pump for an automatic heating boiler. This way you can protect the device from improper use. When connecting equipment to the network, it is better to use an automatic fuse with a flag, which will perform two functions: a fuse and a switch. The fuse should be installed at a distance of more than 50 cm from the boiler.
You can install the pump in a heating system that already has one pump. But here we need to take into account some nuances. The pumping device turns on when the thermal relay is activated.
In order for both devices to work synchronously, the second device must also be connected to the relay.
An additional pump can be connected to the main one by parallel connection. Knowing how to connect the heating pump to the electrical network, this will not pose any particular difficulties.
Most often, pumping equipment operates on 220 volts. But there are units that operate on 380 volts. Today on sale you can also find a 12-volt heating pump with a smooth speed variator. Such units are indispensable if there is no possibility of connecting to a 220 volt power supply. Thanks to the electronic speed variator, the pump starts smoothly, and it is possible to set the exact parameters of the device. But still, a 12-volt heating pump is used extremely rarely.
Where to put
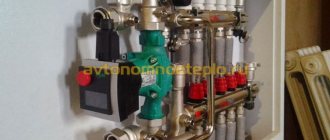
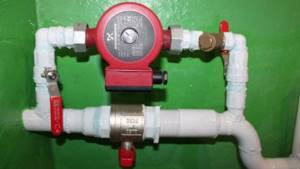
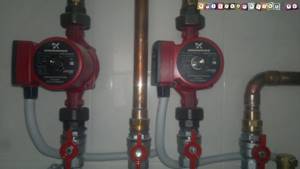
It is recommended to install a circulation pump after the boiler, before the first branch, but on the supply or return pipeline it doesn’t matter. Modern units are made from materials that can withstand temperatures up to 100-115°C. There are few heating systems that work with a hotter coolant, so considerations of a more “comfortable” temperature are untenable, but if you feel safer, put it in the return line.
Can be installed in the return or direct pipeline after/before the boiler up to the first branch
There is no difference in hydraulics - the boiler, and the rest of the system; it makes absolutely no difference whether there is a pump in the supply or return branch. What matters is the correct installation, in terms of strapping, and the correct orientation of the rotor in space
Nothing else matters
There is one important point regarding the installation location. If the heating system has two separate branches - on the right and left wings of the house or on the first and second floor - it makes sense to install a separate unit on each, and not one common one - directly after the boiler. Moreover, the same rule remains on these branches: immediately after the boiler, before the first branch in this heating circuit. This will make it possible to set the required thermal conditions in each part of the house independently of the other, and also in two-story houses to save on heating. How? Due to the fact that the second floor is usually much warmer than the first floor and much less heat is required there. If there are two pumps in the branch that goes up, the speed of movement of the coolant is set much lower, and this allows you to burn less fuel, without compromising the comfort of living.
There are two types of heating systems - forced and natural circulation. Systems with forced circulation cannot work without a pump; systems with natural circulation work, but in this mode they have lower heat transfer. However, less heat is still much better than no heat at all, so in areas where electricity is often cut off, the system is designed as hydraulic (with natural circulation), and then a pump is installed into it. This gives high heating efficiency and reliability. It is clear that the installation of a circulation pump in these systems is different.
All heating systems with heated floors are forced - without a pump, the coolant will not pass through such large circuits
Forced circulation
Since a forced circulation heating system without a pump is inoperative, it is installed directly into the gap in the supply or return pipe (of your choice).
Most problems with the circulation pump arise due to the presence of mechanical impurities (sand, other abrasive particles) in the coolant. They can jam the impeller and stop the motor. Therefore, a mesh dirt filter must be placed in front of the unit.
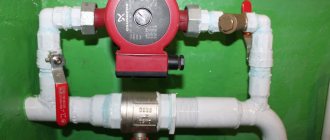
Installing a circulation pump in a forced circulation system
It is also advisable to install ball valves on both sides. They will make it possible to replace or repair the device without draining the coolant from the system. Turn off the taps and remove the unit. Only that part of the water that was directly in this piece of the system is drained.
Natural circulation
The piping of the circulation pump in gravity systems has one significant difference - a bypass is required. This is a jumper that makes the system operational when the pump is not working. One ball shut-off valve is installed on the bypass, which is closed the entire time the pumping is running. In this mode, the system operates as forced.
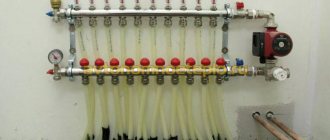
Installation diagram of a circulation pump in a system with natural circulation
When the electricity goes out or the unit fails, the valve on the jumper is opened, the valve leading to the pump is closed, and the system operates as a gravity system.
Installation features
There is one important point, without which the installation of the circulation pump will require rework: it is necessary to rotate the rotor so that it is directed horizontally. The second point is the direction of flow. There is an arrow on the body indicating which direction the coolant should flow. This is how you turn the unit so that the direction of movement of the coolant is “in the direction of the arrow”.
The pump itself can be installed both horizontally and vertically, just when selecting a model, make sure that it can work in both positions. And one more thing: with a vertical arrangement, the power (pressure created) drops by about 30%. This must be taken into account when choosing a model.
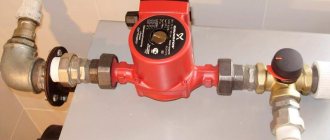
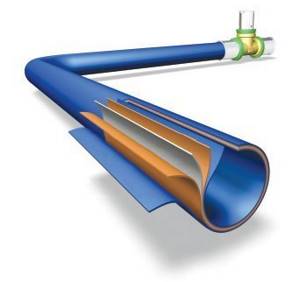
What is a BP/BP connection?
The detachable connection BP/BP of the heating system is a set of adapters that allows you to connect the pipe to the pump body.
BP/BP adapters are used to connect circulation pumps. Here is an example: Photo of an adapter for connecting a BP/BP pump (1 1/2″ - 1″). This means that the pump nut has a diameter of one and a half inches (32 mm), and the pipe connection nut has an inch (25 mm) diameter.
On the nameplate of the pump and in its description, the diameter G is often indicated; this is the diameter of the union nut for the pump. Pumps are sold complete with connection adapters.
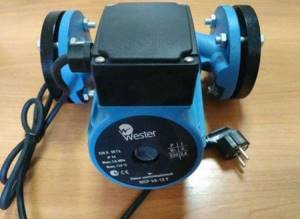
Note: Threaded connection of circulation pumps is typical for low-power household pumps. More powerful pumps are connected via flange connections.
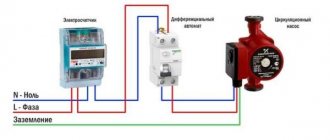
Power connection
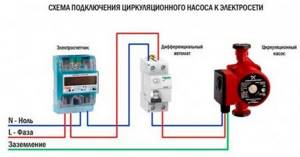
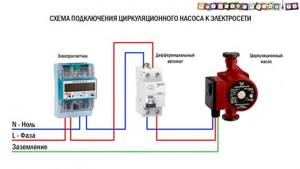
The circulation pumps operate from a 220 V network. The connection is standard; a separate power supply line with a circuit breaker is desirable. The connection requires three wires - phase, neutral and ground.
Circulation pump electrical connection diagram
The connection to the network itself can be organized using a three-pin socket and plug. This connection method is used if the pump comes with a connected power wire. It can also be connected via a terminal block or directly with a cable to the terminals.
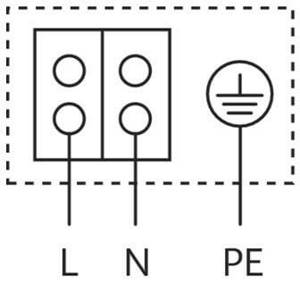
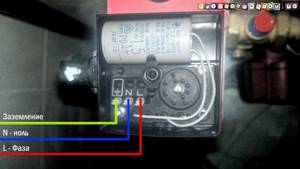
The terminals are located under a plastic cover. We remove it by unscrewing several bolts and find three connectors. They are usually labeled (the pictograms are N - neutral wire, L - phase, and “ground” has an international designation), so it’s hard to make a mistake.
Where to connect the power cable
Since the entire system depends on the performance of the circulation pump, it makes sense to make a backup power supply - install a stabilizer with connected batteries. With such a power supply system, everything will work for several days, since the pump itself and the boiler automation “pulls” electricity to a maximum of 250-300 W. But when organizing, you need to calculate everything and select the battery capacity. The disadvantage of such a system is the need to ensure that the batteries do not discharge.
How to connect a circulator to electricity through a stabilizer
Automation for Grundfos submersible pump
Electronic control units automatically control pumping equipment without human intervention. The equipment monitors many system parameters: pressure force, network voltage and operating temperature of the drive winding.
Grundfos presents a wide range of electronic equipment.
This allows you to select equipment for any operating conditions:
Advantages of the Grunfos well pump.
Automation units can be installed on any pumping mechanisms, thereby turning the devices into full-fledged pumping stations.
Electrical repair
The electrical part of the pump includes the following components:
If the stator winding breaks down, the pump becomes unrepairable; all other components can be repaired or replaced. To analyze the condition of electrical parts, you will need an ohmmeter.
Photo of the circulation pump Wilo MTSL 15/5 HE – 2.
Main symptoms of malfunction
If the boiler display shows an error code corresponding to a water circulation problem, and it is not reset, the problem may be hidden in the electronic part of the device.
Source
What is important to know?
The wiring diagram and methods of connecting a device such as a circulation pump to electricity can have different designs. The choice of a specific option is determined by the characteristics of the heated object, as well as the location where the device is located. There are two ways to connect it:
By choosing the first method, the consumer risks being left without heating in the event of a prolonged power outage. This option can be considered justified only if there is a high degree of reliability of power supply, reducing the likelihood of a long power outage to a minimum, and also if there is a backup source of electrical energy at the site. The second method is preferable, although it requires additional costs.
Connection methods
Electrical connection using a plug and socket
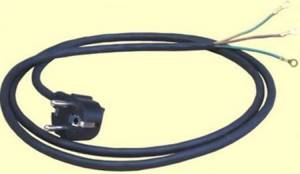
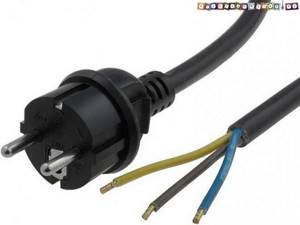
. This method involves installing an electrical outlet in close proximity to the place where the circulation pump is mounted. Sometimes they can be supplied with a connected cable and plug included, as in the photo:
In this case, you can simply plug the device into the mains using an outlet located within reach of the cable. You just need to make sure there is a third, grounding contact in the outlet.
Before connecting the circulation pump, you need to find out which of the three wires of the cord is connected to the ground pin of the plug. This can be done using an ohmmeter, while at the same time checking the integrity of the remaining wires.
Open the terminal box cover. Inside the box there are three terminals designed to connect the device to the network, marked as in the picture:
We unscrew the clamp of the cable coupling (in the first photo it is a plastic nut into which the cable is inserted), put it on our cord, and insert the cord into the coupling. If there is a cable tie inside the box, thread the cord through it. We connect the ends of the cord wires, previously stripped of insulation, to the terminals.
The wires connected to the plugs of the plug should be connected to the L and N terminals (don’t be afraid to mix them up, this is not critical), the wire of the grounding contact of the plug should be connected to the PE terminal (but you can’t make a mistake here). The instructions supplied with the product prohibit its operation without protective grounding. Next, tighten the clamp (if any), tighten the cable sleeve clamp tightly, and close the terminal box cover. The pump is ready to be plugged into the mains.
Fixed connection.
The connection diagram for the circulation pump to the electrical network with grounding is provided below:
The requirements for the wire cross-section here are the same as in the previous version. The cable for this installation can be used either flexible or inflexible, copper, VVG brand, or aluminum, AVVG. If the cable is inflexible, the installation should ensure that it does not move. To do this, the cable along the entire route is secured with clamps.
How to connect the circulation pump to electricity?
The circulation pump is an important element of modern heating systems. It is needed for forced circulation of water in the heating system, which allows you to save up to 30% on heating private houses and cottages.
The savings lie in the fact that the coolant quickly passes through the pipes, as a result of which the water does not cool down so quickly and, accordingly, there is no need to heat it very much. This article will discuss the correct connection of the circulation pump to the electrical network.
Diagrams and video instructions will help you carry out electrical installation yourself without errors!
What is important to know?
The wiring diagram and methods of connecting a device such as a circulation pump to electricity can have different designs. The choice of a specific option is determined by the characteristics of the heated object, as well as the location where the device is located. There are two ways to connect it:
- direct connection to a 220 V power supply;
- connection to an uninterruptible power supply, which in turn is connected to a 220 V or 220/380 V network (in the case of a three-phase UPS).
By choosing the first method, the consumer risks being left without heating in the event of a prolonged power outage.
This option can be considered justified only if there is a high degree of reliability of power supply, reducing the likelihood of a long power outage to a minimum, and also if there is a backup source of electrical energy at the site. The second method is preferable, although it requires additional costs.
Connection methods
Connection to the electrical network using a plug and socket . This method involves installing an electrical outlet in close proximity to the place where the circulation pump is mounted. Sometimes they can be supplied with a connected cable and plug included, as in the photo:
In this case, you can simply plug the device into the mains using an outlet located within reach of the cable. You just need to make sure there is a third, grounding contact in the outlet.
If there is no cord with a plug, they need to be purchased or removed from an unused electrical appliance. You should pay attention to the cross-section of the cord conductors. It should be between 1.5 mm2 and 2.5 mm2. The wires must be stranded copper, ensuring resistance to repeated bending. The cord with a plug for connecting electrical appliances to the network is shown in the photo below:
Before connecting the circulation pump, you need to find out which of the three wires of the cord is connected to the ground pin of the plug. This can be done using an ohmmeter, while at the same time checking the integrity of the remaining wires.
Open the terminal box cover. Inside the box there are three terminals designed to connect the device to the network, marked as in the picture:
We unscrew the clamp of the cable coupling (in the first photo it is a plastic nut into which the cable is inserted), put it on our cord, and insert the cord into the coupling. If there is a cable tie inside the box, thread the cord through it. We connect the ends of the cord wires, previously stripped of insulation, to the terminals.
The wires connected to the plugs of the plug should be connected to the L and N terminals (don’t be afraid to mix them up, this is not critical), the wire of the grounding contact of the plug should be connected to the PE terminal (but you can’t make a mistake here).
The instructions supplied with the product prohibit its operation without protective grounding. Next, tighten the clamp (if any), tighten the cable sleeve clamp tightly, and close the terminal box cover.
The pump is ready to be plugged into the mains.
Fixed connection. The connection diagram for the circulation pump to the electrical network with grounding is provided below:
The requirements for the wire cross-section here are the same as in the previous version. The cable for this installation can be used either flexible or inflexible, copper, VVG brand, or aluminum, AVVG. If the cable is inflexible, the installation should ensure that it does not move. To do this, the cable along the entire route is secured with clamps.
In this option, a residual current device (differential circuit breaker) is used. Instead, you can use a regular single-pole circuit breaker, passing only the phase wire through it.
If the machine is installed in a panel where there is a PE bus, then the cable from the pump to the machine must be three-core. If there is no such bus, the PE terminal should be connected to a grounding device.
This connection can be made with a separate wire.
Separately, I would like to consider such an installation option as connecting the pump to the UPS. It is the most preferable and ensures the independence of the heating system from power outages. The connection diagram of the circulation pump to the uninterruptible power supply is provided below:
The power of the UPS should be selected based on the power of the pump motor.
The capacity of the battery is determined by the estimated time of autonomous power supply of the circulation pump, that is, the time when the power supply is turned off.
We talked about how to choose a UPS for a boiler in a separate article. Requirements for cable cross-section, as well as the presence of protective grounding, apply to all connection options.
Finally, we recommend watching video instructions for connecting various pump models to the electrical network:
Connection diagram of the circulation pump to the thermostat
So we looked at how to properly connect the circulation pump to the electrical network. The diagram and video examples helped to consolidate the material and clearly see the nuances of installation!
It will be useful to read:
Each modern model has its own special technical characteristics of the Grundfos circulation pump. Thanks to timely familiarization with the properties and parameters of a particular model, you will save your time, which could be spent searching for and checking similar equipment purchased in a store. Grundfos is a famous Danish company that manufactures pumps.
How to connect the circulation pump to the mains
For proper operation, any circulation pump requires a phase, a working zero and grounding (protective zero), respectively, the diagram for connecting the pump to the electrical network is as follows:
We discussed in some detail the standard connection diagram for a circulation pump, as well as the connection diagram for a pump via a thermostat and an uninterruptible power supply (UPS), in the article “Connection diagram for a circulation pump.”
There are usually two main ways to connect the pump to the electrical network:
Electrical wiring is carried out to the pump and a standard socket is installed at the end, no matter external or internal.
In this case, a cable with a plug, for example SHUCKO type or another, is connected to the pump, always with protective grounding contacts.
Then the plug is plugged into the socket and thereby provides power to the circulation pump.
2. Connect directly
Electrical wiring is carried out to the installation site of the circulation pump and the connection is made using the same cable, without any unnecessary connections.
Each of these methods has its own disadvantages and advantages, and one of them is chosen depending on the specific circumstances. As an example of installation, the option of connecting the circulation pump to the electrical network directly will be used.
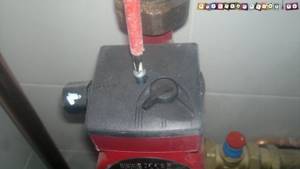
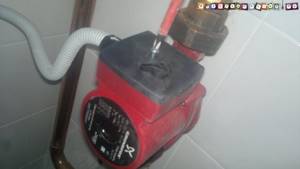
1. GRUNDFOS UPS 25-40 circulation pump installed in the heating system of the house
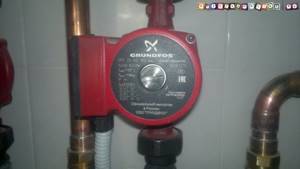
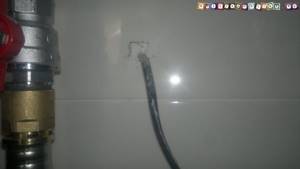
2. Concealed electrical wiring to the pump was made according to the following scheme:
The power cable, in a protective PVC corrugation, comes out of the wall at the connection point.
Maintenance of circulation pumps
Pump malfunctions and ways to eliminate them
The design of a circulation pump with a “wet” type rotor is based on a modular principle. Modules can be configured in different configurations. It all depends on the power and size of the pump.
Any repair work can only be carried out if the power is completely turned off and the area has been drained.
Malfunctions of the heating circulation pump:
- The pump turns on, sounds are heard, but the shaft does not rotate. Why is the heating pump noisy and why do other “symptoms” appear? The reason may be oxidation of the shaft after a long period of inactivity of the device. If the pump is blocked, the device must not be left on. It is necessary to drain the water and all the screws that connect the pump housing with the electric motor must be unscrewed. Next, we remove the engine itself, and its impeller is turned manually. If the pump is of low power, the shaft can be unlocked by turning it with a screwdriver. For this purpose, there is a special notch at the end of the shaft.
- A foreign object has blocked the wheel. How to disassemble a heating circulation pump? We dismantle the pump motor using the above method. To prevent blocking from happening again, a mesh type filter must be installed in front of the pump.
Let's start connecting the circulation pump to the electrical network
As a result, we gain access to the terminals for connecting the pump to the network, as well as to the cable entry through which the power cable enters the terminal box.
The GRUNDFOS UPS 25-40 circulation pump has spring terminals, so in order to connect the power cable cores, you just need to press the levers under each of them.
Let me remind you once again that the order of connecting the wires is indicated in the diagram at the beginning of the article. If you are confused with terminal markings, be sure to check out my article “N and L designations in electrical engineering”
This completes the connection of the circulation pump to the electrical network. It is recommended to check the operation of the pump in a completely finished heating system filled with coolant.
If you still have questions about connecting the circulation pump to the electrical network, or have any additions or comments to the material, be sure to write in the comments to the article, we’ll figure it out together!
Source
Installation and connection of Grundfos pumps
Installation and connection of each model is carried out according to the general plan. Modern pumps are supplied assembled; they only need to be installed and connected.
Sequence of work:
- install a check valve;
- attach the supply pipe;
- an electrical cable is attached to it loosely and sagging with clamps;
- attach a cable to the pump;
- lower the structure;
- fix the cable.
Launch and check the operation of the system.
Source: https://vodasovet.ru/nasos/kolodeznye-nasosy-grundfos