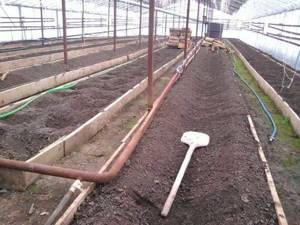
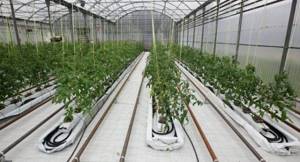
If anyone doubts whether soil heating is needed in a greenhouse, look at the photo below. Under this bed there was a “return” pipe from the radiator heating. As you can see, the onion feather is twice as tall and better in quality. From this plot it was possible to harvest almost twice as much harvest (by weight). After this result, the next season the owner heated all the beds. Very convincing.
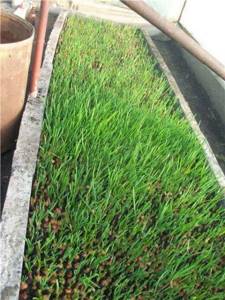
The heating return pipeline ran under this bed. Based on the height and thickness of the feather, it is easy to find out exactly where. After such a clear demonstration of the need to heat the soil, the next season a warm water floor was installed under all the beds
How to heat the soil in a greenhouse
Judging by the feedback from practitioners, everyone who wants to make a warm floor in a greenhouse has only one option: a water floor. It is the most economical. The way of organizing it may be different. Some install a separate boiler that serves only pipes buried in the ground, while others supply water to them from the “return” of radiator heating.
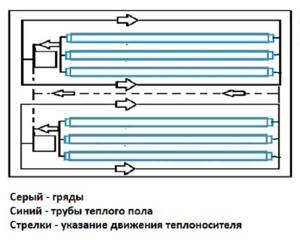
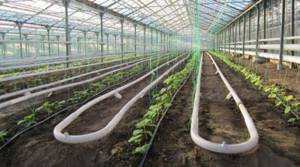
Water heating pipes are laid both in the ground and in pallets. Both options are used and work well. The only difference is that it takes longer to warm up the soil than to warm up the soil in pallets. This is understandable: the mass is different. In any case, solid pipes are buried in the ground without connections and fittings. This way there will be no leaks. The number of underfloor heating loops per bed depends on the heat-loving nature of the crop. Cucumbers, for example, love warm soil; tomatoes can be cooler. Most often, one circuit (supply and return) of a warm floor goes to one bed.
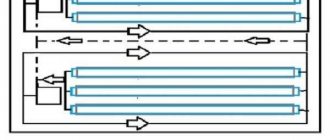
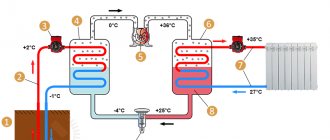
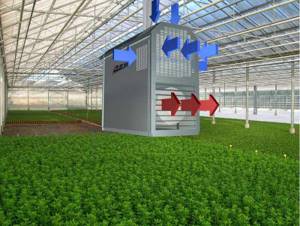
One of the options for connecting a heated water floor: first, the coolant goes to registers or radiators located around the perimeter of the greenhouse, and then to the contours of the heated floor. In this scheme, two boilers are used, and there are two circuits that complement each other
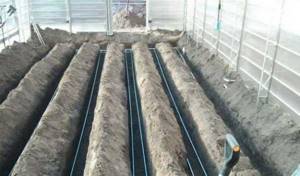
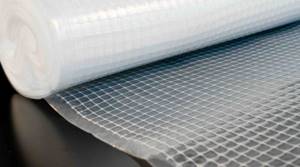
To preserve heat, it is advisable to lay Izolon or foil material at the very bottom. Then, after reaching operating temperatures, the fuel consumption to maintain it will be small. In general, the less heat is lost, the better. Therefore, if you plan to grow something on the ground, it is advisable to make a heat-saving layer. It is necessary to remove the soil to a certain depth, and fill (or lay) a layer of some heat-insulating material. Optimally, polystyrene foam of sufficient thickness. Lay Izolon or similar material on the heat insulator, and then the warm floor.
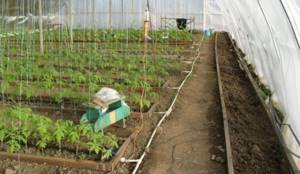
Here a layer of expanded clay is used as a heat insulator. But for greater efficiency it was necessary to lay down a metallized film or foil
The depth of laying pipes depends, firstly, on the crops grown, and secondly, on the desire of the owner. Some people think that it is optimal to lay it 40-50 cm deep, while others bury it only 20 cm. Both options work. The inertia of the system changes. When laying deep, it is necessary to heat the soil for a long time and persistently to reach normal temperature (two weeks or even more). But then you can turn off the floor heating in the greenhouse at night (or vice versa - for the day): high thermal inertia will not allow the plants to freeze. If you plant it shallowly, you won’t be able to afford this, but reaching normal temperatures will be faster in 6-10 days. In this case, you need to carefully control the temperatures: you can burn the root system, and you also need to be careful when working in the ground.
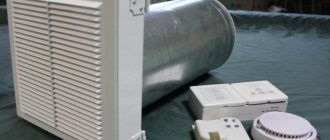
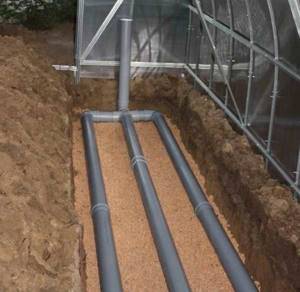
The second option in terms of economy and efficiency: air heating of the soil. Asbestos pipes are buried in the ground, and heated air is supplied to them using fans of the air duct system. The system is not very efficient due to the low heat capacity of the air. But you can make the flow rate higher by using more powerful fans.
The depth of laying pipes can be different - from 50-70 cm to 20-30 cm
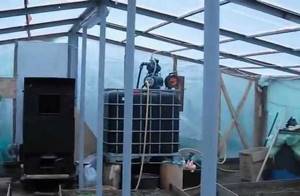
How to heat the air in this case? One of the convectors. The most effective of the solid fuels is Buleryan. You can make a special box around it that will collect heated air, and from this box you can route air ducts to pipes buried in the ground. This system is gentle and comfortable for plant roots.
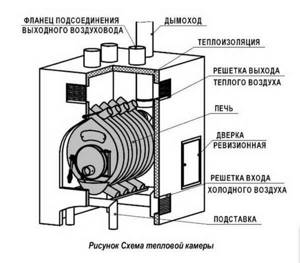
Having made such a chamber to collect warm air, you can then “drive” it into pipes under the beds
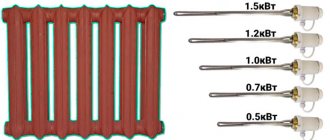
Electric heated floors can be installed in a greenhouse only in one case: if you have a lot of money and a three-phase transformer. With a legal connection, the cost of production (any) will be higher than the market price. Therefore, there is not a single review on the use of this method of heating the soil in a greenhouse. It's simply not used.
How to make heating?
Installation of the systems is carried out according to a single principle - the heating element is placed underground, according to the following algorithm:
- Remove the top layer of soil, approximately 40 cm.
- Level the bottom, then add 5 cm of sand and compact it.
- Spread a thermal insulating film on top, for example, polystyrene foam - thanks to this, it is possible to retain heat and prevent it from escaping deep into the soil.
- Fill in 5 cm of sand.
- Lay a stainless mesh with 5–10 cm cells.
- Laying of heating elements.
- Cover with wet sand - a layer 5 cm thick.
- Cover everything with a net - both plastic and stainless steel are suitable for this purpose. This layer is necessary in order to protect the heating source from any damage.
- Finally, we fill the structure with fertile soil - for this, the initially removed layer is mixed with fertilizers.
Which pipes to use
Here again there are two approaches:
- Use metal (for example, corrugated stainless steel) with high heat transfer. In this case, the installation step is made larger - the heat is transferred well. But here you need to be careful not to burn the roots of the plants.
- Use plastic or metal-plastic pipes. Their heat dissipation is much lower than that of metal, but for some cases this is not bad. For example, pyrolysis boilers do not work well at low return temperatures. In the case of metal-plastic or polypropylene, the temperature difference will be more or less comfortable for such a unit. If you lay metal, then almost cold water will reach the boiler, which will immediately lower the temperature and may disrupt its operating mode. If this situation repeats constantly, expensive equipment (pyrolysis machine) will simply fail.
At low supply temperatures (40°C and below), ordinary black polyethylene pipes can be used. But the reviews here are different. For some they work, others are dissatisfied because they constantly leak from under the fittings. In general, the situation here is this: which pipes in the region are sold cheaper from suitable materials, those are the ones they take. The length of the circuits for heating the soil in the greenhouse is quite large, so this approach is justified. All existing pipes for a warm water floor are also acceptable for heating the soil in a greenhouse (except copper ones, and only because of the price). The only question is cost and feasibility. Therefore, everyone chooses what they consider necessary.
You can use any pipes - the temperatures will obviously be low. Most often they buy those that are cheaper in a particular region.
The system can be organized in different ways. It all depends on volumes and needs. But it’s more rational to do it through a standard comb for a water floor with minimal bells and whistles. Just with shut-off valves and an air vent. Or make a similar design yourself.
Effectiveness of increasing ground temperature
Maintaining normal microclimate parameters is very important when growing plants, especially heat-loving ones, because the growth rate, as well as the crop’s resistance to diseases, depends on temperature.
Find out how to make a vegetarian greenhouse with your own hands.
Equipping a greenhouse with soil heating guarantees compliance with these standards; in addition, the advantages of this method include:
- Keeps you warm. The loss of resource through the soil is eliminated.
- Planting is not tied to the season, which makes it possible to grow crops at any time of the year.
- High growth rate. In warm soil conditions, the horse system develops more intensively, which, in turn, affects the ground part, including the fruits.
- Increased productivity.
- Plants are not afraid of frost.
Which boiler to use
Since it is important to maintain a constant temperature in the greenhouse, the best option is automatically controlled boilers paired with a thermostat inside the greenhouse. But it's a matter of means. All these units are not cheap at all. However, if possible, buy automated ones. In addition to maintaining a stable temperature, they also save fuel. How? They produce the amount of heat that is currently needed to maintain the set temperature. That is, they will not allow your plants to freeze (if there is fuel) when the temperature suddenly drops, delivering their maximum power. But they will not produce excess heat during an equally sudden warming. In this case, they will simply switch to circulation mode and drive water through the pipes without heating (or with minimal heating - depending on the type of fuel) until the temperature drops below the set one. Then the active mode is turned on again, but only until the specified thermal mode is reached.
If you are going to heat with wood or coal, pay attention to pyrolysis boilers. Although they are expensive, wood in them burns for up to 8 hours, and coal lasts for 24 hours. And you don’t need to “live” in a greenhouse or keep a stoker.

Boilers with automated controls performed best in the greenhouse, and you need to choose any fuel that is available and at the same time inexpensive
How to calculate the boiler power for a greenhouse? In general, the surface area of the greenhouse is multiplied by the heat loss coefficient for the material with which the greenhouse is covered, and all this by the required temperature difference.
The temperature difference is considered to be between the minimum during the heating period outside and the required one in the greenhouse.
For example, we will be heating from February to April. The lowest temperature, even -18°C, will be maintained inside at +20°C. Total delta (difference) 38°C. Now let’s calculate the boiler power for such conditions in a greenhouse 10 x 5 x 2.5 m. Covered with double film. The area of all “film” surfaces of the greenhouse is approximately 150 m2, the coefficient of heat loss through the double film is 3.5. Total we get: 150*3.5*38=19950W. Rounding up we get 20 kW. For reliability, you can take a slightly more powerful boiler, approximately 24-25 kW (in case of expansion or abnormal cold).
Tips for gardeners
When choosing a system for heating a greenhouse, it is important to consider the cost of its operation, as well as the existing location. In the case of water heating, it is only advisable if the greenhouse is located near the house, which allows it to be connected to the central system, since the construction of a separate boiler room is financially intensive. Electric heating devices consume quite a large amount of electricity, which will affect your utility bill; in addition, they dry out the air, which negatively affects plants and requires the installation of a humidifier.
In terms of cost-effectiveness ratio, cable heating is considered the most optimal: for a room with an area of 24 m², 92 m of cable with a power of 1650 W is sufficient. The success of the procedure also depends on how long the heat is retained in the room.
To do this, you should think about thermal insulation of both the room itself and the heating elements. Now you know how to make a room warm with your own hands, why thermal insulation is needed in a greenhouse, and also what technology to choose, taking into account the cost-effectiveness ratio. Grow vegetables in the temperature conditions required for them, which will help you fully recoup your costs thanks to high yields.
Was this article helpful?
Thank you for your opinion!
Write in the comments what questions you have not received an answer to, we will definitely respond!
You can recommend this article to your friends!
Already helped once
What you need to know when arranging soil heating in greenhouses
When the soil is heated, the situation is somewhat different from the usual: the soil dries from the bottom up. Be that as it may, you will have to either conserve the moisture that is available or arrange watering. You can preserve moisture by laying mulching film (black). And if you moisten the soil, it is advisable to moisten it by drip: it is both more economical in terms of water consumption and better for plants. In general, it is optimal to do both mulching and watering in combination.
A heated floor system without a circulation pump is possible in principle, but it is absolutely unprofitable (you need to bury pipes of a much larger diameter) and ineffective. The speed of movement of the coolant in such systems is so low that the soil in the greenhouse does not warm up. Why are such systems made? To avoid freezing during a power outage. But since most greenhouses still try to install automated boilers, a backup power supply system is still necessary. Circulation pumps require very little power, so they will not greatly affect the cost of the equipment.
A warm water floor without a circulation pump in a greenhouse will be ineffective
If interruptions are short-term, an uninterruptible power supply (not a computer) with several car batteries connected in parallel is sufficient. This system can provide several hours of boiler and pump automation operation.
If outages are long, you need a diesel generator (or gas). To automatically turn on the generator in the event of a power outage, you also need an ATS (automatic transfer switch). This device automatically starts the generator in the event of a power failure. All this together costs quite a lot of money, but the heating in your greenhouse will work without failure. If you wish, you can save a little: the starting system can be assembled by any normal electrician. He can connect everything.
Of the nuances, that seems to be all. The question remains, what type of fuel should be used to heat the heated floor in the greenhouse. There are no options: the cheapest available. If you don’t see any, you can try to prepare some of the fuel yourself:
- Make fuel briquettes from waste, sawdust, coal dust, etc. You don’t need complex equipment for this; you can get by with a primitive press. But briquettes are an excellent fuel. Sunflower husks, for example, provide more heat than many firewoods.
- Install a biogas production plant. Despite the “scary” name, almost the entire installation is a container where manure and plant residues ferment. If you can get hold of such a “valuable” product as manure nearby (pig, cattle or poultry), then you can provide your greenhouse not only with gas, but also with electricity.
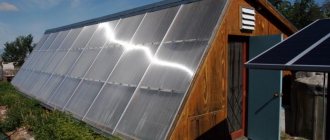
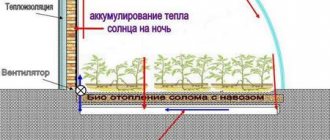
- For regions with a large number of sunny days (not with high temperatures in winter or spring, but with many clear days), part of the heat can be obtained from solar collectors.
Despite the fact that alternative energy is not yet very developed in our country, many people use it very successfully. Why not try it?
Rating of greenhouse heating options
In conclusion, we will make a comparative analysis of the considered options for heating greenhouses.
The easiest way to organize heating is with gas boilers and stoves running on solid fuel. Gas installations are easy to automate and create a comfortable microclimate for plants without auxiliary heat sources.
Buleryan stoves are not very convenient to use (the need for periodic manual loading of firewood). Their main advantages are low fuel cost and high heat transfer.
In second place you can put infrared emitters, cable heating systems and solar collectors. They are relatively inexpensive, easy to install and operate automatically. However, in terms of the cost of energy spent on generating a unit of heat, they are significantly inferior to gas and wood.
Heat guns occupy the third step in our rating. They are easy to maintain, can operate automatically, but are not economical. Heat pumps are located in the same niche. Despite the minimal cost of energy, the price of these installations is high and pays off for a very long time (8-12 years).
Greenhouse thermal insulation
- How to keep warm in a greenhouse
- Location of the greenhouse in space
- Other ways to insulate a greenhouse
The thickness of the outer plastic sheets of the greenhouse should be 1.5 cm. The thickness of the outer plastic sheets of the greenhouse should be 1.5 cm.
How to keep warm in a greenhouse
The most suitable material with high thermal insulation performance is polycarbonate sheets. This translucent plastic ensures minimal heat loss. A more advantageous material in terms of heat preservation is a three-layer coating, which consists of two polycarbonate layers and an air layer.
The thickness of the outer sheets of plastic should be 1.5 cm. For the inner layer, a thickness of 4 mm is sufficient. To minimize heat loss, special rubber seals should be used.
Insulation of the foundation and lower part of the greenhouse is of no small importance. The minimum depth of laying the foundation must be no less than the depth of soil freezing. Optimal thermal preservation indicators are typical for foundations made of adobe blocks, soaked in a cement solution and covered with a layer of polymer mastic. Roofing material must be laid on top of the foundation blocks, and the inside must be insulated with foam plastic and a layer of sand 40 cm thick
Roofing material must be laid on top of the foundation blocks, and the inside must be insulated with foam plastic and a layer of sand 40 cm thick.
Sheet polycarbonate is the most suitable material with high thermal insulation. Sheet polycarbonate is the most suitable material with high thermal insulation.
Location of the greenhouse in space
The correct location of the greenhouse structure helps to save energy resources and reduce heat loss. When constructing a greenhouse, you should select an area where solar illumination will be maximum:
- greenhouse structures in the northern regions should be directed from east to west;
- for Central Russia, the meridian orientation is represented by the location of the structure from north to south.
It is important to minimize shading of the greenhouse, and also, if possible, protect the building from strong winds
Insulation of the foundation and lower part of the greenhouse is of no small importance. Insulation of the foundation and lower part of the greenhouse is of no small importance.
Other ways to insulate a greenhouse
The gardener always has the opportunity to use other options to make the greenhouse structure warmer:
- use of high beds. The standard height of such a ridge should be 40 cm. In addition, the lower layer of soil will require insulation;
- the use of a heating cable, which should be laid along the greenhouse beds with a depth of 10 cm. A special type of such cable operates from a standard electrical network and combines efficiency with low costs;
- installation of a water heating system. This method is expensive and time-consuming. However, water heating is very efficient and reliable.
There are other ways to increase the temperature inside the greenhouse. Choosing the optimal option involves taking into account the terms of use of the greenhouse structure, as well as the cost of materials and maintenance costs of the system used. published econet.ru
If you have any questions on this topic, ask them to the experts and readers of our project here.
What is cable heating?
Most often, such heating is called cable underfloor heating. A system of heat-reflecting cables is laid under the top flooring. Their main difference from conventional ones is that the design uses not a metal core, but a carbonate semiconductor. It is this that serves as the main source of heat.
With such heating, there is a natural movement of heat flows, which allows you to evenly warm the entire area. When heated to a certain temperature, the soil begins to evaporate moisture, thereby providing, in addition to the main heating, a greenhouse effect.
Warming with air
In this case, as can be understood from the name, heated air acts as a heat carrier.
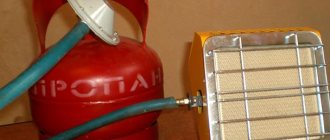
- Quite often, heating is now used in practice using gas catalytic burners, which heat the air in a greenhouse by burning natural or bottled gas. Cylinders are used in cases where heating is needed for a short period of time, for example in cases of frost.
- Another type of air heating is similar to water heating, only in this case, perforated polyethylene hoses are laid from the fuel boiler, through which warm air is supplied to the greenhouse, warming the soil.
- And finally, heating the greenhouse using a good old stove-stove. Despite its primitiveness, this method should not be written off. Its cheapness, simplicity and effectiveness speak for themselves.
Price of heating cable for greenhouses
| Name | Area, m2 | Power, W | Length, m | Size, mm | Price, rub |
| SNGT-2.0-248 | 2.0 m² | 248 W | 16.5 m | mm | 5160 rub. |
| SNGT-2.5-285 | 2.5 m² | 285 W | 19 m | mm | 5332 RUR |
| SNGT-3.0-345 | 3.0 m² | 345 W | 23 m | mm | 5557 RUR |
| SNGT-3.5-384 | 3.5 m² | 384 W | 25.6 m | mm | 5783 RUR |
| SNGT-4.0-458 | 4.0 m² | 458 W | 30.5 m | mm | 6070 rub. |
| SNGT-5.0-552 | 5.0 m² | 552 W | 36.8 m | mm | 6782 RUR |
| SNGT-6.0-675 | 6.0 m² | 675 W | 45.0 m | mm | 6961 RUR |
| SNGT-7.0-780 | 7.0 m² | 780 W | 52.0 m | mm | 7318 RUR |
| SNGT-8.0-855 | 8.0 m² | 855 W | 57.0 m | mm | 7360 rub. |
| SNGT-9.0-960 | 9.0 m² | 960 W | 64.0 m | mm | 9988 RUR |
| SNGT-10.0-1095 | 10.0 m² | 1095 W | 73.0 m | mm | 10319 RUR |
Thermal insulation and heating structures
You can insulate an external structure and provide air heating with your own hands, which will save money. For heating, even in the modern world, homemade potbelly stoves for greenhouses are often used to help maintain the desired temperature inside.
2.1. The process of insulation and sealing
In some cases, it is necessary to make additional insulation of a polycarbonate greenhouse, although the main material is considered quite reliable.
The whole process usually comes down to just two steps.
Rules for fastening polycarbonate sheets.
- First, the cracks and cold bridges that appear, through which heat escapes, are sealed. For this purpose, special sealing agents and materials are used, the price of which is relatively low.
- Then, if necessary, a second coating is installed from the inside, but in this case the thickness of the sheets can be minimal to ensure good light transmittance.
2.2. Interior heating
Water heating of a structure in many situations is realized using solid fuel boilers, polymer pipes and galvanized wiring. If the width of the room is small, then you can install heating devices along one of the walls, then convection currents will completely warm up the entire volume.
Brief instructions for assembling the main component are given below.
Working with a grinder when cutting out the main holes.
- Using a grinder, the pipe is cut to a length that will be equal to the height of the device. Holes are made in this element: one should correspond to the dimensions of the firebox door, and the other to the size of the blower.
- Four stops made from pieces of reinforcement or corners are welded on four sides. Thus, a grate will be located between the combustion chamber and the blower.
- There must be a cover above the combustion chamber, so the diameter of the pipe is marked on a metal sheet, after which a cut is made with a grinder. This component is fixed by welding.
- The same is done on the bottom side of the pipe, where the ash collection area will be located. Without this, homemade greenhouse heating will function rather poorly.
- At the last stage, elements about twenty centimeters long are prepared, made from angle steel. They will act as legs for the device. Fastening is carried out using welding.
The finished design is demonstrated.
Types of soil heating system: main varieties
There are three ways to heat the soil:
- natural;
- biological;
- technical.
With the first method, the soil is heated by the sun, with the second - with biological materials that, when decomposed, release heat (manure, straw, leaves). We will consider the technical method and its types in more detail in subsequent paragraphs.
Water circuits
A universal method that allows you to maintain the temperature of both soil and air. The idea is to lay a heating system from a small boiler room or from a central system under the top layer of soil.
- Pros:
- uniform heating of the area;
- does not reduce air humidity;
- moistens the soil through condensation formed on the pipes;
- availability.
Cable heating
A new and most effective method in which the heating element is a cable placed like a snake in the thickness of the earth.
- Pros:
- the ability to grow any crops;
- high plant growth rate;
- increasing productivity;
- automatic temperature control;
- durability of the installation;
- ease of installation;
- availability.

Air heating
Air from the heating device moves through pipes built into the soil. An alternative is heating using a stove installed in a pit, and the chimney is launched underground, which allows heating the air and soil.
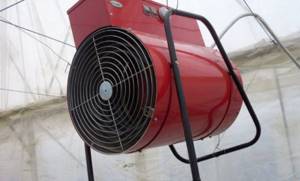
To quickly take action and increase the temperature, you can use portable heating devices: convectors, air heaters, air guns, etc.
Heating with plastic pipes
By laying plastic pipes under the top layer of soil, you can organize both water and air heating. It all depends on which heating element you choose. For soil heating, it is advisable to use plastic pipes - they do not rust, have a longer service life, and also release heat faster, but it is worth remembering that the temperature in the system should not exceed 95°C.
Film materials
In this case, infrared film is used, which has a number of advantages:
- does not affect air humidity;
- indicators are adjusted automatically;
- it is possible to create different temperature zones;
- suppresses the growth of pathogenic microorganisms;
- ease of installation;
- service life is about 30 years.
Does the location of the greenhouse matter?
Where this structure is located plays an important role in the efficiency of its operation. The key factor here is sun exposure.
The direction relative to the cardinal points is also important. The best option: install the structure along the north-south line
In this case, the sun will begin to warm up and illuminate the building along its entire length, starting from the eastern side.
Scheme of gas heating of a greenhouse.
The place for the greenhouse should be such that it is provided with wind protection. For this reason, practical site owners attach one side of it to a residential building or other building. This prevents heat loss due to chilling and wind chill. For the same purpose, you can place a polycarbonate structure near a high fence or a row of trees. But it should be installed not along them, but at the end. When providing wind protection, it is imperative to take into account the prevailing wind direction on the site. If you choose the right place for a greenhouse, it will definitely reward you with good harvests.
Active heating
In addition to insulation, which protects the structure from heat loss, in winter it is necessary to use special heating means and methods.
Air heating of a greenhouse
This is especially true if the greenhouse is used year-round or sown seeds of heat-loving plants are left in it for the winter.
Biological heating
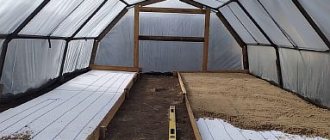
This method combines affordable cost with a relatively small amount of time and effort. The main task is to warm the soil and protect it from freezing during temperature fluctuations in winter; for this, environmentally friendly substances are used. The most popular solution is to arrange “warm” beds, which is done as follows:
- Excavation of soil in the area designated for planting, creation of a trench about 80-90 cm deep.
- Creating a drainage layer. It is optimal to use expanded clay: it retains heat well and is safe for plants.
- Laying the organic layer. It can be made from paper, thick branches, stumps; the main task is to form a dense bottom, the rotting of which occurs slowly.
- Laying a layer of leaves, hay, mulch. The thickness should be 18-20 cm.
- Formation of a biofuel layer. It serves as the main heat source; For preparation, a mixture of compost and manure with small sawdust and wood shavings is used. Thickness – 20 cm.
- The top layer is black soil or meadow soil with peat additives. The finished bed should protrude above the soil surface.
- Organic layers decompose when moisture from precipitation or groundwater enters the soil. The process is accompanied by an abundant release of thermal energy, which goes directly to the root system.
Using heating devices
Biological heating, despite many advantages, also has a disadvantage: it is aimed at the soil without affecting the air temperature. The use of heating equipment allows us to solve the problem; For this purpose, devices of different designs and power can be used.
The efficiency of heating largely depends on the area and layout of the building: for example, the corners freeze the most
For this reason, even at the design selection stage, you should pay attention, for example, to round polycarbonate greenhouses: their heating will be most uniform if the device is positioned correctly
Today, active heating can be organized using the following types of equipment:
- Solid fuel stove. It runs on coal, firewood, briquettes, sawdust pellets, warms the atmosphere well, but requires frequent addition of fuel. In addition, the heat distribution may be uneven and the greenhouse will have to be ventilated from time to time.
- Electric heaters. They maintain optimal thermal conditions and can work together with sensors that regulate air temperature. The downside is the high cost of equipment and high energy costs. In addition, installation of such equipment is possible only in dachas with permanent electricity.
- Water heaters. This option is suitable if the greenhouse is located in close proximity to a house or outbuilding that has heating. The batteries are installed inside the structure along a long wall; they provide economical and efficient heating. The downside is the fact that the system takes up a lot of space, which is not suitable for compact greenhouse buildings.
- Infrared equipment. Such panels are economical, compact, provide uniform atmospheric heating, but are more expensive than their analogues. They are usually purchased for industrial greenhouses.
When choosing equipment, you need to pay attention to power, dimensions, method of operation and cost. Its use allows you to create optimal conditions for growing heat-loving plants in the most severe frosts
Installation
Installation of a cable electric soil heating system in greenhouses consists of the following steps:
Under the greenhouse it is necessary to remove a layer of earth approximately 40 cm deep; Sprinkle the bottom of the hole with a 5-centimeter layer of sand. Sand needs to be spilled and compacted to make the base stronger; We place a reinforced mesh with cells of approximately 10 cm on the sand and lay out the heating cable on it. The cable should be secured to the mesh with plastic ties so as not to damage the outer sheath. The wire is laid out like a snake with a laying step of approximately 12-15 cm; Between the turns of the heating cable we install a temperature sensor, which it is advisable to place in a corrugated tube; Sprinkle the mesh with the cable with a 5-7 cm layer of sand and again spill and compact it; We put a fine-mesh reinforced mesh on top to protect the cable from mechanical damage with a shovel or other objects; We fill the system with a fertile layer of soil on top; Install the thermostat and connect the cable to it
Attention! It is advisable to install an RCD in front of the thermostat to ensure safety precautions against electric shock.
After completing all installation stages, you can safely plant seedlings and connect the plant root heating system in your new greenhouse.
Place for a greenhouse
Initially, you need to choose a good location for the greenhouse - this will help retain more heat and, accordingly, reduce heating costs. The main nuance here is sunlight. A good place is open to light and free penetration of heat.
It is advisable to place the structure in a place protected from the wind: for example, attach one side closer to the house or other building - the wind will not chill or cool it. Near trees or a high fence, the greenhouse should be placed not along, but with the end facing them. It is imperative to take into account where the wind most often blows in the area. An excellent option would be to place the structure like a winter garden: between two stationary walls, but at such a distance that they do not block the sun.