What to consider when choosing a heating system?
When choosing a heating system, you need to pay attention to the overall dimensions of the room and its type, because
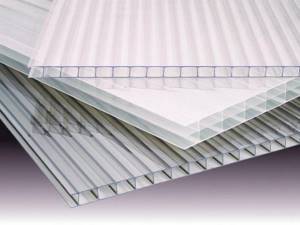
For different materials, the required heating intensity will also vary. For example, polyethylene is characterized by high heat loss, so a greenhouse made of this material will require more intense heating compared to a polycarbonate greenhouse. Polycarbonate greenhouse
When arranging heating for a greenhouse, take into account the total costs of installing the system and its maintenance. Some heating options require significant financial investments, and their use in small greenhouses will not be practical. Others are simple and inexpensive to install, but consume a lot of fuel during operation.
Greenhouse heating
Otherwise, the owner must decide for himself how beneficial the use of one or another heating option will be specifically for his situation. The main thing is that the system ensures uniform distribution of heat throughout the room, does not dry out the air and creates optimal conditions for the development of grown crops.
How to make a warm greenhouse for seedlings with a warm bed
For early sowing, the most effective way is to use warm beds buried below the soil level. Having laid the bed, all you have to do is cover it and wait until the combustion process begins and the soil warms up. Then you can sow the seeds.
To begin, loosen the soil with a walk-behind tractor, install the frame by knocking down the boards, and select the soil from the inside, going about 30 cm deep. Sprinkle the excavated soil from inside the frame - it will serve as a support and will help prevent rapid heat loss.
Now place it in the resulting recess in layers:
- 10 cm - medium-sized branches, straw;
- 40 cm of cow manure;
- 5 cm - straw again;
- 15 cm – a mixture of chernozem with humus.
Cover the warm bed with film and leave it to start “working.” Around the 6th day you can start sowing by placing arcs in front of it. Then stretch the film over them and your greenhouse is ready.
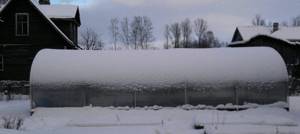
Greenhouse for winter - saving energy resources is the main task
Looking at winter greenhouses with your own hands, videos or descriptions, you can understand the following rule - theoretically, you can heat any greenhouse.
In other words, by installing powerful heating equipment in almost any greenhouse, you can grow plants all year round.
Heat retention is directly related to cost
Of course, in some regions with severe frosts it will be necessary to install a soil heating system, but in any case, the costs of maintaining the required temperature will be significant.
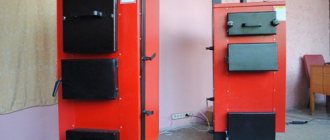
Recently, various boilers have been used to heat greenhouses, including pyrolysis boilers, which consume a relatively small amount of fuel to maintain normal temperature in the greenhouse.
However, the most important thing is not the power and quality of the heating equipment, but primarily how the greenhouse retains the available heat.
This ultimately directly affects the cost of maintaining the greenhouse and the final result, the price per kilogram of products.
New materials - efficient greenhouses
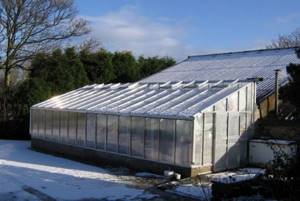
The topic of today's article is building a winter greenhouse with your own hands.
We will build not just a greenhouse with powerful heating, but a winter greenhouse that perfectly retains heat and allows you to grow plants all year round at minimal cost.
Previously, the construction of such a greenhouse seemed quite difficult. This refers to the construction of greenhouses for private use. With the advent of modern materials with high thermal insulation properties and low specific gravity, for example, such as cellular polycarbonate, this task has become within the capabilities of everyone.
The greenhouse accumulates heat
Of course, building winter greenhouses with your own hands is somewhat more difficult than ordinary ones, which can be easily moved from place to place and such constructions will cost more than conventional greenhouses.
But this design fully justifies the efforts and resources invested in it with year-round, high yields. The costs will come back a hundredfold.
The main difference of this design is its efficiency. This is achieved by the fact that the greenhouse accumulates heat in the soil, under the racks and retains it for a long time, due to excellent thermal insulation.
Even in very severe frosts, the temperature inside the greenhouse remains within 20 - 22 °C during the day and 13 - 15 °C at night. This is quite favorable for seedlings.
Minimum costs with maximum effect
It is worth taking into account this point: this temperature regime is maintained in the greenhouse using an electric heater with a power of 1 kW. The heater turns on only during the day and turns off completely at night.
With this fact, we simply spoke about the effectiveness of our proposed design.
If you use more powerful devices, naturally the temperature regime will be completely different.
Soil and polycarbonate - a great combination
This efficiency is achieved by deepening the entire greenhouse into the ground. The walls of the greenhouse are insulated with foamed polyethylene with a reflective screen made of aluminum foil.
The roof of the structure is made of cellular polycarbonate, and it is laid in two layers. The distance between layers is 100 mm. The air gap in this case acts like a thermos, preventing excessive heat loss without loss of light transmission.
Seedlings at the right time
The greenhouse is perfect for forcing greens, parsley, celery, and onions in winter. Forcing greenery does not require a large amount of light, and in winter there is very little of it. Below, under the shelves, you can grow mushrooms all year round.
Seedling
All gardeners feel the need for such a greenhouse at the end of winter, when there is a need to grow seedlings, which will subsequently be planted in open ground to obtain an early harvest.
All gardeners know that a do-it-yourself winter greenhouse is perfect for growing seedlings of tomatoes, eggplants, and peppers. If you plant such seedlings at the end of February, then you have the opportunity to get a harvest of these crops before anyone else.
How to save on heater operation?
Happy owners of heated greenhouses know how much money they have to shell out every year for the opportunity to serve fresh onions and parsley to the table. These numbers can be significantly reduced - you just need to take control of the operation of the heaters. It makes no sense to consume electricity around the clock; in addition, it is not at all necessary to radiate heat to every corner of the greenhouse. Following the recommendations described below will help reduce electricity consumption without harming the desired harvest.
- Using a thermometer. Fruit crops for the most part are ready to be content with little - until the air temperature drops below 10 ºC, they will continue to grow and develop. Place several thermometers in the greenhouse and check their readings regularly. Turn on heating appliances only when the height of the mercury column reaches a “critical” level.
- Zoning of space. By dividing the greenhouse into separate zones, you will not only increase the air temperature in each individual nook, but you will be able to monitor which beds need heating the most. Heaters located next to such areas will have to be turned on for long periods of time, but it will be possible to save on the work of their neighbors. How to isolate plantings from each other? Turn to stretch film, a pimpled material used to package fragile goods. Make long curtains from canvas - secure them on the ceiling and along the walls of the greenhouse with electrical tape, and press them down with stones from below.
- Using a thermostat. If you are not ready to check the thermometer readings every two hours, the help of this simple device will come in very handy. Set the thermostat to a temperature that is comfortable for your plants and go about your business. When it gets cool in the greenhouse, it will turn on the heaters automatically.
Other tips for building a winter greenhouse
The biggest problem of any winter greenhouse is not the air temperature or even the tons of snow on all sides. This is deep freezing of the soil. For example, in Siberia this value can reach 2.3 meters! Naturally, freezing still reaches the greenhouse, and the soil inside needs to be protected from it. First of all, many people use foam blocks or adobe blocks as a foundation, which with cement mortar and polymer mastic against moisture replace 70 cm brickwork at 40 cm thickness. It is also advisable to insulate the inside of the greenhouse near the ground - preferably with polystyrene foam well wrapped in thick polyethylene. Well, at least 40 cm of sand for additional moisture and heat protection.
Otherwise, follow these tips:
Tip #1. Pay maximum attention to soil temperature. The fact is that the higher it is, the better the plants absorb micro- and macroelements. But there is a limit here: about 16-18°C, after which plants produce less oxygen and the process of photosynthesis goes much worse. This is why warm beds made from biowaste in a winter greenhouse are not always needed, especially when the entire heating system is designed for a different mode. But such good old technology is often used to stop soil freezing, and not to warm the roots of plants. To do this, follow these instructions:
- In the fall, after harvesting, select soil 1.5 meters deep.
- Add a compost layer of grass and horse manure.
- Add chopped straw and grain husks to add looseness to the soil.
- After this, you can safely lay metal-plastic pipes for heating - they will not freeze even with strong soil moisture in winter.
All the laid biomass will warm the soil well in winter and will also serve as some fertilizer.
Tip #2
Watering in such a greenhouse is best done using a sprinkler system, and - attention! - only warm water. Drip can end in disaster if you haven’t protected the soil from freezing in any way, so don’t risk it
Tip #3. It is advisable to make a small vestibule in such a greenhouse - this is not only a place to store the necessary tools, but also an excellent “thermal pocket” that will protect the plants from the harsh cold.
Tip #4. For a winter greenhouse, take polycarbonate at least 10-16 mm thick, and if you have already purchased a thin one, then lay it in a thermos in two layers
Also pay close attention to sealing
Tip #5. Sharp transitions from daytime to nighttime temperatures are especially dangerous in winter. Therefore, despite thoughtful heating, always use containers with water for this purpose - during the day they will accumulate solar energy, and at night they will gradually release it, thus well smoothing out sharp transitions in the evenings and mornings.
And finally, don’t be afraid to build a high winter greenhouse - it’s not much more expensive to heat, but the benefits are worth it: excellent microclimate, optimal humidity and ease of use.
Cheap heating for a greenhouse. The cheapest and most efficient heating of a greenhouse in the off-season
Gardeners and vegetable gardeners are no strangers to frosts in the off-season. If the greenhouse is not heated with electricity, you have to resort to additional means of protecting the seedlings from death. One of the simplest and at the same time effective means that has the right to exist is heating a greenhouse with a liquid candle. Perhaps this is the oldest and easiest way to help seedlings survive frosts. Making a candle is not difficult; its efficiency is quite high, and its cost is extremely cheap.
To create a liquid candle you will need:
- the thinnest possible candle with the thickest natural wax wick;
- sunflower oil (the oil should not be the cheapest, otherwise soot will form on the wick);
- any glass/iron container (jar, glass, etc.);
- for reliable fixation - alabaster (or any other building mixture).
Let's start creating a candle:
1. Pour alabaster or any other building mixture suitable for this purpose onto the bottom of the container. This is necessary in order to fix the candle in the glass/jar. Later, when the candle burns out, you can pour warm water, remove the candle and insert a new one. Thus, the action with alabaster is one-time.
2. As soon as the alabaster hardens a little, insert a candle and wait for maximum hardening. Next, add sunflower oil to the top. Do not use oil that is too cheap, as the wick may become sooted and have an unpleasant odor (or even go out).
3. Next, such a candle can simply be left on the table or placed in a bucket with holes drilled around the perimeter. Two or three of these buckets with liquid candles can heat a small greenhouse during the off-season frost. By the way, to save money, you can make one that will burn for more than 100 hours.
Which method should you choose?
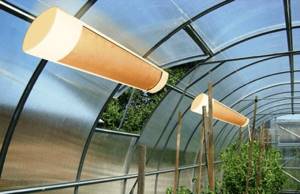
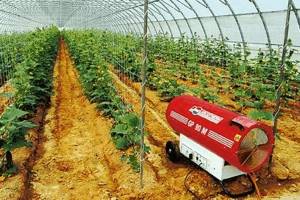
Heating using infrared heaters, heat guns, ovens and gas guns
It all depends on the goals, type of greenhouse, type of crops, as well as financial capabilities. If you plan to grow vegetables or flowers in it throughout the year, you will need a fully insulated building, which can be heated using infrared electric ceiling heaters, underfloor heating or a water circuit. To heat the greenhouse only in spring and autumn, it is enough to install a stove-stove, a gas gun or put biofuel (manure or plant residues) in the soil.
When calculating the required amount of heat, it is necessary to take into account that its consumption depends on the degree of insulation of the room and the ratio of the wall area to the soil area.
Growing cucumbers requires more heat - they can grow at temperatures not lower than +15°C. Greens and flowers do not require too high a temperature - just above 0°C is enough. In central Russia for heating 1 sq. m of room will require approximately 300 Wh of thermal energy.
Making a greenhouse with your own hands from a profile pipe and polycarbonate: a complete description of the process, drawings with dimensions, watering and heating (Photo & Video)
Greenhouse heating systems in different climates
The choice of heating in a greenhouse has a great influence on the region in which it is installed. So, in the south there is no point in installing an expensive heating system with a boiler - it will be used for several weeks a year, and the costs of its installation will not pay off soon. In the northern regions it is impossible to do without constant heating.
Winter greenhouses in warm climates
For the southern regions, it is often enough to build warm beds with bioheating and install a backup heating source in case of frost - for example, electric convectors.
How to make biological heating correctly
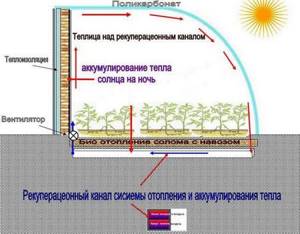
The main source of heat in such a greenhouse will be solar energy. Warming up during the day, the air and soil in the greenhouse gradually cool down overnight. When the minimum permissible temperature is reached, convectors are turned on, supplying warm air to the plants. The soil is additionally warmed due to the processes occurring in the warm bed: it is filled with organic residues, which actively release heat when decomposed.
Warm climate
The costs of installing such a greenhouse are not too high
It is important to correctly install polycarbonate and insulate the north side, especially in regions with strong winds. The greenhouse must be equipped with a ventilation system, since in bright sunshine, even in winter, the temperature in it can rise significantly
Winter greenhouses in temperate climates
In regions with a temperate climate, solar energy in winter is not enough to warm up the greenhouse, so you have to resort to insulating the blind area and installing heating devices. A budget option is to stove with wood or other fuel. It is installed on the north side of the greenhouse or in the vestibule; heating of the entire area is carried out due to natural convection or air ducts laid along the ridges. Heat the stove in the evening and when the outside temperature drops.
Warm beds with manure or compost as biofuel are also effective for heating the soil. A properly laid warm bed warms the soil for 5-8 years, and heating costs are significantly reduced. Plant roots remain warm, and most crops tolerate even significant fluctuations in air temperature.
Temperate climate
In case of peak temperature drops, additional heating can be installed. Infrared lamps or heaters are perfect for heating the soil: directed radiation warms the soil surface and the plants themselves, while the objective temperature in the greenhouse may be low. The air is heated using convectors or fan heaters.
Winter greenhouses in cold climates
In cold climates, winter daylight hours are short and the sun does not have a significant effect on the temperature in the greenhouse. Its heating must be continuous. This task is best accomplished by a water heating circuit laid around the perimeter of the greenhouse. It may consist of registers or radiators connected by pipes. At the same time, a curtain of warm air is created along the walls; the plants do not experience the effects of cold from the walls of the greenhouse.
How to make technical heating correctly
Heating the soil using biofuels in cold climates may be ineffective: when the beds freeze once, the activity of soil organisms stops and the release of heat stops. Therefore, beds in winter greenhouses in the northern regions are insulated and equipped with artificial heating using an electric cable or heating pipes, which are placed at the bottom of the beds and covered with soil.
Cold climate
In addition to the region, the choice of heating system also depends on the crops that you plan to grow. If the winter greenhouse is intended for cold-resistant herbs and greens, you can get by with soil heating and backup electric heaters. Heat-loving tomatoes, peppers and cucumbers require a stable microclimate, constant heating and additional lighting.
Irrigation and humidification system inside the greenhouse
Water is the source of life for any living organism, this is an indisputable fact
Plants are no exception, which is why it is so important to follow the rules of watering and moistening greenhouse crops, because greenhouses with heating, and even with other comfortable conditions without the basics, will not be worth a fraction of the effort.
Obviously, the volumes of water consumed will be impressive, which forces a power and energy source to be placed near the building itself.
There are not many options:
- Extend the pipe from the water supply;
- Pull the pipe from the well.
In the latter case, if there is none, then you will have to dig it out, which adds costs to the family budget, and not everyone will like this item.
The laying of the pipeline should be based on the conditions of the region, but not less than 1 meter for the southern part and 1.8 meters for the northern part.
All about the construction and repair of greenhouses
Recent publications
Show more
Popular publications
- The top leaves of a tomato curl: if they curl on tomato seedlings, why the tops, if the tops, description, video - greenhouse tips
- Scheme for planting tomatoes in a 3x6 greenhouse: how to plant tomatoes - greenhouse tips
- Hyacinth after purchase: replanting, care, what to do with the flower, photos, videos - greenhouse tips
- The most productive varieties of tomatoes for greenhouses: which ones to choose, how to get a good harvest, photos, videos - greenhouse tips
- Tomato mallow f1: reviews, description, photo of the variety, video - greenhouse tips
- The best tomato varieties for the northwest: what are good tomatoes, descriptions, reviews, videos - greenhouse tips
- White plaque on the ground in a greenhouse: reasons for its appearance, how to get rid of mold on the soil, photos, videos - greenhouse tips
- Varieties of early tomatoes for greenhouses: ultra-early, super-early, early ripening, names, descriptions, photos, videos - greenhouse tips
- Gartering tomatoes in a polycarbonate greenhouse: video, how and what to tie correctly, options, photos - greenhouse tips
- Planting lobelia in pots: video, together with petunias, planting, photos - greenhouse tips
- What can be planted in a greenhouse with cucumbers: rules for joint planting, technology, care, photos, videos - greenhouse tips
- Lazy tomato (55 photos): Siberian variety in the garden, reviews, description, video - greenhouse tips
- Do-it-yourself automatic opening of vents in a greenhouse: with a side pusher, 2-way, self-opening device, photos, videos - greenhouse tips
- Gable polycarbonate greenhouses with a roof: drawing, do-it-yourself installation, photos, videos - greenhouse tips
- Multi-tiered beds: making your own, photos of tiered structures, video - greenhouse tips
Information about the site.
What should a greenhouse be like?
All greenhouses have a similar operating principle. However, winter greenhouses have some nuances that must be taken into account during construction. Since the building is stationary, it needs a high-quality foundation and a strong frame:
A prerequisite is the presence of a capital foundation. A foundation made of wood is not suitable because it needs periodic replacement. It is better to use concrete, brick or blocks to create a foundation. The creation of a strip foundation is carried out along the perimeter of the structure, it is characterized by simple installation and reasonable cost;
REFERENCE: Installation of all necessary systems helps to create favorable conditions indoors for year-round cultivation of a variety of cultivated plants. The structure does not need to be dismantled at the end of each season. With proper maintenance, the service life of the greenhouse is unlimited.
An important point is the greenhouse frame. The building is operated in winter, which is characterized by periodic snowfalls. The accumulation of snow on the roof is a fairly strong load on the frame and can cause destruction of the greenhouse. Wood or metal is used to make the frame. Both wood and metal can deteriorate over time and require preliminary preparation, and subsequently preventive measures and periodic replacement of elements that have become unusable.
Biological heating of a greenhouse
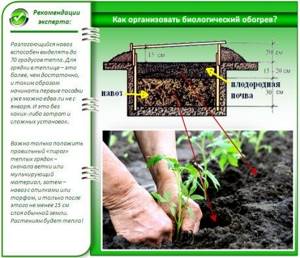
This type of heating is installed when creating beds in a greenhouse. Under a 20-30 centimeter layer of soil, 30-60 cm of biofuel is placed: manure, peat, straw, and other organic material. It gradually burns inside, releasing heat and supplying plants with nutrients.
Previously, horse manure was used as biofuel, as it was the hottest, but at the same time they were afraid not of frost, but of the fact that the plants would freeze. It was impossible to ventilate on a very windy day; the heat was immediately blown out. The manure burns all the time, raising the temperature, and it is impossible to regulate it. You can mix it with straw, this will slow down the combustion process, lower the temperature, and the biofuel will work longer.
Another disadvantage is that this is a rather labor-intensive process that involves a lot of excavation work. But if everything is done correctly, the soil will be warm even in frosty weather.
The advantage of this fuel is not only warmth for the soil, but also nutrients for plants. In addition, evaporation produces moisture, which will reduce watering.
Attached greenhouse
This type of greenhouse at dachas is not often built, because suburban areas in Russia have sufficient area to build a house, outbuildings and plant a garden, vegetable garden and flower beds. But if the plot is small, then a greenhouse attached to the house or garage is the best option.
That is, this structure already has one load-bearing wall. All that remains is to build a frame, which will be attached to this wall on one side and to the ground on the other. For example, the photo below shows one of these options.
The main condition for building a greenhouse is to choose the right wall. It should face south and not cast a shadow on the greenhouse structure. Otherwise, there is no point in building a greenhouse. Without the sun, nothing will grow in it.
Construction stages
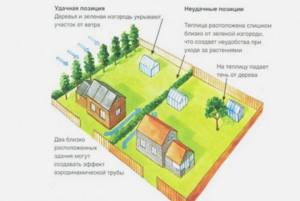
Having decided what kind of greenhouse you need for the winter, you can begin construction. The work must be performed in the following sequence:
- choose a suitable place that will be protected from the winds;
- decide on the type and materials for all structural elements - from the foundation to the roof;
- choose the type of ventilation, heating, insulation and lighting;
- calculate the height of the building - for growing in the ground you can get by with the usual one, when using racks you will need a higher room;
- complete all the work, starting with laying the foundation and ending with interior finishing.
If you require a business premises of 100 sq.m. m or more, then it is better to buy it ready-made or order turnkey construction. A mini-greenhouse for growing produce for your own table in winter can easily be built on your own.
Related article:
What kind of greenhouse to build at the dacha: 7 most convenient and functional types
Selecting a location
A winter greenhouse with heating should be located in compliance with several recommendations:
- the place should be well lit and not exposed to strong winds;
- It would be optimal to attach such a structure to a house or outbuilding, but always on the south side;
- a separate building should be oriented from north to south, while the northern side should be solid and reliably insulated.
Below are instructions for building a gable greenhouse made of foam concrete. The entire process will take approximately 2 months, of which half the time will be spent drying the foundation. It should be calculated that there will be no severe cold during this entire period. For good drying, a temperature within +15 ... +23 ℃ is suitable.
Related article:
Arrangement of a greenhouse: techniques and tricks for planning inside the building
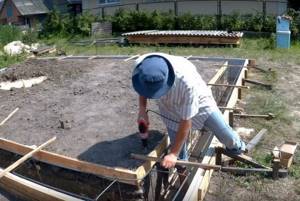
Foundation
Under the specified structure, a shallowly buried strip foundation made of reinforced concrete will be required. The foundation is laid around the perimeter and along the line of the main partition between the vestibule and the greenhouse room.
The work algorithm will be as follows:
- clear and level the area, apply markings using pegs and rope;
- dig a 50 cm trench, cover the bottom with sand, compact it by pouring water;
- install formwork - for heavy soil only at the top, for loose soil - to the very bottom;
- lay the reinforcement, tying it at the intersections with wire;
- pour concrete, pierce it with a rod, level the surface;
- cover with plastic wrap.
Leave to dry for about 1 month. This period may vary depending on the weather - if it is very warm and dry, it may take 2-3 weeks. The drying process should be monitored and if it dries out, water the top layer with water. The formwork is removed after 7–10 days.
Related article:
Where to install a greenhouse on the site
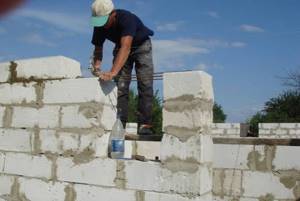
Walls
A greenhouse will be comfortable and warm in winter conditions if the walls are made of foam blocks and fastened together with special glue. The use of such glue instead of cement mortar significantly reduces heat loss due to the minimal thickness of the seams, and also reduces labor costs.
The walls are erected according to the following scheme:
- a mixture of sand and cement (4:1) is applied to the dried foundation, roofing felt or other waterproofing material is overlapped and leveled;
- the foam blocks of the first row are laid out on cement mortar, all the rest are fastened with glue, tightly fitting and placed with dressing on half a block;
- every 3 rows are reinforced with steel mesh;
- doorways are formed from blocks cut to size;
- After finishing the masonry, the outer wall is insulated with polystyrene 3–15 cm thick, depending on the region;
- For exterior decoration, siding, plaster or tiles are used.
Related article:
Why does the soil in a greenhouse turn green and how to deal with it
You can use other thermal insulation, for example, polystyrene foam. It is not recommended to use only mineral wool, as it increases the humidity of the room.
Roof
The roof frame is made of 4x10 cm boards, the rafters are spaced at intervals of 50–70 cm (depending on the snow load).
The installation process will be like this:
- On the south side, a board is screwed to the foundation over the waterproofing layer with anchors. The side posts are fixed to the wall in the same way, and the intermediate and top frames are attached with self-tapping screws and corners.
- A board is laid over the entire upper surface of the laid walls and fastened with anchors at intervals of 60 cm.
- Racks are installed in the center of each transverse wall, secured with a corner and self-tapping screws, then struts are installed. Skates assembled from 2 boards are attached to both sides of the racks.
- Rafters are attached to the ridge and the top frame of the longitudinal wall.
- Cover with polycarbonate sheets, cutting them to the size of the wall and directing the stiffeners vertically.
- The sections are covered with a UP profile. For fastening, self-tapping screws with a thermal washer are used.
- The same work is carried out on the north side.
Related article:
What kind of polycarbonate sheet is needed for a greenhouse?
After installation is completed, all cracks are sealed with polyurethane foam.
Final work
The list of final works includes the installation of doors, heating and other communications. Everything is done in this order:
- For a winter greenhouse, it is necessary to provide 2 doors: into the vestibule and from it - into the room. The outer door is insulated with polystyrene or any heat-insulating material. The boxes are attached with long (from 10 cm) anchors.
- The next stage is heating installation. The traditional solution is a boiler installed in the vestibule and registers in the form of large-section pipes stretched along the perimeter of the entire room.
- The best option for a mini-greenhouse would be drip irrigation. An electrically heated tank is installed in the vestibule; hoses are taken from it and extended to the plants. Hoses with holes are used for watering beds, and drippers are used for shelving.
- Lighting is done under the ceiling, taking into account heating (so as not to damage the polycarbonate coating). The electrical wiring is hidden in a tube made of plastic or metal corrugation, and then suspended from the top.

Finally, beds or shelving are installed. In the northern regions, it is recommended to heat them using biofuel, electric heating or water heating. In warm areas, the walls are lined with foil, the reflective properties of which will significantly increase the illumination of plants.
Video description
The video shows a comparison of an attached and freestanding greenhouse:
The advantage of this option is the reduction of material costs due to the same wall
It is important to attach the frame to its plane as much as possible, making the joining points strong and reliable.
As for materials, there are no restrictions here either. All of the products described above can be used to assemble a frame structure. And such a greenhouse can be covered with films, glass or polycarbonate.
Greenhouse attached to the wall of the houseSource pinterest.com
Heating a greenhouse with gas
Scheme of gas heating of a greenhouse.
The main advantage of gas is that it is more stable in terms of supply, but the final cost of greenhouse products may surprise you. Therefore, if heating a greenhouse in winter with gas lasts only a few weeks, it is not at all necessary to pull it from the house and buy quite expensive pipes for this. A couple of cylinders will be enough for this.
When constructing, remember that excess carbon dioxide can negatively affect the condition of plants, and therefore such a greenhouse must be well ventilated. To remove combustion waste, you need to use an exhaust device that will provide the necessary constant flow of oxygen. To prevent a lack of oxygen from eventually leading to the cessation of the combustion process, it is advisable to use heating devices equipped with an automatic safety device - the sensors will be triggered immediately after the gas supply to the burner stops.
Briefly about the main thing
So, we figured out the question of how to make a greenhouse with your own hands at home. As you can see, there are many options, each of them has pros and cons. The only big advantage is self-construction, which does not require large expenses. But it should be noted that not every greenhouse made independently has a highly reliable design. Professionals will even make “candy” out of waste materials.
| A little more attention! |
Heating options
You can find many ways to insulate the ground and warm up the air in a greenhouse - from industrial installations to laying foam and insulating material with your own hands.
The main power supply for most heaters is:
We will analyze the most popular designs, highlight the pros and cons of each - all you have to do is choose the one that suits your greenhouse.
Electric heaters
Among the variety of these heaters, several groups stand out: working on the principle of the sun (infrared emitters), warming the air (heat guns), warming the ground (heat mats).
- easy to install by yourself;
- For power you only need an outlet;
- easy to remove and move to another place;
- big choice.
- do not warm up the air and soil at the same time;
- you need to take care of protection from moisture so as not to damage the electronics;
- a large greenhouse requires several emitters.
Tip: To get rid of moisture, you can use an exhaust fan (install it in advance).
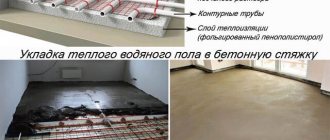
Warm floor
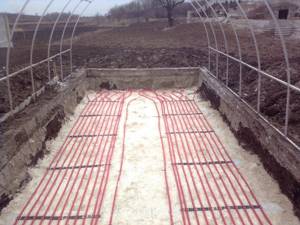
It also runs on electricity and completely covers the base of the greenhouse. You need to remove the soil, lay down the insulating material and cable, then fill the beds again - and the heating is ready.
- the soil heats up evenly – up to 40°C;
- soil heating is automatically regulated;
- economical - it is a simple system that only has cable and insulation;
- you will install it yourself, even if you are not involved in construction and design.
- it is necessary to monitor humidity so as not to damage the cable;
- does not warm up the air.
Tip: to ensure that the beds do not freeze, raise them above the ground by about 40 cm.
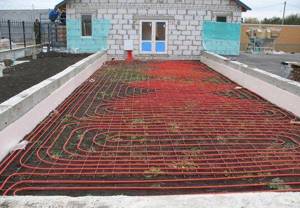
Water heating
It works the same way as home heating - hot water moves through a pipe and warms the ground. You can run it directly from your home, or install a separate boiler. Place pipes around the perimeter of the greenhouse and between the beds.
- installing such heating is quite cheap;
- you can assemble this system yourself;
- warms up the soil and plant roots well.
- almost does not warm the air;
- may not cope with severe frosts.
Solar heating
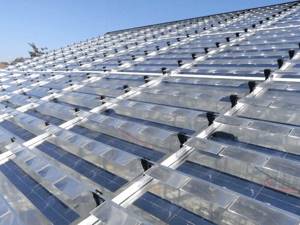
Sunlight is the most natural heating for plants. To preserve the meager heat that the sun provides in winter, install a collector or special panels on the roof of the greenhouse.
- convenient for residents of the southern regions.
- In order for the system to work, it is necessary to constantly clear the snow;
- the greenhouse should be in the brightest place on the site;
- more suitable for glass greenhouses;
- even if you collect daytime heat to the maximum, a sharp drop in temperature at night can bring all your work to naught;
- expensive equipment.
Stove heating
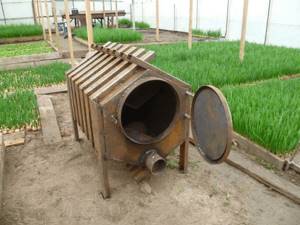
Many people still put potbelly stoves or homemade stoves in greenhouses, despite the fact that this is an old-fashioned way. If you are interested in such a system, you can buy a stove of the required size and make autonomous heating.
- easy to use;
- you can make it yourself and adapt it to your greenhouse;
- you can choose a stove for the available fuel - coal or wood;
- economical way.
- fuel must be added constantly;
- the design is quite bulky, it is difficult to move it to another place;
- heats the air unevenly - it’s too hot nearby, it’s cool in the far corner;
- will not be able to maintain a high temperature if severe frost hits.
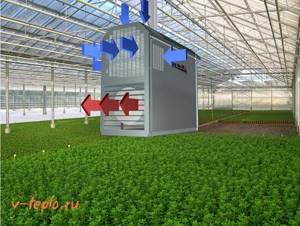
Air heating
It is provided by large installations that circulate warm air throughout the greenhouse. This is complex equipment, so it is installed by specialists during the installation of the greenhouse.
- distributes warm air evenly over the top;
- does not burn leaves with hot air.
- cannot be installed by yourself;
- does not warm the soil;
- expensive equipment.
DIY thermos greenhouse
To do this, you need to prepare drawings in advance. The location of the greenhouse relative to the cardinal points is of great importance. You should choose the orientation of the greenhouse to the west or east.
Creating a Project
When you have decided on the location and decided on the orientation of the greenhouse, you need to make a design of it indicating the dimensions of all the parts that will be part of its structure. In this case, you will avoid difficulties with constructing the frame. The project is a plan for your structure, so you shouldn’t forget about this step either.
Construction of the frame base
The key element of a thermos greenhouse is the pit. Its depth is of great importance. It must be more than 2 m. This will allow maintaining the optimal temperature in such a greenhouse all year round, since the plants will be located below the freezing depth.
When creating a thermos greenhouse in the ground, it is necessary to level it as much as possible. After this, you can proceed to pouring the foundation. An alternative would be to install concrete blocks. Note that the height of the created base should be the same as the depth of the pit.
Before digging into walls made of blocks, first wrap them in heat-saving film or use foil material.
When this work is completed, you need to go back to your project and check the drawings. After this, in accordance with the dimensions recorded in them, it is necessary to make a profile for the frame. It is also necessary to prepare polycarbonate sheets of the required sizes.
Then you can move on to the next step - assembling the upper part of the greenhouse, focusing on the drawing and strictly adhering to the profile dimensions indicated in it, without allowing a deviation of even a millimeter. In order to properly assemble the profile frame, it is necessary to drill holes in each profile that will be used for fastening.
Recent posts We prepare cheese at home from just a few ingredients: 3 recipes tested by housewives Without any air fresheners: 6 ways to quickly get rid of unpleasant odors in the country house and at home 4 mistakes that prevent seedlings from sprouting: many people make them
Next, it is necessary to carry out work on the manufacture of a wooden frame. If possible, you should use metal in the manufacture of the frame, since it has a longer service life, and in addition it ensures optimal penetration of sunlight into the greenhouse.
Greenhouse covering
Nails are used as fasteners for installing polycarbonate sheets. In this case, it is necessary to ensure the complete absence of gaps when covering the frame with sheets. Their presence will lead to a low temperature inside the greenhouse during operation. Therefore, in order to avoid this problem, the joints will have to be glued.
When the greenhouse structure is created, it is necessary to carry out work to seal the cracks. To do this, you can use regular plaster or resort to polyurethane foam.
Underground greenhouse equipment
After the completed stages, the work on creating a thermos greenhouse can be considered complete. You just need to install the lighting. It should be based on LED lamps. It is also necessary to arrange a water supply system that will ensure watering of the plants. Additional heating can also be installed.
- there were no obstacles to the penetration of sunlight into the structure;
- the risk of damage to polycarbonate sheets was eliminated.
Some people use a solar collector to heat the interior of a greenhouse. The main advantage of this device is that anyone can create it, and without outside help.
In order to ensure efficient movement of heat throughout the entire space of the underground greenhouse, several fans must be installed in it.
Air heating of greenhouses
Air heating methods are among the most primitive, but they still have not lost their popularity. The simplest option for its implementation is to lay a pipe through the greenhouse, one end of which will go outside. A fire will have to be lit under it, and heated air will flow through the pipe into the greenhouse.
It will not be possible to maintain the temperature constantly in this way, but you can quickly warm the plants in the event of severe and unexpected frosts.
Heating units with a fan are among the cheapest and most compact. They allow warm air masses to be distributed throughout the greenhouse as evenly as possible. With their help, summer residents not only heat greenhouses, but also have the opportunity to dry the air in them, recreating a favorable microclimate for planting.
Video: how to build an underground greenhouse
Practical examples of a thermos greenhouse, implemented with your own hands, show the main aspects of building an all-season greenhouse.
An example of an underground greenhouse for year-round gardening: description and detailed drawing. Shelter - three-layer polyethylene.
Video: Dugout for vegetables without heating
A recessed winter greenhouse with a water heating circuit from a Buleryan stove and a drip irrigation system. The canopy material is two-layer film.
Video: Arranging and heating an underground greenhouse
An underground thermos greenhouse makes it possible to grow various types of crops all year round
The dry stream is a variation on the rock garden theme. The art of arranging such elements of garden decor originated in. Further
Growing wild mushrooms in the garden is difficult at first glance. In practice, this activity only delivers. Further
Outdated car tires can please the eye, transforming in skillful hands into beautiful flowerpots and flower beds. Further
Our ancestors believed that there are trees that must be planted on the site so that they protect you from. Further
Apples are often recommended for those who have pale skin, anxiety, or simply to boost immunity, however. Further
Women love flowers and try to grow them in their homes and apartments, because they not only create flowers. Further
In spring, every gardener wants to make his vegetable garden or garden beautiful and unique, and from this article you will... Further
In an underground greenhouse you can grow vegetables and herbs for your table or for sale all year round. The successful results from using the design made it popular.
The construction of such a building in compliance with the recommendations of experts becomes not such a difficult task.
Design features of an underground greenhouse
The structure, intended for growing seedlings year-round, is located at a trench depth of two meters. Above the soil level is the upper part of the structure, the roof.
The base of the greenhouse involves the use of timber, brick or stone.
Structures of this type are built on a strip foundation. The covering material is a polymer that scatters the sun's rays. Savings on heating reach fifty percent.
The reliability of the structure increases thanks to modern building materials.
The primary advantage of such a greenhouse is energy-saving technology. It maintains a stable temperature without significant heating costs.
The building can serve for over fifteen years. The costs of its construction pay off quickly.
However, this design has its disadvantages. They are expressed in high humidity.
Equipping with supply and exhaust ventilation eliminates such problems.
The construction of a structure of this type requires significant expenses. A large-scale project cannot be implemented without the involvement of specialized equipment.
What is a thermos greenhouse?
A distinctive characteristic of this design is the location of the main part of the greenhouse underground. There is only a dome on top.
It retains heat due to the penetration of sunlight. The underground location helps create the effect of a thermos.
How does a greenhouse work?
This design is based on the principle of light transmission. It is capable of increasing the energy intensity parameter many times over.
A building erected using this technology can maintain the required temperature at night. Daytime temperatures at night can drop by no more than five to seven degrees.
Such indicators are relevant for crops during the formation of the ovary, allowing for a generous harvest.
The indoor structure is capable of performing excellently in hot weather. The temperature in the room is twenty-five, thirty degrees while fifty degrees outside.
The intensification of the growing season is ensured by good lighting. The criterion is 1.8 times higher when compared with the external one.
Types of structures
Before you build a winter greenhouse with heating, you need to decide on its type. There are 2 types of such premises:
- conditionally capital - a collapsible structure, which, if necessary, can be moved to another place, while it differs from the summer version in the presence of a pile foundation and a wooden floor;
- capital - a more reliable non-portable structure, which is located on a strip foundation.
In addition, all greenhouse premises are divided into several types according to location. Their main characteristics are presented in the table:
| Name | Description |
| Thermos (recessed) | The most common winter greenhouse, which is buried approximately half into the ground, thereby minimizing heat loss. Optimal solution for cold regions |
| Arched | The preferred option for plants grown in the ground. Most often it is made from polycarbonate sheets and purchased ready-made, since it is quite difficult to cover the frame with such material yourself. |
| Gable | One of the tallest greenhouse buildings, optimally suited for growing crops in boxes on racks. Another advantage is the presence of a sufficient slope of the roof slopes, due to which they self-clean from snow |
| Attached to the house | Usually erected for arranging a winter garden. Due to its connection to a warm wall, it retains the temperature inside well. The entrance from the house eliminates the need to get to a separate building in frost or snow |
| With attic | Most often it is intended for growing flowers in multi-tiered beds. The heating is predominantly stove, the transparency of the walls ensures the entry of more sunlight |
When choosing the type, design shape and location of the greenhouse, it is necessary to take into account the characteristics of a particular site, the characteristics of the crops planned for cultivation, the availability of financial resources and other individual circumstances.
Related article:
What kind of polycarbonate sheet is needed for a greenhouse?
Instructions: how to make water heating in a greenhouse
In order for heating in a greenhouse, whether steam or geothermal, to be of high quality, you need to: select the right pipes, install the required number of radiators, carry out proper installation and location of heating devices. Construction boilers and a stove are installed in the vestibule space of the greenhouse, where it is also necessary to equip special shelves for coal and firewood. Installing a device for heating the room in the greenhouse itself is a completely optimal and profitable option, since it will not heat the street, but only the greenhouse itself.
If you plan to additionally lay pipes for the water circuit, then you need to do a number of specific actions:
- Build a foundation on which the stove will be installed, and for a brick structure you need to choose a concrete base, and for a metal structure or boiler it will be made of asbestos-cement or steel sheet.
- There must be a chimney through which combustion products, as well as soot and soot, will escape.
- To seal joints, use a clay-based solution yourself. At too high a temperature, cement will crack and gradually begin to fall out.
- Don’t forget about installing high-quality ventilation, which is made from metal pipes of the same diameter.
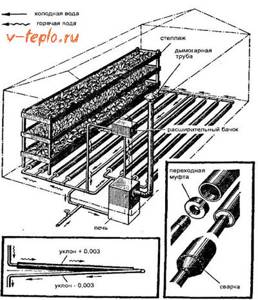
- Before installing water heating, an expansion tank must be installed, which must be located at the highest point of the room next to the stove and boiler.
- Next, the heating system controller is installed.
- If the radiators have a tap, then you need to make jumpers between the outgoing and incoming pipes.
Experienced summer residents prefer to carry out all repair work themselves, since this does not require additional costs and will also be of higher quality, because where is the guarantee that the called master will be able to do everything as required. In addition, you need to choose only high-quality materials that will last a long time, will fully meet all requirements and will produce heating that can warm the room.
Water heating for a greenhouse
Most often, summer residents set up water heating for the greenhouse in winter, which anyone can do on their own. At its core, it will resemble a classic home heating system, when a heated coolant fluid circulates through pipes and radiates its heat.
To implement this method, it is necessary to select the most suitable location for the heating installation (it can be a boiler, stove, etc.). They can also be located in a separate room, but not far from the greenhouse.
It is necessary to determine the type of coolant circulation:
- Natural circulation is the simplest method, when the heated liquid rises through a pipe to an expansion tank located above the boiler, and from it flows at a slope naturally into the pipe lines
- Artificial circulation - it is similar to natural, but the movement of the coolant is carried out due to the installed circulation pump
It is recommended to give preference to the second method, since it ensures a higher speed of liquid movement through the pipes and does not allow it to stagnate. You should not fill the lines with ordinary water - it will probably freeze soon. The best option would be diluted antifreeze.
Rating of greenhouse heating options
In conclusion, we will make a comparative analysis of the considered options for heating greenhouses.
The easiest way to organize heating is with gas boilers and stoves running on solid fuel. Gas installations are easy to automate and create a comfortable microclimate for plants without auxiliary heat sources.
Buleryan stoves are not very convenient to use (the need for periodic manual loading of firewood). Their main advantages are low fuel cost and high heat transfer.
In second place you can put infrared emitters, cable heating systems and solar collectors. They are relatively inexpensive, easy to install and operate automatically. However, in terms of the cost of energy spent on generating a unit of heat, they are significantly inferior to gas and wood.
Heat guns occupy the third step in our rating. They are easy to maintain, can operate automatically, but are not economical. Heat pumps are located in the same niche. Despite the minimal cost of energy, the price of these installations is high and pays off for a very long time (8-12 years).
Did you like the article? Subscribe to the channel to stay up to date with the most interesting materials
Source