It doesn’t matter at all what kind of house you live in: it could be your own country house, a dacha, an apartment in a high-rise building and other buildings. You always want to live in warmth and comfort, for which you definitely need to take care of covering your house with insulating materials. If the walls are properly and efficiently insulated, you will not have to worry that they will freeze in cold weather; the warmth in your home will be retained to the maximum.
How to insulate a house using polystyrene foam?
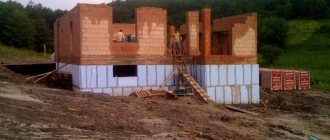
You especially cannot do without insulation if your house is built from beams, because they are not able to save heat, as a result of which you will have to pay decent sums for heating the house in the winter cold.
To prevent home insulation from costing a pretty penny, it has become popular to use polystyrene foam. Polystyrene foam is not only cheap, but also has the following advantages:
- light weight;
- unobstructed breathability;
- capable of suppressing noise;
- has a high level of thermal resistance;
- not afraid of moisture;
- easy to work and decorate.
Since a warm house is the key to correctly installed insulation material, later in the article we will tell you how to insulate a house with polystyrene foam, doing it yourself quickly and efficiently.
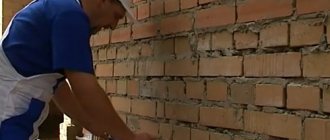
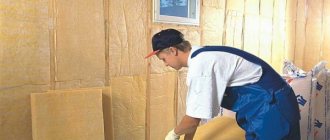
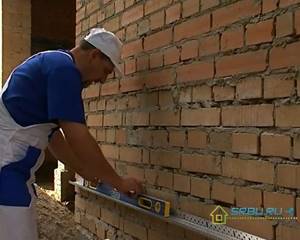
Preparing the wall surface
In order for the thermal insulation to be of high quality and last a long time, the surface to be insulated must be well prepared. This process is quite lengthy, and you will have to put in a lot of effort. But the result is worth the effort and time spent.
If you are insulating a new house, then you do not need to do some things.
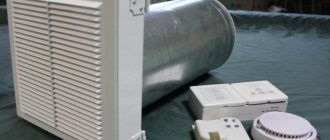
#1. The first step is to remove everything from the external walls that could interfere with the work. These are drainpipes, ventilation grilles, air conditioners, spotlights and wires. If the brick house is old enough, then on its facade there may be decorations framing the cornices and windows. They will have to be sacrificed by carefully knocking them down.
#2. If there is plaster on the walls, we will check its strength by tapping the surface. We check all unevenness and slopes using a plumb line, rule or cord of sufficient length. We will mark all errors with chalk so as not to miss a single flaw. As a rule, upon inspection it turns out that the walls are far from ideal. Not only are they not very even, but in some places the plaster is held to its word of honor.
Do not undertake insulation if you discover these shortcomings. First, remove these pieces of plaster, and then work with a chisel, knocking down the concrete beads and excess mortar between the bricks.
#3. If the façade has been painted with oil paint, it cannot remain on it. In this case, you will have to peel off the paint. Because of this, the adhesive properties of the surface are reduced. Well, perhaps everyone knows that it is necessary to remove mold, grease and rust, as well as salt deposits.
#4. If there are large enough unevenness and cracks on the walls (more than 2 millimeters), then they must be primed. To do this, use a deep penetration primer using a special brush called a paint brush. It will allow you to do this work faster and more accurately. When the primer has dried well, you can apply cement putty for exterior use and fill the cracks.
#5. In the case where the unevenness is very large - more than 1.5 centimeters - we also prime them first. And then we put up beacons along which we apply the plaster composition.
#6. The walls are covered with a brick primer once, with cellular concrete 2 times. You can apply it with a large brush or roller.
Sometimes part of the communications is left on the surface of the wall, covering them with insulation. In order not to damage them when driving in dowels for fastening polystyrene foam, you need to draw up a detailed plan for their location.
Material selection ↑
All the most appropriate insulation materials have both advantages and disadvantages:
- Any builder will say that foam plastic as wall insulation on the balcony is the most common material. This is the result of foaming polymers under pressure and high temperature. It has a porous structure, which provides high waterproofing properties and low thermal conductivity, as well as lightness. In the case of dense insulation of a room, when the joints are sealed with sealant or foam, no convection currents are practically possible. Plates made from it are available in different sizes and thicknesses. The density of foam plastic for wall insulation should be from 15 to 25 kg/sq. cm, if it is intended to be directly puttied. And if the slabs are covered with gypsum cardboard or carriage boards, then the density can be lower. The only drawback is flammability
- Extruded polystyrene foam. These are slabs with a porous structure, obtained by foaming synthetic granules at high temperature and pressure. The foaming agent is carbon dioxide or freon, which is replaced by air in finished products. The material is resistant to fire, moisture, has low thermal conductivity, holds its shape well, but softens and deforms under the influence of solvents, acetone, gasoline, kerosene, oil paints and others.
- Foamed polyethylene. Elastic roll material obtained by foaming polyethylene granules (reagent - butane). The structure is closed, fine-celled. High sound and waterproofing properties. Heat loss is reduced by 70%. But polyethylene is not only flammable, but also supports combustion
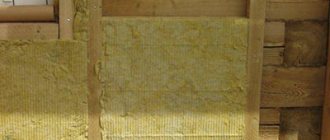
- Mineral (basalt) wool. Synthetic fibrous material is resistant to high temperatures, not susceptible to chemicals, and has low thermal and sound conductivity. But mineral wool contains formaldehydes (carcinogens), which are released during operation
We advise you to study - How to prepare concrete: requirements for materials, proportions and calculation of composition
After choosing the insulation, you can begin the process.
We attach the starting profile
Having studied the project, we calculate the location of the lower border of the walls, which should be insulated with foam plastic. Now we take a hydraulic level, measuring this boundary at all external and internal corners of the house. We pull the cord along these points. It is along this line that we have to install the starting profile on which the bottom row of slabs of heat-insulating material will be supported. Otherwise, until the glue dries, the slabs may move.
We select the size of the starting strip according to the width of our heat insulator. We fasten it with six-millimeter dowel nails, placing them every 30 or 35 centimeters. The expansion element for the dowels is driven nails, onto which washers should be placed. The joints of the starting strip at the corners of the house are made either with an oblique cut or using a corner connector.
To prevent temperature fluctuations from deforming the structure, we place plastic connecting elements at the ends between the base profiles. Overlapping profiles are not permitted.
To be on the safe side, check the level of fastening of the starting profile.
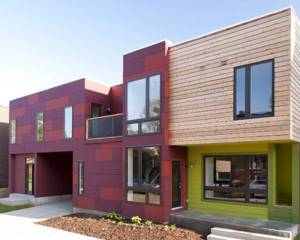
Facade decor made of polystyrene foam
Architectural elements used in the design of buildings made of polystyrene foam are exceptionally light in weight, as well as resistant to natural influences. In addition, reinforced polystyrene foam has high strength, which makes it possible to produce facade decor of almost any complexity and in any buildings.
Watch this video on YouTube
Decorative elements are quickly made from polystyrene foam. Their use significantly reduces financial costs.
The dimensions of the decorative finishing elements of the facade remain unchanged and no cracks appear on them. This decor is safe for health and non-toxic.
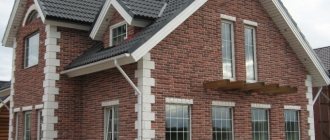
Facade elements can withstand temperature changes, and, accordingly, facades can be made from this material in any climatic zones and latitudes.
Today this type of facade decoration has become very popular; it is also used in the restoration and construction of buildings. It also has a special place in the design of facades of country houses. Facade decor made of expanded polystyrene has been used for decorating facades for more than 50 years.

Modern decor facade made of exclusively natural materials - stone and wood.

Modern and unusual decor facade made of white polyurethane.

The decor of the facade of the building is made of natural wood, which has retained its original texture and color.
Modern façade decor made of polyurethane and natural wood using tinted window glass that does not let in hot sunlight.

White facade decor with a combination of black details and natural wood elements.

Modern facade decor made of polyurethane and natural wood, which also combines contrasting dark elements.

Modern facade decor made of natural dark wood, with large panoramic window openings.

Modern facade decor made of natural gray stone using small metal parts.

Classic façade decor made of natural stone using a gable roof.

Classic facade decor with plaster and cement trim on the windows and doorway.
Glue the insulation
Mixing the glue
To prevent the glue from thickening too much and drying out, it must be used all within an hour and a half to two hours. So we make the required amount of adhesive mixture right on the spot. To do this, take a large plastic bucket and pour water into it. Then slowly pour the adhesive into it. To avoid lumps, put a mixer attachment on the drill, turn it on at low speed and stir the mixture until not a single lump remains.
We wait 5 minutes for the glue to swell, then turn on the drill again for 2 minutes and mix. If after some time the glue thickens a little, you just need to stir it again without adding water to it.
Apply adhesive to foam boards
According to the technology of insulating walls with foam plastic from the outside, glue can be applied to the insulation in different ways. It all depends on how smooth the walls of our house are.
Method 1 - used when surface differences reach 1.5 centimeters. In this case, apply the adhesive mixture on all sides of the foam board, retreating 2 centimeters from the edge. The glue layer should be the same thickness (2 centimeters). To ensure that the slabs do not lag behind in the central part of the slab, glue beacons with a diameter of about 10 centimeters are evenly placed in this place (with an area of 0.5 square meters) 5 - 7 times.
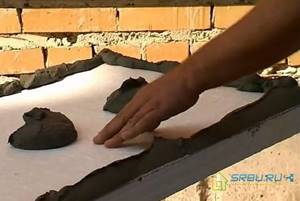
An example of applying glue.
Method 2 - used when the unevenness of the walls is less than 1 centimeter. Along the perimeter of the slabs, as well as in their central part, we apply strips of glue 3 to 4 centimeters wide. As a result, from half to 60% of the surface should be covered with the adhesive composition. When the insulation is pressed against the wall, the glue will spread and occupy the entire space.
Important: To avoid air pockets, never make the adhesive strips continuous. They should look like a dotted line.
Method 3 - used when the walls are almost even and the errors are no more than 5 millimeters. In this case, we arm ourselves with a special notched trowel, applying glue to the entire base of the slabs. The comb tooth size is centimeter by centimeter.
Rules for installing insulation on walls
Once the glue is applied, there is no time to hesitate. Within 20 minutes, all the plates must be glued into place. First, we apply the polystyrene foam boards, slightly moving them to the side from the place where they need to be glued. This distance should be 2 - 3 centimeters. Then, using a building code or a trowel, we press the insulation against the adjacent slabs. The glue that will protrude from the underside of the foam and in the corners must be removed immediately.
We apply the sheet with an offset and press it against the adjacent one.
We check the correct installation of each foam plastic board using a level. We also use control cords and a rule to determine all deviations from the plane.
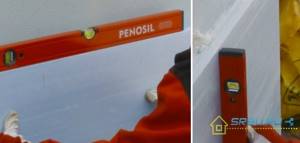
We check each sheet with a level.
The slabs must be laid tightly, at a distance of no more than 2 millimeters from each other. If gaps of larger width occur, they must be sealed. To do this, take either construction foam or long and narrow pieces of foam. There should be no glue in the seams, and the difference in thickness at the joints is allowed no more than 3 millimeters.
Important: if you move the slabs before the glue has hardened, they may not stick well. Therefore, when the need arises to correct some shortcomings, it is better to remove the slab. Having removed the layer of adhesive mixture from it, spread fresh glue and put the sheet back in place.
When installing insulation, we work from the bottom up, starting from the base profile. We pay special attention to the very bottom row of slabs, which will be decisive. The easiest way to do this is to place the first and last plates, and stretch a cord between them, attaching it to the top of the sheets. Along this cord we place the rest of the foam plates.
We lay out the next row with offset joints. It must be at least 20 centimeters. However, it is even better to lay the rows of insulation in a checkerboard pattern, making an offset of half the slab.
The foam joints must be overlapped; to do this, we glue them offset.
When laying the slabs, we carefully look at how their joints relate to the openings for windows and doors. They must not run along the same vertical line as the slopes. It is optimal if the joint passes either under the opening or above it. At the same time, the technology for insulating facades with foam plastic stipulates that the displacement should be at least 20 centimeters.
There is also this option: the wall is made of one material, and then a part of another material is added. For example, brick, OSB or foam concrete are connected. The junction of two adjacent insulation boards should be located at least 10 centimeters from the border of these materials. And if the walls have protrusions or recesses that must be insulated, then these places are also covered with a heat insulator of no less than 10 centimeters.
At the corners of the house, both inside and outside, the slabs are connected with teeth, that is, with a bandage. To prevent a long seam from forming vertically, causing cracks, the insulation is required to extend onto the adjacent wall. In the corners and on slopes, foam plastic slabs are placed with a margin that should allow bandaging.
As soon as the glue on the corner sets, the protruding excess slabs must be cut off. To cut the foam carefully, take a thin file with fine teeth or a wide knife. You need to cut using a ruler or a metal square.
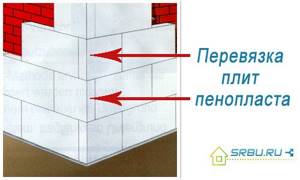
In the corners, the slabs should be tied together.
When insulating slopes, we install insulation sheets flush against window and door openings. To do this, you will need a polyurethane foam sealing tape or an adjacent profile. If tape is used, it is glued directly to the door frame. When insulation is adjacent to it, it is compressed, becoming thinner by about a third. When insulating a window located on the facade, add insulation to its frame by 2 centimeters, no less. Preliminarily cover the entire window opening with polyurethane tape.
If there is an expansion joint on the wall, a gap of 1 to 1.2 centimeters in size is made at the location of the insulation. We forcefully insert a rope of foamed polyethylene into this gap, squeezing it by a third.
We fix the insulation with dowels
When the glue dries (usually this happens after 3 days), you can begin to finally secure the insulation. For this purpose, elastic plastic dowels with a wide perforated umbrella-shaped cap are used. They are fixed with a driven nail or a screw-in pin. Nails can be metal or plastic.
To prevent cold bridges, it is better to choose the option with plastic nails. The length of the dowel is determined by the thickness of the heat insulator and the material from which the walls are made. The dowel should go 5 centimeters into the concrete, 9 centimeters into the brick, and 12 centimeters for cellular blocks.
Important: dowels that have a metal rod inside should not be used. This is fraught with the appearance of cold bridges.
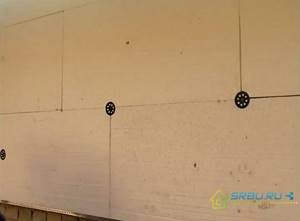
We fix the dowels in all corners of the slab, as well as in the center. There are from 6 to 8 dowels per 1 square meter. Near the slopes of doors and windows, at corners and near the base, more fasteners will be needed. They should retreat 20 centimeters from the edges of the slabs. How many additional dowels to take, and at what distance from each other to attach them, depends on several factors. These are, in particular, the size of the insulation sheets, the size of the house, the wind force and the quality of the dowels.
Before using the fastener, we make holes for it using a hammer drill.
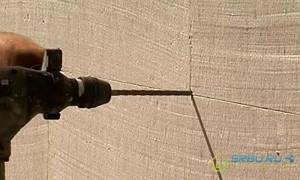
The drilling depth should be 1 or 1.5 centimeters greater than the length of the dowel.
After clearing the holes from dust, we hammer in the expansion nails using a rubber hammer. If pins rather than nails are used, they are screwed in with a screwdriver. The dowel caps should not protrude too much above the plane of the insulation. This distance can be no more than a millimeter.
You may find the following materials useful:
- How to choose a hammer drill - criteria for choosing a hammer drill for home or permanent work.
- How to drill concrete, metal, tile and wood.
Do not forget that you must maintain the perpendicularity of the fasteners relative to the surface of the walls. From time to time we check how firmly the dowels are held, carefully trying to tear them off.
Installation of foam sheets on the facade
Installation tools:
- bucket 2–5 l;
- spatulas 8 and 20 cm;
- construction mixer;
- drill;
- building level.
The plate for applying the adhesive composition should be rough; if it is smooth, then brush it with a brush with metal bristles. The glue is diluted according to the instructions, mixed with a mixer, the finished consistency should be thick enough to support the weight of the slab. But if the mixture is too dry, it will not adhere the foam properly. In order to understand what the consumption will be, mix 50–100 g of dry glue, gradually adding water.
The first stage of installation is the starting profile
Installation begins with attaching the bottom plank or corner to the wall, at a level of 20 cm from the edge of the ground or blind area. The profile will serve as support while attaching the slabs to the wall, and after drying, allow the foam to support more weight of the plaster.
The finished adhesive mixture is applied along the perimeter to the rough side of the polystyrene foam, retreating from the edge by 3-4 cm, after which several patches are made in the middle of the sheet and applied to the wall. The surface of the sheet should be covered by approximately 40%. The first row starts from the bottom corner of the house, the next one is laid so that the edges fall in the middle of the previous row. If the walls are insulated in several layers, then the second layer is applied so as to overlap the joints of the previous one.
Apply glue and glue
If there is a gap between the insulation boards of more than 3 mm, it is sealed with polyurethane foam, the protruding parts of which are cleaned off after hardening. The same is done with the protrusions of the sheets. An adhesive composition is applied to the seams and fasteners to eliminate unevenness.
Laying a reinforcing layer
Installation of auxiliary reinforcing mesh
To prevent cracks from appearing in the corners of the openings of windows and doors, pieces of reinforcing mesh measuring 20 by 30 centimeters must be glued to these places. This reinforcing mesh is installed in exactly the same way as the main reinforcement layer.
When insulating facades with foam plastic in the lower part, up to a height of two meters, it is necessary to lay an additional layer of reinforcing mesh. It will protect the wall from destruction.
Installation of perforated corners
To strengthen the corners of the house, as well as slopes and decorative elements, corners with perforations are used. They are made of plastic or aluminum, and pieces of reinforcing mesh are attached to the edges. To secure the corners, they are coated with glue (including the mesh), and then pressed with a spatula onto the insulation.
Pre-cut the corners. The glue that comes out through the mesh and perforations must be smoothed out. In the corners, we connect the profiles together tightly, cutting off the mesh and shelves at an angle of 45 degrees.
Glued corner.
Installation of the main reinforcing layer
When the additional layer has dried and all the corners are securely fastened, you can begin fixing the main layer of reinforcement. For this, a special facade mesh made of fiberglass is used. It is alkali resistant and does not stretch. A strip of such mesh, 5 centimeters wide, can withstand a load of up to 1.25 kilonewtons.
To glue this mesh and protect the thermal insulation, a special solution is used. It has a different composition than the adhesive mixture, but is prepared in approximately the same way.
Before reinforcing, the foam boards must be sanded. This will smooth out irregularities at the junction of the insulation boards. We sand the foam with a float and coarse sandpaper. After this, thoroughly clean the surface of the insulation and apply the solution in a layer of 2 millimeters.
The reinforcing mesh is cut into pieces, the size of which corresponds to the height of the wall. Apply the solution to the surface of the walls vertically in a layer equal to the width of the mesh. To do this, we use a metal grater or grater. It is convenient to remove excess glue with a notched trowel to form grooves. Then we apply the mesh to the wall, sinking it into the solution and pressing it with a grater or a smooth spatula.
After leveling, the mesh should not be visible on the surface.
Smooth out the mesh carefully, from the middle to the edges. We distribute the excess glue on the wall plane.
Important: do not stretch the mesh too much and do not press it against the thermal insulation. Its place is in the middle between the wall and the insulation.
As soon as the mesh is glued, we do not wait for the solution to dry and apply another layer of it, but at the same time leaving a free edge of 10 cm. Its thickness is the same as the previous one - 2 millimeters. We apply a second strip of mesh to the free edge 10 centimeters wide.
The top layer of the solution should completely cover the mesh; it should not peek out from under it. After this, all of the above steps are repeated with the second strip of the grid. The stripes should overlap each other by 10 centimeters.
We are waiting for tomorrow, and the next morning we can fill up the unevenness with putty. It's okay if it hasn't dried completely yet. But if the unevenness is large enough, you will have to wait for it to dry and then apply an additional layer of glue.
Reinforcement and plastering of foam plastic
Sometimes the insulation of a facade with polystyrene foam needs to be extended over two seasons - left to overwinter at some stage. Without harm to materials, it can be left only after applying a leveling layer. Simply attached polystyrene foam (EPS) cannot be left. It is recommended to keep it even packed in packs indoors and not outside. So you can only stop after plastering.
Sticker of reinforcing mesh on corners
The mesh is used as a façade mesh for exterior work (the inner mesh will simply fall apart from the glue). Density 140-160 g/sq. m. First, glue the corners. All corners are reinforced - both external and internal, and slopes
Important! From now on, you need to use a universal composition, and not the one on which the foam was glued. The glue is diluted a little thinner than indicated in the instructions - it should stick well to the spatula, but be easily pressed through the mesh
For reinforcement, you can use a ready-made corner with a mesh, you can cut strips from a roll (30 cm wide) and glue them. It’s easier to work with a ready-made corner, cheaper - with a piece of mesh. If you make it from a roll, cut strips across the roll, you get pieces a meter long. Fold them in half lengthwise and press the fold well with a spatula. You need to fold it so that the edges of the mesh are wrapped inward (it was in a roll). If it turns out the other way around, they will stick out from the layer of glue and it will be difficult to work.
Corner reinforcement mesh
Either way the work is almost the same. A strip of mortar 6-7 cm wide and 2-3 mm thick is applied to the corner on both sides. If you are gluing not a finished corner, but bent strips of mesh, then the length of the area filled with mortar should be 5-7 cm shorter than the cut piece (93-95 cm).
A corner or piece of bent mesh is placed on top. Running a spatula over the mesh, lightly press it into the glue. Herringbone movements - from top to bottom and to the side.
About half of the mesh on the sides remains without glue. This is normal - it will be easier to join it with foam reinforcement in the plane of the wall. Also, without glue, a strip remains at the top if you glue from pieces. When gluing the next piece above, apply glue directly to this “empty” mesh and cover it with the next piece on top. This way the joint is the same thickness as the entire corner.
When forming an angle, we try to make it even. If you can’t do it with a regular spatula, you can use a corner one (pictured above). It won't be difficult - just move from top to bottom with one click.
Foam reinforcement on walls
Polystyrene foam and EPS are reinforced by applying a layer of plastic mesh, which is pressed into the adhesive composition (universal). The procedure is as follows:
- Apply a layer of glue (universal composition) to the wall with a spatula (width at least 350 mm). The width of the strip is 5-7 cm narrower than the mesh (the mesh is usually 100 cm wide).
- Roll out the mesh from top to bottom, so that 5-7 cm from one edge are free of glue.
- Pass the spatula over the mesh, pressing it into the glue. They try to make the surface smooth.
- The second strip of glue is applied, starting from the section of the “empty” mesh. A new piece of reinforcement is applied close to the one already laid. It turns out there are two layers of stack at the junction, but the thickness of the glue is the same as on the rest of the wall.
The glued mesh is left to dry. It should take at least half a day, or better yet, a day. Then take a grater with sandpaper and smooth out all the unevenness.
Foam plastic plaster (applying a leveling layer)
The technique of applying plaster to polystyrene foam is no different from the standard one (see about plastering walls here). The thickness of the leveling layer is determined based on the results of previous work. If the previous layer was applied evenly, the leveling layer can be very thin - a few millimeters.
There is only one peculiarity - the mixture should be slightly liquid. A little thinner than when applying the mesh. This consistency makes it easier to level.
The applied leveling layer is left to dry. The time depends on the temperature and thickness of the layer. Wait until it dries completely, otherwise the sandpaper will clog. By the way, at this stage it is better to use it already worn - the surface will be smoother. The new one leaves some decent scratches. This is critical if you plan to simply paint the facade in the future, but you can work with a new one before applying decorative plaster.
This completes the insulation of the facade with polystyrene foam. Next - finishing work. What they will be like is up to you to choose.
The video demonstrates all the stages. There is only one mistake: when gluing the mesh, it rolls out onto the laid layer of glue, and not onto the dry wall. With such technology as in the video, there is a high probability that all the finishing will fall along with the mesh.
Useful tips for thermal insulation of external walls with foam plastic
#1. Remember that insulation of walls from the outside must be done at positive temperatures, not lower than 5 degrees and not higher than 25 degrees. Air humidity can be up to 80 percent. It is not allowed to expose the insulation to solar radiation, or leave it in the rain and wind. This applies to all stages of work.
#2. With the help of strong scaffolding or scaffolding, it should be possible to reach any part of the wall, as well as the side surfaces. To make it convenient to work, scaffolding is mounted 20 or 30 centimeters from the walls.
#3. We cover the doors and windows with plastic film, securing it with masking tape. You should also close the brackets and communications running outside the building. We will protect the blind area and porch with cardboard or the same film. After the painting work is completed, remove the tape.
#4. If the foam insulation on the wall has been left for a long time without reinforcement, it will turn yellow and begin to “dust.” This yellowness must be removed using sandpaper.
#5. If you don’t have enough experience, start working on the wall that is least noticeable. Or you can start insulating the simplest surface. Gradually the technology will be developed.
#6. In the event that insulation has to be suspended for the winter, consider installing reinforcing layers. Parapets and slopes will be securely closed if special metal protective elements are installed. Don't forget about window sills.
#7. When planning work, try to make all “wet” stages of work continuous on one wall. This is especially true for reinforcement and finishing.
For this method of insulation, only suitable materials must be used. You need to take polystyrene foam, which has a density of at least 25 kilograms per cubic meter. Never glue it or the reinforcement mesh with tile adhesive.
Use only special solutions, and then the insulation of external walls with foam plastic will last a long time and will bring the desired result.
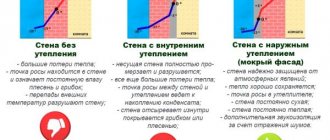
Internal and external insulation
Before you start insulating the walls, you need to decide on the insulation method. Laying insulation outside or inside is an individual preference. Each method has its own advantages and disadvantages. The features of each insulation method must be studied at the time of building design.
Insulation from the inside
Internal wall insulation is characterized by the following features:
- the cost of insulation from the inside is less than that of external insulation;
- season and weather do not affect the choice of time for work;
- there is no need to build additional scaffolding for insulation work.
Negative factors for internal insulation are:
- significant reduction in living space;
- the outer wall is insulated from heating from the room;
- the likelihood of fungus forming inside the wall increases, since the dew point is formed precisely in the inner part of the structure;
- when the heating is turned off, the walls quickly cool down due to the low inertia of the insulation;
- the junction of the ceiling with the external wall cannot be equipped with insulation, which leads to the formation of cold bridges.
We advise you to study - How to choose a mattress for a bed, taking into account all the subtleties
The method of insulating walls from the outside is more popular despite the fact that the cost of labor and materials for performing the work is significantly higher than the method of internal insulation.
Dew point
Insulation from outside
The advantage of insulating walls from the outside is:
- in winter and in cold weather, heat is retained in the wall for a long time;
- the design area of the room is preserved;
- external thermal insulation protects internal walls from dampness.
In addition, the external walls are additionally protected from weather conditions, which significantly increases the service life of the structure.
The main disadvantages of external thermal insulation of a structure are:
- restriction of work in accordance with weather conditions;
- increase in costs for materials used.
Which side of the wall to insulate with polystyrene foam?
It is advisable to insulate walls with expanded polystyrene from the outside, since the material does not allow air to pass through, which can lead to the formation of condensation inside the wall during internal insulation, and also inside the room the material can emit a specific odor.
This is interesting: Wallpaper for the wall in the room - a catalog of modern design techniques
The process of creating decorative elements
To cut a specific part from polystyrene foam, a special machine is used that operates according to the selected program. Everything is done precisely according to size, so there is no reason to worry that the parts will not match in thickness or other parameters.
After the element has received its shape, it must be processed in a certain way to create the required strength.
- Volumetric elements, without a large number of small patterns, are first covered with fiberglass. It performs the function of reinforcement. If there is no such coating, then the strength decreases.
- The next layer is a cement-adhesive composition with mineral and synthetic additives. The thickness of the layer will also depend on the decorative elements made of polystyrene foam (where exactly it is installed, what pattern).
- If an element has a large number of small parts or a complex geometric shape, then it is not possible to cover it with reinforcing fiber. That’s why a special protective compound is used here.
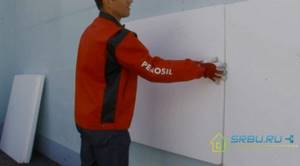
Laying the plinth stop
The technology for installing foam plastic involves attaching a base profile to the bottom of the facade. This construction technique performs two tasks: it facilitates the even laying of polystyrene foam and prevents access to it by small rodents. Thanks to the metal strip, the foam sheets will lie along the wall in even layers and over the years will not turn into dust due to an invasion of mice.
Using a level, a zero level is determined along the bottom of the facade at each point, and a metal strip - a plinth - is attached along it using dowels. To facilitate DIY installation, the zero level is marked with marks and secured with a cord, along which the base is subsequently installed. To more accurately lay the slabs along the wall, install cord slacks every 60 cm. They control the vertical laying of the insulation. But for small surfaces, such as the walls of a loggia, it is enough to control the position relative to the vertical and horizontal of the individual slabs.
Photo 5. An example of foam installation technology
Related Posts
- Do-it-yourself insulation of walls with polystyrene foam - detailed instructions
- Characteristics of façade polystyrene foam PSB-S-25F
- DIY foam cutting
- Which is better: polystyrene foam or polystyrene foam?
- Insulating the attic with foam plastic
- Insulation of a house made of 150x150 timber from the outside
- Insulation of a veranda in a wooden house
- How to properly insulate a garage outside and inside with your own hands step by step
- We insulate the wall of the apartment from the inside with our own hands
- Using slag for floor insulation
- Isover thermal insulation overview
- Insulation of facades. insulation for exterior walls of a house
- Do-it-yourself insulation of a balcony from the inside in a panel house
- Properties and types of dowel mushrooms for fastening insulation
- Equipment for the production of penoizol with your own hands: nuances of assembly and production of insulation
- How to glue foam together
- Which penoplex plaster is better? overview of mixtures and plastering technologies
- Insulation of a concrete floor in an apartment
- "penoplex" under a warm water floor, the advantages of the material, methods and technology for its installation
- Subtleties of attic floor insulation
- Slab foundation construction technology
- How to insulate metal garage doors from the inside
- How to properly insulate a wooden house with mineral wool
- Insulating a balcony with panoramic glazing: useful to know
- Baswool insulation: characteristics and scope of application
Read with this
- Do-it-yourself insulation of walls with polystyrene foam - detailed instructions
- Characteristics of façade polystyrene foam PSB-S-25F
- DIY foam cutting
- Which is better: polystyrene foam or polystyrene foam?
- Insulating the attic with foam plastic
- Insulation of a house made of 150x150 timber from the outside
- Insulation of a veranda in a wooden house
- How to properly insulate a garage outside and inside with your own hands step by step
- We insulate the wall of the apartment from the inside with our own hands
- Using slag for floor insulation