Why are long-burning stoves so economical?
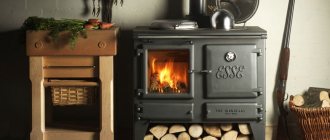
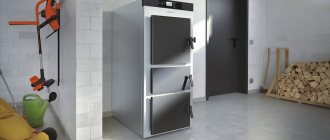
Heating devices of this kind include a long-burning furnace. The fuel in them does not actually burn, but smolders; once you add a portion, you can warm up for about 18 hours without adding it. No automatic feeders required. Fuel is consumed in a minimal amount and a wide variety of fuel, including waste fuel such as wood chips and sawdust. But the devices are also capable of running on wood and coal with good heat transfer, consuming several times less.
A factory stove, called a potbelly stove, burns fuel quickly, heating the room in a short time, but also cools down quickly. To keep the room warm, you need to constantly add fuel, which is not always convenient and consumes a lot. Products are sold in which the combustion process is delayed for a longer period. However, their cost is quite significant, they are not without drawbacks: low efficiency, it is necessary to manually add fuel frequently.
Fuel in a long-burning stove smolders for about 18 hours without adding
The reason for the low efficiency lies in the direct access of oxygen and the free release of combustion products. There are other combustion problems:
- Combustion occurs quickly and the process is difficult to control. There is a strong increase in temperature in the firebox, and the metal burns out over time.
- Fuel does not burn completely, especially household garbage and small waste. The room smells of smoke and hot metal.
- You have to top up the stove with fuel every hour, otherwise it will go out and cool down quickly.
A long-burning stove does not have these disadvantages, so its efficiency is much higher.
Advantages and disadvantages
A slow combustion stove must first be lit to raise the room temperature to the required level. Then you can reduce the thrust to switch to slow combustion mode. The room temperature will be maintained at the same level.
Advantages of long combustion mode:
- relatively high efficiency (up to 80−85%);
- small dimensions of the heating device;
- such a stove becomes the only heating option if there is no gas or electricity supply;
- complete energy independence ;
- ease of use (after loading the fuel, you only need to adjust the draft, 5-6 hours pass between loading firewood);
- no harmful substances in combustion products .
Slow combustion heating devices are suitable for both small country houses and country houses.
But there are also disadvantages:
- the chimney should be as straight and high as possible;
- You can only use dry firewood (damp wood will not burn in this mode);
- smoke enters the chimney at a relatively low temperature, which promotes the accumulation of deposits;
- A homemade stove does not have a very attractive appearance (you can’t call it an interior decoration).
Long-term burning devices also include pyrolysis furnaces. The advantages and disadvantages of such equipment are presented here:
How do long-burning stoves work?
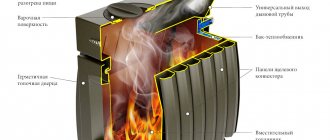
Many designs of long-burning furnaces have been developed, but they all work on the same principle. Heat is obtained not through open combustion, but as a result of pyrolysis. When exposed to high temperatures, fuel smolders and flammable gases are released. They ignite and burn, releasing a lot of heat. The slow combustion process occurs by regulating the oxygen supply. When the fuel flares up, turn off the air supply to a minimum.
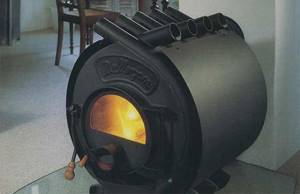
Gas from such a stove does not enter the room, thanks to hermetic doors and dampers
It is impossible to use an ordinary Russian stove in this way; such an attempt will, in all likelihood, lead to disastrous consequences. Gases can enter the room, which threatens to poison people. Stoves with a long combustion process are equipped with sealed doors, dampers, and adjustment devices, which prevent gas from entering the room. Heating devices of this kind deserve attention for many reasons:
- can work on one bookmark unattended for 10–20 hours;
- light weight, can be installed without a foundation;
- any type of fuel is suitable, burns completely, efficiency is up to 90%;
- can be used occasionally, which is important for a summer residence;
- no foreign odors or smoke;
- the ability to assemble it yourself from inexpensive materials.
The undoubted advantages also include low cost, since little material is required. If you do it yourself , using a metal barrel or a gas cylinder, it will be even cheaper.
Modernization of the furnace, increasing efficiency
There are three main ways to increase the efficiency of a stove: one of them is related to the chimney, the second is related to the fuel, and the third is related to operating conditions.
Chimney design optimization
For the chimney, as already noted, a pipe with a diameter of 15 cm and a length of 5 m is used. If you install a smaller pipe, especially in diameter, then it will not cope with the resulting loads. And the furnace itself will operate with reduced efficiency. To adjust the draft, a valve is installed in the pipe. A door is created at the bottom of the chimney for easy cleaning.
Condensation forms and accumulates in any pipes. And in pipes during pyrolysis it turns out even more, since the gases, having parted with all their heat, have negative temperatures at the outlet. This trend becomes the reason for high-quality insulation of pipes. The sandwich technology copes with this task perfectly. Its essence: a second one is introduced into one pipe, and a thermal protection layer is made between them.

You can also make a sandwich pipe with your own hands by wrapping the chimney with insulating material and protecting the structure with an outer pipe
In areas where pipes pass through the roof, it is necessary to perform thermal insulation using a metal box filled with insulation. A deflector is placed on the head of the pipe. It prevents precipitation from entering the system and also protects against the effects of wind.
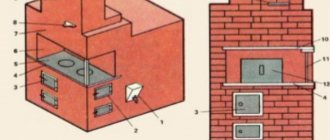
If the installation site for the stove is a stoker, there is no need for a reflector. When the stove is located in a room, the surrounding masonry performs two functions:
- Protective screen for walls and things.
- Heat accumulator.
Since the body of the structure is metal, the oven quickly heats up and cools down. Cooling occurs immediately after the fuel burns out. Therefore, a brick screen created on three sides of the stove accumulates heat and releases it over time. You can use corrugated sheets or a smooth metal sheet as a reflector.
What fuel is better to use in long-burning stoves
The efficiency of the furnace also depends on the fuel used. It is best to use dry logs. But since the stove is homemade, you can save on fuel. The device can even work on waste made from natural materials.
Experts recommend using pellets (granulated fuel) created by dry pressing in such stoves. The basis for pellets can be:
- cones;
- wood chips;
- sawdust;
- nutshell;
- straw.
Coal gives a good combustion temperature. But its use is justified when the oven is made only of materials with a decent thickness. Otherwise, such a unit will quickly burn out. A table showing the specific heat transfer of various materials can serve as a guide.
Table: specific loading coefficient and specific heat transfer of various types of fuel
| Type of solid fuel | Specific loading coefficient, kg/dm3 | Specific heat transfer, kW/h |
| Standard size aspen | 0,143 | 2,82 |
| Coniferous shavings or sawdust | 0,137 | 3,2 |
| Alder pellets | 0,285 | 3,5 |
| Hard coal grade DPK | 0,4 | 4,85 |
| SSOM grade coal | 0,403 | 5,59 |
| Coarse anthracite | 0,5 | 5,72 |
| Peat briquettes | 0,34 | 2,36 |
Area of use – from garage to home
How can I use a long-burning heating stove? The choice of design option depends on the intended tasks. If the unit is required for a home or cottage, it is better to use stoves with a water jacket. They combine conventional stove heating and water heating. Water carries thermal energy throughout the system, heating the room. At the same time, the furnace body warms up, which increases the efficiency of heat transfer.
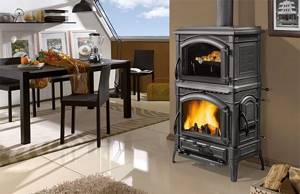
Can be used in the garage, bathhouse or home
In a long-burning boiler, the water quickly cools down when the combustion process stops, and the batteries become cold. But the oven cools down more slowly, still giving off heat little by little. For a summer residence, a stove combined with water heating is preferable to solid fuel boilers. It includes a coil in which water is heated. Sometimes it is installed directly into the firebox, which is unsafe. The high temperature generated by the combustion of gases can cause the water to boil and destroy the coil.
It is better to install a water heating coil in the chimney hood. This solution is suitable for heating a summer house, increasing heat transfer. The design of the unit is chosen taking into account the area of the room. For a small bathhouse, garage, or greenhouse, you can use a stove without a water circuit. An air-heating stove in a bathhouse is convenient because it allows you to adjust the combustion intensity. It warms up a small room well, which is good for a bathhouse, but not suitable for a home with permanent residence.
Nuances of the work
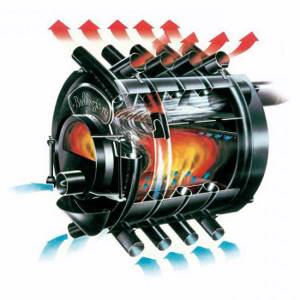
The design of a miracle wood-burning stove was described above; your product must comply with a generally accepted design. The next step will be to return to the bent tubes. In the first two you need to make holes by welding injection tubes to them. These are metal elements with a diameter of 15 millimeters. Whereas the length should be equivalent to 150 millimeters. They are needed to ensure the connection of the firebox with the convection elements.
Using pipes, you should weld the frame with the partition. For the last element, 6 mm sheet steel should be used. The gaps between the pipes are closed with strips of metal, and then the back wall is welded, which will form the furnace body. To accurately fit the partition elements, metal strips and walls, you must first make cardboard blanks. It is recommended to make a special lock for the door, which is an eccentric that strengthens the metal hinge. It is located on the wall of the structure. This device will ensure the tightest possible fit between the oven and the door. The miracle wood-burning stove, the greenhouse version of which is presented in the article, must have a door and hinges; the latter are manufactured and hung at the final stage. This also applies to the legs of the stove, which should be as strong as possible.
Let's start making - what you need
To make a homemade stove, you need to choose a convenient place. This must be a room with connected electricity and sufficient area. Now about the materials. It is easier to use a 200 liter steel barrel for a stove with a long burning time. However, the volume is not of fundamental importance; the heat transfer of the device will simply depend on it. They use gas cylinders and even fire extinguishers.
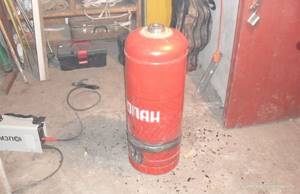
The stove can be made from an old gas cylinder
But, again, the volume of the workpiece: from a 27 liter cylinder you can make a stove for heating a bathhouse, from a smaller one or a fire extinguisher - for a tiny room. The thickness of the metal matters: the thicker it is, the longer the stove will last. If there is nothing suitable, we use a thick-walled pipe or steel sheets. The metal must be free of damage and rust. Other materials you will need:
- material for the legs if the oven is round in shape (pipes, angle, fittings);
- sheet steel 5 mm thick according to the dimensions of the end side of the product;
- sealed door or material for it;
- The 100 mm pipe is 15 cm longer than the device;
- 5 m of 150 mm pipe for smoke removal.
Measuring instruments are required: tape measure, plumb line, level, as well as a hammer, mallet, trowel.
Making a stove with your own hands
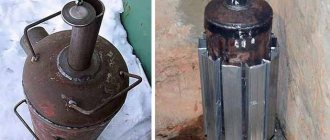
A long-burning heating stove can be made quite simply with your own hands. Most often, the base is steel barrels, waste gas cylinders or large-diameter pipes. The main selection criterion is the thickness of the steel (minimum 5 mm). The height of the proposed unit is at least 1 meter. The operating time of the equipment directly depends on the amount of fuel.
Calculation of parameters
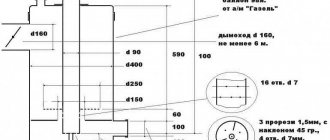
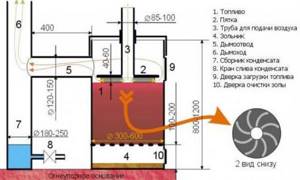
The parameters can be easily calculated using the drawing below, which reflects the internal structure of the furnace with all the necessary dimensions.
Tools and materials
Before starting assembly, you should carefully consider and prepare all the necessary tools.
To work you will need:
- Welding transformer or inverter.
- Angle grinder (angle grinder), commonly called “grinder”.
- Wheel for angle grinder.
- Drill and set of drills for metal.
- Hammer and anvil.
- Level, plumb line and tape measure.
If the design of the heating unit provides for the arrangement of a water circuit, then it is additionally required to stock up on sheet steel and two threaded pipes for inserting the boiler into the hydraulic heating system.
You also need to prepare materials:
- Large-volume steel container with walls 5 mm thick.
- Metal pipe with a diameter of at least 60 mm.
- Steel pipe with a diameter of 100 mm.
- Steel channel or angle 50–60 mm.
- A metal sheet with a thickness of at least 5 mm, slightly larger than the diameter of the body.
- Sheet of steel 3 mm thick.
- Hinges for the door.
After installation, a reflector is made around the stove, but it is planned before measurements and welding are carried out.
Selecting a location
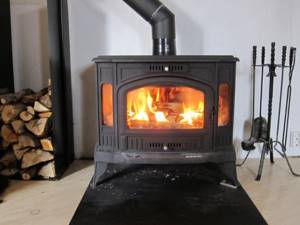
The stove should be installed in compliance with all fire safety regulations. Do not install the unit near flammable objects or near a wall.
The design of the stove is quite heavy and before installation you will need to make a foundation. After installing it, you can begin creating the reflector. It will help distribute heat evenly throughout the room. Any heat-resistant material, such as brick, is suitable for its manufacture.
Furnace assembly
After all preparations are completed, you can begin the actual assembly.
Main stages:
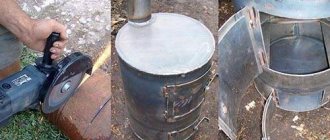
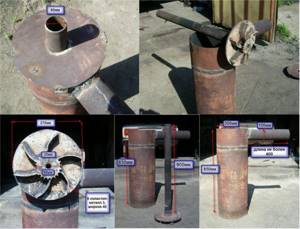
- Using a grinder, carefully cut off the top of the barrel; later it will be needed to create a lid.
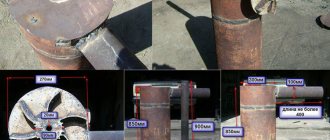
- An air distributor is cut out of a sheet of steel 5-6 mm thick - a circle of smaller diameter than the barrel itself. The edges of the cut are carefully cleaned.
- A hole with a diameter of 20 mm is made in the center of the cut-out air distributor, and a pipe is welded to it to supply air to the combustion zone.
- Four blades are welded on the back side of the flat piston, which should not protrude beyond the air distributor. Thanks to them, there will be an air gap between the metal pancake and the firewood, which is necessary for fuel combustion.
- A lid is made from the previously cut off top of the barrel. To do this, a metal strip is welded from the outside along the entire contour. It is important that its diameter allows you to freely install the top of the stove onto the body.
- A hole is cut in the lid several millimeters larger than the air duct. Afterwards, a handle is welded onto the hatch for loading fuel.
- A hatch for cleaning the oven is cut out in the lower part of the body. We must try to ensure an exact fit of the door to the body. To do this, a metal strip and loops are welded around the perimeter. The valve is installed.
- On the other side of the stove, at a distance of 50–100 mm from its upper cut, a chimney pipe is cut into from a piece of steel pipe, into which the chimney will fit with a slight interference.
At this point, the production of a vertical-type solid fuel unit can be considered complete. All that remains is to install the unit in place and connect the chimney.
Furnace design - detailed analysis of features
Before starting production, we first get acquainted with the features of the device and its operation. We draw up drawings for the stove based on the materials we plan to use. The most suitable base material is a steel pipe with a diameter of 400 mm or the same cast iron. The walls should be thicker, preferably 5 mm, then the stove will last a long time, especially cast iron. Thin metal does not last long, the walls quickly burn out.
Cast iron is preferable as a material for a stove, but it is more difficult to work with than steel. Special electrodes and certain welding skills are required.
The figure shows the operation of a long-term combustion furnace.
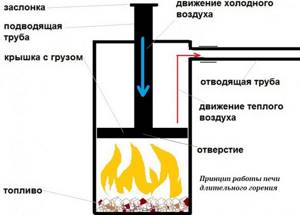
The device consists of three parts. In the lower zone there is solid fuel, which smolders slowly. Above is the zone of gas combustion and smoke removal. Between them is a loading zone, which gradually decreases as the fuel burns out.
For any scheme, an air regulator is required, which determines the duration of combustion. This is a steel disc 5 mm thick. There is a pipe welded in the middle through which air enters the chamber. As the fuel for the daily stowage burns out, the disk gradually lowers. For unhindered sliding, it is made slightly smaller than the internal dimensions of the combustion chamber. At the bottom of the distributor there is an impeller 5 cm high; larger sizes speed up the combustion process, which is undesirable.
A pipe for supplying oxygen with a diameter of 100 mm for a product made from a barrel and 60 mm for a cylinder or from a pipe. The holes in the distributor are 90 or 50 mm, respectively, otherwise a lot of oxygen will enter the combustion chamber, and the fuel will burn faster. A damper is installed at the top of the supply pipe to regulate draft. There are two options available: an air-heated oven and a boiler that heats air and at the same time water to heat the room. The water is heated in the coil and flows to the radiators. The diagram below shows such a design.
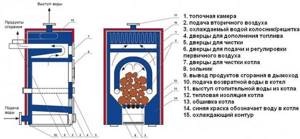
How does it all work?
If you decide to build a long-burning boiler with your own hands, then you should not rush to begin work on its creation. First you need to find a drawing for the stove. There are plenty of them on the web. A diagram of the design of such an installation would also be useful. It will make the work of creating a furnace easier. In addition, before starting work, you need to watch a video on how to make a boiler with your own hands.
When creating a long-burning installation, steel pipes should be used as the main material. If they are not available, then you can choose pipes with a diameter of 30-40 cm. In this case, the minimum wall thickness should be 5 mm. If it is less, then during the operation of the metal it will quickly burn out, and then the installation will be unsuitable for further use. The height of the boiler must be at least 1 m.
The created boiler is divided into three parts:
- combustion zone - it is used to remove smoke and smoldering ash;
- combustion zone - it contains smoldering solid fuel;
- loading zone – it decreases in height, which is associated with the gradual burnout of the briquette.
In any scheme of a long-term combustion boiler there is such a component as an air distributor. The duration of combustion depends on it. It limits the area in which the combustion process occurs. The distributor looks like a disk made of sheet steel 4 mm thick. There is a pipe in its middle part. Air enters the combustion chamber through it.
So that as the fuel smolders in the furnace, it can freely fall inside the chamber, its size is made slightly smaller than the combustion chamber. To control the combustion zone, the distributor has an impeller, the height of which is 5 cm. As its height increases, its space will also increase, which will lead to an increase in the rate of firewood burning in the oven chamber.
The pipe through which air will flow must have a diameter of 6 cm. You can use either a solid pipe or a telescopic one. In this case, the holes in the distributor should not be larger than 2 cm. Otherwise, air will enter the oven chamber in large quantities, which will lead to oversaturation with oxygen. A damper should be installed at the top. It will allow you to regulate the draft in the furnace. You can connect a long-burning boiler to heating in one of two ways:
- a water heat exchanger pipe is passed through the combustion chamber. The water in the tank will be heated through a coil that is connected to this pipe;
- a chimney is passed through the remote tank. The smoke passes through it in a hot state, which leads to heating of the coolant.
Comparing these two methods, it should be noted that the first is noticeably simpler in its implementation, and the second provides high efficiency.
We assemble it ourselves - sequence of actions
It is most convenient to use a barrel or gas cylinder. We carefully cut off the top of them - the material will come in handy later. We first unscrew the valve in the cylinder, drain the remaining gas and leave it for several days until the smell of gas ceases. We cut out a place in the body to attach a sealed door through which the ash is removed. We cut out a circle from 5 mm metal, the diameter is slightly smaller than the inner part.
We weld a pipe in the middle for supplying oxygen. In the lower position, it should protrude 15 cm above the surface of the heating device. We weld 6 blades 5 cm high from below at a certain angle. For a model based on a gas cylinder, we use the upper part of the body, where we cut out a place for the pipe, and use a lid in the barrel for these purposes. The air supply pipe must move freely up and down. We weld legs to the bottom of the body for stability. We cut a round hole on the side of the upper part and attach a 150 mm pipe to remove smoke.
It is more difficult to make a unit from sheet iron. Accuracy in calculations and marking of all parts is required, cutting and welding. It is almost impossible to make a round-shaped device at home without special rollers for bending metal, of course, unless thin sheet metal is used, which is irrational. If it is not possible to curl the sheets, the solution would be to make a rectangular oven. A possible option is shown in the drawing.
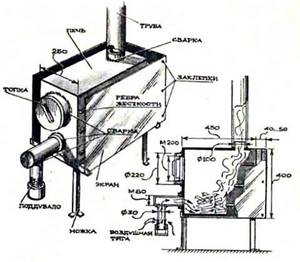
In appearance, it resembles the well-known potbelly stove, but changes have been made to the design to increase efficiency. The main changes concern the blower. It is made of an 80 mm pipe like the letter L, but for simplicity it can be made straight. On the threaded pipe we drill holes with a diameter of 6–8 mm. We install a blind plug on the thread, turning it along the thread to regulate the combustion with great precision.
We determine the correct supply of oxygen by the hot spot on the chimney - at first it should be further away from the stove, and over time it gradually moves towards it.
A potbelly stove becomes hot during operation, so it is used not only as a heating device, but also as a cooking stove. On the outside sides we install the screen at a distance of 50 mm from the walls. There is no need to weld the ribs - the unit works effectively with a hot interior. The screen serves to protect the room from infrared rays and prevents overheating of the room. It reflects at least half of them, maintaining the optimal temperature in the heating device.
What types of wood are suitable for heating
Pyrolysis boilers are universal regarding the fuel used. They can work on wood, coal, pellets and peat briquettes. Only dry fuel should be used for stowage.
Common types of wood:
- The best firewood is oak firewood. Birch and pine burn quickly, but contain a lot of resin. Aspen, alder and linden do not light up well, but then they smolder for a long time.
- Pellets. They are compressed granules. They are made from agricultural waste (straw, sunflower husks) or lumber waste (chips, sawdust, shavings).
- Fuel briquettes. The main filling material is the same as in pellets. But they are pressed in the form of briquettes up to 45 cm long.
- Coal. It cannot be used in steel structures; only cast iron ones are suitable for it. When burned, coal releases a lot of heat, which causes destruction of the chamber walls.
The key point when choosing fuel for a pyrolysis boiler is the equipment data sheet, which indicates the possible types and consumption of fuel for each specific model.
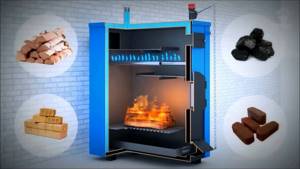
Water heating circuit - an option for heating a house
A potbelly stove can be easily converted into a slow-burning boiler for water heating. Instead of a screen, we install a U-shaped metal water heater, which will also reflect IR rays. We install it at the same distance as the screen. The installation cools the furnace too much, reducing its efficiency. A potbelly stove, as in the drawing, produces 15 kW, so it can heat 25 m2 of space. If there is no need for water heating, you can use a water heater for domestic needs.
The intention to make a potbelly stove with a long burning time to heat a larger area is futile. Increasing the size will lead to a deterioration in quality indicators. In a large firebox, there is sluggish circulation, insufficient gas emission, and the room does not warm up well. If you fill the firebox to the top with wood, there is simply no room left for a convection vortex to form. The conclusion is clear: the size of the potbelly stove determines the properties of the pyrolysis gas.
But still, a more powerful long-burning boiler for water heating has been developed. It is difficult to replicate industrial designs, but the design shown in the drawing can be assembled at home.
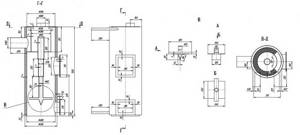
Unit B with a telescopic rod to regulate the flow of oxygen deserves special attention. The unit develops a power of 35 kW when operating on coal and pellets, combustion lasts 12 hours. Firewood is less efficient; it burns out in 8 hours.
Methodology of work
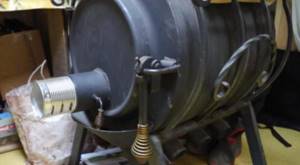
When making a miracle wood-burning stove with your own hands, you will need to cut individual elements from the pipe, of which there should be 8 in the design. The length of each of them should be 1.2 meters. A pipe bender will help bend these workpieces, giving them a radius of 225 millimeters. These components of the furnace will need to be arranged in a checkerboard pattern. To remove smoke and accumulated moisture, T-shaped devices should be made, through which the smoke will rush up into the pipe; as for moisture, it will flow down. To eliminate moisture, a special tap is installed to remove water; it must be opened only for these purposes, and then closed again. This is the only way you can prevent deterioration in traction.
Sawdust stove - nothing complicated and affordable
Such a device runs on the cheapest fuel, which burns well and produces a lot of heat energy. Often sawdust is simply thrown away or sold at a nominal price. But they can only burn in special devices; in other types of stoves, if they burn, it’s bad. The design features provide the possibility of strong compaction of wood pulp so that no air remains between its particles. In this state, they will not burn quickly, but will smolder, giving off heat sufficient to heat one or two rooms.
The installation is assembled according to the same principle as others with vertical loading. It is better to use metal products of a cylindrical shape, but if this is not possible, you can make them in a rectangular shape. Unlike a potbelly stove, where firewood is loaded from the side, we provide for sawdust to be loaded from above. This one differs from other models by the presence of a conical pipe. It is inserted in the middle of the air regulator - a circle with a hole inside the oven. The design is shown in the drawing.
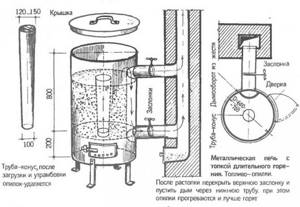
Pour sawdust inside and tamp it as tightly as possible to prolong the combustion process. We remove the pipe - it's easy because of its conical shape. The hole formed in its place will serve as a chimney and for the supply of oxygen to support the smoldering of sawdust. We set fire to the sawdust from the side of the vent and the process has begun. It is important to set up the chimney correctly: excessive draft will draw heat out into the street, and if the combustion is weak, smoke will penetrate into the room.
Combustion occurs mainly in the central part of the combustion chamber, the walls heat up weakly. If you lay a long chimney around the room, the efficiency of the device will increase. This is a good option for greenhouses.
Required materials and design features
The main difference between a long-term combustion stove and a conventional stove is two combustion chambers , which are connected by grates or a simple grate.
The loading zone is intended for smoldering firewood and the formation of pyrolysis. The process occurs with a limited amount of oxygen. Firewood decomposes into two components: coke and pyrolysis gas. The gas moves to the second chamber, where it burns. The remainder of the combustion products enters the chimney. To make such a stove yourself , you need:
- sheet metal (3−4 mm);
- metal corners (50 mm);
- steel fittings (for gratings between zones);
- metal (steel or cast iron) pipe for the chimney;
- Bulgarian;
- welding machine;
- measuring tool.
Installing a heating device - important rules
For the installation to operate safely, certain rules must be followed:
- It is prohibited to place combustible and flammable objects within the warming-up distance;
- we make the chimney dismountable for cleaning;
- Before use, we carry out a test to select the optimal mode.
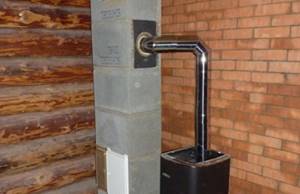
For the chimney exhaust we use a pipe with a diameter of 150 mm and a length of 5 m. With a smaller cross-section, smoke will not be removed well; with a larger cross-section, excess draft will appear. We install an adjustable damper on the chimney. Accumulated condensate must be removed periodically. If the chimney is not dismountable, doors are made in it for cleaning. Excessive formation of condensation can be prevented by constructing a chimney using the sandwich principle. Between two pipes of different diameters we place a layer of glass wool for insulation. We cover the top of the chimney pipe with a deflector to prevent rain, snow, and wind from blowing in.
In a house where there are children, we line the stove with bricks. The masonry around plays the role of a protective screen, so as not to get burned if you accidentally touch it, and protects objects and walls from overheating. It also serves as a good heat accumulator. The brick will accumulate heat and release it much more slowly than the iron body. We arrange the foundation if the floor under the stove is made of flammable materials. It is not necessary to deepen it too much; the weight of the heating device is light.
Connection to the chimney
An important part of the design of a long-burning stove is the chimney and pipes for connecting to it. The chimney diameter must be at least 100 mm, preferably even more. This heating device requires three metal elbows and a plug. To pass through the wall, this particular design also uses a pass-through glass. All connections must be sealed.
Connection sequence:
- the first part of the metal pipe is welded to the upper surface of the stove ;
- then the remaining elbows (up to the wall);
- a hole is cut in the wall in accordance with the diameter of the glass;
- a metal pipe is passed through it .
If the chimney is brick , this is where the work ends. If there is no brick structure, you need to install a metal pipe (minimum length 4 m), to which the elements extending from the heating device should be connected. In addition, a metal chimney needs insulation, which will reduce the formation of condensation. It is advisable to attach a special fungus to the top of the pipe to prevent debris and moisture from getting into it.
One of the most economical stoves is the Breneran Aqua device with a water circuit. The operating principle and nuances are outlined here:
Some tips - what will help improve the operation of the furnace
A long-lasting vertical furnace is heated, adhering to the following rules. Remove the cover and take out the adjusting device - a pipe with a pressure circle. We load the firebox with fuel, the maximum height is to the bottom of the chimney opening. We try to pack any fuel as densely as possible. Place small dry branches on top in the center, then paper or a cloth moistened with kerosene. We install a clamp, a lid, and throw burning paper or a rag into the pipe. It is unlikely that you will be able to set it on fire with a match - it will go out on the fly. When the fuel burns well, close the air damper - work continues in smoldering mode.
Homemade structures use almost any solid fuel: wood, coal, garbage, pellets. But it is still necessary to take into account the features of each model in order to choose the most efficient fuel. As already mentioned, vertical stoves with a conical pipe can work effectively on sawdust. Vertically located devices work well with wood, coal, and briquettes. Long-term burning products with a horizontal firebox are designed for the use of firewood and wood chips. Pellets are used mainly in industrial equipment, where fuel is supplied automatically, but they can also burn in home-made installations.
In horizontal furnaces, heat transfer can be increased by using a combustion bulkhead device. From a thick metal sheet we cut out a blank with a width according to the internal dimensions, and a length - ⅔ of the length of the combustion chamber. We install it at the top under the chimney pipe. Such a simple device slows down the flow of gas and additionally accumulates heat.
Another device for making full use of the long-burning effect is an injector. These are one or two pipes with holes leading into the firebox. We cut holes in the walls of the heating apparatus according to their diameter and weld the injector. It is located at the height of the center of the chimney pipe, but in front of the firebox. The injector serves to feed the combustion process with air, the upper wall warms up better. When the device goes into the smoldering process, it does not work.
There are many design options, we only talked about a few. We hope that using the information received, you will be able to independently make a simple and reliable device that does not require constant maintenance.
Safety and Operation Rules
The surface on which the stove will be installed must be perfectly horizontal and level. On the floor and walls located nearby.
it is necessary to apply fireproof materials (asbestos, basalt). The metal pipe must be finished with a non-flammable compound, and the gaps between the pipe and the wall must be filled with non-combustible thermal insulation. Before lighting a new stove for the first time, you should check its tightness - burn the material that produces a large amount of smoke in the firebox and inspect the device. Perhaps there is a seam somewhere that lets smoke through, or the chimney is not working well.
In order for the stove to operate smoothly, it is necessary to clean the chimney in a timely manner and regularly remove ash from the ash pan. If there are places in the system that cannot be cleaned, before the start of the heating season it is advisable to burn the system with aspen, which helps burn out the soot.
Installation features
In order to control the combustion area, an air distributor is used. Oxygen is supplied through a pipe leading through the top cover. The unimpeded movement of the distributor is achieved due to the difference in diameters.
The thickness of the burning layer depends on the height of the impeller. It is recommended to pay special attention to this parameter. If the blade height is too high, the fuel will burn very quickly. It has been experimentally established that the optimal height should not exceed 50 mm.
The diameter of the air channel is selected to be at least 60 mm. A distributor opening size of more than 20 mm is considered excessive, since oxygen supersaturation increases the combustion intensity, which is unacceptable for a unit of this type. For a mixer for a warm water floor, read our article.
