Assembly
Having made the blanks, we proceed to welding and assembling the stove.
- We place the bottom element on a horizontal surface and place a side wall at its edge. We use a square to check the right angle between them, weld them onto spot clamps in increments of 10 cm. Make sure that we have a right angle, then weld the joint. We do the same with the second wall.
- We cut off two pieces of the corner: their length coincides with the size of the stove. We put marks from the inside on the walls where the grate will be located, and weld the corners along them (with the shelves down). We weld the joint between the corner and the wall on both sides.
- We give the structure rigidity and correspondence to the required geometry: we fix the back wall. Everything is simple here: we place it at the ends of the sidewalls and grab it from the inside without completely welding the joint; if suddenly something goes wrong, we will cut the tacks with a grinder and disconnect the part to adjust the design.
- We install a mirror and a partition that form the upper chamber. But before that, let’s weld the fastenings for them. We cut off 8 pieces of reinforcement 5 cm long and 8–10 cm in diameter. We make marks along the height of the channel (look at the drawing) and weld them as shown in the figure. Rigid fastening of the partitions is unacceptable: due to the high temperature in this part of the stove, they will eventually become unusable and require replacement.
- Let's start making the grate. We cut the fittings with a diameter of 8–10 cm into 25 strips (their length is 2 cm less than the width of the oven), this will ensure a power reserve, and the grate will fall into place freely. We cut out two strips of sheet steel (the width matches the width of the corner). We place them on the first and last pieces of reinforcement along the edges and secure them by welding. We perform similar actions with the remaining pieces of reinforcement. Turn the grill over and weld the joints on the reverse side.
- We make a hole in the cut-to-size lid and place a sleeve to connect the chimney. The easiest way to cut a hole is with a propane cutter, but if you don’t have one, you can burn along the contour using arc welding at high current. For the sleeve you need a piece of pipe with a diameter of 10 cm and a height of 20 cm. We weld it.
- Before attaching the cover, we weld the stuck joints on the back wall, since this will not be easy after installation. Now we can safely weld the lid to the sides and back wall.
- We put the finished grate in place.
- Installation of the front part. First, we cut out the top panel according to the dimensions from the drawing and drill 5 holes in a checkerboard pattern for the intake of secondary air (with a 5–6 mm drill). We attach the panel by welding at several points along the top and sides of the body; it should slightly cover the end of the mirror. Once we have checked the geometry and dimensions, we weld the joints.
- The next stage is the bottom panel covering the ash pan, with the blower door. First, we cut out the panel itself and the rectangular opening for the door. The height dimensions are indicated in the drawing; we measure the width according to the design of the future stove, since it may differ from those shown on paper. The best option is 1/2 of the oven width. The door is cut along the opening.
- In the door itself, we drill a hole for the bolted connection of the locking strap (this is a steel strip 2–3 cm wide and 10–12 cm long, with a curved end of 2–3 cm). The curtain is made from a piece of pipe and a steel plate. The door is placed with a tube on a rod welded to the body to the left of the opening. To lock on the right side of the body, a piece of corner or a curved strip is welded.
- The firebox door (the central part of the stove) and the curtains are made similarly to the bottom one, the only exception is that you don’t have to cut an opening for it in a single sheet: we will make it from strips 4–5 cm wide. They are attached by welding to the ends of the side walls, to the top and lower front panels.
- The oven is ready, we need to put it on its feet. A pipe with a diameter of 15–20 mm is suitable for the legs. We cut it into 4 pieces 20 cm long. To prevent the stove from pushing through the floor covering with its weight, we weld 5x5 cm sheet steel nickels to the tubes. You don’t have to do this if the potbelly stove will be in a garage or utility room, but with nickels it will become more stable. All that remains is to weld the legs to the bottom in the corners, retreating 3–5 cm from the edges (depending on the dimensions of the oven).
- To improve the appearance, the unit is coated with heat-resistant paint. The chimney should be made collapsible: with clamp connections for easy cleaning. The design of the chimney depends on the location of the stove in order to bring it outside.
When installing a stove in a garage, it is important to think in advance about additional safety measures for placing the stove next to the car and ways to retain heat while the stove is operating.
Installation of the system in a finished oven - all the nuances
If the house already has a stove, then only a certain part of it is disassembled and a register is installed. In this case, more frequent fuel supply will be required.
If desired, you can change the number of smoke channels or their direction. However, this is only allowed in the most difficult situations.
All work must be carefully thought through, since after the actions taken it is important to maintain good traction. When dismantling the structure, it is recommended to sketch the location of the masonry
In the future, using this scheme it will be possible to easily disassemble the oven
When dismantling the structure, it is recommended to sketch the location of the masonry. In the future, using this scheme it will be possible to easily disassemble the stove.
If the brick remains in good condition after dismantling the masonry, it can be reused
If it is necessary to replace the material, it is important to select bars of the same quality and shape as the previous ones
Making a mini potbelly stove yourself
By assembling such a stove yourself, you can inexpensively heat any small room. A mini potbelly stove is easy to assemble with your own hands. To do this, you need a certain list of tools:
- level for construction, measuring tape;
- welder;
- Bulgarian;
- chisel;
- sheet metal for components;
- chimney duct;
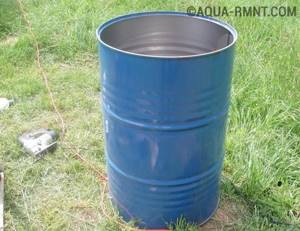
- barrel (for a cylindrical model);
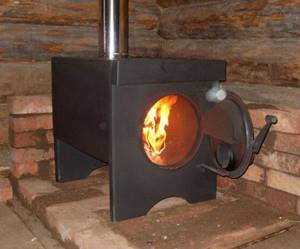
A common boiler option is wood-burning. Thanks to its high efficiency, this device can heat the room evenly as long as the wood is burning. Below are detailed instructions for assembling a wood-burning stove.
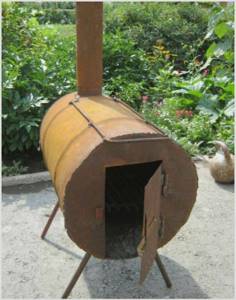
An example of a simple potbelly stove made from a barrel or an empty gas cylinder
Progress
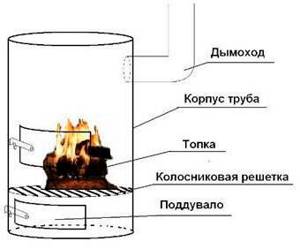
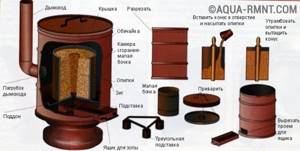
The future oven should be a chamber divided into 2 compartments. The upper one is intended for fuel combustion, the lower one is needed for the accumulation of ash. The compartments are separated by bars. The finished product must have 2 doors, one for the combustion window, the other for the ash pan. At the top of the stove there is a pipe for removing combustion products. Below are several options for making a potbelly stove. We advise you to read in more detail the instructions for a long-burning potbelly stove on our website.
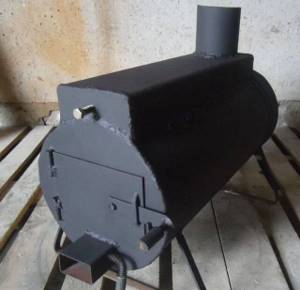
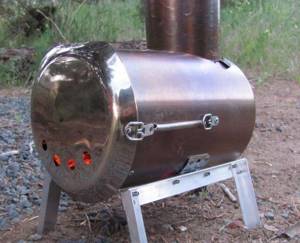
The container of the future furnace will stand horizontally. To do this, take an old gas cylinder. This is an almost finished mini-stove with wood. There is no need to divide it into 2 parts; instead, the ash chamber can be welded from below, which will save the working volume of the device. Next, you should cut out the firebox window.
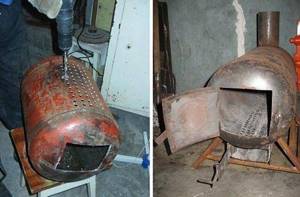
Holes are drilled in the cylinder body through which waste fuel will enter the ash pan.
The fire door is purchased separately and fits into the prepared hole. When the ash compartment is welded, you can begin to make supports for the stove. To do this, metal pipes are attached to the bottom of the chamber using a welding machine. The length of the pipes is selected individually. A hole is made on the reverse side for the chimney pipe.
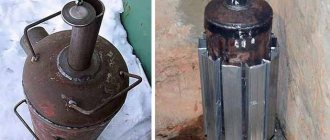
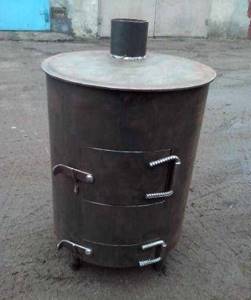
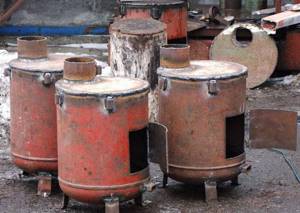
When there is little free space, you can construct a vertical model. It is necessary to divide the cylinder into 2 parts. Fasteners are welded to the inner walls of the cylinder; the grille will rest on them. The upper part is covered with a steel sheet. It can serve as a hob.
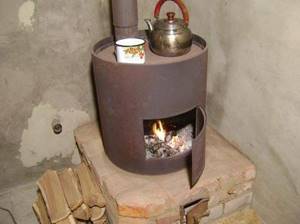
The vertical version of the mini-oven takes up less space and allows you to heat food
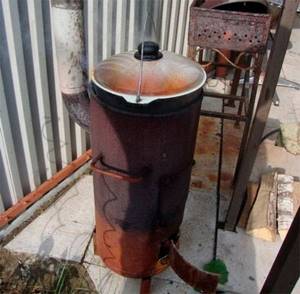
A pot with a lid made a good plug
As a chimney, you can weld a 90 degree bend behind. The rest of the chimney is attached to it.
Readers found these materials useful:
- “Shvedka” stove - a method of arrangement with a bell-type firebox and a stove bench
- Independent construction of a Dutch oven according to diagrams and drawings
Furnace design, its specifics
The important elements of a potbelly stove are:
Furnace compartment. It is located approximately in the middle third of the oven. Designed for burning fuel - wood or coal. Equipped with a door on the side wall of the oven for loading. An ash pan is necessary to collect solid residues after burning wood or coal. It is disconnected from the part for the firebox at the top by grates, which are cast iron rods of a specialized shape. Ash awakens in the gap between them and penetrates into the waste collection tray. At the bottom of the ash pan, a bottom is made of sheet metal 1.2–1.5 mm thick. The container with the coolant is a tank made of sheet metal, filled with water or the rest of the heating agent. This device requires absolute tightness. At the top of the tank there is a hole for the outlet of water, at the bottom there is a return pipe through which the coolant cooled in the heating system is returned. The smoke exhaust duct is installed on top of the stove body; it can be vertical, horizontal or inclined. It is brought out through the wall. For potbelly stoves, in most cases a pipe diameter of 150 mm is used. The supporting part is legs made of profile metal, providing a clearance between the body and the floor of at least 20–25 cm. Under them it is necessary to install a protective sheet of metal with an asbestos backing
This is very important if the heating unit is placed on a floor made of combustible materials.
Pipe coils
The design of this unit depends on the design of the furnace. There are different types:
- With right angles. Such thermal units are made of sheet metal up to three millimeters thick. Naturally, the most technologically advanced pipe coil is made in the form of a jacket located around the combustion chamber. The distance between the walls of the jacket and the furnace body depends on the volume of the heat exchanger. The higher it is, the very slowly the heating of the coolant in it occurs. Often containers are installed on top of the combustion chamber, but in this case the surface for cooking the stove becomes inaccessible.
The quadrangular shape of the stove is most suitable for a potbelly stove

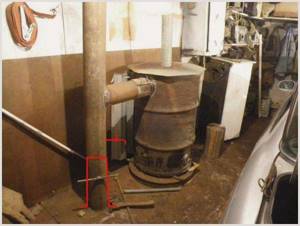
Cylindrical vertical potbelly stove is very cheap
A potbelly stove can be made from a metal pipe needed for a high-pressure pipeline
Lining can be compared with thermal insulation
You can also heat the room with sawdust
Other stove options
Of course, not everyone chooses potbelly stoves. Many car owners, in search of the most economical ways to heat their garage in winter, opt for options that run on exhaust gas or from gas cylinders. Despite the fact that the operation scheme of such furnaces is approximately similar, we will still dwell in more detail on the alternatives so that you can complete the project yourself without any help from specialists.
On used oil
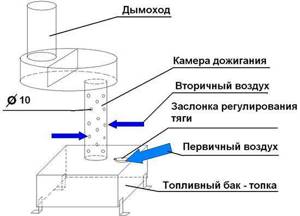
The main difference between this design and a standard potbelly stove is that it consists of 2 chambers. They are connected to each other by a metal pipe with holes: it is from them that the flame comes out.
- lower chamber - designed for spent fuel, here it burns and turns into gas;
- the upper chamber is for mixing the resulting gas with air; the more optimal the design, the better the heat transfer.
Operating procedure:
- we take sheet metal and give it the desired configuration, you can skip this step if you have a ready-made round or rectangular metal container;
- we make a lower section out of it, into which spent fuel is poured, and make a damper so that the air entering the chamber can be regulated;
- we attach legs from the bottom made of thick wire or any available material - they will ensure the stability of the stove;
- We insert a perforated pipe with thick metal walls into the hole from above - it serves as a support for the upper compartment and is constantly exposed to high temperatures, so it must be reliable;
- to make the upper chamber, we take a cylindrical metal blank;
- the final touch is the chimney, installed on top.
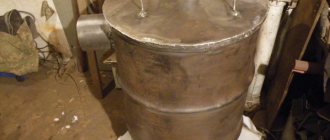
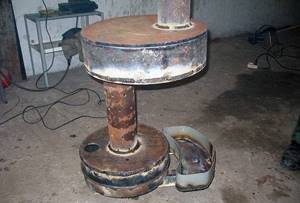
Long burning
Such a stove can be easily made from an old gas cylinder. Or a metal barrel with strong walls. Required conditions:
- cylindrical shape;
- vertical arrangement.
To make it, you need to weld together a metal circle that acts as a weight and a small pipe. They are placed directly into the workpiece and ensure uniform combustion of fuel due to a stable air supply.
A removable lid should be installed on top, and the smoke will come out through a pipe from the top side. It’s good if you can weld the handles - convenience!
Firewood, sawdust and any other type of solid fuel are placed both in the primary combustion chamber - the very bottom of the cylinder, and directly on a metal circle. Such stoves are called long-burning precisely because the wood used for kindling slowly smolders and releases gas, which burns in the upper part, providing the required level of heat.
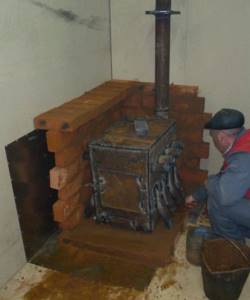
Brick
Perhaps the most labor-intensive and not always justified option, which captivates with its aesthetic appearance and high efficiency.
In order to give the structure stability and increase fire safety, it is necessary to build a foundation.
Brickwork is also carried out according to a special scheme in order to increase strength to the maximum level. Clay mortar is used for gluing, and the seams between the fragments reach 1.5 cm.
You will also have to make a combustion and blower door. For ash you need to install a grate. Don't forget about the cast iron panel: solid fuel will be placed on it. The final point seems to be the execution of the valve, but this is a trifle in comparison with what remains to be done before.
Drawings of projects already tested in practice will help you.
How to use the stove correctly
Only dry wood is suitable for use in pyrolysis heating stoves. This is due to the fact that when wet fuel is burned, a lot of water vapor is released, which reduces the temperature in the working area. Of course, in this case, there can be no question of effective combustion of pyrolysis gases. In addition, there are other unpleasant aspects associated with incomplete combustion of volatile components. Firstly, when cooling in the chimney, they fall out on its walls in the form of tar, creosote and other difficult-to-remove substances. Secondly, the content of hazardous chemical compounds at the outlet of the chimney exceeds all permissible standards, which negatively affects the environment and human health. And, on the contrary, when burning well-dried wood, the exhaust gases consist mainly of carbon dioxide and water vapor, and the operation of a potbelly stove from the outside can only be judged by the slight movement of heated air at the upper end of the chimney.
Before adding fuel, the piston is removed and put aside, and the space inside the stove is filled with firewood. It should be remembered that the thermal power and duration of operation of the heating device depend on the density of the stacking, therefore all gaps between the logs must be filled with shavings, chips, wood husks, etc. Place a rag soaked in kerosene or diesel fuel on top, install the air distribution piston and close the unit lid.
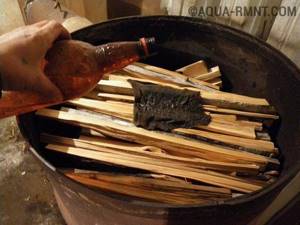
For ignition, you can use a rag dampened with a flammable liquid.
The stove is ignited with the damper of the air supply pipe fully open by throwing burning rags into it, which have been previously soaked in barbecue liquid or the like. After the wood burns, reduce the air supply.
In order to make the operation of a potbelly stove safe, follow a few simple rules:
- If flammable substances are used to ignite wood (gasoline, kerosene, solvent, special products for wood-burning stoves), then it is necessary to install the piston and close the stove with a lid before throwing a lit match.
- It is not recommended to use plastic, rubber, foam and other household waste as fuel for two reasons. Firstly, this is due to the release of extremely toxic substances that cannot burn even during the process of pyrolytic decomposition. Secondly, during high-temperature oxidation of such materials, a huge amount of soot is released, which means that the chimney will have to be cleaned several times a month.
Often, in order to make a potbelly stove more presentable, its body is primed and painted in the desired color. It should be understood that during operation of the stove the paint will fade, so it is better to use only protective compounds designed for operation at high temperatures.
Despite the fact that pyrolysis decomposition promotes the most complete combustion of fuel, a small amount of soot and ash is still formed during operation of the furnace. To remove carbon deposits, you can use a metal scraper and brush. As for ash, the most convenient way to clean a potbelly stove from a barrel is with an iron scoop with a short handle. There is no need to remove all the ashes. A layer of ash 2–3 cm thick will act as thermal insulation, preventing the bottom of the heating device from burning out.
Making a potbelly stove with a water circuit with your own hands
When installing this type of heating system, you can either build a water boiler into a potbelly stove or create the stove itself from scratch. Therefore, the process can be divided into two stages.
We also recommend that you study the article: Water heating from a stove on our website!
Formation of a potbelly stove
Before starting work, drawings are drawn up that include all dimensions of the furnace, and the basic materials for working with metal are prepared: a welding machine, a hammer, an angle grinder, as well as pliers and special clothing.
When drawing up a diagram of a potbelly stove with a water jacket with your own hands, it is important to take into account the thickness of the elements of the future unit. After the metal has been cut, you can proceed to further steps:
After the metal has been cut, you can proceed to further steps:
Connect the bottom to the walls, excluding the front. All elements should be welded at right angles.

The blower opening should be up to 3 cm smaller in comparison with the blower itself.
- Openings for doors are made on the front wall. After this, it can be installed to the main structure;
- Canopies are added to the sides of the front part and doors are installed;
It is better to equip all doors with deadbolts
A chimney pipe is welded to the top of the stove. Upon completion of work, all parts must be checked for defects in the seams. If none are found, you can proceed to the next step - adding a water circuit.
Adding a water circuit to a potbelly stove
The basis of this type of furnace is a heat exchanger, which can be constructed from different materials, for example, hollow steel pipes or steel sheets. In addition to the heat exchanger, to create a potbelly stove with a water circuit you will need:
- Finished furnace body.
- Radiators.
- Pipes.
- Metal sheets.
We advise you to read about water heating from a stove on our website.
The system is installed as follows:
Two holes are made in the upper part of the potbelly stove base for the supply and return of water.
Drawing up a drawing of a future potbelly stove with a water circuit, created independently, will help to simplify the work.
- The water tank is formed from metal or other suitable unused materials, and the largest space should be allocated for it in comparison with the firebox and ash pit. Holes are made in the tank for the pipes, then it is installed behind the firebox. The space is separated by a metal sheet.
- Next, the pipework is installed. It can be one-pipe, two-pipe or manifold.
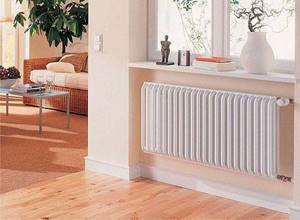
It is recommended to install radiators under windows. This will increase the thermal conductivity of the stove. The design of a potbelly stove with a water circuit is checked for the absence of holes where water can leak through the circuit.
An expansion tank is installed to the supply line, which will prevent the supply of cold water. Its size is selected based on the volume of water that will be in the entire system - the tank should be made 20% larger.
Example of a potbelly stove with an expansion tank
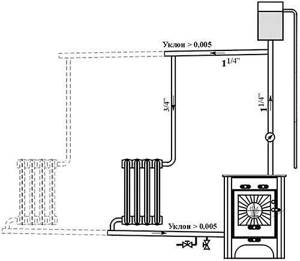
If constructed correctly, the water will heat up in the heat exchanger, pass through the pipes to the radiators, cool and return to the heat exchanger.
We advise you to read more about the types of heat exchangers in addition to this material.
The finished structure can be painted or covered with brick, depending on what appearance the owner prefers.
Video: project of a potbelly stove with a water circuit
With the help of a self-designed potbelly stove with a water jacket, you can significantly save on heating a country house. Such a structure can provide the necessary amount of heat to any room.
How to choose a heater for a summer house
Previously, we found out that a convection cast iron oven is suitable for periodic heating and is not afraid of long downtimes
Like any potbelly stove, it is “omnivorous”, that is, it can burn wood of different species, sizes and humidity, which is very important for dacha owners. It remains to understand which stove from the offered range to choose based on operating conditions
The selection criteria are as follows:
- thermal power of the unit;
- its dimensions and purpose;
- additional functions.
Power is an important characteristic indicated in the technical data sheet of any heater. It needs to be correlated with the size of the room where you plan to install the stove. For example, the technical characteristics of the Russian-made Bavaria PK 004 cast iron stove shown in the photo indicate a power of 12 kW and the cubic capacity of the room for which it is designed is 90 m3. This data should be relied upon when choosing a heat source.
Bavaria stoves PK 004 and PK 153 of the Russian brand Ecofireplace
Before choosing a stove for a country house made of cast iron, we suggest that you familiarize yourself with our recommendations in this regard:
- For a small house or a cabin located on a summer cottage, it is worth buying a small-sized, or better yet, collapsible model of the stove. Then it can be loaded and taken away in a car, so that the wood-burning heater is not stolen in your absence.
- If you need to heat 2-3 rooms, then it is better to take a stove with a water circuit and connect it to radiators installed in adjacent rooms. But you need to understand that this is due to increased consumption of firewood and constant monitoring of the operation of the heat generator.
- In a country house you can purchase and install a beautiful stove - a fireplace with wide panoramic glass.
- To cook and heat up food, look for a stove with a cast iron hob.
Modifications of “Bavaria” with a water heat exchanger (left) and with natural stone trim (right)
Among the many different cast iron stoves, you can also choose a unit with an oven, various additional drawers and original cladding made of natural stone.
Making a potbelly stove
Long-burning potbelly stoves are good because they are made from any available materials - these are various barrels, old capacious cans, pieces of large-diameter pipes or simply sheet metal. We chose sheet steel as the starting material - it is a more convenient material to process. You can adapt a barrel for this, but doing work in its internal volume is not very convenient.
All sizes are presented rather as guidelines, a kind of averaged best option. You, in turn, can deviate from the dimensions of the parts to create a stove that satisfies your specific wishes.
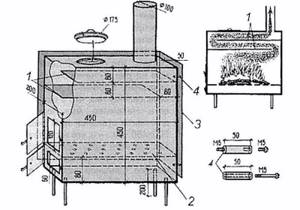
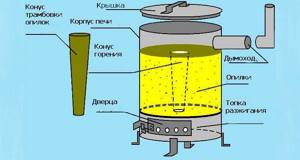
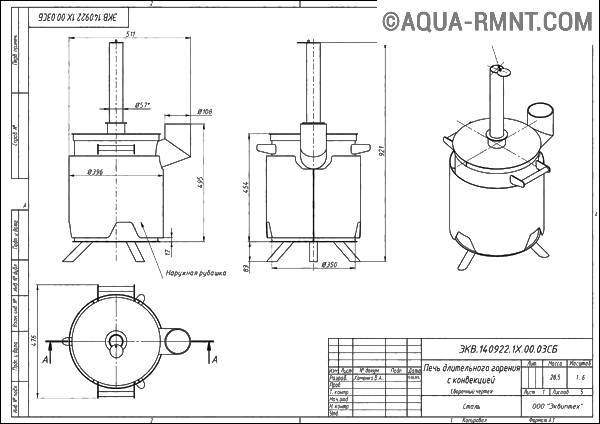
The design of a long-burning furnace is quite clear from the drawing presented above. Here are its main components:
- Combustion chamber - wood burns in it with the formation of pyrolysis gas;
- Afterburner – combustion of pyrolysis products occurs in it;
- Doors of the combustion chamber and ash pan - they are purchased in the store, but you can make them yourself;
- Chimney - in most cases it is a pipe with a diameter of 100-150 mm.
You can deviate from the drawing in one direction or another. But remember that as the size decreases, the burning time decreases and the power of the long-burning stove decreases.
The lower the power, the smaller the heated area. Therefore, it is best to provide a small reserve.
To make a long-burning stove like a potbelly stove, we need sheet steel with a thickness of at least 3 mm - this will ensure a long service life of the heating equipment. If the steel is thin, it will begin to burn through - after a couple of seasons, holes will form in it
Therefore, special attention is paid to the thickness of the steel. The optimal thickness is 3-5 mm
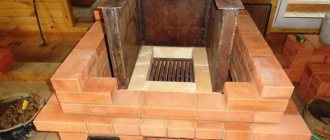
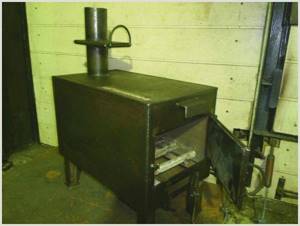
For our example, we will take the classic scheme of a potbelly stove, modify it and get at our disposal an effective wood-burning stove for a home. At the initial stage, we prepare the side sheets - in our drawing they have dimensions of 450x450 mm. Next, we make the lower walls, front and rear walls - their dimensions are 200x450 mm. As a result, we should get a rectangular box. But don’t rush to weld it together - there is a lot of work ahead.
First you need to make a base - this is the bottom wall and two side ones. We weld them together, weld the grate at a height of 80 mm from the bottom. Now we need to prepare the front wall of the long-term heating oven - we weld both doors into it, and then weld it to our structure.
We prepare two metal sheets measuring 200x370 mm. We weld the first of them to the front and side walls at a height of 160 mm from the top. Next, we prepare the back wall - we weld small metal tubes into it, which should fit into the space between the two inner sheets that form the afterburning chamber - secondary air will be supplied through them. Then we weld the back wall and a second metal sheet at a height of 80 from the top (welded to the side and rear walls).
The damper is used to regulate air flow. It is this that improves the efficiency and quality of traction.
Our DIY long-burning stove is almost ready - all that remains is to figure out the top cover. We make a hole in it with a diameter of 100 mm and weld a piece of pipe for the future chimney. Now it remains to find out whether you need a hob or not - it is also welded into the top cover. At the last stage, we install the lid in place and weld it - the stove is ready, now it can be installed on a non-combustible base, attached to the chimney and started.
When starting the long-burning stove presented above, let it burn, then cover the ash pit so that the wood barely smolders and the generation of pyrolysis gas begins.
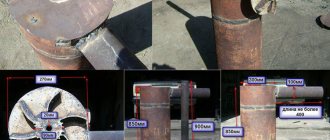
Another interesting long-burning pyrolysis furnace is shown in the following figure. It is made from a barrel or a piece of large diameter pipe and is equipped with a suitable lid. In the lower part, at a distance of 80-100 mm from the bottom, a metal disk with a hole in the middle is welded. A door is welded between the disk and the bottom, on the side wall. The resulting space forms our firebox. We weld a chimney with a diameter of 70-100 mm in the upper part.
In terms of low cost of use, such a stove is a real gift, since there is no shortage of sawdust in a private home.
The resulting long-burning furnace receives heat by burning pyrolysis gases generated when heating sawdust. The sawdust itself is poured into the main volume, and to prevent it from spilling into the firebox, it is compacted using a wooden cone. When the stove starts, a fire is lit in the firebox, the cone is removed - after a while the unit will begin to produce heat.
Basic rules for lighting a stove from a cylinder
The furnace is started according to a certain scheme. It is important to take this into account in order to achieve an optimal result and ensure an ideal level of safety.
- You should do the following:
- For effective kindling, you initially need to completely remove the existing lid and then remove the special device for supplying air masses.
- The fuel used is added, but its volume should not be greater than the chimney line located below.
- If a potbelly stove or bubafonya operates on wood, then in a vertical position it can accommodate much more than if it is laid horizontally.
- It’s worth sprinkling the top part of the firewood you’re using with a small amount of wood chips and putting paper on it.
- The damper opens and paper or rags are thrown into the pipe. After the fuel is completely ignited, the damper closes.
In this position, the oven is able to operate for a day or more, that is, constant human intervention is not required.
How to increase furnace efficiency
There is a very simple method of increasing the total area where heat will be retained for a long time. To do this, simply increase the total area of metal surfaces. Many people use this type of oven as a heating surface for cooking. This goal can be achieved by installing special heat sinks at the very top of the chamber for combustion processes. In the inner part it is worth welding special corners along the entire length. These parts are able to increase the quality of the heating process by approximately 10% and significantly strengthen the walls of a stove such as bubafonya.
If all the pipes are connected to the cylinder body, you can count on a significant increase in heat production.
Many people decide to make a stove lined with standard bricks. Thanks to this, a special effect of a heat accumulator made of stone is ensured and the walls of the room are protected from strong heating.
If you place stones around the stove, which is often used in saunas, you can increase efficiency by 20%.
Some experts direct a fan to the bubafonya stove, which can effectively prevent overheating, that is, make the room as comfortable and uniform as possible. This factor adds about another 10% to the overall efficiency.
It must be remembered that an increase in overall efficiency automatically leads to an increase in the weight of the stove itself - bubafoni from a cylinder
In the process of creating the foundation, this must be taken into account.
Required Tools

- To make a device such as a stove-potbelly stove with high-quality long-term combustion with your own hands, you need to prepare the following materials and important tools:
- A large metal barrel will be required; a cylinder can also be used;
- Two short pipes made of steel (one should be slightly larger than the other);
- If this is a bubafonya stove, then you will need to build a piston;
- Channel made of steel;
- Mallet, axe, hammer, hacksaw;
- Devices for taking measurements will be required;
- Steel sheet, brick and reflector;
- Protective elements for welding and other necessary materials.
Only after preparing all the required tools and materials can you begin the process of creating with your own hands such an effective device as a potbelly stove. It is also advisable to first prepare carefully designed drawings that will help make not only a stove for a long combustion process - a potbelly stove, but a device such as a piston bubafon.
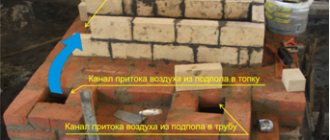
Design features for better heating
If you need to heat a large building, then it is advisable for the exhaust pipe to run horizontally in the room. After all, if it comes out of the oven straight up and out, then all the heat will also quickly end up outside with the smoke. Therefore, the temperature in the room will quickly drop. And if the pipe from the stove extends horizontally throughout the room, the smoke remains in it much longer: the hood is like a battery with a fairly high temperature. And in this case, a potbelly stove, made with your own hands, becomes like a cauldron.
To prevent the surface of the potbelly stove from burning, a box is attached to it. These are additional plates that are installed on three sides of the stove at a distance of 5–10 cm. The surfaces of the potbelly stove and the box should not touch. The air gap between them does not allow the box to heat up too much. This, firstly, protects the room from fire, and secondly, allows you to feel more comfortable near the stove. It is more convenient to make such protection for a rectangular structure, but it can also be made for a potbelly stove made from a cylinder. Moreover, the box can be built from an ordinary piece of tin, because it does not heat up enough to burn out.
Compliance with safety conditions during operation
When planning to make a long-burning stove with your own hands, you must always remember safety precautions. A homemade device should not noticeably reduce the amount of oxygen and release dangerous gases into the interior of the room.
There should be no curtains, curtains, plastic or flammable objects near long-burning stoves. To prevent a possible fire, it is necessary to provide free space near the stove, and below it there should be a metal sheet, brick flooring or foundation.
Making an economical wood stove with your own hands
Of course, purchasing a ready-made long-burning heating unit is easier than making it yourself. But, as already mentioned, such installations are inexpensive.
If you want to make an economical wood-burning stove yourself, you can use an old gas cylinder, metal barrel, sheet steel and other available materials suitable for this purpose.
First of all, you need to prepare the basic materials that may be required:
- Metal drum with a capacity of approximately 200 liters without rust or other obvious damage. Its walls must be strong, made of cast iron or steel alloy.
- An old large capacity fire extinguisher that will make a good base for the unit.
- A section of thick-walled wide metal pipe.
- An old gas cylinder.
- Steel sheets with a thickness of at least 5 millimeters.
A boiler with a round base requires support legs, which can be made from:
- pieces of reinforcement;
- pieces of thin pipes;
- metal profile.
In addition, the home craftsman will need:
The list of tools required for work is small:
- stationary or portable electric welding installation;
- grinder or autogen;
- ax with hammer;
- level, plumb line, tape measure.
Of no small importance is the room in which the wood-burning stove will be assembled. When carrying out installation work, the home craftsman must always have access to power, good lighting and a sufficient level of ventilation.
You need to choose a spacious utility room with good sound insulation, reliably protected from precipitation, in which you can safely store already manufactured parts of the pyrolysis stove.
The long-burning heating unit is assembled in the following sequence:
- Remove the lid from the metal barrel. When a cylinder or fire extinguisher is used for the base, its upper part is carefully cut off with a grinder or using an autogen. Before making a cut, you need to open the valve in advance and pour water inside. There is no need to throw away the top, as it will still be useful. By the way, the square-shaped case, which can be made of sheet steel, is more stable.
- Support elements made of channels, tubes or fittings are welded to the round bottom - base.
- Next, a pressure circle is cut out of the steel sheet; it should pass freely inside the barrel.
- The circle is connected to the pipe. For this purpose, a hole with a diameter of 10 centimeters is cut out in the center of the clamping element and the pipe is welded to the circle. The resulting part, after being placed inside the barrel, should protrude approximately 15 centimeters above its level.
- On the reverse side of the circle, channels are welded crosswise, facilitating a tighter fit of the firewood during the smoldering process.
- A lid is made for the furnace unit. It can be either the upper part, which was cut off at the first stage, or another steel circle. A round hole should also be made in the lid so that the inner section of the pipe with the pressure circle moves freely under its own weight and at the same time fits tightly to the walls of the structure.
- Install the door. At the bottom of the base of the future pyrolysis stove, a hole is cut out for the door and it is secured so that after the solid fuel has burned through, the ash can be removed without any problems.
- Install the chimney. For this purpose, a circle with a diameter of 15 centimeters is cut out in the upper part of the body, and the chimney pipe is secured using a welding machine. The main thing to remember is that its minimum length must exceed the cross-section of the barrel or any other base.
You should also insulate the places where the chimney structure passes through the walls, ceiling and roof surface. An umbrella or fungus should be installed at the end of the smoke exhaust pipe - an element that prevents precipitation from entering inside.
After completing the assembly of the pyrolysis device, it is advisable to cover it with brick, which will not only accumulate heat, but will also protect surrounding furnishings from excess fat.
What you will need for work: tools and materials
This model of a “long-lasting” stove can be made in just a few hours. All you need for this is a great desire and proper organization of the work process. You will also need to thoroughly understand the design of the unit and prepare everything you need in advance.
Tools you will need:
- welding machine - a small, lightweight inverter with the ability to adjust the current up to 200 A is best suited for these purposes;
- angle grinder (colloquially a grinder or “grinder”);
- cutting and grinding discs intended for metal work;
- drill press or electric drill;
- set of drills;
- medium-sized hammer;
- blowtorch;
- chisel;
- sledgehammer;
- tape measure and metal ruler;
- core (a device designed for applying marks to facilitate drilling);
- scriber for marking metal surfaces.
As for materials, there is no need to follow the list exactly. The beauty of homemade structures lies precisely in the fact that they will use any iron that can be found in the backyard or in the corners of the garage (workshop).
Any large container, for example, an unnecessary metal barrel, is suitable for making the furnace body.
So, the list of necessary materials:
- steel pipes with a diameter of 80 to 250 mm, which will be needed for the manufacture of an air supply riser and a chimney;
- a suitable metal container with a diameter of 300 to 600 mm with a wall thickness of at least 2.5 mm (you can use a used gas cylinder, a fuel barrel or a piece of pipe at least 120 cm long);
- a metal sheet with a thickness of at least 4–5 mm from which the air distribution piston will be made;
- durable metal hinges, which will be needed to secure the firebox and ash door;
- asbestos cord (it is needed to seal the loading window and other operational openings);
- corners with a flange from 50 mm, channels and profile pipes - for the manufacture of air distributor blades, support legs and other structural elements;
- a round metal pancake with a thickness of at least 5 mm and a diameter of 120–150 mm (you can take any suitable gear or sprocket from a motor vehicle);
If you plan to equip the heating device with a water jacket, then you should additionally prepare sheet steel with a thickness of at least 2 mm and pipes for connecting the liquid circuit to the heating main (hot water supply).
The pipes are also used when assembling a potbelly stove with a water circuit. Step-by-step instructions are given in our article:
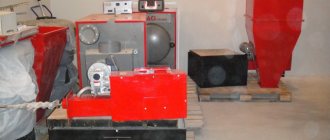
Potbelly stove using waste oil products
A waste oil furnace is a device consisting of two chambers. In the first, oil is burned, and in the second, the resulting gases are burned along with air.

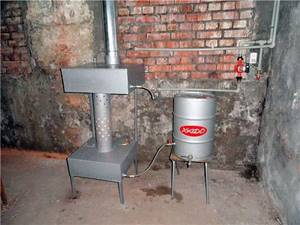
What does such a potbelly stove look like using waste oil and its main components
To weld such a stove, a master will need no more than 2-3 hours. It is made from the following materials:
- chimney pipe;
- fuel tank/finished metal box;
- sheet metal.
https://youtube.com/watch?v=9bm6rwog-EU
Video: review of a potbelly stove for the garage
Tools you will need:
- welding machine;
- Bulgarian;
- chisel;
- sledgehammer;
- tape measure, marker/chalk;
- hammer;
- perforator;
- rivets.
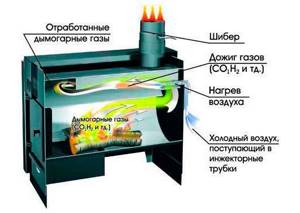
Drawing of a potbelly stove “under development”. The figure shows two sections: in the first, oil is supplied and burned, in the second, gases are burned together with air.
To make such a stove with your own hands, you should proceed in stages:
- First, they make a drawing of a potbelly stove for the garage. In the figure, all parts and workpieces with dimensions are schematically marked.
- A ready-made tank or a metal box with a cut hole for fuel supply is used as a fuel compartment. The legs are attached to the tank using a welding machine.
- The upper section is made in the shape of an elongated cylinder. It is connected to the lower chamber using a pipe. To do this, cut a small round opening in the box. All joints are checked for leaks. Holes (10 mm in diameter) are made in the pipe to allow secondary air to enter the channel.
- The chimney is made in the upper part of the structure at an angle at a height of several meters.
- The top surface of the potbelly stove can be used as a “cooking stove”. This is the hottest place in the oven.
- To light the stove, several liters of waste are poured into the chamber, a little heating oil is added, paper is placed and it is set on fire. If necessary, add oil in small portions.
Read the article about building a mini-stove and find answers to your questions.
A potbelly stove using waste oil is made from a metal box or tank. The upper chamber must be cylindrical.
This material will be perfectly complemented by the following publications:
- Review of Termofor heating stoves for home and bathhouses - the best from Siberia
- Using a rocket stove with a stove bench for heating a house or bathhouse
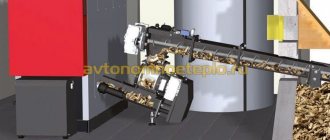
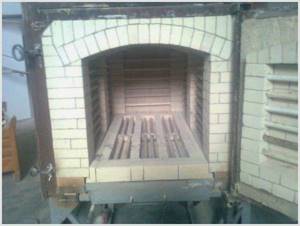
Solid fuel heating stove Professor Butakov Student
Modern solid fuel equipment is constantly evolving, improving its appearance, design and technological processes. Despite this, simple metal stoves remain quite popular among ordinary consumers. The Professor Butakov series of stoves, named after its designer, is one of the few examples of domestically produced equipment that has created full competition with foreign analogues, and in some respects, surpassed them.
For heating small areas up to 150 m#179, an excellent option would be to install a wood-burning stove, Professor Butakov Student, with a power of 9 kW. Despite the modest thermal power, the room is heated in the shortest possible time, no more than 2-3 hours from the moment of startup. The speed of heating is ensured by the special design of the air heat exchanger, which ensures uniform convection heating.
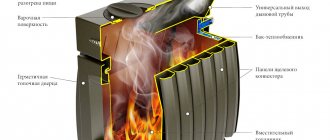
Furnace structure and operating principle
The heating stove Professor Butakov Student is equipped with a combustion chamber capable of burning wood and afterburning pyrolysis gas generated as a result of combustion of the main fuel. The use of this technology made it possible to obtain a significant increase in efficiency and increase it to 90%, which is an excellent indicator for stoves operating on conventional wood.
To obtain the maximum effect and the largest volume of pyrolysis gas, it is necessary to use natural, as dry wood as possible.
The heat exchanger of the heater is made of steel pipes surrounding the firebox. In essence, the fire tube heat exchanger is the body of the combustion chamber, absorbing the maximum heat generated as a result of wood combustion. The lower air intake ends of the pipes are located almost parallel to the floor, this allows cold air to be drawn in. Air entering the heat exchanger pipes quickly heats up, leaving through the upper free ends of the pipes, creating constant draft and convection flow.
To ensure long service life, the bottom of the firebox is equipped with a cast iron grate that is resistant to long-term thermal influences. Through the grate, residual combustion products in the form of ash, ash, and unburned fuel fractions enter the ash box, which allows the stove to be cleaned of debris directly during its operation.
The upper plane of the oven is a cooking surface that allows you to heat or cook food on it.
Some model differences
Currently, this heater model is available in three configurations:
- Heating stove Professor Butakov Student with a cast iron door and glass. Glass makes it possible to observe the living flame in the firebox.
Heating equipment with a blind damper. Butakov Student stoves with the possibility of a rear chimney connection. Compared to the classic design, where the chimney pipe is located on the upper plane, the rear connection increases the area of the cooking surface and ensures the connection of the stove to the chimney built into the wall.
Advantages and disadvantages
Despite a number of disadvantages inherent in such equipment, solid fuel heating stoves by Professor Butakov Student have a wide list of advantages.
Wood is a natural fuel that does not pollute the environment during processing.
The use of a fairly simple design and reliable materials, steel, cast iron, ensures long service life. Wood is the most economically advantageous fuel for many regions. Increased efficiency rates of at least 90%. Easy to use. Possibility of cyclic use only when necessary, unlike most heating devices that require constant operation at minimum power. Low cost.
Among the disadvantages of the equipment, Professor Butakov Student’s heating stove is not equipped with automation, therefore it is necessary to constantly monitor the presence of fuel in the firebox and, for safety reasons, it cannot be left unattended for a long time.
Installation
The entire line of heating equipment by Professor Butakov does not require lengthy preparatory work during the installation process. The stoves are installed and attached directly to the floor. One of the mandatory conditions is maintaining an air gap between the stove body and the nearest surface, especially important for wooden houses. The heaters can be equipped with any suitable chimney system with a height of at least 5 meters to ensure normal draft and, accordingly, a constant fuel combustion process.
Advantages and disadvantages
Let's see what's good about homemade potbelly stoves made by folk craftsmen:
- Cheap - most materials can be found for free or you can pay mere pennies for them;
- Omnivorous - in fact, any solid fuel can burn in a potbelly stove;
- Simple design - if we look at the drawings, we will not find anything complicated in them;
- Possibility of cooking - for this purpose, potbelly stoves are equipped with cooking holes with lids;
- Ease of operation - provided there is a good chimney, the potbelly stove will work properly and without causing smoke in the entire room.
Unfortunately, heating with a potbelly stove also has its disadvantages:
- Low efficiency of the stove - without proper modernization, most of the heat will fly into the chimney;
- Not the most respectable appearance - although some craftsmen make real works of art out of potbelly stoves;
- High body temperature can cause burns;
- High fuel consumption - in order for the stove to retain heat for a long time, without requiring the burning of tons of wood, you will have to resort to tricks.
Despite some disadvantages, simple wood-burning stoves are still in demand among those who need heat in the absence of a gas main.
Features of a potbelly stove - pros and cons
A good master can easily make a Bubafonya stove in one day, this is a significant plus. The maximum you have to buy is a cylinder and pipes from scrap metal. Other advantages of a potbelly stove:
- burning duration on 1 load is 6…10 hours;
- omnivory - waste wood, garbage, sawdust, freshly cut branches are placed in the firebox;
- ease of repair, any burnt part can be easily replaced.
On the left in the photo is the manufacture of a boiler jacket from a bent steel sheet, on the right is an assembled boiler
The disadvantages of Bubafoni are much more unpleasant:
- The stove is difficult to regulate. When working with high-quality dry wood, the damper helps you choose the optimal mode. If you burn with garbage and damp wood, the air duct must be opened completely.
- The potbelly stove's omnivorous nature is a double-edged sword. From burning low-quality fuel, the chimney becomes clogged with soot literally within a day.
- Without good draft, the stove will begin to smoke into the room. Hence the requirement for the height of the chimney - at least 4 m, counting from the grate, pipe turns 90° - no more than two.
- You can’t throw logs “on the go”, unless you pour a handful of sawdust through the air channel. This means we learn to dose the amount of fuel correctly.
- A potbelly stove made from a 200 liter iron barrel is very bulky and inconvenient to use. The piston is too large and heavy, the thin metal quickly burns out. Fortunately, the housing is easy to replace.
Why is “Bubafonya” dangerous: a well-heated firebox cannot be extinguished using a damper. Air seeps through the cracks, and the wood continues to smolder. The heater should not be left unattended or act radically - lift the lid and pour out a bucket of water. Is there a smoke screen in the room?
The process of constructing a potbelly stove
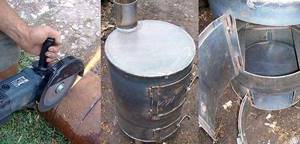
First of all, it is necessary to prepare the cylinder or barrel, depending on what is being used.
- Next, the following actions are carried out:
Using a gas-powered cutter, the top of the base is cut off. This operation must be carried out with the utmost care. The reason is that this element may be needed a little later when making a potbelly stove. If a pipe was taken as the basis, you must weld the bottom to it; the basis for it will be a sheet of steel, previously cut in the shape of a circle. There is also another practice; many experts cut out a small square. This provides the structure with ideal durability.
The work associated with making a device with your own hands, such as a furnace of a special long-term combustion process, is quite dirty and at the same time noisy. It is for this reason that the assembly process should be carried out in a well-equipped workshop. You should first check the availability of electricity, which is essential when welding.
- A circle is cut out of high-quality metal, and its diameter should be no less than the body itself. At this stage, another small circle is cut out, which is equal to 10 cm. Both elements are welded.
- Pre-prepared channels should be welded to the very bottom of the circle. They must be measured as carefully as possible so that they fit very easily and simply into the inside of the firebox, because... they all perform cargo functions. It will slightly press down the fuel during smoldering until the circle of steel moves down.
The length of the pipe that is welded to the steel rod should be approximately 20 cm greater than the height of the main container.
- The next step in the process of making such a device as a potbelly stove or bubafonya with your own hands is making a roof. At this stage, you will need a previously cut top or steel sheet. Regardless of the type of stove - bubafonya or a simple one from a cylinder, a small hole is cut in the sheet for the pipe.
- A hole is cut in the body itself through which the necessary fuel will be placed, incl. logs if the potbelly stove runs on wood.
- Making the door. This part can be made by hand, or you can purchase a ready-made one. For ease of opening, it is worth welding a handle to the door. Many people make another door, smaller in size, which is required to remove residual fuel.
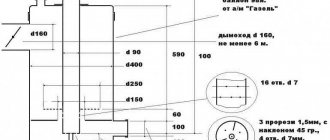
How to properly design a long-burning potbelly stove: diagrams and drawings
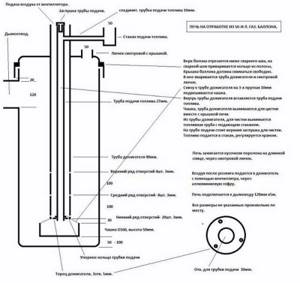
You can take any suitable container as the outer casing of a pyrolysis combustion potbelly stove. The use of waste materials will make it possible to obtain a heating device with almost zero cost. The only thing you need to do is to design all other structural elements in accordance with the dimensions of the selected case. This will make it possible to build not only a cheap, but also a productive, economical furnace.
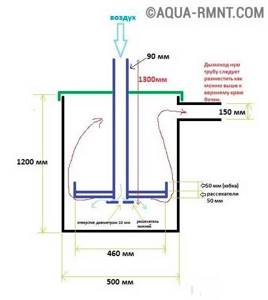
To determine the dimensions and parameters that affect the performance and thermal efficiency of a potbelly stove, you can use a special diagram. To make a calculation based on the dimensions of the found container, you need to measure its diameter (D) and height (H). These will be the external parameters of the heating device.
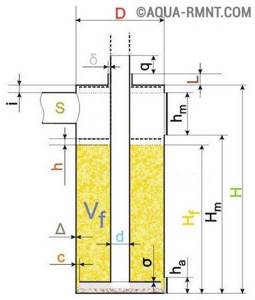
A diagram for calculating a long-burning potbelly stove will help you adjust the parameters of parts depending on the size of the base
Full calculation method:
- The ratio of the diameter (D) and height (H) of the potbelly stove should be within 1:3(5). In a stove that is too narrow and high, the afterburning zone of combustion products will be stretched in height, which means that some of the gases will not be able to ignite in time and will simply go down the chimney. If you build a low and wide unit, then the surface combustion will be too uneven. Air is supplied to the middle part of the bookmark, so the fuel will burn out there much faster than at the edges. This will lead to the formation of a depression in the center of the fill and the piston hanging on the unburned residues at the walls. In this case, there can be no talk of any normal operation, much less pyrolysis combustion.
- The durability of the heating device depends on the thickness of the metal (Δ) required for the manufacture of the body. A container with walls of 4–5 mm is best suited for these purposes.
- When calculating the air distributor, it is important to correctly determine not only the diameter, but also the thickness of the piston. The massive part will heat up and actively heat the air entering the combustion zone, which will have a positive effect on the performance of the stove. In addition, the thin disk will not be pressed tightly against the upper plane of the fill, and this will lead to an increase in the air gap and uneconomical fuel consumption. A piston that is too heavy, on the contrary, will tend to reduce the clearance. Excessive compaction of the fuel can lead to the complete extinguishing of the potbelly stove. The situation is further complicated by the fact that the weight of a metal pancake depends not only on its thickness, but also on its diameter. Consequently, the larger the piston, the thinner the metal used for its manufacture.
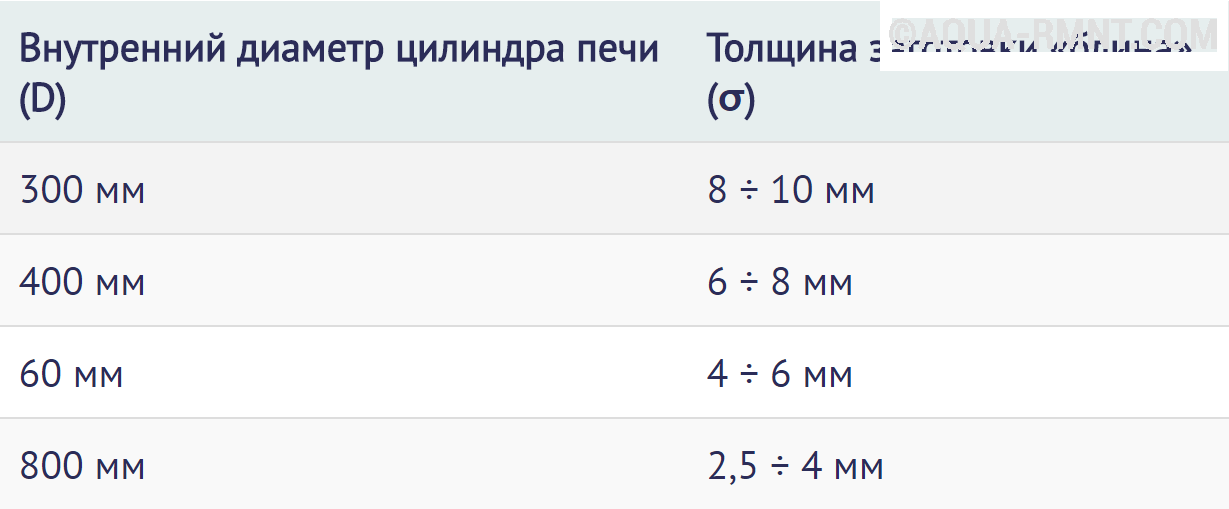
The table for calculating the thickness of the piston will help you find the optimal ratio of the diameter and thickness of the piston block
- The gap between the fuel filler and the air distribution disk is determined by the height of the piston ribs (blades). There are also ready-made tables for their calculation. If the dimensions of the structure do not fit into their framework, then the calculation of the blades is carried out using the method of proportions.
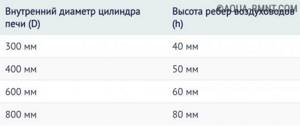
The table for determining the parameters of the blades is suitable for standard furnaces
- The efficiency of air supply to the combustion zone depends on the configuration of the ribs of the air distribution pancake. You should not take the simplest route, welding straight sections of corners or profile pipes to the piston. It is better to bend the blades in a semicircle and weld them in the form of a turbine. The air flow in this case will not be laminar, but turbulent, so the smoldering of the fuel, and therefore the release of gases, will be more intense. The advantage of shaped blades also lies in the fact that the flow of pyrolysis gases will be more actively pushed to the periphery, accelerating gas circulation.
- When calculating the chimney, use the formula S = 1.75P, where P is the thermal power of the heating device in kW/hour. The resulting value is rounded up, adjusting the numbers to the diameter of the pipes that are available.
- At the entrance to the chimney, a rotary damper, called a damper, is installed. It will be needed to regulate the traction force.
- The cross-section of the air supply pipe d should be 2 times smaller than the diameter of the chimney. In order to redirect its flow to the blades, a diffuser is installed on the air supply channel. For these purposes, you can use a disk Ø120–150 mm with a hole in the center Ø15–20 mm or any suitable part from automotive or agricultural machinery.
- A gap δ must be left between the hole in the loading hatch and the air supply pipe, which should be no more than 2.5 mm. It is needed to supply secondary oxygen to the afterburning zone. Here you need to be especially careful and not exceed the recommended values, otherwise excess air will “siphon” towards the chimney, simultaneously drawing pyrolysis gases into the pipe. For the same purposes, there is no need to refuse to install a collar. Its size L is taken equal to 80×δ, but not higher than 200 mm.
- The length of the air supply pipe is calculated based on the fact that when the disk is completely lowered, it should rise above the collar to a height of q=L+150.
Of course, there is no need to observe the dimensions of all parts of the oven. They can be rounded in any direction without consequences. As for the gaps and vias, the correct operation of the heating device depends on their size. These parameters must fully correspond to the calculated values.
There is no need to install a combustion door for a potbelly stove with a diameter of 450 mm or more, since the unit can be easily loaded with firewood through the top. If a gas cylinder is used as a housing, then difficulties during its operation will await you not so much when adding fuel, but when cleaning the potbelly stove from ash. To prevent a long, narrow container from causing inconvenience during operation, you will need to install an ash pan door.
In order not to create an opening for cleaning the oven, you can use a disk with sides that is lowered to the bottom. A steel rod welded to its center will allow you to easily pull out the container with ash. The metal rod does not interfere with the operation of the potbelly stove at all - after installing the ash pan on the bottom, it is passed through a pipe to supply air.
Diagrams and drawings allow you to accurately determine all the design parameters of the heating device and build a productive potbelly stove from any suitable container. There is no need to adhere to the exact dimensions - it is enough to observe the relationships between all the components of the structure.
Photo gallery: diagrams and drawings of a long-burning potbelly stove
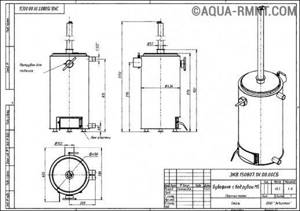
Drawing of a pyrolysis stove with a water circuit
Drawing of a potbelly stove with a convection casing
A simple stove for wood and sawdust
Scheme of a long-burning potbelly stove with a hollow cone
Drawing of a pyrolysis furnace for working on coal and pallets
How to make your own stove with a heating circuit
The main part necessary for installing water heating on wood with your own hands is a heat exchanger. This unit can have a different design: made of pipes (register, coil) or in the form of a closed container (boiler). In any case, its purpose is to heat the volume of coolant contained in it in a short time and send it to the distribution pipes. The hot coolant flows through the pipes throughout all rooms, heating the radiators, and cools back to the boiler. This system is called gravity and can be used to heat small rooms.
If it is necessary to heat a residential building, especially one with 2 or more floors, the circulation of the coolant in the pipes must be forced. For this purpose, an electric pump is installed on the return line. Its purpose is to pump cooled water under pressure into the heat exchanger, forcing it to circulate more intensively and not stagnate in the radiators. The use of a pump is also possible for one-story buildings in order to speed up the heating process of pipes and radiators when igniting the furnace.
So, to install a water heating circuit you will need:
- heat exchanger (boiler, register);
- large diameter pipes for wiring;
- water heating radiators, convectors of any design;
- expansion tank;
- electric circulation water pump;
- welding machine;
- "Bulgarian".
Installation work
For water heating in the garage you will need a set of instruments and parts, including:
- heating boiler;
- metal radiators with good thermal conductivity;
- connecting pipes made of metal or plastic;
- accessories for fastening;
- locksmith tools.
Project development
Before installing the heating system, you need to determine the diameter of the pipes that will connect the radiators. Risers with a large cross-section will increase the flow of hot water to the batteries, increasing the efficiency of the design.
It is worth considering that heating large volumes of liquid will lead to increased electricity costs. The optimal scheme is a balance between the room temperature and the cost of heating. These parameters are also affected by the number of radiators in the insulated garage.
Expansion tank
The design of the garage heating system involves the use of expansion tanks. These items are made from simple plastic containers or large canisters with fill holes cut in the top.
The water circulating in the system constantly evaporates and requires regular addition of liquid, and the steam formed during boiling needs to be removed. The tank is installed at the lowest point of the heating system and at a half-meter distance from the floor.
Boiler
Before installing the boiler with your own hands, you will need to prepare a metal pipe of a certain diameter with a half-meter or meter length. Its extreme end is tightly welded with a metal sheet.
The next step will be assembling flanges for attaching tubular electric heaters and fixing them to the boiler using bolts. To supply the working fluid to the installation, two sections of pipe with the diameter that will be used in the heating system are welded.
Radiators
Heating batteries are attached to the walls of garages using special reinforced dowels. The distance from the floor to the radiator should be at least fifteen centimeters. For effective heating, you need to leave a few centimeters of free space between the walls and the heating elements for air circulation.
The individual structural elements are connected into a system using metal or plastic pipes with special fittings. The seams of their joints and forks require special attention during installation so that leaks do not occur in the future during operation.
Installation
The connection of metal pipes is carried out using a welding machine. Working with polypropylene will require the use of a special soldering iron. Regardless of the material of the pipes, they should be placed on the walls at a slope - this will improve the circulation of liquid.
The water heating system is considered ready after connecting the radiators to the risers and connecting them to the boiler using a rubber hose. Before starting operation, it is recommended to re-inspect the line, search for defects and seal problem areas.