DIY brick cauldron
A solid fuel boiler is an excellent option for solving the heating problem in private homes. If you wish and have all the necessary knowledge and materials, you can build such a thermogenerator yourself, without any help.
Homemade solid fuel boilers can be assembled from pieces of pipes, sheets of steel or brick. However, when building such a heat exchanger, the most popular option is to use brick and metal, since entirely metal structures are often too heavy and expensive.
In addition, a brick boiler can be used not only as a heating device for a private home, but also as a stove for cooking. In this material we will talk about building a brick solid fuel boiler with your own hands.
Ordinary boiler
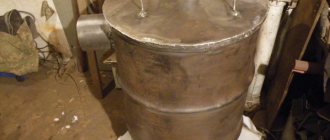
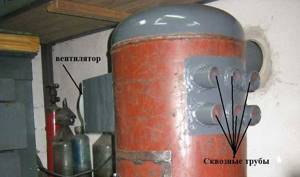
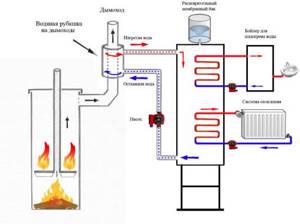
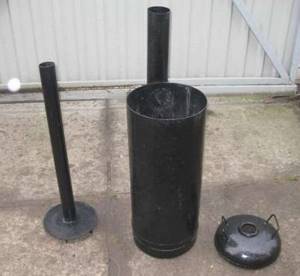
First, let's look at how to make a simple wood-burning boiler with your own hands. The model consists of two cylinders placed inside each other. The first is used as a firebox. When positioned horizontally, it can be lined with fire-resistant bricks from the inside.
The second acts as a convection carrier or is used to heat the coolant. Firewood is placed directly into the firebox.
Available materials
To reduce the amount of welding work, you can use a thick-walled pipe or barrel. It is also possible to use other available materials.
A rectangular firebox welded from a thick sheet can be easily placed inside a cylindrical container.
Design Features
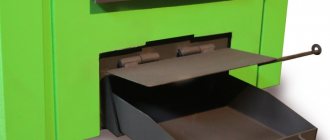
The wood-burning boiler is equipped with a vent for fresh air and a chimney for exhaust gases. The ash pit is located at the bottom of the chimney and allows the bottom row of wood to smolder, generating additional heat. Firewood is placed in homemade boilers through the top. A special hatch is prepared for this purpose.
To ensure that each pile of firewood burns for as long as possible, a special load is often provided, shaped like a disk with blades and a hole with a diameter of 20 mm. When the load is pressed, the burning fuel is compressed. In this case, the volume of incoming air is significantly reduced, since it can only pass through the existing hole.
Connection method
Such a boiler can be connected to the heating system in two ways:
- cutting water pipes directly into the barrel. Circulating between the pipes, it will heat up, so that later, when it enters the heating system, it heats the radiators;
- cutting the chimney into the coolant tank. Exhaust hot gases will enter the container, gradually heating the coolant.
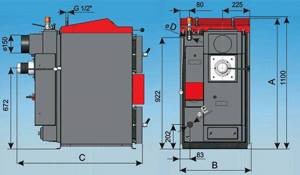
Long burning device - classic design
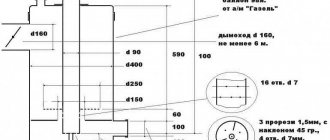
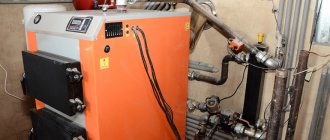
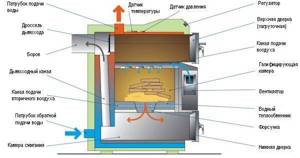
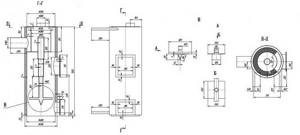
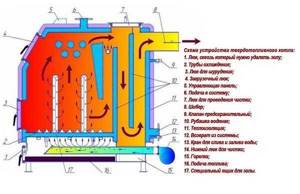
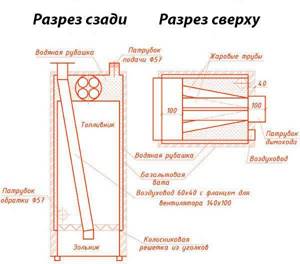
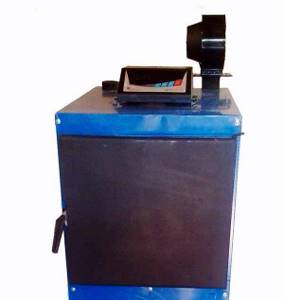
The proposed design has a power of 22 kW, efficiency 75%. It works on wood for 10 hours without additional loading, on coal for 24 hours. The firebox has a volume of 83 liters to the bottom edge of the loading hole. The boiler is equipped with automatic equipment made in Poland: a control unit with a KG Elektronik SP-05 temperature sensor and a DP-02 fan. The general view is shown in the drawing.

The device works as follows:
- Firewood is loaded into the firebox and set on fire. The doors close hermetically.
- The control unit sets the required heating temperature, at least 50°. The unit button is pressed and the fan begins to pump air.
- When the set temperature is reached, the air supply from the fan stops. The firewood smolders slowly and produces very little heat.
- After some time the temperature drops. The fan turns on again and combustion continues.
The electronic unit regulates the combustion process, which occurs at maximum efficiency. There is practically no smoldering; intensive burning and standby modes are used.
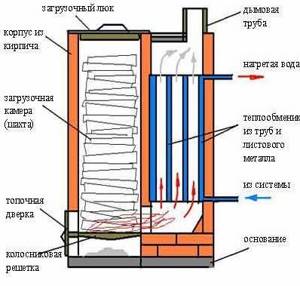
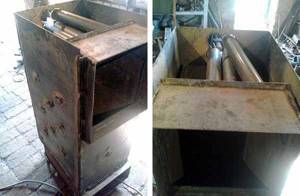
The following picture shows the inside view.
Solid fuel is burned according to the classical scheme: heat is directly transferred to the walls of the water jacket and the roof of the tank. A heat exchanger is built into it, taking heat from the gases. Heated air is supplied to the firebox through an air duct from below. Fuel loaded in large quantities ensures long operating time of the boiler. While waiting for the fan to turn off, the air is completely blocked by a gravity damper, activated automatically, and natural draft is blocked.
The drawing shows the rear end with a fire tube heat exchanger.
Do-it-yourself long-burning solid fuel boiler - drawings, diagram, design options
There are many varieties of such heat generators. We will focus on several main types:
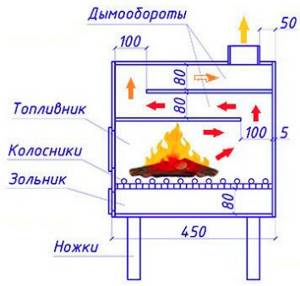
Classic direct combustion boiler
The design of this boiler can be called simple. It is designed in the same way as a traditional Russian stove.
The firebox is just a chamber, and the fuel is ignited and burned in the usual way, such as in a fire.
The classic boiler is easy to make, but it has a significant drawback: the fuel burns too quickly - you have to add a new portion every 4 hours. There are several ways to improve the situation:
This option is extremely irrational:
- Oxidation of the fuel becomes incomplete, as a result of which the smoke contains a large amount of soot, carbon monoxide (referred to as harmful emissions) and various toxic substances.
- Due to the low exhaust temperature, a large amount of condensate is formed, saturated with the above-mentioned toxins.
- The boiler efficiency decreases significantly.
Equip the heating system with a heat accumulator
This is a voluminous reservoir in which a supply of superheated coolant is stored. The wood in the boiler will burn quickly, but the heat produced will not fly out into the chimney, but will remain in the heat accumulator, just as it remains in the brick walls of a Russian stove. Consequently, the boiler will need to be fired up less often.
Equip the boiler with an automation system with forced air supply
The idea is this:
- after generating a sufficient amount of heat (monitored by the temperature of the coolant), the automation completely closes the damper;
- the flame goes out and the boiler, one might say, turns off;
- When the coolant cools, the automation opens the damper and starts the fan, which fans the fire in the firebox.
Pressurized boiler
An automation unit with a fan can be purchased at the store. The only drawback of this solution is the dependence on power supply.
Top combustion boiler
In such a heater, the fuel is stacked in the form of a column and ignited from above. In the direction from top to bottom, the flame moves much less willingly than from bottom to top, so the bookmark burns longer. In addition, to prevent the rapid spread of fire, air is supplied precisely to the combustion zone.
A heat generator with top combustion is quite complex in design, but there is a simplified version of it that is available for self-production. This is the so-called Bubafonya stove, the design of which was developed by Afanasy Bubyakin.
The problem is that if there is a water jacket, the characteristics of this unit drop significantly (low efficiency, the stove smokes a lot), so it is irrational to use it as a boiler.
Gas generator (pyrolysis) boiler
When exposed to high temperatures, fossil fuel molecules (biopolymers) partially disintegrate into various gaseous substances (wood gas), many of which can burn. This decomposition is called pyrolysis. During normal combustion, this mixture of gases is mostly released into the chimney. In a gas generator boiler, it is discharged into a separate chamber (afterburning chamber), where it burns.
Such a boiler has a number of advantages (high efficiency, long-term operation on one bed, etc.), but it is difficult to manufacture, requires the use of special catalysts and requires a forced air supply.
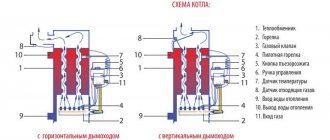
Gas generator boiler diagram
You can make a simplified version similar to the “Professor Butakov”, “Breneran” and “Bullerjan” stoves, which have a kind of afterburner chamber in the upper part of the firebox.
But such units, firstly, are designed for operation in smoldering mode, the disadvantages of which we discussed above, and secondly, like “Bubafonya”, they greatly lose performance when heat is extracted from water, that is, when used as a boiler.
So, the most suitable for self-production is a classic boiler, which, if there is an electrical supply in the house, can be equipped with automation with a forced-air fan.
Baksi gas boilers with automatic equipment are often purchased in our country. Equipment reliability and price are the main components of consumer success. Baxi boiler - instructions for use and unit design.
We will discuss the operating principle of a thermostat for a heating boiler here.
Do you think that wood heating has already become obsolete? Long-burning boilers for wood-burning homes are an economical and effective solution in the absence of communications. Here https://microklimat.pro/otopitelnoe-oborudovanie/kotly/dlitelnogo-goreniya-na-drovax-dlya-doma.html we will look at the types of boilers and operating features.
Advantages and disadvantages
Due to their excellent performance characteristics and ease of use, mine boilers are popular among domestic owners of private houses. The main advantages of such units include the following:
- Simplicity of design.
- Long-term operation on one load of fuel.
- Excellent efficiency.
- Possibility of loading various solid fuels.
- Complete safety of operation.
- Ease of maintenance.
- Affordable price.
- Possibility of choosing units with different power.
The disadvantages include a bulky design with an enlarged combustion chamber, which leads to the need to install such equipment in a separate boiler room, where pipes and a full-size chimney are supplied.
By correctly choosing the design, power and dimensions of the fuel compartment, you can not only heat your house effectively, but also significantly simplify the maintenance of the boiler, which will be distinguished by the reliability and trouble-free operation of the equipment.
The main types of homemade boilers
If you are going to make a long-burning boiler with your own hands, then you will definitely need the information from our review. In the following sections we will tell you how to make a heating unit of one design or another yourself, give several of the easiest schemes, and publish information about the most common long-burning boilers
Let's focus on the last question for now.
The time has come to consider the most current options for long-burning boilers, which we can assemble with our own hands at home. They will all eat wood. As for coal, it is more difficult to obtain, and it also leads to high temperature loads on heating units. In the following sections we will provide drawings of long-burning solid fuel boilers and provide explanatory information.
Long burning mine boiler
We can make the simplest mine boiler with our own hands. It is implemented according to a bottom combustion scheme. The basis of the unit is a capacious loading chamber, which is often called a shaft. Having a vertical design, it allows you to accommodate a large amount of firewood. As they burn, they fall down, and the combustion products are sent through the grate into the ash pan.
If we look at the diagram of a shaft furnace (boiler), we will find that the flame is raging not in the shaft at all, but in the adjacent chamber, from where the resulting heat enters the fire-tube heat exchanger. And the remaining thermal energy is sent to the chimney. The combustion here is long and is determined by the volume of the shaft - after loading a large amount of firewood here, you can safely go to bed.
Pyrolysis boiler
Let's see how a pyrolysis boiler works and how to make this unit with your own hands. The easiest way to explain the operating principle of this unit is to use the example of a potbelly stove. Here we see a volumetric combustion chamber that realizes long-lasting combustion. The resulting combustion products are sent to the afterburner chamber, into which secondary air is supplied. As a result, a large amount of heat is generated. All we have to do is retrofit the potbelly stove with a fire-tube heat exchanger.
There are dozens of drawings of long-burning wood-burning boilers built on the pyrolysis principle of operation. They differ in the location of combustion and afterburning chambers, the presence and absence of blower fans and automation, as well as methods for adjusting the intensity of the wood fuel combustion process. But in general, their operating principle is the same.
Boiler-furnaces Bubafonya
Bubafonya is a stove, and its modification is a water-heating wood-burning boiler with air supply from above, through a pressure piston. We have already written about such stoves more than once in our reviews, now it’s time to talk about units with a heating circuit. To implement the circuit, we can use three schemes:
- Installing a heat exchanger on a chimney is the easiest option;
- Build a continuous water jacket around the boiler body;
- Scald the body of the unit with the pipes through which the coolant will circulate.
Which scheme to choose is up to you. By the way, Bubafonya boilers, due to their spacious chambers, will help to realize long-term combustion lasting up to 24 hours or even more.
Long-burning boilers Bubafonya operate on wood and have an upper combustion scheme.
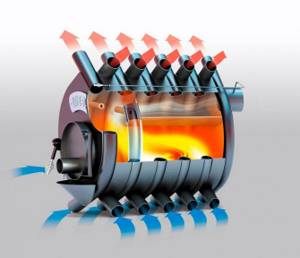
Boiler-furnaces Buleryan
Initially, Buleryans were (and are) convection-type ovens. They are equipped with powerful convectors, which allow you to warm up a large room in literally 20-25 minutes. Having originally appeared in Canada, these stoves reached Russia, which also boasts a harsh climate (true for some regions). Craftsmen turned stoves into boilers, having worked a little on the design of convectors - now not air, but coolant circulates through them. True, Buleryan boilers cannot boast of long-lasting combustion, since they do not have the largest combustion chambers. Some of them have the property of burning for up to 10-12 hours, some – a little longer. But you still can’t count on 24 hours. But they are characterized by high efficiency and the ability to quickly transfer heat to heating systems.
How to choose?
A correctly chosen boiler is the key to ease of maintenance and comfort in the home. In order not to make a mistake, you need to consider all the characteristics of the models you like and read user reviews.
- The selection can be made using the following algorithm:
- Heating unit power The choice of heating equipment always begins with the selection of power. For a larger calculation, it is enough to divide the area of all heated premises by 10 - the resulting number will mean the estimated boiler power in kW. But this formula is relevant for well-insulated new buildings and optimal boiler operation. In real conditions, it is better to choose a boiler with a power reserve factor of 1.2 to 1.6. That is, for a house with an area of 100 square meters it is better to choose a boiler with a capacity of 12-16 kW, and for a poorly insulated building - up to 25 kW. Otherwise, in severe frosts, the temperature in the house may be uncomfortable, and replacing the boiler will cost much more than the initial purchase of a more powerful model.
- Housing and heat exchanger material The second stage of choosing a boiler is the material from which it is made. Coal heating units are divided into two groups: steel and cast iron.
How to make a long-burning solid fuel boiler with your own hands: drawings and diagrams
Before you start making a boiler, you need to decide on its design. Its choice depends on the purpose of the unit. If it is intended for heating a small utility room, garage or country house, then it is not necessary to install a water circuit in it. Heating of such a room will occur directly from the surface of the boiler, through convection of air masses in the room, like from a furnace. For greater efficiency, you can arrange for forced airflow of the unit using a fan. If there is a liquid heating system in the room, it is necessary to provide a circuit device in the boiler in the form of a pipe coil or other similar structure.
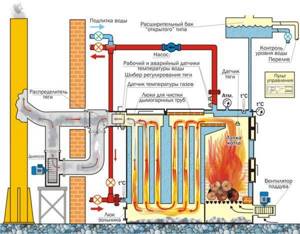
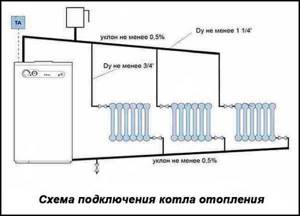
Connection diagram of a solid fuel boiler to the heating system
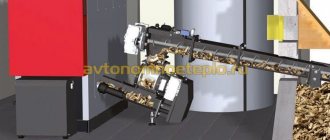
The choice of option also depends on the type of solid fuel that will need to be used. For heating with ordinary wood, an increased volume of the firebox is required, and for the use of small fuel pellets, you can arrange a special container from which the granulated fuel is supplied to the boiler automatically. To make a long-burning solid fuel boiler with your own hands, you can take a universal drawing. It is suitable for any type of solid fuel used.
Drawing of a long-burning solid fuel boiler with a power of 25/30/40 kW
We will tell you step by step how and from what parts you can make a long-burning solid fuel heating boiler according to the proposed scheme:
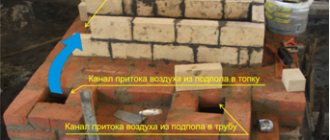
- We will prepare the place where the future unit will be installed. The base on which it will stand must be level, strong, rigid and fire-resistant. A concrete foundation or a thick cast iron or steel slab is best suited for this. The walls also need to be covered with fire-resistant material if they are wooden;
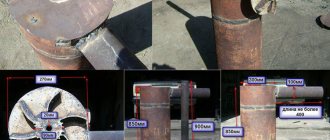
- We collect all the necessary material and tools: of which we need an electric arc welding machine, a grinder and a tape measure. Made of materials: 4 mm sheet steel; 300 - mm steel pipe with 3 mm walls, as well as other pipes of 60 and 100 mm in diameter;
- in order to make a long-burning solid fuel boiler, you need to cut a piece 1 m long from a large 300 mm pipe. You can do it a little less, if necessary;
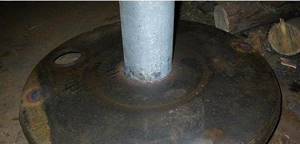
- We cut out the bottom from a steel sheet according to the diameter of the pipe and weld it, equipping it with channel legs up to 10 cm long;
- The air distributor is made in the form of a circle made of a sheet of steel with a diameter 20 mm smaller than the pipe. An impeller from a corner with a flange size of 50 mm is welded into the lower part of the circle. For this, you can use a channel of a similar size;
- We weld a 60 mm pipe into the middle of the distributor from above, which should be higher than the boiler. In the middle of the distributor disk we cut a hole along the pipe so that there is a through tunnel. It is needed for air supply. A damper is embedded in the upper part of the pipe, which will allow you to adjust the air supply;
Schematic representation of a solid fuel boiler
- in the very bottom part of the boiler we make a small door, equipped with a valve and hinges, leading to the ash pan for easy removal of ash. We cut a hole in the top of the boiler for the chimney and weld a 100 mm pipe into this place. At first it goes at a slight angle to the side and up 40 cm, and then strictly vertically up. The passage of the chimney through the ceiling of the room must be protected according to fire safety rules;
- We complete the construction of a long-burning solid fuel heating boiler by manufacturing the top cover. There should be a hole in its center for the air flow distributor pipe. The fit to the walls of the boiler must be very tight, preventing air from entering.
Drawing with dimensions for creating a solid fuel boiler with your own hands
Useful advice! To ignite a long-burning solid fuel boiler made by yourself, the drawing of which was presented above, you need to: remove the lid and lift the regulator, fill the boiler with fuel to the top and pour flammable liquid over it, put everything in place and throw a burning splinter into the regulator pipe . When the fuel flares up, reduce the air flow to a minimum so that it only begins to smolder. After this, the pyrolysis gas will ignite and the boiler will start.
Materials
To make a mine-type pyrolysis boiler, you need to stock up on:
- Sheet steel with lining. Thickness 3-5 mm. Other steel should not be used, since pyrolysis is accompanied by high temperatures and a regular alloy quickly burns out.
- Sheet steel with a thickness of 1-2 mm .
- Fireclay bricks.
- Pipes with a diameter of 13, 5 and 2.5 cm .
- Corners with dimensions 4x4 cm. An alternative could be a profile pipe with the same dimensions.
- Double ash door. It is desirable that it have an asbestos gasket. It must have a valve to regulate the air supply.
- Door for cleaning the heat exchange chamber.
- Valves. 3 pcs. One is intended for the chimney, the second will be installed on the partition between the chambers, the third is necessary to regulate the air supply to the combustion chamber.
- Basalt wool.
- Galvanized sheet.
Before buying materials, you need to calculate the minimum power of a long-burning mine boiler and draw up or find in open sources a drawing of the device.
Principle of operation
The operating principle of long-burning solid fuel boilers is to burn one or another type of fuel using the method of top or top-bottom combustion. When this process occurs, the duration of fuel combustion increases, as well as the amount of heat calories released.
The main distinguishing feature is the use of chambers with large parameters into which fuel is placed. In addition, top combustion ensures good results when burning just one bookmark.
Internal layout and drawings
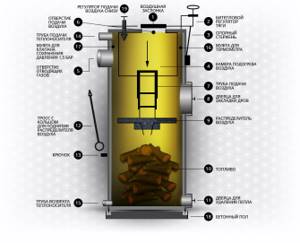
A solid fuel boiler does not have a special grate with an ash pan, and there is a closed pan at the bottom. Thus, it is impossible to allow fuel to burn in the lower part of the firebox. The latter is built in the shape of a cylinder.
The air flow is supplied from above, after which the air distributor divides it throughout the entire volume. The distributor is movable - it lowers and rises.
The upper part of the firebox is intended to accumulate combustion products and ash particles. They are separated from the primary combustion zone by a huge metal disk. At the entrance to the chamber there is an automatic draft regulator, which is a device for determining the temperature of the coolant, according to which the gas flow rate is regulated. The entire housing is used as a heat exchanger.
In addition, the design has places for connecting supply water, return water, a thermometer, and a draft regulator. Reliability is ensured thanks to the thermal insulation shell.
Drawings of a long-burning pyrolysis boiler with a water circuit:
How to calculate the power of a heating boiler, knowing the volume of the heated room?
The thermal power of the boiler is determined by the formula:
Q = V × ΔT × K / 850
- Q
– amount of heat in kW/h - V
– volume of the heated room in cubic meters - ΔT
– the difference between the temperature outside and inside the house - K
– heat loss coefficient - 850
– a number thanks to which the product of the three above parameters can be converted into kW/h
K index
may have the following meanings:
- 3-4 – if the structure of the building is simplified and made of wood or if it is made of corrugated sheets
- 2-2.9 – the room has little thermal insulation. Such a room has a simple structure, the length of 1 brick is equal to the thickness of the wall, the windows and roof have a simplified construction
- 1-1.9 – the building design is considered standard. Such houses have a double brick tab and few simple windows. Regular roof roof
- 0.6-0.9 – the building design is considered improved. Such a building has double glazed windows, the base of the floor is thick, the walls are brick and have double thermal insulation, the roof has thermal insulation made of good material
Below is a situation in which a heating boiler is selected according to the volume of the heated room.
The house has an area of 200 m², its walls are 3 m high, and the thermal insulation is first class. The ambient air temperature near the house does not fall below -25 °C. It turns out that ΔT = 20 - (-25) = 45 °C. It turns out that in order to find out the amount of heat required to heat a house, you need to make the following calculation:
Q = 200 × 3 × 45 × 0.9/850 = 28.58 kW/h
The result obtained should not be rounded up yet, because a hot water supply system may still be connected to the boiler.
If the water for washing is heated in another way, then the result obtained independently does not need to be adjusted and this stage of calculation is the final one.
Using the boiler
Different types of fuel can be used for solid fuel boilers:
- hard and brown coal;
- anthracite;
- wood briquettes with firewood;
- oil shale with peat.
Wood is characterized by a high yield of volatile substances during combustion. Coal is the most popular fuel. Oil shale is used for solid fuel heating relatively rarely, which is explained by its high ash content.
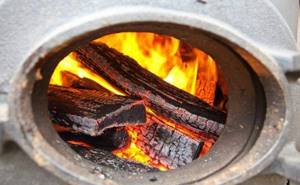
First, you need to load the selected type of fuel into the firebox. If coal is used for kindling, it is prohibited to replenish it during combustion. However, if wood is used, firewood must be added to the firebox. Do not open the doors wide to avoid getting burned.
It is better to take absolutely dry fuel, because moisture can deteriorate its quality.
When heating with peat and coal, it is imperative to use an air flow supply manifold.
Fuel is loaded into any type of apparatus only through the door at the top of the equipment.
Pyrolysis boiler with lower chamber
The design of a long-burning pyrolysis boiler with a lower combustion chamber for wood gas is somewhat more complicated and its manufacture will require a little more cost and effort.
First of all, you need to understand that boilers of this type also come in two types: with supercharging and with a smoke exhauster. Without going into the details of physics and thermal engineering, we will outline the fundamental difference.
In the first case, secondary air is forced into the afterburning chamber using a fan. This creates excess pressure (above atmospheric pressure) in the chamber. The advantages of this design include the fact that any fan will suit you, even a computer cooler, and you can combine the firebox with an afterburner chamber, since with the help of supercharging you can provide a sufficiently large volume of excess air. However, this “advantage” can also be considered as a disadvantage, since it does not allow raising the boiler efficiency above 80–82%. Under pressure, some of the air simply does not enter the middle of the combustion process, so the fuel does not burn completely. Plus, due to excess pressure, some of the pyrogen gases simply do not have time to burn and fly away into the chimney in their pure form, so it is almost impossible to ensure an efficiency of 90%. And most importantly, if the pressure is too strong, the boiler may explode.
Pyrolysis boiler with forced air
In the second case, with the help of an exhaust fan, insufficient pressure is created (below atmospheric pressure), so the outside air, obeying the Coriolis force, gets right where it needs to be, screwed into the very center of combustion. The gases burn completely, the boiler operates at full capacity and is capable of delivering an efficiency of 90%, and sometimes even more.
Boilers with a lower combustion chamber are much more complex in design. One of them, which was made by a master welder with his own hands, is demonstrated in the video.
Features of the combustion process in the afterburner
The initial combustion conditions are such that the boiler operates with some underburning, and full oxidation does not occur, but a lot of carbon monoxide (CO) is formed instead of carbon dioxide (CO2). Secondary air, having heated up under the cast-iron grates on which the fuel smolders, enters under the welded part of the grate in the second chamber (hump). When passing through the numerous holes of the catalyst, an excess of incoming air is created, which raises the combustion temperature of the flue gases flowing through the gas gap to a thousand degrees. The reaction of converting CO into CO2 occurs. Next, the combustion products rise up and flow around the heat exchanger, giving off heat. Afterwards they head into the chimney.
Installation of pyrolysis boilers
When installing a heating system, you must remember that pyrolysis boilers cannot be installed in residential premises; in addition to the potential health hazard, failure to comply with this requirement also risks a fine from the relevant services. Therefore, the arrangement of the boiler room should be taken care of in advance. When installing the boiler yourself, you must follow the fire safety rules:
- maintain a distance to the walls of the boiler room (at least 30 cm);
- equip a non-combustible foundation (concrete or asbestos), not connected with the main floor covering of the boiler room;
- provide a good ventilation system for the boiler room, since for good operation of the pyrolysis machine, an influx of fresh air is necessary;
- thoroughly insulate the chimney (for example, wrap it in mineral wool and foil) to prevent the boiler room roof from catching fire;
Connection diagram for solid fuel boilers without the use of circulation pumps
By adhering to these simple rules, you will not only avoid troubles, but also ensure the high-quality operation of your pyrolysis boiler, assembled with your own hands.
Boiler assembly
The unit must be assembled in the following sequence:
- First, the body is made by attaching the side walls and frames of the openings to its bottom with short seams. The bottom frame of the ash pit opening is the bottom of the housing itself.
- From the inside, corners are welded to the body, on which the firebox grate pan (grid) will be placed.
- Now you need to weld the grill itself. The corners of which it consists must be welded with the outer corner down, so that the air coming from below is evenly distributed over the two inclined surfaces of each corner.
- Next, a firebox with a heat exchanger is welded to the corners on which the grate is laid.
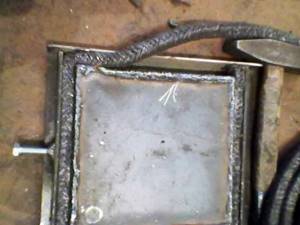
- The doors of the firebox and ash pan are cut from steel sheet. From the inside they are framed with a steel strip laid in two rows, between which an asbestos cord must be laid.
Next, a smoke exhaust pipe and an air duct with a flange for installing a fan are welded. The air duct is led into the boiler through a hole in the middle of the rear wall just below the grate.
Now we need to weld the mating parts of the door hinges and several 20 mm wide brackets to which the casing will be attached to the boiler body.
The heat exchanger must be lined on three sides and on top with basalt wool, which is tightened with a cord.
Since the insulation will be in contact with hot surfaces, it should not contain phenol-formaldehyde binders and other substances that emit toxic volatile substances when heated.
The sheathing is screwed to the brackets using screws.
An automation controller is installed on top of the heat generator, and a fan is screwed to the air duct flange.
The temperature sensor must be placed under the basalt wool so that it is in contact with the rear wall of the heat exchanger.
If desired, the boiler can be equipped with a second circuit, allowing it to be used as a water heater.
The circuit has the form of a copper tube with a diameter of about 12 mm and a length of 10 m, wound inside the heat exchanger on flame tubes and brought out through the rear wall.
The disadvantage of a solid fuel boiler is that it is very expensive. Do-it-yourself solid fuel long-burning boilers are a good way to avoid costs.
In what cases is an expansion tank needed for heating, you will find out in this topic.
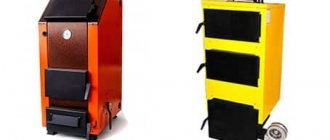
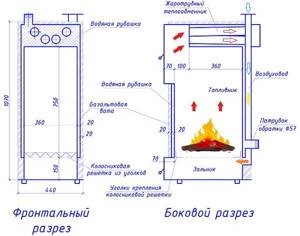
Making a classic model
Building a reliable TT boiler that can last more than 15 years requires the use of the following materials:
- low-carbon steel sheet grade St10-20, 4 mm thick, for the manufacture of a firebox;
- the same, 3 mm thick - for the water jacket and doors;
- metal strip with a cross section of 20 x 3 or 20 x 4 mm;
- a piece of pipe with a diameter of 150 mm for the chimney;
- pipe Ø57 mm with a wall thickness of at least 3.5 mm for the heat exchanger;
- profile pipe 6 x 4 cm for the air duct;
- a corner with a shelf width of 5 cm made of thick metal (4-5 mm) on a grate;
- thin sheet steel with powder painting for external cladding.
Additional materials will require basalt fiber with a density of 80-100 kg/m³ for thermal insulation of the body and asbestos-graphite cord for sealing the door ledges. The automation kit and fan, which were mentioned in the previous section, are made in Poland, model KG Elektronik SP-05. There are also Chinese analogues on the market, they are cheaper.
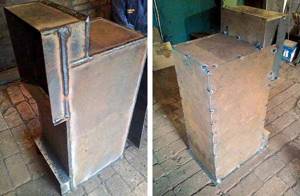
Step one - welding the body
To weld the fuel chamber, it is necessary to cut 4 mm metal into blanks according to the dimensions indicated in the drawing. Start assembling from the bottom of the ash pan - grab the side walls and lid to it, and then form frames for the loading and cleaning door, as done in the photo.
Then follow this algorithm:
- Weld supports for the grate inside the firebox, and weld clips from a steel strip outside for mounting the water jacket.
- Install and weld the 3mm outer lining sheets of the water jacket. Note that it originates from the top of the ash chamber.
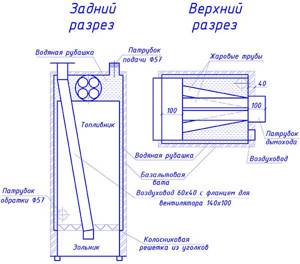
- In the upper compartment, which will subsequently be filled with coolant, cut 4 flame pipes Ø50 mm, and place the same pipes for connection to the heating system.
- Attach legs from pieces of any rolled metal to the unit and install a chimney pipe at the outlet of the fire tube heat exchanger.
Please note that the flame tubes converge in a bundle towards the chimney pipe
Stage two - installation of hanging elements
The doors of the fuel and ash chamber are made by bending the edges of the blanks and welding the internal frame, where the basalt insulation is laid. The insulation is hermetically sealed on top with a lid, and an asbestos-graphite cord is tightly inserted into the resulting groove along the perimeter of the sash.
What else needs to be done:
- Attach the handles and hinges to the body, and cover the doors with heat-resistant enamel.
- Weld a grate from the corners and put it in place.
- Make an air duct with a counter flange and weld it to the rear wall, as shown in the photo.
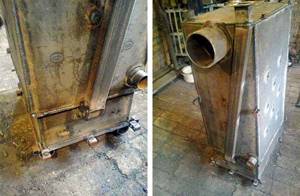
To insulate and line a homemade TT boiler, it is necessary to weld embedded parts made of any metal at the corners of the water jacket, as long as its width does not exceed 20 mm (on the back wall - 4 cm). Also provide stands for mounting the ECU on the top of the unit.
Final assembly of the heater
Thermal insulation of the boiler tank is simple - the walls are lined on the outside with basalt wool slabs, which are secured with a cord. Make sure that the insulation fits tightly to the frame of the loading and ash opening, as well as to the profile pipe of the air duct.
This is how the control unit and fan are mounted
The last step is to cover the heat generator with polymer-painted metal, screwed with self-tapping screws to previously welded embedded parts. After this, the doors are hung and an automation unit with a fan is installed. An original video from the developer of this long-burning TT boiler, Vitaly Dashko, will help you understand the assembly process:
What does a boiler consist of and how does it work?
The fuel in such boilers burns much longer than in conventional units. This is due to their operating principle, which involves burning wood in the firebox from top to bottom. The combustion chamber is cylindrical in shape and is completely loaded with wood through a door at the top of the housing. Ignition is carried out through the same door; the design of long-burning solid fuel boilers is such that air is also supplied to the combustion zone from above through a vertical pipe. A flat round weight made of thick metal (10-15 mm) is attached to the end of this pipe; arc-shaped air distributors made of strip metal are welded to it from below. A similar design can also be used to make a sawdust boiler.
Weight for a homemade boiler
The size of the load is 5 mm smaller than the internal diameter of the firebox cylinder, which allows the structure to move up and down. The other end of the pipe passes through the upper wall of the boiler; a damper is installed on it, with which the amount of air can be adjusted manually. The length of the pipe is 15-20 cm greater than the height of the combustion chamber. The latter can be arbitrary; home-made long-burning units work the longer, the larger the diameter and height of the firebox. At the same time, the volume of the unit’s water jacket and its thermal power increase.
Long burning boiler design
After ignition, the pipe with a load is lowered, pressing down the array of firewood. The air enters directly into the combustion zone; the design of the long-burning boiler provides for operation on natural draft created by a chimney of the required diameter and height. The generated heat heats the water in the jacket of the installation; it begins to flow into the heating system through the upper pipe. The principle of convection works here; the use of a circulation pump is not necessary. The water jacket in a homemade apparatus is located not only around the side walls of the firebox, but also in its top cover.
The grate of a homemade long-burning wood-burning boiler does not perform its usual function; air does not pass through it into the work area. The grate only serves as a support for the fuel mass, and through its cells, ash and ash fall into the lower section, from which they are freely removed with an iron scoop. As the fuel burns in the chamber, the load lowers and you can determine how much firewood is left at the upper end of the pipe. After the process is completed, the door of the ash compartment opens, combustion products are cleaned out of it, the load along with the pipe is raised and fixed in this position. You can make the next download.
Homemade long-burning wood-burning boiler
Kholmov's boiler
This modification of the stove is distinguished by the fact that it is equipped with two chambers - for installing a heat exchanger and separately for burning fuel. These devices feature bottom combustion and a full-height firebox, which became the name for them. The principle of operation depends on the design.
The most popular today are two designs:
- Kholmov pyrolysis boilers (PK);
- normal combustion.
The fuel burns at the bottom of the closed combustion space. The second shaft is smaller in size and is used to burn exhaust gases and cool them in the boiler for heating water.
Non-volatile devices control the temperature with an RT3 thermostat installed at the front of the structure. To ensure complete combustion of the fuel, the air supply to it is regulated by the blower door located on the main door of the ash pit.

Kholmov's boiler. Top and side view
A special restriction valve is installed to ensure minimal air passage. In the upper rear part of the unit there is a pipe for connecting a chimney that provides natural draft.
The boiler is equipped with a shut-off valve and compensators on the outside and inside the body, designed to prevent welds from breaking during emergency overheating.
Set of tools and accessories
Welding machine
The main difficulty is to give a thick sheet of heat-resistant steel a cylindrical shape at home. In factories, this operation is performed using mechanical rollers. A manual machine - pipe bender or hand rollers, if desired, can be found in specialized workshops, which will inevitably entail some costs. The rest of the assembly work can be quite successfully completed at home. To do this you will need:
- welding machine;
- angle machine for stripping and cutting metal (grinder);
- tape measure, ruler, caliper, square;
- hammer and chisel;
- electric drill;
- pliers, preferably with long handles;
- other small plumbing tools that are found in every private household.
Manufacturing instructions
When starting the production process, you need to start by preparing all the essentials:
- Pipes with the following diameters - 30 cm, 5-6 cm, 10 cm (the wall thickness of each is at least 3 mm)
- Steel sheet with a thickness of more than 4 mm
- Bulgarian
- Welding machine
- Hand tools
It is recommended to place the boiler on a level, hard surface. If such an installation will be installed at home in a boiler room, you should think about arranging the foundation, a few words about which will be said later.
Let's start making the boiler:
- Take a pipe suitable for its characteristics and cut off a piece from 70 to 100 cm. A short length will not allow you to load a sufficient amount of firewood, a large length will make loading extremely inconvenient
- Now you need to build a distributor. In order for it to move freely, its diameter is made 15-25 mm smaller than the main pipe
In the center of the circle you need to drill a hole with a diameter of 15 mm - air will flow through it into the combustion chamber. To ensure that the disk does not fit tightly to the panels and there is space for air circulation, it is necessary to weld an impeller to its inner side - several plates up to 5 cm high
A pipe with a diameter of 5-6 cm is welded in the center of the regulator, while its height is made 10-15 cm larger than the boiler. As mentioned earlier, it is recommended to make a damper at the top, which will allow you to adjust the draft at any time, thereby controlling the smoldering process. A door is cut out at the bottom with a grinder, through which ash will be removed
Also, the bottom is securely welded at the bottom of the boiler. At the top it is necessary to run a horizontal chimney pipe with a diameter of 8-10 cm and a length of no more than 40 cm (this is what is passed inside the heat exchanger)
The finishing touch of the design is the boiler lid, in which a hole is cut for the air intake pipe. It should lock the camera as tightly as possible
A good alternative to firewood is heating briquettes - see our review
Manufacturing of the main part
The main part is a homemade body, which is divided into chambers with various functional devices. The body is made as follows:
- They study the drawing of a homemade unit and determine the dimensions of all metal parts .
- Draw rectangles on sheet steel with lining, which will be the walls and individual metal parts of a homemade shaft-type boiler.
- Sheet steel is cut into pieces. This is best done using autogenous welding.
- Weld the side walls of the body.
- In the sheet, which will be the partition between the combustion and heat exchange chambers, two holes are cut out : one should be at the top, the other should be slightly above the level of the grate. It is desirable that the height of the second hole is 3 cm.
- Place the workpiece inside the body, fix it as indicated in the drawing or watched video, and weld it. A valve is installed in the upper hole and its base is welded. The valve should be on the firebox side. On the other side, weld a neck with a depth of 4 cm.
- A grate is made. To do this, narrow longitudinal holes are cut out in a piece of sheet steel with a lining . The grate can be purchased, but must be made of steel with a lining. A product made of cast iron is not suitable, since after several months of operation of a homemade shaft-type boiler it will warp.
- The grate is welded.
- Holes are cut out in the side walls for the ash door and the combustion chamber cleaning door. Necks need to be welded around the perimeter of the holes. They should protrude outward and inward by 6 and 3 cm, respectively . It is better to weld the neck for the hole in the afterburning chamber after the heat exchanger has been welded.
- Two rows of corners or profile pipes are welded to the inner walls of the thermal chamber . The top row is placed 3-4 cm from the top. The lower one is at the level of the bottom of the afterburning chamber. These corners will become part of the water jacket. You cannot make a water jacket around the pyrolysis chamber, because this will disrupt pyrolysis.
- The heat exchanger is welded to the inside of the water jacket (its manufacture is described below).
- Weld the bottom of the afterburning chamber. It should be at the level of the grate. In this case, one third of it should be horizontal, and the rest should rise upward at an angle. The size of the angle depends on the drawing. The part that is located near the internal partition is made horizontal.
- is cut above the bottom for the air supply pipe .
- A large number of holes are drilled in a pipe with a diameter of 5 cm and welded to the hole in the body. In this case, the pipe is placed so that it protrudes 6 cm from the outside. This part should not have holes. A valve is fixed at the end of the pipe.
- The walls of the combustion chamber are lined with fireclay bricks. To adjust the material to the required dimensions, it is cut. The top of the chamber should be a brick protruding inward. There must be a hole between the bricks for further movement of pyrolysis gas .
- A similar process is done in the afterburning chamber.