Recommendations and safety precautions
Before you start creating a homemade unit, you need to make sure you have the necessary tools and evaluate your skills in using them. For example, if a person has never done welding, it will be difficult for him to assemble a structure with his own hands. In this case, it is better to purchase the device in a store. After all, its individual parts can be joined together only thanks to a welding machine.
Below are a few important things to know:
- It is prohibited to connect the device to the main line yourself without the knowledge of the gas service.
- Permission can be obtained by calling specialists to your home or delivering the assembled unit to their office.
- If installed without permission, gas may leak, which will lead to fire and even explosion.
- Welding work is performed only in special clothing, gloves and a mask.
- Each item must be purchased only in a special store and have a passport.
- The creation of the device must be carried out in accordance with the drawing.
Operating rules
During operation of an open-type gas boiler, it is necessary to ensure a sufficient air supply in order to ensure complete combustion of gas.
Otherwise, the efficiency of the unit will be low, and the volume of unburned gas will be large, with possible release into the room. In closed fireboxes, it is also important to monitor the sufficiency of air and the functionality of the blower fan. Basic rules for the safe operation of a heating boiler operating on gas fuel if there is a gas smell:
- immediately turn off the gas valve to the burner device;
- open windows for ventilation;
- in closed-type boilers, forced ventilation is turned on in the chimney system of the gas boiler;
- do not use electrical switches and matches;
- immediately turn off the open flame;
- report an emergency to the gas service.
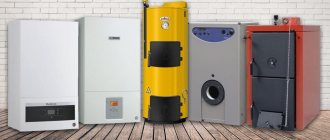
Autonomous heating is gaining popularity; for many homeowners it has become as necessary in the cold season as an air conditioning system in the summer - an affordable level of comfort in residential premises that ensures normal life activities.
The main function in this is performed by modern boiler installations - technologically advanced, innovative units capable of solving multi-level thermal problems.
Calculations and creation of drawings
Before you create a device, you need to find or make your own drawings. They should contain information about what the future unit is, how to connect it, cool it, how the chimney and deflector are installed.
When making a device, you need to take into account how much heat is lost in each room where the battery will be located. Its quantity differs even for rooms in which the footage is the same. Calculations are carried out with a reserve. Add 10% for dimensions. 10 m² requires 1 kW of energy.
Gas emits 6.55 kW. You need to divide your daily energy consumption by this value. This gives the required volume of the boiler. A self-made tank holds the amount of liquid needed to heat a house.
Advantages of using a register
The principle of connecting pipes by welding.
Registered heat exchangers have certain advantages over other heating devices:
- Homemade heating registers are large in size, therefore they provide more uniform heat transfer, unlike radiators, which are local heat sources.
- The devices are easy to clean and do not have hard-to-reach places where dust accumulates.
- With high-quality welding of parts, heat exchangers can withstand significant pressure and high temperature of the coolant.
- When the device is equipped with a heating element, it can serve as an autonomous heating source.
- A well-installed heating register can last at least 25 years without repair.
At the same time, heating registers have worse characteristics in comparison with radiators of the same size, in which the heat exchange surface is formed more compactly. The maximum operating pressure of the heat-carrying medium for which a register heat exchanger can be designed is 10 kgf/cm². The system works more efficiently with the installation of a circulation pump.
What you will need
When a project is selected, it is necessary to calculate how much material is required. If the instructions suggest that you need cast iron, do not buy cheaper aluminum, otherwise the device will quickly fail. It is better to purchase a thermostat and deflector ready-made than to make it yourself.
It is important to consider several points when making the device:
- It is advisable to choose a programmable thermostat, so you can set a controlled temperature.
- It is better to install the deflector above the chimney pipe, thereby ensuring exhaust. It may look like an umbrella with a cone. The material is only stainless steel.
- The device must have automation, which includes control over flame, overheating, and draft. The presence of a blast valve is also important.
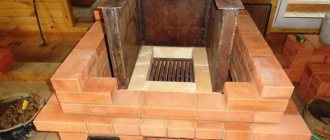
Advantages of using a water boiler in a brick stove
One of the key advantages is efficient heat dissipation. It is also an important fact that the pipes can be connected to all rooms from the pipe.
A water-based boiler can be perfectly combined with different heat generators. When using antifreeze, the system will not defrost when the oven is turned off. Among other things, a water boiler in a brick stove can operate both in the presence of central heating and in autonomous mode.
It should also be noted that a water boiler in a brick is very reliable. like the brick oven itself, traditionally considered a reliable heat source. And when such a stove is combined with a water-based boiler, their mutual efficiency becomes many times stronger, and additional heat transfer appears. Together they are able to heat a room of up to one hundred square meters, without forcing you to spend a lot of money on such heating.
For a typical Russian winter, only two fireboxes per day will be enough to create a comfortable temperature in the room. In addition, the temperature can be regulated using modern automated systems.
Instructions for making a homemade boiler from scratch
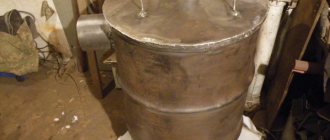
It is better to choose a floor-standing model that can be placed in the garage, in the boiler room, or on the street. The base on which the device is installed must be specially prepared. You need to dig a hole 80 cm deep. Its width is equal to the size of the unit. A pillow should be installed at the bottom of the pit. After this, crushed stone is poured.
The frame is formed from reinforcement and formwork is made. The latter needs to be filled with concrete. After a day, it is removed, and sand and gravel mixed together are poured in its place. Now tar is placed to insulate moisture. A brick wall is formed to protect the building from the heat of the boiler. Then you can start assembling it.
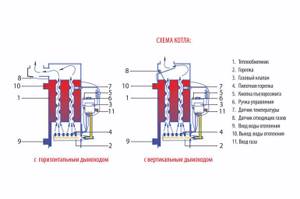
The unit should be cooked using the drawing. The heat exchanger is made of steel. To do this, you need to use a pipe 40-50 cm in diameter. The tank must have appropriate openings at the top and bottom. The end of the pipeline should be sealed with a fitting. When the device starts working, the burner will heat the copper spiral, which transfers heat to the container, and from it to the water. The deflector is installed above the chimney - this is an exhaust hood.
The automation is assembled from control units for flame, overheating, draft, and safety valve. Otherwise, the device will not work correctly.
After completing the base, the unit is installed on it. At this stage you need to weld the chimney to it. This is an iron pipe that removes carbon monoxide. Its diameter should be at least 20 cm. It rises 30 cm above the roof. In order for carbon monoxide to escape faster, you need to make an exhaust hood using a grille and a fan. These elements are installed inside the pipeline.
If there is a possibility of a power outage, you should consider installing an uninterruptible power supply. It can also protect the device from power surges. You can buy a ready-made block or assemble it yourself.
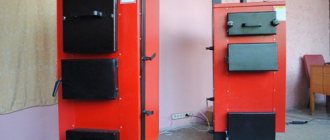
DIY solid fuel boiler
Let's look at the example of the most popular top-combustion boiler (Fig. 3). If necessary, the dimensions can be changed in proportion to those indicated in the drawing. A distinctive feature of the design is the pipe, which serves as an air supply regulator and a heat exchanger at the same time. Gases released during the smoldering process of fuel rise upward and ignite in the upper firebox.
For manufacturing, the materials described in section 2 are required: pipes, sheet steel, angle, insulation, asbestos cardboard, electrodes.
The first stage of a homemade boiler includes the following steps:
- A cylindrical body is welded from a pipe with a diameter of 45 cm and a length of 150 cm.
- The bottom is covered with a circle cut out of sheet steel using welding.
- A rectangular hole is cut out in the lower diameter pipe (lower part) for the ash pan door. It can also be made from steel sheet or purchased ready-made to size.
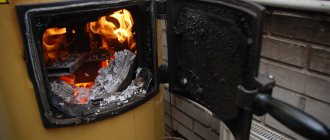
- The firebox is located in the upper part; a rectangle is also cut out under its door. The door must be insulated with asbestos cardboard and asbestos cord around the perimeter. All doors must be closed with latches.
- A smoke outlet pipe is welded from a profile pipe, which will be inserted into the chimney.
Important! Due to temperature changes, moisture (condensation) will form on the surface of the pipe, leading to corrosion, so welding seams must be of high quality
- Legs from an equal angle angle are welded to the boiler body.
- Cut out the top cover with a diameter of 46 cm, which will fit on top of the cylindrical body.
DIY heat exchanger for a solid fuel boiler
The second stage is the production of the heat exchanger:
- A heat exchanger pipe with a diameter of 40 cm and a length of 130 cm is welded from a metal sheet.
- Insert it into a cylindrical body, fix a gap of 5 cm between the pipes, due to which a “water jacket” will form.
- The difference in the length of the heat exchanger pipes and the external one should be at least 20 cm. The pipe in the pipe is fixed by welding using prepared metal rings.
- Nozzles are installed in the upper and lower zones of the water jacket: one for supply, the other for outlet of coolant. To make them, a pipe with a diameter of 5 cm is used; a thread is screwed on the outside through which they will be connected to the pipes of the heating system.
- The distribution pipe through which air will be supplied is welded from metal of greater thickness than for the body and heat exchanger (at least 5 mm with a diameter of 6 cm). The length of the pipe is made 10 cm less than the length of the heat exchanger pipe (120 cm).
Important! The distribution pipe is located in a high-temperature zone and over time deforms and burns out, so metal with a thickness of 5 mm or more is used for its manufacture
- The pipe is inserted into a prepared disk with a finished hole. A metal steel disk with a diameter of 38 cm is welded to the pipe.
- At least 4 corners are welded to the base of the disk, acting as an impeller.
- A valve is installed to the top of the pipe for portioned air supply and a loop is welded on which a chain is fixed to lift the pipe.
Attention! To improve heat transfer, a forced-air fan is installed at the top of the pipe
How to assemble a boiler correctly
After completing the two main stages, they begin the final one.
The third stage is boiler assembly:
- Select a location for installing the boiler, check the level to ensure that there are no differences that could impair the operation of the heat generator.
- The cover with the distribution pipe is pulled onto the body, having previously laid an asbestos cord. The cover can also be welded to the body.
- The smoke pipe is inserted into the chimney.
- Through threaded outlet pipes, the boiler is connected to the heating system of the house.
- The system is filled with water and the operation of the boiler is checked when it is not fully loaded.
- If the test went well, the boiler is loaded at full capacity.
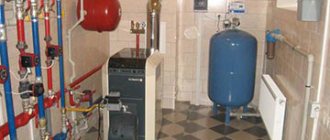
Connection and placement
Before connecting the finished device to the gas pipeline, you need to obtain permission from the relevant organization. After this, 2 American taps are purchased, which are installed on the forward and reverse pipelines. Such shut-off valves will help dismantle the unit if an emergency occurs.
A filter must be installed on the pipe through which the coolant will move back to the boiler. It will protect the device from mechanical debris. It is necessary to install shut-off valves on the gas pipeline. It looks like a faucet and acts as a filter.
Now all that remains is to connect the gas pipe through which the fuel will move. Each joint and connection point of elements must be sealed. The boiler must be connected to a water supply with cold water, as well as hot if it is a double-circuit one.
Place the device in a specially prepared place, on a pillow. The installation location can be a garage, boiler room or street.
Electrodes for manual arc welding
4.1.1. For manual arc welding of joints of pipelines and boilers made of carbon, low-alloy and high-alloy steels, it is necessary to use electrodes that meet the requirements of GOST 9466, 9467 and 10052. The brand of electrodes should be selected depending on the grade of steel being welded. For welding products covered by this RD, domestic electrodes listed in Table 4.1 can be used; the chemical composition and mechanical properties of the deposited metal of these electrodes are given in Appendix 7.
Brands of electrodes from foreign companies that can be used are listed in Appendix 8; The type of electrodes according to the domestic classification is also given there to determine the scope of application of a specific brand of electrodes.
The possibility of using electrodes not listed in Table 4.1 and in Appendices 7 and 8 for facilities of the Ministry of Energy of Russia must be agreed with CJSC "Prochnost MK", for other facilities - with any specialized research organization in the field of welding, given in the appendices to rules of the Gosgortekhnadzor of Russia.
4.1.2. Electrodes for welding fastening parts made of high-alloy steels to superheater pipes and other boiler elements or to a pipeline made of low-alloy pearlitic steels, as well as for welding fastening parts, must be selected according to Table 4.2.
To weld fasteners made of steel of any grade to pipes made of austenitic steel, electrodes EA-395/9, ZIO-8, OZL-6, TsL-25, TsT-10, NIAT-5 should be used; for steel 12X11V2MF - electrodes EA-400 /10U and EA-400/10.
4.1.3. Before welding production joints and testing, the electrodes must be calcined according to the regime given in the relevant document (OST, TU) or label. In the absence of such data, the calcination mode is selected according to Table 4.3.
Imported electrodes are calcined according to the same regime as domestic ones with a similar type of coating.
4.1.4. Electrodes with a basic coating intended for welding pearlitic steels should be used within 5 days after calcination, TsT-45 electrodes - within 10 days, other electrodes - within 15 days, if they are stored in a warehouse in compliance with the requirements of clause 3.10. After the specified period, the electrodes must be calcined again before use. If electrodes are stored in a drying cabinet at a temperature of 80-115°C, their shelf life is not limited.
Table 4.1
How to increase efficiency
Under no circumstances should safety precautions be neglected. If you decide to save on something, you can lose much more. For example, you should not connect a gas pipe to the basement or ground floor.
You shouldn’t skimp on automation either. Otherwise, the system may overheat, causing a rupture in the pipeline. Lack of water circulation can lead to an accident. Therefore, automation must provide control over the operation of the pump, filter, and thermostat.
You can save on the coolant supplied to the batteries without losing temperature. To do this, you need to insulate the walls and windows by sealing the cracks. Savings are calculated at the assembly stage, and not when the device is ready for use, because after the last soldering nothing can be changed.
Other options
There are two more options for homemade boilers, when the units are obtained by remaking a gas water heater or stove. This can significantly save on installation costs.
Based on a gas water heater
The alteration involves replacing the nozzle or block responsible for gas combustion if a liquefied mixture is used. You will need to purchase an atmospheric burner that fits the combustion chamber. The ignition is mounted inside it.
To connect a fan burner, you will need to purchase an additional heating circuit. It consists of a security system unit, an expansion tank and pump, an air vent and a Mayevsky valve. This type of burner is more expensive, since it will also require a pressure gauge, an automatic air bleeder and a coaxial chimney.
Conversion from a gas stove
It is almost impossible to make such a boiler. There is only one available way: install a metal container with coolant on the burner, which will heat up and then move through the pipes to the batteries. The volume of the tank depends entirely on the power of the stove. It does not exceed 100-150 liters.
The return pipe is welded from below, and the direct supply is connected from above. Hot water rises and moves to the radiators. The cold liquid returns through the lower pipe.
Such a homemade device does not require a safety valve and an air vent, since excess water in the form of steam bubbles will escape through a loosely closed tank lid.
You can install a gas boiler yourself. You just need to follow the exact instructions and remember safety precautions. Before connecting, you must remember to obtain permission from Gorgaz.
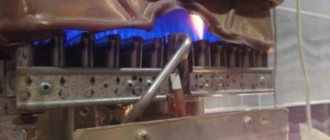
The manufacturing process of an atmospheric gas burner
An atmospheric burner is easier to build, since it is structurally much simpler than its fan counterpart. The most typical example known to most Russians is the burner block in old-style geysers. There are no energy-dependent elements in its design that force gas and air to mix in the required proportions.
Air is drawn into the chamber with the atmospheric burner module spontaneously as needed. Blue fuel processing products are discharged naturally through a standard chimney due to the presence of draft. All the work consists of constructing a manifold with gas nozzles through which gas will flow at the required speed.
If you want to build a gas burner with your own hands, it is better to take a factory-made product as a basis, or rather, the drawing available in its technical passport with the dimensions and designation of structural elements
To make a burner with your own hands to equip a gas heating boiler, you will need:
- Valve series VK-74. Typically used on oxygen cylinders, designed for a maximum pressure of 20 mPa. The package should include a 3/4″ union nut, with which you can tightly connect to the gas supply pipe or hose. The valve will serve as a support base for fixing the nozzle.
- Nozzle cap. The device will hold the gas supply dispenser and form a narrowly directed jet. A hole is drilled at the top of the cap into which the nozzle is to be placed. The base screws onto the valve.
- Nozzle. It is better to buy it ready-made with the expectation of supplying main gas or a liquefied gas mixture. The injectors have different outlet diameters. Instead of nozzles for boilers, you can use a jet from a gas burner.
- Homemade injector. It is constructed from a steel tube with a wall thickness of up to 2 mm. You will need a piece of pipe approximately 10 cm long.
- Piezo element. It is installed at will, although you can do without it. Homemade products can be set on fire with matches.
All of the above elements are assembled mainly by welding. Therefore, skills and minimal knowledge in welding will be very useful for an enterprising “do-it-yourselfer”. However, where it is possible to use threads, it should remain a priority.
The gas supply channel must be impeccable and sealed, because safety depends on its condition. A distance of 10 cm must be maintained between the gas inlet into the device and the nozzle, which is necessary for mixing fuel with air.
Image gallery
Photo from
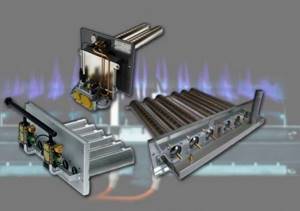
Large gas burner
Gas burner combustion process
Ignition of the atmospheric burner block
Burning oxygen indoors
The home craftsman just has to figure out how to secure a homemade gas burner in the combustion chamber of a used water heater or in the firebox of a former wood-burning boiler. Please note that you need to leave room for air flow. Air must be regularly supplied to the chamber, for which round or longitudinal holes must be cut in the door.
Do not forget that the above option can hardly be called a safe gas supply device. The design does not have automatic equipment that interrupts the operation of the boiler in case of blowing out or unstable flame. Owners will not have the opportunity to adjust the pressure and gas flow, so there can be no talk of either convenience or savings.