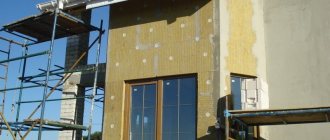
Sequence of work
If you decide to carry out the insulation work yourself, it is better to study in advance and subsequently follow the procedure for performing the work.
Insulation calculation
First, determine the required thickness of the sheets. The final consumption of material depends on it. The thermal resistance indicator (in Russia it ranges between 3.5 to 4.6 m*K/W) is divided by the thermal conductivity coefficient of penoplex slabs. The second parameter is found in the characteristics of the material.
After taking measurements of the insulated room, the required amount of material is calculated. When purchasing, it is recommended to make a reserve of 10-15% to compensate for possible losses from defects or installation errors.
Required tools and materials
If work is carried out on the ceiling, scaffolding will be required to avoid the collapse of the structure. In all other situations, a basic set of tools is sufficient:
- drill with hammer;
- hacksaw;
- sandpaper or fine construction grater;
- laser level;
- hammer;
- spatulas of different sizes.
A set of tools for laying penoplex.
Auxiliary materials will also be required:
- dry adhesive mixture for installation of extruded polystyrene foam;
- polyurethane foam;
- reinforcing mesh;
- dowels;
- plaster mixture;
- finishing materials (lining, drywall, etc.).
Preparation
To ensure that the slabs are light, even and dense, before installation, you need to remove old finishing materials, dust and cement residues from the working surface. After this, using a building level, you should check the evenness of the structure and, if necessary, eliminate deviations with putty and plaster. Then the surface is primed.
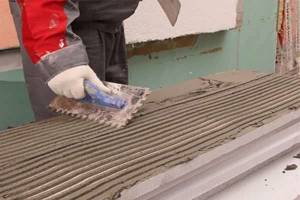
When it stops being wet, you can start insulating it. There are 2 common installation methods: with glue and with the additional use of dowels. Whichever one is chosen, the slabs are first lightly rubbed with sandpaper to improve adhesion. The glue is applied with a spatula.
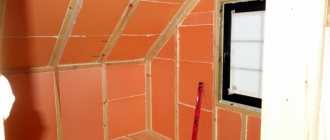
During installation, you can lay the finishing material directly on the insulation, or you can use a wooden frame and guides installed at the width of the slabs. The frame method will take more time, but is considered more reliable.
Walls
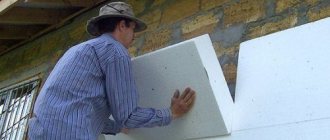
It is recommended to start insulation from the bottom corner of the wall, slightly moving the slabs at each next level. For reliable fixation, use bitumen mastic, cement-based glue, polyurethane glue or polyurethane foam.
The slabs are attached to the wall using special glue.
After applying glue to the slab, it should be pressed firmly against the wall and held for 1 minute, if necessary driving in dowels in the corners and in the center. The adhesive layer may be uneven, so it is necessary to check the evenness of the installation from time to time using a level. The gaps between the plates are filled with polyurethane foam. When it dries, the resulting mounds are cut off.
Ceiling
As in the case of walls, it can be mounted with or without a frame of guides. If a private house is being insulated, then penoplex is laid on the ceiling from the inside and outside, from the attic side.
The ceiling should be cleaned, leveled and primed. Glue is applied to the material and pressed tightly to the installation site. For best fixation, dowels can be used. The seams are sealed with foam.
Finishing
Depending on what decorative material will be used to complete the finishing, the finishing of the insulation is carried out. Reinforcing plaster is applied under the tiles or wallpaper, then a reinforcing mesh is laid, plastered again (the second layer is at least 3 mm) and puttied.
It is permissible not to apply plaster under drywall. When the glue has dried, the decorative sheets are mounted to the insulating structure with self-tapping screws, and the joints between them are puttied. Before gluing wallpaper, the surface should be sanded.
Recommendations
When purchasing penoplex, you should pay attention to the labeling of the product, the safety of the packaging, and the technical characteristics of the material. It is worth buying 10% more material from the measured initial quantity, in case it is rejected during use. It is necessary to work with the material carefully, since if its integrity is damaged, water may get inside, which will shorten the service life of the material. It is better to use the services of professionals or read the instructions yourself and work with penoplex correctly.
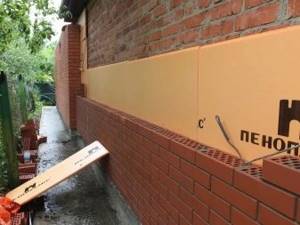
Due to the possibility of toxic vapors being released under the influence of UV rays on penoplex, its use outside is considered optimal. The insulation must be treated with mesh plaster or other façade material on top of the insulation.
It is not worth covering the insulation with a water-repellent agent, because the penoplex itself is waterproof. You should be careful when you are near penoplex with other substances. Some of them can destroy the cellular structure of the slab
As a result, its technical performance will deteriorate.
Penoplex slabs should be used in the range of -50… +75 degrees. At this temperature, all the characteristics of the material are perfectly preserved. They can be stored for a long time in the manufacturer's packaging, but they should be protected from direct exposure to sunlight.
When choosing penoplex, the question is how to make the correct calculations of raw materials. For this purpose, many manufacturers’ websites have a special calculator. In it you can indicate the area of the surface to be insulated, and he himself will calculate the amount of material required.
Before you begin installing penoplex, you need to complete several points:
Preparation of the working surface, this is especially important for walls. It is necessary to remove all dirt and smooth the surface of the wall. If necessary, it is worth treating the facade walls with a primer. To fix the slabs, a special mixture with an adhesive base is prepared. To prevent the slabs from moving due to wind, they are additionally secured with fasteners.
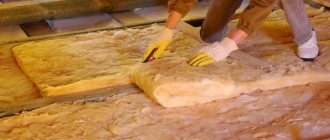
See below for a master class on floor insulation with penoplex.
Fixation methods
The ease of installation of penoplex is one of its main advantages, thanks to which not only a specialist, but also any other person, if desired and knows the correct sequence of work and its observance during the process, can insulate the walls outside the building properly. The material can be fastened in several ways, both outside and inside the structure.
With the construction of the sheathing
In this case, you need to build a special frame or, when fastening, you can resort to using thermal insulation between wood planks or aluminum profiles. Giving preference to this method, it is best to select sheets with dimensions that will correspond to the distance between the components of the sheathing, which will significantly reduce the amount of waste.
In such a situation, during installation it is necessary to lay insulation in the gaps, after which it is necessary to seal the perimeter using polyurethane foam, which also simultaneously secures the material to the wall. Finishing is installed on top of the penoplex, which can be a block house, siding and wall panels.
Using special adhesives
Without erecting the sheathing, the insulation can be fixed using a special cement-based adhesive, which is also used when using mineral wool and polystyrene foam.
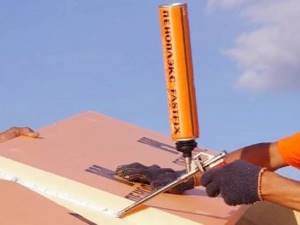
These formulations are sold dry in paper bags. Subsequently, the mixture must be diluted with water. In addition, you can use bitumen-polymer mastic, liquid nails or polyurethane foam, the application of which must be carried out using a special gun, which is often used when spraying the latter. It is necessary to cover the sheet with the selected composition in a zigzag, around the perimeter or crosswise. The surface of the panels is corrugated on the inside, providing better adhesion. If the sheets are smooth, then they need to be rolled with a needle roller.
If the material does not fit tightly, the seams should be taped with foil tape, which prevents heat leakage. Before the adhesive mixture hardens, you have about an hour to make adjustments or remove the layer. To prevent the penoplex from sliding down, its lower part must be attached to a starting bar, which must be installed in a strictly horizontal position.
Using special fasteners
To fix the slabs, special dowels with wide plate-shaped caps are used. To fasten one sheet, you need to use 5-6 such fasteners. With the help of dowels it is possible to make a reliable and long-lasting fixation. Their large-width caps themselves do not lead to a violation of the integrity of the insulation. The use of these elements is optimal if it is necessary to finish large areas or in cases where there are uneven surfaces on the walls.
Drilling holes in the rough base must be done using a hammer drill. The length of the dowels must be at least 10 cm, depending on the thickness of the insulation used, which in many cases includes self-tapping screws of the required size.
It is better to additionally cover the joints of the plates with adhesive and cover the seams with foil tape. Due to this method of fixation, a loose fit occurs, which causes the formation of fungus under the penoplex itself. To avoid this negative consequence, the rough base should first be treated with an antifungal mixture.
Installation Tips
A guarantee of the effectiveness of thermal insulation is compliance with all stages and rules of installation work.
- Before installing penoplex, you need to prepare the surface on which the material will be laid. A non-uniform surface with cracks and dents must be sealed with a plaster mixture. If there is debris, loose elements and remnants of old finishing, then the interfering parts are removed.
- If traces of mold and moss are detected, the affected area is cleaned and treated with an antiseptic fungicidal mixture. To improve adhesion to the adhesive composition, treat the surface with a primer.
- Penoplex is a hard, inflexible thermoplastic that is attached to flat surfaces. Therefore, the level of evenness is measured. If the difference exceeds more than 2 cm, then leveling will be required. The technology for installing heat insulators differs slightly depending on the surface design - for the roof, walls or floor.
- Installation of thermal insulation can be carried out at any time of the year, but it is more comfortable if the temperature is above +5 degrees. To fix the slabs, special adhesives based on cement, bitumen, polyurethane or polymers are used. Facade mushroom-shaped dowels with a polymer rod are used as additional fastenings.
- Installation on walls is carried out using the horizontal method of placing slabs. Before installing the penoplex, you need to place a starting strip so that the insulation is in the same plane and the rows do not shift. The bottom row of insulation will rest on the bottom bar. The heat insulator is attached to glue in a checkerboard pattern with the grooves aligned. The adhesive composition can be applied in strips of 30 cm or in a continuous layer. Be sure to coat the connecting edges of the panels with glue.
- Next, holes are drilled to a depth of 8 cm. For one sheet of penoplex, 4-5 dowels are enough. Install dowels with rods, the caps should be in the same plane with the insulation. The last step will be decorative finishing of the facade.
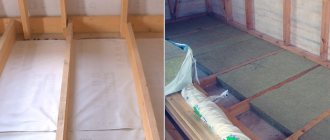
- When insulating the floor, foam plastic is laid on a reinforced concrete floor slab or prepared soil and secured with glue. A waterproofing film is laid on which a thin layer of cement screed is applied. After complete drying, the final floor covering can be installed.
- To insulate the roof, penoplex can be laid on the attic floors above or below the rafters. When constructing a new roof or repairing a roof covering, a thermal insulator is installed on top of the rafter system. The joints are sealed with glue. Longitudinal and transverse slats 2-3 cm thick are attached to the insulation in increments of 0.5 m, forming a frame on which the roofing tiles are attached.
- Additional roof insulation is carried out inside the attic or attic space. A sheathing frame is mounted on the rafters, on which penoplex is placed, secured with dowels. A counter-lattice is installed on top with a gap of up to 4 cm. A layer of vapor barrier is applied, followed by cladding with finishing panels.
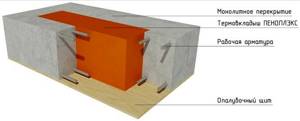
- When insulating foundations, you can use the technology of permanent formwork made from foam panels. To do this, assemble the formwork frame using a universal screed and reinforcement. After pouring the foundation with concrete, the insulation remains in the ground.
For an overview of the comparison of penoplex with other materials, see the following video.
Advantages and disadvantages of wall insulation with penoplex
The positive side of using this heat insulator is associated with saving energy costs. The effectiveness of using this material lies in the fact that it differs from mineral wool or other insulation materials in that it is not affected by high humidity. Penoplex, used as insulation, has a special advantage over other types of heat insulators:
- the use of insulation technology does not require the installation of vapor and waterproofing;
- purchasing a heat insulator does not involve large expenses due to the low price of the material;
- has low thermal conductivity;
- the material is light in weight and easy to transport;
- increases the service life of the building due to strength and durability;
- the insulation is environmentally friendly and safe to use;
- The heat insulator has a high density and resistance to loads.
The material is self-extinguishing in case of fire. Penoplex is very convenient for finishing wooden houses. Carrying out such work will not cause difficulties even for a beginner. The material has virtually no disadvantages, but it should not be exposed to direct sunlight. To professionally insulate the outside of your home with polystyrene foam, you can seek the services of specialists.
The lack of disadvantages of this heat insulator is the main reason for its widespread use in construction. In most cases, its characteristics are similar to those of foam plastic.
Benefits of Penoplex
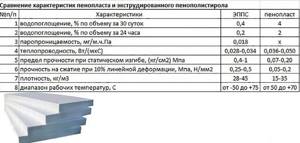
Unlike most materials for similar purposes, extruded polystyrene foam:
- has a low thermal conductivity coefficient of 0.030 W/m*K;
- has low water permeability;
- the slabs are light in weight, the material density is 25–48 kg per 1 m³;
- has high strength 0.2-0.6 MPa;
- has a high coefficient of elasticity in compression, and is easy to cut blanks;
- the modified material is resistant to temperature changes and open fire (flammability class G1 and NG);
- non-toxic, environmentally friendly, harmless to human health;
- durable in use, the service life of the material is about 50 years.
These advantages, along with excellent sound insulation properties, have made penoplex a leader in the segment of thermal insulation materials.
Main pros and cons
Penoplex Foundation, like any other building material, has its own advantages and disadvantages. The advantages are obvious, and they are expressed in:
- low thermal conductivity;
- low moisture and vapor permeability;
- high strength and resistance to chemicals;
- environmental friendliness;
- ease and simplicity of installation;
- duration of service life;
- resistance to temperature changes;
- affordable price.
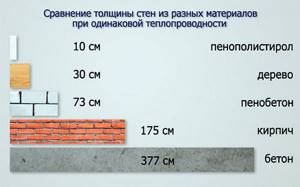
The thermal conductivity of the described material is 2 times less compared to sand-lime brick. As for moisture and vapor permeability, it is only 0.5% maximum of the volume of insulation. Therefore, Penoplex Foundation does not provide for the additional use of waterproofing.
This material has high compressive strength. Among other things, it copes well with mechanical impacts. Thermal insulation is resistant to fungus, mold, rot and decay. The insulation does not emit toxic substances. It is quite easy to cut, attach with dowels and glue.
Penoplex Foundation is also good because it is resistant to temperature changes, therefore, it can be used over a wide range from -80 to +100 °C. You can purchase the material at an affordable price, and it is ready to serve for about 50 years.
The insulation protects the base well from freezing and extends the life of structures. It is not afraid of numerous cycles of freezing and thawing. The material acts as a barrier to ground and storm water, protects waterproofing from mechanical influences and presses it well. However, Penoplex Foundation has one drawback, which is its flammability. This insulation can be used for foundations that are installed on aggressive soils. Creating a layer of thermal insulation is very simple, so the help of qualified specialists is not required, this will save money.
Application of thermal insulation
Thermal insulation is used to reduce heat transfer wherever it is necessary to maintain a given temperature, for example:
In construction, thermal insulation is used for internal and external insulation of external walls of buildings, roofs, floors, etc. This reduces energy consumption for heating and air conditioning.
- In the production of clothing and footwear. Thanks to the thermal insulating properties of clothing, a person can spend a long time outdoors in extreme cold or in cold water without active movement.
- In housings or enclosing structures of refrigeration equipment and furnaces. Thanks to thermal insulation, it is possible to significantly reduce energy costs to maintain the required temperature inside.
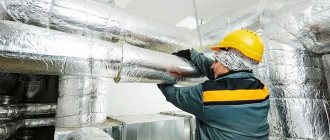
- Heating pipelines are surrounded with thermal insulation to reduce cooling or heating of the transferred coolant. Protects against corrosion. Thermal insulation has vapor barrier (not always) and noise protection properties.
- Insulation of containers, reservoirs, boilers.
- Insulation of pipeline fittings where removable thermal insulation structures are used.
First we count, then we insulate
The parameters necessary for making the right decision are defined at the beginning of the article and do not cause difficulties in calculations. The only catch is the thickness of the penoplex slabs. What should it be like? It is impossible to act at random in resolving such an issue. But there’s nothing difficult about it either. A page in a notebook, a pen, or a calculator will help you calculate the thickness.
We determine the required heat transfer resistance of the building envelope. You can find it in table 1b of SNiP II-3-79, having previously calculated the degree-day in a particular case, multiplying the number of days of the heating period by the room temperature.
For the sake of simplicity, we will assume the furnace firing duration is 180 days and the room temperature is 20 degrees Celsius. We get the number 3600. Using the table, we find the required coefficient for walls equal to 2.8, for floors – 3.7 (only part of the table is presented here to understand the order of calculations).
| Buildings and premises | Degree-day | Required heat transfer resistance of enclosing structures Rotr, m2 °C/W | ||
| heating season | walls | coverings and ceilings over driveways | attic floors, over cold crawl spaces and basements | |
| Residential buildings | 2000 4000 6000 8000 10 000 12 000 | 2,1 2,8 3,5 4,2 4,9 5,6 | 3,2 4,2 | |
7,2 8,2
6,4 7,3
The area of all materials that make up the enclosing structures, and, consequently, the insulated surface, is the same. Only the coefficients of specific thermal resistance of the materials used in the construction of the object differ.
| 2,8 3,7 | ||
| Material | Material thickness (mm) | Calculated thermal resistance |
(m2x°C/W)
It is necessary to calculate the heat transfer resistance value of each construction material by multiplying the coefficient by the layer thickness. All materials used in construction must be included in the calculations.
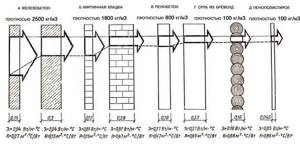
For example, a wall is made of white sand-lime brick 1.5 bricks thick and aerated concrete blocks.
In this case we get:
- for the brick part of the wall the value will be 0.16 units (0.44x0.38m);
- for the aerated concrete part - 0.22 units (1.1x0.2).
From the required coefficient of 2.8, we subtract the obtained values of the available materials. We get 2.42. We must obtain this required resistance to heat transfer when using insulation.
The calculated coefficient of resistivity of penoplex is known from its technical characteristics and is equal to 0.028 m2x°C/W.
By multiplying these numbers (2.42x0.028) we get 0.068 m or 6.8 cm. To insulate the walls, we will use an insulation thickness of 7 cm, combining slabs with a thickness of 40 and 30 mm.
In a similar way, you can calculate the required insulation thickness for any structure made of any material. Having made insulation based on calculations and obtained the necessary insulating effect, we save money without overpaying for:
- excessive thermal insulation with greater thickness;
- heating when it is insufficient.
Curtain facade
An equally common technology for insulating houses with penoplex is a curtain wall façade.
It has some important advantages over the “wet facade”:
- There is no wet work during the installation process, so insulation can be done at any time of the year;
- there is a large selection of facade finishing materials;
- the finish is more durable and durable.
As mentioned above, a “wet facade” using penoplex is not suitable for wooden houses. This raises the question: is it possible to insulate a wooden house with penoplex? I’ll say right away that such finishing is allowed, however, it also has its own subtleties, which we will get acquainted with below.
The technology for arranging a curtain façade also consists of several stages:
The procedure for installing a curtain façade
Preparation of materials
To insulate a house using this method, you will need the following materials:
- wooden slats or metal profiles and brackets;
- vapor barrier film;
- glue foam;
- protective impregnation for wood;
- finishing material - lining, vinyl siding, etc.
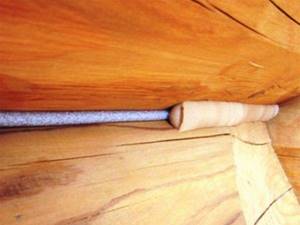
Insulation of the inter-crown seam
Preparing the walls
If the walls of the house are made of bricks, blocks or other similar materials, preparation is carried out according to the scheme described above.
If the walls are wooden, built from timber or logs, preparation is carried out as follows:
- the walls need to be wiped from dust and dirt, and then treated with protective impregnation;
- then it is necessary to insulate the inter-crown cracks by filling them with any suitable thermal insulation material.
Now the walls are ready for insulation.
Frame installation and wall insulation
There are several ways to make a frame.
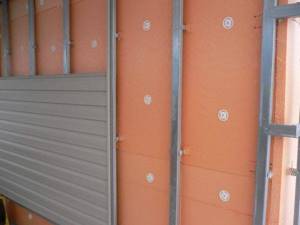
As an example, I will tell you how to make a structure on brackets:
- First of all, you need to mark the location of the racks in the form of vertical lines. The optimal distance between them is 50 cm;
- then, on the marked lines, brackets are attached to the wall, also in vertical increments of 50 cm. To fix them, you can use self-tapping screws or dowel nails;
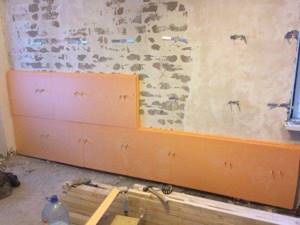
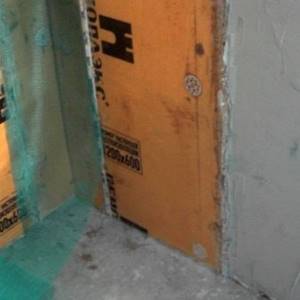
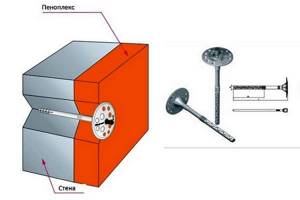
An example of attaching penoplex to a wall
- After that, we cover the walls with penoplex, which is strung on brackets, as in the photo above. It must be said that it is not necessary to use glue in this case, the only thing is that it is advisable to secure each slab with at least one dowel;
- If a wooden house is insulated with penoplex, there is no need to fill the cracks with foam, as this will improve the vapor permeability of the insulation, which is important for wooden walls. If the walls are brick or other material, the cracks should be filled with foam;
- if the house is wooden, the surface of the insulation must be covered with a vapor barrier film so that moisture does not get through the cracks onto the walls. You can grab the vapor barrier with umbrella dowels;
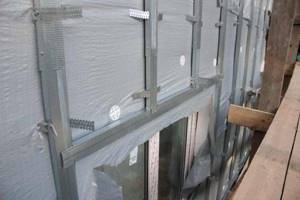
Ready metal frame
- Then metal racks or wooden beams are fixed in the brackets. During the installation process, it is necessary to ensure that they are all installed in the same vertical plane.
This completes the insulation and installation of the frame. It must be said that in the case of insulating a wooden house, you can first sheathe the walls with extruded polystyrene foam, and then attach the sheathing slats to them with self-tapping screws directly through the insulation.
Covering the frame with siding
Finishing
The final stage is finishing, which does not contain any special features, so let’s consider this procedure briefly using the example of installing vinyl siding:
- a starting profile is installed around the perimeter of the house in a horizontal position;
- Next, corner profiles are installed on the outer and inner corners;
- then the first row of vinyl siding is installed, which is connected from below with a hook to the hook of the starting profile, and from above is attached to the frame with self-tapping screws;
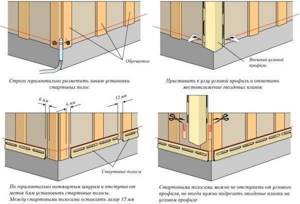
Installation diagram of the starting profile and corners
- the second row from below clings to the hook of the first row, and from above it is fixed in the same way with self-tapping screws. The entire frame is sheathed according to this principle;
- before installing the last row, the finishing profile is installed, after which the top row is connected to the penultimate one and tucked into the profile;
- At the end of the work, additional elements are installed - slopes, ebbs, etc.
The sheathing of the frame and lining will be done in approximately the same way, the only thing is that the boards are connected to each other using a tongue/groove locking connection. In addition, corner trims are installed after sheathing the frame, and not before, as is the case with vinyl siding and other similar materials.
This, perhaps, is all the information regarding insulating a house with penoplex, which I wanted to share with you.
What is important to know for competent calculations
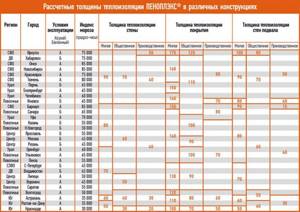
The thermal insulation material used for walls, due to its low thermal conductivity characteristics, replaces the lack of thermal resistance to ensure certain standard values. These indicators are established by current SNiPs. They will differ depending on the climate of certain regions.
So, it is worth considering some features:
- the required value can be identified using a special map - diagram. At the same time, three values are indicated for each region, depending on the types of surfaces being calculated;
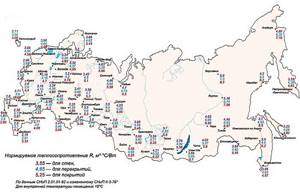
Schematic map for determining the required value of thermal resistance
- the thermal conductivity coefficient of penoplex is already included in the calculation program and does not need to be specified specifically;
- It is important to enter the thickness of the surfaces for insulation, as well as indicate what they are made of. It is taken into account that each material has its own thermal characteristics;
- An important parameter is the cladding of the walls outside. If ventilated decorative facades are used, then such a layer does not affect the quality of wall insulation. When using wet facade technology with reinforced plaster and external decorative cladding, the thermal resistance indicator is taken into account. Also taken into account is the finishing, which is made from some version of sheet cladding in the form of panels. But at the same time there should be no space between it and the penoplex;
- Interior decoration is also important. In this case, the nature of the finish matters. A small layer of putty and painting the walls or wallpapering them will not bring much benefit. But the use of warm plasters, cork cladding or wood cladding can change the thickness of the wall insulation, so they must be taken into account when calculating;
- the result is given in millimeters. It will need to be correlated with the standard thickness of the Penoplex material.
If the value given by the program is negative, then external insulation is not needed.
The technology of insulation using penoplex is not so complicated. But even this requires compliance with all recommendations. It is better to find out more information about the nuances of this technology.
Related article:
Insulating the facade with penoplex: technology for performing the work. In the article we will consider what types of penoplex there are, how insulation occurs, as well as the pros and cons of this facing material.
Save time: selected articles delivered to your inbox every week
The use of penoplex as insulation
Repairing the building and insulating the facade with penoplex is best done in the summer season. In hot weather conditions, wooden surfaces dry faster. Drying the material in this way prevents unwanted moisture from appearing in the future.
Houses built from wood are able to retain heat well inside. Therefore, external wall insulation is required in cases where:
- the old house is dilapidated and the wood lets in a stream of cold air;
- the joints of the walls were in poor condition;
- the logs were cracked.
Since wood is a material that requires special processing, before insulating it, you will need to carefully examine the total surface area of the walls.
This involves carrying out the following types of work:
- cleaning the surface from the old layer of paint;
- checking the quality of joining logs and filling potholes;
- leveling those parts that protrude beyond the surface;
- impregnation of wood with a special composition.
Wood should be processed using special antiseptics of high quality. Otherwise, penoplex will not be hygroscopic. The foam insulation used for the walls of a wooden house must comply with modern standards. This means that the thickness of the material layer should be 5-30 mm, which should provide the maximum level of thermal insulation.
Penoplex size matters
A well-known saying when installing thermal insulation should be: “Count seven times, insulate once.” The meaning of the saying is clear: “Think more than once so that you don’t have to redo it.” Before you start insulating, you will need to climb with a tape measure and ruler, work with paper, pencil and calculator. Before starting work you need to know:
- insulation area;
- insulation thickness;
- number of slabs (packs);
- mass of adhesive composition;
- number of disc dowels;
- time to carry out work;
- and, of course, the cost of materials and labor.
How many positions did you get? Seven. So the saying is true. Despite the importance of the remaining initial data, the dimensions of the penoplex are still the basis for calculations.
Design and principle of operation of a three-way valve
The design of a three-way mixer includes the following elements:
- Sealed housing with three T-shaped pipes.
- Valve with internal T- or L-shaped channels. Most often, the bolt mechanism has the shape of a ball, less often a cone or cylinder.
- Stuffing box.
- A rod that transmits movement to the bolt mechanism.
- Control unit - handle (butterfly or lever) or drive.
The operating principle of a three-way valve is based on the rotation of the valve inside the body. An L- or T-shaped stroke drilled into the valve serves to pass flows. By turning, the shutter either opens all the holes in the pipes or closes one of them.
Let's consider the principle of its operation using the example of a heating circuit. A three-way valve is installed in the circuit so that one of its pipes is connected to the pipeline coming from the boiler.
The pipe located in the middle is connected through a bypass connection to the “return”, where the coolant has a lower temperature. The third pipe connects to the pipeline going to the radiators.
The shutter position is set by turning the handle:
- In the first position, transported flows are mixed, simultaneously coming from the circuit supplied from the heat generator and from the “return” circuit.
- In the second position, only hot coolant from the boiler is supplied to the heating circuit.
- In the third position, the flow of hot coolant is blocked, only cooled water from the return circuit is supplied to the system.
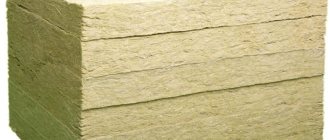
Types and properties
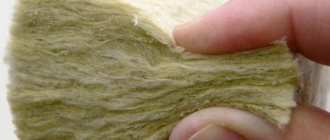
Penoplex is a popular and in demand material. It is represented by many modifications, each of which has its own markings and designations. Currently, there are several varieties of this thermal insulation coating.
"Wall"
The density of such extruded polystyrene can range from 25 to 32 kg/m3. This heat-insulating material is perfect for installation on external and internal floors. In addition, penoplex “wall” can be used in the design of partitions and plinths. Thanks to this material, the sound insulation characteristics of the room are increased.
"Foundation"
No less popular today is a material such as penoplex “foundation”. Its density varies from 29 to 33 kg/m3. You can safely use this coating if you want to insulate the foundation and upper part of the basement. This material is highly dense and water resistant. In addition, this insulation is often used for thermal insulation of septic tanks that have a significant depression.
"Roof"
Another common and popular material is foam roofing. Similar products are produced directly for insulating rafter or flat roof types. Also, material from the “roofing” category can be used to insulate attic structures. The density of this brand, as a rule, ranges from 28 to 33 kg/m3. This material is lightweight and does not place a large load on the roof sheathing.
"Comfort"
Comfort products are in great demand today. Such materials have a density of 25-35 kg/m3. They are used to insulate walls in apartments. For example, this could be the area of a balcony or loggia. It is acceptable to use such a coating in baths and saunas.
"Geo"
Penoplex "geo" is an alternative to materials belonging to the "foundation" class. Such coatings are more often used in industrial and civil construction work. It is worth noting that slabs of this insulation are often used for cladding floors, foundations and other similar
"The basis"
Penoplex from this category has an optimal density that allows it to be used in a wide variety of construction work. Such insulation is laid on the floor, walls and roof bases. Penoplex “base” is popular due to its durability and versatility of use - it is often used in both civil and industrial construction.
"Pitched roof"
Penoplex “pitched roofing” was developed specifically for roof insulation. This coating is ideal for installation on the foundations of low-rise buildings. As a rule, this thermal insulation material has a thickness of 10 and 15 cm.
"Facade"
The name of this type of penoplex speaks for itself. It is used for insulation of plinths, facades, external parts of ceilings and partitions. This material has a special milled surface on which plaster can be applied much easier and more reliably. The thickness of the penoplex “facade” is 20-100 mm.
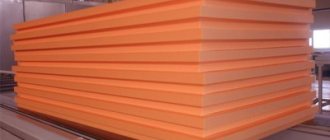
Production technology and scope
The specifics of penoplex manufacturing are aimed at improving the strength and technical characteristics of the material. It is given special properties by the process of extrusion from raw materials in special furnaces.
First, polystyrene granules are mixed with a foaming agent under conditions of high humidity and temperature. The catalyst is a composition of carbon dioxide (CO2) and freon. The polystyrene foam composition is melted in ovens and resembles lush cream.
Then, through the extrusion installation, the substance begins to be squeezed out, the freon gradually evaporates, and the cells are filled with simple air.
Currently, heat insulation is in demand in different climatic conditions for insulation and protection:
- foundations and walls of low-rise buildings;
- balconies and loggias;
- pools and wells;
- ceilings and basements;
- floors and ceilings;
- water supply systems;
- airfield runways;
- railways and roads;
Penoplex of various categories is widely used in the process of reconstruction of buildings due to its high resistance to environmental changes and chemical influences. The material is used to make sandwich panels.
Types of penoplex for insulating houses
Since 2011, the production of 4 types suitable for the construction and insulation of wooden houses has been launched. As a result, the release of this insulation provides the consumer with the opportunity to choose the most suitable option from the following types:
- "Fundamental";
- "Comfort";
- "Wall";
- "Roof";
- "Industrial".
The types of penoplex listed above have different densities. The value of this parameter is in the range of 25.0-45.0 kg/m³. Each of the listed types of material has its own purpose, which depends on the name.
For example, penoplex for the foundation has a density of 29 kg/m³. When purchasing a roofing insulator, you must keep in mind that its density is 28.0-33.0 kg/m³. Insulation of the “Wall” type allows for internal and external insulation of the surface; it has a density of 25 kg/m³.
When choosing the universal penoplex “Comfort”, you should take into account that it is often used for thermal insulation of one-story wooden buildings. It is characterized by a density from 25.0 to 35.0 kg/m³. The density of industrial insulation is 45.0 kg/m³, it has increased strength. The scope of its use is the construction of roads and insulation of industrial pipelines.
Dimensions and weight, quantity calculation
Penoflex thermal insulation boards can be of different thicknesses, so the packaging can have different sizes and contain a different number of sheets. It is also necessary to take into account that the dimensions of the slabs are indicated without taking into account the tenons/locks.
| Name and thickness | Dimensions (L/W) | Amount in a package | Insulation area per package | Packaging volume |
| Comfort 20 mm | 585*1185 mm | 18 pcs | 12.48 m2 | 0.273 m3 |
| Comfort 30 mm | 585*1185 mm | 12 pcs | 8.32 m2 | 0.2704 m3 |
| Comfort 40 mm | 585*1185 mm | 9 pcs | 6.24 m2 | 0.2493 m3 |
| Comfort 50 mm | 585*1185 mm | 7 pcs | 7.69 m2 | 0.2429 m3 |
| Comfort 100 mm | 585*1185 mm | 4 things | 2.77 m2 | 0.2772 m3 |
| Foundation 50 mm | 585*1185 mm | 7 pcs | 7.69 m2 | 0.2429 m3 |
| Foundation 100 mm | 585*1185 mm | 4 things | 2.77 m2 | 0.2772 m3 |
| Pitched roof 100 mm | 585*1185 mm | 4 things | 2.77 m2 | 0.2772 m3 |
| Wall 50 mm | 585*1185 mm | 8 pcs | 5.55 m2 | 0.2776 m3 |
There are two methods for calculating the number of packages: using the volume or area of the package:
If the number of packages is not whole (most likely this will be the case), some surplus will be created. If the surplus turns out to be large (as in the example - more than half of the slabs turn out to be unnecessary) and you have nowhere to use it, check to see if the seller sells incomplete packages. In this case, the calculation will be a little more complicated. You should estimate how many slabs you need in addition to the whole packages. For this:
With such an accurate calculation, it is better to take a small supply - one or two slabs. In case there was a mistake somewhere in measurements or calculations, somewhere the edges became wrinkled and other unforeseen cases.
Features of the heat insulator
The production of penoplex for wall insulation includes the following technological operations:
- Granules of the material are loaded into an extruder, where they are heated to 130-140°C;
- Foaming agents – porophores – are added to the portion;
- The thickened mass is squeezed out of the extruder onto a conveyor belt, after which it is cut into dimensional slabs;
The mixture of semi-finished penoplex for external wall insulation consists not only of polystyrene foam and foaming agents - it also contains antioxidants designed to prevent thermal oxidation during processing and damage to the integrity of the insulation during operation, fire retardants to increase fire resistance, as well as antistatic, light-stabilizing and modifying additives that protect thermal insulation material from the influence of external factors.
The main positive parameters of the material:
- Low moisture absorption of expanded polystyrene is the main advantage;
- The minimum coefficient of thermal conductivity, which allows, when calculating the thickness, to choose thin slabs;
- High vapor permeability of penoplex: a 20 mm thick slab replaces one layer of roofing material, but at the same time also insulates the working surface;
- High compressive strength and other mechanical loads. The extrusion method in the production of thermal insulation allows the cells of the material to be evenly distributed, improving the quality of density and strength;
- Easy and quick installation of insulation due to its low weight and good density;
- Long service life of extruded foam – up to 50 years;
- Excellent sound insulation and minimal chemical activity.
Features of penoplex
Penoplex size range:
- Slab length – from 120 to 240 cm;
- Slab width – 60 cm;
- Thickness – from 2.0 to 12.0 cm.
Disadvantages of extruded foam:
- Flammability of groups G3-G4, formation of toxic smoke during fire;
- Polymer additives in the composition of the material can evaporate toxic substances when exposed to sunlight. Therefore, the optimal use of penoplex is external, for example, insulation of brickwork;
- Petroleum products and some organic substances can deform penoplex, the thickness of which can be any. These are substances such as: formaldehyde and formalin, acetone and methyl ethyl ketone; liquids containing ethyl, benzene components, polyester resins, synthetic paints and fuels and lubricants.
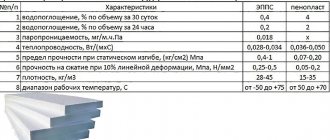
Performance characteristics of penoplex
Thermal conductivity properties determine the quality of penoplex insulation. The higher the thermal conductivity coefficient, the fewer centimeters the layer of insulating material will be. Laying the insulator from the inside or outside depends on the characteristics of vapor permeability and strength (density). You can compare the parameters of popular materials for insulating floors and other surfaces by studying the data in the table:
Comparison of thermal insulators
From the table it is clear that foam plastic thermal insulation has an average thermal conductivity value, which is slightly less than that of polyurethane foam, mastics and roll materials. But you can choose penoplex only because the layer of such liquid insulation does not have joints and seams, like slab insulation, no matter how many layers are applied to the surface.
Any thickness to choose from
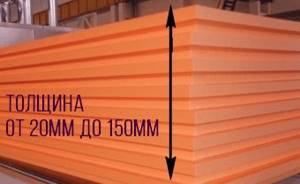
The most important indicator of penoplex is thickness. The range of thicknesses of mineral insulation does not pamper the consumer and greatly limits his choice. The lack of materials of the required thickness on sale often dooms to forced overconsumption of material with inevitable material losses. After all, it is impossible to put a thinner layer of insulation; there will not be the required insulation coefficient.
Insulation materials made from extruded polystyrene allow you to “go wild” and are available for sale in slabs of various thicknesses, which allows you to set a thickness close to the calculated one.
A foam board with a density of up to 35 kg/m3 comes in a thickness of 20; thirty; 40; 50; 60; 80; 100; 120; 150 mm. Penoplex sheets with a thickness of 40; 50; 60; 80; 100; 120; 150 mm have a density of 45 kg/m3.
The presented range of thicknesses with the same length and width allows you to combine different installation options to achieve maximum insulation efficiency. The required layer of insulation can be easily obtained by adding two layers of insulation, especially since this installation option is recommended by the manufacturer. Materials with a thickness of 20 and 30 mm are used mainly for internal thermal insulation, which allows saving the internal volume of insulated rooms. It should be remembered that the selected size of insulation does not have an L-shaped protrusion.
Types of fasteners for thermal insulation.
The mushroom dowel for attaching insulation can be plastic or steel. Its type depends on the insulation with which builders have to work. Also, dowels differ from each other in the type and quality of production, and in their configuration. The design may include a thermal head.
Features of plastic fasteners
There are cone-shaped holes on the surface of the umbrella. This design feature provides additional adhesion to the material. For installation of non-solid materials, nylon fasteners are used, which are made from high-strength polypropylene, nylon, and polyamide.
The features of such fungi include:
- lack of response to temperature changes;
- low cost;
- reduced thermal conductivity;
- impeccable stability in extremely harsh conditions;
- long service life due to the absence of rot and rust;
- load bearing capacity of 400 kg/m2.
Plastic fungi are widely used for insulating walls made of brick and concrete.
Metal fasteners
The internals of the metal fasteners are made of steel. The sleeve used is polypropylene, at the end of which there are spacers. With this type of fastener, a high degree of load is allowed. Telescopic fasteners TechnoNIKOL are used for arranging the facade. The disadvantages of the material include:
- high price;
- the occurrence of condensation at the entry point of the metal rod;
- possible rust (metal parts come into contact with moisture, rust may appear on the plaster).
Thermal Head Fasteners
It is a metal rod, which is coated with polyamide near the cap. This plastic part prevents condensation from accumulating at the fastening points, thereby preventing rust from appearing on the plaster.
These devices are mainly used for insulating wooden houses. The advantages of these fungi are similar to the positive properties of plastic and metal fasteners. The disadvantage of the product is the high price, which surpasses everything in this segment.