Description, advantages and disadvantages
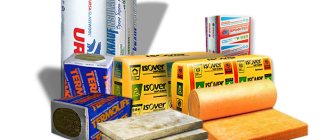
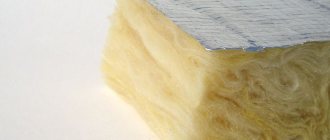
Penoplex is a thermal insulation material made on the basis of polystyrene foam by the company of the same name.
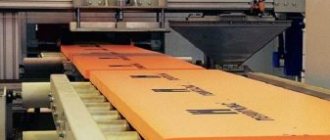
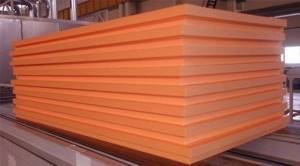
In its production, gas-free technology is used, unlike foam plastic. First, the raw material in the form of a composition of gas-forming filler and primary polystyrene is passed under high pressure through filters in order to obtain a spongy structure, then the extruded mass is crushed into sheets of the required thickness using roller equipment, and finally cut into slabs of the required size.
The material has a number of advantages:
- strength;
- good sound insulation;
- increased density;
- environmental safety (penoplex does not emit harmful toxins and does not contain components hazardous to health);
- inability to absorb moisture, which is a problem when insulating with mineral wool;
- long service life (40-50 years);
- resistance to rotting and corrosion;
- light weight and ease of installation, unlike insulation with stone wool;
- resistance to temperature changes (retains properties from -50 to +75°C).
In addition to the advantages, the material has several disadvantages:
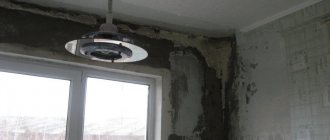
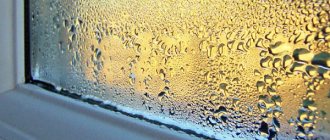
- low level of vapor permeability;
- changes in properties under the influence of ultraviolet radiation, which requires additional finishing;
- ability to easily ignite and melt (flammability class G3);
- susceptibility to rodent attacks.
The cost of penoplex cannot be called low relative to other building materials with a similar purpose, for example the same foam. This is the main limiting factor in the popularity of penoplex as facade insulation.
Read about facade insulation with foam plastic here
Methods for attaching insulation to the wall
Penoplex can be attached to the wall in several ways:
- on the dowel . Fastener with a large head. Used to increase the adhesion of the insulation to the wall, especially if installation of additional materials on the insulation is provided;
- on glue . They are applied pointwise to the slabs and glued to the wall treated with an adhesive composition. You should carefully choose the adhesive solution, as some substances destroy the insulation;
- on polyurethane foam . Foam can be an additional fastening of panels when fastening them with dowels;
- self-tapping screws Not a very suitable method, since when they are located inside the wall, cold bridges are formed, which reduces the thermal insulation properties of the material.
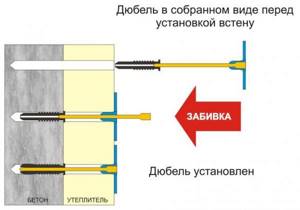
Fastening with dowels
The most common method of fastening is installation with an adhesive composition and fastening with dowels , which ensures the greatest adhesion and fastening strength.
How to choose?
When choosing a material for insulating a facade, you first need to choose the right thickness. To do this, you need to consider the following factors:
- climatic conditions of a particular region (in warm conditions it should be minimal, and vice versa);
- the amount of precipitation (the requirements for the level of moisture resistance depend on this indicator).
When choosing penoplex, it is recommended to give preference to trusted manufacturers, since material of dubious origin probably contains a large number of substances harmful to health.
Companies produce different types of penoplex, the characteristics of which are determined by the purpose of the slabs. In this regard, you need to purchase material recommended specifically for facade insulation. Read product labels carefully!
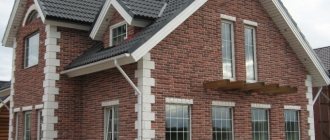
Calculation of material for insulating a brick house
In order to properly purchase insulation, first determine the minimum layer of insulation. It depends on climatic conditions, brick characteristics, thermal protection area and is determined by the formula: Sp= (Rq - S1/ Kt.s.) x Kt.u., where :
- Sp - minimum thickness of the insulation layer in m;
- Rq - temperature coefficient for climatic zones, Rq = 3.3 m2 * K / W for the city of Kerch;
- S1 - brickwork, m;
- Kt. With. — thermal conductivity coefficient of the wall material, for solid red brick, Kt. With. = 0.81 W / (m * K);
- Kt.u. — coefficient of thermal conductivity of the insulation material, for Penoplex Kt.up. = 0.04 W / (m * K).
For example, for the city of Kerch, the thickness of the wall is 1.5 bricks - 380 mm, density 1800 kg/m3, plan 10 X 10 m and height 3 m, the insulation thickness will be equal to SP = (2.8 - 0.380 / 0.81.) x 0.04 = 10.26 cm.
Next, select packaging with a thickness of Penoplex slabs equal to 100 mm:
- number of slabs per package - 4 pcs.;
- area of slabs in a pack - 2.8 m2;
- number of packs with a safety factor of 15%, 120/2.8/0.85= 49 packs.
For a more accurate calculation, you will need to remove the area of the glazing and door blocks.
Detailed instructions for those who want to insulate themselves
The process of insulating the facade of a building using extruded polystyrene foam is quite simple. If all installation rules are followed, you can insulate the walls on your own in the shortest possible time.
Preparatory work and necessary tools
To ensure strong adhesion of the material to the surface, it is necessary to carry out high-quality preparation. This work includes not only processing the wall itself, but also protruding elements (window sills, ebbs, etc.). Preparatory work includes:
- Facade cleaning. At the same time, a layer of old finishing material is removed, as well as various contaminants: dirt, stains, dust, etc.
- Elimination of harmful microorganisms (mold, mildew, etc.) from the surface. For this purpose, antiseptic agents are used.
- Processing of metal objects existing on the facade. Produced with an anti-corrosion compound.
- Checking the evenness of the wall. Only small deviations are acceptable; unevenness exceeding 2 cm per 3 m2 requires leveling.
- Prime the prepared surface to ensure maximum adhesion.
In situations that require leveling the wall surface, perform the following steps:
- Plastering. Allows you to achieve perfect smoothness. The layer of plaster does not have a negative impact on the properties of penoplex.
- Use of insulation boards of various thicknesses. Used in case of large differences. A thinner insulation is placed on the protruding surface. However, it should be noted that the level of thermal insulation in such areas will be lower.
- Installation of special gaskets for alignment. Such a procedure cannot be called simple; its implementation requires the appropriate skills.
For work related to wall insulation, you will need the following tools:
- tape measure and steel square;
- aluminum rule and level (2 m or more);
- masking tape;
- steel brush, hacksaw and hammer-pick;
- drill and construction mixer;
- metal scissors and construction knife;
- hammer drill and screwdriver with attachments;
- stainless steel grater and set of spatulas;
- sanding block;
- rollers, brushes, trowel.
Methods
To insulate the facade with penoplex, several mounting options are used:
- sheets of extruded polystyrene foam are fixed with mastic or glue;
- special polyurethane foam is used;
- the material is secured with dowels.
Each method has its own characteristics. Professionals often use several methods simultaneously, which ensures reliable fixation of the slabs. For example, glue is used first, and then dowels are used. However, if you comply with all the requirements during the application of each method, the strength of the material will be guaranteed, capable of withstanding an additional layer of finishing, which will eliminate the need for additional fixation.
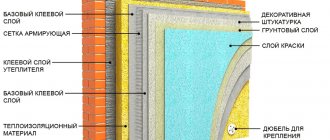
Description of technology
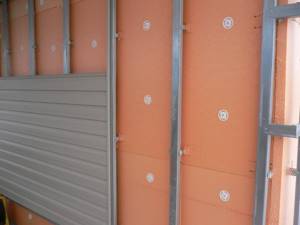
Installation of penoplex on facade walls includes several stages:
- Fastening the base profile. Required as a support for slabs. The thickness of these two elements must match each other.
- Preparing the adhesive base. Prepare according to instructions.
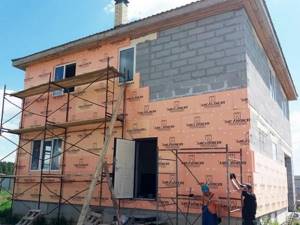
- Sheathing with slabs. The adhesive composition is applied not only in their center, but also along the edges of the material. Work begins from the lower section of the building. For cladding door and window openings, only solid sheets are used.
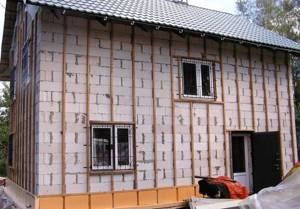
- Fastening the slabs using metal or plastic dowels. This happens 2-3 days after the glue has completely dried.
- Processing of joints. They are filled with polyurethane foam or insulation.
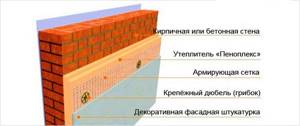
- Performing reinforcement. For this, reinforcing mesh is used.
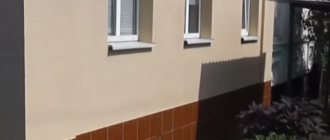
- Carrying out finishing work. Usually decorative facade plaster.
Important! Installation of penoplex under plaster must be carried out in such a way that the surface is perfectly smooth. Otherwise, after finishing work, all errors will be noticeable.
Features of the technology for performing work under plaster or siding
Insulating walls with penoplex under siding or plaster requires compliance with a number of rules:
- mandatory surface preparation, including leveling and treatment with antiseptic agents;
- installation of a base profile for fastening penoplex in order to create a perfectly even layer of insulation;
- maintaining the interval between sheets (2 mm);
- high-quality fastening using special dowels or adhesive.
Is it possible to insulate with penoplex under siding?
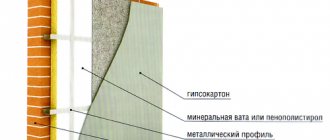
Before making a decision, you need to understand the capabilities of extruded polystyrene foam. Siding can be laid on polystyrene foam only if the thermal insulation layer can withstand the additional load. With the traditional approach, the installation of siding panels is carried out according to three schemes:
- On a wooden frame with a vapor barrier laid under the grating, on top of which a horizontal sheathing is sewn;
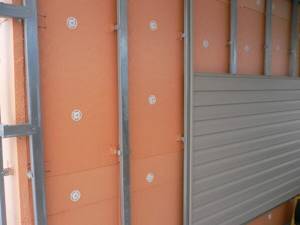
- On a metal frame. A vapor barrier is installed directly on the wall, thermal insulation is laid on top, and all this is covered with waterproofing. Next comes the installation of metal supporting structures on the insulation, and then it is possible to lay siding panels;
- On cast, perfectly smooth walls, installation of siding can be carried out after laying a vapor barrier or waterproofing and insulation. Next comes the installation of the slats, and only on them can the siding be attached.
The first installation case is the most common, the second is used if installation is planned on very curved walls, sometimes even with a negative slope. The third is the rarest, since perfect walls are rare.
Cladding with siding panels is classified as a passive type, which means that the material, after installation on the wall, does not form a sufficiently rigid coating with a smooth and flat surface. Therefore, in all of the above cases, the siding was laid on a supporting frame, which ensured reliable retention of the weight of the cladding and compensation of the load from gusts of wind and the mass of frozen snow. Moreover, a ventilation gap is left between the insulation layer and the siding panels, thanks to which condensation can be removed.
"Dry" facade
The “dry” (hinged) facade is more popular than the “wet” one due to the fact that it can be installed at any time of the year, and the finishing will last longer.
To insulate a house using this method you will need:
- metal profiles and brackets (wooden slats are also suitable);
- vapor barrier film;
- impregnation for wood;
- glue foam;
- material for finishing the facade (lining, siding, etc.).
Preparing walls for insulating a brick house with penoplex from the outside is carried out according to the scheme described above. Wooden structures are additionally treated with protective impregnation, and the inter-crown cracks are filled with a suitable thermal insulation composition.
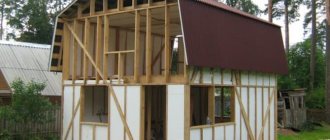
Installation of insulation
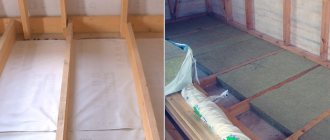
Insulating a wooden house from the outside with penoplex begins with installing the frame. First, you need to apply vertical markings along the walls for future racks. The distance between them is 50 cm. The brackets are installed according to the markings. A distance of 50 cm is also maintained between them.
Penoplex sheets are strung directly onto the brackets. That is, the metal must pass through the material. If penoplex insulation is carried out on the outside of a wooden house, then the gaps between the sheets of expanded polystyrene are not filled with foam. This is necessary in order to maintain the vapor permeability of the insulation. When work is carried out on brick and other walls, the cracks must be filled with foam.
After stringing the penoplex, the material is covered with a vapor barrier film if the installation is carried out in a wooden house.
At the end, vertical posts are fixed to the brackets. They must be kept in the same plane.
Attention! You do not need to use glue to fix the penoplex to the wall.
Working with expanded polystyrene does not require special knowledge and skills from the installer. To understand the process of applying the material to the walls, just watch the video below before insulating the outside of the house with penoplex with your own hands:
Preparatory work
Having analyzed the advantages and disadvantages, we will consider the stages of preparatory work for external insulation:
- The soil around the house is selected, the depth of which should be equal to the depth of the foundation. Next, for ease of installation, a trench about a meter wide is dug.
- The base is cleaned of dust and dirt.
- If necessary, the surface of the base is leveled using a cement mixture.
Next, waterproofing is performed with roofing felt. However, you can get by with a less expensive method, namely, priming with bitumen mastic. The mastic is applied in 2 layers, with the second layer applied only after the first has completely hardened.
Features of strengthening insulation on the base of a building
The technology of insulating the base with penoplex provides two options for its fastening (depending on whether there is a risk of movement of the load-bearing base and the base of the building), namely:
- If there is a risk of movement, the EPS is fixed to a vertical surface using special plastic dowels (fungi). The bushings used for fixation must be plastic or basalt.
- In the event that the base and foot of the structure are motionless, you can attach slabs of insulating material using glue or polyurethane foam.
When working on creating a wet facade, such fastening must be duplicated with plastic dowels.
The zero vapor permeability of EPS makes it possible to apply the next finishing layer to the insulation layer without a ventilation gap. There are no words, choosing which penoplex to insulate the base with is not a problem, the main thing is to prevent direct sunlight from hitting the penoplex, as this will lead to its destruction (only 1 season is enough).