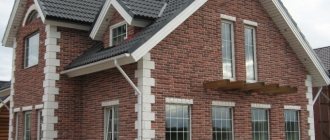
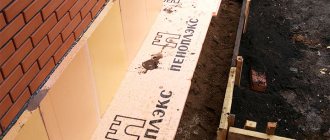
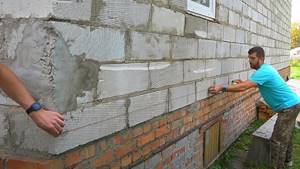
When insulating the walls of a house, owners expect that the material used will last no less than the period specified by the manufacturer. Products made from polystyrene foam retain heat well, but are easily destroyed by constant exposure to sunlight or attacks from those who like to chew on something. To protect thermal insulation, different methods are used. Penoplex plaster is one of the most popular.
Expanded polystyrene and penoplex what is the difference
The invention of polystyrene marked the beginning of the creation of new building materials used for insulating building structures. One of the first to appear was polystyrene foam, in its abbreviated form called polystyrene foam. Then penoplex (or penoplex) was created.
These insulation materials are made from polystyrene, but the production technologies differ:
- foam is formed by treating polystyrene granules (with or without pressing) with steam, under the influence of which the granules swell (reaching sizes of several mm) and stick together;
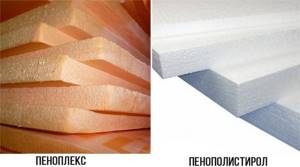
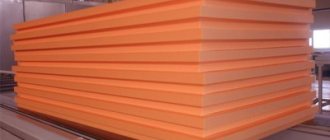
- to create penoplex, a molten foam mass with gas-forming catalysts and modifying additives is pressed through a forming hole (extruded) and pressed; the material is a hardened foam with air pores usually up to 1 mm (0.1-0.2).
Penoplex is extruded polystyrene foam. Both materials differ in a number of criteria: density, thermal conductivity, strength, water absorption.
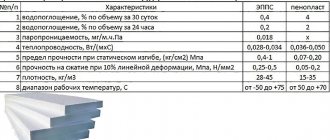
To make it clearer, the characteristics are shown in the table.
| Comparison criterion | Styrofoam | Penoplex |
| Substance – polystyrene polymer, formula (C8H8)n | ||
| Production | Steam processing, pressing | Foaming, extrusion, pressing |
| Density | Up to 25 kg – 1 m3 | m3 weighs up to 47 kg |
| Thermal conductivity (thermal conductivity coefficient) | Gaps between granules reduce thermal insulation properties - 0.037 to 0.043 | Thermal conductivity is almost a quarter lower - 0.03 W*m*0С |
| Moisture permeability (water absorption) | 2% | 0.4-0.2% |
| Vapor permeability (vapor permeability value in mg/m×h×Pa) | small | Almost zero, 0.007 |
| Strength: 1 – compression, MPa, 2 – bending, MPa 3 – modulus of elasticity, MPa | Brittle, does not resist bending 1 – up to 0.16 2 – up to 0.25 | 1 – from 0.2 to 0.5, 2 – from 0.25 to 0.7, 3 – up to 18 |
| Durability (when protected from UV rays, birds, precipitation) | 10-40 years | At least 50 years |
| Operating temperature, degrees Celsius | -60 to +80 | -50 to +75 |
| Price | below | |
Both types of materials are produced in sheet form, which can be easily cut even with a knife.
Is it possible to use penoplex for walls?
When visiting a construction market, you can find penoplex foam for foundations, walls, floors, ceilings, etc. on the shelves. Having succumbed to advertising, it is easy to go on unreasonable expenses. It is more rational to delve deeper into the issue.
The high cost of penoplex dictates rational areas of its use as insulation for building structures. If the price does not matter for the home owner, you can use penoplex indefinitely, however, without looking at the builders’ assurances that PP sheets 2-3 cm thick will block the cold well.
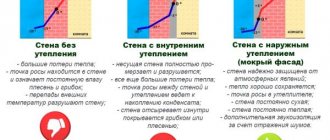
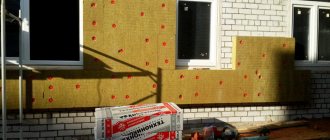
To insulate the facade of a house, it is more profitable to use polystyrene foam.
The effect of using thin-layer insulation is minimal and hardly noticeable, and the areas of facades covered with the wet facade method are significant. Unjustified overspending occurs. Often this is money thrown away. In many cases, it is more profitable to use polystyrene foam and then also protect it with plaster, because the same insulation should save the owner’s money.
Another reason to abandon penoplex is the operating conditions of the wall materials. Concrete walls can withstand conditions of complete vapor barrier quite undamaged. Brick and wooden walls, unable to remove the moisture that collects in the pores, begin to collapse faster. Consequently, for the sake of preserving the main load-bearing structures of the house, the use of foam plastic and mineral wool is more justified.
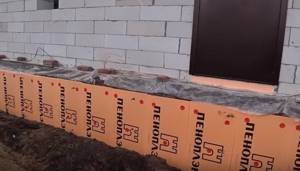
Penoplex is great for foundation insulation
Penoplex has its own areas of application. Thus, penoplex sheets are suitable for insulating loggias or foundations with shallow depths, as well as insulating the soil under the blind area around the house.
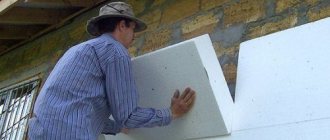
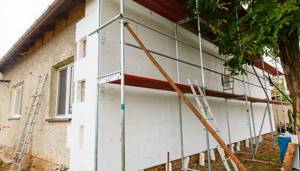
If you succumb to the assurances of the builders and decide to insulate the walls with penoplex, then you need to reliably protect the cladding from external influences. For this purpose, polystyrene foam plaster is used.
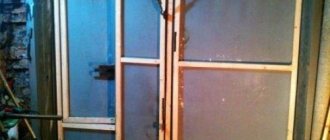
Briefly about the curtain façade
If you are not confident in your plasterer skills, you can cover the house with siding. The technology is called a ventilated or curtained façade.
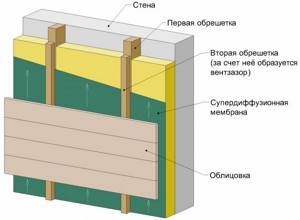
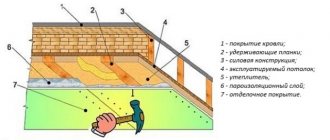
In this case, for insulation you will need to form a so-called “pie”.
The order of layers from the load-bearing wall:
- vapor barrier membrane layer;
- load-bearing sheathing;
- insulation for home;
- siding.
Many online resources recommend laying a layer of waterproofing before installing siding. We do not recommend doing this for reasons of saving money. This approach is explained by the properties of the material:
- it practically does not absorb water;
- there are no conditions for the growth of fungus or mold on the surface.
A gap of 1–2 cm is left between the insulation layer and the finishing, which will serve for ventilation and timely evaporation of condensation and moisture seeping through the siding sheets.
Why plaster
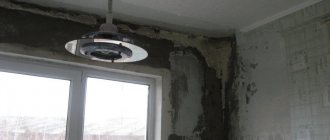
Opened penoplex is exposed to the following dangers:
- Birds love to peck, and rodents love to sharpen their teeth;
- exposure to UV rays (when insulating facades);
- mechanical shock or abrasion.
To protect sheet insulation from them, different methods are used:
- covering with siding, clapboard, other sheet material;
- finishing with mastics;
- coloring;
- plastering.
Penoplex easily withstands proximity to many chemicals, including any plaster.
Therefore, to answer such questions: is it possible to putty penoplex at all? And is it possible to plaster penoplex? – you can answer in the affirmative.
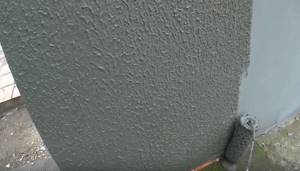
Thus, correctly executed façade plastering using penoplex will not only protect the insulation, but will also make the walls monolithic, smooth and decorate the building. By using decorative plastering, you can make your home unique.
Specifics of different types of finishes
Depending on the location of the insulated structure of the house, penoplex plaster has nuances. First of all, this concerns what can be used to finish penoplex.
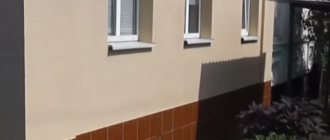
Base finishing
Since the plinth is part of the building structure, installed directly on the foundation, it especially needs protection from moisture. Therefore, additional measures are taken to protect against water ingress, but only those that prevent the occurrence of cold bridges.
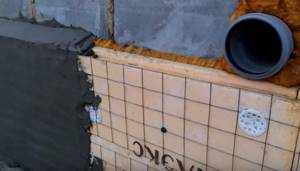
Plastering the base on polystyrene foam is usually done in a thicker layer, because:
- a) the likelihood of strong mechanical impacts on the base is higher;
- b) often for the base the finishing is done with cladding: stone-look tiles or pebble plaster (heavier).
When using heavy cladding, reinforcement is made with metal mesh, which also requires a thickened plaster coating. Only façade plaster over penoplex is used.
How to plaster penoplex indoors
If for a number of reasons it is impossible to perform penoplex insulation outside the house, it is performed indoors. Here polystyrene foam will “eat up” more area than polystyrene foam. To plaster penoplex indoors or on warm loggias, you can use gypsum plaster to protect penoplex.
The sequence of performing these works is similar to performing penoplex plaster on the outside, however, the installation of a base profile is not required. In addition, when plastering, putty is used over the reinforced layer.
There should be no drafts in the room. You should also not use heaters and fans to speed up the drying of the plaster coating. Depriving the solution of the moisture necessary to gain strength leads to a sharp decrease in moisture, as well as to the appearance of shrinkage cracks.
For plastering from the inside, not only compositions intended for interiors are suitable, but also plasters on polystyrene foam facades.
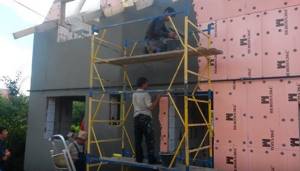
How to plaster penoplex outside
To apply plaster to penoplex from the outside, special façade plasters for penoplex or adhesive compositions (for reinforcement) are used, on top of which suitable façade or universal plaster compositions are applied.
At a height of more than 2 m from the ground surface, reinforcing mesh is practically no longer needed for reinforcement. However, it is necessary to ensure strong adhesion of the plaster coating to the PP. It is better to choose plaster that firmly “sticks” to polystyrene foam.
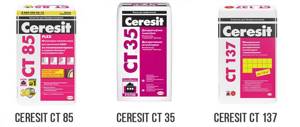
For example, for gluing penoplex boards to the wall, as well as for attaching reinforcing mesh, you can use the plaster-adhesive composition Ceresit CT 85. Ceresit also produces plaster compositions for decorative finishing, for example, polymer-cement “bark beetle” - ST-35, pebble - ST- 137.
Primary layer sketch
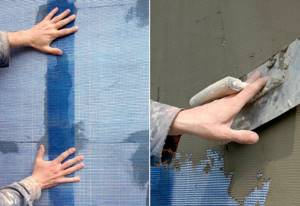
Penoplex is prepared for plastering by laying the primary layer. For this purpose, alkali-resistant PVC mesh should be used. By using PVC, you will insure yourself against the aggressive influence of cement on the exposed mesh. Cement is known to react with many materials.
Cut strips the length of which should be slightly greater than the height of the wall. Please note that installation is done from top to bottom. Apply the strip to the fiberglass with one hand, and apply the solution to the mesh exclusively along the top edge with the other. Thus, the mesh is, as it were, “welded” to the penoplex. As a result, the primary layer should be up to 5 mm thick.
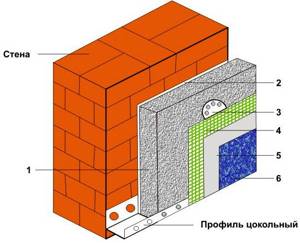
Penoplex insulation scheme: 1 - penoplex slabs, 2 - glue, 3 - dowels, 4 - reinforcing mesh, 5 - primer, 6 - plaster coating
When the top edge is fixed to the plane, apply the solution to the mesh so that it is evenly distributed across the entire width. Every movement comes from top to bottom. Be sure to leave a vertical “tape” clean of the plaster mixture on the right side, because each subsequent strip will overlap the edge of the previous one by almost 1 cm.
As a result, it turns out that the wall will be strip by strip covered over the entire surface with a mesh. Look at all the places on the wall where the geometry of the plane changes (door openings, slopes, window openings) - this is where you should first start laying the mesh.
Reinforcing mesh for foam plastic
Prices for reinforcing mesh for foam plastic
Reinforcing mesh for foam plastic
Required tools and materials
The main tools of a plasterer are a spatula and a trowel (trowel). It is better to use stainless steel spatulas for work. You will need tools of different widths. For a beginner, it is better to take a wide spatula up to 35 cm. It is advisable to round the edges of the trowel and spatula blades, this will make the work easier and faster.
You will also need:
- grater with sandpaper (you can use a plastic one);
- masking tape;
- mixer;
- rule with level;
- knife for cutting penoplex, scissors for cutting mesh;
- primer roller;
- brushes;
- containers;
- roulette;
- rags.
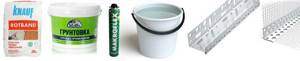
From materials:
- sufficient volume of plaster mixture (with a 20% margin);
- primer;
- polyurethane foam;
- tap water is not higher than room temperature;
- reinforcing mesh;
- special plastic corners with mesh (for reinforcing corners);
- base profile (to cover the top of the penoplex cladding, if it is in the middle of the wall).
Preparatory work
Installation work begins with preparation:
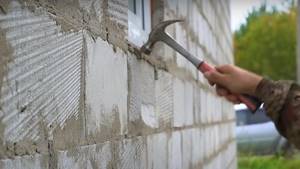
1. Inspect the entire house, check for unevenness and protruding elements. Remove all excess using a spatula and a hammer, so that later during the work it does not cause unnecessary trouble.
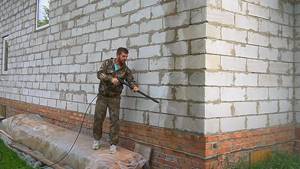
2. Wash the walls of the house using a hose or Karcher. This will help remove dust and dirt from the surface.
3. Draw a line using a laser level, since thermal insulation of the walls will not insulate the foundation. This will happen separately, together with the blind area. Back off 10 cm to cover the seam later.
4. Use a coated thread to mark the starting line.
Preparing the penoplex plane
- Before plastering polystyrene foam, the surface of the penoplex cladding is inspected.
- The evenness of the entire surface is checked by the rule. The protrusions must be cut off, otherwise they will show through under the thin layer of plaster. And large differences will have to be leveled with a plaster compound, which will increase its consumption.
- All open seams (even narrow ones) must be filled with polyurethane foam, otherwise freezing spots will form in these places - cold bridges. Seams that are too wide are sealed with cut strips of penoplex of the required width and sealed with foam. Excess foam is carefully cut off flush with the surface.
- Remove dirt from the surface, sweep away dust or remove with a damp cloth.
- The heads of the dowels that attach the sheets are sunk below the surface. The solution is applied on top of them (level with the surface).
- It is advisable to make the surface of the thermal insulation rough. To do this, it is scratched with a brush, sandpaper or rolled with special needle rollers.
Fastening dowels, primer, plaster
After completing the above work, you need to secure the sheets to metal dowels made in the shape of an umbrella. If desired, you can use plastic ones; they are cheaper and do not allow cold air to pass through. However, you should not choose the cheapest ones; they will become deformed when hammered.

Penoplex can be secured with dowels or various mixtures
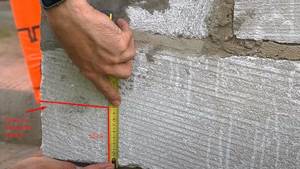
It is necessary to drill holes 1 cm wide. The length is determined by adding 5 cm to the thickness of the slab and a centimeter adhesive layer. If the penoplex has a thickness of 6 cm, it is recommended to choose dowels 12 cm long. The depth of the holes will be 14 cm.
To mount one slab, you need to use 6 umbrella-shaped dowels. They should be hammered into the corners. Fasteners are placed in different ways, for example, 4 pieces in each corner and 1 in the center of the slab.
The dowels are driven in so that the caps are located at the same level. If they go a little deeper, there's nothing wrong with that. To cut long nails, use wire cutters.
Upon completion of this work, you need to process the joints . The gaps, 5 mm in size, must be filled with polyurethane foam. If they have a larger diameter, you should use strips of insulation. The foam dries in 5 hours. After this time, you will need to cut off the excess and nail the dowels.
To correctly calculate the size of the dowels, it is necessary to measure the layers of insulation. Next, reinforcement is performed. An adhesive mixture 2 mm thick is applied to the corners. It is recommended to work with a spatula from the bottom up.
The next stage is applying plaster. It should close the joints. After drying, you will need to complete the finishing process and paint the walls, first applying a primer. Insulation with penoplex from the inside is carried out according to the same principle, but a film should be installed that will provide waterproofing.
How to plaster penoplex correctly - technology
Next, we’ll figure out how to plaster penoplex.
First of all, the following conditions must be met:
- choose calm, not hot (below +30°C), dry weather with an air temperature above +5°C;
- the workplace is shaded from the sun and protected from precipitation.
Plastering penoplex on the outside of a building is similar to plastering polystyrene foam.
Plastering polystyrene foam using the Wet Facade technology is carried out in stages:
- preparation of the surface of the mounted PP;
- padding;
- preparing the solution;
- applying adhesive solution;
- attaching reinforcing mesh;
- mashing;
- applying a leveling layer;
- padding;
- preparation of decorative mortar (preparing the finished mixture);
- performing finishing decorative plaster;
- painting.
Preparation of the solution
Plaster compositions intended for plastering polystyrene foam surfaces are diluted according to the instructions. The dry mixture is poured into a prepared container with water (the amount of liquid is initially taken less than what is needed for the entire solution). Mixing is done using a mixer. If necessary, add water. After achieving uniform mixing, the solution is left for 5 minutes, after which it is mixed and used.
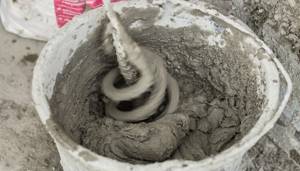
Ready-made mixtures must be stirred before use to lift settled heavy filler particles.
Installation of reinforcing mesh
The technology is simple. Installation must begin from the corners. Apply the adhesive solution to the corner with a spatula (on both sides of the corner). Apply a corner, press it to the solution and, checking the verticality with a level, press it into the mixture. If the corner has a mesh, then glue is applied under it in advance. The mesh applied to the solution is leveled and pressed down, pressing into the solution with a smoothing motion of the spatula.
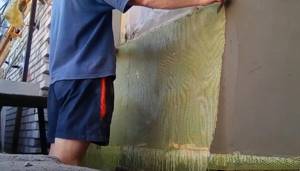
The mesh is attached to flat areas of the wall after the wall corners and slopes are reinforced.
- First, draw a horizontal line for the top of the reinforcement on the wall.
- Using a wide spatula, apply a layer of adhesive solution to the area adjacent to the corner of the wall.
- “Stroke out” the solution with a notched trowel.
- Apply a grid starting from the drawn line. Align it at the corner, press it in several places to the solution with your hand.
- Smooth it with a spatula, from top to bottom and from the center to the edge so that the solution comes out through the cells. Excess is removed or added to places where the solution is insufficient. As a result, the mesh should be completely immersed in the solution.
- Apply glue to the area nearby. Apply the mesh with a 10 cm edge overlap onto the previously laid mesh fabric. Smooth out with a spatula.
- When all the sheets are plastered, the surface is dried.
They try to smooth the mesh with a spatula evenly, so that fewer uneven spots ultimately have to be sanded off.
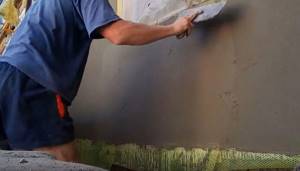
Plastering
The reinforcing mesh should be completely placed in the plaster layer. There should be a solution under and above it. Therefore, after installing and fixing it, a 2-3 mm plaster-adhesive solution is applied with a spatula. It is better to do this with a wide tool. When all the sheets are plastered, the surface is dried.
In order not to create cold bridges, dowels are used not metal, but plastic.
Grouting and leveling
After a day (which is necessary for drying), the surface is rubbed - using a grater with sandpaper, the sharp protrusions are sanded in a circular motion. The pressure is kept constant over the entire surface.
The grain size of the skin is selected according to the subsequent finishing:
- coarse grain for decorative structural plaster;
- fine grain - for painting and wallpapering, and if decorative plaster is done in a thin layer.
After grouting, remove dust.
Application of decorative plaster
After leveling, the penoplex can be painted without plaster with decorative solutions. However, plaster decoration looks more attractive. Finishing plaster on the walls will provide additional protection.
Do I need to prime? What primer is suitable for plaster? Before plastering penoplex with decorative compounds, the surface is primed. For these works, compositions suitable for leveling and decorative mortars are selected.
The primer composition is applied using a roller and brush (where it is inconvenient to use a roller).
Before applying the decorative layer, the “layer cake” is dried.
The decorative solution is applied in a manner consistent with the desired effect. Bark beetle, travertine, rain, and fur coat patterns are often used on the façade. For indoors, the choice of effects is richer.
Installation of reinforcing mesh
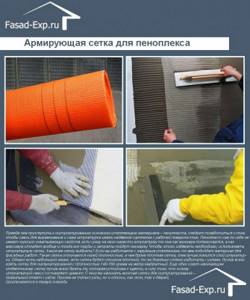
Before applying a layer of plaster, penoplex needs to be reinforced with special nets. Polymer cellular fabrics with a density of at least 140 g/m2 and no more than 160 g/m2 are best suited for reinforcement. The general rule is that the smaller the cells, the better the reinforcing properties. A high-quality mesh with suitable characteristics helps to level and strengthen the surface of the penoplex.
Note! If you plan to use cement-based plaster, the mesh must be inert to an alkaline environment.
Reinforcement should start from the corners. To do this, cut strips from the mesh, the width of which should not be more than 35 cm, and the length is determined by the length of the corner. The strip is folded in half lengthwise, a fixing compound is applied to the penoplex and the mesh is pressed against it.
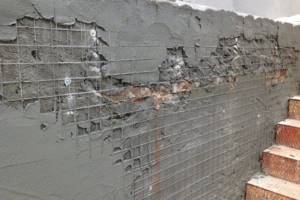
The entire wall is reinforced in a similar way. First, lay a layer of fixing mixture (plaster), then press the mesh against it, smooth it out and make sure it is fixed. The reinforcing fabric should be overlapped, because areas not covered with a polymer mesh will stand out noticeably against the general background. A thin layer of fixing mixture is applied on top of the cellular coating, which ensures a tight fit and strong fastening.
How to paint penoplex
It’s time to resolve the questions: is it possible to paint plastered foam sheets? What composition can be applied outside the house?
For painting, varnishes and paints containing:
- benzene;
- kerosene or gasoline;
- toluene;
- acetone;
- oolif;
- coal tar;
- xylene;
- polyester resins.
All these substances, penetrating through a thin layer of reinforced plaster coating, destroy polystyrene foam. It is better to choose paints with mineral fillers, as well as water-based and silicate ones. All of them are suitable for interior and exterior decoration.
Famous manufacturers
The main well-known brands for plastering polystyrene foam are produced by the following companies:
- the Sto AG concern (Germany) offers a line of Stolit plaster mixtures;
- Henkel concern (Germany) produces Ceresit plaster mixtures;
- Ecomix company produces mixtures of the same name for Wet facades.
Line of materials from the Russian subsidiary of the German concern Sto AG:
- Sto-Baukleber (for gluing polystyrene foam);
- StolevellDuoplus or Uni (for gluing and reinforcement);
- StoPutzgrund or StoPrep Miral (intermediate priming);
- Sto-Strukturputz or StoMarlit (finishing plaster mixtures).
Ecomix offers:
- adhesive for mounting polystyrene foam – BS-113;
- plaster and adhesive composition for making a reinforced layer on top of slabs - BS-106;
- quartz primer – BS-707;
- for finishing – decorative mixture “bark beetle” BS 208 or pebble BS
The German company Knauf offers the “Warm Wall” line, including the following compositions:
- Sevener (plaster and adhesive);
- Decorgrund (primer);
- Diamond (decorative).