1. Find a test product with VAT (picture below).
2. Click the “add to cart” button – go to cart – click the “place an order” button.
3. Select a shipping and payment method.
4. At the next stage, you can register as a GUEST or CLIENT indicating the delivery address. In this case, you will receive a letter (invoice for payment). An invoice does not obligate you to anything.
How to order a product if it is out of stock
1. Register (authorize)
2. Find a test product with VAT (picture below) or any other.
2. Click the “To order” button - go to the cart “Items to order” - make sure that the product is in the cart.
4. Go to the ONLINE STORE menu –> ORDER MANAGEMENT (for registration).
5. On the PRODUCTS TO ORDER tab there will be a list of products that you want to purchase - you can give it a name (just click the “save” button)
6. Print your order or click the @ SHARE button and send us an email.
7. You will then receive a message whether pre-ordering the product is possible or not.
TECHNOCLIMATE 67 – 81 – 10
- Are you here:
- home
- PERSONAL AREA
- Question answer
- How to connect the refrigerator thermostat yourself?
question answer
How to connect the refrigerator thermostat yourself?
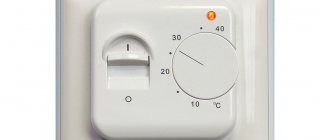
Let's start with the fact that the thermostat in the refrigerator serves to turn off/on the refrigeration compressor. When a working refrigerator is initially turned on, the thermostat contacts are closed and a command is given to turn on the compressor. You can set the temperature in the refrigerator by turning the knob - the degree of cooling varies, as a rule, from +8 degrees to 0 degrees Celsius, a lower temperature is achieved by turning the thermostat knob clockwise all the way.
To understand what malfunctions there may be in the thermostat of the refrigerator, you need to understand its structure.
Refrigerator thermostat device
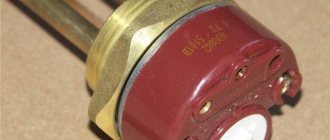
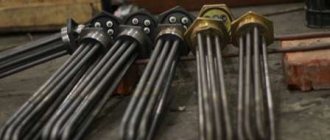
The thermostat mechanism is a lever system that controls electrical contacts. Externally, the thermostat is a small box with a handle, on one side of which there is a tube filled with freon, and on the other side there are contacts for connecting to an electrical circuit.
The number of contacts can vary from 2 to 6, and the length of the tube filled with freon can be from 0.8 to 2.5 meters. This depends on the additional functions of the thermostat, temperature conditions and the number of connected refrigerator modules (light, defrost, indication). It is not recommended to disassemble a working thermostat to study the internal structure.
Principle of operation
The operating principle of the thermostat is quite simple. The end of the thermostat capillary tube is located in the cooling zone and is attached to the refrigerator evaporator. The lever mechanism of the thermostat, which is located in the box, acts on the contact group when cooling - the thermostat opens. When the temperature rises, the thermostat returns to its original position - the power contacts close.
Malfunctions
Externally, a breakdown of the thermostat (temperature sensor) manifests itself in two ways. This may be a banal disconnection of the refrigerator compressor from the electrical circuit (the compressor does not turn on, there are no sounds, there is light in the refrigerator), or it may be a change in the temperature in the refrigerator compartment (freezing or high temperature).
In the first case, there is a high probability of damage to the galvanized capillary tube of the thermostat, which is susceptible to corrosion in an aqueous environment, as a result of which the lever mechanism of the thermostat simply stops working. In the second, it is necessary to understand what exactly caused the temperature violation - corrosion, sticking of the thermal relay contacts or a violation of the internal factory settings of the sensor. The answer can only be given by a specialist - a refrigerator repairman.
Installation location
A faulty thermostat requires replacement. Replacing a broken thermostat yourself is quite simple if you get to the place where it is installed. This is where difficulties arise.
In modern refrigerators, the thermostat adjustment is usually located on the front panel and is located at the top of the refrigerator, but it can also be located inside. The refrigerator cooling module (evaporator) is hidden under the plastic casing and is located in the rear.
To install a new thermostat yourself, you need to remove the broken thermostat.
- To do this, you need to turn off the power to the refrigerator by unplugging the power cord.
- Depending on the refrigerator model, remove the plastic casing cover that contains the broken thermostat.
- Mark the wiring diagram with a marker.
- Remove the capillary tube of the broken thermostat from the place of attachment (placement).
Install the new thermostat in reverse order.
Connection features
Do not confuse different thermostats that look similar to each other. Some can only work at positive temperatures, others are intended only for freezers. Using a thermostat that is not designed to operate a refrigerator (freezer) can lead to incorrect operation of the equipment and failure of expensive components (compressor).
Therefore, be sure to check the wires connected to the thermostat. It’s one thing if you find your own replacement thermostat, from the same manufacturer or brand, but another thing if you use an analogue.
By the way, the wires suitable for the thermostat have the following purpose:
- orange, red or black - connects the thermostat to the compressor;
- brown - phase wire leading to the socket;
- white, yellow or green - leads to a light indicating that the refrigerator is on;
- striped yellow-green - grounding.
Starting from the size of the contacts and location, thermostats can differ in the settings of the contact groups (power or low-current) and purpose (medium-temperature or freezing). For example, using an externally similar temperature sensor K57-2.5 instead of K59-2.5 will lead to freezing in the rear wall of the refrigerator and a change in the temperature regime of the refrigerator.
The refrigerator thermostat is a relay that, based on the degree of cooling of the chambers, sends a signal to start or stop the compressor motor. Failure of this part can lead to complete failure of the unit. In some cases, repairs can be done yourself, but if you do not have sufficient experience, it is better to call a specialist. In this article you will find information about the device, operating principle, causes of failure, methods of checking and repairing the thermostat.
Where is the thermostat located in the refrigerator?
It's not difficult to find. It is always directly connected to the button or knob of the temperature regulator and is located in close proximity to the device for setting the mode. The exact location depends on the model and year of manufacture of the refrigerator.
Possible placement options and ways to gain access to the mechanism:
- The inside of the freezer. The solution is relevant for domestic and some foreign refrigerators, the design of which today can be described as “outdated”. To see the temperature relay housing in these models, just open the freezer. On one of the panels there will be a rectangular plastic box. Inside it is the desired object. To gain access to it, remove the thermostat knob and unscrew the protective box. The latter can sometimes be dismantled quite easily; tools may not be needed. All you need to do is press the latches.
- External part. In modern refrigeration units, the relay is located outside the refrigeration chamber, namely in the upper part of the refrigerator, above the wheel. To access the device you will need a Phillips screwdriver. Using it, unscrew the screws on which the bar with the signal lamp is attached. But before using the tool, as in the previous case, you will need to pull out the temperature control button.
What is a thermostat for a refrigerator?
A mechanical relay consists of the following elements:
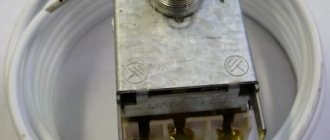
- bellows with tube;
- spring;
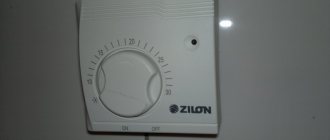
- a control handle that rotates a screw or roller;
- electrical insulating gasket. Protects the internal components of the thermostat from adverse external factors (humidity);
- power lever;
- contacts.
Outwardly, it resembles a small box. On one side, a hermetically sealed tube filled with refrigerant extends from it. Its length in different relay models ranges from 0.8 to 2.5 m. The end is attached to the evaporator. With a small diameter, it is problematic to ensure a tight fit of an even tube, so it is bent into an elbow or curled into a spiral.
On the other side there are contact terminals with which the thermostat is connected to the electrical circuit and controls the operation of the compressor. Depending on the number of additional functions of the refrigerator, their number varies from 2 to 6.
The design of the thermostat in household refrigerators may differ slightly. Some models are equipped with a semi-automatic evaporator defrost unit, which simplifies the process of removing ice.
Signs that it's time to change the temperature sensor
The part is important, so signs of failure will be more than serious and noticeable. They will definitely leave no doubt that it is time to replace it. Therefore, you will not have any problems checking and subsequently replacing the refrigerator thermostat. Signs of damage:
- The technology began to turn food into ice. Yes, it's very easy to notice. We are sure that this will definitely not pass your eyes and will instantly make you think about repairs. Also, such a breakdown can manifest itself in the formation of ice on the walls of the equipment.
- Products do not receive enough cold. It is clear that this will lead to their damage.
- You hear the compressor running too often or not enough. Yes, during the operation of the equipment you have probably become accustomed to the noise, but a change in frequency may indicate a breakdown.
- Leaks also indicate a malfunction of equipment. Ice melts due to lack of cold, which a broken thermostat does not allow to add.
The principle of operation of the thermostat
The operation of the device is based on the change in pressure in the bellows tube that occurs when the temperature in the refrigerator and freezer increases or decreases. When its value increases, the spring is compressed, the contacts are closed, the compressor is turned on and vice versa.
The temperature at which the contacts switch occurs is determined by the tension force of the spring. In refrigerators with a mechanical type of control (most models from domestic manufacturers - Atlant, Nord, Biryusa, Oka, Orsk, Sviyaga, Exqvisit, as well as some units of imported brands - Indesit), it is regulated by a handle that rotates a screw, which moves the nut to the end of the elastic element.
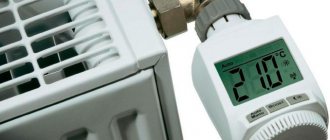
Attention! Modern units (Stinol, Liebherr, Samsung) are equipped with electronic thermostats, consisting of a control module and temperature sensors for each cooling zone. Such a device allows you to more accurately record temperature changes.
What is a thermostat and why is it needed?
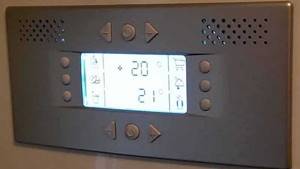
A thermostat, or thermostat, is a device that ensures the normal functioning of the refrigerator by maintaining the optimal temperature. It records sensor readings inside the unit.
If the chamber is warm, the thermostat sends a signal to the compressor start relay, and it starts working. When the air cools to a predetermined level, the motor turns off.
Thermostat position
Let's look at the placement of the device using the example of the Stinol refrigerator. It is located on the panel that is located above the door. For the convenience of its location, a temperature control knob is mounted nearby.
The process of removing the thermostat is simple:
- turn off the power to the refrigerator;
- pry the handle with an awl or a thin screwdriver and remove it;
- carefully remove the decorative trim from the protrusions, as it is made of fragile material;
- Unscrew the nuts holding the thermostat, and then the screws securing the control panel. Lastly, remove the screws from the door hinges, supporting it;
- after dismantling the door, unscrew the fastening screws on the back of the refrigerator and remove the top cover;
- disconnect the contact connections of the thermostat and remove it.
Attention! For error-free subsequent installation of the device, mark the wires or photograph them before disconnecting.
In units with mechanical control, the thermostat (early models of the Atlant, Oka brand) is located inside the refrigeration chamber. On one of the panels you can see a small plastic box. To remove it, unplug the refrigerator, remove the temperature control knob by pulling it towards you, and the protective housing, which is held in place by latches.
Rules for dismantling the thermal relay
If the refrigerator does not turn on at all, it will be impossible to carry out the diagnostics described above. The probable cause of the breakdown is an electrical failure of this element.
But a problem can also be a compressor malfunction, for example, a burnt out motor winding. To determine whether the thermostat needs to be replaced, it will have to be removed from the refrigerator for examination.
Typically, the thermostat is located next to the control knob, which is used to set the air temperature in the refrigerator compartment. Double-chamber models are equipped with a set of two such handles
First you need to unplug the refrigerator. Now you should find the place where it is located, as described earlier. Usually you need to remove the adjustment knob, remove the fasteners and remove the protective elements.
Then you need to carefully inspect the device, paying close attention to the wires through which the power is supplied.
All of them have different color markings depending on their purpose. Typically, a yellow wire with a green stripe is used for grounding. This cable should be left alone, but all the others should be disconnected and shorted together.
Now the refrigerator is plugged in again. If the device still does not turn on, the thermostat is probably working properly, but there are serious problems with the compressor.
If the refrigerator does not turn on at all, the cause may be not only a malfunction of the thermostat, but also a breakdown of the compressor, for example, a burnt-out motor winding
If the engine starts working, we can clearly conclude that the relay needs to be replaced. Before starting work, it doesn’t hurt to arm yourself with a smartphone or camera in order to consistently record all operations.
When installing a new thermostat, these pictures can be very helpful, especially for beginners.
You need to clearly remember which cable core was used for what purpose. Typically, a black, orange or red wire is used to connect the thermal relay to the electric motor.
A brown wire leads to zero, a yellow-green wire provides grounding, and a pure yellow, white or green wire is connected to an indicator light.
To connect the thermal relay, wires with different color markings are used; you need to remember the purpose of each wire so as not to get confused during reassembly
Sometimes removing a damaged regulator can be difficult, especially when it is placed outdoors. For example, in some Atlant refrigerator models you have to completely remove the chamber door from its hinges.
To do this, you need to remove the trim that is installed above the top hinge and unscrew the bolts hidden under it.
Before removing the adjustment knob, you also have to remove the plugs and unscrew the fasteners. All these operations must be done carefully.
It is better to store fasteners and linings in a small container so that they do not get lost. The thermostat itself is usually screwed to the bracket; it must be carefully removed, unfastened and removed.
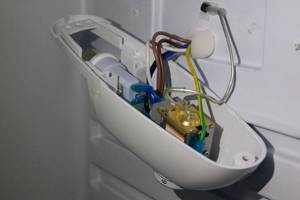
If the thermostat is located inside the refrigerator compartment, it is usually hidden under a plastic casing, where a lamp for illumination can also be mounted
A new thermostat is installed in its place, following the reverse assembly order. Sometimes the breakdown of the thermostat is associated with a malfunction of the so-called capillary tube or bellows. If you replace only this element, the relay can be left.
To perform this procedure, you will have to remove the thermal relay, following the method described above. The bellows must be disconnected from the evaporator and carefully removed from the device body.
Now a new capillary tube is installed, connected to the evaporator, and the relay is mounted in its original place, and the disconnected wires are connected.
Methods for checking the thermostat
If the refrigerator stops turning on, there may be several reasons. To confirm that the device is faulty, follow these steps:
- unplug the refrigerator;
- remove the casing from the thermostat;
- disconnect the wires that enter the device;
- close them together.
In old units, 2 wires come from the thermostat terminals, and in new ones - 4. They are distinguished by color:
- yellow with green stripe – grounding;
- brown - from the outlet;
- red, orange or black - from the engine;
- green, white or yellow - from the signal indicator.
In refrigerators with a No Frost system and an electronic temperature control relay, you need to close the 2nd and 3rd wires, which will make it possible to exclude the device from the engine switching circuit. The motor will be connected directly.
A breakdown of the thermostat is indicated by the compressor turning on when the wires are connected in this way. If it does not start, then the cause of the problem lies in a malfunction of the start-protection relay or the engine itself. Only a master can correct the situation.
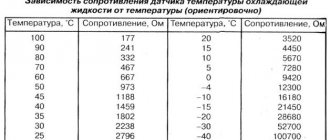
A more reliable test is the method of ringing the thermal relay. Perform it using a multimeter:
- turn off the refrigerator;
- remove the thermostat;
- on an analog multimeter, set the switch to minimum and fix the arrow at 0. On a digital device, leave the switch in the “200” position;
- end of the bellows tube for 2 min. place in a container filled with ice water;
- measure the resistance between the terminals.
If the arrow on the first type of device goes off scale, and the number 1 is displayed on the digital multimeter, then the thermostat needs to be replaced.
When the engine is running without stopping, you can check the refrigerator thermostat for malfunction in the following way:
- turn off the refrigerator and empty it of food;
- turn the control knob to maximum cold or fast freezing mode;
- place the thermometer on the middle shelf of the refrigerator compartment (choose a device that can also show sub-zero temperatures);
- turn on the empty refrigerator;
- take out the thermometer after 2 hours.
If the temperature value does not correspond to 6-7 0C, then the relay has failed.
You can use a simpler test method that does not require removing and disassembling the thermostat:
- find the plate near the axis on which the temperature control knob is attached;
- try to move it.
If it does not budge and you do not hear clicks, then the thermostat is faulty.
If ice builds up on the inside surface of the unit, also look for the root cause in the thermostat. Turn the control knob to the left and wait until the compressor stops. If this does not happen, the part must be replaced.
Signs of a broken temperature relay
There are a number of signs indicating a thermal relay failure:
- violation of cyclicity in the operation of a household appliance (the unit operates for a long time without switching off on its own);
- rapid growth of a layer of frost in the freezer, the appearance of ice in the refrigerator compartment;
- The electrical device does not turn on for a long time.
Such problems may indicate a malfunction in the relay or be a consequence of other refrigerator malfunctions (refrigerant leaks, motor failure, door seal failure, etc.).
Reference
The exact reason for the incorrect operation of household appliances can only be determined after diagnostics.
Snow coat in the freezer
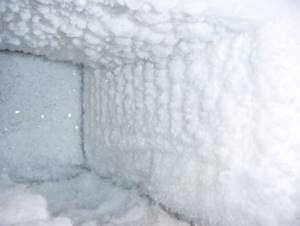
If you find a significant layer of frost on the walls of the freezer, first make sure that the temperature mode is selected correctly and check the tightness of the chamber door. If everything is in order, there is a high probability of a thermal relay malfunction.
After setting the set temperature in the freezer, the failed sensor does not send a signal to the start relay of the refrigerator compressor about the need to complete the cooling cycle. The motor continues to work, the evaporator does not have time to thaw, and a snow crust quickly grows inside the chamber.
If the refrigerator is equipped with two thermostats and independent temperature control in the compartments, ice may form in the freezer and refrigerator compartment.
Disconnected and silent
Reasons for the refrigerator to turn off:
- external factors (for example, loss of power due to a power surge, faulty socket, plug or cable);
- breakdown of the engine start relay, electric motor;
- failure of the thermostat.
A broken relay does not respond to an increase in the temperature level in the refrigerator compartment, a signal is not sent to the start relay, and the motor does not turn on.
A sign of a malfunctioning thermostat is the complete absence of noises, sounds, or clicking sounds in the refrigerator, which indicate attempts to turn on the motor.
Doesn't turn off on its own
The compressor operates cyclically: after a certain period of time (10–20 minutes), it turns off, then again continues to circulate freon in the system (learn about the features of filling a refrigerator with freon with your own hands here). During the hot season, the working period may increase slightly, but the device cannot operate continuously.
The reason for the lack of shutdown of the unit, in addition to violation of the rules for operating household appliances, loose door fit, breakdown of the start-up relay, refrigerant leak, may be a malfunction of the thermostat, which ceases to signal the need to stop operating the compressor. The motor continues to work without stopping, which leads to its overheating and failure.
Interchangeability of refrigerator thermostats
There are 2 main types of device:
- Mechanical. Produced by the Oryol plant (with the letter marking TAM), the Italian company RANCO (from K-50 to K-59), and the Danish company Danfoss. The cost and quality of the latter are much higher.
- Electronic (installed in units with the No Frost system).
Mechanical thermostats are found in older models of refrigerators; they can be replaced with devices of the second type. If the price is high for you, then if the device breaks down, buy an analogue.
| Refrigeration type | Model of faulty thermostat | Analogue |
| Single chamber | T-110, T-111, T-112 | TAM-112, TAM-113 |
| Double chamber | TAM-125 |
TAM-133
K59, Danfoss 077B6
K56-L1954
Attention! In Stinol refrigerators you can install not only TAM-133-1M, TAM-145-1M thermostats, but also RANCO K-57, K-59 devices. Their distinctive feature is the covering of the bellows tube with a vinyl sheath.
How to adjust the relay on a refrigerator
I recommend performing this procedure in the following cases:
- the back wall is completely covered with frost. If ice is present only on half the wall, then adjustment will not help;
- The temperature in the refrigerator compartment is too low.
Such adjustment reasons apply to two-chamber units. In single-chamber ones, it is enough to check the distribution of ice in the freezer. If its inner walls are completely covered with frost, then the procedure can bring results. If there is no frost in any area and the engine is constantly running, the cause of the malfunction lies in a freon leak, deformation of the seal, or obstruction of the filter.
It is difficult for someone without experience to adjust the thermostat. Specialists spend at least a day on such a procedure if the unit is two-chamber. Adjusting the thermostats of single-chamber refrigerators takes 2 rubles. less time, since their work and rest schedules are much shorter.
Let's look at how to adjust the device using the example of a Danfoss 25T65 thermostat for a two-chamber refrigerator:
- place the control knob in the middle position;
- If you tighten the central adjusting bolt, the unit will turn off. If you unscrew it a little, the operating time of the refrigerator increases;
- the second bolt is located on the outside. They regulate the time the unit is parked. If you unscrew it, it will last longer; if you tighten it, it will last less.
Attention! The bolts are live, so the screwdriver you use must be well insulated.
DIY thermostat replacement
If you decide to replace a mechanical device with an electronic one or it has failed, then you must perform the following installation steps:
- turn off the refrigerator;
- remove the handle, protective cover:
- disconnect the tube from the evaporator;
- remove the old thermostat and disconnect the wires;
- start installing a new device by attaching the tube to the evaporator;
- connect the wires, secure the thermostat;
- put on the casing;
- install the control knob.
To avoid confusion with connecting the wires, we recommend that you photograph them first. For beginners, it is advisable to perform this action at each stage of removing the thermostat, so that their sequence is not disrupted when installing a new device.
Attention! Do not neglect the relay wiring diagram supplied with the instructions.
Thermostat for the refrigerator: device, check + details of replacement if necessary
It is difficult to imagine your life without household appliances. There are devices that we could do without, and there are those without which the arrangement of a living space is quite rightly considered incomplete. One of these vital items is the refrigerator. Do you agree?
Do-it-yourself repair of household appliances is a good help for the family budget. If desired, you can master many repair operations. For example, replacing a refrigerator thermostat is not that difficult. You just have to understand the design features and operating principles of the device.
We will tell you how to detect a faulty thermostat. The article we have proposed describes in detail how it is replaced during the repair of a Stinol brand refrigerator. The information is accompanied by a thematic selection of photo and video materials with expert advice.
Why the thermostat breaks and how to repair it
The main reasons for device failure include the following circumstances:
- leakage of coolant into the element;
- violation of the thermostat seal. At the same time, the temperature inside the chambers begins to rise;
- oxidation, rusting or burnt contacts. The circuit does not close and the engine does not start.
In some cases, you can correct the situation at home yourself, but you must take precautions:
- repairs cannot be carried out while the unit is connected to the network;
- When working, periodically check the voltage on all current-conducting surfaces;
- metal tool handles and joints must be well insulated.
If the wires are oxidized, treat them with a cloth soaked in an alcohol solution. If contacts burn, clean their spots. Remove rust with sandpaper.
If the thermostat fails, replace it by following the steps described in the corresponding section. If you do not have experience, you are afraid of worsening the situation, then contact a service center or call a technician.
Connection diagram for thermostat Electrolux ER9002
A similar circuit must be used when replacing a device. Its designations are deciphered as follows:
- L – phase;
- TH1 – thermostat;
- RH1 – thermal relay;
- RA1 – start-up protection relay;
- N – neutral;
- TIM – timer;
- TR – evaporator heating element relay;
- TF – fuse;
- SL1 – indicator lamp;
- IL1 – lamp switch;
- CO – compressor;
- R1 – evaporator heating element
- V – fan electric motor;
- IMV – push-button fan.
Results
The thermostat is an important element of the refrigerator, as it maintains the correct temperature conditions inside the chambers. If you suspect it is faulty, you can follow simple steps to check its operation. If it confirms a breakdown, then if you have no experience in repairing refrigerators, call a technician who will install a new or interchangeable part.
Sources:
Video: How to check the thermostat (thermostat) on the refrigerator
1. Find a test product with VAT (picture below).
2. Click the “add to cart” button – go to cart – click the “place an order” button.
3. Select a shipping and payment method.
4. At the next stage, you can register as a GUEST or CLIENT indicating the delivery address. In this case, you will receive a letter (invoice for payment). An invoice does not obligate you to anything.
How to order a product if it is out of stock
1. Register (authorize)
2. Find a test product with VAT (picture below) or any other.
2. Click the “To order” button - go to the cart “Items to order” - make sure that the product is in the cart.
4. Go to the ONLINE STORE menu –> ORDER MANAGEMENT (for registration).
5. On the PRODUCTS TO ORDER tab there will be a list of products that you want to purchase - you can give it a name (just click the “save” button)
6. Print your order or click the @ SHARE button and send us an email.
7. You will then receive a message whether pre-ordering the product is possible or not.
TECHNOCLIMATE 67 – 81 – 10
- Are you here:
- home
- PERSONAL AREA
- Question answer
- How to connect the refrigerator thermostat yourself?
question answer
Conclusions and useful video on the topic
The process of replacing a thermostat using the example of an ATLANT refrigerator is shown here in detail:
Interesting tips for diagnosing the condition of the relay and replacing it using the example of two models of refrigerators are contained in this video:
The procedure for replacing a thermostat cannot be called too complicated. However, if you mishandle this element, you can only worsen the situation. A detailed study of the repair procedure and attention to detail will help restore the functionality of the refrigerator .
How to connect the refrigerator thermostat yourself?
Let's start with the fact that the thermostat in the refrigerator serves to turn off/on the refrigeration compressor. When a working refrigerator is initially turned on, the thermostat contacts are closed and a command is given to turn on the compressor. You can set the temperature in the refrigerator by turning the knob - the degree of cooling varies, as a rule, from +8 degrees to 0 degrees Celsius, a lower temperature is achieved by turning the thermostat knob clockwise all the way.
To understand what malfunctions there may be in the thermostat of the refrigerator, you need to understand its structure.
Refrigerator thermostat device
The thermostat mechanism is a lever system that controls electrical contacts. Externally, the thermostat is a small box with a handle, on one side of which there is a tube filled with freon, and on the other side there are contacts for connecting to an electrical circuit.
The number of contacts can vary from 2 to 6, and the length of the tube filled with freon can be from 0.8 to 2.5 meters. This depends on the additional functions of the thermostat, temperature conditions and the number of connected refrigerator modules (light, defrost, indication). It is not recommended to disassemble a working thermostat to study the internal structure.
Principle of operation
The operating principle of the thermostat is quite simple. The end of the thermostat capillary tube is located in the cooling zone and is attached to the refrigerator evaporator. The lever mechanism of the thermostat, which is located in the box, acts on the contact group when cooling - the thermostat opens. When the temperature rises, the thermostat returns to its original position - the power contacts close.
Malfunctions
Externally, a breakdown of the thermostat (temperature sensor) manifests itself in two ways. This may be a banal disconnection of the refrigerator compressor from the electrical circuit (the compressor does not turn on, there are no sounds, there is light in the refrigerator), or it may be a change in the temperature in the refrigerator compartment (freezing or high temperature).
In the first case, there is a high probability of damage to the galvanized capillary tube of the thermostat, which is susceptible to corrosion in an aqueous environment, as a result of which the lever mechanism of the thermostat simply stops working. In the second, it is necessary to understand what exactly caused the temperature violation - corrosion, sticking of the thermal relay contacts or a violation of the internal factory settings of the sensor. The answer can only be given by a specialist - a refrigerator repairman.
Installation location
A faulty thermostat requires replacement. Replacing a broken thermostat yourself is quite simple if you get to the place where it is installed. This is where difficulties arise.
In modern refrigerators, the thermostat adjustment is usually located on the front panel and is located at the top of the refrigerator, but it can also be located inside. The refrigerator cooling module (evaporator) is hidden under the plastic casing and is located in the rear.
To install a new thermostat yourself, you need to remove the broken thermostat.
- To do this, you need to turn off the power to the refrigerator by unplugging the power cord.
- Depending on the refrigerator model, remove the plastic casing cover that contains the broken thermostat.
- Mark the wiring diagram with a marker.
- Remove the capillary tube of the broken thermostat from the place of attachment (placement).
Install the new thermostat in reverse order.
How to get to the thermostat
It is easy to find, since the thermostat is located in the same place as the temperature control knob. In older models, for example, Oka 6M, it is located inside the refrigerator compartment, on the right wall, next to the lighting lamp. To get to it, first remove the handle by simply pulling it towards you. Then the protective casing is removed, which is secured with latches in the holes in the chamber wall.
In modern refrigerator models: such as Indesit, Stinol and others, the thermostat is installed outside, usually above the door, but other options are possible. To access it you will need a Phillips screwdriver. The path to it also begins with removing the handle, the casing is removed from the latches and removed, then the screws securing the bar with the signal light and the thermostat itself are unscrewed.
The thermostat may be located in different places.