Convector heating, its features and operating principle
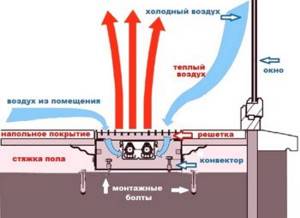
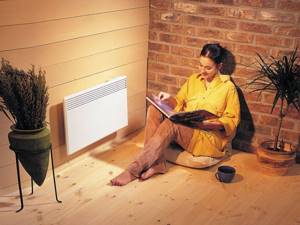
The operating principle of convector heating is based on the properties of air masses. Heated air is lighter than cold air, so it always rises. After cooling, the air masses descend to the lower part of the room and are heated again when passing through the convector.
The main advantage of convector heating is the rapid heating of the room and maintaining the desired temperature throughout the entire operating time of the device. Convectors are suitable for heating residential and commercial premises.
The operating principle of convector heating is as follows:
- Inside the heating device there are heating elements with a significant surface area. They heat up when using certain energy resources.
- When air comes into contact with the heater area, it warms up and becomes lighter.
- The heated air exits through the convection holes at the top of the radiator and rises.
- After cooling, the air masses descend to the lower part of the room and again enter the heating device through the slots in its lower part. This circulation continues while the device is operating.
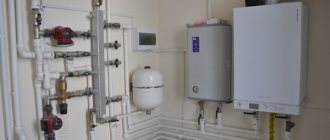
Setting up and controlling heating convectors
Setting up the heater and controlling the temperature, in most modern models, is carried out automatically using a thermostat (or thermostat). Depending on the type of device, the principle of adjusting and maintaining temperature changes.
- In water convectors, control occurs using thermostats, the same as those installed on conventional control radiators. When the air temperature changes, the pressure of the substance in the thermostat changes, and this actuates the control valve. As a result, the supply of coolant (hot water) is reduced or increased. Thus, the thermostat maintains the required air temperature.
- In a gas convector, the thermostat is also controlled by a valve, but by supplying gas to the burner. When the air temperature reaches the desired level, the gas supply is reduced. Such thermostats, like the previous ones, can be adjusted manually or automatically (electronic thermostats).
- Electric convectors can be equipped with mechanical or electronic thermostats. They are controlled by turning the heating element's power supply circuit on and off. A mechanical thermostat operates using a bimetallic plate. It is simple to operate, but less accurate than electronic. This thermostat is controlled manually.
The electronic thermostat operates from a signal from a temperature sensor that measures the air temperature.
The accuracy of such devices is much higher (up to 0.1°C). Simpler models have manual control. More modern ones are supplemented with a wide range of functions; they allow you to program temperature conditions by time and day. The smartest models of thermostats on electric convectors can be controlled remotely via the Internet or smartphone, and can also be connected to the Smart Home system.
To do this, modern models of electric convectors have the ability to connect to the Nobo Energy Control system, with which you can set, control and program various temperature conditions. Thus, installing electric heating convectors is the simplest and most practical way to heat your home. And the choice of modern models with electronic thermostats and the ability to intelligently control will ensure maximum ease of use.
Installation of heating convectors, taking into account power calculations
Speaking about installation methods, you can find floor and wall models, and the use of one or another coolant divides these devices into mechanisms that operate using water, electricity and gas. It is important to remember that installation of gas-type heating convectors can only be carried out on walls in a vertical position, while water and electrical systems can be installed both on the wall and on the floor (read: “Household convector: principle of operation and installation”) .
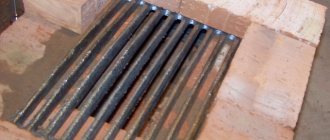
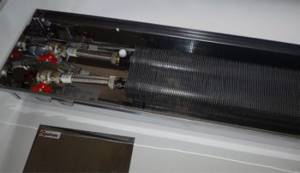
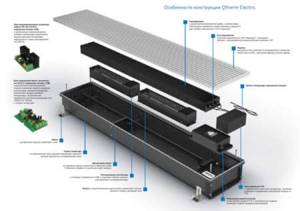
Construction of a water domestic convector
The installation of heating convectors, operating with water used as an energy source, is distinguished by the fact that the basis of the design is a heating battery. In this case, special attention should be paid to such a procedure as calculating heating convectors of this type, and in particular, correctly calculating the number of battery sections required for high-quality heating of the air in the room.
Another factor that should be considered when choosing this equipment is the material from which the convector is made.
- alloy of copper and aluminum;
- bimetal panels;
- aluminum;
- steel elements.
Copper-aluminum models are the most expensive. The connection diagram for heating convectors made of this material involves the installation of copper connecting parts, which have a very high price.
The use of such devices will be relevant if there is a need to make the design of the heating system lighter. Most often, consumers prefer samples made of aluminum or bimetal, but their installation requires the purchase of special fasteners and kits of installation systems.
It will be much more profitable to install batteries made of steel.
- by means of side fastening;
- using lower fixation to the system.
To install a water-type convector, you first need to fix the radiator on the wall, for which special holes are drilled in it and special hooks are fixed, which act as brackets. You can connect the water mechanism to the general heating system using pipes made of plastic or steel (read also: “What are the types of water heating convectors - types, advantages”). It is best to entrust such work to professional craftsmen, since incorrectly installed equipment can cause serious problems in the entire heating system. In addition, specialists can provide photos of convector options and help you correctly calculate the power of a heating convector for a specific room.
Installation of electric convectors
Another option for such equipment is electric convectors. These models can be installed and connected by hand, but it is very important to correctly calculate the power of this type of convector.
- the device must be removed from its packaging;
- then the protective film must be removed from the convector;
- Next, you need to decide where the mechanism will be installed.
When calculating the power of a heating convector operating using electricity, as well as connecting it, it is extremely important to follow a large number of recommendations, which, nevertheless, will allow for high-quality installation of the equipment.
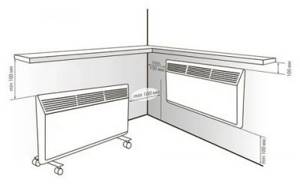
- the minimum distance from the floor to the convector is 20 – 25 cm;
- the device must be located at least 25 cm from nearby objects, from above and in front - at least 24 - 55 cm;
- the convector should be installed at a distance of 25 cm from the wall, and it should be located at least 35 cm from the ceiling;
- It is strictly not recommended to install the device behind curtains and doors, as well as under openings intended for ventilation.
The installation process for an electric convector is as follows:
- Having unscrewed the fastening bolts, you need to pull out the bracket;
- using a drill, you need to make pre-marked holes intended for fastening the mechanism;
- Next you need to fix the bracket;
- then you need to insert the electric convector into the clamp with its lower part;
- Guys should be placed on the equipment;
- it is necessary to place the upper part of the device into the mounted guy wires;
- after this, all the clamps must be tightly secured, and the fixing bolts must be screwed in;
- The convector operation regulator should be set to off mode and power should be supplied to the device;
- After the LED on the device lights up, the equipment can be switched to operating mode.
Installation technology
You can install the in-floor convector yourself. All work includes the following stages:
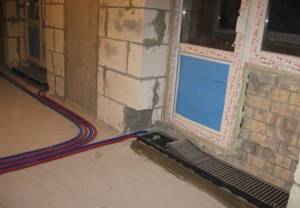
- Preparing a niche in the floor for the box.
- Box installation.
- Heat exchanger connection.
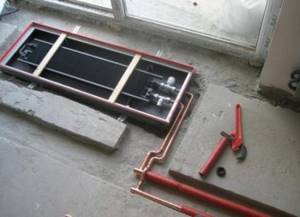
Installation diagram
Box installation
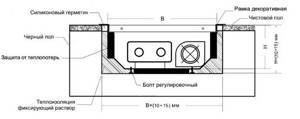
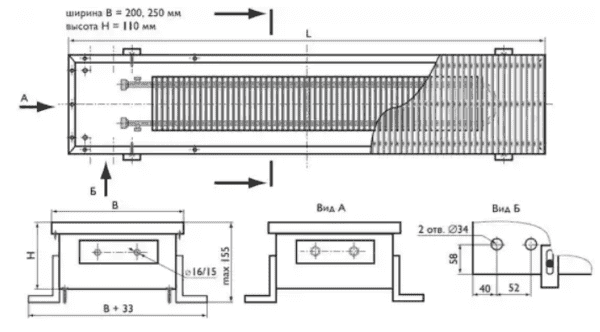
The preparation of a niche for the unit body is carried out after the brand of the convector has been determined and the dimensions of its body are known. First, determine the installation location of the unit. The recommended parameters are:
- The distance from the window to effectively blow glass is 5–15 cm.
- The distance from the walls (to the left or right of the heater) is 15–30 cm.
It is more convenient to equip a niche for a convector during the process of creating the floor at the stage of building the building. The depth and width of the niche is made with a margin of 1–1.5 cm. This takes into account the thickness of the future screed and finishing coating. The convector grille must be level with the finished floor.
If the heater is installed in an existing floor covering, it is necessary to remove the finishing layer and measure the distance to the rough base. It may be possible to find a unit whose dimensions will fit into the existing gap. If the distance from the rough base to the surface of the finishing coating is small, it is necessary to consider options for deepening the niche.
The heater tray is attached to the base of the niche through adjustable brackets. The horizontal position of the upper edge of the box is adjusted using the bracket bolts and set so that the grille is level with the finishing coating.
When pouring concrete into the box, it is recommended to use a weight pressing from above and install spacers to prevent its deformation.
Connection to the heating circuit
Electric models simply connect to the wiring. Water convectors must be connected to the heating circuit pipes. Before connection work, the fans must be removed. In most modern models they are attached using magnets or Velcro. The heat exchanger can be connected in two ways:
Flexible connection. Flexible hoses with metal braid are used. This installation requires most convector models that come with flexible hoses. This method is convenient because it is not demanding on the accuracy of the location of the supply pipes. The flexible connection makes cleaning the convector easier, since it is possible to lift the heat exchanger and remove debris accumulated under it. This connection method is suitable for models with natural circulation.
Flexible connection
Hard connection. This method is used for installing units with an electronic control system, equipped with a servo drive and a forced ventilation system. A servo drive and a thermostatic valve with a remote sensor are installed on the supply pipe, and a check valve is installed on the return pipe. A rigid connection is made using fitting elements. Supply pipes must be thermally insulated and laid in a screed.
Hard connection
The quality of the connection is checked by hydraulic testing: maximum pressure is applied and checked for leaks.
Models with a fan and an automatic control system are connected to the power supply.
After pouring the screed and installing the finishing coating, a decorative frame is installed and covered with a grille.
Video of how to install the convector:
During operation, the heat exchanger radiator is periodically swept with a brush, and the bottom of the box is cleaned with a vacuum cleaner. Such measures must be carried out at the beginning of the heating season in order to make the heater work as efficiently as possible.
Installation of a water convector
The basic component of this convector is the heating battery. The main goal when using water heating is that it is necessary to make the correct calculation of heating convectors in order to create the most comfortable and optimal conditions in the room by choosing the correct power of the heating convector. A specialist, instructions and special formulas will help you calculate the power of a heating convector. When installing the battery, it is also necessary to take into account the fact that radiators are made of different materials.
The most expensive are considered to be a convective heating system with copper-aluminum sections.
When installing such convectors, it is necessary to use connecting components made of copper, and they are not cheap. Such radiators are used mainly to lighten the design of the heating system. Aluminum and bimetallic radiators are used much more often. However, such radiators will also require the purchase of expensive connecting components.

Water covector device
The cheapest is considered to be a heating convector made of steel. Such a battery can have two types of connection:
Types and types of heating convectors
- Bottom connection;
- Lateral connection.
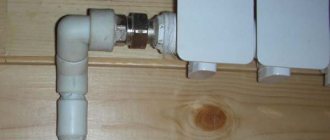
Installation of a water convector, first of all, begins with fixing the radiator to the wall. To do this, you will need to drill the necessary holes and secure the hooks with which the battery will be held on the wall. It will then be necessary to hang the convector sections on these hooks. After this, the heating convectors can be connected to the heating system using the pipes. For this purpose, a heating convector connection diagram is used.
A water heating radiator can be connected to the heating system using plastic or steel pipes.
If you are using steel pipes, you will need to call a specialist, but in the case of plastic pipes, you can make the connection yourself using an iron for welding plastic. However, if you are not sure, it is better to also invite a specialist.
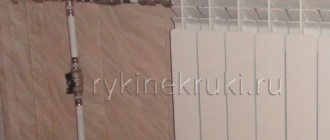
Wall mounted water radiator
Standard connection to heating pipes
The underfloor convector is connected to standard heating pipes using the supplied parts. Pipes can be located in specially prepared recesses to hide communications. It is technically possible to connect several devices in series, but if the sections are long, it is recommended to separate them for parallel supply of coolant. Convectors with index B (built-in fan) will require electrical wiring.
Installation work and connection should be carried out strictly according to the instructions for the device, observing the requirements of the standards. The technical characteristics and design of KZTO convection water heaters comply with the standards for heating systems of private and apartment buildings.
Installation of electric convectors
This type of convector, such as an electric one, is also excellent for heating rooms. Installation of heating convectors of this type can be done independently. To do this, you will need to perform the following steps in a certain sequence:
- First of all, you need to remove it from the packaging.
- It is necessary to remove the protective film from the convector panel.
- Next, you need to choose a place to install the convector.
Electric convector
When installing a heating convector with your own hands, you must consider the following recommendations:
Technical characteristics of water heating convectors
- The distance from the floor to the bottom of the convector must be no less than 20 cm.
- The distance from the walls should be no more than 25 cm, and from the ceiling no less than 55 cm.
- The distance from sockets must be at least 35 cm.
The electric convector must be installed as follows:
- The convector is turned over and support legs with wheels are fixed on it. In order to screw them on, you will need standard bolts.
- The convector turns on, and then the necessary modes and other parameters are set.
Electric heating convector - installation and types (wall-mounted, with fan, liquid)
An electric convector is one of the most popular modern devices for heating an apartment, private house or industrial premises. It does not require special conditions for operation; it is simply installed and effectively heats the premises.
Operating principle and main characteristics of electric convectors
These heating devices owe their name to the physical phenomenon of the same name on which their action is based. When passing through the hot heat exchanger of the convector, cold air heats up, becomes lighter and rises higher. New layers of cold air take its place, forming a constant directed flow of heat.
With electric convectors, the heat exchanger is heated due to the consumed electricity. To do this, a special element (heating element) is installed inside the housing.
Electric convector device
In most models, the heat from the electric heater is immediately transferred to the surrounding air, but not so long ago a new interesting modification appeared - a liquid convector. It contains an additional container with coolant, which serves as an intermediate link between the air and the heater coil. This solution allows you to increase heating efficiency - a liquid convector consumes noticeably less electricity when heating the same area.
In addition to the energy source, the technical characteristics of convectors include:
- installation method: wall, floor, built-in;
- power consumption;
- effective heating area;
- thermostat type;
- presence of a fan.
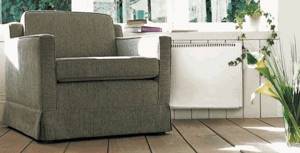
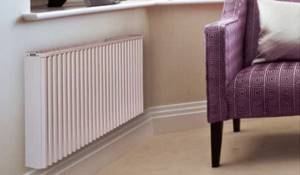
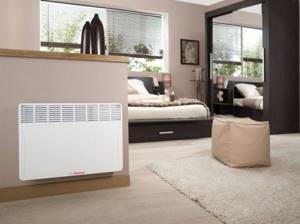
Wall and floor convectors
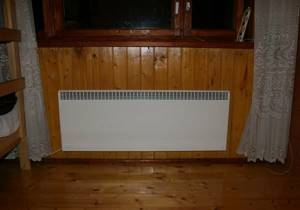
Wall-mounted electric convectors are a classic option for a private country house. Particularly convenient are models that can be combined with each other to heat several rooms.
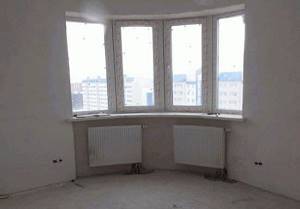
Installing an electric convector under a window is the most correct way to place it, since it is in this place that it can best protect the room from the penetration of cold air and optimally warm up the entire working volume.
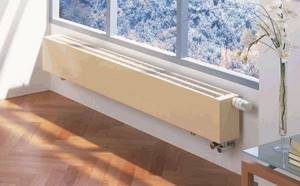
Heating large areas with floor-mounted convectors is not very effective - you will need to run an electric wire across the entire room, and the device will get in the way and can be accidentally dropped or scratched. Therefore, floor installations are usually used for local heating, for example, in an office workplace.
Wall and floor convectors
Installation of gas convectors for heating systems
Self-installation of a system such as a gas convection heating system is unacceptable, as the consequences can be quite dire. It is necessary to invite a specialist, and to do this under his supervision or entirely by his own efforts. In order to carry out correct installation, you must complete the following preparatory steps:
- Support legs are made. They can be made from scraps of steel or aluminum pipe.
- Using a drill, you need to make a hole of 22-23 cm in the wall if the air vent is 14.5-15 cm in size.
- A screen consisting of two layers of basalt blanket is mounted on the wall.
- Similar insulation is mounted on the outlet pipe of the gas convector.
- The convector body is mounted vertically on the wall. The convector is connected to the gas main and the heater is turned on.
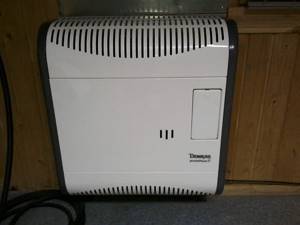
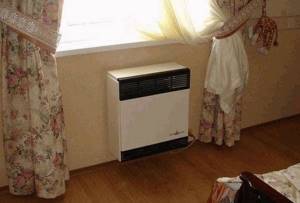
Gas covector
When installing different types of convectors, the following tools and materials may be required:
- Drill and drill bits with different diameter sizes;
- Simple and anchor bolts;
- Chisel and hammer;
- Stainless steel sheets;
- Basalt thermal insulation;
- An iron designed for welding plastic;
- Grinder, you can also use a hacksaw.
- Plastic pipes;
- Pipe scraps and other various materials.
Gas supply to the convector
Close the gas valve located in front of the meter.
This process requires special attention in any room, and even more so when it comes to a wooden house. The main thing here is to check whether all gas supply elements correspond to the description of the accompanying documentation.
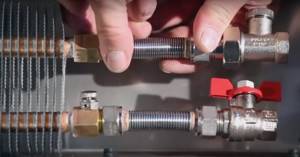
Ball valves with yellow handle markings are screwed onto the convector. They must remain closed until start-up. It is necessary to screw a hose or sleeve to the gas cylinder or line; be sure to check the presence of a paranitic gasket in the union nut of the hose.
The next step is to connect the other end of the hose to the tap installed on the gas convector. Here you should also check whether there is a gasket. Then you need to crimp all connections using spanners.
Calculate the force; it is important not to overpress the gaskets, otherwise gas will pass through damaged parts of the system.
Now you can open the gas and taps on the convector. Using a shaving brush, apply the foam solution to all joints. After making sure that there are no leaks, you can proceed to the first start-up.
The first start-up in a wooden house is made with the windows open for ventilation.
Advantages, disadvantages
Advantages:
- Easy to install and operate. It comes down to three steps: remove the packaging, hang it on the wall, plug it into the socket. The controls are intuitive.
- Reliability, long service life - up to 15-20 years. Virtually no moving parts, proven designs.
- Safety - maximum heating temperature of the thermoelement is 80 degrees. Fire and serious burns are not possible. Location on the wall or ceiling reduces the risk to a minimum.
- Environmentally friendly - does not burn oxygen.
- Efficiency - up to 97%.
- You can fit the convector into any interior by placing it on the wall, ceiling, or floor.
The disadvantage is the cost of electricity needed to operate. But, due to rising prices for other energy sources, the disadvantage is less noticeable in comparison with the advantages.
Floor recessed design
Advantages and disadvantages of floor-mounted convectors
We list the positive and negative features of in-floor heaters without dividing them by the type of energy carrier used and listing the characteristics inherent in all convectors as a whole.
- due to the location of the unit, the lower, coldest layers of air are heated;
- installation of devices does not reduce the usable volume of the room;
- quick access to working mode;
- preventing the formation of condensation on glazing.
- with high ceilings, building natural convection units into the floor is not effective - convective flows of heated air are concentrated high under the ceiling and cool down before they fill the actual volume of the room;
- convection from the level of the floor covering initiates intense movement of dust in the air, which is constantly present in the air during heater operation;
- inconvenience of daily care of niches in which household waste accumulates.
Deciding on the location for installation
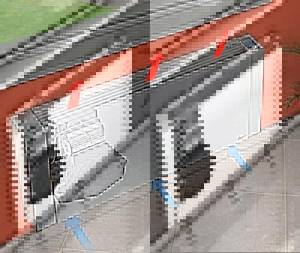
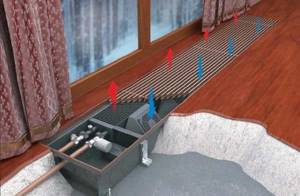
The quality of operation of the in-floor convector depends on the chosen location. Silence, speed, power, efficiency - these factors are fundamental. The distance from the window or wall should be at least 8 cm and no more than 35 cm. The fan should be placed in relation to the window so that air flows are drawn in and used to heat the room. Air flows can be divided into two types: large and small. The large one is directed in the direction of the heat exchanger, and the small one is directed in the direction of the fan. The convector will work for heating when the fan is directed towards the window to draw in air. To remove condensation from windows, the fan must be located in the center and the heat exchanger in relation to the window. This will allow you to heat the room with a smaller flow and blow the window with a larger flow.
Installation of an in-floor convector: choosing the type of pipes
Expert advice: install pipes made of the same material as those present in the room. This will allow you to achieve better hydraulics in the system.
Pipes connected to the convector can be from:
- Cross-linked polyethylene - installation is carried out using a press tool.
- Polypropylene - requires a special soldering iron and adapters.
- Copper - requires a special heating pad and solder, angles and fittings.
- Steel - requires a welding machine and electrodes.
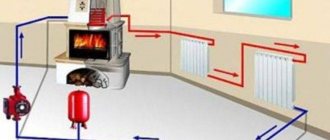
Choosing convector heating for a private home
Heating in a wooden house with convectors running on liquid coolant is the best option because it ensures fire safety. Water heating is also suitable for heating multi-storey buildings and several rooms at once. Since all radiators are connected to the same wiring, all rooms can be maintained at the same temperature. This cannot be achieved with gas and electric convectors.
Electric convectors are suitable for heating one residential or commercial space. These devices can be used to heat a garage, greenhouse or balcony. It is not profitable to use electric convectors for heating several rooms, because in addition to purchasing a unit for each individual room, there will be significant energy costs.
Electric convectors can be used to heat small houses for seasonal use. This way you will be protected from freezing of the coolant during the cold season when the owners are absent from the house. Gas and electric convectors are not suitable for heating a large house. A significant disadvantage of gas units is that for each device you need to install a separate chimney and make a hole in the wall of the house. In this case, it is much more profitable to install a gas boiler and organize water heating.
Pros and cons of convector heating
The advantages of convector heating in a private house are as follows:
Individual devices can be used to heat all rooms, regardless of their purpose. Water convectors are used to maintain a comfortable temperature in several living rooms, and electric gas units are more suitable for utility rooms and seasonal buildings. Water radiators and electric convectors do not burn oxygen
This statement is true only for gas units with a closed combustion chamber. Convectors maintain a comfortable temperature in the room without changing the air characteristics, which is important for people’s well-being. There are devices on sale with different sizes and characteristics, so each buyer can choose a suitable convector. The main advantage of such devices is their visual appeal. Thanks to this, they fit well into the interior of the rooms. Convector appliances heat the air in the room quite efficiently and quickly. To reduce heat loss, a convector-type device is installed under the windows to form a thermal curtain. The device can be installed on the floor or hung on the wall
Mobile convectors can be moved from place to place. There are many types of water convectors - baseboard devices, in-floor units, devices hung on walls.
The main disadvantage of convector heating is the excessive dryness of the air in the room. Active air circulation contributes to the same movement of dust in the room, which negatively affects the health of young children and allergy sufferers. Another disadvantage is that the difference between the air temperature at the bottom and at the top of the room is significant.
Another disadvantage of convector appliances is that they cannot be used for heating high rooms. This is due to the fact that the heated air will be high under the ceiling, and it will be cold in the area where the person is staying.
Installation and piping of batteries in the floor
The difficulty of installing an in-floor convector with your own hands is that its grille is flush with the floor covering
Therefore, it is extremely important to accurately align the heat exchanger trough with the water level. At the same time, it is necessary that it stands rigidly, because people will walk on the grate
Installation is carried out in a cut-out niche; a screed is poured around the perimeter. Filling nuances:
- stick damper tape around the perimeter of the body;
- Do not remove the grate until the solution has completely hardened.

The convector grille must be level with the floor.
The damper tape compensates for thermal expansion of the screed and dampens possible vibrations from fan operation
It is extremely important that the grille is inserted into its seat. During hardening, the screed may deform the trough and the grate will no longer fit there at all.
The case has holes for several connection options, which mainly depend on the position of the radiator relative to the circuit. In principle, the simplest piping option is to install conventional ball valves on the supply and return. Ideally, faucet handles should face down so that they are not visible through the grille. Also, some convectors do not have enough trough height to install shut-off valves with the handles up.
Here we compared pipes for heating a private house.
The piping method described above is not suitable if you have a long heating system with several branches of different lengths. In this case, for proper operation of the circuit, balancing will be required, and for this there must be a balancing valve on the radiator return. In addition, ball valves do not make it possible to regulate the degree of heating of the battery, which is very useful. Therefore, you need to install a thermostatic valve on the supply, preferably in tandem with a thermal head or servo drive.
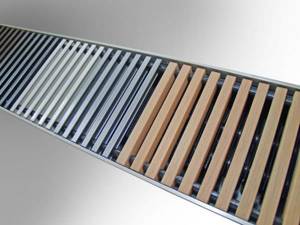
General understanding of floor-mounted convectors
Convectors that are simply built into the floor are a durable rectangular body, often framed, covered on the front side with a decorative metal grille. The housing contains a heat exchanger that is heated, depending on the type of heating device, by the coolant or electric heater circulating through it.
In-floor heating convectors are installed in separate point or general linear niches made in the load-bearing floor according to the size of the heaters, as well as in the space between the raised floor and the concrete base. To reduce heat loss, the bottom and side walls of the casing of in-floor convectors are equipped with external thermal insulation.
The design of such heaters includes adjustment screws that allow precise adjustment of the horizontal position of the front grille plane to the level of the finished floor covering, so that the protruding parts of the body do not create obstacles when walking on them.
Sectional diagram of the device in the floor of an in-floor convector
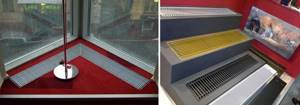
For more efficient use, floor-mounted heaters are located along panoramic glass enclosing structures and window openings in order to use convective flows also as a thermal curtain between the room space and the cold glazing surface.
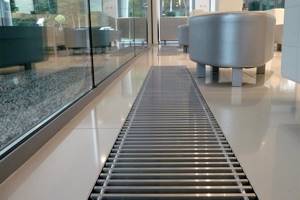
Option for installing a TURBO VKN5 duct convector with a fan into the floor.
How to maintain a trench convector?
Like any other heating equipment, trench heating convectors require periodic cleaning. This is done using a vacuum cleaner, after removing the protective grille. Clean the finned surface of the heat exchanger, using a brush if necessary, to remove dirt and dust. The grill itself can be washed with water.
During hydraulic tests, when the pressure in the heating system exceeds the nominal one, it is necessary to make sure that the convectors do not leak. To do this, just open the grille and inspect the box. If it is dry, it means that the convector has passed the test with honor.
Subject to the installation and maintenance rules, in-floor water heating convectors will bring warmth to your home without violating the overall design idea. A convector installed in front of the front door can trap up to 90% of cold air when it opens and create a thermal curtain. At the same time, they are silent, look stylish and, thanks to the variety of colors, fit perfectly into any interior, giving coziness and comfort.
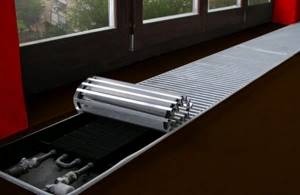
With or without a fan?
Fans on in-floor water convectors significantly increase the power of the system as a whole, since they force air through the radiators. Using fans, you can absolutely precisely regulate the volume of air passing through and, accordingly, the air temperature in the room. Of course, such a system upgrade will take a little more money out of your pocket, but if you are ready to spend money for greater comfort, feel free to install it, you won’t go wrong!
Types of in-floor heaters
There are many models of in-floor heaters produced today, and they all differ in some way from each other. If we do not consider parameters of secondary importance, then all heating convectors built into the thickness of the floor can be divided into two groups:
The units within each of these two groups differ in size, configuration, power, design of the external grille, type of convection - natural or forced (with fan) and performance class.
Water heaters for internal floor placement
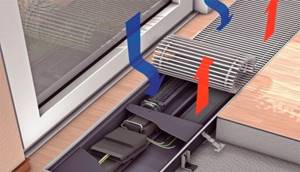
An underfloor water convector is a heating device connected to a central or autonomous heating system.

The operating diagram of a water in-floor convector is the flow of cold air from the glazing of the window opening to the heating device, its heating and exit into the room.
A valve is installed at the point of insertion into the system, which can be used to regulate the amount of coolant circulating through the floor water heater.
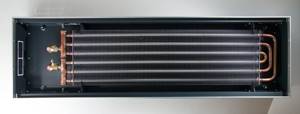
The main element of the unit is a radiator with inlet and outlet fittings, through which flexible hoses or fittings are used to connect to the heating system, and hot water circulates through the heat exchanger.
Connecting the radiator of a floor-mounted heater using flexible hoses.
The radiator is made of a copper pipe, on which aluminum fins are made to increase the heat transfer area. Modern water heating convectors are equipped with automatic release valves for air entering the system along with water, which eliminates the formation of air locks and ensures efficient operation of the unit due to the stable intensity of coolant circulation.
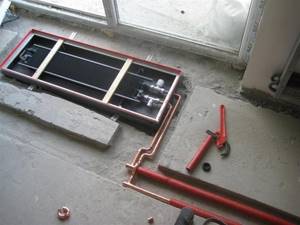
Installation of a water convector in a niche and its rigid connection to heat-insulated pipes in grooved channels.
The intensity of the coolant supply to the convector can be manually changed by a valve at the point of connection to the heating system, but it is more effective to install a mechanical thermostat at the inlet of the heater that regulates the flow of hot water into the heat exchanger depending on the temperature of the water in the radiator.
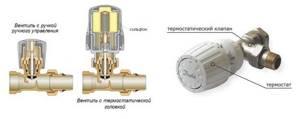
On the left is a schematic cross-section of a manual valve and a mechanical thermostat, on the right is a natural image of the thermostatic head.
Floor-mounted heaters with a natural type of convection are designed for heating medium-sized rooms (16-25 sq. m.).
To ensure the natural movement of convective flows, the depth of the housing box must be at least 20 cm, and yet even multi-pipe devices of the natural type of convection do not always cope with the role of the main and only means of heating, forcing homeowners to additionally use other heating devices.
Multi-pipe radiator for a floor-mounted water convector with increased heat transfer.
The main advantage of this group of in-floor heaters is safety due to the absence of factors associated with the use of electrical appliances. In-floor water heating convectors do not require grounding, are not afraid of direct contact with moisture (this often happens on the floor), the surface temperature of these units is safe for humans upon short-term touch, and the outer grille can be made of valuable wood.
Methods of arrangement of floor-mounted heaters: on the left - corner placement, on the right - installation in steps.
Tips for choosing convectors
It is advisable to make the decision to install a convector at the stage of planning the flooring. What parameters should you pay attention to when selecting a heater?
Case material
If the device will be installed near the entrance doors, then it is advisable to choose a model with a stainless steel body. The fact is that during the winter period snow can get into it, high humidity and elevated temperature accelerate the oxidation processes of the metal by an order of magnitude. There is a lot of moisture in indoor pools, bathrooms, etc. Even high-quality galvanizing cannot withstand such difficult operating conditions for long. One more thing. A decorative closing grill rests against the body. If it is subject to significant loads, then the housing must be selected from thick, durable materials; it is to this that the loads are subsequently transferred.
Convector with stainless steel body
Case dimensions
Manufacturers offer products of various lengths, widths and depths. How do these parameters influence the choice of a specific convector?
- Length . It is desirable that it be equal to the width of the window or doorway. If such options cannot be found, then professionals recommend installing two convectors in a row, their total length must meet the requirements described above.
- Width. It does not have any particular influence on the technical parameters; when selecting a model, it is recommended to pay attention only to the interior design of the room.
- Depth. A very important parameter. For residential premises, it is recommended to buy low convectors; they are much easier to install on thin floors of buildings.
Keep in mind that the linear dimensions of the case depend on the number and capabilities of the equipment and elements installed in it.
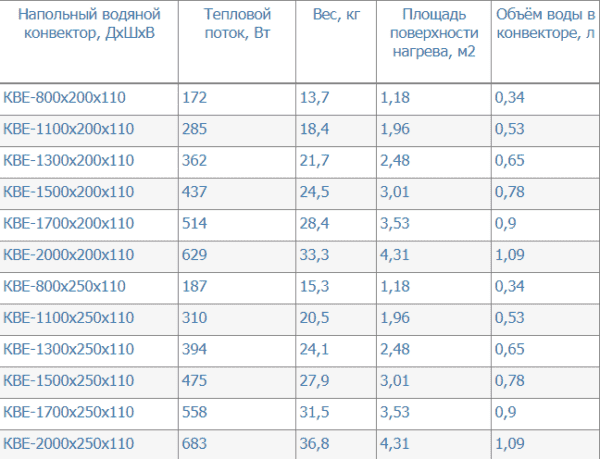
Built-in convectors KBE with two-row six-pipe heat exchangers (without fan), characteristics
Trench convectors KBE 110 mm high
Heating method
Convectors can have water or electric heaters. Electric ones can be installed on all types of floors, they have completely autonomous control. Water, respectively, only in rooms with floor heating systems. This somewhat worsens the technical characteristics of the devices; the temperature of the coolant depends on the temperature in the overall system. This feature limits the possibility of built-in convectors.
Water trench convectors
Another difference between water and electric types of convectors. Electric ones can be installed at any convenient time; to do this, you only need to partially dismantle the flooring. It is recommended to install water systems only simultaneously with the installation of a floor heating system; if this condition is not met, the combined system will not function.

Convector with heating elements and fan
Radiator dimensions
The efficiency of heat transfer depends on two factors: materials of manufacture and surface area. All manufacturers use materials with maximum thermal conductivity during the production of devices; there is not much choice here. Changing heat transfer is mostly done by adjusting the size and number of radiators. But this parameter must be consistent with the size of the windows or doors.
Ventilation type
Air can pass through the heat exchanger due to natural movement or with the help of electric fans. The first option works more reliably; convectors can be installed in any premises, including those without electrical wiring. The disadvantage is the insignificant power of the convector, and the change in heat transfer occurs outside the user’s wishes.
Convector with fan
Forced ventilation is performed using axial or radial fans. The air flow speed does not depend on external conditions; the convector can change its performance taking into account the specified modes. Disadvantages - the installation process becomes somewhat more complicated, and the noise in the room increases. Keep these device performance characteristics in mind when making your selection.
Grill type
In most cases, gratings are made of durable metal alloys. They can be rolled up or stationary. When choosing, it is recommended to pay attention to two parameters: physical strength and appearance. The greater the load on the floor covering, the higher the strength of the lathing should be.
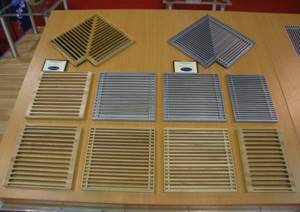
Grilles for trench convectors
Decorative grilles
Operating pressure
For private residential buildings, this indicator does not matter; the pressure in water supply networks for various purposes does not exceed 3 atm, and the minimum operating pressure for all types of convectors is never less than 10 atm. As for apartment buildings, buy devices with maximum pressure testing values. Before the start of the heating season, water supply systems in houses are tested with high pressure; convectors must withstand it.
Additional control and monitoring equipment
To control and change operating modes, electromechanical or mechanical instruments and devices are used. The elements are located directly in the housing, and control can be from a remote control. Electronic models allow you to program not only the temperature, but also the frequency of on/off. The choice of convector type depends on the wishes of use and the operating characteristics of the room.
How to choose a heating device by power
Step one is to determine the heat energy requirement for each room. Calculated according to SNiP or a simplified method - 0.1 kW per 1 m² of area. The choice of electric convectors is simple; the thermal power of each modification is indicated in the passport.

Table from the instructions for the electric convector from the Ballu brand
Choosing and buying a water floor heater is more difficult. The technical characteristics of the device indicate heat transfer under certain conditions, for example:
- t (temperature) of water in the supply pipeline – 75 degrees;
- return t – 65 °C;
- air t in the room – 20 °C.
If you send a coolant with a temperature of 60 °C into the convector, its power will decrease; you need to take the device with a certain reserve. To accurately determine the heat transfer value of a specific model, you should use the manufacturer’s data; there are no other options.
Reference. The Verano company publishes in the equipment data sheets a table of the power of each heating device under various operating conditions. Let us give an example of such a table for a convector with a height of 300 mm and a width of 284 mm.
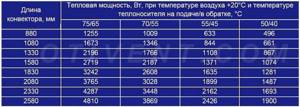
The heat transfer of a convector of a specific size depends on 3 temperatures: water in the supply/return line and room air.
Since the range of convection-type heaters is quite wide, it is unrealistic to lay out the technical parameters of all devices here. Therefore, to select the size of the convector, it is better to contact an online store consultant or visit the manufacturer’s official website.
Expert advice
Convectors belong to the category of simple, promising heating devices. For those who want to purchase and install it correctly in a house, apartment, or office, a few tips from experts will be useful:
- Convectors are potentially dangerous electrical appliances. If you are not confident in your skills as an electrician, contact a professional. This especially applies to laying a dedicated power line to the device and installing in-floor models.
- Electricity can compete with gas. Plus - simplicity, freedom of installation of the convector - incomparably greater than when installing a gas boiler. You can reduce costs with a two-tariff meter (the night tariff is cheaper).
- You need to know exactly the required thermal power. You can install convectors at several points in the room.
Choice
You need to be guided by value, purpose. Can be used as backup, main heating, thermal curtain generator in front of panoramic windows, glass walls (for example, on verandas, winter gardens, greenhouses).
The second sign is the power of the device. For 10 sq. meters of area should account for 1.2-1.5 kW of power.
It is enough to purchase 2-3 devices and place them evenly throughout the room along the external walls, under the windows. It costs less than buying one powerful device, will reduce the load on the electrical network, and will create a safety margin for the heating method. If one breaks, the room will be heated by the remaining ones.
The third important factor is additional functions. They make the device comfortable and multifunctional. The mandatory number of additions includes protection against overheating, tipping over, and short circuit. Useful: air humidifier, ionizer, forced circulation, remote control.
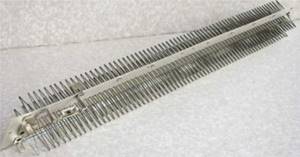
Needle heater