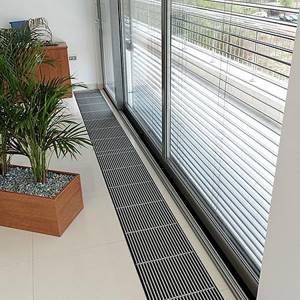
Heating convectors built into the floor.
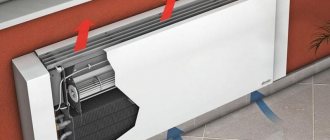
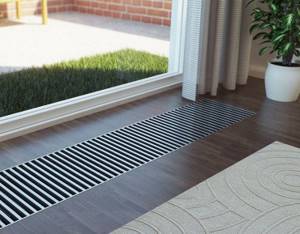
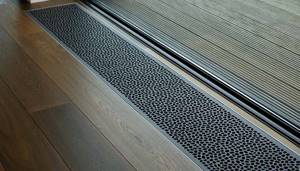
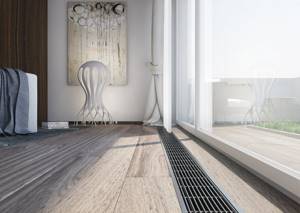
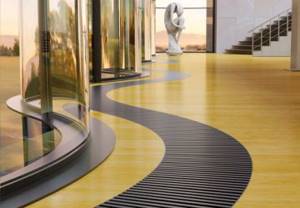
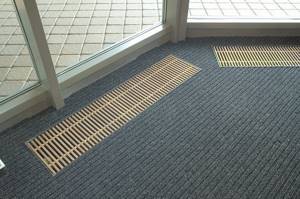
Nowadays, many people living in private houses have changed their choice from heating radiators (radiators) in favor of convectors built into the floor. This heating method appeared relatively recently; it is not used in apartments. In fact, such a convector is the same as a heating radiator, but with a modified design, and it is built into the floors. It will not spoil any interior; it is often used with panoramic glazing (when the glass is the length of the entire wall). They look like a long pencil case with a heat exchanger located inside. There is a decorative grille on top. Once assembled, the convector is placed in a specially designated place in the floor and connected to the heating system.
Installation work
The installation instructions for water heaters are simple and consist of connecting to a heating pipeline.
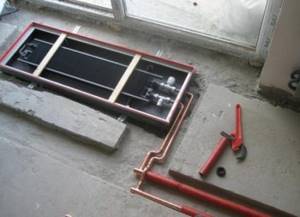
In-floor models are installed simultaneously with the installation of the floor; wall-mounted or baseboard models can be installed at any time. The installation process includes routing electrical cables, coolant supply circuits, and creating a niche for the unit box, which must be flush with the finished floor. It is better to entrust this work to qualified specialists.
Depending on its purpose, a heating water convector can perform 2 functions:
- to heat the room - the device is installed away from window openings;
- create an air barrier for cold air in the window area - a heater opposite the window at a distance of 20 to 30 cm.
Impeccable heating is achieved by observing the mandatory conditions during installation:
- The supply/discharge of coolants is made from rigid or flexible connections and shut-off valves
(included).
- The convector niche must have such a depth that the decorative cover of the device is flush with the finished floor.
- Permissible gaps for the width and height of the convector are from 10 to 15 mm
. - Using adjusting bolts, the water heating convector is leveled horizontally and secured
. - Gaps are insulated and sealed with special material
. - After installing the finished floor, connect the water supply
(electrical is required if there is a built-in fan). - Seal the remaining cracks with sealant/finishing material, turn on the device and cover with a grill
.
Installing wall and baseboard heaters does not have so many nuances and consists of connecting the object to the water supply network, and this is easy to do with your own hands.
Before working with the wall heater, you need to remove the battery, then proceed directly to installation.
- Instead of radiator plugs, screw two couplings with a diameter similar to the hose onto the pipes - usually 20 mm.
- Fix the convector on the brackets and align its thread axes with the axes of the bends.
- Rewind the threads on the heater, push the couplings onto them until they stop and tighten the locknuts.
- To avoid water hammer, when starting the riser, open the valves slowly.
Is the fan closer or farther from the window?
The position of the in-floor radiator fan in relation to the window opening depends on the intended purpose of the device . If the convector is installed only as a thermal curtain , the fan should be located closer to the room and direct the flow of warm air onto the glazing.
If the main function of a floor-standing convector is heating the room , then the fan must be installed closer to the window opening so that it directs cold air from the glazing through the heat exchanger into the room.
We recommend that you always install the fan closer to the glazing . Thanks to the increased power of these devices in this position, they will cope with both functions: heating and cutting off cold air.
Homemade heating batteries
How to combine cork flooring in an apartment interior; area of application, design possibilities
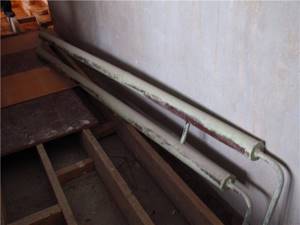
Despite the huge range of heating radiators on the market, for dachas, garages and small houses it is more economical to use homemade heating radiators, which will cost much less.
Such batteries can be made from round pipes, and from square or rectangular pipes. This design is called a heating register. The principle of operation of the register is similar to that of . The coolant heats the metal of the register, and it heats the air in the room. There are two types of homemade heating devices - homemade heating radiators made from round or rectangular pipes. Homemade registers made from rectangular pipes are more compact, they are easily hidden in the interior and have proven themselves well in operation.
Registers made of round pipes are divided into two types:
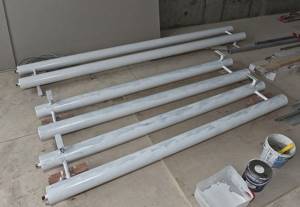
- sectional registers;
- serpentine registers.
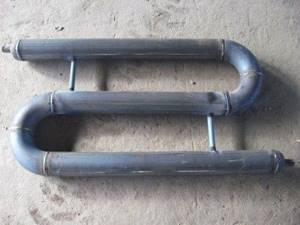
These devices are made from pipes of different diameters and differ in structural geometry. In sectional registers, large-diameter pipes are arranged in parallel and connected to each other by a pipe of a smaller diameter, and in coil registers, a large-diameter pipe can have several bends. After production, the registers must be subjected to high pressure testing. Test pressure - 13 atmospheres.
Classification
Sprayed thermal insulation scope, advantages and disadvantages, application technology
Convectors used in water heating systems may differ in design features, technical characteristics, control method, etc. These devices are usually divided according to the type of execution into the following types:
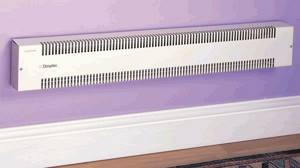
wall models. A characteristic feature of this type is its light weight and compact size, which allows installation on room walls, including plasterboard. Note that despite their small dimensions, these devices are much more efficient than conventional water heating radiators;
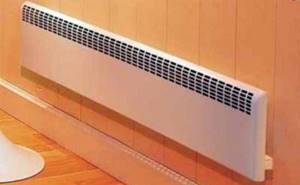
Wall version
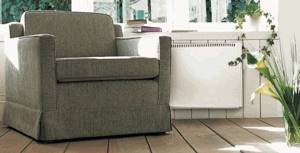
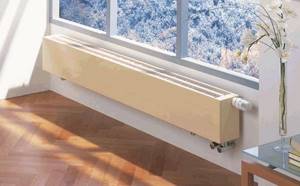
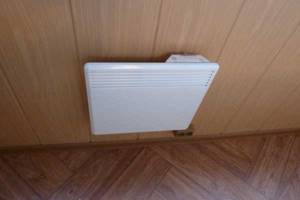
floor placement models. The design of devices of this design has much in common with wall-mounted models; it is a solid block. Note that the material from which the convector body is made has low thermal voltage, this allows you to place the device next to various objects without the risk of damaging them;
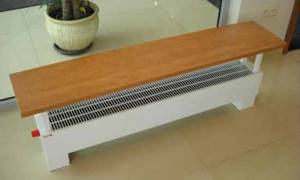
Floor-standing version
built-in models, this type of equipment is designed to be placed in the floor or walls of a room. This installation option will not violate the overall interior concept of the room.
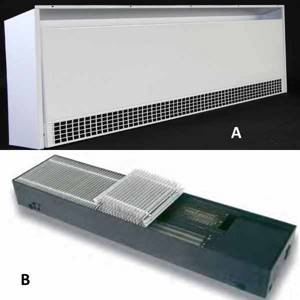
In-wall (A) and in-floor (B) models
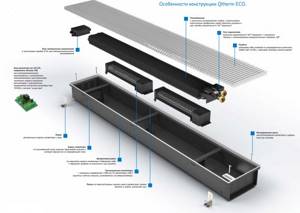
Components of built-in convectors
Reliability and long service life are largely due to the simplicity of the equipment.
Convector design
Regardless of the models, they all consist of several elements.
- Housing (box). Made from galvanized or alloy steel sheets with a thickness of 0.5 mm. Some models are coated with polymer powder dyes to increase resistance to corrosion processes. The body is laid flush with the finishing coating, precise adjustment of the spatial position is carried out by special screw devices. Inside the box there is all the equipment, water shut-off and control valves, electrical cables, etc. The specific list of elements depends on the type of convector. The dimensions of the housing vary widely, which allows them to be installed under various types of floors. The appearance of the case does not matter; it is completely hidden by the decorative grille.
- Heat exchanger. There may be a water radiator or an electric heater. To increase heat transfer, special technical solutions are used or the number of radiators is changed.
- Decorative lattice. It is made of stainless alloys, alloy steel, and there are options made of wood. Through the decorative grille, cold air enters the convector and heated air is removed. The grille is double-sided; after critical wear on one side, it turns over.
Heating adjustment is carried out using manual or electromechanical devices, heat exchange is done using a natural or forced method.
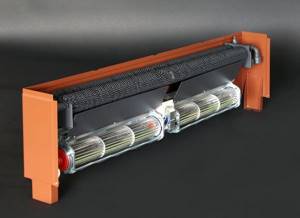
Floor-mounted convectors, design
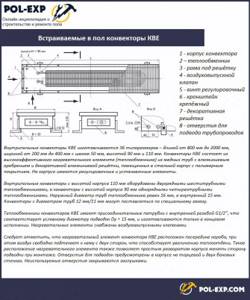
Floor-mounted convectors KBE
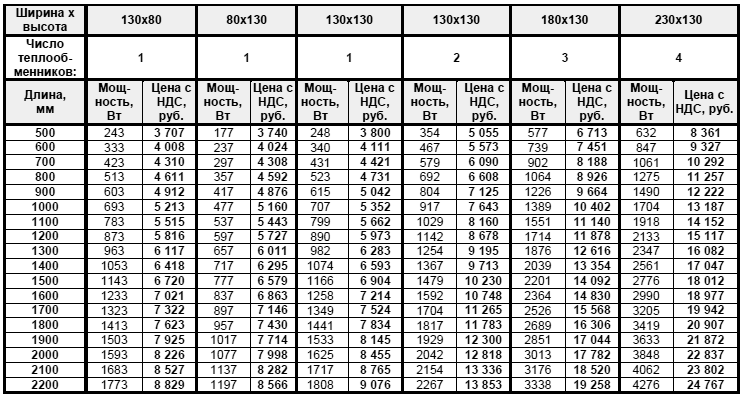
Prices for convectors built into the floor
convector built into the floor
Selection of convectors
Choosing a boiler for a warm water floor, characteristics of types, scope of application
Installing an in-floor convector may seem like a rather complicated process. Therefore, we will describe everything step by step, starting with the choice of equipment. We can install electric or water heating devices in front of panoramic windows or in front of the entrance area - it all depends on the type of main heating in the building.
Electric in-floor convectors operate on a 220 Volt network and are designed to heat households not connected to gas mains. Their design most often already includes fans of one design or another (axial or tangential). The disadvantage of electrical appliances is their high energy consumption, but in some situations they are irreplaceable. But to connect them you only need wires.
Electric convectors can also be used in gasified buildings, where it is difficult to install water heating to the place of their installation.
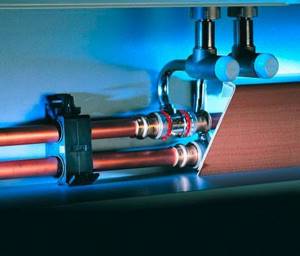
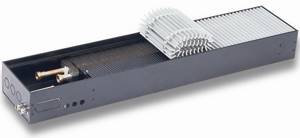
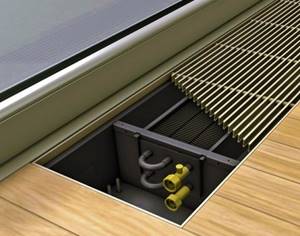
The device of a water convector installed in the floor.
Water convectors have a similar design - they have heat exchangers connected to the heating system. For this purpose, metal or plastic tubes are used, which require certain skill for their installation. In this regard, electric in-floor convectors win - for their installation and connection you only need wires of a suitable cross-section.
When planning the installation of an in-floor convector, pay attention to choosing a model with forced convection. These devices have the following advantages:
- Higher warm-up speed;
- Increased operating efficiency in rooms with a ceiling height of 3 meters;
- Effective removal of moisture from the entire glazing surface.
By choosing in-floor convectors with low-noise fans, you can increase heating efficiency and prevent noise sources from appearing.
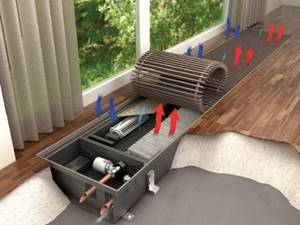
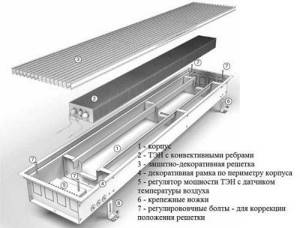
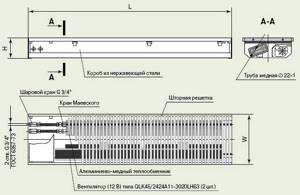
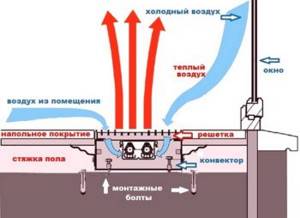
Device and principle of operation
“Convection” is Latin for “transfer.” Therefore, when we talk about convectors, we mean very fast flows of warm air, which is heated by heating circuits laid under the floor. It goes up, then along the wall, passes along the ceiling to the opposite wall, goes down and again enters the convector. The water convector in the floor has a simple design, which includes the following parts:
- metal body;
- holes for pipes with plugs;
- installation brackets;
- a heat exchanger that connects to the heating pipes;
- outer frame;
- decorative lattice.
In addition to these parts, the convector may have shut-off and control valves, a thermostat, and a fan. The body of the device is mainly made of steel. It is built into the floor, raising it to the required height, so you need to plan the type of floor and the installation of the convector at the same time. The heat exchanger consists of a copper pipe and aluminum plates, which provide maximum heat. The heat exchanger pipes are connected to the heat circuit pipes. As usual, control valves are installed here.
In this video you will learn how to install a convector in the floor:
Aluminum plates are soldered to the convector pipeline with a special compound containing silver. It is because of this that heat loss during transmission is minimized. At the top of the case there is space for a frame and grille that covers the inside of the device. The grille must be strong enough to support the weight of a person; it is made of stainless steel, durable plastic or hardwood.
Read also: analysis and rating of the best electric convectors for the garden and home.
Electric underfloor heating units differ in the way the heat exchanger is heated and in their design. The heat exchanger here becomes a heating element placed in a silvered housing. To free a person from this process, a special thermostat is added to the electrical circuit, with the help of which the device turns off when a certain temperature is reached.
Types of in-floor convectors
In water convectors built into the floor with natural circulation, the working process is quite slow, but silent and does not require connection to the network. Equipping a fan adds more efficiency to the system. The fans operate on 12 volts, which is completely safe for people. Cylindrical tangential fans, which are inserted into the convector structure, also operate from the same voltage. This type is most popular today in private homes.
Double-circuit convectors with heating and cooling of air are the third type of appliances built into the floor. They are quite expensive, not everyone can afford something like this, so there is little demand for them. This convector operates on the principle of an air conditioner. In winter, the air is heated by the hot coolant circulating in the heat exchanger, and in the summer, when coolness is needed, the secondary circuit pipes pass cooled liquid, thereby creating a comfortable atmosphere in the room.
In addition to functionality, converter heaters differ in other properties:
- width, height, length of the product;
- power;
- automation and regulation (sensors, valves, control units, etc.).
Convectors differ according to certain criteria.
In addition to water convectors built into the floor, there are other types. These are wall-mounted and floor-mounted water fixtures. The operating principle of the former is the same; they differ in that they are installed on the floor and equipped with stable legs to secure them. They are compact, do not take up much space and heat well. They are placed in place of conventional batteries, and in the case of panoramic glazing they create a thermal curtain. Windows and walls will always be dry.
Positive aspects of the devices:
- simple installation;
- instant heating;
- saving money when paying for electricity;
- light weight and simple device.
When installing in-floor, wall-mounted or wall-mounted convectors, additional room space is freed up. The modern and beautiful appearance makes it possible to use them in any interior. A floor heating convector or a heater built into the floor are the most convenient devices for heating any room.
Installation process
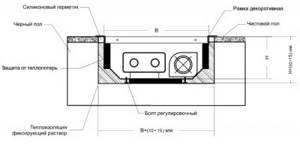
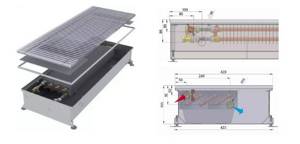
Dimensions of the in-floor convection heater and the niche for it.
If you want to install an in-floor convector yourself, we recommend that you think about the location for its installation during the construction stage of the building - this will make it easier to organize a niche of suitable depth. Moreover, the niche itself should be 1-1.5 cm larger (on each side) than the metal box of the device
. At the same time, you need to make sure that the upper part, where the decorative grille will be located, is on the same level as the future floor covering.
Once the niche is ready, you can begin installing the equipment. We fasten the in-floor convector box using the included fasteners. We check the correct installation using a building level - the heater should be located evenly in the niche, without distortions. Further installation involves connecting to a heating system or electrical network - for this, plastic pipes, flexible hoses or metal pipes of suitable diameter are used.
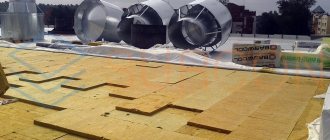
If you are installing a water convector, provide thin, shallow niches for laying pipes/hoses. When installing an electrical appliance, we recommend laying the connecting wires in cable ducts or pipes so that they can be replaced without problems. We recommend wrapping supply pipes with coolant in thermal insulation.
The radiator pipes will also be covered with screed.
At the next stage, we fill in the concrete screed - our DIY installation of the in-floor convector is nearing completion. The result of this stage should be a subfloor, with a metal box protruding slightly from it. Next, we complete the final leveling of the floor and begin laying the floor covering. At the last stage, we place a decorative grille over the box - it is best to choose it in the same tone as the color of the floors.
Do-it-yourself installation of in-floor convectors is complicated by the fact that you need to choose the correct dimensions of the niche so that the metal body of the device is located at the correct depth. Recommendations on this issue can be found in technical data sheets. The worst thing is if you have to carry out the installation in a house that has already been built - it is not a fact that it will be possible to make a niche in the subfloor, as this may affect its strength. In this case, it will be necessary to increase the height of the subfloor in all rooms.
Caring for installed floor convectors is very simple - just remove the decorative grille and remove the dust accumulated inside. Do not use aggressive detergents for this.
Using water as a coolant is a cost-effective idea. Increasingly, instead of the usual batteries, water heating convectors are being installed in apartments. Advantages such as: safety, compactness, exclusive design only contribute to the growing popularity of convectors.
How to maintain a trench convector?
Like any other heating equipment, trench heating convectors require periodic cleaning. This is done using a vacuum cleaner, after removing the protective grille. Clean the finned surface of the heat exchanger, using a brush if necessary, to remove dirt and dust. The grill itself can be washed with water.
During hydraulic tests, when the pressure in the heating system exceeds the nominal one, it is necessary to make sure that the convectors do not leak. To do this, just open the grille and inspect the box. If it is dry, it means that the convector has passed the test with honor.
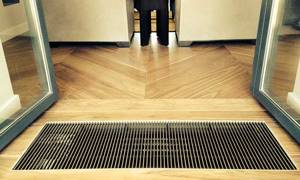
Subject to the installation and maintenance rules, in-floor water heating convectors will bring warmth to your home without violating the overall design idea. A convector installed in front of the front door can trap up to 90% of cold air when it opens and create a thermal curtain. At the same time, they are silent, look stylish and, thanks to the variety of colors, fit perfectly into any interior, giving coziness and comfort.
Design features
Externally, the unit is a rectangular solid body covered with a grille. The floor version looks like a small bench, the wall version is a panel of small thickness, and the built-in ones can be seen only thanks to the grille.
The classic casing is made of stainless steel. But, taking into account the design features of the room and the wishes of the clients, the body can be made of wood, marble chips or MDF panels.

Ascetic on the outside, the inside of the water heating convector is more complicated. Their “heart” is considered to be a heat exchanger, which is a flat copper pipe or a coil-shaped pipe. The lamellas are attached perpendicularly to it using a tight fit method.

The place where they are connected to the pipe should exclude the slightest gaps that reduce heat transfer. Copper is most often used to make plates; steel and aluminum options may be found, the main thing is that the thermal conductivity is high.
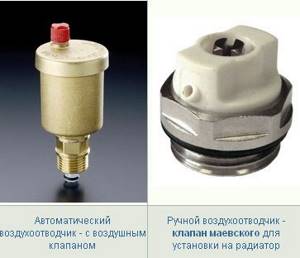
Connection to the riser or central pipeline is made through special threaded entries inside, which are located at the end of the device or on the side. Modern heating water convectors are equipped with tap valves or manual/automatic valves to release excess air that impairs heat transfer.
If the kit includes an electronic thermostat/thermostat, it will control the operating rhythm of the device. The heating process periodically stops when the set temperature is reached and starts again when the air cools.
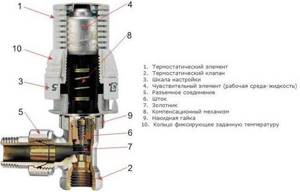
To enhance air circulation, a fan is used, which is either already built-in or will have to be purchased. This useful addition (1-2 pieces) is found only in.
How convection helps you stay warm
Unlike conventional batteries, which warm the air by radiating heat from their surfaces, water heating convectors operate differently. They mix air masses, replacing warm air with cold air and creating a pleasant atmosphere. At the same time, there is no feeling of dryness and a specific unpleasant smell of burnt dust.
Hot water from the heating system enters the heat exchanger and heats the plates. Considering the thermal conductivity of the material used, as discussed above, the parts heat up very quickly. Through the holes in the grate, warm masses rise unhindered, being displaced by cold ones.
The built-in fan stimulates this process, and in a matter of minutes you can already feel the result. At the same time, the efficiency increases to 95%, which makes it appropriate to use water convectors in spacious rooms with large window and door openings.
In accordance with the requirements of GOST 20849-94, water heating convectors must have the primary inherent property - tightness and strength, which is checked by a test water pressure of 1.5 MPa. The heating elements and casing must be coated with an anti-corrosion, heat-resistant compound.
Among other things, water convector heating is relatively inexpensive, given its growing popularity. Installation of a wall, floor or plinth structure by specialists will cost you almost half as much as an in-floor structure. This price is justified by the complexity of the preliminary work on constructing a niche in the raised floor.
Brief characteristics of typical convectors
Their technical characteristics are important for water heaters; it is on their basis that a specific heater model is selected. The characteristics of most standard convectors are within the following limits:
The characteristics of most standard convectors are within the following limits:
- the maximum permissible pressure during operation is 16 bar;
- pressure testing – 25 atm;
- water temperature can reach 130 °C;
- maximum case heating – 60 °C;
- the heat exchanger can be 4 or 6 rows;
- the volume of water in the heat exchanger is 0.7–0.9 l;
- throughput per hour from 90 to 170 liters;
- power from 100 to 200 kW;
- weight ranges from 14 to 21 kg.
Installation technology
You can install the in-floor convector yourself. All work includes the following stages:
- Preparing a niche in the floor for the box.
- Box installation.
- Heat exchanger connection.
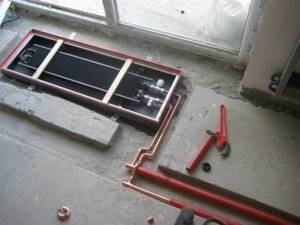
Installation diagram
Box installation
The preparation of a niche for the unit body is carried out after the brand of the convector has been determined and the dimensions of its body are known. First, determine the installation location of the unit. The recommended parameters are:
- The distance from the window to effectively blow glass is 5–15 cm.
- The distance from the walls (to the left or right of the heater) is 15–30 cm.
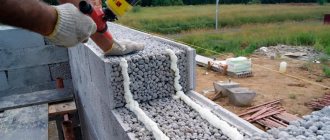
It is more convenient to equip a niche for a convector during the process of creating the floor at the stage of building the building. The depth and width of the niche is made with a margin of 1–1.5 cm. This takes into account the thickness of the future screed and finishing coating. The convector grille must be level with the finished floor.
If the heater is installed in an existing floor covering, it is necessary to remove the finishing layer and measure the distance to the rough base. It may be possible to find a unit whose dimensions will fit into the existing gap. If the distance from the rough base to the surface of the finishing coating is small, it is necessary to consider options for deepening the niche.
The heater tray is attached to the base of the niche through adjustable brackets. The horizontal position of the upper edge of the box is adjusted using the bracket bolts and set so that the grille is level with the finishing coating.
When pouring concrete into the box, it is recommended to use a weight pressing from above and install spacers to prevent its deformation.
Connection to the heating circuit
Electric models simply connect to the wiring. Water convectors must be connected to the heating circuit pipes. Before connection work, the fans must be removed. In most modern models they are attached using magnets or Velcro. The heat exchanger can be connected in two ways:
Flexible connection. Flexible hoses with metal braid are used. This installation requires most convector models that come with flexible hoses. This method is convenient because it is not demanding on the accuracy of the location of the supply pipes. The flexible connection makes cleaning the convector easier, since it is possible to lift the heat exchanger and remove debris accumulated under it. This connection method is suitable for models with natural circulation.

Flexible connection
Hard connection. This method is used for installing units with an electronic control system, equipped with a servo drive and a forced ventilation system. A servo drive and a thermostatic valve with a remote sensor are installed on the supply pipe, and a check valve is installed on the return pipe. A rigid connection is made using fitting elements. Supply pipes must be thermally insulated and laid in a screed.
Hard connection
The quality of the connection is checked by hydraulic testing: maximum pressure is applied and checked for leaks.
Models with a fan and an automatic control system are connected to the power supply.
After pouring the screed and installing the finishing coating, a decorative frame is installed and covered with a grille.
Video of how to install the convector:
During operation, the heat exchanger radiator is periodically swept with a brush, and the bottom of the box is cleaned with a vacuum cleaner. Such measures must be carried out at the beginning of the heating season in order to make the heater work as efficiently as possible.
Brief list of manufacturers
To make your choice easier, we suggest familiarizing yourself with the most well-known manufacturers of convectors; their products have positive reviews from numerous consumers.
| Brand name | Technical specifications |
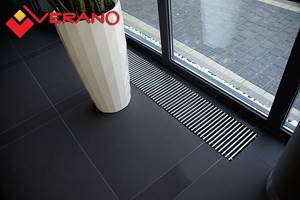
Verano | Manufactured in Poland, can be with natural or forced convection. The thickness of the aluminum radiator plates is 0.22 mm, the steel frame is coated with zinc-magnesium. The diameter of the main copper tubes is 15 mm, body dimensions are from 100×50 mm to 200×100 mm. It is equipped with aluminum, wooden or stainless steel gratings. |
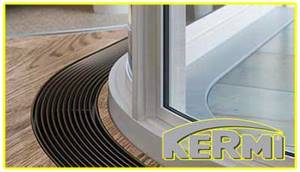
Kermi | They can be with or without fans, the depth of the box is 18–35 cm, the width is 9–20 cm. It is used as additional heating of the room, installed near entrance doors and stained glass windows. The small installation height allows the devices to be mounted on thin interfloor ceilings. |
Mohlenhoff | German convectors for in-floor installation. They can have radial and tangential fans, and there are electric heating options. Depth 7–19 cm, width 18–41 cm. A wide range of models makes it possible to increase the scope of use of the equipment. Maximum pressure 16 atm., working pressure 10 atm. They can function in one- and two-pipe heating systems. |
Jaga | The box is made of galvanized steel, width 14–42 cm, depth 6–19 cm. Manufactured in Belgium, small dimensions significantly expand the scope of use. They can have natural or forced ventilation of the heat exchanger. Service life is at least 30 years. |
Kampmann | Hi-End devices operate with forced or natural ventilation. Manufactured in Germany, the company was founded in 1972. Depth 9–20 cm, low noise fans. The heat exchanger has aluminum fins and can withstand temperatures up to +120°C. |
Minib | Produced in the Czech Republic, they have a reduced height (from 5 cm), which allows the devices to be installed on thin flooring bases. The box is made of stainless steel. They have a wide selection of decorative grilles. |
Heatmann | During manufacturing, the most modern technologies are used, due to which the efficiency is significantly increased. Convectors are manufactured in Germany, the frame is made of powder-coated galvanized steel. Width 10–42 cm, depth 8–20 cm. A wide range of sizes allows consumers to choose the best option, taking into account the size of the room and the specific installation location. There are options with natural and forced ventilation of the heat exchanger. |
Itermic | The devices are manufactured by a domestic company, the casing is made of galvanized steel, there are options with and without fans. Depth 7–19 cm, width 20–40 cm. Heat exchanger tubes are copper, aluminum lamellas. The thickness of the lamellas is 0.5 mm, the diameter of the tubes is 16 mm. Designed for working pressure 15 atm., pressing pressure 25 atm. There is manual or automatic control of operating modes. |
Varmann | They are widely used in Europe and our country, the casing is made of galvanized steel, and electric heater options are available. They can work both for heating and cooling a room with natural or forced convection. Depth 9–20 cm, width 14–37 cm. |
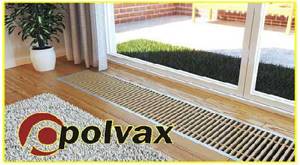
Polvax | The manufacturer is a Polish company; they may have one or two heat exchangers, which increases heating performance. Housing made of alloy sheet steel, depth 7–34 cm, width 18–38 cm. Tube diameter 22 mm, coolant temperature up to +90°C, operating pressure 10 atm. |
Each company produces a wide range of equipment according to technical characteristics, which makes it possible to find the most suitable convector option, taking into account the maximum number of different factors.
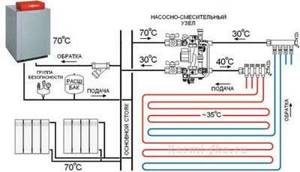
How to make water heating yourself
The optimal connection of a water-heated floor in a two-story house is based on forced circulation of liquid. Water and antifreeze will constantly circulate using a pump, and the boiler can be heated with wood, coal, gas, kerosene, and electricity.
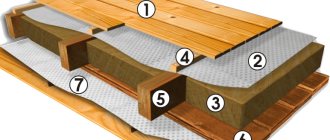
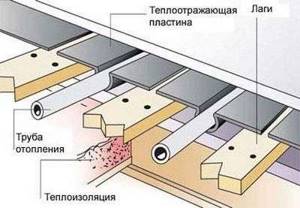
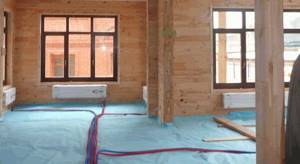
On wooden floors, water heating is performed as follows:
- Insulate the wooden floor if necessary.
- Place and level the joists.
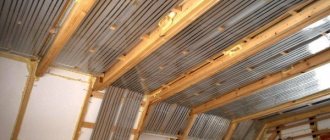
- Taking into account the chosen scheme, heat-reflecting material or an aluminum profile is laid.
- The pipeline is placed along aluminum guides.
- Insulate the space between the joists and the profile.
- According to the instructions, the water heated floor is connected to the gas boiler and the system is tested.
- If the result is good, the structure is covered with a subfloor followed by finishing.
Installation tips and tricks
- When going through a wall, use corrugated tubes (peshel).
- The minimum height of the finishing screed should be 3 cm from the top of the pipe.
- When installing floors from central heating, it is unacceptable to use the coolant directly, since it can disrupt the hydraulics of the entire house.
- If the heated floor is connected to the boiler together with a radiator, then the batteries can be connected to it directly, and the floor contours can be connected to collectors.
- Many components and mechanisms of the structure are designed for pressure within 1-2.5 atmospheres, while in a centralized system it can reach up to 16.
- In principle, you can connect a warm water floor without a pump yourself, using a three-way control valve. It is designed to mix 2 different streams into a common one. With the help of the valve, flows from different pipes are redirected, the water temperature changes due to the mixing of hot and cold flow, it is obtained with a constant indicator.
If a water heated floor is connected to an electric boiler, then the owners will not need to allocate a special room for the boiler room and install a chimney. It does not emit harmful substances and can fit in a kitchen drawer.
Mistakes when laying heated water floors
- The rough screed is not level enough.
- There is no damper tape near the walls. As temperatures change, concrete can expand and contract, causing cracks to form. The tape must be firmly attached to the wall.
- Thermal insulation is not installed. With some savings on material, the desired room temperature will not be achieved. Too thin it also leads to heat loss.
- The use of metal pipes instead of high-quality metal-plastic ones. They are susceptible to corrosion and may leak.
- Careless laying of pipes with deviations from the diagram and failure to maintain the distance between them.
- Using expanded clay as part of a screed above the floor. It is usually added for thermal insulation when pouring on the first floor.
- Turning on the heating too early will damage the integrity of the floor.
Warm floors using a water pipe system are an excellent alternative heating, especially for private homes. To install them yourself, you just need to follow the instructions exactly and perform all the steps sequentially, especially when laying pipes.
Installation of a gas convector
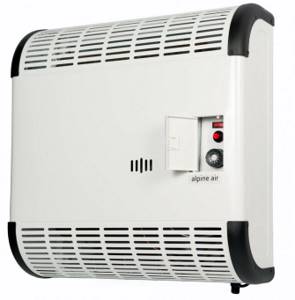
Installing a heating convector that runs on gas is a more complex process, so it is better to seek help from a professional. The complexity of installation is complicated primarily by the fact that a device of this type can only be installed on a gas pipe, which is a domestic one.
The first step is to mark and drill holes for the air intake and coxial pipes. To ensure that the convector is not damaged by water ingress, the air intake pipe must be flush with the wall outside and have a small angle of inclination (from the wall), and protrude inside the room.
The coxial pipe is the main component; its standard length is sixty centimeters, but it can be cut if necessary. In order to avoid various kinds of emergency situations during the assembly and repair process, it is necessary to ensure that all components are connected tightly. The end terminal is installed on the outside
It is important to ensure that the rod is the correct length (if it is too long, the combustion chamber may be damaged). The flue gas exhaust pipe is installed using nuts and a rod into the convector channel
Gas is connected only after all pipes have been completely removed, completed, and installed.
It is also important to use special materials for gas connections to avoid accidents.
It is important to carefully install the device so as not to damage the components, which can lead to disruption of convection. When installing, you also need to maintain distances to objects, windows, etc. . It is worth special mentioning the type that is mounted on the floor
Before installation, we should prevent possible deformation of the housing, which may occur after we fill the niche with solution. As a preventative measure, you can use spacers that are installed in the middle of the convector. The heater should also be insulated from heat and sound. After installation, you need to level the device to the desired level. For this, special adjusting screws are used. Then the pipes are connected (they need to be laid in advance) and a test run (hydraulic testing) is carried out to identify possible leaks. If the test is successful, the remaining space between the convector and the walls of the niche and the channels for laying pipes should be filled with solution
It is worth special mentioning the type that is mounted on the floor. Before installation, we should prevent possible deformation of the housing, which may occur after we fill the niche with solution. As a preventative measure, you can use spacers that are installed in the middle of the convector. The heater should also be insulated from heat and sound. After installation, you need to level the device to the desired level. For this, special adjusting screws are used. Then the pipes are connected (they need to be laid in advance) and a test run (hydraulic testing) is carried out to identify possible leaks. If the test is successful, the remaining space between the convector and the walls of the niche and the channels for laying pipes should be filled with solution.
https://youtube.com/watch?v=AIEgi_eDjUM
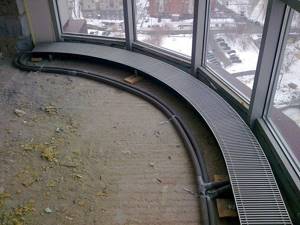
Where are trench convectors used?
This type of heater is used in rooms with low windows and in other cases where there is not enough space for wall convectors and radiators. The devices are also used in rooms with large heat losses due to the presence of the following architectural elements:
- thin entrance doors;
- windows on the loggia;
- exits to building terraces;
- glass doors;
- large stained glass windows;
- panoramic windows.
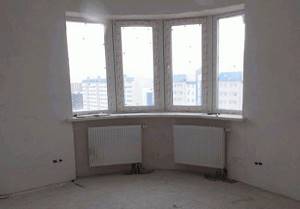
High heat losses occur when the ratio of wall area to glazing is small. This problem is only partially resolved by installing triple (double-chamber) double-glazed windows. However, the windows still blow cold in severe frosts. Therefore, it is possible to provide warmth and comfort only with the help of in-floor convectors. They do not reduce the usable area, but require special niches in the floor. Warm air enters the house through a decorative grille that hides the installation sites of convectors.
Installation of an electric convector
This process is not a simple procedure. Installation can be done either with the help of a specialist or on your own. The first step is to study the instructions. It is necessary to carefully read each point and strictly follow them. When installing, it is important to follow all recommendations, because your safety and the service life of the convector depend on the quality of installation.
Depending on your desire, when purchasing a heater, you must first select one of three models: floor-standing, wall-mounted or universal. After purchasing and studying the instructions, you need to choose a convenient place.
When choosing, it is important to calculate the location so that it is safe and at the same time allows maximum use of the convector. When installing an electric convector, you must maintain a minimum distance from surrounding objects (twenty centimeters on the sides, fifty centimeters on top and from the front); from thirty centimeters - from any outlet and electrics; fifty centimeters - from the ceiling; twenty centimeters - from the wall and for models that are mounted on the wall, it is necessary to maintain a distance of at least twenty centimeters from the floor
When installing, the legs are attached to the bar, and the bar, in turn, is screwed into the floor. Wall convectors require more work to install. This already requires screws that will secure the device, braces and brackets. Having drilled pre-marked holes in the wall, we fix the convector. Under no circumstances should the device be connected to power until installation is complete. You can switch the device to operating mode immediately after the indicator light comes on.
Installation of heating convectors, taking into account power calculations
Speaking about installation methods, you can find floor and wall models, and the use of one or another coolant divides these devices into mechanisms that operate using water, electricity and gas
It is important to remember that installation of gas-type heating convectors can only be carried out on walls in a vertical position, while water and electrical systems can be installed both on the wall and on the floor (read: “Household convector: principle of operation and installation”)
Construction of a water domestic convector
The installation of heating convectors operating using water used as an energy source is distinguished by the fact that the basis of the design is a heating battery
In this case, special attention should be paid to such a procedure as calculating heating convectors of this type, and in particular, correctly calculating the number of battery sections required for high-quality heating of the air in the room
Another factor that should be considered when choosing this equipment is the material from which the convector is made.
- alloy of copper and aluminum;
- bimetal panels;
- aluminum;
- steel elements.
Copper-aluminum models are the most expensive. The connection diagram for heating convectors made of this material involves the installation of copper connecting parts, which have a very high price.
The use of such devices will be relevant if there is a need to make the design of the heating system lighter. Most often, consumers prefer samples made of aluminum or bimetal, but their installation requires the purchase of special fasteners and kits of installation systems.
It will be much more profitable to install batteries made of steel.
- by means of side fastening;
- using lower fixation to the system.
Installation of electric convectors
Another option for such equipment is electric convectors
These models can be installed and connected by hand, but it is very important to correctly calculate the power of a convector of this type
- the device must be removed from its packaging;
- then the protective film must be removed from the convector;
- Next, you need to decide where the mechanism will be installed.
When calculating the power of a heating convector operating using electricity, as well as connecting it, it is extremely important to follow a large number of recommendations, which, nevertheless, will allow for high-quality installation of the equipment
- the minimum distance from the floor to the convector is 20 – 25 cm;
- the device must be located at least 25 cm from nearby objects, from above and in front - at least 24 - 55 cm;
- the convector should be installed at a distance of 25 cm from the wall, and it should be located at least 35 cm from the ceiling;
- It is strictly not recommended to install the device behind curtains and doors, as well as under openings intended for ventilation.

The installation process for an electric convector is as follows:
- Having unscrewed the fastening bolts, you need to pull out the bracket;
- using a drill, you need to make pre-marked holes intended for fastening the mechanism;
- Next you need to fix the bracket;
- then you need to insert the electric convector into the clamp with its lower part;
- Guys should be placed on the equipment;
- it is necessary to place the upper part of the device into the mounted guy wires;
- after this, all the clamps must be tightly secured, and the fixing bolts must be screwed in;
- The convector operation regulator should be set to off mode and power should be supplied to the device;
- After the LED on the device lights up, the equipment can be switched to operating mode.
If the electric convector used is floor-standing, then its connection is as follows:
- The unit must be turned over and the mounting legs equipped with wheels must be secured to it. Standard bolts can serve as fastening elements;
- After this, the convector can be turned on and set to the desired operating mode.
It is important to remember that the power consumption of the convector is one of the factors that must be taken into account when selecting and installing equipment
Connecting heating convectors
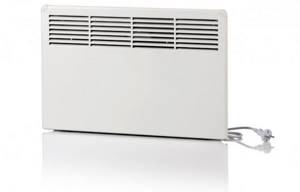
How to install an electric convector on a wall?
Installation instructions
So, if you decide to install an electric convector on the wall, you need to proceed as follows:
- Unpack the convector and turn it over on the back side.
- Remove the fastening.
- Lean the removed bracket against the wall in a suitable place (where installation will be done) and mark the mounting holes with a marker.
- If the wall is wooden, screw the mount using wood screws (length 40-45 mm). If the wall is made of concrete, pre-drill the holes with a hammer drill, then drive in the dowels and install the frame, as in the photo below.
- Place the electric convector on the installed bracket.
- Connect the plug to the outlet, turn on the power.
- Set the thermostat to the appropriate temperature.
As you can see, installing an electric convector on a wall is not difficult, let alone connecting it. However, there are several nuances that need to be taken into account during installation, which we discuss below.
Some useful tips
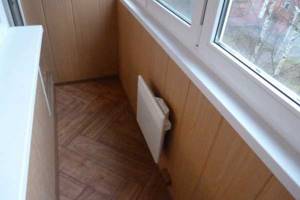
Sometimes it becomes necessary to install an electric convector on a balcony, the interior decoration of which is made of PVC panels. Since the weight of an electric convector can reach several kilograms, you must understand that plastic may not withstand such a load. In this case, it is recommended to choose a compact-sized electric convector, for example, like the Nobo model in the photo below.
Another nuance is the correct placement of the convector. Usually, the purchase package includes instructions in which the manufacturer himself specifies the optimal distances from the floor, windows and other objects. If in your case there is no such information, install an electric heater, taking into account the following rules and regulations:
- height from floor 20 cm;
- gap from the wall 20 mm;
- lateral distance to nearest objects – 20 cm;
- there is a gap of at least half a meter at the top and front;
- the socket is no closer than 30 cm.
Special attention should be paid to connecting the electric convector to the network. As a rule, the power of devices does not exceed 3 kW, so if you have modern electrical wiring in your house or apartment, feel free to connect the power from an outlet (they, as a rule, can withstand up to 3.5 kW)
If you want to hide the cords and make a neat installation, you can even connect the electric convector directly to the mains without a plug or socket. To do this, you will have to pull a separate cable from the distribution box or even the panel (if you decide to make a separate line for heating). In this case, select 2.5 mm2 for the cable cross-section.
Finally, we recommend watching a visual video of the installation of an electric convector:
That's all the installation instructions for this heater. We hope that now you know how to properly install an electric convector and connect it to the network with your own hands!
It will be useful to read:
samelectrik.ru
What is a heating convector and how does it work?
Heating a private home » Convectors
Modern model
Today, saving is becoming a basic requirement in all areas of life, including home heating. Moreover, of all engineering systems, heating is the most expensive - both in terms of installation, materials and equipment, and in terms of energy consumption. Therefore, the latest technologies in this area immediately become popular and in demand. Heating convectors are no exception.
Today, manufacturers offer two types of convectors that operate on different types of fuel - water and electric. There is no point in comparing them, but it is necessary to understand each one. Therefore, we will determine their advantages and disadvantages, types, operating principles and efficiency of space heating.
Water heating convectors
The first option is a water floor heating convector. There are different models of such a heating device:
- Convectors with forced circulation of coolant.
- With natural circulation.
- Devices that can operate in wet areas.
Today this type of heating equipment is in great demand because it has a number of advantages:
Firstly, this is a huge assortment both in material of manufacture and in shape, size, color and design.