How to make a heater with your own hands: 4 best ideas
Low ambient temperature significantly reduces labor productivity and living comfort. Therefore, heating domestic and industrial premises performs an important function that requires significant financial costs for the purchase of special equipment. To save money on heating appliances, you can assemble a heater yourself. Which is especially important for those rooms and locations where there is no need to care about its aesthetic appearance and design.
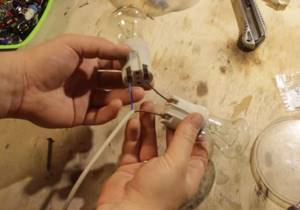
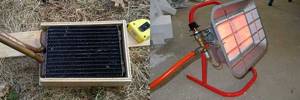
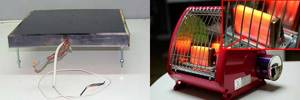
Option No. 3: hand warmer
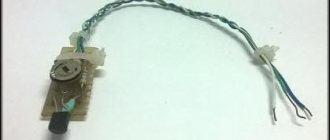
In order to escape the cold with the help of this heater, it is enough to have a charged car battery.
Prepare the following items:
You will need more than modest tools:
Warm-up time for this heater is approximately 10 minutes. Warming your hands on it should be done with caution, as the temperature of the metal can becomes quite high.
Of course, a homemade electric heater, even such a low-power one, cannot be used in a room filled with flammable gases and fumes. It should also be kept away from flammable materials.
Monitor your battery charge level. If the voltage at its terminals drops to 10 V, the heater must be turned off immediately. If this is not done, the battery will be irreversibly damaged.
Today, the variety of heaters is so great that it is difficult for the buyer to decide on the choice of device. In this article we will look at ceramic heaters for the home - the principle of operation and selection criteria.
What are the advantages and disadvantages of ceiling infrared heaters, you will learn in this material.
Idea N1: Making a local mini-heater
For this design, you will need two rectangular pieces of glass, metal foil, a paraffin or stearin candle, a wooden block (or a block of other dielectric material), an electrical cord with a plug, and sheet metal for contacts.
The manufacturing procedure for such a mini heater is as follows:
- Take two identical pieces of rectangular glass, in this example the dimensions are 4x6 cm, but this is not critical, you can take a different ratio, the main thing is that the area is about 25 cm 2. Clean and degrease their surface.
- Using a lit candle, carefully apply a layer of soot to one surface of the glass. Make sure that the carbon black is evenly coated and distributed, as it will act as a conductive material.
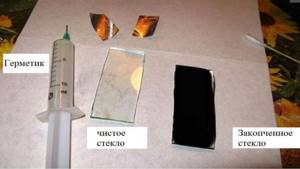
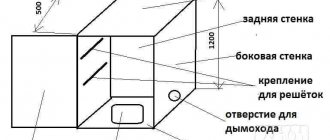
Figure 1: elements for making a heater - Using cotton wool or an ear stick, clean the edge of the smoked glass, approximately 5 mm.
- Cut a piece of foil the same width as the soot-covered glass surface. In length it should protrude 3–4 cm beyond the edge of the glass. Place the foil on the glass.
- Coat the edge of the glass with sealant and align the two halves together with the foil in between.
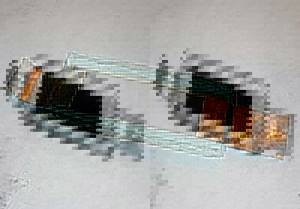
Rice. 2: Combine two glasses
Fold the edges of the foil under the glass to one side.
- Attach metal contacts to a wooden block and solder the ends of the electrical wires with a plug to them. Place the glass on the block - the heater is ready.
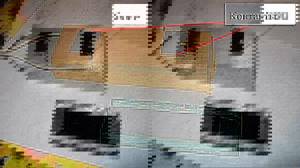
Rice. 3: Fix the contacts on a wooden block
It should be noted that the maximum temperature of such a heater should be about 40ºC. Naturally, you won’t be able to heat a house, cottage, or garage with such a homemade heater; it is suitable for heating tents, a work area in front of a workbench, or other space directly in front of the work surface. If the device gets too hot, you will need to reduce the resistance of the conductive elements; for this you can use thicker foil or increase the thickness of the soot.
Types and classification
Based on their intended purpose, devices are divided into professional and household.
The first include:
- Burners for work related to metal processing: soldering, forging, welding.
- Devices for general construction, road work, roofing, wood burning, and removal of old paint.
- Technological equipment for various purposes. For example, drying chambers, food industry tools.
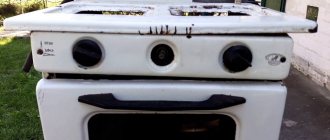
For household purposes, this includes a gas stove, nozzles for home stoves, heating boilers, and gas convectors.
Household devices include home workshop devices. This is where you most often find do-it-yourself burners, not only manufactured, but initially designed to perform specific tasks.
They are arranged according to two main schemes:
- injection or injection;
- with complete preliminary mixing of the working mixture, or ejection.
In the first type, air (or oxygen) is captured by the supplied gas stream. In the latter, the gas-air mixture is obtained in a preliminary chamber.
Idea N2: Infrared heater
To make an infrared heater with your own hands, you can use several device options. Let's look at the two simplest to implement, for one of them we will use IR film used in a heated floor system, and for the second we will make a heating panel from improvised means. If you still have a film IR heater from the floor or have the opportunity to get it, then this will greatly simplify your task.
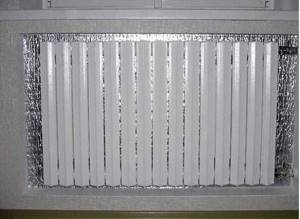
Film IR heater
To make such an infrared model, you will need a piece of rolled foil thermal insulation, a heating film, a power cable for connecting to the electrical network, terminals for connecting the wire to the film, a thermostat or other devices for changing the temperature of the heater.
The manufacturing process consists of the following stages:
- Choose a location, since the film heater cannot stand on its own on the floor or table; it must be attached to a wall, ceiling, frame or other hard surface.
- Cut the thermal insulation to the size of the infrared film and prepare the foil surface for gluing the film.

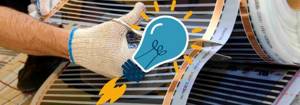
Rice. 4: Cut the thermal insulation to the required size - Glue the film to the prepared roll, ensuring a tight fit along the entire length. To fasten surfaces, you can use both adhesives and double-sided tape. But the adhesive application points should not be located on the infrared emitters.
Rice. 5: places for applying adhesive composition - Attach the terminals along the edges of the film; first solder a wire to the terminals to supply electrical energy.

Rice. 6: Solder the terminal to the copper bus bar - Insulate electrical connections using electrical tape, heat shrink, or bitumen tape. This is necessary in order to eliminate the risk of electric shock from the heater when connecting the heating device to the network and to isolate live parts from walls and other structural elements of buildings.

Rice. 7: Insulate electrical contact points - Include a thermostat in the design of the electric heater; the most convenient switching point is the power wire. Since the control element can be placed in the most convenient and accessible place. This will allow you to control the heat output of the heater to heat your garage.
- Mount the IR heater on a wall or other structural element. If you want to install it on the floor, you can make a wooden frame.
Panel IR heater
The working element of an infrared heater can be made independently. We take the design of a ceramic heater as a sample; for it you will need two identical panels of heat-resistant plastic (about 1 m2 in area), graphite flour, epoxy glue, and a power cord for an electric heater. Graphite flour will act as a conductive medium; it can be purchased separately, taken from used electric batteries, or made from a construction pencil.
Optimal heating power
To assemble a lamp heater, it is best to use 150W models. Just note that after the introduction of a law prohibiting the production of conventional incandescent lamps of more than 100W, they began to be sold under the name “heat emitters”.
With their sequential connection scheme, even two copies, you can immediately feel the radiated heat. At the same time, they do not blind the eyes.
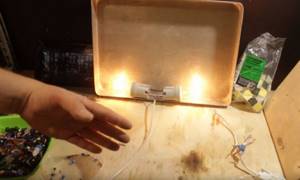
The current in such a circuit at the same voltage will be 420mA. This means that two lamps consume about 100 W in total, and most of them are used for heating.
You can compare what power infrared heaters are sold for and what area they are designed for. The ratio for conventional models is 100W per 1m2.

Oil radiators have almost the same indicators.

That is, in any case, watts turn into heat. Only specialized infrared models will have more directed radiation to a specific point or area, while your homemade product will have a wider angle.
By the way, these 100 W/m2 are taken from SNiP for premises insulated according to all standards. This is the optimal power for all heaters in central Russia.
For northern latitudes, including cold, uninsulated garages, the values will be higher. If, for example, the heat loss in a garage is 1000 W/hour, and you heat it at 300 W, then your temperature will never rise.
But if the ideal heat loss is close to zero, then 100 W will be enough to create a bathhouse inside.
This power also depends on the height of the ceilings (the average calculated one is up to 3 m).
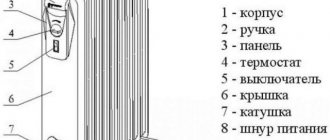
Idea N3: Oil heater
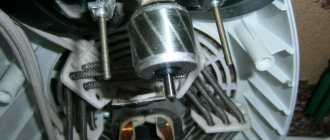
Since technical oil has good heat transfer functions, it is widely used in heaters. You can assemble this oil heater yourself at home. To do this, you will need an old heating radiator (cast iron or bimetallic battery, register or other tubular structure), a tubular heating element, the oil itself as a coolant, sealed plugs for placing the heating element.
Rice. 11: Example of using a register control unit
To maximize the safety of the oil device, it can be supplemented with a heating sensor, the open contacts of which are connected to the power circuit.
The manufacturing process of an oil cooler is as follows:
- Take the old radiator, it is important that it is replaced due to the modernization of the system, and not due to a violation of the integrity of the case. It is advisable to verify this yourself by adding liquid or at least through an external inspection.
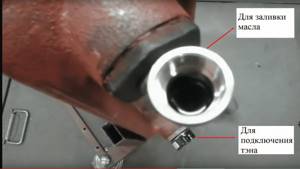
Rice. 12: Take an old radiator - Prepare two holes in the heater - for the heating element and for filling the oil. The first hole must be equipped with a thread and located in the lower part so that the heated masses rise upward. It is more convenient to place the second hole in the upper part; when putting the heater into operation, it will also have to be sealed. In addition, holes can be made for draining the oil and for the emergency pressure relief valve.
Rice. 13. Prepare two holes - Screw the heating element into the hole on the radiator. When choosing a specific heating element model, it is important to make sure that the thread diameter matches the hole diameter, and that the kit includes oil-resistant rubber gaskets.
Rice. 14: screw the heating element into the bottom hole
Another important point is that the diameter of the heating element must be such that it never touches the walls of the radiator. For sealing, linings, special compounds and tow are used.
- If you left necks for oil drainage and for installing sensors, install the appropriate equipment in them. Seal all holes that will not be used in the future, leaving only the neck for filling the oil.
- Fill the heater with technical oil approximately 85% of the total volume. A margin of 15% is necessary for the free space that the liquid will occupy after heating and thermal expansion. Never fill oil too close. Close the oil filler neck.

Rice. 15: Close the oil filler neck - Ground the heater to a ground loop.
It should be noted that to increase the service life of such a device, the heating element should be selected in accordance with the housing material. Otherwise, due to the large difference in the output voltage of the particles of these metals, destruction of the elements will occur. Also note that the heater will have a decent weight, so it is advisable to ensure it is securely fixed in space or make a structure for ease of movement.
Rice. 16: Wheeled design
How much light and heat does a light bulb provide?
Therefore, we will consider another more efficient and durable design, assembled on the basis of simple incandescent lamps.
An ordinary light bulb with an incandescent filament is the most accessible source of not only light, but also heat. Of its entire radiation spectrum, we see only a small part.
Everything else is hidden from us in the infrared region.
As an efficient light source with its efficiency of 3%, the light bulb is no good.
But if we consider it from the point of view of heat, then the efficiency is already approaching 100%.
How to increase the efficiency of the light? For example, you can increase the voltage.
However, at the same time, its lifespan will sharply decrease. She will live with you for literally a few hours.
But if you do the opposite, that is, reduce U=220V by half, this will sharply reduce the light output by five times. But at the same time, almost all the useful energy will go into the IR spectrum.
Of course, it will not increase, and its overall level will fall from its original values. However, the level of the visible spectrum will drop even more. The whole point here is that your assembly should primarily heat, not shine.
The most important and significant advantage of this is the increase in lamp life to almost 1 million. hours (over a hundred years).
That is, you buy it once and you can use it for the rest of your life! How can you reduce the voltage at home without any regulating devices, like LATR?
Idea N4: Heater with a spiral
The classic version of a spiral-type heater involves connecting heating coils to the network. Heat-resistant dielectrics were used as the basis for installing the spiral in such models. But these are quite simple options, so in this article we will look at the principle of manufacturing a device whose characteristics are not inferior to a gas heater. It uses the same principle as a heat gun, but with less heat output.
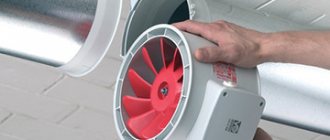
To make it, you will need a heating coil, an electric fan, a metal pipe or box for the housing, a dielectric heat-resistant frame, and a power cord. The heater manufacturing process includes the following steps:
Cheap and cheerful
Typically, devices that are heated by electricity are used as an emitter - incandescent filaments or lamps. But the simplest version of the emitter is a heating radiator. This is the same physical body as the Sun. And it can also emit heat. Stand by the radiator and feel the emanating heat - this is radiation. It just spreads in all directions. Why heat the walls if you can direct the rays towards the living space?
Take the foil, smooth it well to improve the reflective effect and stick it on the wall behind the radiators and radiators. As a result, the heat that the walls could receive will be directed in the opposite direction - towards you. This method helps to get up to 20% more heat without any tricks. The only drawback is the ugliness of the reflective screen: it spoils the interior.
Attention! Instead of foil, you can use heat insulators with a reflective screen. A striking example is the material penofol, one or both sides of which are foil-coated.
How to make your own economical and efficient infrared heater
Winter has come, and with it the cold. And everything would be fine if it were only cold outside. In many apartments the temperature dropped to completely uncomfortable levels. At the same time, taking into account housing and communal services tariffs for electricity, I don’t want to turn on oil heaters at all. A solution was found by the author of the YouTube channel “Do It Yourself”, who offers to get acquainted with the option of making an infrared heater with your own hands, with a power of only 200 W, from the remains of a heated film floor.
Serial connection of light bulbs
Very easy. Simply connect two light bulbs of the same wattage in series and the voltage across each will be cut in half.
They will of course shine dimmer.
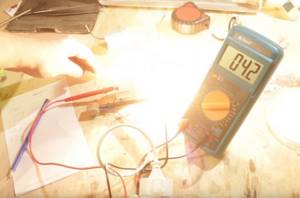
How will the power consumption of such a combination of light sources change? Measurements can be taken with a multimeter.
Let, for example, at a constant voltage of 240V, for two 100-watt light bulbs the current is 290mA.
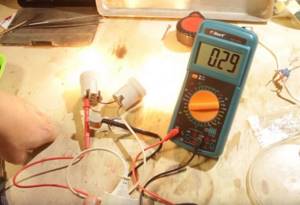
Based on the formula for calculating power, we find that:
P=I*U=0.29A*240V=69.6W
As you can see, consumption has dropped. But at the same time, the heat dissipated per watt of power has increased.
What is needed to make an infrared heater
To make a low-power but highly efficient heater you will need:
- films for heated floors (the size does not matter, the main thing is that all sections on it are intact);
- wires with plug;
- a switch switched with a wire;
- soldering iron, solder, flux;
- cable stripping tool;
- wooden slats for making a frame;
- insulating material (in our case, it is raw rubber on a backing);
- screws and screwdrivers.

Infrared device option 3
Its manufacture requires the use of graphite. In addition to this, you need to prepare:
- A flat box, such as shoe polish.
- Pure river sand.
- Fork.
- Two wires.
- Pliers.
- A sheet of tin with dimensions not exceeding the same characteristics of the box.
The production of an infrared heater includes the following steps:
- Removing cream residue from the box and washing it. It should look like a mirror.
- Grinding graphite and mixing it with sand. Proportions: one to one.
- Place the prepared mixture in a container. Only fill half the box with the mixture.
- Cutting a circle or square from a sheet of tin. The blank must match the shape of the box and be placed in the middle of the box.
- Attaching one of the wires to a tin circle. To do this, use pliers. Next, the sheet metal with pliers is installed.
- Cutting a small hole in the side wall. It is necessary for the wire output.
- Further filling of the box with graphite and sand. The mixture is poured so that a dome-shaped top is formed.
- Blockage of the structure with a lid. The latter is pressed tightly, compressing the graphite with sand. Due to this, excess pressure is formed in the middle.
- Connecting the second wire to the box body.
- Installation of plug or terminals for battery. They are installed at the ends of the wires.
The made IR device is very easy to use and can be suitable for any room. especially for the garage. It is small and installation is very easy. It is able to work for a long time, because there is virtually nothing in it to burn out. Thanks to this, there will be no need for frequent repairs.
To control the IR heater, you need to change the position of the lid. The closer it is to the base, the greater the pressure inside becomes and the more the entire structure heats up. To reduce power, unscrew the lid or lift it higher.
Over time, its contents “sinter.” Therefore the power decreases. A small repair to restore power involves loosening the graphite. You can also shake the heater.
What is warmer, a convector or an infrared heater Infrared electric heater Convective infrared heater Infrared gas heater
Preparing the wire and plug for use
First of all, we cut the wire in half and install a switch in the gap. After all, constantly unplugging and plugging the plug into the socket again is not very convenient. And if you have a switch, you can greatly simplify the task.
Such breakers are often installed on wall lamps. Even if there is no switch of the required design in the closet, it will cost a penny in any electrical goods store.

Basic requirements for a homemade heater
Any type of heating equipment for the home, regardless of design features and manufacturing complexity, must meet the basic requirements:
- Simplicity and accessibility in assembly.
- Safety and reliability in operation.
- Efficiency in energy consumption.
- High productivity and working power.
- Affordable cost of structural elements and materials.
- Ergonomics and ease of transportation.
- Durability and practicality.
Among the existing heaters, the most efficient and productive are: infrared, quartz and ceramic emitters, and electric convector.
Making a heater frame from wooden slats
Now it is necessary to make the frame of the future heater. To do this, a square of the same dimensions as the section of the heated film floor remaining after the repair is assembled from wooden slats. You can use corners to secure the slats to one another, but it will be easier to attach the slats by simply driving self-tapping screws into the end. Too much strength is not needed here, and the film will add rigidity to the structure when it is fixed in place.
To make it more convenient to attach the film to the frame, it is better to use wider slats, however, for lack of a better one, you can even get by with window glazing beads that should hold the glass in the frame.
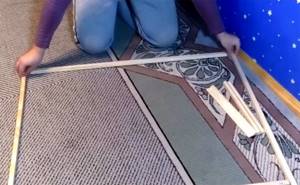
It is necessary to assemble a frame from wooden slats according to the size of the heated floor film
When the frame is assembled, you need to make it so that it can stand vertically, similar to a conventional heater. To do this, you can use a pair of short slats that are fixed at the bottom of the frame perpendicular to it. These improvised legs are also fixed using self-tapping or regular screws. After this, the frame can be considered complete and proceed directly to the installation of the infrared heating element.
Interesting! When voltage is applied to the underfloor heating film, it itself heats up slightly. At the same time, the air around it practically does not heat up. But the temperature of obstacles that are in the area of action of the heating element rises quite quickly. This effect of the film can be compared to the spring sun, which cannot warm the air, but people already feel the warmth from it.
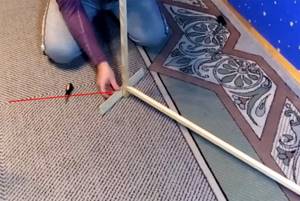
The legs are attached to the frame - now you can proceed to installing the heating element
Nozzle for gas burner
Craftsmen solve this problem in the following way:
- A hole of as small a diameter as possible is drilled in the housing tube. Today, drills with a diameter of 0.2 - 0.3 mm and special chucks for them are available for sale. An example is Dremel brand products.
- Next, the burner is clamped in a vice with soft jaws and with careful blows of a chasing hammer, it is slightly deformed so that the hole narrows to the required size - 0.1 mm.
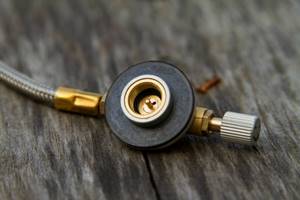
Gas regulator and nozzle/jet
All that remains is to treat the nozzle with fine-grained sandpaper, eliminating burrs and irregularities. This must be done to ensure that the gas flow, and therefore the torch, is smooth.
When you first start up the burner, you need to see if this was achieved, and if not, clean it more thoroughly.
Heating element connection: soldering, insulation
To connect the power wire to the heating element you will need a soldering iron, solder and flux. First, you need to burn a hole in the film in the area of the copper bus, which protects it on both one side and the other. This should be done as close to the bottom edge as possible so that the wire does not dangle. In places where the film has been removed from the tires, it is necessary to apply a little flux, and then a thin layer of solder. The ends of the wires need to be tinned, and then soldered to the busbars - one to the right, the other to the left. For those who have held a soldering iron at least once in their hands, this work will not be difficult.
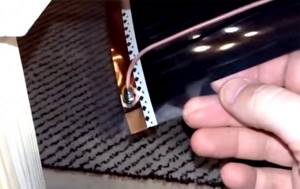
The wires must be soldered to the copper busbars of the heating element
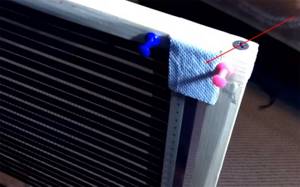
Insulation of the resulting contacts and other live parts
To ensure that the resulting connections are safe, they must be insulated. The best option here is to use molded raw rubber. At the same time, there is no need to remove the top protective layer from it.
Having cut pieces of suitable size, you need to press them tightly to the connection, completely closing the contact. Raw rubber sticks well, so you should be careful. It will no longer be possible to peel it back, only together with a piece of copper contact bar.

Connections are insulated using a piece of raw rubber
In a similar way, it is necessary to close the ends of the tires where the film was cut off when laying the heated floor. The fact is that in these places there also remains a bare current-carrying contact, which means there is a danger of electric shock. And this is fraught not only with injuries, but also with death.
Similar to soldered contacts, the cut points where the busbar is exposed are also insulated.
Permanent heating system
The best way to heat a garage is to connect it to a common circuit. This option makes sense if the garage is attached or is part of a building with common heating. In other cases, you need to make a separate heating and ventilation system.
When the task is to heat the room for a long time, it is better to choose gas and electric boilers. The gas heater is practical and easy to use, the fuel is available and inexpensive. But there is one caveat - you need to allocate space for the boiler room and connect to the gas main. Electric boilers are much safer, but such a heat source cannot be called cheap. It is for these reasons that motorhomes are less and less frequently drowned today.
You also need to remember about wood heating. At the moment, solid fuel is the most economical type. There are different options for such systems: pyrolysis combustion, home-made heaters, or all kinds of potbelly stoves and fireplaces. On sale you can find fully automated pellet boilers with fuel supply without human intervention.
It is difficult to choose which of the permanent heating systems will be more economical - when calculating, you need to take into account not only the price of purchasing and installing the equipment, but also think in advance how much the operation and raw materials will cost. It must be said that different heating systems are suitable for each region of our vast homeland. In places with an abundance of wood, the choice will fall on solid fuel units. In gasified areas, gas boilers and heat guns are most used.
If you don't spend much time in your garage, an electric heater might be the way to go. It does not require special installation skills. Even if such devices are resource-intensive, for heating for a short time this will be the best choice.
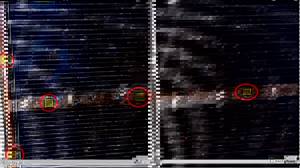
Checking the resulting infrared heater for functionality
When all the work is completed, you can connect the resulting device to the network and check its functionality. In our case, for clarity, we used an electronic thermometer. To begin with, the temperature of the wall near which it was planned to install the heater was measured. The device showed only 19.5ºС. After measurements, a self-made infrared heater was installed near the wall and plugged into the network.
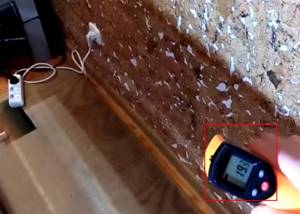
Initial measurements showed that the wall temperature was initially equal to 19.5ºС
Exactly 3 minutes later, temperature measurements were taken again. The result exceeded the wildest expectations - the temperature rose by 5ºC. And this despite the fact that the electricity consumption of such an infrared heater is several times less than its oil or spiral counterparts.
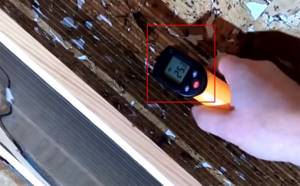
The temperature has increased significantly, which confirms the functionality of the manufactured infrared heater
Intermittent heating
Most garage buildings are unheated, but in order to carry out repair work in the cold season, you need to create a comfortable temperature. Of course, it is much easier to buy a heater in a construction hypermarket, but it is much more interesting to build a heating system yourself.
Today, drivers use a wide variety of devices for heating: gas burners, electric and infrared heaters, heat guns, potbelly stoves, solid or diesel fuel boilers. You can do all this with your own hands. Each option has positive and negative sides, let’s look at them in more detail:
- electric heaters. The main advantage is ease of use. There is also an advantage in heating efficiency. The negative side is considered to be a rather large bill for consumed electricity after use,

- gas-burners. Plus - a cheap type of heating. Disadvantage - during operation, decomposition products are released, which, if accumulated, are dangerous,
- solid fuel and diesel stoves. Such boilers, although they are the most economical heating option, also have disadvantages. They constantly need to be refueled; they cannot operate completely autonomously. In addition, the price of diesel is high,
- waste oil devices. Undoubtedly, they heat superbly, but too much soot appears from their operation and, most importantly, they are a dangerous type of heating.
What happened in the end
If you pay attention to the appearance, the heater turned out to be quite neat. For greater aesthetics, the frame can be painted in any color that suits the interior style. For this, it is best to use spray paint, which dries very quickly. But, if the apartment or private house does not have expensive renovations, in which the interior design has been thought out to the smallest detail, it is quite possible to leave the heater in its original form.
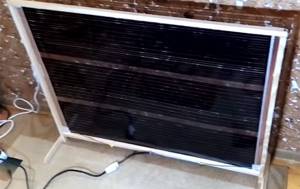
The manufactured infrared heater looks good even without additional decoration
Advantages of homemade devices
Homemade appliances for heating a city apartment, country house or cottage have significant advantages over factory-made products. They are as follows:
- Possibility of manufacturing from accessible and cheap materials, which leads to a reduction in the cost of the finished device.
- Simple and compact design that can be used in various rooms.
- Ease of use and transportation.
- High efficiency with silent operation of structural elements.
- Self-assembled quality.
Today, infrared heaters are available for self-production, which are the safest and most efficient to use. If more powerful equipment is required, then you can assemble an oil radiator, an alcohol heater, a heat gun, a battery-powered and gas-powered device.