Making a homemade garage heater
Requirements for creating a heater for a garage
The most important thing is the safety of this device, since it will be located in a closed room and with very flammable devices. At the same time, you will not be able to be nearby all the time.
If at home we somehow control the heat and constantly monitor safety, then we will not be able to constantly monitor the car, so it is very important to choose a truly safe heating device so that our car remains warm and safe. Therefore, it is very important that the homemade heater does not pose a threat of fire or, worse, explosion.
Also, the heater, naturally, does not burn oxygen and does not emit a certain burning smell
Therefore, it is very important that a homemade heater does not pose a threat of fire or, worse, explosion. Also, the heater, naturally, does not burn oxygen and does not emit a certain burning smell
The unit quickly warms up the room and maintains this temperature for a period of time. The device must be portable and not take up much space, but must be very powerful and efficient.
The best models of heaters from the cigarette lighter
Instructions for making a homemade roof rack for your car + drawings
Below are the best heaters powered by a cigarette lighter. All of them have proven themselves well among drivers and are suitable for almost any car.
Alca 544200
Alca 544200
Price: from 1,200 rubles.
Pros:
- Long lasting ceramic air heater.
- Built-in fuse protecting against overloads.
- Operates in heating and cooling modes.
- Warming up a large area.
Minuses:
Chinese assembly.
150 W fan heater for the interior from a 12 V cigarette lighter. The ceramic heater effectively heats the air, and the fan directs the flow to the appropriate place. The 1.4 m long power cable allows you to install the equipment even next to the rear window.
The power of the equipment is sufficient to heat an area of up to 5 square meters, which means providing comfort in a car of any size. At the same time, the air does not dry out, so there will be no inconvenience for the driver and passengers.
KOTO EFB 220 12V 901
KOTO EFB 220 12V 901
Price: from 1,300 rubles.
Pros:
- High power.
- Possibility of working in two modes.
- Interesting appearance.
- High quality build.
- Convenience of placement.
Minuses:
The installed protection system does not always work correctly.
Electric heater from a well-known company producing heating equipment for cars. It has a ceramic heating element that heats the air without drying it out. The model is capable of functioning in two modes: as a regular fan or as a fan heater.
Due to the convenient rotating base, you can install the device in any convenient place and adjust the direction of the warm air flow according to your preferences. The power of 200 W is enough to defrost frozen windows, as well as for general heating of the interior.
Heat current v12
Heat current v12
Price: from 1,250 rubles.
Pros:
- Convenient installation on the dashboard.
- Operates in heater or fan mode.
- Folding handle.
- Possibility to regulate air flow.
Minuses:
- The housing is sensitive to damage.
- Low power.
A multifunctional device that allows you to simultaneously blow air onto passengers and the windshield. A convenient stand helps regulate the air flow by tilting the structure in one direction or another by 45 degrees.
The folding handle will provide the necessary comfort when heating icy windows and defrosting specific elements. The model operates much faster than a standard stove, without causing fogging of windows during operation. A power of 150 Watts does not allow heating large areas effectively.
AUTOVIRAZH AV161007
AUTOVIRAZH AV161007
Price: from 1,000 rubles.
Pros:
- Multifunctionality.
- The presence of a folding handle.
- Built-in fuse.
Minuses:
Assembly in China may not be of very high quality.
Car ceramic interior heater that can be used both in winter and summer. The 3 in 1 system can be used as a heater, cooling fan or hair dryer.
In the latter case, the folding handle is especially useful, allowing you to comfortably hold the structure while heating the elements of the car. The case is made of durable plastic and copes well with all loads and practically does not change its properties under regular temperature exposure. The device weighs only 0.45 kg and is mounted on a swivel stand.
Autolux HBA 18
Autolux HBA 18
Price: from 6,900 rubles.
Pros:
- Great power.
- Advanced system for adjusting the direction of airflow.
- Long cable for connection.
- Versatility.
Minuses:
Price.
Powerful car interior heater, suitable even for large trucks. The ceramic heating element transfers temperature well to the air and does not dry it out. In addition to the standard connection via the cigarette lighter, it is also possible to provide power directly from the battery.
The 300 W device allows you to quickly warm up the car windows, as well as create the necessary conditions for the driver and passengers. When installing, it is worth considering the weight of the equipment, which here is 1.5 kg.
Do-it-yourself primitive heating of the interior of any car in winter: current technologies

Many owners of budget cars complain about the efficiency of a car heater. No, it functions properly, and the cabin filter is fresh, but in cold weather worse than -20°C it cannot cope with its duties. On many cars, a similar phenomenon occurs due to incomplete warming up of the engine, while some models are equipped with a radiator with low heat transfer. Improve the standard design or use additional heaters?
Fan heater
Those who like simple solutions will like additional means of heating the interior. Designing a car heater from a cigarette lighter with your own hands is one of the simple and affordable options for designing additional heating. The advantages of such a device are difficult to underestimate:
- Fuel and oxygen are not burned.
- Possibility of use in cars of any class.
- Compact design.
A similar solution is commercially available. Its name is a 12 Volt car fan heater. The main disadvantage is low efficiency: it cannot create a microclimate alone. It is recommended to use the car heater only as an addition to standard heating devices. Yours is more reliable and, moreover, repairable - all by analogy with winter washers: a homemade anti-freeze recipe is much better than a roadside canister of an unknown potion.
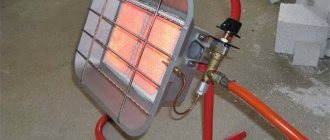
Ceramic oven
Using combustion gas as a heat source is an effective way to quickly raise the temperature to comfortable levels. The minimum elements are a ceramic stove and a 15-liter gas cylinder. The risk of fire and intense oxygen combustion limit the demand for this type of heating.
Modify the factory furnace
It is preferable to take the path of improving standard equipment, but the costs are incomparable. Modifying a heater is not an easy task: it requires skill and the elements are compact in size. It is not a fact that an additionally installed radiator will have an effect, since it is difficult for the fluid to warm up to operating temperature. Another thing is to introduce an electric heater from a diesel modification (RTS) - the effect is obvious. In addition, warm air flows immediately after starting the engine.
Option number 1: car heater
Instructions for installing lambo doors with your own hands
Of course, in a working car, a 12-volt electric heater is, to put it mildly, useless. But anything can happen: it happens that the stove refuses to work at the most “appropriate” moment, and the car enthusiast, sitting inside an uninsulated metal box, is left alone with the severe frost. Also, a homemade 12 V heater may be needed if the rear window heating system breaks down.
- computer power supply;
- cooler (small fan): it can be removed from the same power supply;
- soldering iron with everything necessary for soldering;
- the wire;
- fragment of tile;
- M5 bolts with nuts of the same diameter (8 pieces);
- nichrome wire.
If everything is ready, you can start creating a homemade heater.
Case manufacturing
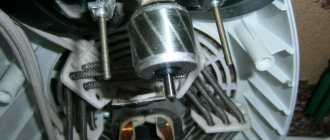
First of all, the computer power supply needs to be disassembled into its components. We carry out the disassembly in full: we remove the electronic board fixed with self-tapping screws, the cooler, as well as connectors and switches (during the operation of the heater, they can become a source of an unpleasant odor).
Manufacturing of heating elements
To make a heating element, you don’t need to “reinvent the wheel”: for this purpose we will use a nichrome spiral - the same as that installed in any heating element. Nichrome (an alloy of nickel and chromium) is a conductor, but it also has significant electrical resistance, so it gets very hot when an electric current is passed through it.
Spirals are made by winding nichrome wire onto any cylindrical rod.
It is important to select the resistance of the heating elements and their connection diagram (in parallel or in series) so that the heater does not overload the on-board electrical network. Otherwise, the operation of the device will be accompanied by all sorts of undesirable phenomena, for example, insufficient battery charging
Otherwise, the operation of the device will be accompanied by all sorts of undesirable phenomena, for example, insufficient battery charging.
Car heater
As an example, consider a Daewoo Sens car. The electric generator installed in it is designed for a current of 70 A. In such conditions, it is permissible to use an electric heater that consumes a current of 10 - 15 A - such a load for the on-board electrical network will be almost imperceptible.
The finished nichrome spirals need to be screwed to a piece of tile using M5 bolts and the same nuts. The tile will have to be drilled for this.
The tile with heaters must be secured in the housing from the power supply in such a way that the cooler installed in its place blows on it, expelling warm air into the car interior. As a result, we will get a 12-volt fan heater.
To prevent the material from crumbling, tape or adhesive tape should be placed on it at the drilling site, and the drill should rotate at a minimum speed.
Heater assembly
At the assembly stage, the cooler and cover are installed.
After which all wires are connected to the heater.
Their cross-section must correspond to the calculated current strength.
In a copper wire, for every 10 A there should be 1 sq. mm section, in aluminum - 1.25 sq. mm.
Do not confuse the diameter of the core with its cross-sectional area - for small-diameter wires these values are very similar.
You also need to insert a fuse into the device circuit, which is again selected depending on the calculated current strength.
Installation
Despite the modest voltage, the homemade heater consumes an impressive current and heats up quite strongly. To avoid accidents, it must be secured securely so that the device does not accidentally fall while the car is moving.
How to assemble a heater
Once the preparatory work is completed, this device can be constructed. To begin with, we process the inside of the fiberglass with sandpaper, then make an indent (two cm), and on the sides (three cm). Then we take a sheet to which we will directly attach the wire spirals and directly calculate the number of curls.
Then we lay the wire according to the already prepared pattern, trying to pull the wire tightly.
After laying 5-7 turns, we secure everything with paper and glue. We remove the matches, align the elements and secure them with paper. The edges of the curls are fixed with glue and strips of paper.
Afterwards, metal rivets are inserted into the holes and the wire material is wound around the end. The main thing is to calculate the wire to secure everything correctly
We secure it with washers, this is very important so that the wire does not come off. This is how a homemade heater is created
Gasoline auxiliary interior heaters
Instructions for setting up the ignition system of a VAZ 2107 with your own hands
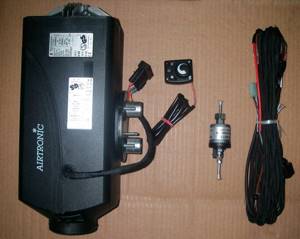
Webasto is a popular brand that offers a wide selection of quality heaters. One of them is Air Top.
The device comes with a control element and an installation kit.
The device is capable of quickly warming up sleeping areas and cabins even in large trucks (including those operating in harsh climates).
The use of ceramic technology minimizes the load on the battery.
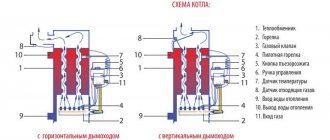
Structurally, the device consists of:
- air intake systems;
- control unit;
- built-in temperature sensor;
- air blower motor;
- burners with evaporative gasket;
- heat exchanger;
- switch;
- fuel pump;
- timers and other nodes.
Design and functionality may vary depending on model.
The only thing that remains unchanged is the main fuel for work - gasoline.
Advantages of a gasoline auxiliary heater:
- high water resistance of parts and connections;
- fast air heating even in a large cabin;
- air capture not from the cabin, but from the street;
- low noise level;
- control using an automatic control unit;
- battery life - up to two hours;
- the presence of a temperature controller, alarm function, and so on.
Characteristics of one of the most popular models Air Top 200 ST:
- power - from one to two kilowatts;
- voltage - 12 Volts;
- gasoline consumption - 140-270 grams per hour;
- volume of incoming air - 78 cubic meters. meters;
- total weight - 2.6 kg.
Gasoline heaters are used:
- for heating cargo compartments when transporting certain goods;
- to normalize temperature in passenger transport;
- in construction, loading and road equipment;
- on yachts or ferries.
Additional heater VAZ 2110
Although the additional heater is intended for northern regions, when the standard stove simply cannot cope, residents of the middle zone also install it. Usually these are very heat-loving individuals, or those who believe that it is easier to install an additional heater in the cabin than to deal with the problems of the standard heater..
In this article, I want to touch on interior heaters, which fit into the standard Engine Cooling System (ECS) and, using a built-in electric fan, distribute hot air throughout the vehicle's interior.
You can buy an additional heater for the VAZ 2110 either in the store or try to make it yourself:
Additional stove for the VAZ 2110 interior
There are many options for ready-made additional heaters, from the smallest to quite large ones, and all of them could be suitable for dozens, if not for the size.
For reference, dimensions under the passenger seat of a VAZ 2110:
Indeed, there is not much space in the top ten for installing an additional stove:
Therefore, the choice of autonomous heaters comes down to a list of compact models.
For example, such models include an additional heater from TechnoMaster (Tolyatti) (code 8110.0500.10 and 8110.0700.10)
The price of the additional heater TechnoMaster is from 2500 rubles. Price list. Or additional heaters Helios, Xeros and Zenith from Eberspächer.
The price of additional stoves Helios, Xeros and Zenit is from 3000 rubles. Price list.
When choosing an additional heater, carefully read the characteristics and dimensions of the additional stove.
Installation of an additional heater in a VAZ 2110
Installation of an additional stove can be divided into stages:
The additional heater uses the coolant flow forced by the standard pump. For more productive operation of the stove, you can install an additional coolant pump.
Installing an additional heater in a car will take no more than 4 hours.
Advantages of an additional heater in the car interior
Disadvantages of an additional heater in the car interior
Do-it-yourself additional stove for a car
If you have an old heater radiator from a car lying around in your garage, you can assemble an additional heater with your own hands.
Examples of such self-assembled heaters:
In what cases and on what vehicles are heaters used?
The task of autonomous interior heaters is to maintain optimal temperature in the cabin or luggage compartment.
Feature: operation without starting the power unit. The principle of operation is based on capturing air, warming it up and sending it back into the cabin.
The devices can operate in several modes - with air intake from outside or in standard ventilation mode.
The heater is started by an external thermostat or a built-in timer (programmed by the car owner).
Autonomous interior heaters provide a comfortable temperature for the work of different categories of motorists - operators of special equipment, truck drivers, truckers, and so on.
Any of these professions requires maximum attention and has an increased level of complexity. Full heating allows you to perform the assigned tasks efficiently.
In the CIS countries, the cold season lasts for 4-5 months, so the use of special heaters is very important.
These devices are installed in ambulances, truck cabins, vans with cargo sensitive to cold weather, and so on.
The heater will be useful in the interior of a minibus, in the compartments of truck drivers, in the cabins of construction and road special equipment.
High-quality and timely warming up eliminates the problem of driver freezing and prevents icing of the windows and control panel.
Frequently warming up the car while idling is ineffective and leads to excessive fuel consumption. That is why heating devices, distinguished by their autonomy, are so popular among car enthusiasts.
Characteristics of autonomous interior heaters:
- high-quality heating of the cabin even in severe frost;
- autonomy from the engine, fuel tank and battery (not relevant for all models);
- ease of use and reliability (no rotating elements, no electronic parts);
- fuel economy;
- no harmful emissions into the atmosphere.
How to make an autonomous heater for your car yourself
It has long been known that a comfortable temperature for a driver is the range from +21...23 degrees Celsius. Low temperatures negatively affect concentration and alertness while driving, causing irritability. And safety is affected by driving with limited visibility due to icy windows.
If you have at least once had to get to your car in a parking lot in severe frosts or simply get into an icy car interior after leaving a warm home, then you know firsthand that this feeling is not a pleasant one. And how I would like to warm up at this moment. You can, of course, run around the car or leave the snow while the interior warms up, but there are also less radical methods. As always, there is a solution, and it has long been known among motorists - an autonomous interior heater, which will happily provide comfort.
Useful modifications
A heating element for an incubator (12 volts) can be made in several ways. The first of them is heating using a carbon cord. Below are its features:
- Possible connection – 12-24 V.
- The device provides fast heating and active cooling.
- Temperature changes are eliminated due to the absence of inertia.
- With proper maintenance and braiding, the device will last for many years.
- It is possible to directly connect to the thermostat without fear of relay failure.
- Scope of application - heating floors or walls in utility rooms, residential premises, incubators, evidence, maintaining the microclimate in greenhouses and beds.
Winding is done carefully, using non-conducting parts made of textolite, ceramics or similar materials. The cord is connected to crimp sleeves to which a copper wire is connected. The heating level depends directly on the network voltage, which requires the inclusion of a stabilizer in the design.
Incandescent and film version
Instructions for polishing headlights with your own hands
A flat film-type heater acts on the interior elements of the room, which subsequently heat the air. To further retain heat, a reflective substrate is placed under the film. Distinctive features of this model:
- High price.
- Operation from a 220 V network; for other operation possibilities an inverter is required.
- The package includes a thermal regulator.
- The size and power of the device is fixed - 150 or 220 W per square meter.
An incandescent lamp provides fast heating, is sold in any hardware store, and is connected to circuits from 12 to 220 V. The heater is as simple as possible to install and maintain. The main disadvantage is a sharp change in the resistance of the tungsten filament when the device is turned on.
The best models of liquid heaters
Liquid heaters
On the market you can find many high-quality liquid heaters designed for installation in cars of any class. Models from Webasto and Eberspacher are common.
Webasto
- Webasto Thermo Top Evo START, 5 kW, diesel or gasoline, for cars with an engine capacity of 2 to 4 liters, price from 28,500 rubles.
- Webasto Thermo Pro 90, 9.1 kW, 12/24 V, diesel, emergency heating function, extended equipment, price from 72,000 rubles.
- Webasto Thermo “SPHEROS”, 20/32 kW, diesel, independent operation, circulation pump included, price from 60,000 rubles.
Eberspacher
- Eberspacher HYDRONIC D4W SC, 2.4/4.3 kW, 12 V, diesel engines up to 2 liters, GSM module for starting, price from 29,500 rubles.
- Eberspacher HYDRONIC 3, 4.2/5 kW, gasoline/diesel, separate installation of pumps, Easy Start Timer control, price from 28,900 rubles.
- Eberspacher HYDRONIC D 10, 9.5 kW, 24 V, diesel, fuel pump and liquid pump, price from 58,400 rubles.
Autonomous heating device
This heater is designed for 12 volt current. Thanks to this, it can be connected to a battery. It can be used in rooms where there is no heating and where renovations are being carried out, as well as in the garage or any room in the house. Its power is not enough to heat the entire room. It does not create infrared rays. It only heats the air.
To make it you need to take:
- Metal can. It could be a coffee can. Its height and diameter should be 20 and 10 cm, respectively. These values may deviate upward or downward. You should not use a jar made of plastic, cardboard or any other material. This is because they are poor conductors of heat.
- Bracket. It can be a U-shaped part of a children's metal construction set.
- Bayonet cartridge.
- Car brake light lamp. It is designed for 12 volts. Its power is 25 W.
- 2 A fuse.
- Sleeve made of insulating material.
- Cable. The cross-sectional area of one wire must exceed 1 mm².
Sequence of manufacturing an autonomous heater
A 12 volt device is made as follows:
- Drill 20-30 holes in the side wall of the can. Their diameter should be 3 mm.
- Make a hole in the bottom of the jar. It is drilled in the center of the bottom. The diameter should be equal to the diameter of the bolt that will secure the bracket.
- Fix the bracket at the bottom of the can.
- A cartridge is secured to the top of the bracket. This element must be positioned so that the lamp does not touch the walls of the container.
- A hole is drilled in the side wall of the can at the level of the top of the bracket so that the bushing for the cable fits in it.
- A sleeve is inserted into this hole and an electrical wire is pushed through it, through which a current of 12 volts will flow. The cable will be connected to the socket.
- Screw in the lamp and close the jar with a lid.
- A fuse is connected to the cable break.
The 12 volt heater is ready. Now all you have to do is connect it to the battery and wait 10 minutes. During this time, the homemade garage heater will warm up. When using a device with an operating voltage of 12 volts, you need to monitor the battery voltage. It should not fall below 10 volts. Otherwise, the current source cannot be restored.
Option number 2: homemade thermal film
Nichrome makes good thermoelements, but what to do if you don’t have this material at hand? It turns out that ordinary soot can replace it.
It is also a high-resistance conductor, but it has an important feature: a significant part of the thermal energy is released by the heated material in the form of infrared radiation.
This means that heaters with a carbon element heat not only the air, but also the user directly who is in the area of infrared radiation. This property made it possible to create thin film heaters based on carbon emitters.
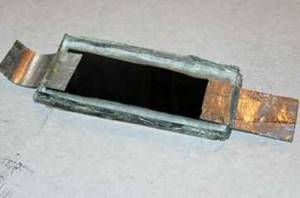
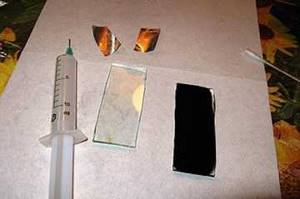
The device will consist of the following components:
- two rectangular pieces of glass measuring approximately 30x70 mm,
- aluminium foil,
- 2-wire wire with plug.
You will also need some tools, materials and products:
- soldering iron,
- multimeter,
- candle,
- sealant or glue,
- cotton swab.
The heater is manufactured in several stages:
- The glass must be washed, treated with a degreaser and dried.
- We light a candle and begin to move one of the glass rectangles over it, as a result of which it will become covered with soot. The more soot there is, the lower its electrical resistance will be.
The operation must be interrupted periodically to allow the glass to cool.
Now you need to cut out two parts from aluminum foil in the shape of oblong rectangles, the length of which will correspond to the width of the soot strip.
They will serve as terminals for connecting wires.
At this stage, you need to measure the resistance of the carbon coating. We place aluminum contacts on both sides and press them with the second glass.
Now you can use a multimeter by placing its probes on the protruding pieces of aluminum foil. We are satisfied with a resistance of 120 Ohms, then the power of the device will be 1.2 W. If the device shows a different value, you need to remove (to increase resistance) or add (to decrease) a little soot.
- As soon as the desired resistance is achieved, using a cotton swab we clean the edges of the glass from soot to a width of about 5 mm.
- Lubricate the cleaned edges of the smoked glass with glue, then again lay out the foil contacts (they now need to be shortened by 10 mm) and glue the second glass blank on top. The job is done, now the heater can be connected to a 12-volt source.
Instead of carbon black, you can use a mixture of graphite and epoxy glue. Then, instead of glass, you can use laminated paper plastic as a base.
Infrared heating element
This device is a device for heating specific areas where an additional increase in temperature or constant additional heating is required. Unit configuration: Mylar film, which contains heating elements made of an alloy of iron and magnesium, as well as an aluminum conductor of up to four microns that conducts electricity.
Heat is produced in the form of infrared radiation. A heating element (12 volts) of this type is used in production and at home. The abbreviated name of the unit is INE; it allows you to quickly get rid of fogging from mirrors and other equipment in rooms with high humidity, and will also provide heating for parts of the vehicle, hives, incubators, seedlings and much more.
Infrared rays are essentially heat that travels directly to a specific object. Such devices are popular in medicine for warming up equipment and treating certain diseases.
Idea N3: Oil heater
Since technical oil has good heat transfer functions, it is widely used in heaters. You can assemble this oil heater yourself at home. To do this, you will need an old heating radiator (cast iron or bimetallic battery, register or other tubular structure), a tubular heating element, the oil itself as a coolant, sealed plugs for placing the heating element.
Rice. 11: Example of using a register control unit
To maximize the safety of the oil device, it can be supplemented with a heating sensor, the open contacts of which are connected to the power circuit.
The manufacturing process of an oil cooler is as follows:
Take the old radiator, it is important that it is replaced due to the modernization of the system, and not due to a violation of the integrity of the case. It is advisable to verify this yourself by adding liquid or at least through an external inspection
Rice. 12: Take an old radiator
Prepare two holes in the heater - for the heating element and for filling the oil. The first hole must be equipped with a thread and located in the lower part so that the heated masses rise upward. It is more convenient to place the second hole in the upper part; when putting the heater into operation, it will also have to be sealed. In addition, holes can be made for draining the oil and for the emergency pressure relief valve. Rice. 13. Prepare two holes
Screw the heating element into the hole on the radiator. When choosing a specific heating element model, it is important to make sure that the thread diameter matches the hole diameter, and that the kit includes oil-resistant rubber gaskets. Rice. 14: screw the heating element into the bottom hole
Another important point is that the diameter of the heating element must be such that it never touches the walls of the radiator. For sealing, linings, special compounds and tow are used.
- If you left necks for oil drainage and for installing sensors, install the appropriate equipment in them. Seal all holes that will not be used in the future, leaving only the neck for filling the oil.
- Fill the heater with technical oil approximately 85% of the total volume.
A margin of 15% is necessary for the free space that the liquid will occupy after heating and thermal expansion. Never fill oil too close. Close the oil filler neck. Rice. 15: Close the oil filler neck - Ground the heater to a ground loop.
It should be noted that to increase the service life of such a device, the heating element should be selected in accordance with the housing material. Otherwise, due to the large difference in the output voltage of the particles of these metals, destruction of the elements will occur. Also note that the heater will have a decent weight, so it is advisable to ensure it is securely fixed in space or make a structure for ease of movement.
Rice. 16: Wheeled design
Autonomous devices
SITITEK Termolux-200 USB – 4-in-1 battery model
A small interior heater, powered by a battery, can, if desired, be connected to a 12 V car network - a meter-long cord with a plug for the cigarette lighter is included. On the body there was a place not only for the deflector grilles, but also for a small LCD screen, as well as LED indicators notifying about the operating mode of the device. When heating, it blows out warm air with a temperature of +37 °C.
Pros:
- Does not burn oxygen in the cabin;
- There is a timer and clock that allows you to program the heater to start automatically;
- Presence of a 15-amp fuse on the power cord;
- Can be used in summer as a fan to cool the air in the cabin;
- You can charge your phone or tablet via a 500 mAh USB connector;
- Built-in LED light;
- A wide, comfortable handle for carrying, which is not superfluous for a 3-kilogram bar.
Minuses:
- Not suitable for harsh winters, when the outside temperature drops to -20 degrees;
- It takes a long time to charge - up to 18 hours from the cigarette lighter and 6-8 hours from a household power supply.
TRUMA Vario Heat Eco – efficient gas heater
Quite a serious device designed to warm up the spacious interiors of passenger and truck cars, caravans and motorhomes. The heater operates in two thermal modes: 1.3 and 2.8 kW, and is “powered” by liquefied propane-butane from cylinders with a pressure of 30 mbar (usually through a gas reducer).
Pros:
- Relatively low gas consumption - depending on the selected mode 100-220 g/h;
- Good air flow speed (155 m3/h) is maintained even in the most remote areas of the system;
- Automatic power control taking into account the set temperature;
- There is a night mode, in which the fan becomes almost inaudible;
- Possibility of connecting an extensive air duct system for uniform heating of the entire cabin;
- The set includes a control panel with a large and informative display.
Minuses:
Price 125 thousand rubles.
Gas heaters
Gas interior heaters differ from the “competitors” discussed above in their power source. In this case, the devices operate on liquefied gas.
The main advantages of the designs are ease of execution, safety in use, and complete independence from anything. With such a heater you don’t have to worry about the battery draining.
In addition, gas combustion products do not poison passengers, but are discharged into the street, which guarantees safety even for long-term use.
The principle of operation of the device is to circulate air flows in the car. Heat transfer occurs due to natural convection of air in the car.
For more active mixing, an additional low-power fan can be mounted in the cabin.
Gas autonomous heaters do not cause problems during operation; they have no rotating elements, which ensures maximum reliability and safety.
Structurally, the device is a system of coaxial pipes, when each of the subsequent pipes is located inside the other. One pipe carries clean air from the street, and the second pipe removes exhaust gases.
As a result, the air in the cabin is not used or burned out. All that remains is warmth.
The device does not depend on the performance of the car, so even if the engine breaks down or the battery is discharged in winter (even in an open field), you can turn on the device to enjoy the warmth.
The average lifespan of such devices is about 14 years.
Advantages of gas autonomous heaters:
- affordable price due to the lack of electronics in the device;
- the presence of a climate control system, which is found in most modern devices. At the same time, you can always set and maintain the optimal temperature;
- independence from vehicle resources, which guarantees performance in any conditions;
- the ability to power the device from cylinders of various capacities - 12 and 24 liters.
Basic operating rules:
- the heater can be turned on both when parked and while moving;
- to activate the device, just open the tap through which gas is supplied, turn on the device and start it;
- deactivation is carried out by triggering the corresponding toggle switch.
For example, a good option is SELENA PILOT-2 -E1. The heater requires only gas to operate.
Power - about 2 kW, heated area - up to 20 sq. meters. Thanks to this power, it can be used not only to heat the cabin, but also to warm up the space inside the body.
Gas autonomous heaters are used wherever autonomous heat is needed - in cars (trucks and cars), in the garage, when working on special equipment, and so on.
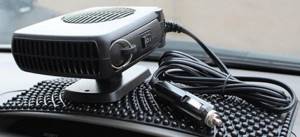
Warmthok V12 – heater + hairdryer with adjustable stand
A fan heater made in China, which is appreciated even by demanding car enthusiasts.
An adjustable stand that tilts 45 degrees allows you to adjust the heat flow. Warm air is simultaneously supplied to the windshield and passengers.
If parts of the car body, mirrors or windows are covered with ice, just grab the handle and direct the air flow to the desired area.
In terms of performance, it is better than a standard stove. For example, with the onset of autumn, windows usually fog up. But, if you install this heater, the glass will always remain transparent. While working, it does not dry out or burn the air.
The power of the device is 150 W, it operates in two modes (fan, fan heater). Streams of warm air begin to be felt 30 seconds after switching on. It is connected to the cigarette lighter with a 1.8 m cable. For protection, there is a 15A fuse on the power cord. Device dimensions – 14 x 12 x 4.5 cm, weight – 370 g.
Pros:
- easy installation on the dashboard;
- air flow adjustment;
- can be used as a fan in summer;
- There is a folding handle that allows you to use the device as a regular hair dryer.
Minuses:
production - China.
Ceramic samples
The ceramic heating element (12 volts) is a pulse unit consisting of a pair of working parts. The voltage is measured with a standard multimeter. The exact characteristics are indicated in the passport, and the nominal value is 12 volts with the possibility of breaking the circuit after reaching the temperature limit of 230 degrees. The thermal fuse provided in the design is responsible for this position.
You can make a miniature heating element (12 volts) yourself. To do this, you will need nichrome with a diameter of up to 0.1 mm, slightly larger steel wire and asbestos thread with a thin sewing needle. First, the wire winding made of steel and nichrome is securely fixed by twisting.
Next, a circuit is assembled that serves as a determinant of the number of coils of the heating coil. After connection, the voltage is gradually increased, according to the readings of the voltmeter and ammeter. At a value of 12 volts, the approximate power of the device will be 5.5 W. This invention can be used to operate an electric soldering iron or similar tools.