The Babington burner was originally used to heat buildings and ran on diesel fuel.
The burner's inventor, Robert Babington, patented his device in 1979, and after the patent expired, information about the invention became publicly available.
After this, many craftsmen came up with the idea of using waste oil in the burner instead of diesel fuel.
This is how the modern burner design arose, which is still used today.
Operating principle of the burner
The burner works by atomizing fuel with a stream of high-pressure air. The fuel flows down a spherical surface in which a small hole is drilled. Inside the sphere there is a tube through which air flows under pressure. It bursts through a narrow hole, tears off part of the fuel and sprays it, forming a conical torch.
The rest of the fuel flows by gravity into a special settling tank, which is located under the sphere. It can then return to the main reservoir.
Some consider the principle of operation of a torch to be similar to the principle of operation of a blowtorch, but there is a significant difference between them.
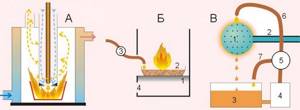
Operating principle of the burner during mining
In a blowtorch, air displaces the fuel, but does not mix with it. And in a Babington burner, a stream of air passes directly through the fuel stream, forming a cone of atomizing aerosol. This ensures better contact of small droplets with oxygen in the air and allows the fuel to burn more efficiently. That is why it became possible to burn oils, while a blowtorch uses gasoline.
When starting the burner, the torch may be unstable, go out, or, conversely, burst out. This is due to the fact that the fuel has not yet had time to warm up properly.
Do-it-yourself burner: operating principle
If you look at photos, pictures and drawings, it becomes obvious that the secondary oil forms a thin film on a curved surface.
Through a groove, gas or air is supplied into the container under low pressure. After heating, the oil is atomized by this air flow, ensuring high-quality ignition. It was this method of ignition that became the basis for inventions that have become widespread in homemade devices and drip burners using waste oil, produced in factories. Used oil is essentially free fuel, a used suspension. Therefore, it is considered more advantageous compared to other heat sources:
You can make a waste oil burner yourself
- solid fuel and briquettes for a homemade pellet burner;
- gasoline and diesel fuel;
- electricity;
- natural gas;
- kerosene;
- fuel oil.
The first devices using kerosene, diesel fuel and oil smoked heavily and emitted an unpleasant odor. Later they offered a do-it-yourself gasoline burner and devices using other combustible raw materials, but an active search was underway for budget fuel. Oil turned out to be a suitable source of heat, but the soot and smell negated all the benefits. Therefore, all the efforts of the inventors went into eliminating these disadvantages of the burner for waste oil boilers. This should have been facilitated by complete combustion, heating and filtration of contaminated fuel.
How to build your own apparatus based on the Babington burner principle: drawings
The principle of operation of a homemade burner, made based on the idea of Robert Babington, is clear from the drawings, where the components of the unit are visible:
Drawing of a waste oil burner according to Babington
- waste oil tank;
- waste tray;
- fuel supply pipe;
- a small fuel pump for supplying portions of oil;
- hemisphere for spraying with a small hole;
- heating chamber with heating element (may be missing).
The used oil evaporates and flows down the hemisphere. These oily vapors are mixed with the air mass, resulting in a fuel mixture. The remaining oil that has not had time to be utilized flows into the pan, and from there through the tube back into the fuel tank.
This unit, based on Babington's patent, designed to burn liquid fuel, is quite simple. Therefore, it can be reproduced from scrap parts in a home workshop. Success depends on the exact compliance of the parts with their intended purpose and on the coordinated operation of all components. Therefore, before making a burner with your own hands, you should carefully calculate all the parameters.
The design of the burner is quite simple, so it can be made from available materials
Design Features
The design is based on a hemisphere (ball) through which fuel flows in a wide stream from top to bottom. The hemisphere has a very narrow hole through which an air stream is supplied. The air sprays oil along its path, forming a stream of finely dispersed mixture, which is ignited and burns safely.
Air is supplied to the hemisphere under low pressure (up to 0.5 atm) by a compressor, and oil drains from a pressure equalizer tube (same level with overflow). But the viscosity of the oil should not be high and stabilized. To do this, it is heated in a copper tube, which wraps around the burner in 2–3 turns, which stabilizes the thickness of the flow on the hemisphere, and hence the combustion power.
Productivity (power) is actually determined by the area of the hole in the hemisphere and the thickness of the oil flow (its viscosity), i.e. the volume of oil that the air stream will spray per unit time. Unatomized oil flows back into the tank with a pump or into a sump, depending on the design.
And another important point that is sometimes forgotten: holes are made in the burner nozzle (preferably adjustable), through which secondary air is drawn in, with which complete combustion occurs.
How to make a burner yourself
The simplicity of the burner design allows it to be easily manufactured in a home workshop or garage. Let's look at how to make a burner of the simplest design.
First of all, you should select materials:
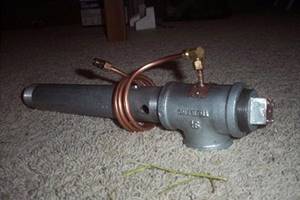
- The body of the future burner is a steel tee with internal thread. Inner diameter – 50 mm.
- The nozzle is made from a squeegee (a piece of threaded pipe). The outer diameter must be 50mm to fit the body. The nozzle length is not less than 100 mm.
- Connection to the fuel line is made through elbow DN 10.
- The fuel line is a copper pipe DN 10, at least a meter long.
- The air duct is a steel tube of the same diameter.
- A metal sphere or hemisphere that can fit freely into a tee.
- Fuel tank and settling tank.
- Heating element for fuel.
The fuel tank should not be located in close proximity to the flare. Otherwise, a fire will occur.
Step by step guide
Step one is to drill a hole in the sphere. This cannot be done using conventional tools, because the hole diameter should be from 0.1 to 0.3 mm. You need a special drill and a special chuck. If you have a drill with a diameter of 0.1 mm, but the power of such a torch is not enough, you can make two or three holes. Such holes are drilled at high speeds.
When the sphere has a hole, it is attached to the air supply tube. Then the structure is installed inside the tee. A rubber plug is placed at the outlet of the tube from the housing, which is necessary to prevent air under pressure from escaping out. A hole is drilled in the plug through which the tube will pass.
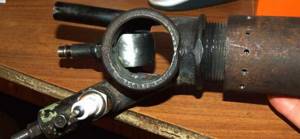
Waste oil burner
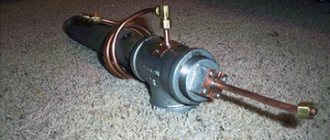
A fitting is soldered to the tee on top through which fuel will be supplied. A copper fuel line is connected to the fitting. Of course, the sphere inside the housing must be installed in such a way that fuel from the fuel line falls on it.
The next step is to take steps to warm up the fuel. To do this, a heating element is installed in the tank, which will carry out primary heating and prevent thickening at low air temperatures. The copper tube of the fuel line is bent into a spiral around the nozzle so that the oil heats up even more.
During installation, the nozzle is first screwed on, then the already twisted fuel pipe is put on it, and then connected to the fitting. The lower outlet from the tee is designed to drain the remaining fuel. The settling tank can be placed directly underneath it, but it is better to move it a little to the side, away from the flame.
Pellets are wood processing waste. Do-it-yourself pellet burner - operating principle and manufacturing recommendations.
Step-by-step instructions for insulating the floor in a private house are presented here.
Instructions for making a gas torch for soldering can be found here.
Features of making your own liquid fuel burner
Babington burner Its internal size is one inch and the wall is quite thick. The lower section is necessary to supply an oil-air suspension to the compartment where combustion occurs. The upper section is used as a burner bell. A torch of flame with a high temperature emerges from it. To ensure the flow of air that is pumped into the furnace to form a torch, use a simple household vacuum cleaner with high power.
Making a burner with your own hands is quite simple. To do this, you will need a welding machine, which is used to connect the parts, as well as a grinder and a lathe.
Manufacturing begins with the body. To do this, you need to find an empty gas cylinder of a suitable size. Then remove the filler hole and use a template to mark the pipe fasteners. Then use an electric drill to drill them along the inside of the circuit. To do this, you need to use a drill in the form of a spiral. With a high degree of accuracy, using a chisel or grinder, you need to remove the jumpers between the holes. To ensure that the holes for fitting the pipes are of the correct shape, it is necessary to bore them manually using a round file. This can also be done with a cutter by placing it in an electric drill. When working with metal, you must follow safety regulations.
Pipes are inserted into the holes of the required size and welded. The pipes are measured in advance and sawed off with a grinder. A hole is made in the lower half of the pipe and an M16 nut is welded. This hole is necessary for attaching the oil nozzle.
The principle of feeding waste into the burner itself
The oil nozzle is made on a lathe. For the base, use a rod that has a smooth shank. It will be required when attaching the oil supply hose. If a flexible line is provided, then it is necessary to cut a thread on this part. A metric thread is made along most of the length of the rod. The diameter of the pipe is 16 mm. A hole is drilled almost the entire length of the nozzle. It meets a transverse piece installed at the bottom, the diameter of which is 3 mm. If you have turning skills, then this part is easy to make with your own hands. And if not, then you can order it from a professional.
The principle of operation of the nozzle is based on the drainage of a viscous consistency from a hole drilled in the transverse part and its capture by the air flow. This process breaks the fuel into small droplets. Their combustion is much easier.
Air flow control
Making a furnace for testing The strength of the fire torch depends on the intensity of the air flow. The adjustment system is based on a steel cup. It has a semicircular bottom and a hole of a certain diameter. This fairly simple part can also be made on a lathe. To accurately make the bottom in the form of a hemisphere, you need to use cutters, and, of course, it must be made by a highly qualified turner.
The air flow is adjusted using a round curtain. It is secured to the L-shaped axis using an M4 screw.
To firmly connect the outlet pipe onto which the hose is placed and operate the air valve, use an adapter that has a slot along its length.
During arson, access to the exhaust chamber is provided by a lid with a sufficiently large weight. It is installed on pre-welded canopies on the neck of the body. If the part is not such a massive part, then spontaneous opening of the device during operation is possible. If all the steps in assembling the burner were completed correctly, then its operation is accompanied by an even violet flame, which occurs when the oil-air mixture burns in the body of the device.
When working with a liquid fuel burner, fire safety regulations must be observed. The attachment point of the nozzle itself and the hose through which liquid fuel is supplied must be protected with a steel screen. It will protect used oil from fire if the seal is broken.
Manufacturing recommendations
There are several useful recommendations that will help in making a burner:
- The hole should be exactly in the center of the sphere, and its axis should coincide with the axis of the air duct. Otherwise, the torch will hit to the side, and this creates additional danger.
- Instead of drilling a hole, you can use a ready-made jet. To do this, a hole slightly smaller than the outer diameter of the nozzle is drilled with a conventional drill, then it is modified manually, and the nozzle is simply hammered inside.
- If there is more than one hole, the distance between them should not be less than 7 mm.
- To ignite, you need to make a hole in the side of the nozzle.
- In the simplest case, fuel should be supplied to the burner by gravity, but a fuel pump can also be used.
- Even a low-power compressor (for example, from a refrigerator) can cope with air injection. The working pressure inside the sphere does not exceed 4 Bar (4 * 105 Pa).
It is not necessary to use a heating element in the design. When starting the burner, you can use a propane torch, hot water, or even an old coffee maker to preheat the oil.
Safety precautions: burner using a blowtorch
It may be dangerous to use if it is not installed correctly or if it is used incorrectly.
In order to protect yourself from fire, you must follow these rules:
- The walls and floor of the room where the burner will be installed must be lined with metal or asbestos;
- The fuel supply must be kept at a safe distance from the burner;
- Oil leaks must be cleaned up promptly;
- The electrical component of the burner must be properly insulated so that sparks do not fall into the oil spray zone;
- The burner location should not be exposed to air or drafts.
Under no circumstances should the burner be left unattended while the nozzle is open.
