Sooner or later, all things fail. What to do if your favorite faucet, which has pleased you with its impeccable performance for many years, unexpectedly breaks down or, during a bathroom renovation, a decision is made to replace the equipment? There are two options for the development of events. You can call professionals and spend some money on their services, or take on the matter yourself.
Contrary to popular belief, installing a bathroom faucet is not that difficult. Any home master, even a beginner, can handle it. However, before starting work, you should carefully study the instructions and become familiar with all the nuances of the upcoming procedure.
Tools and materials
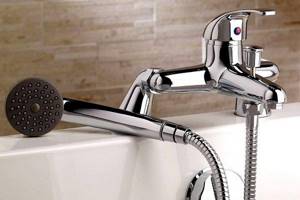
Faucet in the bathroom
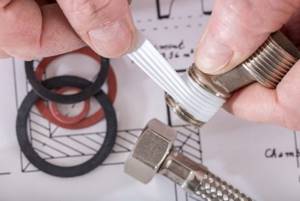
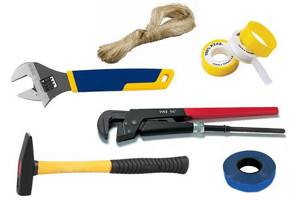
Before installing the mixer, you should prepare the following tools and materials:
- adjustable wrench;
- linen winding or FUM tape;
- plumbing paste or sealant;
- pliers;
- rags;
- masking tape to protect the chrome coating of the nuts (you can get by with a soft rag);
- faucet installation kit;
- eccentrics (if not included in the kit).
Heavy faucets must be installed only on brass eccentrics. Over time, salumin fittings crack or even break off the threads. It is very difficult to unscrew them from the water sockets later.
Selecting a seal
To seal the joint, flax and FUM tape are often used. Both methods are good, but it is important to consider some installation features when using either material:
- When using FUM tape, it is not advisable to turn the eccentrics in the opposite direction. If you then have to center the fittings, the seal will be compromised. In this case, it is necessary to rewind.
- If the FUM tape slips, you also need to rewind it, using a new piece of material for this.
- When using flax, the eccentric can be safely turned in the opposite direction by a quarter turn, but no more.
Flax provides sealing due to swelling under the influence of water, and FUM tape is elastic and is pressed into the thread when the nut is screwed on.
Preparation for installation
To install the mixer, you need to purchase a complete device. The set includes: body, spout, eccentrics, shower hose and watering can, fasteners, seals. The main thing you need to pay attention to when choosing a device is the distance between the centers of the fittings for connecting the water supply pipes. GOST 25809-96 provides a distance of 100 and 150 mm. Water pipes are not always routed perfectly, so eccentrics are included with the mixer; with their help, you can adjust the distance by 1-2 cm.
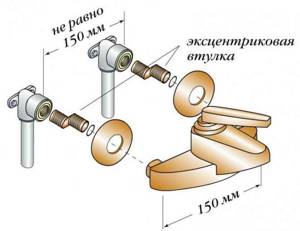
Adjusting the center distance using eccentrics.
The only installation tool you will need is an adjustable wrench. And to waterproof the connections you need FUM tape, plumbing flax or thread.
Mixer installation methods
Wall installation
The faucet in the bathroom can be installed in three ways:
- on the wall;
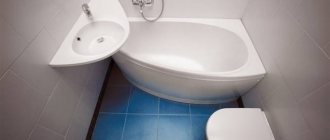
- on board the bath;
- on the counter.
When mounted on a wall, one tap can be used for both the bathtub and washbasin (provided they are located next to each other). Usually there are no unsightly hoses or pipes left in sight - everything is hidden by the wall decoration.
In the second case, this plumbing element will be used only for the bath.
The third option - rack mixers - is the most expensive. Before installing them, it is necessary to prepare the pipe distribution on the floor. However, they look presentable and original.
Since the last installation method is labor-intensive and rarely used, we should dwell in more detail on the first two.
Installation features
Here are some tips for preparing, installing and choosing a bathroom faucet:
- When organizing wiring from scratch, hot water is supplied from the left, and cold water is supplied from the right.
- The distance between the axes of water sockets should be 150 mm.
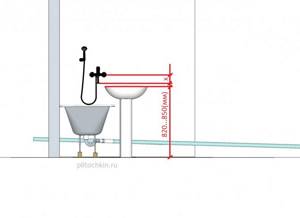
- When installing a faucet on the side of the bathtub, choose a device 150-200 mm high. When installing a wall-mounted model, it is installed at a height of about 30 cm above the bathtub.
- The length of the eccentrics is selected so that after installation they are not visible and are hidden by the wall finishing and nuts.
Such small recommendations will help you correctly fix the structure without seeking the services of specialists.
Attaching the shower head holder
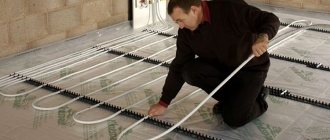
How to attach the holder to the wall depends on what material it is made of. If it is concrete, then dowels and screws will be required. Installation steps:
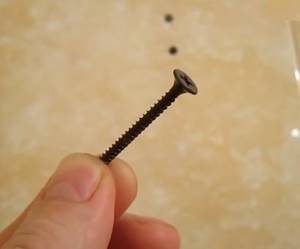
- Mark the location of the fasteners on the wall. A pencil or marker is suitable for this. The holder must be placed at the installation site at the required height and marks must be made through the holes for fasteners. To prevent the drill from sliding on the surface of the tile, you need to slightly damage the smooth coating of the tile using a self-tapping screw or a pobedit drill. It should be placed in the center of the mark and knocked down with a hammer.
- Drill holes and insert dowels into them.
- Secure the watering can holder with self-tapping screws.

Installing a holder in a plasterboard wall lined with tiles is more difficult - you need to know the location of the rack profile or mount it in advance, at the stage of constructing the partition. Only in this case is the secure fixation of the holder guaranteed. The first two stages of installation in drywall are similar to mounting on a concrete wall. You only need to drill the tiles and the adhesive layer. In this case, the holder is attached to metal screws with fine threads.
This completes the self-assembly and installation of the faucet in the bathroom. All that remains is to turn the water supply valve and use the device for its intended purpose. If all the work is done correctly, the tap will not leak for a long time.
Advice! If you need bathroom renovation specialists, there is a very convenient service for selecting specialists from PROFI.RU. Just fill out the order details, the experts will respond and you can choose who to collaborate with. Each specialist in the system has a rating, reviews and examples of work, which will help with the choice. Looks like a mini tender. Placing an application is FREE and does not oblige you to anything. Works in almost all cities of Russia.
If you are a master, follow this link, register in the system and be able to accept orders.
Removing an old wall-mounted faucet
Dismantling is easier than installing a new device. Actions are performed step by step:
- The water in the bathroom is previously shut off.
- Drain the water remaining in the body and pipes.
- Unscrew the shower hose.
- Use an adjustable wrench to loosen the nuts securing the eccentrics.
- Unscrew the reflectors.
- Then the old eccentrics are removed.
It is important to perform dismantling so as not to damage the threads in the water sockets, otherwise you will have to change the fittings. Afterwards, the water socket is thoroughly cleaned with a rag to remove any remaining sealing material and dirt.
Installation of eccentrics

When the eccentrics are installed, you need to check their horizontal position with a level or tape measure. If they are bent, they must be untwisted and re-secured in the correct position. Decorative reflectors are then installed on the structure to hide the holes in the wall.
When the cups are installed, the pipes are secured with eccentrics. A gasket must be installed between the nuts to seal. The nut is firmly tightened when connecting the spout or shower hose.
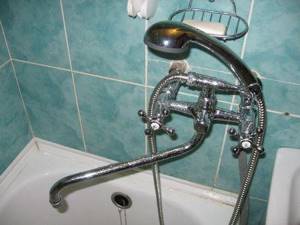
Installing the structure on the wall
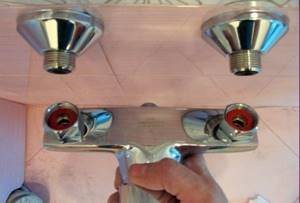
Installation of wall structure
First of all, it is necessary to install the eccentrics correctly. They are usually included in the kit, but can easily be purchased separately, which is recommended if they are not the right length. Procedure
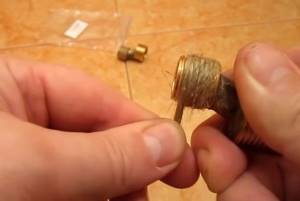
- The eccentrics are screwed into fittings coming out of the wall. Be sure to wind it from FUM tape or strands of flax and plumbing paste. In the latter case, take a strand of flax (about 3 mm thick and about 50 cm long) and wind it onto the thread. The point of winding is to hide the thread under the winding.
- Then plumbing paste is applied to the flax and the eccentric is screwed into the water socket. The paste protects flax from rotting. You can use sealant instead.
- You need to wind the flax in the opposite direction from the direction in which the eccentric will be screwed in so that the fibers do not ride up.
- If you use FUM tape, you must thoroughly clean the threads of dirt and wipe them with gasoline. When winding the tape, apply layer by layer, overlapping the previous one by half, with a slight stretch. Usually 6-8 layers are made. Then the tape is pressed with your fingers until the thread appears.
Eccentrics are necessary so that the structure can be mounted even where the distance between the holes of the mixer and water sockets differs. They make it possible to correct discrepancies of up to 5 mm horizontally and vertically. If one of the water outlets is deeply recessed into the wall, it is impossible to install the faucet on identical eccentrics. Therefore, they select the fittings in this way: screw the long one into the recessed water outlet, and the short one into the one that is less recessed.
When installing eccentrics, it is necessary to maintain a horizontal level. Therefore, when adjusting the tightening of fittings, be sure to check the level. But it is also necessary that the distance between the eccentrics coincide with the axial distance between the mixer leads.
Before installing a new faucet in the bathroom, it is advisable to check the tightness of the created connection. It is clear why it is recommended to do this before installing the housing: so that you do not have to remove the tap later if a malfunction is detected. It is convenient to use plugs with rubber gaskets for this purpose. They are installed on eccentrics and the water supply is turned on. If there is no leak, proceed to installing the mixer:
- The gap between the water sockets and the tiles is sealed with silicone sealant so that water getting behind the reflectors does not flow under the tiles.
- Mount decorative cups. They are threaded and screw onto the external thread of the eccentrics.
- Install mesh gaskets into the nuts and screw the mixer into place. Moreover, the smooth side of the gasket should be pressed against the eccentric, and the ribbed side against the nut. First tighten the nuts by hand, and then use an adjustable wrench to do this. Tightening must be done carefully so as not to cut the gaskets. Place a rag between the nut and the key, otherwise scratches will remain on the nuts.
- Correct installation assumes that the nuts completely hide the eccentrics, but it happens that the fittings are visible. If this does not suit you, you can shorten the eccentrics with a grinder, choose a shorter eccentric or a deeper reflector cup. Cups differ not only in depth, but also in diameter. Larger diameter reflectors help hide chipped tiles.
- Then the rain hose is screwed to the mixer using a nut, and the shower head is attached to the cone-shaped nut. Gaskets are pre-inserted on both sides.
- The gander is screwed in the same way.
You should flush the pipes before installing the aerator to remove dirt from the pipes. After its installation, the installation of the mixer is considered complete.
Removing the faucet installed on board
To remove the old faucet, it is enough to turn off the water, unscrew the flexible hoses from the water intake points and one or two nuts that secure the faucet to the side of the plumbing fixture. After this it can be easily removed.
Selecting a thread sealant
Rewinding is only needed for eccentrics.
The quality of installation of the mixer depends on how reliably the threaded connections are waterproofed. For this purpose use:
- Plumbing linen.
- Plumbing thread.
- FUM tape.
Linen is a time-tested material. Despite the emergence of many other methods of waterproofing, it is still popular among professional plumbers and amateurs. The quality of the seal is at a high level. Correct linen winding does not move when screwed in and is not cut by thread. The external bushing with flax winding can be adjusted in space, but by no more than ¼ turn.
To wind the thread, flax is twisted into a braid. Then they are wound tightly in one layer, so as to hide the thread. The tail of the thread must be clamped with the first turn. The direction of the winding should be opposite to the direction in which the part will be screwed. Then the flax will remain in place when connecting the threaded pair.
The only disadvantage of flax is that it is not slippery enough. It is imperative to use special plumbing lubricants (pastes) with it. They prevent the fibers from being cut when screwed in and allow the flax to crumple tightly along the thread, making the connection as reliable as possible. In addition, it protects flax from destruction under the influence of moisture.
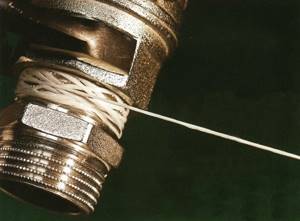
Plumbing thread is a less common material for waterproofing threaded pairs, as it is quite expensive and has specific uses. The thread is wound not along the thread, but crosswise. The tail is also clamped with the first turn. The material is reliable and easy to use, ideal for small jobs. Allows you to twist the connection in the opposite direction up to half a turn.
FUM tape is a popular material among amateurs and professionals, as it is very easy to use and fix on the thread. The tape is wound in several layers - from 3 to 10, depending on the diameter of the threaded pair, the density of the connection without winding and the thickness of the tape itself. The winding should be done from the base of the thread to the edge. The tape is wound along the thread, pulling slightly. The end must be cut, not torn off. FUM tape is quite smooth, so it does not require the use of additional lubricant.
Important! After twisting, the element with a winding made of FUM tape cannot be rotated in the opposite direction. To immediately install the eccentric correctly, you need to tighten it without winding and remember the number of turns and location in space.
Mounting the faucet on board
Fixing the faucet on the side of the bathroom
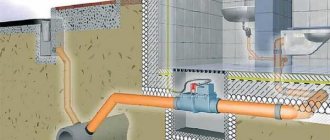
Before installing the mixer on board a sanitary fixture (this can be either a bathtub or a washbasin), it is necessary to make a water supply to the installation site. This condition is ensured by:
- metal pipes - installation of wiring is complex and time-consuming;
- metal-plastic or polypropylene pipes - plastic pipes are not used too often;
- flexible hoses - they are easy to attach, but must be changed periodically as they fail over time.
The latter connection option is often used.
The size of the flexible hose must be determined. Therefore, the faucet is first secured to the side of the sink or bathtub and the distance from the inlet holes in the mixer to the water supply pipes is measured. The hose should not be in a tense position, but it also makes no sense to buy one that is too long. Often flexible hoses are included with the mixer, but their standard length is 30-40 cm, and this is not always enough.
Also included in the package:
- mixer body, which performs the function of mixing water;
- mounting kit (two (one) studs, two (one) nuts, metal bracket and rubber gaskets);
- special keys: tubular 8×9, 10×11 (if you use regular ones, it is not always possible to dismantle and install the mixer without removing the sink);
- small screwdriver.
The installation procedure is as follows:
- Each faucet of this type has threaded holes inside. Studs are inserted into them and screwed in - each stud has a slot for a flat-head screwdriver. Tighten the fastening.
- A gasket is placed between the faucet and the sink outside.
- The structure is installed on board the plumbing with the top gasket, screwed in studs and hoses, pushing the latter into the hole.
- Put a rubber gasket on the studs from below, then an iron bracket and tighten the tap with nuts.
- All that remains is to connect the mixer: screw the hoses to the water points.
- Open the water and check the connection for leaks.
Installing faucets on bathroom sinks (and kitchen sinks) is relatively simple because the holes are already made at the factory. But on the side of the bath you need to prepare it yourself.
How to properly install a faucet in a bathroom
Correct installation of a faucet consists of choosing the optimal model of a plumbing fixture for specific operating conditions, preparing the most convenient location for users, and performing the job efficiently. An understanding of the principle of operation and structure of the crane will help you fix its breakdown yourself. Let's look at these questions in more detail.
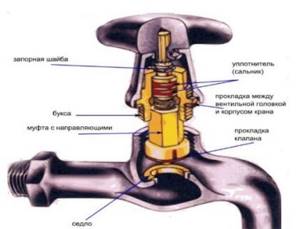
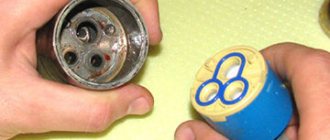
Construction of a traditional valve
The axle box is a worm-type locking mechanism. When the valve rotates, the reciprocatingly moving rod presses the sealing gasket against the seat, cutting off the water supply. A gasket that wears out with increasing operating time is easily replaced.
Attention! Much more reliable are axle boxes made of two ceramic plates with slots . One of them is fixed motionless, and the other is rotated by turning the valve. When the slots are aligned, the water supply opens. Ceramics perfectly resist mechanical wear, so failures of such a structure are extremely rare.
Video - Instructions for proper installation
Features of choice
The criteria that you should pay attention to when purchasing a mixer are shown in the following diagram:
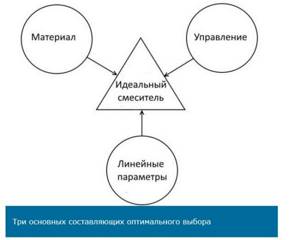
Criterias of choice
What are faucets made of?
The most common materials for making faucets are brass and silumin . Brass plumbing fixtures are quite expensive, but they are resistant to aggressive chemical environments and have high mechanical strength. They have a long service life, and you don’t have to worry about the part breaking if handled carelessly.
Silumin is an inexpensive alloy of aluminum and silicon. Products made from it are lightweight and fragile; they cannot be called reliable in operation. Very rarely they function after the end of the warranty period. Savings on purchasing a cheap silumin mixer result in further costs for its repair.
Interesting to know! You can determine what the faucet is made of by its weight; a heavy one will be made of brass, a light one will be made of silumin.

The silumin mixer is beautiful, but extremely unreliable
Find out which kitchen faucet is better to choose, high or low, in a special article on our portal.
Management functionality
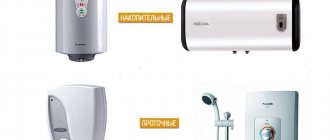
Water supply is controlled:
- using two valves;
- one lever;
- using a thermostat;
- in a contactless way.
The choice of method for adjusting the temperature and pressure of the water jet depends on the financial capabilities and operating conditions of the faucet. There was previously no alternative to the two-valve To adjust each of them, a separate tap was intended, which was easily replaced if a defect appeared in it. Among the advantages are low cost and compliance with the classic style. The disadvantages include the difficulty of adjusting the temperature of the water jet, especially low pressure.
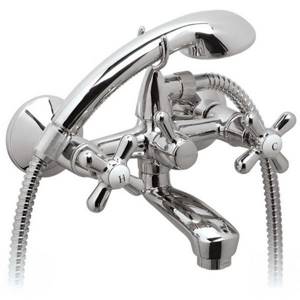
Mixer with two valves
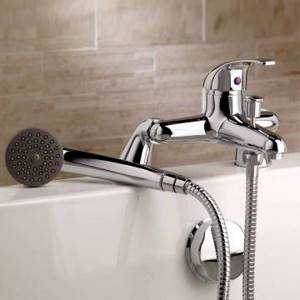
Currently, single-lever mixers are most widespread. They have the best ratio of cost and performance, and have an attractive appearance. It is possible to control the mixing of water flows passing through the cartridge with a slight movement of the hand, turning the lever up and in different directions. Two-stage models make it possible to save water consumption due to a noticeable increase in the effort to start a jet of maximum pressure.
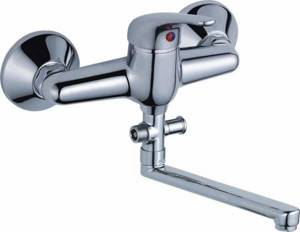
Single lever mixer
In thermostatic models, one handle regulates the temperature, and the other increases the jet pressure.
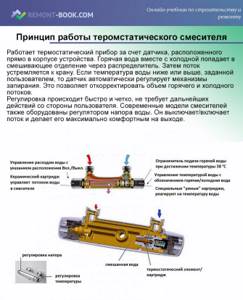
Mixer device with thermostat
The high cost of such a system is compensated by eliminating the possibility of burns, which ensures safe use for children. In addition, it is very convenient to fill the bathtub with water at a predetermined comfortable temperature.
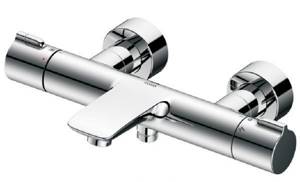
Thermostatic model
The most economical and convenient to use is a mixer with contactless control. It has the highest cost among other crane models. The design includes an infrared sensor that opens the water supply when a hand approaches it. To maintain the functionality of the system, it is necessary to promptly replace the batteries of the electrical circuit. These devices are often installed in public places.
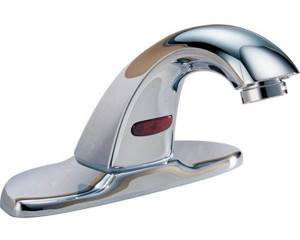
Non-contact device
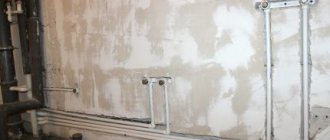
Preparing the installation site is made easier by simply replacing an old product. In this case, the structural parts are carefully dismantled, the threads of the connecting elements protruding from the wall are thoroughly cleaned of winding residues and contaminants. If major repairs are carried out to connect the pipeline system to a water outlet, grooves are punched in the walls using a grinder and a hammer drill.
Linear parameters
When choosing a mixer, you should pay attention to the geometric dimensions. They should provide ease of use. In particular, the length of the gander should not interfere with the user’s presence in the bathroom; the water jet should splash against the side surface of the container. The height above the floor can be adjusted during installation if the repair involves replacing water pipes.
Faucet installation methods
The main installation methods are as follows:
- installation on a wall surface;
- construction of a separate rack;
- location on the side of the bathroom.
The most widespread installation of the mixer on the wall . It allows you to place the faucet in any convenient place along or across the bathtub, and makes it possible to hide water pipes that spoil the appearance of the room from prying eyes.
Installing the mixer on a separate stand is suitable for large rooms. In this case, the water pipes are hidden inside the ceramic structure. Significant labor costs are compensated by the possibility of creating an original design solution.
To install the faucet on the side of the bathroom, you will need flexible plumbing hoses. In addition, the container body must have appropriate connectors. It will not be possible to install a faucet in this way on a Soviet-era cast-iron bathtub. In general, there are no restrictions on installation methods; it all depends on the financial capabilities and preferences of the users.
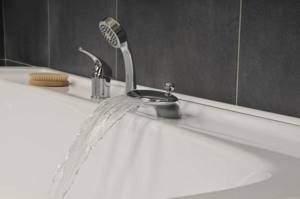
Location of the faucet on the side of the bathroom
In conclusion, we note that a well-installed faucet will work flawlessly for a long time, fulfilling its functional purpose of providing users with hot and cold water for hygiene procedures. Doing the work yourself makes it possible not to invite paid specialists and save a lot of money. However, if you have a complete lack of skills in connecting plumbing fixtures, it is better not to take risks and turn to people who know their business for help.
If, in addition to replacing the faucet, you are also planning to change other plumbing fixtures, pay attention to the article - How to change a toilet in an apartment with your own hands.
Prices for popular faucet models
Faucets
Preparatory work
- Before starting work, you need to clear the workplace of foreign objects and turn off the water supply valves.
- You can cover all surfaces and the bathtub with bubble wrap so that if the tool accidentally falls, they will not be damaged.
- Dismantle the old mixer as carefully as possible.
- Gather the necessary tools: adjustable wrench, screwdriver, hammer.
What height to choose
Faucets can be installed at different heights, and devices can be attached directly to the bathtub or to the wall. It is optimal to install a faucet in bathrooms with your own hands at a height of 20 cm from the bathtub. However, this indicator is considered only conditional, therefore, for each individual situation, its own suitable height is selected.
The structure should be installed taking into account some recommendations from experts:
- the ease of use of the device at a certain height is preliminarily assessed, and this must be done by immediate future users;
- It is not advisable to choose the height of the bowl as a starting point, since usually, after installation, the bathtub is supplemented with various convenient elements that increase the comfort of taking water procedures, and these include various pads or stands, so the height of the bowl can be increased;
- if it is assumed that the faucet will constantly turn from the bathtub to the sink, then it is important to evaluate the convenience of this process;
- the installation height of the shower mixer is influenced by various accessories that can be installed on the faucet, and these include softeners or filters;
- if you choose a wall-mounted mixer, then to attach it it is important to use special drills designed for tiles so as not to damage the wall covering;
- Often products intended for wall mounting are fixed to the curb to increase the comfort of their use.
Thus, the preliminary stages of installation consist of selecting high-quality plumbing equipment, as well as determining the optimal height for its installation. The correct choice of faucets determines their service life, comfort of use and the attractiveness of the entire bathroom.