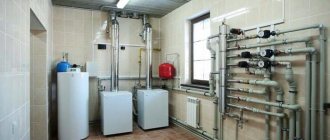
Technique for performing work on connecting radiator sections
Extending radiators is a useful skill for a home handyman.
Knowing how to join sections, it will not be difficult to provide your own microclimate in each room. Before connecting two radiators, a power calculation is made. The formula is simple - 10 m2 requires 1 kW of thermal power. The section's performance is indicated in the data sheet. This data will be useful for calculations. Then you need to buy the required number of elements, find tools and assemble the heating device.
Tools and components for work
To assemble a heating radiator with your own hands, you will need:
- wrench or adjustable wrench;
- radiator key;
- plugs with right and left threads – 1 pc.;
- nipples;
- paronite gaskets;
- intersection gaskets made of durable, flexible material;
- battery sections;
- sandpaper of fraction No. 120.
Thread gloves are useful for protection. It is more convenient to install the batteries with two people; an assistant will not hurt.
Step-by-step battery expansion process
Do-it-yourself heating radiator assembly can be done at any time. If the heating season has already begun, the network must be shut off, the coolant must be drained from the circuit and the heating device must be dismantled.
How to connect the battery:
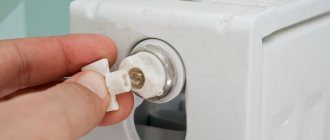
- Place the dismantled radiator on a horizontal plane. To avoid scratching the coating of the battery and table (floor), lay a cloth. Remove all additional elements - taps, temperature sensors. To wash the battery, take it into the bathtub, open the plugs and rinse with a stream of water.
Check the integrity of threaded connections and ends of the heating device. If there are deposits, sand the joints. Place the battery back on a flat, horizontal surface. The area is chosen to be level to ensure the tightness of the joint. The slightest curvature of the position will lead to an uneven joint. For seals, only paronite gaskets are chosen. This is a durable, flexible material that can withstand heat without loss of quality. Check the quality of nipple threads
Smooth and uniform cutting without chipping is the key to a strong joint. Move the sections together, placing spacers between them. Carefully begin to tighten the nipple. The part has a left-hand thread on one side and a right-hand thread on the other. This means that when rotating, both sections are attracted
It is more convenient to carry out work with a special radiator wrench. The tool may come complete with a battery, but is also sold separately.
This means that when rotating, both sections are attracted. It is more convenient to carry out work with a special radiator wrench. The tool may come complete with a battery, but is also sold separately.
- Grab the sections a little, check the evenness of the joints and tighten until tight. The number of turns of the nipple turns on each section must be equal.
Knowing how to increase the heating battery, it is not difficult to assemble a system with the required power indicators. After building up the sections, the radiator is checked for leaks.
For a household check you will need:
- a piece of pipe with a cross section of 15 mm;
- automobile pump with pressure gauge;
- tire nipple.
Now solder the nipple to the pipe and insert it into the radiator. This design is needed for air pressure testing. Install a plug on one of the radiator inlets. Connect a car pump with a pressure gauge to the nipple. Pump air at a pressure of 1 bar. If the tightness of the joints is broken, a whistle of escaping air will appear. You need to find a leak, tighten the nipple or change the gasket. Carry out the pressure test again. If there are no leaks, install the radiator into the network.
Pressure testing with water is carried out in the same order. Instead of air, colored water is pumped in. Let the device stand for 5 hours and inspect for leaks. If there is a leaky joint, water will leak out. Tighten the joints, check again, install the battery into the system.
An extended battery increases in weight. Before installing the radiator, it is advisable to strengthen the fasteners and screw in additional brackets. This will protect the device from collapse, because the battery will be even heavier with coolant. The device is integrated into the network at a selected location, taking into account the increase in battery length.
Cleaning a cast iron radiator when a blockage is detected
You need to remove the battery, wash it and put it back in place. The work is carried out with an assistant, since the weight of the product is quite large. The procedure should be carried out in the summer, when the coolant does not circulate through the system. To remove internal blockages, you need to dissolve soda ash in hot water, then pour the solution into the battery and shake the device a little. The main thing is to close the plugs on both sides so that the liquid does not leak out.
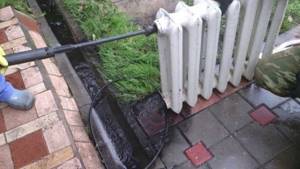
Leave the battery for 1.5-2 hours with the soda solution inside, then tap the radiator with a hammer or stick, but not too hard, so rust and impurities will fall off the inner walls. Now all that remains is to open the plugs, insert a hose into one of the holes and rinse the inside of the radiator with good water pressure. After washing, the battery is installed in place.
Fastening methods and number of elements
Attaching cast iron radiators to the wall is the first stage of installation, the quality of which determines the further connection and quality of operation of the entire system. Although newer cast iron batteries weigh half as much as their older counterparts, weak brackets or improper fastening can cause a serious accident over time. Therefore, you should perform this part of the work very carefully, using one of two installation methods:
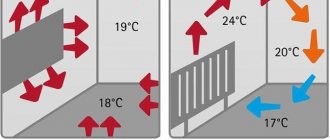
- Wall mount for cast iron batteries is the most common. As a rule, they are mounted under windows not because it is prettier or easier, but to prevent the glass from fogging up. Warm air rising from the structure creates a kind of curtain that prevents cold currents emanating from the window from entering the room. The main types of fasteners with this fastening method are:
- Brackets are made of cast iron, which are made in the same way as radiators, by casting.
- Steel fasteners located on a strip of the same metal.
- Steel pin fasteners up to 30 cm long. They are suitable for particularly heavy structures.
- The most convenient are adjustable steel clamps. They allow you to select the optimal position for the battery and change it if necessary.
If the wall is brick or reinforced concrete, then there will be no problems with fastening. It is enough to make holes in the places where the brackets will hang, insert dowels there and secure everything with cement mortar. But how to hang a cast iron battery on a wooden wall or plasterboard? This will require floor stands, which will take on most of the weight of the structure.
- Floor mounting is used precisely in cases where the wall is not reliable enough to support the weight of a cast iron device for a long time. In this case, special floor brackets are mounted into the floor, and wall mounts are needed only to hold the radiator in the required vertical position.
Having chosen one of the mounting methods, you can proceed directly to installing the battery.
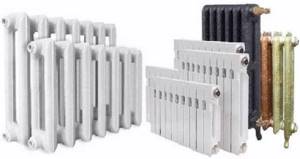
What is the secret of popularity
- Let's start with the fact that such units are considered perhaps the most durable . Most reputable manufacturers confidently offer a 50-year warranty. And this is quite justified, for example, in Tsarskoe Selo, a radiator installed 110 years ago is still functioning;
Important: there is an opinion that the cast iron radiator now is worse than in Soviet times. This is only partly true. It all depends on the quality of the product and the manufacturer. If the battery is cast in accordance with domestic or European GOST standards, then there is nothing to be afraid of. But when purchasing units from Chinese or Turkish “masters”, a person is essentially taking a pig in a poke.
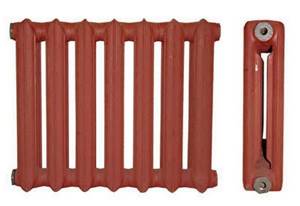
Standard MS 140.
- Cast iron, although a brittle metal according to its characteristics, is still quite durable . The working pressure for such a battery is 8 – 12 atmospheres, plus during short-term surges or water hammer, it can withstand a load of up to 20 atmospheres. If we take into account the fact that in the urban network the pressure rarely exceeds 6 - 8 atmospheres, and the average water hammer force is 15 - 20 atmospheres, then the safety margin is obvious;
- Such batteries are present both in the budget segment of the market and in luxury goods . The fact is that the price of the classic MS-140 is perhaps the lowest. At the same time, the cost of artistic thick-walled casting can sometimes be several times higher than the price of good bimetal;
- Adherents of modern materials forget about the quality of the coolant in our urban networks . This harsh “cocktail” can destroy many newfangled models. While cast iron is completely resistant to all chemical attacks and neutral to corrosion, it simply does not rust;
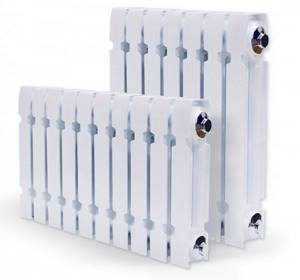
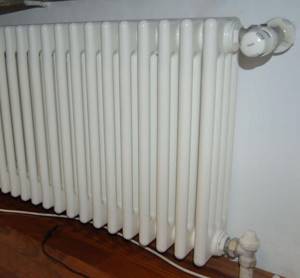
Design of modern cast iron batteries.
- Thanks to the large diameter of the battery channels, any debris slips through it, practically without stopping , which is very important for urban high-rise buildings with old pipework;
- As you know, cast iron has a high heat capacity . The battery takes a long time to gain temperature, but also maintains it for a long time. In case of interruptions in heating, this unit will give off heat for several hours after switching off;
Battery connection options.
- Technically, installing a cast iron heating radiator with your own hands is not very difficult . With a tool and a couple of assistants for support, the job can be completed within a day;
- Another important advantage is the fact that components for cast iron heating radiators can be found in any hardware store and the price for them is quite reasonable;
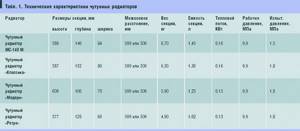
Characteristics of modern cast iron radiators.
We seem to have figured out the reasons for the nationwide popularity.
Now let's talk about the pitfalls of these heating devices:
- The first reason why many people refuse cast iron is the serious weight of the structure. Judge for yourself, a standard section weighs about 7 kg; on average, 7 – 10 sections are installed per room. As a result, we have from 50 to 70 kg of empty structure; when filling, another 1 - 1.5 kg is added to each section. In addition to installation problems, not every wall can support such a unit;
- The minimum volume of coolant in one cell is about 1 liter. For modern competitors this figure is 3–5 times less. And as you know, the more liquid, the more energy is required to heat it and maintain temperature. Plus, it is very difficult to quickly regulate the temperature in such systems, due to their high inertia;
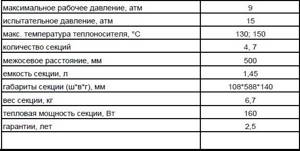
Data of the classic cast iron radiator MS 140.
- The area of such structures, compared to modern analogues, is somewhat smaller, and accordingly the heat transfer is lower;
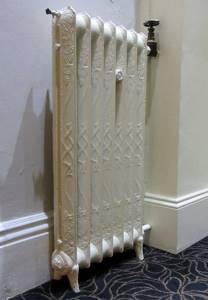
- Reproaches regarding the unattractive design are unfounded; to some extent they can be addressed to the widespread MS-140. As for figured casting, their beauty leaves them far behind their modern counterparts;
Advantages of cast iron batteries
Among the obvious advantages of this type of radiator are the following:
- the minimum service life is 50 years, which is due to the high resistance of the equipment to corrosion plaque;
- cast iron batteries are reliable;
- the ability to accumulate a very large amount of heat due to the presence of thick walls;
- poor quality of the circulating coolant will not affect the operation of the equipment;
- unlike steel products, cast iron heating devices are not prone to leakage;
- The installation of cast iron batteries can easily be done with your own hands, that is, without the help of professional craftsmen. To facilitate installation, you can study various photo and video materials that can simplify the installation process.
What is needed for installation
Installation of heating radiators of any type requires devices and consumables. The set of necessary materials is almost the same, but for cast iron batteries, for example, the plugs are large, and they do not install a Mayevsky valve, but instead, somewhere at the highest point of the system, they install an automatic air vent. But the installation of aluminum and bimetallic heating radiators is absolutely the same.
Steel panel ones also have some differences, but only in terms of hanging - they come with brackets, and on the back panel there are special arms cast from metal, with which the heater clings to the hooks of the brackets.
These are the arms that hook the hooks
Mayevsky crane or automatic air vent
This is a small device for releasing air that may accumulate in the radiator. Placed on the free upper outlet (collector). It must be on every heating device when installing aluminum and bimetallic radiators. The size of this device is significantly smaller than the diameter of the manifold, so you will also need an adapter, but Mayevsky taps usually come complete with adapters, you just need to know the diameter of the manifold (connection dimensions).
Mayevsky crane and method of its installation
In addition to the Mayevsky crane, there are also automatic air vents. They can also be installed on radiators, but they are slightly larger in size and for some reason are only available in a brass or nickel-plated case. Not in white enamel. In general, the picture is unattractive and, although they deflate automatically, they are rarely installed.
This is what a compact automatic air vent looks like (there are more bulky models)
The side-connected radiator has four outputs. Two of them are occupied by the supply and return pipelines, on the third they install a Mayevsky valve. The fourth entrance is closed with a plug. It, like most modern batteries, is most often painted with white enamel and does not spoil the appearance at all.
Where to install the Mayevsky plug and tap for different connection methods
Shut-off valves
You will need two more ball valves or shut-off valves that can be adjusted. They are placed on each battery at the input and output. If these are ordinary ball valves, they are needed so that, if necessary, you can turn off the radiator and remove it (emergency repairs, replacement during the heating season). In this case, even if something happens to the radiator, you will cut it off, and the rest of the system will work. The advantage of this solution is the low price of ball valves, the disadvantage is the impossibility of adjusting heat transfer.
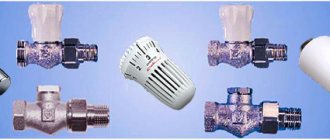
Radiator taps
Almost the same tasks, but with the ability to change the intensity of the coolant flow, are performed by shut-off control valves. They are more expensive, but they also allow you to adjust the heat transfer (make it less), and they look better externally; they are available in straight and angular versions, so the piping itself is more accurate.
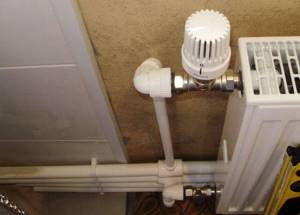
If desired, you can install a thermostat on the coolant supply after the ball valve. This is a relatively small device that allows you to change the heat output of a heating device. If the radiator does not heat well, you cannot install them - it will be even worse, since they can only reduce the flow. There are different thermostats for batteries - automatic electronic ones, but more often they use the simplest one - mechanical.
Related materials and tools
You will also need hooks or brackets for hanging on walls. Their number depends on the size of the batteries:
- if there are no more than 8 sections or the length of the radiator is no more than 1.2 m, two mounting points on top and one on the bottom are sufficient;
- For every next 50 cm or 5-6 sections, add one fastener at the top and bottom.
You also need fum tape or linen winding and plumbing paste to seal the joints. You will also need a drill with drills, a level (preferably a level, but a regular bubble one will do), and a number of dowels. You will also need equipment for connecting pipes and fittings, but it depends on the type of pipes. That's all.
https://youtube.com/watch?v=nnQz2VA7C_M
How much does it cost to install a cast iron radiator?
If for some reason you cannot install the battery yourself, specialists will come to the rescue.
When finding out how much it costs to install a heating radiator, it would be useful to clarify the scope of work. If the master only hangs the battery, then the work is estimated from $15 (1000 rubles), and when purchasing consumables, joining sections and leveling the wall, the estimate will increase significantly. The section costs from $25 (1,600 rubles), together with components and taps, the radiator will cost $300 (21,000 rubles) - do it yourself. The same work in the company is estimated from $500-550 (35,000 rubles).
How to disassemble an aluminum heating radiator with your own hands
The aluminum battery is removed in the following cases:
- When the system changes completely.
- It is necessary to increase or remove the excess section.
- Fix the leak.
Before disassembling the aluminum heating radiator, you need to prepare a set of wrenches and a screwdriver.
Further actions are performed in the following sequence:
The coolant is discharged from the system. If disassembly occurs during the heating season, you should wait until the battery cools down.
Using a wrench, unscrew the coupling that connects the hose going from the battery to the heating pipe.
The disconnected radiator must be freed from any remaining water and placed on a flat surface with its face up.
The filter is removed from the battery and thoroughly washed. This must be done immediately, since the dirt accumulated in it can harden and then it will be extremely difficult to remove it.
Further work is to disassemble the battery into sections. They are connected to each other with special nipple nuts. To remove them, you need a key for disassembling aluminum radiators; by turning it counterclockwise, they can be easily removed from the radiator
This must be done extremely carefully to avoid distortion.
After disassembly, the battery cells are washed and assembled in the same sequence of actions.
If it is necessary to eliminate a leak, then for aluminum radiators a special solution made of epoxy resin with the addition of bronze powder is suitable. You need to work with this composition quickly, as it dries in a matter of minutes, so the leak site must be cleaned and prepared in advance.
Counter-lattice for metal tile roofs
This roof structure is quite simple and quick to install.
For metal tiles, you should use bars that have a length of 1350 to 1370 millimeters and a standard cross-section of 30x50 millimeters. Fastening must be done using galvanized nails with a pitch of 300 millimeters.
In the process of installing counter-lattens for a metal tile roof, you will need to connect the upper ends of the bars from opposite slopes by sawing. The result should be a strong connection. Subsequently, this may make it possible to carry out more accurate calculations of the sheathing for a given roofing material and construct the correct ridge.
In addition to the fact that the counter-lattice structure for metal tiles is used on roofs, it is also used on vertical surfaces while the process of external wall insulation is being carried out. This will create an air space between the insulation and the facing material.
Condensation will not fall on the inside of the cladding onto the surface of the insulating material. If the house is planned to be covered with wooden panels, this will have to be done in order to keep the house cladding intact for a long time.
Such a roofing pie will make it possible to solve problems such as:
- more reliable fastening of the membrane on a metal roof;
- arrangement of a reliable frame for the sheathing;
- obtaining an air gap for proper ventilation.
Electricity consumption
This indicator should be considered in two groups. The power of liquid heating devices does not exceed 1 kW. Most often, manufacturers offer radiators of 500-800 W. This means that such a device will consume 20 kW of electricity per day. But if you configure it correctly, you can get a reduction of up to 12 kW.
With liquid-free ones it’s a little more difficult. Here the consumption per section is taken into account, which means that everything will depend on the number of sections present in the battery. Based on the fact that each section consumes 150-200 W, you can calculate the consumption of the radiator. Again, with the right setup, you can achieve a 40% reduction in consumption.
Fasteners for cast iron, sectional, panel radiators
The procedure for installing radiators does not depend on their type: the rules remain the same, only the fasteners change. If installation under a window is intended, the following distances must be observed: from the floor should be at least 80-120 mm, to the window sill at least 60-100 mm, to the wall - 30-50 mm. It is also necessary to decide on the quantity and location of fasteners.
The number of brackets (hooks) per battery depends on its length. If there are few sections - up to 8-10 pieces - then two holders are required at the top, and at least one more at the bottom. If there are more than 10 sections, install three supports on top and two below. For each next five to seven sections of cast iron radiators and ten tubular and aluminum ones, the number of fasteners increases: one holder is added at the top and one at the bottom.
Methods of using various types of fasteners for sectional radiators
Self-installation of radiators
Installing batteries is not complicated; it requires a minimum of tools and basic construction skills. Since cast iron radiators are heavy, it is better to install them with two or three people. The quality of installation affects heating.
Installation of brackets
Before installation, mark the wall and determine the locations for the brackets. If the wall is reinforced concrete, drill holes 12 cm deep and insert dowels or wooden plugs.
Attach the brackets to the prepared holes, secure with cement mortar and plugs.
If the walls cannot withstand the weight, it is rational to use floor-type brackets. They are not inferior to wall ones and will protect the walls from serious loads.
Bracket installation
How to install a cast iron battery?
In addition to radiators, the heating system involves the installation of components that ensure easy maintenance of batteries, reducing the likelihood of emergency situations. Step-by-step description of installation work:
- Installation at the point of the upper manifold, at the point where the supply pipe is connected, of a manual or automatic air vent.
- Installation of plugs on free collectors. If the diameter does not match the pipes, use the adapters included with the radiators.
- Installation of shut-off and control valves. Ball valves installed at the outlet and inlet of the battery allow you to dismantle the radiator without stopping the operation of the heating system.
- Connecting equipment to the heating system. Can be connected according to 4 schemes. The connection is determined by the selected fittings and pipes.
Crimping
Pressure testing is the final stage of installation. You will need equipment; if you don’t have it, you can actually do the work yourself. Fill the batteries with water slowly to prevent water hammer, damage to fittings and heating systems.
Preparatory work
In order to correctly select the necessary parts and calculate their quantity, you should know the type of wiring of the heating system - one- or two-pipe. In a single-pipe system, the heated coolant rises through the riser, and the heating devices are connected to the downward line. In a two-pipe system, the coolant moves from the heater to the heating devices and back. One line is designed to supply hot water, the second - to return the cooled coolant to the boiler. There are two ways to connect system elements - horizontal and vertical.
All connection details should be clarified before work begins. Before installation, you need to drain the water from the system, dismantle the old heating devices, and remove the fasteners on which they were held. The supply of hot coolant to the system must be stopped until the work is completed.
Assembly of cast iron heating radiators
First of all, you need to group the sections. To do this you will need radiator keys. The device is mounted on a workbench; radiator keys must be inserted into the lower and upper holes so that they rest against the internal protrusions. Both nipples need to be deployed simultaneously to avoid skewing of the sections, so the manipulation is performed with an assistant. The nipples should be lubricated with drying oil and gaskets should be placed on them. The keys are rotated in the direction opposite to the thread. If it is left, then they turn to the right, and if it is right, they turn to the left. You need to screw in 1-2 thread strokes.
Hydraulic tests of the finished structure are carried out on a special stand, where a pressure of 4-8 kgf/cm2 is created using a press. The performance of the device is checked using a pressure gauge. If its performance begins to decline, it means that either defective sections are connected, or the work was performed poorly. In the first case, the elements are replaced, in the second, the nipples are tightened. If minor damage occurs, it can be repaired with epoxy glue. If the connections are not made correctly and the joints are leaking, the gaskets should be changed.
Painting the radiator after assembly
After testing, the heating device is painted and dried. To obtain a durable and even coating, it is necessary to apply two thin layers of paint. As a result, radiators must meet the following requirements:
- Heat-resistant coating of the device body. It must withstand temperatures of 80 degrees without softening or releasing harmful substances into the atmosphere.
- The painting must be of sufficient quality to protect the radiator from corrosion as much as possible.
- The selected composition should not change color.
Experts recommend using alkyd enamels as a coating, because... after drying, they are harmless and do not poison the air during operation. Option - acrylic compositions. They do not crack, do not change color and are resistant to heat. Both types of compositions have their advantages: alkyd enamels are cheaper, acrylic-based paints are more durable. You can also use water-dispersion paints, which have a manufacturer’s mark stating that they can be used for painting heating appliances.
How to correctly determine the location of the radiator
Heating devices are usually located under windows at a height of at least 6 cm from the floor and 5-10 cm from the bottom of the window sill. The distance to the wall should be at least 3-5 cm. The system pipes are placed at a slight slope, which is made in the direction of movement of the coolant. If there is no slope or distortions appear when installing a cast iron radiator, air will accumulate in the batteries, which will have to be removed manually. An “airy” radiator will not be able to warm up properly and give off heat. The center of the device should coincide with the center of the window opening plus or minus 2 cm.
Connecting taps and subsequent connections
The taps are connected to the battery in this way:
- The tap needs to be disassembled, and then screwed onto the radiator with a fitting and a union nut.
- Tight tightening is ensured by using a special key for “American women”.
Connecting radiators with polypropylene, as well as their subsequent piping, will require the following materials:
- Threads for carving.
- Sealing connecting material.
- A set of keys.
- Tow and thread paste.
The quality and speed of connecting a radiator to polypropylene pipes will increase if you know the following details:
- The distance between the radiators and the window sill is chosen to be no less than 10 cm. If it is reduced, this will entail a change in the trajectory of the heated air flow, which reduces the heating effect.
- There should be 12-15 cm between the radiator and the floor to avoid sudden temperature fluctuations.
- The distance between the rear surface of the heating device and the wall is from 20 mm.
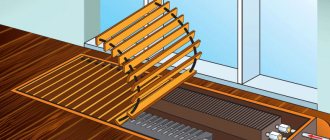
The most optimal location for installing a heating battery is the area under the window: this will ensure heating of cold currents penetrating from the street. If possible, radiators are left in an uncovered position, which, if other installation recommendations are followed, allows the efficiency of the device to approach 97%. If you place the device in a niche, its efficiency drops to 93%. Using a partially closed screen reduces this figure to 88%.
A completely closed decorative screen, used to decorate not very attractive cast iron radiators, can reduce the coefficient by up to 75%. As for the use of polypropylene pipes for connecting heating radiators, which are increasingly replacing traditional metal ones, this is completely justified. As a result, installation and maintenance work is greatly facilitated, which can be carried out independently.
In residential buildings of the old stock, both in the private sector and in apartment buildings, work is currently underway to re-equip heating systems. Physically and morally worn-out heating equipment (steel and cast iron radiators, pipelines, shut-off valves) are replaced with new heating systems. Outdated devices have been replaced by more advanced heating units, for example, bimetallic heating radiators with improved characteristics. Steel pipes, a familiar and durable material, are still in demand when installing heating circuits, but worn-out steel pipelines are increasingly being replaced with new materials, in particular, polypropylene, a polymer widely used in the production of pipe products.
Despite the fact that polymer pipes have been used in construction for decades, many homeowners who still use steel pipelines and are planning to modernize their heating circuits have questions about the technology for the upcoming installation - how to install polypropylene lines in their homes conditions, what does it look like to connect a heating system radiator to polypropylene reinforced pipes? To partially answer them, let’s take a closer look at how polypropylene pipe materials are connected to heating radiators.
Connection diagrams
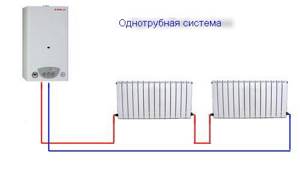
The most fault-tolerant scheme for connecting heating radiators in a private house with a bottling and boiler is a single-pipe Leningradka. Heating appliances are connected parallel to the bottling line, which is laid around the perimeter of the room.
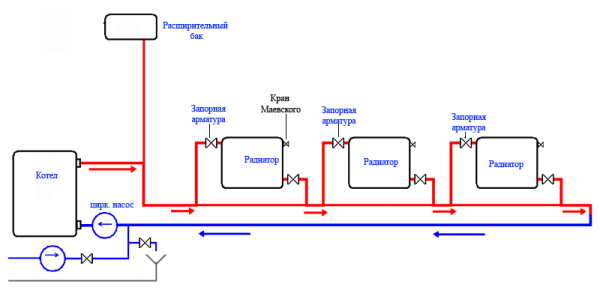
Somewhat cheaper to install, but noticeably more problematic to operate, is a circuit that uses a series connection of batteries. Suffice it to say that their independent adjustment in this case is impossible.
A variant of a single-pipe circuit with a serial connection.
Finally, a two-pipe system involves connecting each radiator as a jumper between the supply and return lines. It is inconvenient in that it requires the already mentioned balancing - limiting the passage of the heating devices closest to the boiler.
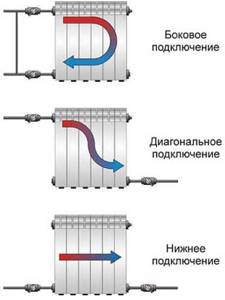
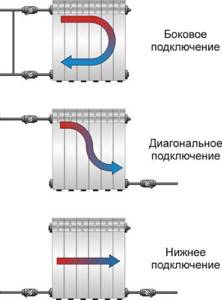
What are the possible diagrams for connecting heating radiators to the supply line?
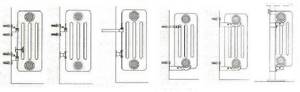
- One-sided. The connections are connected to the upper and lower radiator plugs on the right or left. It is compact, but makes the heating of the device uneven: the last sections will always be colder than the first.
- From bottom to bottom. In this case, the battery must be equipped with an air vent. The advantages of the solution are that the radiator with this connection does not require flushing and always heats along its entire length.
- Diagonal. Heating of sections is even more uniform; however, the lower corner of the device with a blind plug will gradually silt up.
Connection options for liners.
How to disassemble a new cast iron radiator
Cases when new plumbing equipment fails are not uncommon. The reasons for the failure are various. As a rule, this is either a factory defect or a non-professional assembly of the elements of the heating structure. There are other reasons that require you to remove and disassemble a new cast-iron heating radiator yourself. One of these is the need to increase or decrease, sometimes this happens, the number of battery sections.
New cast iron radiators
It doesn’t matter what problem prompted you to disassemble the heating plumbing fixture, but the sequence of repair actions is the same. First, the cast iron structure must be disconnected from the communications and removed from the hooks of the clamps
Before carrying out such activities, it is necessary to completely drain the liquid from the heating system of a residential building. By the way, it is advisable to immediately drain the water from the heating radiator, a little, by lifting one of the sides. This way you will significantly reduce the weight of the structure and avoid many side incidents. Like, liquid getting on the floor, with the ensuing consequences.
Due to the heavy weight of the plumbing fixture, repair work is best carried out with an assistant. You must understand that during disassembly and assembly of a cast iron heating radiator, you will have to lift and tilt the structure more than once. Therefore, physical assistance will be very helpful. This approach will make the repair process much easier for you and make it less dangerous.
Next, we lay the removed cast iron radiator flat on a previously prepared platform, face up. This could be a wooden board or pallet. Then, using an adjustable wrench, unscrew the plugs and fittings. Futorki - hollow nuts, with internal and external threads, which are intended for connecting heating pipes to a heating product.
How to disconnect a section of a cast iron battery
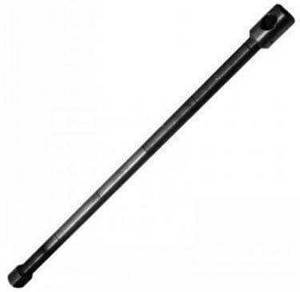
Radiator key
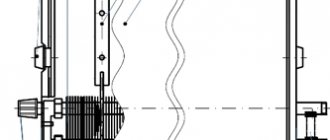
Now, it's time to find out how to properly disconnect a section of a cast iron radiator. To do this, we need a special plumbing tool - a radiator wrench. You won’t find similar plumbing equipment in a store, but you can make it yourself, rent it, from a specialized service center or from a familiar plumber. The tool is specific and individual, it is a homemade device. As a rule, it is not possible to encounter two identical radiator keys. Their only similarity is the rectangular tip, 40 by 24 mm. Typically, such a tip is welded to fittings or a pipe with a diameter of 15-20 mm and a length of 60-80 centimeters. On the other hand, they make a special eyelet so that it is possible to insert, for a lever, a pry bar or a long crank.
Conclusion
As you can see, installing a cast iron heating radiator with your own hands is not rocket science, and with a strong desire, any good owner can do this work. If the water has been drained from the system, you can try, especially since you will always have time to invite locksmiths.
Floor installation of the radiator.
Did you like the article? Subscribe to our Yandex.Zen channel