Why do you need garage lining inside?
Finishing the garage will keep the room dry and warm. The creation of such conditions is necessary to keep things in the garage, as well as the vehicle, safe and sound.
If finishing work is not carried out, the humidity in the room will always be high.
Dampness will contribute to the beginning of the process of rotting of the car and the appearance of rust on its spare parts. Tools and other things stored in the garage will also deteriorate.
Finishing work is intended not only to create an aesthetic appearance in the garage, but also to maintain hygienic conditions in it.
And working in a warm, well-maintained garage is much more comfortable.
Conclusion
Both gates with increased thermal insulation and energy-efficient roller shutters have long ceased to be a curiosity and are actively used by owners of country houses as a universal barrier - not only from cold, heat and noise, but also as one of the elements of protection from unwanted visitors.
To increase the level of comfort, an alternative to manual control is specialized automation for sectional garage doors. For those who are just planning to develop their site, here is an interesting selection of homemade sliding gates. The video is about passive house technologies, including energy-efficient roller shutters and energy-efficient gates.
Subscribe to our Telegram channelExclusive posts every week
Material requirements
The main requirements when choosing a finishing material are to have the following properties:
- fire resistance;
- resistance to the effects of substances containing chemical elements;
- increased strength and durability;
- the material should be easy to clean even from the most difficult contaminants;
- resistance to deformation;
- resistance to absorption of odors.
Since a lot of work is carried out with various chemicals, finishing work must be done from exclusively high-quality, proven materials. Let's take a closer look at how you can decorate a garage.
Plaster
Plaster has become less and less used for finishing work, since it is very difficult to work with it, especially if there are no special skills. In damp and cool weather, this material dries completely only after a few days.
Suitable for both wall and ceiling decoration. You most likely won’t be able to create a neat and high-quality plaster finish yourself and will have to hire a specialist.
Plaster tends to burst due to temperature changes.
Over time, the appearance of such cladding deteriorates greatly - the plaster becomes dull and quickly becomes dirty. Getting rid of dirt on plastered walls is not easy.
How to do the finishing yourself?
Whatever building material you choose when finishing a garage, you need to know how to work with each of them, where to start and what stage of finishing should be next.
Floor preparation is the initial step when carrying out interior finishing work in the garage. Porcelain stoneware is mainly used for floor finishing . But they only lay it on a concrete-filled, perfectly flat, completely dry floor.
The tiles are attached using a special glue that is resistant to temperature changes.
If the concrete used to fill the floor is old and chipped, you can use a leveling mixture to level it. But before that, the floor is thoroughly cleaned of debris and dust , and then covered with a special primer - it is applied with a roller.
While applying the leveling mixture to the floor, all windows and gates must be closed . The mixture is applied using a leveler only after the primer has completely dried.
After preparing the base, you can begin laying the tiles. Apply glue to a small area of the floor (no more than 1 sq.m.) in an even, not and level it with a spatula.
Then the tiles are laid one by one, inserting a special cross between each one , designed to maintain equal spacing between the tiles.
If necessary, the tiles are cut with a special machine, but it is recommended to leave these parts near the baseboard so that the appearance of the laid tiles looks aesthetically pleasing. In order to avoid moving to the side when laying, you can stretch transverse ropes over the floor.
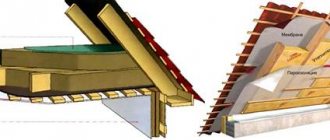
Before decorating the ceiling, you need to make sure that moisture will not penetrate into the room through the ceiling and heat will not escape.
Plastic panels are often chosen for its cladding. The reason for this is the lightness of the material, since you have to work with them at height. They are also economical and practical.
Do you know how to glue foam ceiling plinths? More information here.
They are attached to the ceiling on a prepared frame. To ensure it is assembled correctly, you must perform the following steps:
- Make precise markings along the entire perimeter of the ceiling.
- If the garage has a slope and all its corners are at different heights, first, using a water level, you need to determine the lowest of them - it will be the reference one.
- Also, using a water level, this height is marked on the opposite wall, in the same corner.
- The resulting two points must be connected to each other using a rope and measurements taken at the same height in the remaining two corners.
- As a result, 4 ropes should be stretched along the perimeter of the ceiling at the same height, along which the frame is attached.
- to attach guide metal profiles to each wall , which are secured with dowels.
- The intermediate frame elements are attached to the guide profiles at intervals that will be equal to the dimensions of the panels. But this distance should not be more than 50 cm.
The panels are inserted into the prepared frame with a shim into the groove of the previous element. The most difficult ones to secure are those that should be located against the wall. If necessary, they can be cut to the desired size by stepping back from the side that will meet the wall.
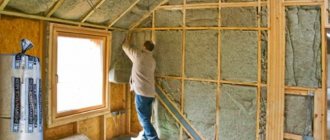
The walls can be lined with plastic panels, which are easy to clean when dirty . They are attached to a pre-prepared wooden or metal sheathing (its base is a metal profile).
Above the floor (departing from it by 2 cm) and above the ceiling, longitudinal bars or a metal profile are attached, the length of which should be equal to the length of the wall. The sheathing is attached strictly level to avoid further distortions.
If vertical cladding with panels is chosen, then markings are made starting from the beam or profile located above the floor. They measure every 50 cm - this is the place where the transverse sheathing is attached .
Having made several marks, use a level to measure a straight line and draw a straight line with a pencil from the floor to the ceiling - according to this drawing, the transverse fastenings for the panels are attached.
You can place a trim strip under the ceiling and above the floor which will help decorate the upper edges of the panels.
When the sheathing is completely ready, begin fastening the panels. If necessary, they are cut with a hacksaw to the desired height. The panels begin to be attached from the far corner relative to the entrance to the garage, inserting the top and bottom of each into the sheathing strip.
Each subsequent plastic element is also first inserted into the upper and lower strips of the sheathing, and then into the groove of the previous panel, while snapping the clamps into place. For reliability, each panel is secured on the clamping side with several self-tapping screws.
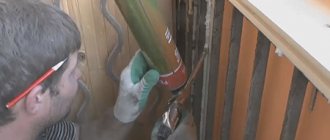
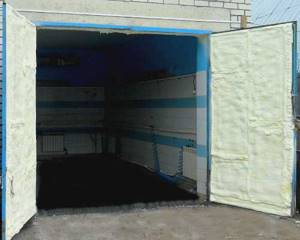
Before you begin decorating the inside of the garage doors, they must be insulated, since most of the heat from the garage leaves through them.
It is better to use polystyrene foam, since its thermal conductivity is minimal, which means it retains heat in the room .
The inside of the gate is covered with bitumen mastic, and then covered with a vapor barrier membrane, then with isolon - it is a foil film 2 mm thick and is intended to create a water barrier.
After preparing the surface of the gate, they begin installing the sheathing for the future cladding. If facade lining is chosen for this, then the lathing can be mounted from either wood or metal.
Guide beams or metal profiles of the frame are attached approximately 2 cm from each edge of the gate . This is necessary in order to ensure air circulation under the lining. Also, such fastening will help preserve the lining in its original form and will not allow it to change shape.
Intermediate frame elements are screwed to the guides . The distance between them should be equal to the size of the lining.
In the spaces between the beams or metal profiles, foam sheets are attached , cutting them to the required size if necessary. In order for the foam to hold securely, it is glued to the waterproofing material with mounting foam or liquid nails.
Next we move on to the sheathing itself. Each sheathing board is attached to the frame using thin nails, which are driven into the grooves. You can also fasten the lining only using clamps, but the option with nails is more reliable.
The choice of facing materials for the interior decoration of a garage must be taken seriously and selected in accordance with fire safety and hygiene requirements. It is also necessary to take into account financial capabilities.
Surface preparation and lathing creation
The first step is to prepare the surfaces for installation of materials. To do this you need:
- Free the sashes from all foreign objects - brackets, hangers, and other elements that are often installed on the sashes. Only the upper and lower latches of the fixed sash and the lock are not removed, which in any case are attached directly to the metal and cannot be moved;
- The surface of the gate is cleaned of old paint, peeling or crumbling areas. It is most convenient to use a drill with attachments - a wire brush or an emery wheel;
- Detected cracks or deep corrosive potholes are repaired by welding. In difficult cases, patches are welded in, after which the seams are carefully cleaned flush with the main surface;
- The prepared surface is covered with a protective layer of bitumen mastic using a brush. The coating is applied in 2 layers in the transverse direction.
After the protective layer has dried, they proceed to installing the sheathing. It is a system of wooden bars installed around the perimeter of each door with several lintels inside.
The sheathing serves as a support system for installing the sheathing, which protects the heat insulator and gives the sashes a neat appearance. After finishing, the inside of the gate can look much more impressive than the outside.
To install the sheathing, a reinforcing corner is used, welded along the perimeter of the sashes, in which holes are drilled for self-tapping screws. In some cases, you have to make holes directly in the sashes, which is acceptable, but undesirable.
The bars under the sheathing must have a thickness no less than the selected heat insulator
This is important because after installing the material, the sheathing will need to be attached to the bars. The internal cavity formed by the sheathing and sheathing must be sealed and not allow air to pass through, so the sheathing must be equal to or even slightly thicker than the insulator. When installing the sheathing, it is necessary to leave the upper and lower latches with a lock and bolt free
These elements are subsequently provided with their own protective covers that cut off contact with warm air. The sides of the bars adjacent to the sashes must be covered with a strip of polyurethane foam before direct fastening. This will ensure the tightness of the sheathing and prevent the formation of cold bridges. All joints between the bars are also insulated with polyurethane foam. The finished sheathing should completely cover the perimeter of each sash. Inside, the lintels are installed based on the area of the sash and the degree of rigidity of the cladding. Sometimes one jumper is enough, but usually several bars are used. It must be taken into account that installing strips too frequently reduces the effectiveness of insulation and makes work more difficult.
After installing the sheathing, installation of the heat insulator begins.
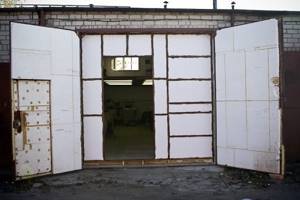
How to sheathe a garage door: instructions (23 photos)
Experienced car enthusiasts know how difficult it is to keep the garage warm in winter. When opening the garage door and leaving the car, a large amount of cold rushes in. If we consider, for example, the design of a typical garage and try to determine through which structure the maximum heat loss occurs, it turns out that this is the gate. Garage door trim can help improve thermal insulation.
Features of insulation from inside and outside
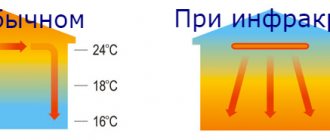
The most common methods of insulating any building envelope are insulation from the outside and from the inside. How are these technologies different? Let's introduce the terms: condensate, dew point. The dew point is the temperature at which the vapor present in any air precipitates as dew.
We will insulate the gate from the outside. The subzero street temperature gradually increases as it passes through the insulation; if the insulation is thick enough, the dew point (the place where the temperature reaches 0°C) remains in the insulation layer, which means that condensation will not form on the surface of the gate. By insulating from the inside, we expose the load-bearing part to the cold, but the dew point will still be on the layer of internal insulation and there will be no condensation on the inside of the gate.
Selection of materials: fire safety requirements
All building materials are divided into flammable, non-combustible and low-combustible. When choosing a method of insulating a garage door, in particular the type of insulation, it is important to remember fire safety. With any method of insulation with flammable materials and non-compliance with installation technology, the likelihood of a fire increases. The fire resistance of individual building materials within the structure plays a big role in the fire safety of the entire garage.
If the gate insulation method is incorrectly chosen, failure to comply with fire regulations often has disastrous consequences; in the event of a fire, the entire façade easily ignites with the release of acrid smoke, toxic gases and the appearance of fiery rain from flowing materials.
Currently, several types of thermal insulation materials compete on the market. All of them have many advantages: they have a high coefficient of heat transfer resistance and are almost non-flammable. Against the background of advantages, disadvantages also appear: they are non-flammable, but have no load-bearing capacity, do not have waterproofing properties, and when wet they lose their thermal insulation properties. When using thermal insulation materials, the issue of laying the electrical cable is strictly resolved. In many cases, the cable is laid in a protective casing - in a corrugated tube.
The most common thermal insulation building materials:
Let's look at each individual type of insulation.
Styrofoam . Thermal insulation material, 95% consisting of gas, is flammable, emits toxic smoke when burned, has a high coefficient of heat transfer resistance, and is not compatible with many paints and varnishes. Mainly used between non-combustible materials. Although fire retardants can be added to it, which will make it quite resistant to combustion.
Expanded polystyrene is also a foamed type of insulation; all the pros and cons of polystyrene foam can be safely attributed to it. Very often used in construction. It is mainly used between non-flammable materials, although its flammability may vary, which is reflected in the material labeling.
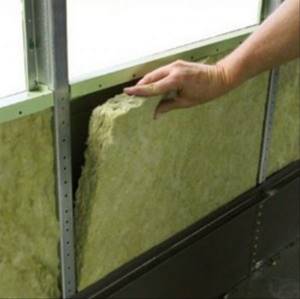
Mineral wool , unlike the above materials, is resistant to high temperatures up to 700°C, i.e. it is non-flammable, has good thermal insulation properties, however, when wet it loses its properties. It must be used in combination with waterproofing, which can be reinforced non-flammable film or foil.
Penoizol is almost polystyrene foam and is transported in liquid form. Applied to the surface under pressure. After contact with oxygen, it swells, filling spaces, cracks, and recesses. It does not burn, under the influence of an open flame it loses its shape, but does not become fluid, it chars without emitting smoke or toxic gases. Thermal insulation properties are twice as good as mineral wool. Having considered the main qualities of thermal insulation materials, we can, with some reservations, safely consider them as insulation for garage doors.
Step-by-step instructions for lining gates
It is important to note that when planning to sheathe a gate, you need to understand the technology and have the skills to install the selected class of insulation.
Work on insulating gates should begin by preparing and cleaning the surface: remove oil stains, clean slag, trim protruding parts of the welding seam.
After cleaning, it is necessary to take measures to protect the metal from corrosion, repeatedly test the performance of all built-in and mortise locks, replace them or lubricate them, if necessary.
After all the work done, the insulation is fixed.
To protect against mechanical external influences, the insulation is sheathed with durable finishing material.
When choosing a method for insulating garage doors with polystyrene foam, polystyrene foam and penoizol, it must be used as the middle layer.
To increase fire resistance, the insulation is sheathed on top of a non-flammable durable material, such as foil insulation.
Let's look at the process of covering a gate with insulation using foam plastic as an example.
These gates will be insulated. The gate frame is made of a metal angle 50×50 mm.
For the frame, we take a wooden board 50 mm thick and cut it with a circular saw into bars of approximately square cross-section.
To secure the frame in a metal corner, drill 4 mm holes for self-tapping screws.
Make a recess of 8.5 mm.
Make a hole in one of the bars for the latch.
The block is fixed around the perimeter of the gate. In order not to remove the gate, the bottom bar in the corners is secured with corners.
This is what a fixed foam frame looks like.
To process the gate junction, polyurethane foam was chosen - one of the popular options. Before applying it, the corner fixed to the wall was processed by working off.
The end of the sash is sprayed with water so that the foam adheres well to the metal.
Then foam is applied.
Then the gate leaves are closed.
The polystyrene foam is attached to the foam, applying it to a moistened surface, then the foam is applied. You can temporarily secure the boards so that the foam does not squeeze out under the pressure of the foam.
At this point, the insulation work can be considered complete.
How to give an aesthetic appearance from the inside
One of the important factors is the aesthetic appearance; all the work done is assessed by it. Therefore, they are not limited to installing insulation when covering garage doors, but cover it with some kind of material.
To cover the gates on top of the insulation, 12.5 mm thick lining is suitable. It is advisable that it is subsequently deeply impregnated with paint and varnish material, since many gates open outward and can be exposed to water. The material is attached vertically to a durable wooden frame. If you used one for installing insulation, you can attach it directly to it. Before installation, it is necessary to keep the lining indoors for at least 48 hours. Garage owners, if they have the means, often do not limit themselves to covering only the gates, but also trim the walls and ceiling with clapboard. Garages finished in this way look very presentable inside.
Another type of finish that works well for lining a garage door is siding. It is easy to install. Installation of siding is carried out both on a wooden frame and on a steel profile. There is also a wooden type of siding. Siding can also be used to cover both the gate and the entire garage.
You can use plywood and OSB for cladding. Working with these materials is easy and does not require special skills. Sheathing is carried out mainly on wooden sheathing. Before installation, all wooden structures must be protected from precipitation and moisture. After that, sheets of material are attached to the finished sheathing with screws. The entire garage can be covered with plywood or OSB. After completing the sheathing, all joints must be caulked and sanded. And then you can paint it.
Another piece of advice from personal experience. You need to know the minimum temperature for storing your car. Basically, the optimal temperature for many cars is 5–10 C°. You can take the garage temperature on duty in this range. And when repair work is being carried out and you are in the garage for a long time, the temperature is temporarily raised to the desired setting using heating devices.
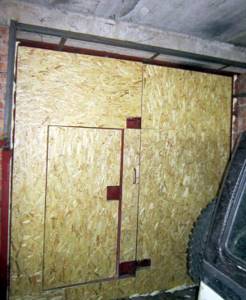
The gates are insulated with foam plastic using foil insulation, and then sheathed with OSB sheets.
We have studied the insulation of garage doors in detail, revealed all the pros and cons, all that remains is to wish you success in completing the work.
Third stage: finishing cladding
When the insulation work is completed, there is a reasonable desire to make high-quality cladding. Since there is a wooden sheathing between the sheets of insulation, this will not be difficult to do. How to cover garage doors? There are several widely used options:
OSB sheets for insulating garage doors
- Corrugated sheet
- Plastic panels
- Lining
- OSB sheets
Advice. The cladding can be secured using either a construction stapler or self-tapping screws.
How to cover the outside of a garage door
To sheathe the outside of the garage door, buy plywood, lining, siding or corrugated sheets. These materials are ideally suited for decorative and protective finishing.
Covering garage doors with plywood
Plywood is the most budget-friendly finishing material. The work will not take much time.
For sheathing you will need the following tools and materials:
- plywood sheets of selected thickness;
- drill with drills for metal and wood;
- nuts, washers and bolts;
- electric jigsaw or hacksaw;
- two wrenches of the required size.
Finishing takes place in 4 stages:
- Cut sheets of plywood to fit the dimensions of the sashes. When marking, keep in mind that you need to retreat 0.5 cm on each side. Allowances are necessary to ensure that the gate closes easily and tightly.
- Mark the sheets and sashes.
- Drill through holes in the required locations.
- Secure the sheets to the sashes using keys, bolts and nuts.
Note! For fixing, galvanized fasteners matched to the color of the plywood are best suited.
After completing the installation work, cover the sashes with protective compounds and/or paint. This will increase the moisture resistance of the coating.
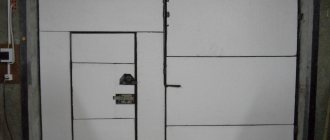
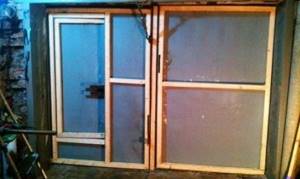
Photo No. 1: garage doors lined with plywood
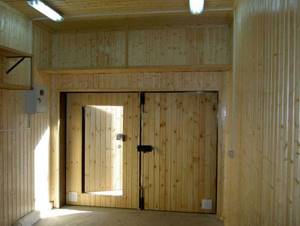
Covering garage doors with clapboard
Gates covered with clapboard look much more attractive, but such finishing involves more serious labor costs and will cost more.
Photo No. 2: garage doors covered with clapboard
During the work you will need:
- drill with drills for metal and wood;
- bolts, washers and nuts and keys;
- jigsaw;
- thin nails and a hammer.
The materials needed are lining and timber for the manufacture of guides.
To sheathe the outside of the gate, proceed according to the following scheme:
- Saw the timber into pieces of the required sizes (3-4 pieces for each sash).
- Mark the guides and sashes.
- Drill through holes in them. At the same time, do not forget that the bolt heads must be recessed.
- Attach the bars to the sashes.
- Cut the lining.
- Nail the strips to the guides with thin nails.
Important! With this option of decorative and protective finishing, you can additionally insulate the garage. To do this, before attaching the lining, place the material selected according to the thickness of the bars between the guides.
For finishing, colorless varnish is best, since paint will hide the natural texture of the wood.
Covering garage doors with siding
Siding is the most expensive finishing option. However, this material has a number of important advantages:
- Excellent technical characteristics. The panels are durable and resistant to precipitation and temperature changes. Gates covered with siding will retain a presentable appearance for decades.
- No finishing required. The material does not require painting or treatment with protective compounds.
- Easy to care for. The lining and plywood will have to be treated annually. The siding only needs to be washed periodically.
Photo No. 3: garage doors covered with siding
Garage door siding is covered using the same technology as in the case of lining. Additional insulation is possible.
Covering garage doors with corrugated sheets
This finishing option is also popular. Sheets of corrugated sheets are perfect for covering old metal gates.
Photo No. 4: garage doors covered with corrugated sheets
During the work you will need:
To sheathe the gate with corrugated sheets, proceed according to the following scheme:
- Take measurements.
- Cut out the sheets.
- Mark the material and sashes.
- Drill holes (the diameter should be less than the diameter of the screws).
- Screw the sheets to the sashes.
If you purchased painted corrugated board, no additional finishing is required.
Attaching the insulation
When installing insulation on the sheathing, there are nuances associated with its type.
- When attaching mineral wool, you will need waterproofing. The simplest and cheapest way to solve this problem is to apply bitumen mastic. Pieces of cotton wool are cut in such a way that they can be placed very tightly inside the sheathing. No glue is required.
The top of the wool is covered with a vapor barrier film. You need to close it correctly, taking into account the sides of the film. The vapor-condensate film is placed with the smooth inner side against the insulation, the fleecy side faces outward. Energy-saving vapor barrier material is laid with the foil side out. If ordinary polyethylene is used, it does not matter which side it is laid towards the insulation.
The joints are taped and the film is secured with a construction stapler.
- The foam is cut so that fewer pieces cover the insulated area. When slicing, you need to leave a small margin so that the pieces fit tightly together. The easiest way to cut foam is with a construction knife, using a ruler as an auxiliary tool.
Glue the pieces of polystyrene foam with polyurethane foam using a gun. To ensure the required adhesion, the foam is applied along the edges and in a crisscross pattern crossing the center. The foam must be pressed tightly and supported for some time.
After installation, joints and free cavities are also filled with foam. After it hardens, the excess must be cut off with a knife.
- Before applying polyurethane foam, it is recommended to cover the bolts, hinges, and locks with film and secure it with tape. It is advisable to work in a protective suit.
- For a garage, a household sprayer will suffice. Such installations, if their containers run out of components, can be charged again. Applying a layer 5 centimeters high takes about a minute. After drying, the excess is cut off.
Sheet polyurethane foam is attached like polystyrene foam.
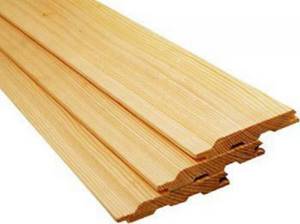
Pine lining
How to sheathe a gate from the inside
Do you want to sheathe the inside of your garage door to create the most favorable conditions for preserving and repairing your car? Polystyrene foam, extruded polystyrene foam and foil-foamed polyethylene are suitable for this.
It is worth noting that automatic sectional garage doors do not require sheathing, since the thermal conductivity of high-quality sandwich panels is comparable to the same characteristic of a 0.6 m thick brick wall. Below we will look at methods of insulating traditional metal swing structures.
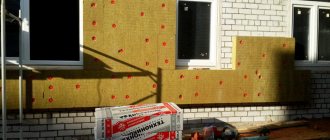
Garage door interior lining with polystyrene foam
Polystyrene foam is most often used to insulate garage doors for three reasons:
- Low cost. This insulation is the cheapest.
- Light weight. The load on the hinges will practically not increase.
- Durability. The material does not deteriorate at high air humidity.
Laying foam plastic will not take much time and effort.
- Preparation. Thoroughly clean the internal surfaces of the metal doors to remove any old finish and rust. Paint the gate and apply a layer of bitumen mastic for waterproofing.
- Creating a sheathing. For this purpose, wooden blocks selected according to the thickness of the foam and cut to the width of the sashes are suitable. Secure the strips with nuts and bolts. Their caps should be located on the outside of the gate. The optimal step for fixing the guides is 30–50 cm.
Photo No. 5: covering the gate with foam plastic
- Installation of insulation. Cut the foam into panels of the desired size. For fixation, use polyurethane foam, which also has thermal insulation properties, or any suitable adhesive.
If you want to create an additional protective layer and give the gate a finished and attractive appearance, cover the gates with plastic panels or sheets of plywood.
Important! To do this, you will have to make sure that the bolts do not stick out from the guide bars.
Garage door interior lining with extruded polystyrene foam
Extruded polystyrene foam is more expensive than regular polystyrene foam, but compared to it it has three advantages.
- The material is better suited for maintaining a comfortable indoor temperature due to reduced thermal conductivity.
- If you buy extruded polystyrene foam foiled on one side, no additional waterproofing will be required.
- Due to its high strength and rigidity, the insulation can be attached directly to the sashes. There is no need to do the sheathing.
Photo No. 6: gates lined with extruded polystyrene foam on the inside
To attach the panels to the sashes, use high-quality imported mounting adhesive. German quick-hardening liquid nails are perfect. Don't forget to seal the joints with foam.
Note! Plywood, lining, plastic panels and even wallpaper are suitable for finishing. In the latter case, you will have to putty the surfaces.
Internal lining of garage doors using foil-foamed polyethylene foam
Photo No. 7: foil-foamed polyethylene foam
The thermal insulation properties of this coating are lower than those of the materials described above. Foiled polyethylene foam is used as the main insulation only in regions with mild climates. For fixation, high-quality quick-hardening liquid nails are usually used.
Photo No. 8: garage doors lined on the inside with foil-foamed polyethylene foam
The main advantage of this coating is its excellent waterproofing. The flexible material fits even into the most difficult to reach places without any problems. Thanks to these qualities, foil-foamed polyethylene is excellent for creating combined cladding.
The ideal option is 3 layers.
- Foiled polyethylene foam.
- Extruded polystyrene foam.
- Foiled polyethylene foam.
This way you will get maximum thermal and waterproofing properties of the cladding.
Why you shouldn't use mineral wool
Many garage owners use mineral wool for insulation, but this should not be done (even if you use foil).
Photo No. 9: foiled mineral wool
This airy material perfectly absorbs water, which makes it unsuitable for use in garages where humidity levels are significantly higher than normal values. At first, mineral wool will provide the necessary thermal insulation, but over years of service it will lose its properties and become unusable. The sheathing will have to be redone.
Thermal insulation
Depending on what type of insulation you decide to use, further steps will look like this:
Styrofoam. He is placed on polyurethane foam. There is no need to apply too much of it, as it will greatly increase in volume as it dries. Just apply a little foam to the back of the sheets and immediately press the squares to the surface of the door leaf. Place all panels end to end. Then blow out all remaining seams, cracks and gaps with foam. After drying, remove excess with a knife.
Mineral wool. Its rolls or slabs are driven tightly between the lathing slats. If you use rolls, you must first coat them on one side with glue and only then press them against the door. Fill all joints and cracks with foam. Attach a layer of waterproofing to the top of the door leaf (oilcloth will do). But be sure to completely cover the entire surface of the cotton.
Interesting: Insulating the attic for winter
Polyurethane foam. It is simply sprayed in even rows onto the door leaf directly from the can. Leave approximately 7-9 cm between the rows. Later the foam will expand and occupy all the voids. On average, 5 cylinders of polyurethane foam are used per 7 m2. After drying, the excess that protrudes beyond the sheathing is cut off with a knife.
Stage 4: door trim
To make the doors look aesthetically pleasing from the inside, they need to be lined. For this purpose the following materials are used:
OSB boards. Durable, dense material. Attaches well to the sheathing. Lets air through. But quite heavy. Be prepared for garage doors to add 10-13 kg in weight.
Insulation of the entire garage with OSB slabs
Profiled sheeting. Durable, moderately lightweight finishing material. In addition, you can choose its color at the request of the master.
Lining. Moreover, both polymer and wood. The first option is especially good. Not afraid of water and temperature changes.
Any exterior door trim is mounted on sheathing beams. The main thing is to choose the right parameters according to the parameters of the canvas.
Interesting: Installation of sliding gates
To learn how to insulate a garage door from the inside with your own hands, watch the video. And remember, warm doors are the key to your comfort and safety of your car.
How did you insulate your garage door?
How to properly sheathe a garage door with your own hands
To properly sheathe your garage door with your own hands from the outside and inside, carefully study the following professional advice:
- Fix materials to surfaces and joints as tightly as possible and pay special attention to sealing joints. Maximum exclusion of air layers will give tangible results.
- If the gate does not have a wicket, install one. The amount of heat loss will be significantly reduced.
- After cutting, finish the edges of the panels. In this case, the materials will not crumble. You will get perfect joints.
Important! If your garage has very thin walls, you can create a good microclimate only if you line the entire structure.
Methods of additional insulation
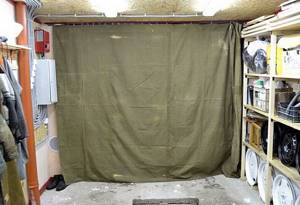
There are two good ways to provide additional insulation.
Awning manufacturers market a wide range of single- and multi-layer tarpaulin and PVC canopies. Products equipped with eyelets are excellent for additional insulation of garages.
Photo No. 10: garage insulated with a tarpaulin canopy
To hang a curtain:
- weld the steel cornice;
- fix it above the doorway;
- tie a rigid metal wire on one side;
- thread the free end through the eyelets of the canopy;
- raise the curtain and complete the installation.
Sealers for cracks
To seal the side and top cracks, buy a roll of sealant at the construction market. Silicone self-adhesive tape is best. It is characterized by reduced thermal conductivity. Installation will take place as quickly as possible and will not require the use of adhesives.
Image #1: Self-adhesive silicone tape
To seal the bottom cracks, buy special wax-coated nylon brushes. Their installation will not complicate the operation of the gate.
Photo #11: Wax coated nylon brush
Additional methods of insulation
To make your garage warmer and further reduce heat loss, you can resort to various methods.
Garage curtain
A curtain that is hung directly outside the gate will help conserve heat in the garage in winter.
It is made from a material that must meet the following requirements:
- high density;
- resistance to high humidity;
- fire resistance;
- strength and elasticity.
A tarpaulin best suits the above requirements, but it must additionally be impregnated to repel moisture. Sometimes PVC fabrics are used for these purposes. To make curtains from tarpaulin, in addition to the material itself, you will also need eyelets, which are fixed in the fabric in increments of 20 cm. The curtain is hung on a metal cable, threading it through the rings.
If the gate is not insulated from the inside and only a curtain is used, it should be raised at night so that the inner surface does not freeze.
How to cover sliding gates
Do you want to cover your sliding gates yourself? There are two options:
- Buy the necessary tools, materials and components and do everything yourself (which is extremely difficult).
- Order the production and installation of sliding gates without filling the frame at a competitive price in Moscow.
Next, we will talk about how to cover the gates on the street and show interesting design solutions.
Note! Filling the frame yourself will not require significant time investment. Sheathing involves only fastening selected materials using screws or welding.
Covering sliding gates with corrugated sheets
Corrugated sheeting is the most popular material for cladding sliding gates. Galvanized steel sheets treated with high-quality paints combine:
- low cost;
- wide choice of color and design solutions;
- light weight;
- resistance to adverse weather conditions and temperature changes;
- long service life.
Photo No. 12: sliding gates covered with corrugated sheets
Covering sliding gates with European picket fences
Covering sliding gates with European picket fences will help maintain the area's airflow. The structure will not experience serious wind loads.
Photo No. 13: sliding gates lined with Euro picket fence
Covering sliding gates with wood
Wood is an excellent choice for those who want to combine modern technology and traditional natural materials. This option for filling the frame has one important drawback. Gates lined with wood will have to be regularly treated with protective compounds.
Photo No. 14: sliding gates covered with wood
Covering sliding gates with sandwich panels
Covering sliding gates with sandwich panels is popular when decorating street and sectional garage structures in the same style. To fill the frame you will need a welding machine. The result is a rigid structure. Sandwich panel fabric does not make loud sounds when moving.
Photo No. 15: sliding gates covered with sandwich panels
FakeHeader
Comments 51
I chose a day where there was not much thaw and foamed the gap between the threshold and the gate, it became better) By the time I had time, the frosts now reached -30.
The bottom can be made with felt
Frozen to the gate.
Then from the heart's sleeve
Hang a curtain made of dornite, we have one of these hanging in every garage and you will be happy
You can put felt padding on the gates, but I also saw that in the neighborhood in garages people wrap a tarp around a board and just lay it down with their hands every time.
Thank you! I am also inclined towards this design, make brackets for the threshold and insert a board with felt there.
I was also intrigued by the question until I saw that people were just using the boards, not just one person, but quite a lot.
such a good corner for a sealant... my toad says that a profile for drywall would be enough, it is noticeably cheaper!
The threshold is coated with the compound and the foam is applied directly into the crack on the closed door. After hardening, the foam will remain on the door itself, creating a seal and will not stick to the threshold.
I support! I did exactly the same thing around the entire perimeter, everything worked out perfectly and it turned out hermetically sealed. Only I didn’t smear it with polish, but with a thin layer of lithol. Three years have already passed, no complaints.
The threshold is coated with the compound and the foam is applied directly into the crack on the closed door. After hardening, the foam will remain on the door itself, creating a seal and will not stick to the threshold.
You can cover it with tape; the foam won’t stick to it either.
I screwed a doubled fire hose around the perimeter. Bend outward. First, you put a galvanized metal strip with holes into the sleeve. Self-tapping screws every 200 mm.
And I have insulation around the perimeter with frost. Just so neatly.
Nope)) I don’t like this kind of insulation, I used it for a while too)
I sewed up the gate first with a wooden sheathing around the perimeter, then with polystyrene foam and then the whole OSB-3 thing on top. So I tried to adjust the OSB so that it would fit right next to the frame. But there’s still such a neat frost around the perimeter. It doesn’t grow and melts when you heat it too much. Or rather , it doesn’t melt, but falls off in pieces. I’ll have to hang a curtain.
I should have taken a photo of the gap at the bottom too, the options depend on its size
I cut rubber inner tubes from Kamaz into strips. I secured these rubber strips in two layers - on one side and the other side of the rail (it turned out to be a double shutter). I did this around the entire perimeter of the gate. Then I trimmed these strips in place (in width so as not to interfere with the closing of the gate).
Polyurethane foam. I did this to myself, everything tightly in a circle. There are a lot of videos on YouTube.
Now on sale there are a lot of rubber profiles for sealing the joints of window doors and gates. Why reinvent the wheel?
I didn't see the rapids.
You can use the same ones for thresholds. Or too small?
Create an anti-threshold! )))))www.antiporog.ru/ustanovka-antiporoga.html
Cool stuff! I'm afraid it will freeze and the mechanism will become clogged with frost.
to seal the cracks at the gate, the first thing you need to look at is that at the exit from the garage - it’s just the ground that rises in winter or thoughtfully poured concrete... and so that it’s straight according to Feng Shui, or make second light doors so that there is a vestibule so that it plays the role of an “air cushion” or a more budget-friendly option for curtains made of felt and there will be a song
The only problem is with the threshold. I got confused with the rubber bands because I didn’t want a curtain.
A huge canvas curtain covers the entire wall, it will have a very cool effect.
I have a 50th corner welded to the prog without insulation and there are no problems.
a dozen mops with the bristles down. But in general, leave it, ventilation has never harmed anyone.
ventilation and draft are very different things... and where there are cracks, in winter there will be frost and quite a bit of it, which then melts and moisture - one wonders where are the advantages of such “ventilation”...
moisture is where the humid air of the garage comes into contact with cold objects; if there is a blow through the gap under the gate, then there will be no frost there, but if there is frost, what is the problem at the frost threshold? This is not a ceiling. Besides, the more ventilation, the less chance of catching the dew point. And I probably won’t list the advantages of ventilation.