When the conversation turns to foam plastic, white granular sheets immediately come to mind, which easily crumble into balls filled with air. But the concept of polystyrene foam itself is a wide range of materials made from different polymers. The basis is precisely foamed structures. For example, foam rubber is polyurethane foam; food packaging is made from polyethylene. And this is also foam.
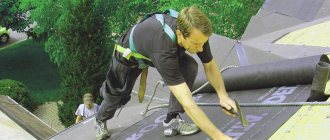
But when the conversation turns to such a process as insulating the floor with foam plastic in a house or bathhouse, then it is necessary to talk about material made from polystyrene. It is this insulation that is used to carry out thermal insulation measures regarding floor bases.
Advantages of bottom insulation
From the point of view of labor costs, it is more profitable to insulate the floor from above.
In this case, the insulating layer is mounted between the frame (joists) and the top finishing layer. But in some situations, bottom insulation is preferable.
- the insulation layer is not subject to loads from furniture standing on the floor and people moving around the house, so you can use thermal insulation material of any hardness;
- the height of the room does not decrease;
- Not only the top flooring, but also the entire floor frame is protected from freezing, which reduces the likelihood of freezing and water getting on the wood - this increases the service life of wooden structures and ensures their reliability.
It is more expedient to insulate a house on stilts from below. Source valet.ru
Characteristics, pros and cons of polystyrene foam
For several decades now, humanity has been exploiting polystyrene foam. It is widely used in various areas of the national economy. But its main area of application is thermal insulation of buildings and structures, refrigerators, isothermal vans, etc. This popularity of the material is due to its physical and technical characteristics:
- thermal conductivity coefficient - 0.037-0.043 W/(m×°K);
- density - 8-35 kg/m3;
- compressive strength - 0.04-0.16 MPa;
- flammability class - G3;
- vapor permeability - 0.05 mg/(m*h*Pa);
- water absorption - 2-4%.
In terms of thickness, you can find sheets on sale from 1.0 to 10.0 cm, in increments of 1.0 cm. If necessary, you can get a slab thickness of up to 50.0 cm. There are two standards for length and width: 50.0 x 100 .0 cm and 100.0 x 100.0 cm. There is also a non-standard size of 100.0 x 200.0 cm.
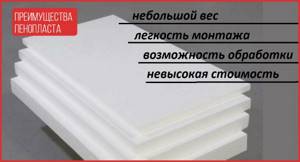
Insulation has both pros and cons. Among the advantages :
- low thermal conductivity, allowing this indicator to seriously compete with other insulation materials. The graph below confirms this well (the foam is labeled polystyrene foam, which is the same thing);
- ability to work in temperature conditions from -50oC to +75oC;
- budget cost - can be purchased by people with incomes below average;
- simple installation - no special knowledge, work experience or complex equipment is required. Everything can be done with your own hands in a short time;
- low specific gravity, resulting in minimal load on insulated structures;
- inertness to the components of cement-sand mortar, gypsum and non-concentrated acids.
Another positive property that should be noted: fungus does not grow on it and mold does not multiply.
disadvantages :
- burns well, releasing various toxic substances;
- during the combustion process it melts and spreads throughout the building, increasing the fire area;
- when heated above 30oC, it begins to release harmful styrene in small volumes;
- amplifies (resonates) indoor noise;
- unstable to most solvents - melts quickly;
- Aging intensively under ultraviolet radiation;
- vapor-tight;
- low mechanical strength - easily breaks and crumbles.
Particular attention should be paid to the relationship between the insulation and rodents - if there are rodents, then, first of all, they will gnaw the foam plastic. Thermal insulation material is discussed in more detail in the article “Foam insulation”.
Features of the structure
Once the issue of choosing the required fabric has been resolved, it is important to pay special attention to the tulle texture. In order to correctly determine the appropriate choice, it is important to take into account the placement of window openings and the correspondence of suitable fabric for curtains to the overall style of the room
There are several types of fabric texture:
- mesh;
- with pattern;
- smooth;
- with an embroidered design.
If you want to see a photo of kitchen tulle in a variety of product ranges, go to the catalog of our resource.
Important points of thermal insulation
- When purchasing insulation material, you need to check its quality. Don't be shy about asking for a certificate for verification. High-quality materials restore their shape after mechanical stress.
- The main criterion for choosing thermal insulation material for residential premises should be health safety, not cost. Remodeling a floor is a labor-intensive and time-consuming process.
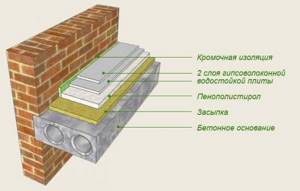
- Waterproofing of insulation must be organized on both sides (internal and external).
- It is worth providing a compensation gap between the insulation and the finished floor.
- A metal mesh can be placed on the rough flooring to protect the floor from rodents.
- Between the rough and finished floors, you can organize a heating system using a special heating cable.
- The floor of a wooden house should be well ventilated.
- To increase thermal insulation, the foundation and basement are insulated.
A reliably furnished floor in a wooden house is a criterion for heat preservation. It is not difficult to insulate it yourself, the main thing is to choose the right material. The most popular method is the double floor system.
Sequence of work
Technologies for floor insulation with polystyrene foam differ greatly depending on the base on which the insulating layer will be mounted.
Consider the insulation instructions:
- On the ground.
- On wood.
- On a concrete base.
Insulation on the ground
After leveling the soil (subgrade), the following steps are performed:
- Backfill. A “pillow” of sand and crushed stone is made on an earthen base.
- Rough screed. A reinforced layer of concrete is poured, which will serve as the base for the floor. Layer thickness 10 – 15 cm.
- Waterproofing. A layer of thick film or special waterproofing is laid.
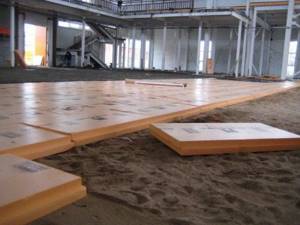
- Styrofoam. Styrofoam sheets are laid. The joints between them are sealed with sealant or sealed with metallized tape.
- Waterproofing. Another layer of film is spreading.
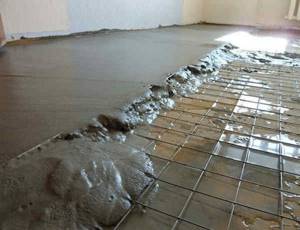
- Top screed. A reinforcing mesh is laid and a layer of concrete is poured (5 cm thick). To do this, the surface is divided into zones, and strips are poured sequentially, starting from the windows, moving towards the door. To achieve better results, it is advisable to use beacons.
- Clean finish. Depending on preferences, any finished floor can be made, be it tiles, laminate or any other.
Manufacturers of Penoplex allow its installation without a rough screed. To do this, the base is carefully leveled, compacted, crushed stone is added, then sand is added. And then EPS sheets are laid on the waterproofing layer.
Wood insulation
First, the old covering is dismantled and the free space is cleared of debris.
The sequence of work on insulating a wooden floor with polystyrene foam is as follows:
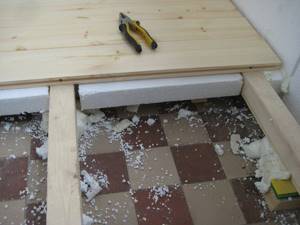
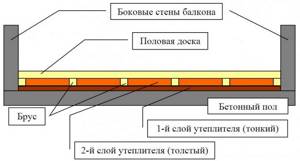
- Wooden logs. Logs made of timber are installed on the subfloor. The distance between them should take into account the dimensions and properties of the finishing coating. It is on the bars that its subsequent fastening will be carried out, so the logs must “coincide” with the seams of the flooring. But you need to focus on a width of 35 - 60 cm.
- Styrofoam. Expanded polystyrene slabs are inserted tightly between the joists, without gaps. If they do form, you need to seal them with acrylic sealant or foam.
- Finish coating. This could be a layer of finishing boards, chipboard, OSB board, etc.
- Finish coating - depending on the preferences of the owner.
Insulation by joists
Insulation over concrete
Let's consider options for insulating a concrete floor with polystyrene foam. The concrete base must be prepared before the main work begins. To do this, the previous coating is dismantled, all cracks are sealed, and the bumps are sanded. The horizontal level is checked and if its absence is detected, the surface is leveled with special filling compounds. When the floor is dry, a thorough cleaning is carried out.
Then the following steps are performed:
- Waterproofing layer. The film is spread on the concrete base, the joints are sealed with construction tape, and the edges are folded onto the walls so that there is a margin of 15 centimeters. Later, when the baseboards are installed, these edges will be cut flush.
- If any wooden covering is planned on top of the insulation, then load-bearing logs are laid. If there is a concrete screed, nothing is needed.
- Polystyrene foam is laid.
- You can lay a second layer of polystyrene foam - this will allow you to position the seams so that they do not coincide.
- If one layer of foam is assumed, then the seams must be sealed with metallized tape or acrylic sealant. Large cracks are filled with foam.
- Another layer of waterproofing.
When using any insulation, the best effect is achieved by laying two layers with the seams spaced apart.
The process of laying insulation
When a concrete screed is planned, the surface is divided into strips by beacons. The solution will be poured over them, starting from the windows and moving towards the exit. The work must be done quickly so that the edges of the mortar do not have time to begin to harden. The surface is leveled with a trowel and a rule, and a plane is created.
If you plan to install a “warm floor” system, not a waterproofing film is laid, but foil penofol and heating pipes are laid, and then the screed is poured.
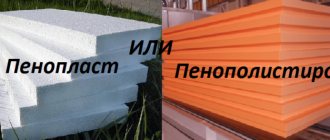
Styrofoam
Usually this word refers to foamed polystyrene and extruded polystyrene (penoplex). In terms of chemical composition and thermal insulation properties, these materials are practically the same, however, penoplex has much greater bending strength and resistance to crumbling than traditional polystyrene foam. For this reason, recently most consumers are abandoning foamed polystyrene (foam) in favor of extruded polystyrene (penoplex).
Styrofoam
The advantage of this type of thermal insulation is its low price, ease of installation and moisture resistance. The disadvantages include the flammability of this material, and when polystyrene burns, a large amount of toxic substances is released.
Polystyrene slabs are produced in thicknesses from 5 mm to 50 mm; a special chamfer is made on the edges of the slabs so that during installation, gaps and, consequently, “cold paths” do not appear at the joints.
Expanded polystyrene
If a layer thickness of more than 50 mm is required, then two or even three layers of polystyrene are laid, with each new layer being laid offset relative to the previous one so that the joints of the slabs of the upper row fall on the centers of the slabs of the lower one.
Screed diagram with foam plastic
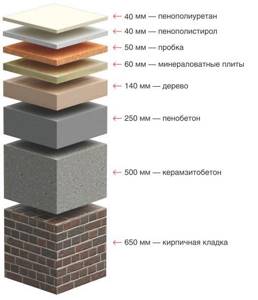
When insulating a floor located directly above the ground, the foam layer must be at least 300 mm for a house with a wooden floor, and 200 mm for a house with self-leveling concrete floors. You should lay at least 4 layers of the thickest foam panels, offset from each other.
If there is a cold basement under the floor, then the foam layer can be reduced by 50mm.
To insulate floors between floors of a private house, 150 mm of foam is sufficient for wooden floors and 100 mm for concrete floors.
If you are insulating floors in an apartment building, then for all floors except the first it is enough to lay one layer of foam plastic 50 mm thick. On the ground floor the thickness can be increased to 80-100 mm.
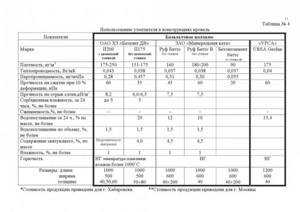
| Index | Polyspen | Polyspen Standard | Polyspen 45 | Control method |
| Density, kg/m3 | 30-38 | 30-38 | 38,1-45 | 5.6 each |
| Bending strength, MPa, not less | 0,4 | 0,4 | 0,4 | 5.8 each |
| Water absorption in 24 hours, % by volume, no more | 0,4 | 0,4 | 0,4 | 5.9 each |
| Thermal conductivity at 25+-5 degrees Celsius, W/m * °C, no more | 0,028 | 0,028 | 0,030 | at 5.10 |
| Toxicity, Hcl 50, g/m3 | T2 moderately hazardous | T2 moderately hazardous | T2 moderately hazardous | at 5.11 |
| Flammability group | G-3 normal-flammable | G-4 highly flammable | G-4 highly flammable | at 5.12 |
| Flammability group | B-2 moderately flammable | B-3 flammable | B-3 flammable | at 5.13 |
| Smoke coefficient | High smoke generating ability | High smoke generating ability | High smoke generating ability | at 5.14 |
| Compressive strength at 10% linear deformation, MPa, not less | 0,2 | 0,2 | 0,3 | 5.7 each |
Calculated thicknesses of Penoplex thermal insulation
Polystyrene foam qualities
These qualities are used for thermal insulation of rooms inside and outside. Foam plastics are moisture and vapor proof, so water does not affect the thermal insulation properties.
The use of these materials to insulate a room from the inside confronts builders with the task of protecting against condensation. Warm air coming into contact with the cold surface of the walls leads to the formation of dew drops on them. Once under the foam, the liquid cannot evaporate. This leads to the destruction of concrete, brick and wood.
Foamed polymers are flammable, so additional fire safety measures must be taken.
When ignited, the foam releases toxic substances. There are also fire-resistant foams on the market, which are more difficult to flare up. In terms of ease of ignition, they are comparable to wood and cost half as much.
Foam plastics are easy to cut and saw, convenient to work with, attach to any surface and are strong enough not to break under their own weight. This allows for simple installation procedures. Such qualities distinguish polystyrene foam from mineral wool and other insulation materials.
Thermal conductivity, 15 times lower than that of concrete, attracts mice, which nest in foam plastic insulation in families and colonies. Foam insulation requires regular treatment of the premises to prevent rodents.
If mice are already infested, it will be difficult and expensive to get rid of them.
Foams differ in density and hardness. From soft, easily crumbling ones, such as those used to cushion household appliances during transportation, to hard ones that you can walk on without fear. The denser and stronger the foam, the higher the price and weight. Thermal insulation properties depend slightly on density. When the density is doubled, there is a ten percent improvement.
Good insulation materials are made from polystyrene foam - their thermal insulation properties are 10-15 percent higher than those of analogues at the same density and thickness.
Insulation by joists
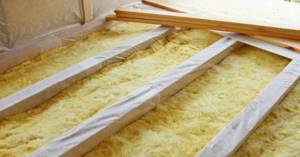
It is possible to carry out insulation along the logs both at the construction stage and during the operation of the dacha. For example, consider thermal insulation with mineral wool in slabs. According to building codes, to insulate floors above a cold basement, a layer of material 50-100 mm thick is required; above warm rooms this figure can be reduced to 30 mm. In the northern regions, the layer thickness should be about 150-200 mm. Depending on this, it is necessary to immediately determine whether the slabs will be laid in one or two layers in order to accurately calculate the amount of material.
Scheme of floor insulation by joists
In addition to mineral slabs, you will need a film for hydro- and vapor barrier, as well as a standard set of tools:
- level;
- drill;
- roulette;
- construction stapler;
- mounting knife;
- jigsaw
For logs, use dry and strong timber with a section of 100x150 mm or boards 100x50 mm.
Step 1. Prepare the base: sweep away dust and debris, inspect the concrete base for damage and unevenness.
Step 2. Line the surface with strips of thick polyethylene film, overlapping the edges by 15 cm. It is advisable to tape the joints with tape to eliminate the slightest risk of moisture penetration. When insulating the floor of the first floor, you can use roofing felt instead of film.
Step 3. The timber is cut to size and treated on all sides with primer with antiseptic properties. To save money, you can use drying oil or used machine oil. Lay the wood out to dry.
Step 4. Dried logs are laid on top of the waterproofing layer in increments of 58-59 cm. This distance will allow the insulation boards to be tightly laid without trimming the sides. Each lag is set according to its level; wooden linings are used for adjustment. If large loads on the floor are not expected, the logs do not need to be screwed to the base. Otherwise, they should be secured with anchors.
Recommended distance between floor joists
The height of the logs must correspond to the thickness of the insulation
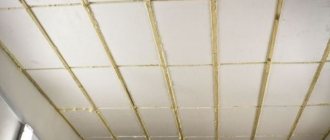
Step 5. Mineral wool slabs are carefully laid between the beams, carefully straightening them into the corners. The insulation is tightly joined together, and the second layer is laid so as to completely cover the joints of the lower layer by at least 10 cm.
Cutting the insulation is carried out using a sharp knife according to the markings
Laying diagram of two layers of insulation
The photo shows how to lay mineral wool in two layers
Step 6. Having laid the thermal insulation, a vapor barrier membrane is rolled out over the mineral wool. It also overlaps by 10-15 cm, the joints are fixed with tape.
Vapor barrier membrane flooring
The edges are glued with tape
The canvases are laid with an overlap of 10-15 cm
Step 7. Now begin installing the flooring. The slabs are laid with the long side across the joists and screwed with self-tapping screws. The rows of slabs should be arranged with offset joints, while the short sides are joined exclusively along the joists.
Flooring of large self-supporting slabs
Fixing the slabs with self-tapping screws and laying the final floor covering
After that, all that remains is to lay the finishing coating and enjoy the comfort of your home. If you need to insulate old floors, first carefully dismantle the baseboards and flooring, inspect the base, boards and joists, and discard heavily damaged elements. Anything that can be reused must be dried in the sun and treated with protective compounds. Further actions are carried out as described above, and finally boards are placed on top of the vapor barrier.
Insulation is carried out in a similar way with bulk materials - expanded clay, vermiculite, shavings. When filling in the insulation, the logs should protrude by 20-30 mm so that there is a gap for ventilation between the flooring and the insulating layer.
Floors
0 votes
+
Vote for!
—
Vote against!
To save heat in a house, you need a whole range of work related to insulating walls, roofs, windows and floors. Insulating residential buildings allows you to keep money that is intended to pay for utilities safe and sound. The primary task when carrying out insulation is to cover the floor with heat-insulating material. The network of construction outlets offers many thermal insulation materials for floors, but the most popular among domestic developers is polystyrene foam.
Qualities of polystyrene foam as insulation
Warm floors, the absence of labor-intensive processes for laying insulation, significant financial costs, and ultimately drafts - these are the main advantages of foam plastic. Currently, more than 60% of foam plastic in Europe is used for thermal insulation purposes.
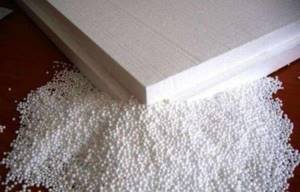
This material is a gas-filled white polymer, which consists of myriads (small particles of foamed polystyrene) and is best suited for use in a floor insulation system, which is quite successfully implemented in practice.
Some developers are deeply mistaken because they believe that polystyrene foam is just granulated polystyrene foam, which has been known since childhood for its ability to crumble into small balls. But this is not really true. There are polyethylene foam, polyurethane foam, polypropylene foam, which are classified as foam plastics and are inexpensive and good in practice.
Polystyrene foam consists of 97% natural heat insulator - air bubbles. This insulation is produced in the form of sheets of varying thickness and strength. It is recommended to purchase foam plastic with profiled edges for floor insulation in order to get rid of cold bridges that form in the cracks between the foam panels in the future.
During manufacturing, the foam is overheated with water vapor, which ensures a high level of moisture resistance. Good properties of moisture repelling are good to use for insulating the floor in a house that is located in an area with a high groundwater level.
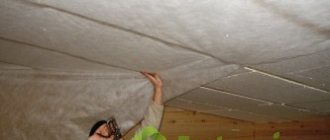
Insulation of a wooden floor
Insulation of wooden floors is a rather serious issue when renovating an apartment, country cottage, country house or bathhouse. Wooden floors are very popular because they place minimal load on the floor slab, regardless of the height to which the floor must be raised.
Wooden floors are a combination of an air gap that is formed between the ceiling and the bottom of the boards and a layer of wood. Wood itself is an excellent thermal insulation material; it is not for nothing that in Rus' huts were built from wood. The only trouble lies in the fact that at the junction of the walls and the ceiling, ventilated cracks are formed that require insulation.
Any owner of an apartment or private house can insulate a wooden floor with polystyrene foam. It’s not difficult to cope with its installation; you just need to observe certain conditions during the work.
First, you need to prepare the surface for the heat-insulating material: clean it, carefully seal various cracks and cracks in the base through which parasites and insects penetrate, lay a 10-centimeter overlap on top and tightly thick film over the entire floor, ensuring good waterproofing. This layer will not allow water to penetrate into the middle of the floor.
Of course, you can purchase regular plastic film, but it is better to use a special material that is made on a water-repellent basis and has heat-reflecting properties. Give special importance to this point, because water getting on the thermal insulation material significantly reduces the thermal insulation functions and the useful life of the floor itself. After installing the waterproofing layer, secure the edges with tape.
Then you should watch a video about insulating the floor with foam plastic and make a wooden sheathing from logs where the thermal insulation material will be placed. With such a floor arrangement, the loads are evenly distributed on the frame, so not only extruded polystyrene, but also polystyrene foam in traditional, granular form can be purchased as a thermal insulation material.
On the laid film covering, it is necessary to place sheets of foam plastic tightly to each other and to the walls using the bandaging technique. Fill all joints and various gaps with foam. Another layer of waterproofing film on the foam can provide insulation of the floor from possible penetration of liquid from above.
At the final stage of insulating a wooden floor, with great care so as not to damage the film, it is customary to install a metal frame and make a cement screed with a thickness of at least 5 centimeters. After such manipulations, you can safely begin laying the main floor.
Insulation of concrete floor
Concrete floors require insulation in any case. The best thermal insulation material is polystyrene foam, just like for a wooden floor. Remember that foam floor insulation technologies differ for houses with a basement and buildings without a basement. Let's take a closer look at each of them.
Insulation of concrete floors in houses with basements
Owners of apartments located on the first floors of multi-storey buildings are faced with problems with the presence of cold concrete floors. Insulating the floor with polystyrene foam will help cope with them. It is better to cover the concrete floor with thermal insulation material from the basement side. In this case, the stove ends up in a layer of warm air. After this, the cold stops penetrating into the home.
To insulate a concrete floor with polystyrene foam, you will need sheets of foam plastic 5-10 centimeters thick. Nowadays, manufacturers produce sheets with chamfers that allow for high-quality installation. In the process of work, craftsmen may encounter uneven walls, which can be easily corrected with the help of polyurethane foam and the use of different thicknesses of foam for floor insulation.
The foam is fastened with special plastic dowels, which are 120-140 millimeters long. Start work from remote areas of the basement. Attach a sheet of foam plastic to the slab, drill a hole through it with a hammer drill, first marking the attachment points. Then remove the sheet and continue drilling a hole that matches the size of the dowel. For convenience, it is recommended to use 2 drills that have different diameters.
Before securing the sheet of foam in place, apply foam adhesive to the joint surfaces, which is similar to ordinary foam to fill any uneven joints and ensure reliable thermal insulation of the seams. The sheets are attached to the concrete slab using dowels and the joints are filled with foam.
In the process of insulating a concrete floor with polystyrene foam, there are areas on the basement side where it is not possible to use entire sheets of insulation. In this case, it is recommended to cut pieces of suitable size and shape from a whole foam sheet and lay them.
You should not leave polystyrene foam open, as it is flammable and can be easily damaged. Therefore it is necessary to plaster it. You can use glue as a plaster mixture for laying ceramics using reinforcing mesh. The result is a thin but durable layer.
Insulation of concrete floors in houses without basements
The procedure for insulating a concrete floor in this case will be slightly different. Before starting work, you must carefully prepare the base. First of all, remove the old floor covering and check the floor for visible chips and cracks, if detected, you will again need to apply an adhesive composition for installing ceramic tiles.
It is recommended to seal the cracks with a thick solution using a metal spatula, after which proceed to waterproofing the floor. For such work, you can use special bitumen mastic or roll material. Remember that in this case it is necessary to capture 10-15 centimeters of the walls. Place a reinforcing mesh on the film, or you can take a regular masonry mesh.
After this, you can safely insulate the floor of the first floor with polystyrene foam. The thickness of this material varies; it is best to choose a thermal insulation material with a thickness of 2-3 centimeters. Place the foam on the mixture tightly, end to end, to prevent the formation of gaps and gaps, and also to obtain the best insulation effect.
Using a mixer, mix the glue to medium consistency at medium spindle speeds and spread directly onto the floor, or onto the foam every 10-30 centimeters. This is quite enough for reliable fixation of the foam. After you have laid the foam sheets, you can begin installing the beacons.
For the outermost beacons, make marks on the walls using a water or laser level, and the remaining elements are usually mounted using a linear building level. To fix the beacons, it is recommended to use the remains of the adhesive composition previously used for installing heat-insulating material. The distance between the guide beacons should not be more than 1.4 meters.
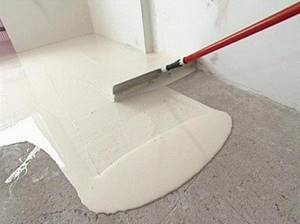
The screed solution should be poured between the beacons, its excess should be removed with a level lath or a rule that creates a perfectly flat floor surface. If in the future you are going to choose parquet as a floor covering, then after the screed has dried, you should fill the floor with a thin layer (2-3 millimeters) of a self-leveling mixture that eliminates the slightest unevenness of the floor.
Foam insulation of floors on the ground
In private houses, industrial and public buildings, floors on the ground must be insulated with an additional layer of thermal insulation, which has a width of at least one meter around the perimeter adjacent to the external walls of the floor. The floor, which is located on the soil, does not place a load on the foundation, but is in contact with the ground, increasing the likelihood of the harmful effects of groundwater. To protect the floor from moisture, you need to properly design waterproofing.
A floor that is placed on the ground can be above or below ground level. Floor insulation with foam plastic in a house with a basement and a building without one differs in the thickness of the thermal insulation material used. In buildings with a basement, the layer of material may be thinner than in a building without basements, since the floor is located below the freezing level of the soil.
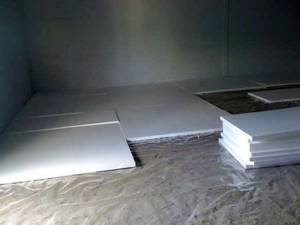
First you need to level the base. If the soil is loose, it needs to be compacted and allowed to settle for a month. Pour a cushion of crushed stone or gravel about 10 centimeters thick and compact it mechanically. Lay a layer of sand of similar thickness, compress tightly and cover with polyethylene. The base for insulating the floor with polystyrene foam under the tiles must be dry, clean and free of significant irregularities.
Floors on the ground must be waterproofed. As a moisture-protective layer, you can use polyethylene film 0.2 millimeters thick or roofing felt. Lay out the waterproofing strips with an overlap of 10 centimeters and an outlet on the walls 10 - 15 centimeters above the floor level.
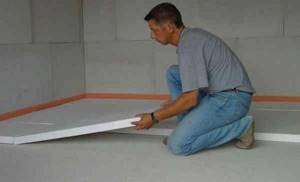
It is customary to start laying foam plastic slabs from the corner, pressing one tightly against the other. Start the next row with half a slab to offset the seams between the slabs. It is recommended to lay polystyrene foam in 2 layers, creating offset seams in levels to avoid the formation of cold bridges. To completely prevent the penetration of cold, it is worth using foam with milled tongue-and-groove edges.
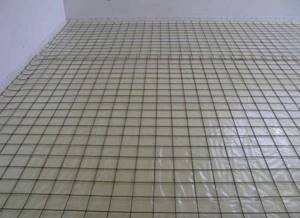
Cut the last slabs a little larger in size and lay them with some force. After laying all the foam, it must be covered with a protective layer - 0.2 mm thick plastic film or roofing felt and bring the edges above the floor plane up the wall. To increase the durability of the floor on the ground, it is customary to reinforce the screed with metal or alkali-resistant fiberglass mesh.
It is customary to pour a concrete solution onto foam plastic slabs laid out in this way. The filling should be of a thick consistency and contain filler, which has a diameter of up to 8 millimeters. Make the screed from grade 200 cement. The minimum thickness of the screed should be 4 centimeters. Pour the solution between the guide rails and rub it in after hardening using thin cement mortar. A horizontal deviation of no more than 5 millimeters is allowed.
The base of the floor must be protected from stress during the first three days. During the hardening process, the floor must be looked after for 10 days, moisturizing from time to time and not allowing it to dry out. Floors on the ground in rooms over 30 square meters are usually divided into segments of 10 square meters to avoid the occurrence of unwanted warehouses and deformations during work.
Thus, insulating the floor with polystyrene foam yourself is an easy way to add warmth to the floor. In addition, the use of foam boards is an excellent means of reducing impact noise. The advantages of polystyrene foam have long been appreciated by both professional builders and private developers.
Work on mistakes
In order for all the work to be carried out correctly and efficiently, the following mistakes cannot be made:
Pay special attention to the plinth rail. Defects may appear on the plaster - this means that the plinth was installed incorrectly
In order to eliminate these defects, it is necessary to remove ten centimeters of plaster from the edge that is located below. It is also necessary to cut off some of the heat insulation covering the base rail. After this, you need to secure the rail again, then cover it with reinforcing mesh to the edge, which is located below. At the end, a connection is made between the old and new mesh. The connection is made with an overlap of ten centimeters. The final stage is coating with plaster.
Avoid contact of polystyrene foam boards with the ground layer. Due to such contact, the product becomes wet and is no longer suitable for use. The protection function in this case is performed by the base rail. In order to eliminate this error, it is necessary to remove the lower part of the heat insulator, and then replace it with polystyrene foam. Namely, the floor is insulated with extruded polystyrene foam.
During installation, pay attention to weather conditions. Work should take place at room temperature (20-25 degrees Celsius).
Make the insulation layer as thick as possible. Otherwise, the floor will remain cold if the thickness is small.
If you have a wooden house, then this building product is generally not recommended for use for thermal insulation. Because polystyrene foam boards delay the release of moisture, which will significantly harm the wood and ruin it. Wooden floors are not insulated. Remember that floor insulation in a wooden house is done using other building materials.
https://youtube.com/watch?v=E_ujUkB-vaw
Using expanded polystyrene for floor insulation guarantees you unique comfort and coziness. This material has proven itself in the construction market and has a lot of positive reviews. When insulating, you just need to follow some rules and nuances. Insulation requires only high-quality materials.
Preparation of foam insulation for concreting screeds
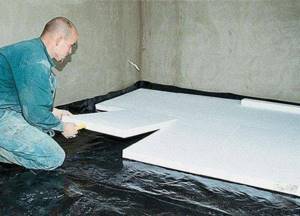
If laying polystyrene foam is to be done on a rough concrete floor, you must first knock down all the bumps and ridges on which the relatively brittle sheets of insulation can be broken or chipped. When laying on gravel screenings, it is recommended to level the plane of the future screed as much as possible, preferably using a laser level or level.
We lay polyethylene film on the prepared base so that during the process of laying the foam the waterproofing does not wrinkle underfoot; the canvas is pulled in the corners using weights.
It is best to lay foam sheets on tile adhesive, without using foam, mounting dowels, mushrooms, various acrylic resins and paints. The adhesion strength of the tile mass is sufficient to fix the foam boards until the concrete is poured. The sheets must be laid out staggered so that the joints in the rows are offset by at least half the width. An adhesive mass is applied to each sheet on the reverse side in the corners and along the perimeter, after which the foam is laid on the base and lightly slammed by hand to improve adhesion.
If the floor is uneven, or the polystyrene foam has to be laid on gravel chips, the surface of the thermal insulation often turns out to be uneven, and humps form in some places due to the “hanging” of the material. To reduce the risk of damage to the thermal insulation when pressing with your foot or during the process of pouring the screed, the sheet in the hump area needs to be cut into two or three parts so that the resulting fragments fit as tightly as possible to the base, as in the video
https://youtube.com/watch?v=6eSa8gPCLsM
The joints between the foam boards can be blown out with a very small amount of professional foam and cleaned with a spatula. If the screed is planned to be subject to a serious load, for example, from the weight of a car or equipment, then it will be necessary to additionally lay a mesh of composite reinforcement. The grid is raised above the layer of polystyrene foam on the bones, at a height of at least 2 cm.
Penoizol
This is a liquid version of polystyrene foam, which has the same pros and cons as the solid version. Its advantage is that it can be poured into hard-to-reach places and, after hardening, forms a monolithic coating without seams.
Penoizol
The disadvantages include the fact that you need to think about the method of supplying penoizol for pouring; on high floors this can be a problem. In most cases, penoizol is used during the construction of private houses; when insulating floors in apartment buildings, it is more convenient to use polystyrene foam and penoplex.
The required thickness of the penoizol layer is the same as that of solid foam.
Selection of expanded polystyrene
You want to provide thermal insulation using this product. How to make a choice in favor of quality material?
Before purchasing the necessary material, you need to pay attention to the following characteristics:
- The first criterion is appearance. The granules should not flake off and the color should be uniform white. There should be no damage to the surface of the material.
- The next criterion is smell. There should be no foreign odor. This smell is, for example, chemical.
- Pay attention to the structure. The components must be perfectly sintered. When you break polystyrene foam, the boundary should pass between the granules, as well as inside them.
- The material must be well packed. Also, the packaging must have labeling and manufacturer's information. The brand and manufacturer's recommendations must be written. All this will be proof that this product is of high quality.
- Information on the properties of the foam should be available. It should also be on the packaging. The packaging indicates the technical, physical, and mechanical qualities of this product.
- Please pay attention to where you buy this material. Make sure the store is a legal location and has a warehouse.
Location of doors in the room
Common accommodation options.
In the partition
Such products are particularly unique and are perfect for use in both large and very small rooms. Sliding doors in partitions competently organize space and effectively solve many interior problems.
In the wall
Due to a special box with a sliding system, compartments built into the wall make it possible to obtain a perfectly hidden structure that will ensure convenient use.
In a niche
To create a complete fenced area, these recesses are often decorated with comfortable coupe models.
The photo shows a studio and a corner niche with a bed, decorated with sliding sliding doors.
Preparatory work
Before insulating the floor, it is necessary to prepare the base. Since the base can be of 2 types: concrete and wood, the instructions for preparing them are different.
Preparing the concrete base
To obtain highly effective thermal insulation in an apartment, the subfloor must be prepared. The work is performed in the following sequence:
- the old screed is dismantled using a hammer drill;
- construction waste is removed;
- the surface is swept and then washed with a damp cloth (you can, if you have a construction vacuum cleaner, but not at home; do not wash the concrete floor, but vacuum it);
- a thorough inspection of the floor is carried out, during which cracks, holes and other defects are identified;
- the seam between the slabs is sealed with repair mortar in two steps, since during the setting process the first layer will sag in any case;
- Cracks and chips are repaired. The technology for repair work is described in detail in the article “Preparing the floor for pouring screed.”

Large cracks are reinforced.
After the repair mortar has completely set, the concrete base is primed in 2 layers with cement laitance or a deep penetration primer (“Ceresit ST 17”).
Preparatory work continues at the waterproofing . The technological process is described in detail in the work “Waterproofing the floor before screeding”. However, one important point must be taken into account here: the foam should not have direct contact with the bitumen. Therefore, all types of thermal insulation materials containing a bitumen component must be abandoned. If this is not possible, then the bitumen waterproofing layer is covered with plastic film.
This completes the preparatory work for insulation under the concrete screed.
However, recently the installation of floors on joists over concrete floors has become increasingly popular. In this case, preparatory work continues: a timber frame is installed under OSB, straight slate or gypsum fiber board sheets, on which the final laminate flooring, quartz vinyl panels, porcelain tiles, etc. will be laid.
They can be mounted in several ways, each of which is described in detail using the example of insulating a balcony using photos as illustrations in the article “Insulating the floor on a balcony.”
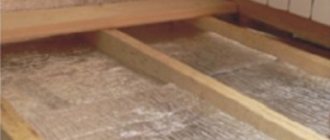
Preparing the wooden base
Insulating the floor with foam plastic between the joists begins with dismantling the old floor covering. After this, debris is removed from the subfloor and the wooden structures are thoroughly inspected. Lags should not have:
- rot;
- fungus;
- mold.
Damaged beams are replaced, since attempts to cure, for example, remove mold with a planer and then treat the entire joist with an antiseptic, rarely give a positive result. It is not clear in what ways, but fungus and mold appear again after a few years in previously damaged areas.
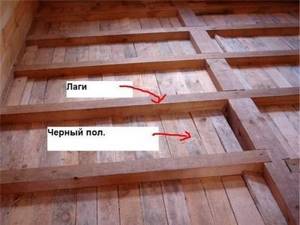
This is what the subfloor looks like.
There are more stringent requirements for subfloor boards. They should not:
- have rot, mold and mildew;
- creak;
- have fallen knots;
- sag;
- be poorly nailed to the cranial block;
- have greasy stains, traces of glue and paint.
Defects are eliminated as follows:
- rotten, sagging, with mold and mildew - change;
- poorly attached boards are secured with additional screws;
- traces of paint and glue are removed with a plane, and greasy stains are degreased (acetone, white spirit, gasoline, anti-silicone);
- cracks and fallen knots are sealed with wood dust putty or a composition of oil paint and sawdust in a ratio of 1 to 4;
- wooden structures are treated with fire retardants and antiseptics.
Waterproofing work is carried out on the restored base of the subfloor, protecting the foam from water and steam from below. Instructions for carrying out this type of work are described in detail in the material “Waterproofing a wooden floor.”
How to insulate a concrete floor
Concrete floors can be insulated with the following materials:
- expanded polystyrene;
- Styrofoam;
- ecowool;
- liquid insulation;
- mineral wool.
But this heat insulator will take away precious centimeters from the height of the room, since logs need to be mounted on top of the base, on top of which you will have to lay plywood or OSB, and only then the finished floor covering. At the same time, this is a very labor-intensive process and very expensive.
You can arrange a pie from expanded clay and gypsum fiber board, then the thickness of the thermal insulation will be 7 centimeters. If the base is initially flat, then only gypsum fiber sheets can be used, and the thickness of the insulation will be only 2 cm. When insulating the floor in an apartment with not very high ceilings, it is not advisable to choose thick insulation, since the usable living space will be reduced.
If the floor in the apartment requires insulation, then it is better to use Izolon followed by the installation of a warm, infrared, or electric floor. This option will not reduce the height, and will make living in the apartment more comfortable, due to the fact that the floor temperature can be adjusted.
The most effective option for high ceiling heights is to install a water-heated floor. The height of the coating in this case will be 10-12 cm.
To save space, you can use a screed with an insulating effect. This is a fairly new material, but has already proven itself to be of high quality and reliable. In this case, the insulation layer will be only 3 cm.
You can use the simplest and most common method - double flooring. Boards 2.5 cm thick are secured directly onto the concrete base with tongue and groove. After this, a substrate and laminate or linoleum with an insulating layer are laid on the wooden base.
Polyurethane foam has proven itself to be excellent; with a thickness of 2 centimeters, it saves 40% of heat. In addition, the material has soundproofing properties and is not afraid of high humidity.
Fiberglass or wood can be laid on top of this insulation. Some people lay a finished floor covering directly on polyurethane foam in order to save money.
How to properly place polystyrene foam under a floor screed
Before starting work, you must purchase the required amount of materials, have a minimum set of tools and experience.
Step 1. Preparing the base. Foam boards have well-known advantages. But not everyone knows their disadvantage - such materials need to be placed only on flat surfaces.
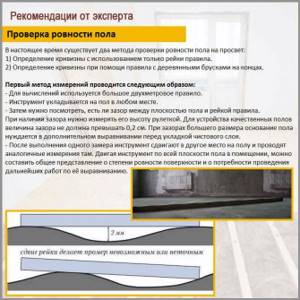
Checking the levelness of the floor

How to use a hydro floor level
Large protrusions or differences in the height of the base cause cracking of the slabs, which significantly reduces the efficiency and service life of the insulation. There are several ways to level load-bearing surfaces: dry plaster, pouring liquid mortar, etc. The main thing is that the height difference across the entire area of the room is minimal.
Do-it-yourself floor leveling
Practical advice. At the first opportunity, do not install waterproofing between floor slabs and foam plastic; it is better to do it above the foam slabs.
Waterproofing a floor for laying polystyrene foam - an example
The fact is that in this case the strength of fixation of the slabs is significantly reduced, they can no longer be fixed from below with solutions, none of them will attach to the waterproofing. The slabs will lie freely, and fixation can only be done around the perimeter. This significantly increases the risk of extremely unpleasant and difficult to eliminate squeaks while walking.
The thickness of the base leveling layer does not matter, its task is only to level the surface, it will not bear any physical stress.
Screed diagram with foam plastic
Step 2. Marking the room and choosing the optimal method of laying the slabs. Every effort must be made to reduce the number of cuts and adjustments. Depending on the geometry of the room, make an optimal plan for the location of the foam boards. The thickness of the slabs is selected taking into account the required heat saving coefficient.
Step 3. Laying foam boards. If the base is concrete, then special glue can be applied to the reverse side, which significantly increases the strength of fixation. It can be applied with a special comb over the entire surface or with a spatula in the center and four sides. The first option is preferable, but requires more time and materials. The position of each slab should be checked with a level in all directions; the front surface should lie strictly horizontal.
Laying slabs
The thickness of the foam under the screed depends on the level of thermal insulation: the greater the effect expected, the thicker the sheets should be
Practical advice. If you do not have a long level, then use a flat rod. The tool must simultaneously control the position of at least three plates, otherwise deviations will inevitably occur.
You need to level the foam boards very carefully; it is better to do this only with the palm of your hand. If great effort is required, use a wide spacer made from scrap boards, plywood and other materials between the rubber hammer and the plate. The side surfaces of the slabs must be coated with glue, and the remains are removed with a staple. After laying all the slabs, the surface must be absolutely clean and level.
Step 4. Sealing the seams. The seams between the slabs are small or completely absent, it all depends on the skill of the performer. Problems may arise where they meet the walls.
Practical advice. You can come across recommendations from “craftsmen” to be sure to leave a gap between the wall and the foam covering of about 2–3 centimeters to compensate for thermal expansion. Do not pay attention to them, foam plastic is not metal or brick, it easily compresses and straightens and thus successfully compensates for all possible expansions.
The gap between the wall and the foam is not necessary
It is better to seal the seams with glue. If you want and are concerned about tightness, use tape. But in most cases, a screed is made on the foam plastic for the floor, and a waterproofing barrier must be placed under it. It will simultaneously seal all the cracks hermetically, so there is no need to waste time on unnecessary operations.
At this point, the work on laying foam plastic ends; you can prepare for the finishing screed, if it is necessary for the technology of laying floor coverings.
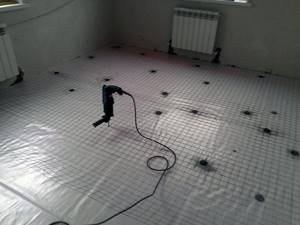
Reinforcing mesh over foam boards
The photo shows the reinforcing mesh
For these purposes, you can use both traditional metal meshes with different cell diameters and wire thicknesses, as well as the most modern meshes made of especially durable polymers. Due to the reinforcement, the entire load will be evenly distributed over the area of the room, this reduces the effort per square centimeter by hundreds of times.
Screed on foam sheets
Tools and materials
To create high-quality thermal insulation, you need to choose polystyrene foam wisely. For insulation with logs, it is enough to purchase foam plastic with a density of 15 kg/m3, since the main loads will fall on the wooden structure.
With classical technology without the use of logs, when foam plastic is attached directly to the floor, it is advisable to use material with a density of 30-35 kg/m3. This density indicator will ensure sufficient strength of the thermal insulation layer and protect the cement screed from deformation.
A more expensive option is to use extruded foam with a density of 42 kg/m3.
As for the thickness of the foam for floor insulation, it should be calculated in each case individually. Calculating the thickness of insulation for floors is similar to the calculation for walls; how to do it correctly can be read in the article “Features of calculating the thickness of insulation for walls and roofs.”
Tools and materials:
- Styrofoam;
- polyethylene for waterproofing;
- mounting tape;
- damper tape for laying around the perimeter of the insulated room, acting as an expansion joint;
- reinforcing mesh;
- adhesive for foam boards;
- cement and sand for preparing screed mortar;
- chipboard sheets as needed;
- screws, screwdriver;
- level;
- putty, etc.
The list of devices may vary depending on the chosen type of foam insulation, room parameters and individual preferences.
Foam insulation is the best option for the price-quality ratio. The selected material has the necessary characteristics to create sufficient thermal insulation, and is inexpensive.
Watch the video instructions for insulating the floor with foam plastic under the screed below:
Is it possible to insulate the floor with polystyrene foam?
Foam plastic for floor insulation is a lightweight, reliable and inexpensive material that is the most affordable. It is easy to work with due to its excellent mechanical action and light weight. If you look at its structure in more detail, you can see many balls filled with air. And air, as you know, is an excellent heat insulator.
In the modern world, this material is very often used for floor insulation. After all, this is a simple process, thanks to which you will get a warm coating. Also, its use is an excellent way to insulate and reduce noise from furniture impacts or footsteps.
Thus, insulation with a foam layer allows you to create a warm floor that resists the cold without much expense and effort. The main advantages are:
- thermal insulation – thanks to its structure, it retains heat well, which, in turn, will save on heating costs;
- sound insulation – has excellent sound suppression properties, and will allow you to significantly reduce the noise level from being in the house;
- fire resistance – has excellent self-extinguishing properties when burning;
- does not change its shape and structure under the influence of heavy objects;
- durable - you can be sure that this material will serve you for many years, while it does not shrink, does not rot and does not allow moisture to pass through, which means that mold and mildew do not appear.
We also note that polystyrene foam will be optimal both in winter and in summer, since in winter it will protect you from the cold, and in summer – from the heat, creating a comfortable temperature in the house.
Why do many people prefer this material?
To insulate the floor, you can use different insulation materials, some people prefer the traditional method of insulation using expanded clay, others, on the contrary, use modern heated floors, but all of them have a number of disadvantages compared to expanded polystyrene.
If we compare insulation with expanded polystyrene and expanded clay, there is a significant difference. If expanded clay prevents cold air from entering the room, then polystyrene foam, in addition, also reflects heat from the room and returns it back. At the same temperature in the room, the floor that is insulated with expanded clay will be colder.

If we compare these two materials, a 2 cm layer of expanded polystyrene has the same thermal insulation characteristics as a 35 cm layer of expanded clay.
This material is especially good to use on a loggia or in a room where there is a heated floor, since it reflects that part of the heat that goes down and returns it to the room.
Is polystyrene foam harmful to health?
*
This question still does not have a precise answer. On the one hand, one can come across claims that polystyrene foam releases many harmful substances that adversely affect numerous aspects of human health. On the other hand, over decades of using polystyrene foam in various fields, no cases of diseases associated specifically with the use of this material have been identified. And its use still continues even in the food industry.
It is reliably known that under the influence of sunlight or high temperature, an element harmful to health, styrene, is released from polystyrene foam. But under normal conditions, if styrene is released, its amount in the air does not exceed the maximum concentration regulated by sanitary standards.
However, for safety reasons, it is worth paying attention to the styrene content in the purchased polystyrene foam. In the best samples of imported materials, this value of harmfulness of the material does not exceed 0.05%. Unfortunately, in low-quality varieties of expanded polystyrene the styrene content reaches 0.2%.
If you want to use polystyrene foam, but health concerns are a concern, then be sure to insulate the floor with polystyrene foam only from the outside, and not from the inside of the living space.
Detailed description of the technology
First of all, the base (subfloor) is prepared. The floor needs to be repaired, all cracks repaired, and leveled. Treat the wooden floor with an antiseptic. Cracks in a concrete floor can be repaired with cement mortar or polyurethane foam, with further removal of excess. Coat the dirt floor with clay. At the final stage, dry and clear of debris.
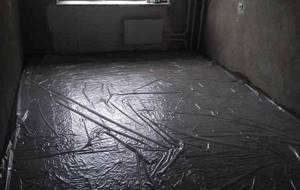
After preparation, waterproofing is carried out - a polyethylene film or membrane is laid on the base. If one sheet is missing, and in most cases this is the case, the film is laid overlapping, that is, so that one edge of the film lies on the other, at a distance of 10-15 cm. The sheets are fastened together with adhesive tape or double-sided tape. This process requires maximum care when working on concrete floors, as it is easiest to tear the film or membrane on them.
Installation of logs is the most important stage of work. The logs are made of wooden beams and installed between the walls in increments equal to the width of the insulation sheets. Most often, the width of the sheets is 1 meter. This means that the logs should be installed in increments of 1 m. Sometimes it is recommended to do a little less so that the gaps are minimal. To fasten the lags, dowel-nails with screws are used.
It is extremely important that all joists are strictly horizontal. This is the main condition for a flat floor to be installed on them. A long liquid or laser level is used to level them
A long liquid or laser level is used to level them.
Work begins with the installation of side joists running along the walls. Drive short ones between the long bars so that you get cells slightly smaller in size than the size of the insulation sheets. If cotton wool in rolls is used as insulation, there is no need to make jumpers between the joists.
At the end of the work, the entire system is thoroughly treated with an antiseptic. Once again check the horizontal position using a level.
Insulation sheets are laid. If the cells were made slightly smaller than a sheet of mineral wool, then it is enough to slightly compress the wool. When it falls into place, it straightens out and fills all the cracks. It is better to cut the foam at the place of installation. This will help avoid even the slightest cracks.
A hydrobarrier is also installed on top of the insulation. It can be either polyethylene film or specialized materials with or without a metallized layer. This is necessary to protect the insulation in cases where something is spilled on the floor.
As with the bottom film, the sheets are laid overlapping so that the edges overlap each other by 10-15 cm. The joints are sealed with double-sided tape or adhesive tape.
A lining for the finished plywood floor is mounted on top. Plywood sheets are fastened with self-tapping screws or clamps. As a rule, the distance between the walls is first measured. The plywood sheets are marked so that the plywood covering is approximately 1 cm away from the walls. The fact is that the plywood lining can expand as it is installed, and it is better to compensate for this expansion in advance. And the remaining gap will then be closed with skirting boards.
When laying plywood, you need to ensure that the joints are located in the center of the joists. To achieve this, the sheets are trimmed with an electric jigsaw or circular saw.
In addition, we must not forget that as you move around the room, its width may change up or down. Accordingly, the width of the plywood sheets should be adjusted.
The biggest challenge will be installing the last sheets of plywood. They will have to be cut not only along, but also across. The entire resulting structure is once again treated with an antiseptic solution.
The finished floor can be installed on the resulting plywood lining.
In some cases, in order to eliminate possible gaps, two-layer floor insulation is done. In this case, the second layer is located across the first. That is, another joist structure is attached on top of the first layer and another layer of insulation with appropriate waterproofing is laid.
Installation methods
The high performance properties of expanded polystyrene make it very popular for any thermal insulation work. This insulation is used not only by professionals, but also by home craftsmen. There are several methods and technologies that bring maximum efficiency.
Insulation of a wooden floor
Initially, this technology was conceived for thermal insulation work in a wooden house. However, over time, it began to be used everywhere: when insulating a balcony, carrying out work in a bathhouse. The essence of this method lies in the following installation work:
- A layer of waterproofing is spread over the prepared and cleaned base. Regular thick plastic film will do.
- Then wooden logs are laid. They need to be aligned in the same plane using wooden blocks.
- The distance between the lags should be equal to the width of the polystyrene foam sheets.
- Then insulation is installed between the bars. It must be laid as tightly as possible.
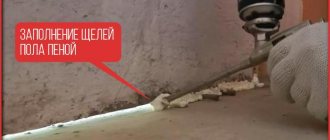
- Upon completion, all cracks must be filled with construction foam.
- When insulating a balcony or performing similar work in a bathhouse, it is better to cover the insulation with a layer of vapor barrier. For these purposes, it is optimal to use foil penofol, the small thickness of which does not greatly affect the thickness of the wooden floor.
- The final stage is the installation of boards or thick plywood as flooring.
Application of polystyrene foam under cement screed
This kind of floor insulation with polystyrene foam is also quite popular. It is used in cases where it is necessary to insulate a concrete floor in a house, bathhouse or other premises. This method is also widely used for thermal insulation of balconies or loggias. The installation technology comes down to the following sequence:
- The concrete base must be prepared accordingly: remove the old coating, seal all cracks and irregularities.
- The use of waterproofing under a concrete floor in a bathhouse is a prerequisite. Thick polyethylene film, laid overlapping with tape taped at the seams, will do.
- After this, you can lay the polystyrene foam boards. For a tighter fit, you can use a sealant that coats the ends of the insulation sheets.
- It is worth noting that the thickness of the slabs in the house should be at least 10 cm, since with this installation method the insulation experiences significant loads.
- When thermally insulating a balcony or carrying out work in a bathhouse, polystyrene foam should be covered with another layer of plastic film.
- When insulating large rooms in a house, it is necessary to use reinforcing mesh, which will add strength to the supporting structure.
- Now everything is ready to pour the concrete floor. For this, a cement screed is used, the thickness of which should be from 5 to 10 cm. For a balcony, a minimum screed is enough, but for rooms in a house or a bathhouse, you need to make the concrete layer thicker.
- The screed must be carefully leveled using a long rule and covered with film for proper drying.
After the cement layer has completely dried, you can begin installing the floor covering: ceramic tiles, linoleum or laminate.
The considered polystyrene foam insulation technologies are suitable for a wooden or stone private house, city apartments and public institutions. Thanks to its excellent properties, this modern material is almost indispensable when performing high-quality thermal insulation work.
Popular types of thermal insulation materials
Ease of use is one of the most important criteria for choosing materials. Some of them are hard and can only be used on flat surfaces, while others are successfully used for thermal insulation of areas of complex shape. Before insulating the floor in a wooden house, you should choose the most suitable type of insulation.
When choosing a material, you must take into account the conditions under which it will have to be laid. Source pro-uteplenie.ru
Insulation in rolls
Insulation materials are supplied in this form, the base of which is balsa wood or mineral wool. The physical characteristics of these materials (softness and reduced density) make it possible to lay thermal insulation not only on a perfectly flat surface without any particular difficulties. Roll insulation can be laid with the smallest number of joints, which increases the degree of thermal insulation. In most cases, this type of insulation is susceptible to high humidity, so when installing it you should take care of waterproofing. Sometimes rolled materials have an outer foil layer that protects the material from moisture.
Rolls are easy to unwind on a flat surface Source kak-sdelat-fundament.ru
Plate materials
These are lightweight insulation slabs or mats that cannot change shape during installation. They are characterized by low thermal conductivity and low weight. Easily mounted on surfaces with minor errors.
The slabs can also be laid aloneSource zoubi.net
Liquid polymer thermal insulation
This type is a special composition that, when exposed to air, forms a hard foam structure. With the help of such thermal insulation, all hard-to-reach places and errors are filled. Among the well-known representatives of this type of insulation is penoizol, which is applied to the surface from a spray can using a special sprayer. The only drawback of liquid insulation is its high price.
Liquid insulation sticks to any surfaceSource alio.lt
Loose thermal insulation
This type of insulation is represented by bulk materials such as slag, expanded clay or sawdust. They fill the required volume quite tightly, and installation is possible both on a pre-arranged base and on ordinary soil.
When choosing a method for insulating a wooden floor covering, you should be guided by the efficiency of using the material and the financial benefits.
Least labor costs on flat surfacesSource kakpostroit.su
Insulation class mineral wool
It is profitable and safe to insulate wooden houses with mineral wool.
Mineral wool is more often used for wooden houses
If we compare mineral wool with expanded polystyrene, with a comparable density, the thermal conductivity coefficient of the former will be on average 50% higher.
Where 5 cm of polystyrene foam is enough, 7.5 cm of mineral wool can replace it. There are several varieties of mineral wool with different characteristics. Products from different manufacturers vary significantly in quality.
Comparison of the characteristics of mineral wool from well-known Russian manufacturers
Types of mineral wool:
- Glass wool is the most affordable, containing harmful formaldehydes. It generates a lot of dust, so it is practically not used for residential premises.
- Slag wool is also a material harmful to health due to phenol-formaldehydes. There are composite models that contain up to 20% wool. Slag wool retains heat more effectively. It can be used for the floor of an unheated attic.
- There are several types of stone wool. They have the same disadvantages as the previous types, but to a lesser extent. Basalt wool does not burn even when heated to +1000 degrees.
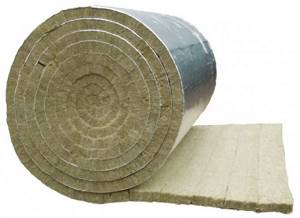
Foil-coated basalt wool
Such insulation costs on average from 100 to 160 rubles per square meter with a thickness of 5 cm.
Mineral wools are vapor permeable, which is considered a great advantage and disadvantage. When wet from steam, they lose thermal efficiency; glass wool suffers more than others.
Therefore, they must be protected with vapor barrier films.
This need not be done in interfloor ceilings when all rooms are heated. The steam simply passes through, the moisture evaporates, and the insulation dries out.
Wool with a density of more than 150 kg/m3 is used as a base for screed, although it is better to use extruded polystyrene foam.
To insulate frame floors, you can use wool with the lowest density, which will make insulation more effective.
![]()
The frame floor and walls are insulated in four layers
If we average the layer thickness for structures facing the street, the average thickness of mineral wool is taken to be 15 cm.
The floors are also insulated in layers. For mineral wool, a rigid base is required, since low-density material cannot support its own weight without sagging.
Why insulate a wooden floor?
Wood is a fairly warm material compared to concrete, but when building a frame private house or a house made of timber with your own hands, it is not always possible to achieve a rational balance of the thickness of the structure in terms of strength and thermal conductivity.
Insulating the floor in a wooden house can prevent the following problems:
- the appearance of excessive dampness in the room;
- reducing the temperature in the task;
- condensation, which causes mold to appear;
- the appearance of fungus and other microorganisms dangerous to humans;
- increased heating costs;
- destruction of wooden structures from the inside.
By doing the work yourself you can significantly reduce costs. Now there are many materials, the use of which does not require special skills and high qualifications.
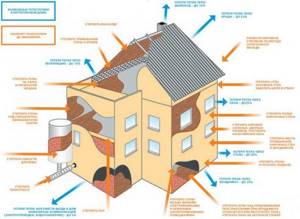
Diagram of all heat losses of a wooden house.
Thermal protection of the floor located above the ground
How to insulate the floor with polystyrene foam in rooms located above a low subfloor? Ground floor insulation differs from other technologies in that the heat insulator is in direct contact with the ground
Therefore, special attention should be paid to the installation of waterproofing, since the earth is exposed to groundwater and melt water. Floors on the ground are insulated according to the following scheme:
- Dismantling skirting boards and old coverings.
- Leveling the soil followed by compaction.
- Construction of a crushed stone base 30 - 40 cm thick.
- Backfilling a layer of sand and layer-by-layer compaction.
- Installation of reinforced mesh and pouring concrete screed.
- Laying a layer of waterproofing made of dense polyethylene or foil.
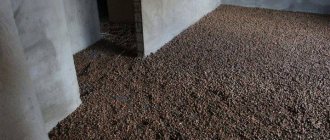
- Lay the floor insulation on the ground. Expanded polystyrene is placed on the floor in a checkerboard pattern, filling the voids between them with polyurethane foam.
- Laying sheets of waterproofing material overlapping, sealing the seams and edges with special tape.
- Installation of reinforced concrete screed with a thickness of at least 50 mm.
- The final floor layer of decorative finishing.
The result will be better if you fill it with polystyrene concrete. Concrete to which polystyrene chips are added has increased heat-shielding properties.
Choice of insulation
Many materials are used to insulate the floors of a wooden house. The simplest and most inexpensive is expanded clay or sand, which is poured between the rough and finishing coating. They are hygroscopic and protect the boards from rotting, the spread of fungus and provide ventilation. However, bulk non-metallic insulation has its own drawback - over time, their hygroscopicity decreases.
Today on the market you can find many materials for insulating a wooden house. In addition to good thermal insulation, it must meet basic requirements:
- ecologically pure;
- be safe for the residents of the house;
- long service life.
For insulation, fiberglass, mineral wool, penoplex, expanded polystyrene, etc. are used. Each of them has its own advantages and disadvantages:
o Mineral wool. It can be slag, stone and glass. The form of release is also varied - plate, roll, mat. Mineral wool has a high density, does not burn, conducts heat poorly and is quite economical. The main disadvantage is considered to be low moisture resistance.
When using mineral wool, you should carefully consider the vapor barrier system and ventilation. The side of the stove that is not covered with foil should be on the bottom.
When purchasing mineral wool, carefully read the composition, since the impregnation often contains substances hazardous to the body. The more saturated the yellow color of the material, the more dangerous it is.
The following are more in demand in construction stores:
- Izovol is a mineral fiber product. A distinctive feature is its high hydrophobic efficiency in comparison with conventional mineral wool. Additionally, it has low thermal conductivity, is non-flammable, biologically and chemically resistant.
- Rockwool is a basalt tile. Its peculiarity is that it does not cake, does not lend itself to deformation and shrinkage, like mineral wool. Rockwool resists mechanical stress well. The material is additionally used for sound insulation, since the porous structure absorbs noise well at any frequency. Like Izovol, Rockwool conducts heat poorly, does not burn and is resistant to biological and chemical influences.
- Expanded polystyrene - has a high thermal insulation rate. It is resistant to moisture and does not absorb water, holds its shape well under temperature changes, is durable, environmentally friendly, durable and is not subject to the destructive effects of microorganisms. Expanded polystyrene is easy to process and use.
- Penofol is a modern heat insulator. Sold in rolls, it is insulation with a layer of foil. The thickness and weight are small. The base may vary, but in most cases it is penofol (foamed polyethylene). Thermal insulation properties are maintained under high mechanical load. Laying occurs overlapping or butt. The seams must be taped with metallized adhesive tape. Penofol does not require an additional layer of hydro- and vapor barrier, since the foil already performs these functions.
- Ecowool is a natural heat insulator made from cellulose. The fibers are bound with boric acid and lagnin (an organic antiseptic). The uniqueness of the material is that it does not absorb water and removes it outside. The composition contains no components hazardous to health. Ecowool is fire- and bio-resistant, absorbs sound well and does not conduct heat. A special sprayer is used for application, but the material consumption then increases by 40%.
- Isolon is a new material in construction. With a thickness of 2-10 mm, it insulates well heat and sound, has high moisture resistance, is not subject to rotting and is durable.
For insulation, ordinary sawdust can be used. This heat insulator has been used for many centuries. The natural material is quite cheap and completely safe for the body. Sawdust is often left behind after building a house. This is the most affordable insulation for a wooden house.
Sawdust is added to some building materials:
- sawdust concrete consists of sawdust, cement, sand and water;
- granular heat insulator - sawdust, glue and antiseptic-fire retardant;
- wood concrete – sawdust with cement and chemical additives;
- wood blocks - sawdust, cement and copper sulfate.
What can replace polystyrene foam?
Penofol is used to insulate screeds when using heated floors.
Foam has long been used in various fields. It is valued for its affordable price and durability. But the material also has disadvantages: it breaks down in some liquids, releases toxins when burned, and is brittle. It competes with other insulation materials.
- Penoplex. Like polystyrene foam, it does not rot and is not afraid of moisture, does not decompose and is easy to use. It is also durable, but has increased strength (and cost).
- Mineral wool. Made from slag or rocks. It has high fire safety and low thermal conductivity, but unlike foam plastic, it does not tolerate moisture at all.
- Basalt wool. A brittle fibrous material with water-repellent properties. Excellent sound and heat insulator. Does not require additional vapor barrier.
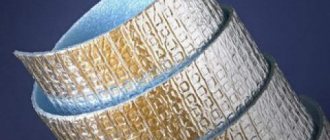
- Penofol. The material has a porous structure. Consists of foamed polyethylene. Often it contains an additional layer of foil. Thin, light, perfectly reflects energy. Prices for it start from $1.2 per m2.
Conclusion. The main advantage of polystyrene foam over other heat insulators is its low cost and ease of installation. It clearly wins in terms of price/quality ratio, and in general it has decent characteristics.
Floor insulation on the ground
Sometimes in construction, floors are made directly on the ground. Then they just need to be insulated. The order of work is as follows:
- the soil is compacted, a layer of gravel and crushed stone 10-15 cm thick is poured onto it, compacted again;
- the next layer is sand of the same thickness, compacted;
- screed with concrete mortar; a reinforcing frame can be laid for strengthening;
- when the screed is dry, you can begin insulation;
- a plastic film is first laid so that moisture does not seep through the entire thermal insulation;
- insulation is laid down, waterproofing material (glassine, roofing felt) is mounted on it;
- a wooden or concrete floor base is created. For a concrete floor, a metal mesh must be laid on top of the roofing material, and then the solution is poured.
What thickness of extruded polystyrene foam is needed for floor insulation?
It remains to determine the power of thermal insulation, its design and the thickness of the polystyrene foam sheet placed in the base of the floor. The thickness of the floor insulation depends on several factors:
- Schemes for laying polystyrene foam in the floor, whether it will be a concrete screed or a standard insulation scheme using joists;
- The presence of a basement or additional insulation of the foundation;
- Is it planned to insulate directly on the ground, or will the insulation of the ground floor floor with polystyrene foam be done on an insulating basis?
Most capital buildings are placed on a strip, shallow or pile foundation. In this case, the logs or load-bearing floor beams are raised to the height of the base. An air gap remains between the floor insulation and the ground, which is actively warmed up due to heat leakage from the heated room on the first floor.
In general, the thickness of floor insulation with polystyrene foam in a frame house can be taken to be equal to the thermal insulation of the building walls. In this case, the thermal insulation power can be reduced:
- By 15% in the presence of additional filling of the ground with expanded clay, the use of insulating insulation of the foundation tape with sheets of extruded polystyrene foam or backfilling with foam glass;
- By 10%, provided there is a basement under the house without a garage.
Important! If a storage area for a car or any other similar room with a high ventilation rate is equipped under the building, the floor insulation must be no less than the thickness of the wall insulation.
In this case, it is necessary to lay insulation for the floor over concrete, and install the thermal insulation of the ceiling of the basement room separately.
The plan is to insulate the floors in the bathhouse with polystyrene foam in a completely different way. Firstly, thermal insulation is formed from at least two layers with an air gap between them. The first layer, relatively thin, 25-30 mm, is laid from polystyrene foam, the second - from extruded polystyrene foam with a thickness of at least 50 mm. In general, the efficiency of floor insulation with extruded polystyrene foam is lower than for walls and ceilings. This is done deliberately in order to warm up the thermal insulation layer, the air gap, and even part of the soil underneath deeper and stronger. This is the only way to shift the condensation point, dry the subfloor using residual heat, and get rid of dampness on the floors in the bathhouse.