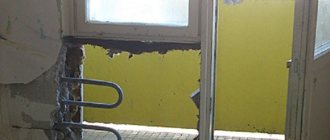
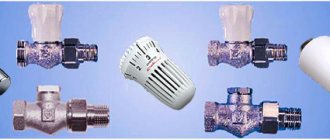
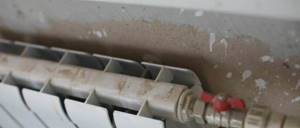
I am glad to welcome my readers. Today we will talk about the intricacies of repairs when leveling with drywall. Despite all the advantages of the material, it can be difficult to secure heavy objects on it. So I recently had to think about how to hang heating radiators on drywall. The decision depends on whether you took care of the issue in advance (then you can install an additional profile) or have time to carry out finishing work. Let's look at both cases together and determine the algorithm of action.
There are two types of heating devices - radiators and radiators. It is necessary to determine whether there are differences between the installation: the battery weighs more than the radiator. So you need to be careful when securing the structure.
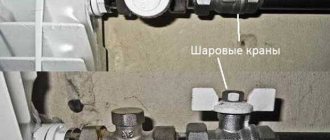
Fastening heavy objects to drywall: an overview of fasteners and how to use them
Aluminum battery on drywall - read on for details on how to hang it
. Greetings. This time you will learn how to attach heavy objects to drywall. I hope the topic of the article will be of interest to many and there is a good reason for this. Finishing building surfaces with plasterboard is becoming increasingly widespread.
At the same time, you most likely will not be able to secure heavy objects to such a finish using traditional methods. So, how to fix certain objects on the surface of a sheathed gypsum board so that the result is durable and looks neat?
A few words about installation difficulties
What problems do installers face when they have to attach heavy objects to a plasterboard wall ?
GKL strength table in accordance with sheet thickness
Plasterboard with a sheet thickness of no more than 12 mm is traditionally used for wall cladding. This material is quite durable and resistant to mechanical stress. However, installing a boiler or heating radiator, the weight of which when filled with water is more than 100 kg, is fraught with the risk that the fasteners will tear out of the casing.
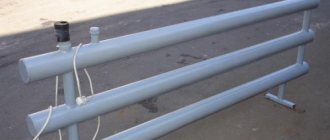
By the way, with such an elegant stand, the installation of heating radiators will be more effective, since it will be possible to remove part of the load from the wall mounting
The problem is obvious, but there are simple and effective ways to solve it. If you need to hang something heavy on the wall, you can do it as follows:
- Using special fasteners and supports installed under the fixed object;
- By pre-installing mortgages for wall cladding;
- Through the combined installation of mortgages and the use of special fastening hardware.
What are the advantages and disadvantages of the listed methods?
The advantage of mounting on fasteners without installing mortgages is that the method can be applied to an already used wall. That is, if there is no immediate renovation of the room and there is no desire to dismantle the wall, this is the best option.
Among the disadvantages of the solution, I note that fastenings that are designed for heavy loads are rarely found on sale and their price is high. Well, of course, you need to know what is suitable in a particular case and what is not suitable.
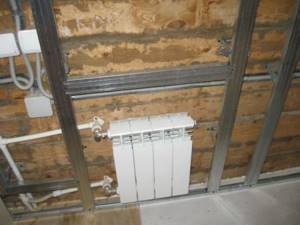
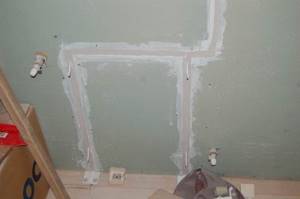
On the wall you can see embedded boards for the heating radiator, which will then be covered with gypsum board sheets
Installing mortgages under the cladding is the best solution if you have to install heavy objects weighing more than 50 kg. In fact, in this case, the fastening is carried out not on drywall, but on mortgages, which, in turn, are rigidly fixed to the rough wall.
The disadvantage of this solution is that it cannot be used on walls that are already in use. That is, the mortgages need to be installed under the sheathing, which is only possible before installing the gypsum boards.
The combined option is used in cases where the dimensions of the embedded parts under the casing partially do not correspond to the location of the hinges on the mounted equipment.
Let's consider the listed methods and find out how to hang a battery on drywall or how to install other equally heavy objects.
Installation of mortgages for fastening heavy objects on gypsum boards
How to install mortgages under gypsum boards with your own hands? The installation instructions are as follows:
Location of the embeds in the wall, where the boiler will be installed
- Immediately after assembling the supporting frame, we determine the installation location of the item whose installation is planned;
- Along the width of the gap between the profiles in the sheathing, bars are cut with a thickness corresponding to the thickness of the guides;
Mortgages before sheathing with plasterboard
- Using dowel nails or anchor bolts, the bars are attached to the wall or to the profile, as in the photo;
- On the sides we attach the bars to the profile with self-tapping screws;
- Next, we sew up the frame with gypsum board sheets;
Fastening hardware for mounting a boiler in embedded parts
- After finishing the walls, we fasten the heavy object with massive screws, which will be firmly held in the thickness of the fixed bars.
I would like to draw your attention to the fact that during installation you will have to photograph the installed bars from different angles. This must be done so that when performing the subsequent installation of attachments, you will hit the bars and not the void.
The question is, why do you need mortgages if you can immediately screw long screws into the wall? There is a reason - if you hang a boiler or heating radiator on screws without placing mortgages under the wall cladding, the load on the fastening elements will be high. As a result, over time, either the fasteners become deformed, or the wall on which the installation was performed becomes unusable.
Fastening elements for installation without preliminary installation of embedded parts
Many people believe that it is impossible to simply hang anything on partitions and walls made of gypsum plasterboard, using certain types of fastening hardware. In fact, this is not so, you just need to choose the right fasteners, the maximum load of which will correspond to the weight of the equipment that you decide to hang.
Let's look at the list of fasteners and methods of their use.
Fastening hardware specially designed for use on plasterboard partitions and walls
Among the things that can be purchased, I note the following:
- Self-tapping screw for metal-to-metal plasterboard;
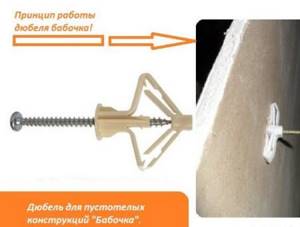
- Butterfly dowel with self-tapping screw;
- Screw dowel with self-tapping screw;
- Dowel “umbrella” with a bolt;
- Hartmut dowel from Knauf with bolt.
Screwing in a regular self-tapping screw for gypsum boards
An ordinary self-tapping screw for plasterboard, with which the sheets are fixed to the profile, can withstand long-term loads weighing up to 3 kg. That is, by screwing such a screw into the wall, you can hang a mirror, picture or other similar objects on it. If you tighten several screws and hang an item not on one, but on several loops, you can achieve higher installation strength.
The so-called “butterfly” from the inside of plasterboard
Butterfly dowel for hollow structures - can withstand weight up to 10 kg with single-layer wall cladding. This is an excellent solution for mounting various elements of the surroundings, starting with a mirror and ending with small shelves.
Accordingly, if you hang an object not on one dowel, but on several spaced dowels, the resistance of the fastener to weight loads will be increased.
Screwing in the screw dowel without the need for pre-drilling holes
Screw dowel with self-tapping screw - screws into the slab without the need for drilling holes. When mounted on a single-layer cladding, it can withstand a little more than 6 kg of weight load; when mounted on a double cladding, each mount can withstand a load of up to 15 kg.
The spacer part of the so-called “umbrella” from the inside of plasterboard structures
“Umbrella” dowel – a metal version of the “butterfly” dowel consists of a bolt and a metal spacer, which, when the bolt is screwed in, opens like an umbrella. When the fastening hardware is installed correctly, the umbrella dowel can withstand up to 35 kg of weight load on each fastener. With an increase in the number of fastenings, the load on the wall can be increased.
This is what the power element of the Hartmut dowel looks like, due to which fastening hardware is held on vertical structures
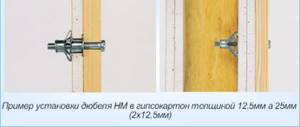
The Hartmut dowel from Knauf, when installed on a single-layer sheathing, can withstand up to 35 kg of long-term load. As the number of fastening hardware used increases, the permissible load also increases.
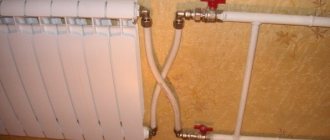
Using such fastenings, you can hang aluminum and bimetallic radiators on drywall without the use of floor stands
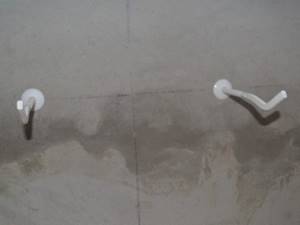
The installation instructions for such a dowel are as follows:
- A hole with a diameter of 13 mm is drilled;
- A dowel with a folded spacer is inserted into the hole;
- The dowel is pulled back so that the spacer part from the inside is pressed against the sheathing;
- We secure the plastic part on the outside of the casing with a fastener and break off the excess;
- We screw in a bolt on which you can attach hanging loops or other hardware adapted for mounting a particular item.
To ensure that the installation of a cast iron heating radiator on drywall can be done without mortgages, we use Hartmut fasteners. But there is one condition: installation of a structure with a nominal weight of over 100 kg is allowed only on double or triple wall cladding.
Now we know that attaching heating radiators to a plasterboard wall, as well as installing other heavy objects, is not impossible. I hope that as a result of independently installing heavy objects on plasterboard sheathing, you will receive high-quality and reliable fastening. To make the task easier, I recommend watching the video in this article.
Attaching a radiator to drywall
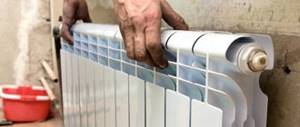
Rarely do any repairs or finishing work take place without the use of plasterboard systems. Their use makes it possible not to bother with leveling the walls with plasterboard and significantly speeds up the work. However, despite their versatility, in some cases their installation creates additional difficulties. Attaching a radiator to drywall is one of the most striking examples of such difficulties.

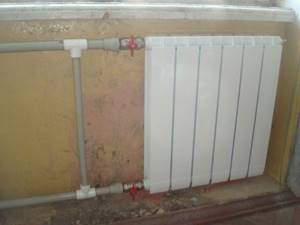
An example of a mounted radiator on drywall Return to contents
Full contents of the material
Compliance with engineering standards and a list of necessary tools
Drywall is capable of withstanding colossal longitudinal loads, but it is not adapted to lateral forces. The slightest pressure can lead to disruption of the integrity of the sheet, its deformation and the appearance of cracks.
To avoid such misunderstandings, try not to overload plasterboard partitions, and, if necessary, reinforce the structure. Based on this, the installation of heating system elements should be thought out at the stage of creating the project, and not after the design has been formed.
In practice, not everyone thinks in advance about exactly how the heating radiator will be mounted. The method of fixing heating devices varies depending on their design, connection method and total weight.
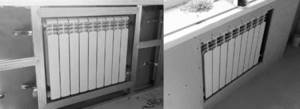
Option for placing a radiator in a plasterboard niche
A classic cast iron or steel battery requires the creation of a system of suspensions that will take on the entire weight of the system. Modern bimetallic models with a plastic supply can easily be fixed on top of a plasterboard base. However, for greater reliability, it is better to use special brackets that are screwed into the main wall. Installing a heating radiator is a rather difficult task, for which you will need the following tools:
Using these tools you can install the radiator.
At the same time, the main difficulty of installation work is not the installation process itself, but the installation of communications, filling the system and de-airing it. These tasks take the most time and require a lot of effort. In addition, certain requirements are put forward for the installed battery, the fulfillment of which affects its functionality. They look like this:
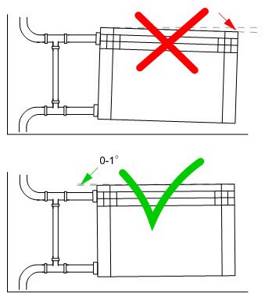
- the distance to the windowsill should be at least 6–10 cm;
- the height from the floor should be at least 10–15 cm;
- the distance from the wall should be at least 2–3 cm;
- The radiator should be as open as possible on both sides.
Compliance with such requirements makes it possible not only to increase the temperature in the room, but also to reduce heating costs. However, only those who have individual heating or have a heat meter installed in their apartment will be able to experience similar benefits.
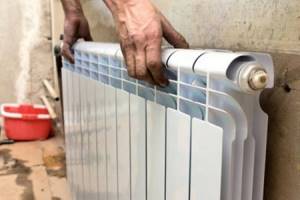
Radiator installation: step-by-step sequence of actions
Let's consider the process of installing a heating element using the example of a bimetallic radiator consisting of 5 sections. Depending on the thickness of the metal, the weight of the battery varies between 7.5–10 kg. With the correct arrangement of fasteners, sheets of drywall are quite capable of supporting such weight. However, it is better not to risk it and immediately install it on brackets mounted into the main wall.
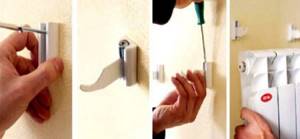
Step-by-step installation of the bracket on the radiator
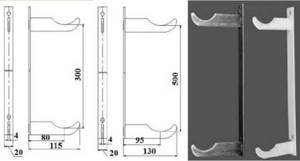
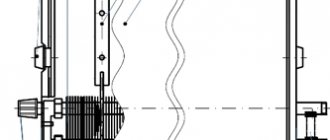
Drawing with dimensions of the bracket for mounting the radiator
At the same time, depending on the material of the initial surface, the structure of the work may undergo minor changes. In this case, the order of fixing the radiator takes the following form:
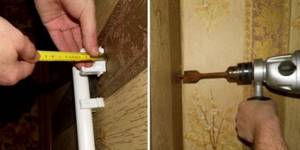
- First, we mark the future fasteners. We take a tape measure and measure the required distances, after which we apply the corresponding marks to the drywall (for greater accuracy, they can be checked using a building level).
- If the initial wall is made of concrete, then a dowel will be needed to secure the bracket. In this case, its diameter must correspond to the bracket. In addition, special pobedit drills are used for concrete walls. It will be screwed into a wooden base without the use of additional elements using an ordinary drill (for wood or metal).
- We connect the drill and screw the drill into it, and then install it at the marking point. We drill through the drywall at low speeds and reach the wall. In our case, it consists of concrete. Therefore, we turn on full speed and press on the drill. The drill should enter the wall 1–2 cm longer than the length of the dowel.
- We put a dowel on the drill, thread it through the hole in the drywall and insert it all the way into the wall. You should not press too hard on the drill, as the dowel will screw onto the drill and come out with it.
Scheme for attaching dowels to drywall
- The simplest bracket is L-shaped with a thread on one side. We insert the thread into the hole and begin to slowly screw in the bracket clockwise. As you tighten it, adjust the length of the fastener.
The fasteners are completely ready and can be used for their intended purpose. However, to hang a heating radiator weighing 7.5–10 kg, at least two such brackets are needed, and if metal pipes will be connected to it, then it is better to make four of them.
Existing bracket options for radiator mounting
An example of installing a heating radiator in a niche made of profiles
The second and all subsequent fasteners are installed in a similar way, and after installation, all elements are compared with each other.
Most batteries are hinged and have special holes into which fasteners are threaded. Therefore, we hang the radiator on the brackets and once again check its location with the level, which should be perfectly level.
General features of battery installation
Drywall is one of the most popular materials used in construction for interior decoration. Drywall sheets are used to level walls, ceilings, and create decorative structures (like fireplaces). Attaching heating radiators to a plasterboard wall must be carried out taking into account certain rules and regulations.
Battery holder
Regardless of the type of radiators, the same rules apply when installing them. For example, if you plan to use the space under the window for installation, you need to build on the following requirements:
Installation of heating radiator, battery
When installing a heating system or improving it, it may be necessary to do the wall mounting of bimetallic heating radiators yourself. It is quite possible to cope with this task on your own if you know how to use an electric drill and a measuring tape. However, it should still be taken into account that this task is very responsible; it has many subtleties and nuances that must be adhered to. Otherwise, improper fastening to the wall may cause an accident.
If you are planning to install a radiator yourself, keep the following in mind:
Carrying out preparatory work and calculations
Before proceeding with installation, the following preparatory operations must be performed:
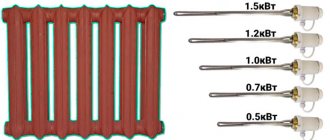
- deciding on the size of the device is easy to calculate if you know that a power of 1000 W is enough to heat 10 m2;
- find out what material the device is made of - the fastening material must be exactly the same;
- determining what material the wall is made of is important because you need to know whether it will support the weight of the radiator. If the wall may not be able to cope with the load, it is necessary to use additional floor fixation of the battery.
After this, we need to determine what type of heating system we are dealing with - single-pipe or double-pipe.
- The essence of a one-pipe system is that water is supplied from the upper floors to the lower ones through one pipe. The disadvantage of this type is that the water reaches the lower floors when it has cooled down significantly. In addition, such a system does not make it possible to regulate the heating temperature without additional improvements;
- In a two-pipe system, hot water is supplied through a pipe to which appliances are connected in parallel. The cooled coolant is removed through the second pipe. In such a system, you can easily regulate the heating temperature.
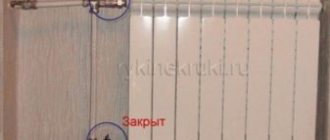
- Next, we need to determine what type of connection to the heating system we are dealing with. The following connection options are available:
- One-sided lateral connection - its essence is that the coolant enters from the side into the upper pipe, and exits from the same side from the lower pipe;
- Diagonal connection - with this type, the inlet pipe is connected to the upper hole on one side, and the outlet pipe to the lower hole on the other side. This method provides the most uniform heating of the radiator;
- Bottom connection – the device is connected through the bottom pipes. This method is used if the heating pipes are hidden in the floor. Heat loss can be up to 10%.
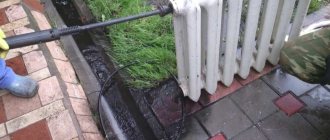
Before installing batteries, it is necessary to flush the system. You should know that under no circumstances should this be done using alkaline solutions - only specially designed liquids should be used.
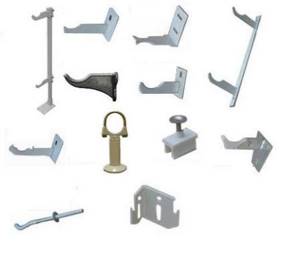
Selecting brackets for mounting a heating radiator to the wall
When choosing fasteners, you should take into account, as mentioned above, that its material should be the same as the battery material. The bracket for a cast iron product must be able to withstand its large mass and make it possible to adjust the distance from it to the wall. If we are attaching to a wall made of plasterboard or wood, we need to be on the safe side, since the wall may not be able to withstand such a load. In this case, additional floor fixation of the device is carried out.
To attach a bimetallic or aluminum radiator to the wall, we select brackets of a fixed length. The mass of the bimetallic device is also very large and it will also require additional floor fixation. Aluminum products are quite light and floor mounting is not required here - you can only get by with wall mounting.
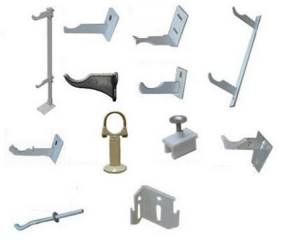
Types of fasteners for heating radiators
Butterfly dowel for drywall
Before starting installation, you should decide what quantity and quality of fasteners you will need.
The number of brackets - fasteners per radiator depends on its length and, accordingly, weight.
Fasteners for heating radiators to the wall are selected taking into account such parameters as:
- The material from which radiators and pipes are made.
- Battery sizes.
- The material of the wall to which the battery is attached.
- Number, sizes, location of window openings.
- The style in which the interior of the room is designed.
A competent approach to choosing brackets will make it easier to attach radiators to the wall in the future. For example, the weight of cast iron heating radiators requires the use of a certain type of fasteners:
- The steel bracket must be adjustable and allow you to change the distance between the wall and the battery, and even its horizontal position.
- Cast iron bracket.
- Steel pin fasteners (length can reach 30 centimeters).
- The bracket should be on a metal strip.
- Features of attaching heating radiators to a plasterboard wall
Fastening heating radiators to a plasterboard wall involves the use of fasteners installed on the floor. With this option, the main load will fall on the supporting fasteners, and the wall bracket acts as insurance.
Self-tapping screws for plasterboard profile
Bimetallic batteries are mounted using the same principles. Of course, the mass of such batteries is less than that of similar cast iron products, but the load on the plasterboard wall can become excessive.
It is recommended to use the same floor fasteners as for mounting cast iron batteries.
Aluminum radiators, due to their small weight, can be attached to a wall made of any material without any problems. To install bimetallic, aluminum batteries, brackets are used:
- Corner fasteners or reinforced steel brackets.
- Steel pin fasteners, which are used with dowels 12 - 17 centimeters long.
- Standard wall mounts with decorative plastic trim.
Attention! For radiators of some manufacturing companies, only branded brackets are used.
Radiator bracket
To summarize, we found out that the bracket is selected based on the technical characteristics of the wall and batteries. The methods and fastenings by which radiators are attached to plasterboard walls depend on the batteries themselves.
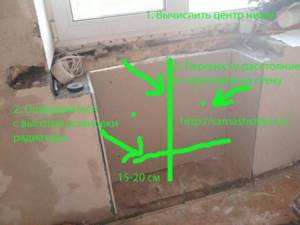
Marking the installation location of the heating radiator
To properly install a heating radiator, you should rationally mark its location, especially under the window space. To do this you should:
- measure the height from the finished floor mark to the window sill: let’s say 92 cm;
- knowing that the height of the radiator is 50 cm, we calculate the remaining space: 92-50 = 42 cm;
- if you want to install the radiator in the middle of the opening height, then divide: 42/2=21 cm;
We retreat 21 cm from the window sill and draw a horizontal line using a spirit level:
We retreat 50 cm from this line (the center distance of the radiator) and draw another horizontal line:
We measure the width of the window opening, say 135 cm, divide it in half: 67.5 cm, and draw a vertical line - this is the middle of the opening:
Installation of heating radiators to a plasterboard wall
Of course, in order to hang a battery on a wall covered with plasterboard, it is best to initially include the required number of metal profiles in the structure.
Corner cutting with galvanized profile
Unfortunately, the use of unskilled workers in finishing results in unpleasant surprises. Not a single plasterboard structure will withstand if Russian-made cast iron heating radiators are installed on it. Of course, you can install such a battery on floor brackets and fix it to the wall so that it does not fall. However, this method cannot always be used. Therefore, to attach the radiator to the wall, you will have to break through a layer of plasterboard to the main, load-bearing wall. For this work, we will need a drill with a length of at least 150 - 200 millimeters, with which we will need to drill a hole in the main wall, passing through the plasterboard structure. Then, using a hammer, firmly secure the drive-in fastener into the prepared hole in the concrete wall. It would be more correct to use wooden plugs (chops), but in this case our maneuvers are limited by a layer of drywall.
Installation and fastening of heating radiators
It is worth using wooden plugs if the bracket is wobbly or does not go into the wall to a sufficient depth.
To do this, a hole is drilled using a drill, and a wooden rod with a diameter of 1.2 centimeters is cut out of wood to the length of the drilled hole.
One end of such a rod is sharpened, and the fasteners are slightly clogged in the second. Then, using a hammer, this structure is fixed in the wall. When preparing the mount for cast iron heating radiators, do not forget to mark the wall in advance. Then, if the battery does not lie flat on the mounts, you will have to bend them, use a hammer, or in case of large discrepancies, drill a new hole.
Using a similar method, you can mount radiators made of other materials to the wall. However, the light weight of bimetallic and aluminum radiators allows for other installation methods. There are brackets on sale that are attached directly to the drywall itself or to a metal profile pre-installed in the structure.
Plasterboard radiator box

Many people, during repairs, try to cover the battery with drywall. This is primarily due to the unaesthetic appearance of the batteries. It is very difficult to come up with and implement a successful design solution that could make the part of the room in which this element is located attractive. That is why owners are increasingly deciding to cover the radiator with plasterboard. This solution obscures the radiator from view and does not harm the heating system in any way.
In order to cover the battery with plasterboard, you will have to build a special plasterboard box. Anyone can make a plasterboard box for a battery on their own. This solution will not only cover unsightly heating pipes, but will also decorate the room if you choose the right design.
What will be required during the work process?
In order to create a box for a plasterboard battery, you will need the following.
- Screwdriver;
- Hammer drill (as well as a six-centimeter drill);
- Scissors cutting metal;
- Roulette;
- Level;
- Pencil;
- Stapler;
- Knife (stationery and preferably with replaceable blades).
How to sew up a battery with plasterboard without materials? That's right, no way! You will need the following:
- Twelve-millimeter plasterboard sheets;
- Metal profiles;
- Serpyanka;
- Perforated corner;
- Self-tapping screws for metal;
- Self-tapping screws for drywall;
- Dowels.
And also, you probably want to decorate the structure after hanging the battery on the drywall. For decoration, of course, additional materials will be required.
Decorating batteries
Oddly enough, the installation of cast iron heating radiators is also found in luxury new buildings, and with all their undoubted advantages, their appearance irritates many housewives. Buying an apartment in itself involves a considerable investment, and in the end there is not much free money left. This is where decorating a heating radiator on the wall using plasterboard becomes relevant.
A metal profile is used for this.
Using profiles and drywall, you can hide painted cast iron heating radiators in a beautiful design.
Decorative screens for batteries
Russian manufacturers, unfortunately, when producing radiators and batteries, rarely think about such things as the appearance and design of products. In order to hide the battery that spoils the interior of the room, we will need:
- Plasterboard sheets.
- Metallic profile.
- Jumpers.
- Power tool.
- Self-tapping screws, screws, dowels.
Preparing and assembling a structure designed to hide an ugly battery does not require any specific skills. The profile should be wider by 1-1.5 centimeters from the wall on which the battery is mounted to its outer side.
- The profile size is cut to the width of the room in two parts. In the area where the battery is mounted, cuts are made on the edge of the profile and secured to the wall using corners.
- One profile lies along the battery and is attached to the floor.
- The second profile is located above the first, but below the height of the window sills and is attached to the wall using dowels.
- Drywall, unlike a profile, is mounted using self-tapping screws or self-tapping screws.
Patterned profile for drywall
A rigid structure in the form of a rectangle is assembled from the profile and jumpers, in which the battery is hidden. Drywall will be needed to cut out the planes for this rectangle. The prepared drywall is attached to the profile using self-tapping screws. You will need to cut holes in the drywall sheets through which air will move. The slots in the lower part of the facing plasterboard planes will take cold air from the floor, and it will come out through the upper holes, warmed by the radiator.
Banal slots can be replaced with an original grille that best suits the design of the room.
Replacing or hiding a battery or radiator is not as difficult as it seems; at first glance and upon closer examination, all the work can be done independently. The interior of the room can be changed by the owners at minimal financial cost. You just need to think in advance about the option that is most suitable for the room.
Stages of work
- In order for the work to be done correctly, it is important to determine as accurately as possible where the edge of the protrusion will be located. The UD profile is screwed onto it to the floor.
- If you intend to close the heating pipes, the guide is stretched from one wall to another. When this is not required, the size of the radiator acts as a limitation.
- Next, the profile connects the front line and the profile.
- 2 vertical UD strips are screwed in the direction of the wall near the battery. This indicates the corner of the box inside.
Criteria for selecting fasteners
To ensure the reliability of the installation, you should select the most optimal option from the entire variety of products presented. A number of factors must be taken into account:
To solve such problems, special fastening technologies are used, since massive structures will not hold without appropriate fixation
Advice! Sometimes special preparation of the foundations is required at the stage of repair work, so you will have to provide for the location of the elements in order to properly strengthen the foundation.
If you approach the process carefully and scrupulously, the result of the work will be excellent.
Main options for carrying out work
Let's consider how to mount a heating radiator depending on the type of base, since this criterion is the main one when working.
Drywall
This is the most difficult option, since the structure does not have high load-bearing properties.
Let's look at how to attach a heating radiator to drywall:
- The first option is to build a box around the structure, and the radiators themselves are attached to a solid base. This option is most often used when using cast iron products, since the weight of an average-sized product exceeds 50 kilograms. The work is carried out in a standard way: places are marked, the base is drilled, dowels are inserted, then strong brackets are inserted.
The boxes are built on the sides, and the place where the radiator is attached is left
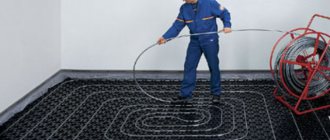
- If you have lighter radiators, then you can simply strengthen the frame from the inside with a wooden block with a section of 50x50 or larger, the most important thing in this case is to accurately install the reinforcing elements, otherwise they will be of little use. In addition, you can place pipes under the sheathing, but if problems arise, you will have to destroy part of the wall.
In this case, the most important thing is to carry out the preparatory work correctly.
Advice! If you do not know the exact width of the brackets, then you can strengthen the base with two 50 mm thick boards; they can be positioned horizontally or vertically, in which case nothing bad will happen if the brackets deviate from the planned location.
- Finally, if you have not prepared the wall, then to increase stability, floor brackets are also added to the wall brackets, this way you can ensure stability even if the strength of the walls is low.
Concrete, brick and blocks
In this case, components should be selected based on the configuration of the batteries, and not the type of base; it is strong enough to withstand any load.
Instructions for doing the work yourself look like this:
- Load-bearing elements of the appropriate configuration are purchased, you can choose the simplest options, the price of which is low, or purchase adjustable brackets, they are more expensive, but they are also more convenient to work with.
The most common types of products
- The work begins with marking the location of the fasteners, keep in mind that the distance to the floor from below and to the window sill from above must be at least 100 mm, and the distance to the wall must be from 3 to 5 cm, based on this the length is selected. If the fastening is made in aerated concrete, then it is better to use special dowels for this type of base.
- After this, holes are drilled using a hammer drill; it is important to keep the tool level so that there are no distortions. Next, dowels are placed in the wall and the brackets are screwed into them to the desired level.
- If you use a reflector for a heating radiator, you need to secure it after installing the brackets, so you can position this element correctly and not damage it when drilling.
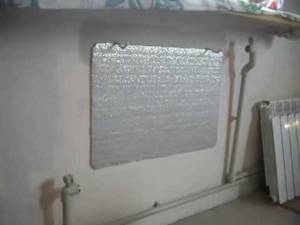
The reflector is glued directly under the radiator holders
- Next, the radiator is hung and its position is checked using a level; if there are distortions, then the elements are either bent or adjusted (if these are adjustable options). After this, the level is checked again, and if everything is normal, then the pipes can be attached.
Expert advice
- When installing the box, be sure to leave free access to valves and taps.
- The façade grille must be made removable. A board or OSB can simply be screwed onto the frame. The first option is suitable for a cast iron battery, and the second for an aluminum one.
- Attaching the battery to drywall can be difficult if the brackets do not screw into a thick wall. In this case, consoles will be required. They can be screwed to a board or OSB with self-tapping screws, but their length should be from 45 to 55 mm. Moreover, they must be stainless.
- To ensure reliable fastening of the battery to the drywall, it is recommended to use wall consoles. Each of them is fixed at 2 points. This allows you to increase the load-bearing capacity during installation. It is not advisable to choose a corner console. It has only one attachment point. Therefore, it is inconvenient during installation work.
- The console is anchored using a metal dowel with a metric screw. This method of fastening is considered the most reliable. The required tightening is provided by metric threads. Special pliers make it possible to quickly install dowels. But their use is not required. Anti-rotation locks of mechanical fasteners do not allow parts to rotate during installation.
- When measuring the distance at which the consoles will be installed, you need to pay attention to how the supporting profiles to which the plasterboard sheet will be attached are positioned.
- When working with a drill, you need to use the drill size recommended by the manufacturer. If the thickness of the plasterboard is 12.5 mm, then the minimum length is 32 mm, the wall is 25 mm - the drill is 37 mm.
Recommendations for the arrangement of elements
This factor is also important; the number of brackets must correspond to the type of structure:
- For cast iron structures with a number of ribs from two to nine, it is necessary to install one holder at the bottom and two at the top.
- If the number of sections is larger, then you need to install at least two brackets at the top and two at the bottom , sometimes you can add one more on top if the radiator is very large.
A sufficient number of fasteners is the key to reliability and durability
- As for the bimetallic and aluminum options, most often the delivery kit already includes fasteners , so you just need to install it in accordance with the instructions. If the elements were not available, then you can purchase a ready-made kit consisting of three saber brackets with dowels.
Some kits include components for heating radiators and fasteners, so you get everything you need to get the job done
Selecting reliable elements and installing them correctly is very important, since the radiator must be positioned level and held firmly. The video in this article will help you understand some of the nuances in more detail.
How to hang a radiator or radiator on drywall
Published on August 25, 2017 in the Walls category // // Author: Admin
- 5
- 4
- 3
- 2
- 1
(1 vote, average: 1 out of 5)
You have just finished finishing the walls with drywall. But a cold winter is ahead, and it’s time to think about heating your apartment. This could be a radiator or a battery. But all of these are quite heavy structures, into which water will then be poured, so these structures are not so easy to attach to drywall due to its insufficient strength. But it is quite possible. Let's figure out in order how to hang the battery on drywall.
First, let's determine whether there are any differences between installing a battery and installing a radiator on drywall. Yes, they exist, and this happens due to the different weight of the structures (the mass of the battery is significantly greater than the radiator).
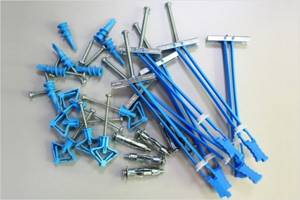
Fasteners for batteries on drywall
Things to consider when choosing brackets:
- battery weight;
- type of base.
Let's take a closer look at heating batteries, since for proper mounting it is worth taking into account not only the weight, but also the dimensions.
There are several types of fasteners for heating structures: a simple hook with a pointed end that is simply driven into the surface, a bracket equipped with a dowel, and fasteners with a plastic plug.
Fastener selection
An important detail in this matter is the fastener, or rather, the bracket. What factors will be decisive when choosing it?
- Type of base to which the radiator or battery is attached
In our case, this is what the actual wall under the drywall is made of. It would be very good if it is concrete or brick, since these materials can withstand heavy loads.
- Radiator type
The heaviest are old-style cast iron batteries. Due to their weight, installation problems may arise, so if possible, you should consider replacing them with aluminum or steel ones. The efficiency is the same, but the weight is noticeably different.
- Design dimensions
Here everything depends on the area and volume of the heated room: the larger the room, the more sections the radiator should have. The number of sections should be used as a starting point when choosing the quality and quantity of brackets.
- Design Features
If your designer’s plan includes some non-standard solutions in the form of radiators of a special design, then you should take care of the appropriate fastenings. It's good when they come with a battery.
Main types of batteries
It all depends on the room and the temperature of the coolant in winter. If the heating is good, then there is no need to install a large radiator; if the situation is the opposite, then you should choose a battery with a large number of sections. The quality of the brackets and their number depend on the number of elements on the radiator.
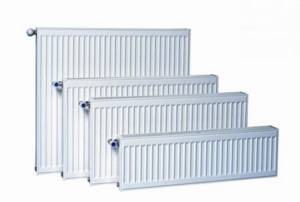
For example, for a small kitchen 3 sections are enough, but a room of 24 square meters will require the installation of a 5-8 section radiator.
How to attach a battery to drywall
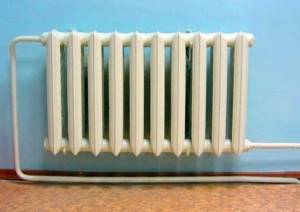
Let's start with a proven option, which many already consider outdated, but it is not losing ground. This is a regular cast iron radiator.
No gypsum board is capable of supporting the weight of this battery, so you will have to mount it not on a false plasterboard wall, but to get to a real, usually concrete or brick, wall. Only this will ensure the reliability of the fastener.
You can combine welded legs and brackets, and it can be screwed not into the wall, but into the profile, since the legs will take on the entire load, and the bracket is needed to protect it from “collapse.” In addition, the heating pipes themselves will support your battery. But now we are considering the option of installing it on drywall.
At this stage we need to drill a hole in the drywall, reaching the wall. Depending on the design of the false wall, the gap between the drywall and concrete can be from 3 to 10 cm. Since we need to make a hole in the wall itself, the drill must be 15-20 centimeters long in order to securely fasten the bracket. Diameter – about 10 mm.
Having finished with the holes, we hammer in the bracket for the batteries. It is a metal rod, curved at one end and repeating the shape of the battery section, and slightly tapering at the other. It would be much more correct to hammer a wooden chop into the hole and then drive the fastener into it. But sheets of drywall do not give us such an opportunity.
If the bracket cannot go deep or moves, then we will drill the hole so that its diameter is 12. Now we hammer the fasteners exactly into the middle of the long wooden chop and only then into the wall.
We hang the battery on the brackets; if it hangs unevenly, the fasteners can be bent with a hammer. So we figured out how to attach the battery to the drywall. Let's now look at attaching heating radiators to a plasterboard wall.
How to attach a battery to drywall: step-by-step instructions
Let's look at how to secure a cast iron battery - an outdated method, but many still use it.
The specific weight of this battery will not withstand even double plasterboard, so you need to secure the structure to the main wall through gypsum plasterboard.
The video shows how to properly mount the battery on a plasterboard
.
For structural strength, shaped legs can be welded to the cast iron structure, which will take the load from the weight of the battery. To prevent the battery from collapsing, brackets are screwed into the profile. In addition, iron pipes will support the battery. But we are looking at how to fix a radiator to drywall.
Attaching the battery to drywall: step-by-step instructions
- First of all, using a drill with a wood drill bit, drill holes in the plasterboard. This must be done carefully, without pressing, as the drywall may break. Important! The distance between the gypsum board and the base can reach up to 10 cm, so the drill bit for the hammer drill is taken 20 cm.
- As soon as the holes in the gypsum board are ready, you need to take a hammer drill with a 10 mm diameter drill and drill holes for fasteners in the main wall. Try to keep the tool exactly parallel to the floor so that the bracket does not move sideways later.
- Then we hammer the hooks into the holes. Ideally, you need to install a dowel and screw a threaded fastener into it. But such elements are difficult to find, especially for a cast iron battery, so let's assume that we have a hook with a pointed end.
- If the hook moves or does not fit at the required distance, you need to pull it out and drill a hole with a larger diameter and deeper. Then prepare a wooden cap, into the middle of which fasteners are driven, and only then hammered into the wall.
- Hang the battery on the bracket and check the level. If the battery hangs unevenly, you can slightly knock down the fasteners with a hammer. Try not to knock too hard on the bracket, since in a brick wall made of old material, you can loosen the fasteners and have to do the work again.
These are all the instructions for attaching a cast iron battery to a plasterboard wall. Now let's look at how to fix an aluminum radiator.
How to hang a heating radiator on drywall
A radiator is a newer and more progressive solution to the heating problem. How to hang a heating radiator on drywall?
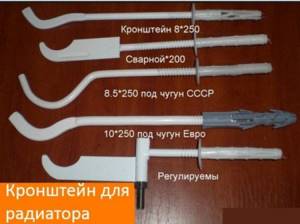
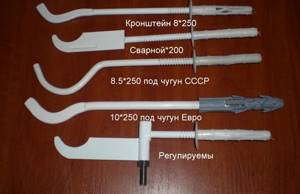
This is even simpler, because the mass of the radiator is much less, many types of fastenings are provided for it: from cast iron from the USSR to modern European standards. Now we will use a mount for heating radiators to a plasterboard wall, which is called a bracket with a plug.
Installation of heating radiators on drywall also begins with drilling holes: using an 8-inch drill, you need to make a hole, which should be 7 cm long in the concrete wall itself. Next, screw the plug onto the fastener and hammer it into the hole. Again, using a hammer, bend the edges of the plug into this hole and tighten the bracket for the last time. If you drive it in, take a wooden block or something similar so that the paint doesn’t come off and ruin the look.
There are also mounts for heating radiators on plasterboard, which are attached directly to the plasterboard sheet. They are suitable for lightweight radiators. They are fastened with long bolts that do not have heads. The sharp part is driven into a sheet of drywall, and at the other end the bracket is secured with a nut. The excess part of the bolt can be removed with a grinder.
So we figured out how to fix a heating radiator to drywall. The main thing is to take your time and carry out the installation diligently and efficiently so that collapse does not occur under the weight of the structure.
Methods for installing mirrors on drywall: easier than batteries
When it comes to hanging mirrors on plasterboard walls, there are three installation methods.
Note! All of the methods below are suitable for attaching not only mirrors, but also other objects to plasterboard walls.
These methods vary depending on the size and weight of the mirror:
Note! In this situation, you should use a special tape specifically designed for attaching mirrors to walls.
The second and third methods are most often used, since mirrors of such sizes fully correspond to their purpose.
In a situation where your product weighs up to 20 kg, you can use liquid nails. To attach a product to a plasterboard wall in this way, we carry out the following manipulations:
Mirrors that are large in weight and size are attached using special fasteners - a butterfly dowel.
The peculiarity of this fastening element is that when it is screwed into the wall cavity, the dowel opens like a butterfly (hence the name of the fastening element). As a result, the dowel is firmly fixed in the hole and will not be pulled out, unlike ordinary nails. Such fasteners will not rotate in the hole made, which will ensure greater rigidity of adhesion of the product to the wall surface.
Note! To protect yourself from the risk of the mirror tearing out a piece of the wall, it is recommended to screw butterfly dowels into metal profiles.
Scheme for installing heavy mirrors on drywall
We install the product according to the following scheme:
In a situation where the product has quite impressive dimensions, anchor bolts should be used instead of butterfly dowels.
Anchor bolts for mounting on drywall
This fastening is more durable than a butterfly dowel. In terms of its structure, an anchor bolt is practically no different from a butterfly dowel. When screwed into the hole, it helps ensure that the mount is firmly fixed in it. Installing such fasteners in a metal profile under sheets of drywall will create such a strong fastening that can withstand the weight of even a full-length mirror. And when installing anchor bolts in two adjacent profiles, it will not allow your mirror to fall.