How to hang a heating radiator on brackets
Before you begin installing the heating radiator, it is recommended to prepare it: coat it with paint (if required), install the Mayevsky tap, thermostat and plug.
In order to install the radiator, you will need:
- several brackets (and the longer the radiator, the more brackets may be needed), and the required number of dowels for fastening them;
- a hammer drill and a drill suitable for working with wall materials (concrete, wood, etc.);
- level (spirit level), tape measure, meter ruler.
The brackets must be made of the same material as the radiators themselves (cast iron, steel or aluminum).
Cast iron radiators are the heaviest of all heating devices. For them, special brackets are used for cast iron heating radiators, which have a sufficient margin of safety to withstand such a large weight. With the help of such brackets you can adjust the distance from the wall to the radiator.
The bracket for bimetallic radiators must also have sufficient strength. Such radiators are not very heavy, but if a large number of sections are used, they can create a significant load on the wall.
Aluminum radiators are much easier to install because they are lightweight. They are installed using brackets for aluminum heating radiators with a fixed length.
When installing radiators, you must follow these rules:
- distance from the floor to the radiator – 10–12 cm;
- height under the edge of the window sill –8–10 cm;
- distance from the wall – 2–5 cm.
To prevent air bubbles from accumulating in the radiator, it is placed at a slight slope. Such installation requirements are imposed in cases where the coolant is supplied from above.
The support points and their number are determined depending on the type and size of the battery. To mount a six-section cast iron radiator, two cast iron brackets on top and one on the bottom will suffice. As the number of sections increases, more brackets will be required (1 bracket per 3 sections).
Aluminum heating radiators are also mounted on brackets, the number of which depends on the number of sections. When installing radiators with less than 8 sections, 3 brackets will be sufficient. If the number of sections is more than 8, then use 4-5 brackets.
Sequence of steps when installing radiators:
- Preparing the wall (plastering and wallpapering).
- Marking the mounting locations for the brackets, taking into account the distance between the sections (so that the hooks pass freely between the sections).
- Holes are drilled in the marked places, dowels are installed in them and brackets are attached.
- Check the location of all bracket hooks (must be on the same line).
- Hang the radiators on the brackets and apply a slight force to it to make sure that it is securely fastened and has no play.
- The horizontal position of the radiator is checked by level and, if necessary, spacers of the required thickness are placed on the skew side.
- The pipes are connected and connected, and they are hermetically connected to the radiator.
Read material on the topic: Types of heating radiators
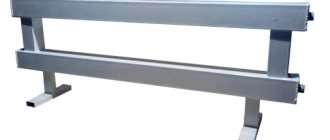
Floor mounting of radiators
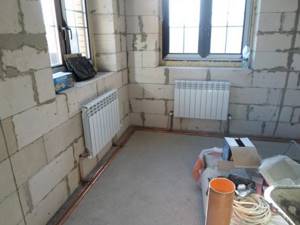
If there are large windows in the room, you have to attach the heating radiators to the floor (place them on legs or on a special pedestal on the floor). Most often, in such cases, lighter and more attractive aluminum radiators are used.
The process of floor installation of heating radiators occurs in the same order as in the case of wall mounting. He contains:
- purchasing suitable brackets for floor mounting of aluminum heating radiators;
- marking on the floor places for each bracket;
- drilling holes and installing fasteners for the heating battery;
- installation of radiators and connecting pipes to them.
When screeding the floor in a house under construction, we advise you to provide in advance the embedded elements for attaching heating radiators. This is most relevant when installing self-leveling floors.
When choosing brackets for radiators, first of all focus on the quality of the products. Buy consumables only from reliable, trusted suppliers.
What kind of harness can be
The main stage of installing a heating system in a house is tying the heating radiator with polypropylene. During this process, you need to install parts that allow you to regulate heat transfer.
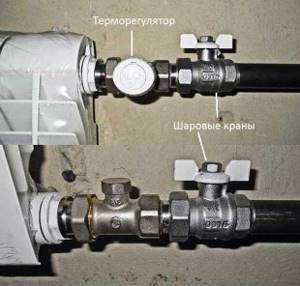
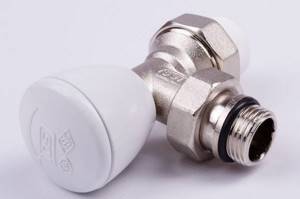
Shut-off valves
There are several types of shut-off valves that are suitable for piping heating radiators:
- Chokes with thermal control capability. To adjust heat transfer, you need to set the parameters. After this, the mechanism will work automatically. Regardless of what temperature changes occur outside, the same temperature regime will be maintained in the room. Throttle is a valve designed for manual adjustment of heat transfer. The temperature begins to change two hours after changing the valve position.
- Valves are a part that is installed in front of the battery. Designed to shut off the coolant supply.
Fitting
To connect the battery to the pipeline, you need to use the following fittings:
- American couplings with which shut-off valves are connected. If there is a union nut, you can quickly dismantle the heat exchanger.
- Triple couplings - suitable for connecting pipes for supplying coolant simultaneously with control valves.
- Tees that have vias.
The choice of connecting part depends on the complexity of the water supply system.
Tools
To assemble a polypropylene heating system you will need a set of tools:
- special soldering iron for welding plastic;
- a tool for removing the reinforcing layer from tubes - a shaver;
- key with hooks for installing shut-off valves;
- scissors for cutting polypropylene.
Additionally, you will need measuring and marking tools.
Stages of connecting heating radiators
Installation of radiators with polypropylene pipes is carried out in several stages:
- Marking the laying of tubes and battery installation locations.
- Fastening heat exchangers to the wall. For small models, two brackets are enough, for large ones - one per section.
- Installation of shut-off valves.
- Pipe connection.
- Installation of jumpers, compensators.
The last stage is connecting the pipeline to the battery. To make the joints more airtight, you can use sealants that are resistant to prolonged exposure to high temperatures.
To heat rooms in an apartment or private house, it is necessary to install radiators in each room. For them to work, you need to correctly connect the heat exchangers to the heating pipeline.
Installation nuances
There are two types of bimetallic radiators: partially or fully bimetallic
In the first case, aluminum is used for the manufacture of vertical collectors, which requires special care during installation. There are the following requirements for how to properly connect a bimetallic battery:
There are the following requirements for how to properly connect a bimetallic battery:
When connecting fittings and manifolds, be careful not to use excessive force. As a rule, the accompanying documentation contains detailed installation instructions
A torque wrench is very convenient in this regard, allowing you to control the applied force. When using linen winding, it is important not to overdo it with its quantity. Otherwise, some of the effort will go into it, which will ultimately lead to the appearance of microcracks.
After the coolant gets into them, the process of peeling off the paint will begin. As a result, sooner or later a leak will appear. It is best to apply sealant and a little flax. It is better to avoid using paint in systems where antifreeze acts as a coolant. This will lead to rapid corrosion of the seal and the appearance of a leak.
- The battery must be mounted in a strictly horizontal position. An exception is when an air vent is used, when, for greater efficiency in releasing gases, a slight forward angle deviation along the circulation path is allowed. It is prohibited to make a slope in the opposite direction, because this disrupts circulation.
- When hanging the radiator, you must use three brackets: two on top and one on the bottom. The upper elements take on the entire load. Due to the lower fasteners, the desired direction is set.
- To ensure effective air exchange, the following parameters should be adhered to: distance to the floor - from 60 mm, to the window sill - from 100 mm.
In some cases, the manufacturer may recommend other distances, depending on the design features (the differences are usually a few centimeters). However, the gap between the rear surface of the battery and the wall remains unchanged - 30-50 mm.
Criterias of choice
A radiator valve is, as a rule, a ball-type device that regulates water flow and connects pipes to the radiator. Installed on the bypass, risers, at the top of the battery, in places where air accumulates to bleed it.
Choosing a suitable faucet is not difficult, just know a few nuances:
- the diameter of the pipes to which it will be connected (DN, in millimeters or inches);
- working pressure (PN, in the range of 15–40 and above);
- type of connection, presence of thread inside or outside, American.
The choice should take into account the purpose of the reinforcement, its location, and the properties of the environment
The ratio of the input and output of the valve in the radiator, their relative position is also important
When choosing, you should consider the characteristics of the cranes:
- Ball valves, although the most common and affordable, are not very effective. It has only two modes: closing/opening;
- a cone valve is a more acceptable option due to the possibility of an intermediate position. Disadvantage: the tap must be returned to its original position and constantly monitored;
- An automatic thermostat is the most efficient, reliable, but also much more expensive than others. When installing it on a one-pipe system, a bypass must be present.
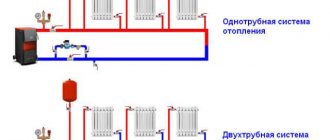
Single pipe system
The one-pipe method is when all radiators are connected to one pipeline. When installing this method, it is necessary to correctly calculate the diameters of the pipes for effective heat transfer. This type has its positive and negative qualities.
When connecting, you can significantly save money on materials, but only with a falling vertical riser. Suitable for five-story buildings.
Tests
If until now everything was done with your own hands, at this stage it is better to invite a housing and maintenance mechanic. By turning off the American taps, you can open the connecting tap. It is better to leave the opening of the return pipe to a mechanic.
If there are no leaks at the connection points, it will be possible to open the valve on the batteries and close the bypass valve. The coolant will begin to flow into the heating system. To bleed air, you should use the Mayevsky tap.
Once the heating circuit in all rooms has warmed up, the plumber will open the straight pipe. This will restore pressure in the system. The control tests can be considered completed. If the installation was done correctly, the apartment will be comfortable at minimal cost.
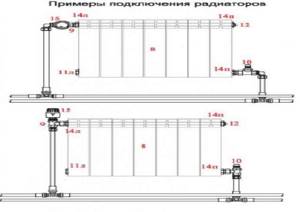
How to connect a radiator
You can connect the radiator in several ways:
- diagonally;
- along the parallel;
- according to a sequential principle;
- attach the batteries to the side of the device;
- bottom connection.
Type of connection with bottom connection to the radiator.
Another way is to use a bottom connection block, with which the radiator is disconnected from the network without draining the water. That is, in other places the heating system continues to function properly.
Installation of radiators with bottom connections
As we promised at the beginning of the article, we will look at devices with bottom connections in more detail. They can be mounted in different ways:
- one-sided;
- versatile;
- from bottom to bottom;
- central connection.
- Here are a few principles for installing bottom-connected batteries:
- The distance from the edge of the window sill to the top edge of the device should not be less than 11 cm.
- From the floor to the bottom edge of the device - at least 13 cm.
- Distance from the wall by 2-3 cm.
After you select the correct location for installation, secure the multiflexes with nuts on a vertical part of the structure. Attach the pipe from below.
Side method
This method is used for one-pipe and two-pipe systems. It has a distinctive feature: the pipe for processing and supply is mounted from a certain edge of the radiator.
The scope of application is considered to be multi-storey buildings in which a vertical coolant supply is installed.
Correct connection of heating batteries: diagram and methods
Proper connection of heating batteries implies the installation of not only an effective, but also an economical heating system, which is not always possible to do.
Therefore, in order to understand how normal heating in a room should function, you should, first of all, consider which heating battery connection diagram is the most common and efficient. This will help connect the entire system as correctly as possible and give it the opportunity to work for a long time (for more details: “How to connect a heating radiator - methods and options”).
Types of heating systems
Before talking about how to properly connect heating batteries, you should consider in detail which system options are most common today. Even after studying numerous photos of these communications, one way or another, you need to understand the principle of their operation and understand the peculiarities of the functioning of each part of a particular system.
Single-circuit heating
This option involves supplying coolant to a heating device, which is usually located in a multi-story building. Such methods of connecting heating batteries are the simplest, since their implementation does not require any serious construction skills (read: “Single-circuit heating system - possible implementation schemes”). The main disadvantage of this design is the lack of control over the heat supply, since this system does not provide any special devices, such as a temperature sensor, that perform this function. That is why the volume of heat transfer is strictly fixed and is prescribed in advance at the stage of drawing up the design of the future system.
Where is the best place to place the heating battery?
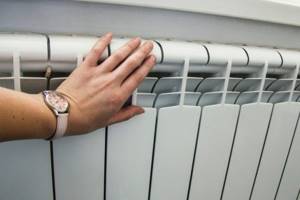
Regardless of the appearance of a particular heating system, its main purpose is, first of all, to heat the room. If you connect the heating battery correctly, this device will prevent cold air from entering the room from outside, which explains the need to install a room radiator in the space under the window sill.
Even before considering how best to connect the heating radiator, you should decide what the layout of all heating devices in the room will be (read: “What is the optimal connection diagram for heating radiators”)
It is very important to place all radiators so that they stand at approximately equal distances from each other, in this case it will be possible to ensure the most efficient heat transfer
- from the bottom of the window sill – 100 mm;
- from the floor – 120 mm;
- from the nearby wall – 20 mm.
Options for coolant circulation in the heating system
In order to decide how to properly connect the heating battery, do not forget that the coolant, which is water, can circulate both autonomously, that is, naturally, and forcibly. In the first case, a special circulation pump is used, the main function of which is to move the coolant through the pipes. The installation of this pump is usually carried out in the area of the heating boiler, but sometimes it can already form the basis of its design.
This is due to the fact that the heating boiler operates exclusively on electricity, due to which the cooled coolant is forced out of the system.
Methods for connecting heating batteries
To finally understand how to connect heating batteries, you should consider the following methods of connecting them:
- Single-sided installation option. This series connection of heating batteries implies the installation of an inlet pipe and an outlet pipe for the same part of the battery:
– feeding is carried out from above;
– the outlet is performed from below.
This installation is carried out as follows: the water supply comes from above, and the drainage comes from below, only this is done from different sides. The maximum amount of heat lost in this case is 2%.
Features of the diagonal connection scheme
If you also wondered why a diagonal connection is the most effective, then you should consider this option in more detail.
If we take into account the process where hot air or water is involved, then the action will occur according to one physical law, which involves the rise of warm masses upward, while the cold ones sink downwards
To ensure uniform heat distribution throughout the volume of the radiator, the coolant should be distributed throughout the battery. As mentioned above, lateral connection in city apartments acts as the main circuit. After all, forced circulation under high pressure is used there. The diameter of the incoming and outgoing pipes is only 20 mm. Through them, water enters the battery under high pressure, which allows the device to be filled evenly and quickly.
If we are talking about private housing construction, where the circulation is natural, the filling of radiators occurs under the influence of the above-mentioned physical law. That is why hot streams penetrate through the upper pipe, pushing cold water through the lower outlet on the opposite side. The two pipes are located diagonally when viewing the device. This is where the name of the connection comes from. The coolant fills the battery gradually, releasing heat to the entire volume. It is necessary to take into account not only the law of heat transfer, but also the physical law. That is why this scheme is the most effective.
Advantages and disadvantages
Modern bottom connection radiators have many advantages:
- installing batteries of this type allows you to achieve a laconic interior without unnecessary technical elements;
- the original design involves the installation of a device direction adapter;
- pipe connections immediately go into the floor or wall;
- Almost all modern radiators come with a built-in thermostat.
Like any other device, these newfangled devices are not without their drawbacks.
- For a beautiful aesthetic appearance, pipes are usually installed in the floor or hidden under the baseboard. In the event of an accident, it will be difficult to notice the malfunction immediately. Solving the problem can also be difficult. Pipe repairs cannot be performed without dismantling the floor covering; as a result, you will have to eliminate not only the pipe malfunction, but also floor defects.
- Most experts believe that the bottom connection loses in terms of heat transfer compared to side-connected batteries. It happens that with a bottom connection, multi-section radiators warm up in parts. Of course, this problem can be solved, but it is best to use these devices in private homes.
- Each battery section must be equipped with a separate air vent.
- Radiators with bottom connections are strictly prohibited from being used for a gravity heating system.
- For efficient operation, you will need to install an additional circulation pump.
There are several ways to connect a radiator:
- side;
- diagonal;
- cross;
- lower.
If the pipe exit is meant only on one side, then this is a one-way connection. Hot water is supplied through the upper part of the battery, at the bottom of which there is a plug for draining cold water.
With a multi-sided connection, hot water comes from one end, and cold water is discharged from the other side of the structure. This is an ideal option for houses with individual heating. Its advantages include the versatility of supplying water to the radiator: from top to bottom, from bottom to top, and even from bottom to bottom. It is worth noting that the length of the pipes for supplying and draining water in this case is much shorter.
Types of lower pipe connections
- One-sided. With a one-way connection, two pipes of the heating device exit from one side. In this case, hot water passes through the upper radiator plug, and cold water is discharged through the lower one, which is located next to the upper plug.
- Versatile. In the case of a versatile connection, a pipe with hot water enters on one side, and cold water is discharged from the opposite side. This type of liner is ideal for individual heating systems. The big advantage here is that water flows to the heating devices in any direction: bottom-up, top-down, bottom-down. A versatile liner has a shorter length of supply and return lines. The choice depends on the level of heat transfer that is most appropriate to obtain for the room.
Tying polypropylene pipes instructions
Radiator piping can be done using a variety of pipes, but experts recommend using polypropylene pipes. Ball valves for piping are also purchased in polypropylene; they can be straight or angular; this option is the simplest and most inexpensive. Brass fittings are more expensive, and their installation is more difficult.
Polypropylene strapping is done as follows:
- the coupling with a union nut is inserted into the multiflex, which easily connects to any outlet;
- The pipes themselves are attached to the walls at a convenient height; they should not fit tightly to the surface; it is better to leave a gap of 2-3 cm. The pipes are secured using special brackets, which are fixed to the wall with nails or self-tapping screws.
Polypropylene piping to radiators can also be carried out when laying pipes in the wall, in which case they come to the surface only at the connection points.
Radiator piping can be done using a variety of pipes, but experts recommend using polypropylene pipes.
Battery fasteners can be very different, most often it is a pin connection that is fixed to the wall surface. Corner brackets can also be used, which also allow radiators to be suspended at the required height. For panel batteries, fasteners are supplied included; for sectional batteries, they must be purchased separately. Typically, two brackets or pins are sufficient for one section.
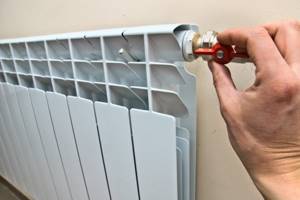
The taps are connected as follows:
- the tap is disassembled, the fitting and union nut are screwed into the radiator;
- Use a special wrench to tighten the nut tightly.
As you can see, this process is extremely simple. To perform such work, you only need to purchase a special plumbing wrench for American women, without which it is unlikely that you will be able to simply install a faucet.
To install batteries and tie them, the following materials and tools are required:
- a set of special keys;
- seals for threaded connections;
- tow and thread paste;
- threads for carving.
Features of connecting radiators
Heating installation has some features:
- It is necessary to maintain a distance of 100 mm from the radiator to the window sill. If the gap between the batteries and the bottom of the window sill is different, then the heat flow is disrupted and the effect of the heating system will be low.
- The distance from the floor surface to the battery should be 120-150 mm, otherwise a sharp temperature change will occur.
- In order for the heat transfer of the equipment to be correct, the distance from the wall must be at least 20 mm.
At the same time, we take into account that the installation and efficiency of heating radiators is greatly influenced by the installation method: under an open window sill the efficiency of the heating system is maximum - 96-97%, in an open niche - up to 93%, in a partially closed form - 88-93 %, completely closed - 75-80%.
The heating radiator can be installed using a variety of methods; its piping is done with metal, polyethylene, polypropylene pipes
During installation, it is important to correctly position not only the pipes, but also the batteries themselves, and make the connection in accordance with all recommendations and standards. In this case, the heating system will work very efficiently and will not require repair work. Share a useful article:
Share a useful article:
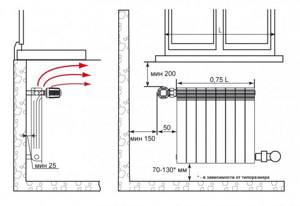
Battery Location Requirements
Regardless of which connection method is chosen, the radiator should be located:
- 5 cm from the wall;
- 10 cm from the window sill (a distance of at least 5 cm can be allowed);
- 10 cm from the floor surface (a slight deviation is possible - maximum 2 cm).
How to install heating radiators correctly
On a note! When purchasing fasteners, consider the thickness of the foil thermal insulation (if provided). In this case, the length of the locking hooks should be slightly longer.
Radiator location standards are observed
Installation of radiators with bottom connection
In order to mount radiators with bottom connections, you will need the following components:
- heating pipes laid in the walls;
- radiators of the selected model;
- connection points for radiators with bottom connections (if necessary).
Batteries connected to pipes hidden in the floor look best.
The nodes are selected based on the location of the pipes. If they pass through floors, ordinary nodes are selected (they are somewhat similar to small binoculars). If pipes pass through walls, L-shaped units are used. Are you planning to install a one-pipe system? Don't forget to make sure that the connection nodes you choose have bypasses with built-in control valves.
Next, the radiators are installed. They are fixed on plastered walls, including finished ones. It is necessary to mark the installation locations of the fasteners, taking into account the location of the inlet and outlet pipes, the dimensions of the batteries themselves and the dimensions of the connection nodes. The correct installation is controlled using a building level - the radiators must hang strictly horizontally. It is also necessary to make sure that the distances to the window sills, walls and floors are maintained (all this is calculated at the stage of designing the house).
What else do you need to know
Side connecting holes (also called inlets, pipes and manifolds) can have different diameters. The most common:
- G1” – one inch (2.54 cm);
- G3/4” - three quarters of an inch (1.91 cm);
- G1/2” – half an inch (1.27 cm).
This is important to know when choosing shut-off and control valves: you need to know whether it will be possible to connect the device to the radiator directly or whether adapters will be required. When connecting sectional radiators of any type, you cannot do without adapters (footers): here in some collectors the thread is left-handed, and in others - right-handed
Therefore, special installation kits are produced for sectional radiators with side connections. They are available for different diameters of collectors and supply pipes. Their configuration varies, but most often there are seven elements: four adapter fittings, a Mayevsky valve (air vent) with a key and a plug (for an unused manifold)
When connecting sectional radiators of any type, you cannot do without adapters (footers): here in some collectors the thread is left-handed, and in others - right-handed. Therefore, special installation kits are produced for sectional radiators with side connections. They are available for different diameters of collectors and supply pipes. Their configuration varies, but most often there are seven elements: four adapter fittings, a Mayevsky valve (air vent) with a key and a plug (for an unused manifold).
https://youtube.com/watch?v=nnQz2VA7C_M
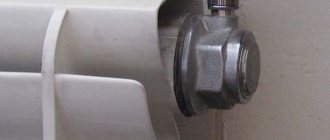
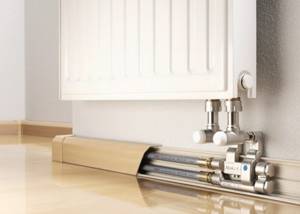
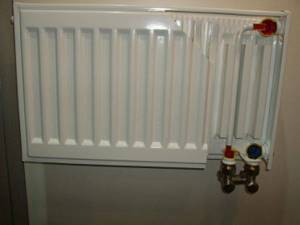
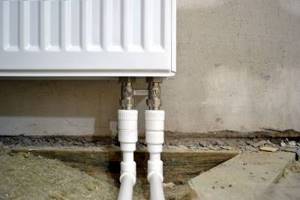
With a bottom connection, all you need is a radiator connection unit, which is also called “multiflex”. Two shut-off ball valves are built inside it, which serve to cut off the coolant. If necessary, simply turn the miniature taps and the radiator is turned off: it can be removed.
He can be:
- straight - pipes are supplied from below;
- corner - pipes come out of the wall.
When choosing it, it is important to know the distance between the centers of the pipes (center distance). This value is indicated in the technical data and is usually 80 or 50 mm. There is a set of adapters for any type of pipes for the bottom connection of radiators
For more information about these fittings, watch the video.
There is a set of adapters for any type of pipes for the bottom connection of radiators. For more information about these fittings, watch the video.
https://youtube.com/watch?v=otVXrHAX2EE
What does it take for batteries to work efficiently?
An efficient heating system can save money on fuel costs. Therefore, when designing it, you should make informed decisions. After all, sometimes the advice of a neighbor in the country or a friend who recommends a system like his is not at all suitable.
It happens that there is no time to deal with these issues yourself. In this case, it is better to turn to professionals who have been working in this field for at least 5 years and have grateful reviews.
When deciding to install new batteries or replace heating radiators yourself, you need to take into account that their efficiency is directly affected by the following indicators:
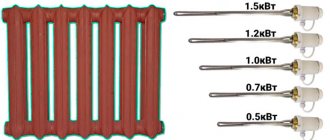
- size and thermal power of heating devices;
- their location in the room;
- connection method.
The choice of heating devices amazes the imagination of the inexperienced consumer. Among the offers are wall-mounted radiators made of various materials, floor and baseboard convectors. They all have different shapes, sizes, heat transfer levels, and connection types. These characteristics must be taken into account when installing heating devices into the system.
Among the models of heating devices on the market, it is better to choose based on the material and thermal power specified by the manufacturer
For each room, the number of radiators and their size will be different. It all depends on the area of the room, the level of insulation of the external walls of the building, the connection diagram, the thermal power indicated by the manufacturer in the product passport.
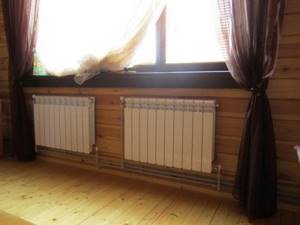
The location of the batteries is under the window, between windows located at a fairly long distance from each other, along a blank wall or in the corner of the room, in the hallway, pantry, bathroom, in the entrances of apartment buildings.
Depending on the location and method of installation of the heating device, there will be different heat losses. The worst option is a radiator completely covered with a screen
It is recommended to install a heat-reflecting screen between the wall and the heating device. You can make it yourself using one of the heat-reflecting materials - penofol, isospan or another foil analogue.
You should also adhere to the following basic rules for installing a battery under a window:
- all radiators in one room are located on the same level;
- convector fins in a vertical position;
- the center of the heating equipment coincides with the center of the window or is 2 cm to the right (to the left);
- the length of the battery is at least 75% of the length of the window itself;
- the distance to the window sill is at least 5 cm, to the floor - no less than 6 cm. The optimal distance is 10-12 cm.
The level of heat transfer from devices and heat loss depends on the correct connection of radiators to the heating system in the house.
By following the basic standards for the placement of radiators, you can maximally prevent the penetration of cold into the room through the window
It happens that the owner of a home is guided by the advice of a friend, but the result is not at all as expected. Everything is done like his, but the batteries don’t want to heat up.
This means that the selected connection diagram was not suitable specifically for this house, the area of the premises, the thermal power of the heating devices were not taken into account, or annoying mistakes were made during installation.
Single-pipe scheme (apartment version)
This connection scheme is very common in apartment buildings (from 9 floors and above).
One pipe (riser) descends from the technical floor, passes through all floors and enters the basement, where it enters the return pipe. In such a connection system, there will be heat in the upper apartments, since, having passed through all the floors and given off the heat to the bottom, the water in the pipe will cool down.
And if there is no technical floor (5-story buildings and below), then such a system is “ringed”. One pipe (riser) rises from the basement, passes through all floors, goes through the apartment on the top floor to the next room and descends, also through all floors, to the basement. In this case, it is not known who is lucky. On the ground floor, in one room, it may be warm where the pipe rises, but in the next room it is cold, where the same pipe descends, giving off heat to all apartments.
How to connect a heating radiator with a bottom connection?
There are several ways to connect sectional batteries to the heating system. Each of them has its own pros and cons. The diagonal connection is ideal when the pipeline is in a horizontal position, the side connection allows the connection to be made on one side, and the bottom one is combined with the interior and looks aesthetically pleasing.
Peculiarities
Radiators with bottom connections are popular because they help hide the presence of pipes.
Most often, this method is found in private homes, since the pipeline is located directly under the building.
Pipes going down significantly free up usable space and are not noticeable. However, the cost of sectional radiators using a bottom connection is significantly higher than others.
At the moment, only two types of batteries of this type are produced: steel and panel. Steel radiators are easy to install and small in size. Panel batteries use thermostatic fittings with connection points. The speed of heating the room depends on the number of sections. For small rooms, 3-6 panels are enough. Spacious rooms require more sections.
Panel heating radiators
https://youtube.com/watch?v=esXEbda3_qg
Steel batteries are in many ways superior to panel ones, since they can be installed in any position and water flows directly into the last section. Which is very convenient when replacing old structures with new ones. They suit all connection types, unlike modern radiators which may not be suitable for many older heating systems.
Steel heating radiators
The problem of old two-pipe batteries can be solved by re-lining. True, such an operation is more expensive and takes a lot of time.
Installation
During work, do not remove the production packaging. During installation, radiators are often subjected to mechanical stress, which affects the appearance of the structure. The presence of a protective film helps to avoid scratches and other damage to surfaces.
Radiators should be installed at a height of at least seven centimeters from the floor and ten centimeters from the window. This will ensure proper air circulation and ease of installation.
Determine exactly which of the pipes is feed and which gives feedback. The batteries are easier to understand; they have markings on the ends indicating the connection point.
Each radiator using the bottom connection has a thermostatic liner. It is used to properly regulate the temperature. True, due to this feature, the price of radiators of this type is higher on average by 10%.
Types of eyeliner
There are two ways to connect the heating system to the battery. If both pipes are located on the same side, hot water flows into the top plug of the battery. Cooled water is discharged through the bottom. Both plugs are located next to each other. This method is called one-way.
Heating radiator with one-sided bottom connection
The versatile method involves supplying hot water on the opposite side of the cold outlet. This option is perfect for personal heating systems. The main advantage of this method is the ability to move water in any direction. In addition, the length of the liquid input and output lines is much shorter, as in a two-pipe battery.
Heating radiator with versatile bottom connections
Bimetallic radiators
The alloys from which these batteries are made use steel and aluminum. Steel is used as a material in contact with the coolant. Aluminum plays the role of a heat-conducting element.
All bimetallic radiators can be dismountable or solid. The advantage of monolithic batteries is the ability to operate at high pressure. This ensures safe operation of the structure.
Connection selection
When determining the connection method, it is first necessary to take into account the heating circuit and the connection of the system components. Correct selection allows you to use batteries with maximum efficiency. Failure to do so will result in loss of power.
Please note that a lower connection will reduce the efficiency of the heating system. However, the convenience created in this way can be decisive in your choice. The main thing is to take into account all the features of the heating system and then the radiator will last a long time without unnecessary investments.
Types of lower pipe connections
- One-sided. With a one-way connection, two pipes of the heating device exit from one side. In this case, hot water passes through the upper radiator plug, and cold water is discharged through the lower one, which is located next to the upper plug.
- Versatile. In the case of a versatile connection, a pipe with hot water enters on one side, and cold water is discharged from the opposite side. This type of liner is ideal for individual heating systems. The big advantage here is that water flows to the heating devices in any direction: bottom-up, top-down, bottom-down. A versatile liner has a shorter length of supply and return lines. The choice depends on the level of heat transfer that is most appropriate to obtain for the room.