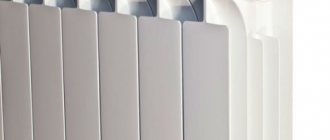
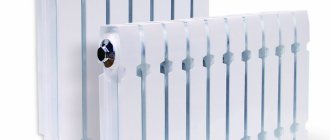
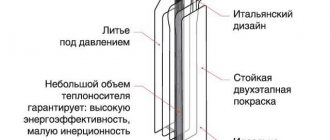
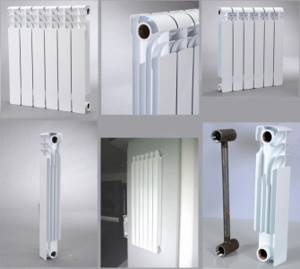
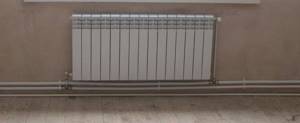
Aluminum heating panels consist of sections that are made of metal alloys with silicon additives. This composition makes the device much more resistant to mechanical damage and exposure to hot temperatures. The metal alloy is not subject to corrosion damage. Often, to enhance the protection of the inner surface from the effects of heating fluid, a thin polymer coating of approximately 50 microns is used.
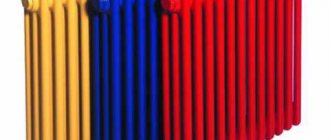
Radiator panels are usually produced in a standard white color. If desired, they can be repainted with enamel that can withstand high temperatures. Often the original photographic image is applied to the devices.
Also, most manufacturers produce equipment of any color and design upon personal order. In order to disguise them, you can use special decorative grilles.
Advantages of aluminum heating devices
The growing popularity of the devices is due to a number of advantages of their use in the design of a heating system:
- compact, take up little space;
- high heat transfer;
- light weight (does not complicate transportation, installation and connection of devices);
- rapid heating of equipment by coolant;
- the convection heating method prevents the accumulation of dust deposits between sections;
- favorable price-quality ratio;
- attractive appearance;
- the ability to select a custom radiator of any design;
- sections are powder coated to prevent corrosion.
Flaws
These devices, despite all their positive performance qualities, have their drawbacks. Poor quality coolant and water hammer resulting from increased pressure inside the heating system can lead to failure and rupture of the radiator. Also, low quality fluid causes metal corrosion.
Equipment is often connected to pipes made of metals that are antagonistic to aluminum - copper and steel. Their interaction provokes the formation of rust. To avoid this, experts recommend using pass-through plugs made of chrome-plated and nickel-plated metals when installing aluminum radiators indoors.
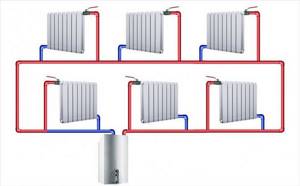
Radiator connection diagrams
Heating radiators are connected to the heating circuit according to several schemes, the choice of which must be approached very responsibly. The fact is that incorrect connection leads to loss of almost half of the heat. Incorrect connection of sections leads to uneven heating of the system, and violation of assembly technology leads to the formation of leaks and ruptures. Therefore, it is important not only to choose a suitable diagram for how to connect the heating batteries to each other, but also to correctly connect the radiator sections. In any case, the work requires attention and accuracy.
Radiators are connected to the heating system as follows:
- Consistently . In this case, one heating circuit pipe is required.
- In parallel . The work involves two pipes; the radiators are connected to each other by means of an upper and lower outlet.
- A through connection involves the passage of coolant through the heating device system.
If we take reliability and the economic side as a basis, then we can say that parallel connection of heating radiators will be the most profitable option.
Which battery connection scheme should I choose?
Since heating radiators can be connected to each other using different schemes, let’s consider which one is more convenient and efficient.
Series connection of radiators is most often used. Because it provides a high level of reliability. Requires minimal maintenance. Technical costs are low. Using this scheme, you can connect up to four batteries. The heating device is connected to the system from below. If radiators or pipes sag, it is necessary to install spacers.
The only disadvantage when connecting batteries according to this scheme is large heat losses. When water enters the top of the system, the battery cools by about 7 degrees. The latest radiators will heat the apartment worse. The temperature difference between the near and far batteries can reach 18 degrees. Thus, the room will warm up unevenly. But this problem can be solved by installing an additional electric boiler.
Briefly about installing bimetal heating radiators in a private house or apartment
So, you have decided to go through all the stages of organizing heating in your apartment. There is nothing particularly complicated about this, just follow certain rules:
- Before starting installation, be sure to make sure that there is no coolant in the system.
- Check the contents and build quality of the battery.
- The fitting connection unit requires a gasket, which is used as flax with sealant or special-purpose threads.
- According to the basic rules for installing bimetallic heating radiators in an apartment or private house, it is important that the window sill does not cover them completely. Those who are concerned about the aesthetic side of the issue should look at the material on how and with what to cover radiators.
- When designing a system, you need to know all possible connection diagrams for heating devices (diagonal, bottom, side). Decide which design is acceptable in your conditions, given that for bimetallic batteries, a diagonal circuit gives the most optimal result.
- When starting the heating system, the taps must be opened smoothly, avoiding sudden twisting. Otherwise, clogging or water hammer may occur.
- Air is removed from the system through a Mayevsky valve or other air vent.
Connecting sections
To ensure that all elements are connected correctly, the radiator must be placed on a flat surface with the outer side facing you. The sequence of extension actions is as follows:
- The plugs are unscrewed from the end connecting compartments.
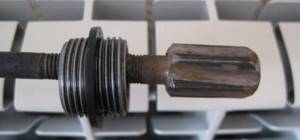
- You need to put a gasket on the part of the nipple where there is no thread.
- Insert the nipple into the aluminum radiator manifold and turn it lightly several times.
- Connect the section prepared for connection to the other side of the nipple.
- Take the wrench and slowly tighten the nipple. Due to the fact that it has opposite threads at different ends, its sides will twist at the same time.
- Twist until it touches the gasket.
The nipples of the upper and lower manifold should be tightened the same number of times to avoid distortion in one direction. To do this, calculate how many turns were made.
Before installing an enlarged radiator to a heating pipe, you need to check how airtight the extension is. To do this, you need to fill the battery with colored water and watch for a couple of hours to see if there is a leak.
Having hung the structure on the wall, you can begin the last stage of work.
Conclusion
The work process itself does not take much time, you do not need any special skills or expensive equipment, you can purchase all the necessary tools at any hardware store. And don’t forget, the connection will serve you for a long time and without hassle only if you used high-quality materials in your work and followed all the rules for installing the heating system.
We are talking about exactly what is indicated in this figure.
Radiator installation includes
- A specialist will visit the customer to provide technical advice and draw up an installation diagram.
- Installing radiators by level
- Layout of insulated pipes to radiators
- Without gating
- Installation of shut-off valves on radiators
- Connecting radiators to pipelines using a special tool
You can purchase radiators in one of our stores.
Our advantages
- The work is performed by qualified specialists who are citizens of the Russian Federation;
- We treat every order with great responsibility;
- We take on even very complex orders;
- We use only modern equipment and technologies;
- We are ready to repair the old boiler system, restoring its functionality;
- We give a good guarantee and provide technical support.
By contacting our company, you will receive high-quality installation of a boiler room in accordance with the agreed deadlines and on favorable terms.
Calculation of the cost of material and work for one room with an area of 16 m2, with one window opening 1 meter wide and a height from floor to window sill of at least 750 mm:
- Radiator Henrad 500x800 22V
- Headset with bottom connection
- P-ethylene pipe Sanha MultiFit-Pex PE-Xc 16x2mm 20m
- Fitting
- Radiator installation (layout of the route, installation of the radiator at a level, laying pipes in thermal insulation, without grooves)
Total: ≈ 11,000 ₽.
Additionally, you can order the installation of a collector cabinet if you have radial wiring. The cost of this service without gating is 4,500 ₽.
How to add sections to aluminum radiators
If the actual thermal power of the installed and connected device is insufficient, it may be necessary to install additional sections. Let's look at how this can be done.
How to disassemble an aluminum radiator
Sequence of actions when disassembling the device:
- Shut off coolant circulation, relieve pressure;
- Unscrew and remove the connecting couplings at the inlet and outlet of the device;
- Remove the radiator from the fasteners;
- Drain the working substance and place it face up on a flat surface;
- Remove the filter and wash it;
- Separate the sections, which are most often connected to each other with a special nipple nut.
- Replace deformed metal gaskets (silicone gaskets must be replaced).
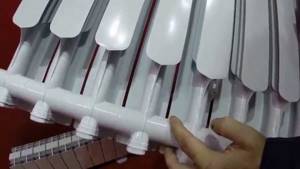
How to connect aluminum radiators to each other
To connect two sections of the device to each other, you must perform the following steps:
- The end holes for connection must be freed from plugs;
- In the place where there is no thread on the nipple nut, install a gasket;
- Align the sections so that the nipple nut fits into the hole;
- Tighten the fastener.
The nipple nuts located at the top and bottom are tightened alternately by the same number of turns. This will prevent damage to the threads.
Tools required for work
If you do the extension yourself, you should first ensure that you have the necessary tools. The set includes:
- Radiator key, standard for all battery types.
- Special nipples with which aluminum heating radiators are connected to each other.
- Pipe wrench.
- Plugs for side sections with left and right threads.
- Paronite or other intersectional seals for heating radiators.
- Emery cloth.
You can purchase these tools at any building materials store.
Selecting a connection method depending on the type of system
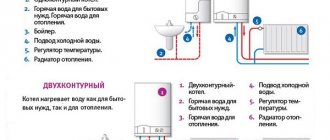
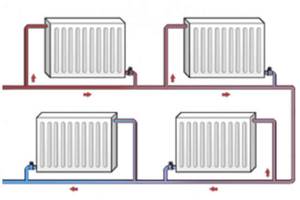
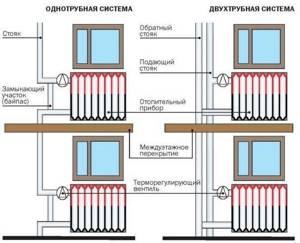
There are two types of systems: one- and two-pipe . In the first case, the coolant passes through the supply pipe to the heating devices, and as it moves it cools down. In single-pipe systems, radiators are mounted in series. In fact, with this scheme, the supply pipeline “turns” into a return pipeline. In two-pipe systems, parallel connection of bimetallic heating radiators is used: the supply and return branches are completely “autonomous” from each other, and they are connected using the final device of the heating system.
All bimetallic heating radiators produced today are unified for any connection; their design provides 4 possible connection points, that is, a pair from below and a pair from above. Therefore, you need to choose a scheme based on the type of house, its number of storeys, and type of system .
Features of one- and two-pipe systems
Remember that:
- Single-pipe systems can be with horizontal or vertical wiring. The first, as a rule, is used in private houses with a height of 1 or 2 floors, in exceptional cases - in three-story houses. Vertical layout is typical for multi-storey buildings. The advantage of single-pipe systems is that their installation requires minimal financial costs, and at the same time they are stable (that is, it is not easy to unbalance such systems).
- Two-pipe systems are rarely used in high-rise buildings. This is due to the fact that to create such a system, a larger number of pipes is required, and the use of control valves is also mandatory. However, it has a significant advantage - all heating radiators are supplied with the same temperature coolant, which means that all rooms will be equally warm.
Radiator installation within 24 hours
Any type of radiator can be installed on individual heating.
These are aluminum, bimetallic, cast iron and steel radiators. They differ in heat transfer, appearance, installation method, physical and chemical characteristics. For example, aluminum radiators are cheaper in price, but they are less durable than bimetallic ones. Cast iron radiators are the most durable, but they have a lot of weight, lower heat transfer, and are quite expensive. Steel radiators are presented in the form of panels, have good heat transfer, are quite durable, and in price are not much different from sectional ones. But if damaged, you will have to replace the entire radiator, and not just one section. If you are planning to change your heating, the question arises: which radiators are best to choose? The point here is not only in price and quality, but also in particular about the heating of the radiators themselves. Some models consist of sections. These are aluminum, bimetallic and cast iron. Other models consist of panels that are made of steel. It is worth noting that we are talking about the most common types of radiators. In addition to them, there are monolithic bimetallic radiators. Steel ones can generally be in the form of a heart or a dinosaur skeleton. But such radiators are very expensive, so they are used quite rarely.
Heating scheme options
To connect radiators and other elements of the heating system, one-pipe and two-pipe circuits are used. The first option can be used when installing networks with natural circulation in one-story private houses and with forced circulation in multi-apartment buildings. The single-pipe scheme is characterized by economical consumption of materials and does not provide for regulation of the degree of heating of individual heating devices. Other disadvantages of such a system include:
- uneven heating of batteries located on different floors or at a considerable distance from each other. It occurs due to the gradual cooling of the coolant during circulation;
- impossibility of turning off one heating device for repair or maintenance work.
In private houses, the height of which is 2-3 floors, a two-pipe heating scheme is in demand. When installing it, the radiators are connected to each other in parallel, and the coolant circulates through two circuits. The heated working medium is supplied to the battery through the direct pipeline, and the cooled water flows out to the heating boiler through the return pipeline. The two-pipe scheme is characterized by a significant increase in the amount of materials required for its installation. Among the advantages of such a network are uniform heating of all devices and the ability to control the temperature in each of them separately.
Placement of heating devices
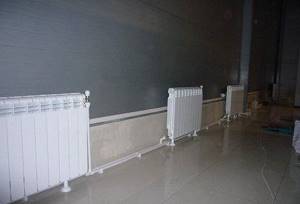
It is of great importance not only how to connect heating radiators to each other, but also their correct location in relation to building structures. Traditionally, heating devices are installed along the walls of rooms and locally under windows to reduce the penetration of cold air flows in the most vulnerable place.
There are clear instructions for this in SNiP for installing heating equipment:
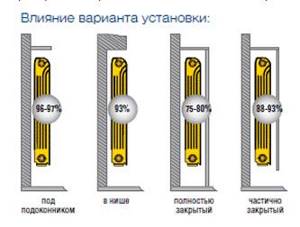
- The gap between the floor and the bottom of the battery should not be less than 120 mm. When the distance from the device to the floor decreases, the distribution of heat flow will be uneven;
- The distance from the back surface to the wall on which the radiator is mounted should be from 30 to 50 mm, otherwise its heat transfer will be impaired;
- The gap from the top edge of the heating device to the window sill is maintained within 100-120 mm (no less). Otherwise, the movement of thermal masses may be hampered, which will weaken the heating of the room.
Bimetallic heating devices
To understand how to connect bimetallic radiators to each other, you need to know that almost all of them are suitable for any type of connection:
- They have four possible connection points - two upper and two lower;
- Equipped with plugs and a Mayevsky valve, through which you can bleed the air collected in the heating system;
A diagonal connection is considered the most effective for bimetallic batteries, especially if we are talking about a large number of sections in the device. Although it is not advisable to use very wide batteries equipped with ten or more sections.
Advice! It is better to think about the question of how to properly connect two heating radiators of 7-8 sections instead of one device of 14 or 16 sections. It will be much easier to install and more convenient to maintain.
Another question - how to connect sections of a bimetallic radiator may arise when rearranging sections of a heating device in various situations:
The place where you plan to install the heating device is also important.
- In the process of creating new heating networks;
- If it is necessary to replace a failed radiator with a new one - bimetallic;
- In case of underheating, you can expand the battery by connecting additional sections.
Aluminum batteries
Interesting! By and large, it should be noted that a diagonal connection is an excellent option for any type of battery. If you don’t know how to connect aluminum radiators to each other, connect diagonally, you won’t go wrong!
For closed-type heating networks in private homes, it is advisable to install aluminum batteries, since it is easier to ensure proper water treatment before filling the system. And their cost is much lower than that of bimetallic devices.
Of course, over time, moving through the radiators, the coolant cools
Of course, you will have to try hard before connecting the sections of the aluminum radiator for regrouping.
Advice! Do not rush to remove the factory packaging (film) from installed heating devices until finishing work in the room is completed. This will protect the radiator coating from damage and contamination.
How to properly install an aluminum battery with your own hands?
This process takes place in stages.
Preparatory work
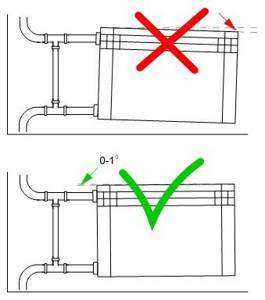
They begin with determining the location of the future installation of the radiator and fixing the brackets.
To correctly calculate the installation of the battery, the following construction indentation indicators must be taken into account:
- from 10 cm or more - from the window sill;
- 3–5 cm from the wall;
- approximately 12 cm from floor level.
The bracket is fixed to the wall using dowels . The holes left by the drill are filled with cement.
If the battery is a floor-standing type, then it is placed on a special stand and lightly attached to the wall, only to establish its stable balance.
Radiator assembly
Before directly starting the battery, you need to install it step by step:
- screw in plugs and radiator plugs;
- connection with shut-off valves;
- collection of thermostats;
- nipple stability control;
- fixing air bleed valves.
Attention! For further correct operation of the valves, it is necessary to install their outlet heads so that they face up.
After completing all the steps, the radiator is fixed to the brackets.
Hooks are located between the sections. Detailed instructions for assembling an aluminum room heating source should come with it.
How to independently connect heating radiators to each other: preparatory stage
To assemble the heating device, you will need the following tools and fittings:
- Adjustable wrench.
- Radiator key.
- Nipples (come with sections).
- Paronite gaskets.
- Elastic intersectional seals.
- Two plugs: with right and left thread.
- Sandpaper No. 120.
- Work gloves.
If you intend to work with already installed batteries, then first of all you need to block the access of water to the heating devices. After this, they are disconnected and cleaned of dust and lime deposits. By the way, as modernization progresses, you can get rid of situations where bimetallic radiators do not heat well or the rules for their installation are violated.
Limescale or other deposits can be easily removed with sandpaper. You should not neglect the cleaning procedure, otherwise contamination will cause leaky connections, or, simply put, leaks.
Application
All of the above schemes can be applied in a private home. If desired, you can use two heating sources: a boiler built into the stove and a gas or electric boiler, which is connected in parallel.
Installation
Let's consider the correctly executed sequence of installation of a single-pipe heating system in a private house:
- installation of a heating boiler;
- finishing the walls where the battery is installed, thermal insulation if necessary;
- installation of radiators on walls;
- determination of places for attaching pipes and tapping branches;
- filling the system with water and performing a test run.
The connection of heating radiators can be flow-through and with closing sections. The first method is simpler, requires less materials and labor, and is used for small systems. The second method allows you to regulate the coolant supply for each individual radiator, but requires the installation of additional bypass sections - bypasses. Additional shut-off valves are also required here.
When building a house or simply during a major renovation of a private estate or apartment, the installation of heating radiators should be done after elements such as doors and windows have already been installed. In this case, you must determine in advance which connection of heating radiators you will use, and in addition, of course, prepare the necessary materials and tools.
How to properly connect a heating battery? The process of installing the radiator itself does not take much time and effort. First of all, you need to install the battery mounts. Their number and location directly depends on the number of radiator sections. Next, we connect the pipes, install the radiator itself and connect everything. Let's look at an example of how to connect a heating radiator using polypropylene pipes.
Advantages and disadvantages of single-pipe and two-pipe heating systems
The main difference between the two heating schemes is that the two-pipe connection system is more efficient in operation due to the parallel arrangement of two pipes, one of which supplies the heated coolant to the radiator, and the other removes the cooled liquid.
The single-pipe system circuit is a sequential type wiring, due to which the first connected radiator receives the maximum amount of thermal energy, and each subsequent one heats up less and less.
However, efficiency is an important, but not the only criterion that you need to rely on when deciding to choose one scheme or another. Let's consider all the pros and cons of both options.
Single pipe heating system
- ease of design and installation;
- savings in materials due to the installation of only one line;
- natural circulation of coolant, possible due to high pressure.
- complex calculation of thermal and hydraulic parameters of the network;
- the difficulty of eliminating errors made during design;
- all network elements are interdependent; if one section of the network malfunctions, the entire circuit stops working;
- the number of radiators on one riser is limited;
- it is impossible to regulate the flow of coolant into a separate battery;
- high heat loss coefficient.
Two-pipe heating system
- possibility of installing a thermostat on each radiator;
- independence of operation of network elements;
- the ability to insert additional batteries into an already assembled line;
- ease of eliminating errors made at the design stage;
- to increase the volume of coolant in heating devices, there is no need to add additional sections;
- no restrictions on the length of the contour;
- coolant with the required temperature is supplied throughout the entire pipeline ring, regardless of the heating parameters.
- complex connection diagram compared to a single-pipe;
- higher consumption of materials;
- installation requires a lot of time and labor.
Thus, a two-pipe heating system is preferable in all respects. Why do the owners of apartments and houses refuse it in favor of a single-pipe scheme? Most likely, this is due to the high cost of installation and the high consumption of materials required to lay two highways at once. However, one should take into account the fact that a two-pipe system involves the use of pipes of a smaller diameter, which are cheaper, so the total cost of installing a two-pipe option will not be much more than a single-pipe one.
Owners of apartments in new buildings are lucky: in new buildings, unlike residential buildings of Soviet construction, a more efficient two-pipe heating system is increasingly used.
Installing taps and painting the battery
Thus, we looked at how to add cast iron heating radiators. If you have the desire and opportunity, you can install taps on them. However, it is worth noting that insufficient heat in rooms heated with cast iron batteries can arise not only due to the fact that the batteries do not pull the load. Very often, cast iron batteries are painted, adding a layer of new paint to their surface year after year. Of course, such a “fur coat” can lead to a reduction in the efficiency of heating radiators by a certain percentage.
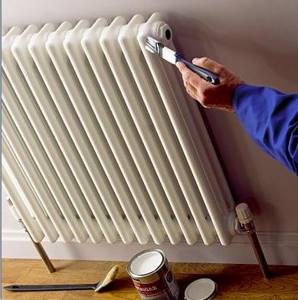
Painting a heating radiator
In addition, for painting it is worth using not ordinary enamel, but paint that is not exposed to high temperatures. Regular enamel can turn yellow over time if exposed to constant heat.
But if it’s a matter of load, then we already know how to increase the efficiency of the heating battery. In order not to carry out additional unnecessary work in the future, you should calculate everything well from the very beginning - not only when you already need to add sections of the heating radiator, but also when installing the heating system, when replacing old batteries with new ones.
Our video materials will help you on how to build up heating radiators. The most important thing is to be careful in your work, and then you will be able to make the heating system in your home more efficient.
The principle of tying polypropylene pipes
Plastic pipes are popular due to their low price and ease of installation. Polypropylene does not rust and is therefore durable. The boiler is connected with such pipes by hot welding using a special soldering iron.
Antifreeze does not combine well with polypropylene, so water is used as a coolant for this type of piping.
When choosing plastic piping, the most important point is to take into account all the features of a particular building. The installation process itself is not complicated; even a beginner can handle it. The preparation of the project should be carried out by experienced professionals, since the slightest errors and shortcomings can lead, at best, to heat loss and increased fuel costs, and at worst, to serious accidents.