Possible problems and ways to solve them
A wooden house is subject to shrinkage, so previously the chimney was mounted in a special shaft, standing separately from the main building. Today this approach is not relevant. According to the rules, an individual chimney is supplied to each heating device. It is important to comply with the standards for their height above the roof level. However, these standards only apply if the firebox is open.
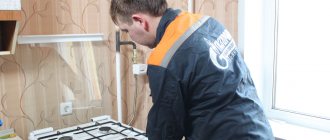
The gas exhaust system is pre-designed: a wooden house is a fire-hazardous structure, so all the features of the structure are taken into account. Engineers provide design documentation on the basis of which the smoke exhaust system is installed.
Standards and rules
In fact, their number is not so large, and taking them into account when installing the structure is not at all as difficult as it might seem. The most important thing is that following all the basic rules will make smoke removal safer.
- The stove must be located on a specially assembled foundation if it is made of brick or stone. The weight turns out to be very significant and it is simply impossible to install it on the floor of the house.
- Each stove must have its own smoke channel. If several furnaces are connected by one pipe, then in its lower part there must be a dissecting jumper with a height of at least one meter.
- From the walls of the heating device to the walls of the house, it is necessary to leave at least a quarter of a meter.
- The heater housing should not reach the ceiling at a distance of about 40 centimeters. Next, you need to organize a drainage channel.
- Where there is a passage through the floor material and through the roof, the outlet channel should not have connections or joints of parts.
- The layout in the passage through the ceiling is made of a heat insulator that can withstand high temperatures, and the distance from the channel wall to the nearest material that supports combustion should not be less than 10 centimeters.
As for the sizes and internal diameters of smoke outlets, there are even special SNIPs that should be observed no less carefully:
- With a heating device power of up to 3.5 kW, the cross-section of the smoke exhaust duct must be at least 140 by 140 millimeters.
- With values from 3.5 to 5.2 kW, the same parameter should not be less than 140 by 200 millimeters.
- More powerful stoves - from 5.2 to 7 kW - must be equipped with a chimney no smaller than 140 by 270 millimeters.
For round terminals, the general principles of construction will be the same as for rectangular ones, however, the internal diameter of the chimney will be measured:
- For heaters with a power of no more than 3.5 kW, the diameter will be at least 16 centimeters.
- For stoves with indicators from 3.5 to 5.2, the size must be at least 19 centimeters.
- For those devices that are more powerful than 5.2, but exceed the figure of 7 kW, the diameter will be 22 centimeters.
At the same time, the dimensions of the chimney pipe at a distance from the boiler to the ceiling should not be smaller in diameter than the size of the heating device pipe. Further, narrowing is also not allowed. It is allowed to use expanding elements, but it is impossible to narrow the outlet.
The height to which the outlet structure should be understood above the roof of the house is calculated based on the following diagram:
Also, it should be remembered that the length of horizontal and inclined sections should not be more than one meter. If the length is greater, soot will accumulate in such a section and the removal efficiency will significantly decrease.
Particular attention must be paid to the passage through the roof; here you will need to ensure maximum tightness, and at the same time, protect the roof from heating. Therefore, for a well-arranged passage, it is necessary to assemble the same structure as for passage through the ceiling.
Interested in what documents establish safety requirements for the installation of coaxial chimneys (SNiPs, SP, instructions)? In particular, what is the minimum distance d.b. observed from the chimney pipe outlet to the opposite wall of the neighboring residential building (when placing gas boilers in both houses and chimney outlets facing each other) Thank you
The situation with standards for the installation of coaxial chimneys in Russia and the CIS countries is unique in its own way. They (norms) seem to exist and at the same time they do not exist. However, this is not the first time such a phenomenon has occurred in Russia, which is confirmed by many popular sayings.
There are current standards governing the installation of heating equipment: SP 60.13330.2012 “Heating, ventilation and air conditioning”, “Rules for the production of pipe and furnace works” as amended in 2006, SNiP 42-01-2002 “Gas distribution systems”, SNiP II-35- 76 “Boiler installations”, SP 31-106-2002 “Engineering systems of single-apartment buildings”, SP 41-104-2000 “Design of autonomous heat supply sources”, SanPiN 2.1.2.1002-00 “Sanitary and epidemiological requirements for residential buildings and premises”, SNiP 02/31/2001 “Single-apartment residential houses.” Alas, in many respects they are technically outdated and there is practically no mention of either coaxial pipes in particular or horizontal chimneys in general.
The only federal standard that somehow reflects this topic is SP 42-101-2003 “General provisions for the design and construction of gas distribution systems made of metal and polyethylene pipes.” It stipulates the minimum distances from the smoke duct on the facade of a residential building to the ground (2 m), horizontally to openings of doors, windows, ventilation grilles (0.5 m) and to the same openings vertically (if located on top - 0.5 m , below - 1 m). There is also a vague requirement in sanitary standards to place chimney outlets on the facades of buildings in such a way that harmful substances are dispersed into the atmosphere.
Realizing that the requirements contained in the standards for conventional vertical chimneys are not applicable to chimneys that are fundamentally different in design, the Ministry of Construction suggests that designers and developers focus mainly on TSN (territorial building codes, each region has its own) and the recommendations of heating equipment manufacturers. It is the latter that serve as the basis for making technical decisions. This, however, does not exclude the possibility that TSN will contradict them, and expert services and approval authorities will not relapse into trying to adapt outdated standards to new technologies at their own discretion.
Let's summarize: the distance from the coaxial chimney to the wall of the neighboring residential building located opposite is determined by:
- Territorial building codes are different for each region.
- The level of literacy of your designer, fire and gas inspectors, the presence of departmental regional regulations and restrictions.
- Understanding by the inspector of the sanitary and epidemiological service of the problem of dispersion of harmful substances in the atmosphere.
- Recommendations from the manufacturer of gas equipment equipped with forced smoke removal. The situation here is also quite interesting: the recommendations are based on foreign design and construction standards, in general they are quite similar, but may differ in details.
We recommend that you begin a detailed study of the issue by talking with the designer or equipment supplier. Or you can download technical documentation from the manufacturer’s website (if the brand of the heat generator is already known). German companies consider it necessary to place it on their resources, which cannot be said about all the Italian and French manufacturers, who are also popular here.
Let's take a specific example: recommendations from the famous company DeDietrich for their equipment. For a gas boiler with a power not exceeding 70 kW, the distance from the flue gas removal hole to the opposite wall of a residential building should not exceed:
- 8 m if the head of the coaxial pipe does not have a deflector.
- 5 m if there are window, door and ventilation (air intake only) openings on the opposite wall, and a deflector on the chimney.
- 2 m if the wall opposite is blank and the pipe is equipped with a deflector.
The recommendations do not say anything about placing coaxial chimneys on both opposite walls of adjacent buildings, which means that this fact does not affect the distance (according to DeDietrich).
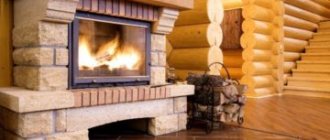
A very serious and responsible undertaking would be the installation of a chimney in a wooden house. The reason for this is the high temperature of combustion products formed in furnaces. Wooden surfaces at 200 degrees already begin to char, and when wooden structures are heated to 300 degrees, a fire is inevitable. The temperature of the combustion products entering the chimney can reach 500 degrees, and in some cases an open fire can be observed in it. Thus, insufficient insulation of chimneys from wooden structures can lead to tragic consequences.
Installation features
According to state rules. The standard chimney is made only of glossy brick. Its location can only be vertical; deviations from the axis are not allowed. A wooden house must be protected from possible overheating of the roof base, so the pipe must be more than 5 meters. The distance is measured from the grate.
It is not easy to build a chimney with your own hands. It is important to take into account the installation features. Depending on the type of roof, the height of the pipe is calculated. Photos of some typical solutions are presented in this article. If the roof is flat, then the pipe rises 50 cm. If there is a ridge, then the distance is measured from it. The chimney should be located at some distance from the ridge, and it is important to comply with all recommended parameters. A wooden house will last for many years with the right approach to the installation of heating equipment.
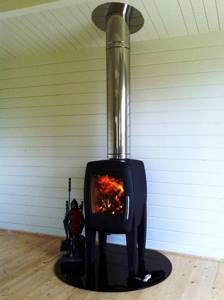
Stove in a bathhouse: features
In the vast majority of cases, this is a wood-burning, cast-iron or steel structure, often equipped with a water heater. Sometimes the product is covered with stone, but usually they do without such covering: the body and pipe in this case also act as heating elements.
The most common type of chimney pipe is steel. Firstly, the material is quite resistant to chemically aggressive substances. Secondly, it is relatively light in weight. And thirdly, the high thermal conductivity of the metal in the steam room is an advantage: the heat from the chimney goes to maintain a high temperature in the room or is used to heat the water in the tank.
However, this same property is also the main disadvantage: the pipe becomes so hot that there is a danger of ignition. Even placing the smoke exhaust duct too close to a wooden wall significantly increases the risk of fire.
The location where the smoke exhaust duct passes through the ceiling must be selected and marked in the design. This greatly simplifies the work, as it allows you to pre-cut a hole of the required size.
When arranging a chimney, you must follow a few more rules.
The passage of the pipe through the ceiling should not only not affect the supporting structures, but also be at a certain distance from them: the minimum distance of the chimney from the supporting ceiling beam or wall is 13 cm.
No contact is allowed between the walls of the chimney and the ceiling, regardless of what material is used - steel, ceramics, etc.
The gap between the edges of the hole and the chimney duct must be carefully insulated, otherwise it will not be possible to maintain a high temperature in the steam room. The use of materials with synthetic components as a heat insulator is not allowed. For example, basalt wool with a foil coating is used, but with lavsan - absolutely not.
The passage section is sealed from below with a stainless steel sheet. Galvanized iron is not recommended.
You can improve the heat dissipation function of the chimney, and at the same time protect the wall near the stove using a heat shield. You can make it yourself - it’s a sheet of stainless steel polished to a mirror shine. The photo shows a heat shield in a bathhouse.
The best way to ensure compliance with all fire safety rules and ensure proper thermal insulation of the steam room is the installation and installation of a PPU - ceiling-passage unit.
PPU is a tin box with holes the size of the chimney pipe. The finished product, which can be bought in a store, is dismountable, since its installation is carried out in parallel with the chimney. However, the device can be made with your own hands.
The sides of the box with holes are large because they are fixed to the ceiling. As a rule, the lower part is fixed in advance on the box.
Before installation, the product is covered with aluminum foil to seal the seams.
The polyurethane foam is inserted into the holes in the ceiling and secured to the surface with self-tapping screws. Then a section of the chimney is taken out, and expanded clay is poured into the space of the box. You can also use basalt wool, although expanded clay is more affordable.
Put on the removable part of the box and screw it to the ceiling.
The pipe into the bathhouse through the ceiling and roof must be exactly vertical, and the hole in the roof, accordingly, must be made exactly above the hole in the ceiling. After installation, the chimney is thermally insulated with mineral or basalt wool, always foil-lined.
To insulate the passage through the roof, steel linings are used.
The video demonstrates the process of constructing a chimney channel with your own hands.
Greetings, dear readers of the Sam Samych blog, today we will talk about a rather relevant and difficult topic - how to make a pipe in a bathhouse through the ceiling with your own hands. This article will come in handy for those who do. In the previous article, we already learned how to correctly install guide beams under the ceiling and provided a special osmosis for the future furnace.
Ready-made option for installing a chimney
But if you have already installed the ceiling and bought a stove, but did not provide any holes, then it does not matter, then I will tell you how to act correctly in such a situation.
In this article we will look at how to install a pipe correctly and according to what standards, how to make a box in the ceiling and much more. I'll start with some useful tips for novice stove makers.
For you, dear bathhouse attendants, I have compiled an up-to-date set of rules and requirements that will give you an idea of the installation of a chimney. So, let's begin:
- Be sure to install the stove ceiling box. This design dissipates heat from the pipe and eliminates the possibility of fire in the ceilings. Expanded clay is used as insulation for chimney pipes, min. cotton wool, foam glass, etc. Under no circumstances should the box be filled with earth, much less sand. Sand has a high heat capacity coefficient and can retain heat for a long time, which we do not need at all.
- The recommended height of the assembled chimney is 4-5 meters. Recommended from the link.
- Most often, the chimney is located near the wall. The proximity of the finishing, and in our case, eurolining, can lead to a fire, then a special stainless steel protective screen is installed in this place.
- According to GOST, the distance from the chimney to the guide beam is at least 13 centimeters. The diameter of the pipe with additional insulation is 320-330 mm. It turns out that the distance between the guide beams should be at least 60 centimeters. This distance is valid when using special insulating chimney pipes.
- Follow the recommendations about.
- When using conventional ceramic pipes, the distance should be at least 25 centimeters on each side of the pipe.
- After the stove, only a thick metal pipe is used! Insulators, stainless steel will not withstand such high temperatures, so only a metal pipe. The height of the pipe must be at least a meter. Closer to the ceiling, I recommend using sandwich pipes with insulation.
- No more than 3 bends (elbows) along the entire length of the chimney.
- All connections must be visually visible.
We recommend that you use sandwich pipe where it passes through the ceiling. The market currently offers many varieties of sandwich pipes, in which the insulation thickness is 30, 40, 60 millimeters. I recommend that you use special chimneys with an insulation thickness of 10 centimeters, this is much more reliable and safer.
In order to fix the chimney in the ceiling hole, you need to make a special box, the so-called cutting. This item is for those who want to cut a chimney pipe through the ceiling with their own hands, and if you already have one, you can skip these instructions for making a ceiling assembly yourself.
An example of what not to do
If you don’t want to bother, then I recommend that you buy ready-made industrial cuttings; they are inexpensive and of very good quality. There are many options for making ceiling units, but the meaning is always the same - a round hole is made in the middle of the square plate into which a sandwich pipe is inserted. This plate has stainless steel screens on the sides, which limit the spread of heat.
Example of a ceiling unit
If you decide to do the cutting yourself, then perhaps you are faced with the question - what to make the ceiling assembly from? In fact, there is nothing to choose from - only stainless steel. Some craftsmen make it from galvanized steel, but this is a bad option - galvanizing releases many harmful substances when heated strongly. Now let's move on to creating a ceiling fluff with our own hands:
- We decide on the size of the ceiling screen. The average diameter of a sandwich pipe is 200 millimeters (we recommend taking a pipe with 100 mm insulation), therefore the hole in the stainless steel sheet must be several millimeters larger in order for the pipe to fit into the hole. We cut out a stainless steel square that will cover the size of the pipe by 10-20 centimeters on each side.
- We mount a screen, square or round, on the reverse side of the (attic) stainless steel. The screen should be wider than the sandwich pipe, but should extend a few centimeters from the edge of the stainless steel.
- We cut a square hole in the ceiling of the bathhouse, slightly smaller than the size of the screen. If you provided the hole during the process of laying the ceiling, then you are great? The hole can be made with an electric jigsaw or chainsaw.
- The edges of the ceiling should be insulated with mineral wool or similar thermal insulation material.
- There is no need to attach the stove pipe to the transfer case; it must have free movement when heating and cooling.
- On the side of the bathhouse, between the screen and the lining, a small layer of heat insulation is laid. The stainless steel sheet itself is attached to the ceiling with galvanized screws.
About current approaches
If there is a fireplace in the room, then the Sandwich technology is the most relevant. Do-it-yourself installation is not complicated by “wise” decisions. The chimney consists of an inner pipe made of stainless steel and coated with a ceramic layer; mineral wool necessary for thermal insulation; sealant and fixatives. To better understand the features of the Sandwich design, it is recommended to look at the photo.
Installation is also carried out according to the “plastic stocking” principle. This technology is used mainly when the pipeline is bent. A house can be built not only according to standard designs, but also using original solutions. Then a plastic stocking can become simply irreplaceable. It should be remembered that such a chimney cools quickly, but also heats up quickly.
If the pipe is routed through a wall, the exit point is insulated with a special non-flammable material (mainly foam concrete). All this is hidden under the finishing panels. A protective collar is installed at the exit points, which increases waterproofing.
Understanding Cravings: Factors Affecting Cravings
For normal operation of gas appliances, a constant supply of clean air is required, which is provided by natural supply and exhaust ventilation.
The removal of combustion products from gas appliances is provided through a chimney.
To remove gas combustion products into the atmosphere, there must be a certain draft - a force that forces air to penetrate the chimney, and the resulting combustion products to move along the chimney and dissipate into the atmosphere.
The draft depends on the temperature difference between the smoke and the air, the height of the chimney and a number of other factors.
To ensure better draft, the temperature of the exhaust gases must be high. The temperature of exhaust gases from water heaters is 180-200°C. Due to the cooling of the reinforced steel and the suction of air in the draft stabilizer, the temperature drops. When operating chimneys, condensation of vapors from flue gases must be prevented. Wetness of the channel reduces traction, leads to its destruction, and in the winter season it can lead to freezing and blockage of the channel. The temperature at which condensation begins is called the “dew point”. For natural gas combustion products = 60-65°C. The air intake in the draft stabilizer reduces the relative humidity of the exhaust gases, and the dew point also decreases to 40-50 degrees. To exclude condensation, the temperature of the flue gases at the exit from the pipe head is usually taken to be 65°C. The draft decreases with high ambient humidity.
About cladding
At the construction stage, do not forget about the pipe lining. The house will look better if the chimney is made in an antique style. Some masters recommend applying 3 mm. cement plaster. For greater durability, it is coated with silicone paint.
The cladding is also done using clinker bricks. Its advantage is that it is resistant to harmful influences. As an alternative, clinker tiles are chosen - they are lighter than bricks. They lay it in a checkerboard pattern. The cladding made of natural stone looks good. It is fixed with glue; it is important that the thickness of the layer is not more than 1 cm.
If bitumen shingles are chosen as a facing material, then it is necessary to take into account a number of nuances during installation. It can only be installed at temperatures below 25°C. There should be no wind.
Briefly about the main thing
It is not always easy to solve the problem of installing a chimney when installing a stove in a wooden house. Today there are a number of rules and regulations, failure to comply with which may result in fines and other government sanctions. Before starting construction, you should consult with specialists.
has been designing and installing smoke removal systems for many years. Among the projects completed by our company, a considerable part is related to the installation of chimneys in wooden houses.
Do-it-yourself cutting for a chimney
- tin for making cutting boxes;
- stainless steel sheet;
sheet of gypsum board or basalt cardboard;
The material for filling the box is expanded clay, but dry clay can also be used.
The pipe passage in this example is carried out at the stage before finishing the ceiling. This is not important; the sequence of operations does not change.
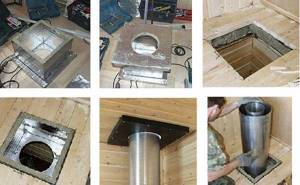
| Illustration | Description |
| A tin box is made - a board is taken as a template for the folds, the edges are fastened with rivets. The dimensions of the box correspond to the distance between the ceiling beams, if their location was thought out taking into account the future installation of the chimney. The indentations are calculated according to the standards, 380 * 2 the diameter of the inner pipe of the sandwich. | |
| Using a plumb line, the center of the pipe is determined. A point is marked where the weight dropped from the ceiling hits the center of the hole for the pipe. This will be the center of the chimney and the floor passage unit. A hole is cut above the pipe. When marking it, the mineralite layer that runs along the perimeter is taken into account. After laying it, the box should sit freely on the ceiling. The ends of the hole are laid with strips of mineralite; it is enough to provide thermal insulation along the edge, where the metal will come into contact with the ceiling structure. | |
| The tin box does not have sufficient rigidity, and to maintain its shape, galvanized profile spacers are installed. | |
| A stainless steel sheet is cut. Before removing the protective film, fix the exact location of the hole for the pipe. The cutout diameter leaves a gap between the pipe and the hole. Additionally, a decorative shield is prepared from the same material, which will cover the joint. Using metal scissors, carefully cut out the center of the resulting circle in sectors. | |
| Start cutting the heat-insulating gasket under the sheet. The template for it is a ready-made sheet of metal. The tools you will need are a jigsaw. Insert the box into place and cover the hole with a stainless steel sheet. To make sure that the ceiling in the area adjacent to the box will not char or catch fire, this is done through a thermal protection sheet. The decorative overlay is attached to the sheet. As a result, a reliable and beautiful screen is obtained above the stove near the chimney. |
The bathhouse is a wooden structure, which means it is extremely fire hazardous. Therefore, special attention should be paid to the issue of competent implementation of ceiling cutting - leading the chimney through the ceilings between floors or onto the roof.
Specifics of installing chimneys in wooden houses
A house made of wood is a very environmentally friendly and pleasant house for permanent residence, but making an effective and safe heating system in it is not an easy task. It's all about the flammability of wood: any contact with a heated heating unit or chimney element can lead to a fire. This means that when designing heating and smoke removal systems it is necessary to pay maximum attention to thermal insulation issues.
Main document
The basic requirements for chimneys installed in houses are described in SNiP 41-01-2003 “Heating, ventilation and air conditioning”. This document notes in particular that:
- the minimum distance between structures made of flammable materials and brick pipes or ceramic pipes with thermal insulation should be 130 mm;
- The minimum distance between flammable elements and ceramic pipes without thermal insulation must be 250 mm.
When installing chimneys in wooden houses, these standards must be strictly observed.
What do building codes and regulations (SNiP) say about this?
SNiP 41-01-2003 “Ventilation, air conditioning and heating” regulates the main aspects related to the arrangement of various autonomous heating systems. Since this publication is devoted to an analysis of the design features of the passage of a chimney through the attic floor, it is necessary to pay special attention to section 6.6 - this is “Stove heating”, and its subsections.
In some cases, these existing rules become a real problem for owners of private houses when arranging their home heating system. Such difficulties arise due to the fact that some of the requirements for modern heating systems and materials used for thermal insulation are clearly outdated. However, despite possible obvious contradictions, regulatory organizations rely on this guidance and demand compliance with established standards.
It must be remembered that if a stove is installed in a newly built house, then it will be necessary to legalize its presence with the fire services, otherwise it will simply not be possible to register the property. Such a permit is issued on the basis of a document drawn up by an employee of the controlling organization who accepts the building. If during the inspection serious violations of current standards are discovered, then there is no escape - the mistakes will have to be corrected. Therefore, it is best not to immediately deviate from the established standards.

The design and location of both the stove itself and its chimney are strictly regulated by current building codes and regulations
Not everyone likes the dry language of regulatory documents, and that is why they are simply afraid to look into them. Let's try to outline these rules for them in a few paragraphs:
- The thickness of the walls of a brick chimney in the area of its passage through the floors, roofing or walls (partitions) must be greater than along the main height. This thickening is called cutting.
According to existing standards, the cutting thickness is calculated taking into account the thickness of the pipe itself. Craftsmen often use the colloquial term “from smoke” in this regard. So, the standard cutting size is:
- 500 mm if the pipe borders a building structure made of flammable material (which, of course, includes a wooden floor).
- 380 mm - for those cases when the materials of the building structure are protected from fire by a layer of plaster of at least 25 mm reinforced with steel mesh, or a metal sheet with an asbestos lining underneath with a thickness of at least 8 mm.
- The height of the chimney cut must be at least 70 mm greater than the thickness of the ceiling. By the way, SNiP does not stipulate from which side these millimeters should “look out” - from below, on the ceiling, or in the attic. Judging by the forums, there is also no unanimity among the masters. But, as a rule, customers ask for a flat ceiling in the room, so a 70-mm step can be located in the attic. However, if you read the forums again, you can come across cases where fire inspectors demanded a 70-mm “side” both at the top and bottom. And it was not possible to convince them otherwise.
- It is not advisable to attach the chimney section rigidly to the floor materials or to rest it on any building structures. True, there is no categorical prohibition in this regard, but one should still adhere to such a recommendation so that the deformation of one element that occurs for some reason does not entail the destruction of another.
- The space between the cutting and the building structure is filled with non-combustible materials. The list of materials is not specified, but in practice those that can be classified as thermal insulators are usually used - expanded clay, vermiculite, mineral wool.
- If the pipe is cut through the opening of a wall or partition and flammable materials, then its thickness cannot be less than the thickness of the partition itself. In this case, the cutting must be done along the entire height of the wall.
- When the pipe passes through the roofing, cutting is also often performed, which in this place is called “otter”. In any case, the distance from the outer walls to any elements of the roof structure made of combustible materials must be at least 130 mm for a brick pipe, and 250 mm for a ceramic pipe without thermal insulation (when using insulation with a heat transfer resistance of at least 0.3 m²×ºС/ W – 130 mm). The roof section at the passage point should only be made of non-combustible material.
- When constructing a stove and its chimney, it is important to maintain the distance to walls and partitions. This gap has its own name - retreat. The amount of derogation is also regulated by the requirements of SNiP:
Choosing a chimney type
The choice of material and design of the chimney is determined by the architecture of the house, as well as the characteristics of the heating units that will be connected to the smoke removal system. So, for example, the temperature of the flue gases of a pellet boiler rarely exceeds 250 degrees, and the temperature of the flue gases of a coal-fired boiler can reach 700 degrees Celsius. Obviously, much more stringent requirements are imposed on the chimney for a coal boiler.
Brick chimneys
Brick chimneys are common in older homes, where the stove and chimney were often built before the building itself. Today, brick is not so popular, but many homeowners choose it.
Advantages of brick chimneys:
- high mechanical strength;
- relative durability;
- attractive appearance.
Disadvantages of brick chimneys:
- heavy weight;
- rectangular cross-section (imperfect from the point of view of traction force);
- rough surface;
- sensitive to strong acids and aggressive chemical compounds;
- complexity of installation and maintenance.
For the installation of chimneys, red solid brick is used. Masonry inside the house is done using lime or cement-lime mortars. For laying bricks above the roof level, only waterproof cement mortar is suitable.
Ceramic chimneys
Ceramic chimneys are an excellent alternative to bulky brick structures and rather short-lived chimneys made of sheet steel. They are widely used in modern houses made of rounded logs, timber and other wood materials.
Advantages of ceramic chimneys
- mechanical strength;
- good traction;
- ease of installation;
- Possibility of installation both inside and outside the building;
- resistance to aggressive compounds;
- resistance to high temperatures (up to 1000 degrees);
- exceptional durability (manufacturers' warranties for many systems are 30 years or more);
- high-quality thermal insulation.
The latter should be mentioned separately. In the vast majority of cases, ceramic chimneys have a three-component structure. Each element includes a piece of ceramic pipe with a smooth inner surface, thermal insulation mats and a lightweight concrete box. Thus, even when very hot fuel gases pass through, the outer concrete casing practically does not heat up. This is very important for installing chimneys in wooden houses.
Ceramic smoke exhaust systems have only one drawback - high price.
Metal chimneys
There are one-component and two-component metal chimneys.
Single-piece chimneys consist of simple steel pipes with a circular cross-section. This is the cheapest solution, but it has many disadvantages:
- low durability;
- large heat losses;
- impossibility of external installation;
- the need to create complex and expensive thermal insulation.
The latter is especially important in the case of wooden houses. Thermal insulation is used literally everywhere where even the slightest heating is possible. This applies to any chimney, but in the case of thin steel pipes it is especially important.
A two-component chimney (steel sandwich chimney) has its own thermal insulation layer, which is located between two steel pipes. This is a more expensive, durable and safer option. Such a chimney can also be used for external installation, which allows you not to go through all the floors and roofs, but to make one passage through the wall at the installation point of the heating unit ().
Installation of a sandwich chimney. Recommendations from experts
FORUMHOUSE users are well aware that high-quality installation of a metal chimney directly affects the safety of living in a cottage. We have already written about how to choose a heating system for a private home. It's time to talk about the features of installing a steel chimney.
1. What is a sandwich chimney
Despite the large selection of materials for installing smoke exhaust systems, reliable steel sandwich chimneys are most widely used in private housing construction.
A sandwich type chimney consists of two pipes of different diameters inserted into each other, and all the free space between them is a place to be filled with non-combustible insulation - mineral wool.
Mineral wool simultaneously plays the role of insulation and insulator.
Sandwich chimneys have the following main advantages:
- High installation speed and low cost compared to brick chimneys;
- Low weight of the smoke removal system;
- Smooth internal walls of the chimney provide good draft and help reduce soot formation;
- The use of acid-resistant stainless steel grades guarantees a long service life of the chimney.
The temperature of the flue gases directly depends on the type of heating boiler and the type of fuel used. The higher the temperature of the exhaust flue gases, the more the pipe and, accordingly, all the structural elements through which it passes, heat up. The following table will help you understand the dependence of the flue gas temperature on the type of boiler and the type of fuel used.
It should be remembered that unprotected wood begins to char at a temperature of 200 ° C. Well-dried wood can ignite from an open flame source at a temperature of 270-290 ° C. And if a wooden surface is subjected to constant heating for more than 24 hours in a row, then it can spontaneously ignite already at a temperature of 170° C. Therefore, when installing a sandwich chimney, it is important to observe all fire safety measures. And any mistake made at this stage can lead to dire consequences - fire and loss of property.
Graphical and mathematical method for determining the height of the chimney
This method of determining the distance of the chimney from the ridge is considered the most difficult; it is used when the chimney is 300 cm or more away from the ridge.
Quite often the stove is installed almost in the center of a complex building in which the chimney crosses the roof at the extension site or very close to the edge of the main slope. If the distance from the grate level to the designed chimney outlet is 500 centimeters or more, then it is not possible to install it. In this case, it will be necessary to determine the height of part of the smoke exhaust duct in relation to the roof ridge.
To determine the minimum limit of the distance of the chimney from the ridge of the roof, two methods are used: graphical and mathematical.
Graphic constructions have some similarity with the above methods for determining the maximum value of the chimney height. A diagram of the house is drawn on a suitable scale with the indicated dimensions, taking into account the proportions.
A horizontal line is drawn at the top of the roof, and from it down, using a protractor, an angle of 10º is measured and marked. The place where the estimated axis of symmetry of the chimney intersects with a line drawn at an angle will indicate the value being determined.
The resulting segment is measured, and the results on a scale are converted to real values.
If necessary, the project can be changed slightly by moving the chimney in a horizontal plane. Thus, you can find its optimal location. Remember that the distance between the roofing material and the short part of the smoke exhaust duct must be at least 50 cm. This is necessary for the arrangement of the otter and the possibility of protecting the roof with a metal roof covering.