Types of sawdust
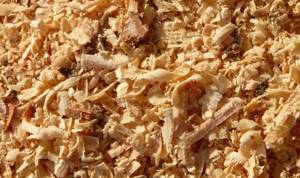
Sawdust is small particles of processed wood that are obtained from sawing. In appearance they look like small dust.
Sawdust can be purchased in different fractions from 5 mm to 3 cm. The length depends on the technological process of the woodworking enterprise, namely on what type of tools is used in each specific case.
This material is environmentally friendly. In addition to low cost, sawdust has many other advantages, for example, excellent thermal insulation and sound-absorbing qualities, as well as a low specific gravity of the material. Sawdust is mainly created from hardwood species such as spruce, pine or ash.
Is it true that sawdust is truly an ideal insulation material?
We immediately answer: sawdust is not ideal at all, but simply a good and cheap heat-insulating material. Sawdust and shavings have great advantages as insulation, but they are not without disadvantages.
Wood waste is attractive because:
- they have fairly good thermal insulation properties;
- due to their price, they are one of the cheapest insulation materials;
- finding them and purchasing them is quite easy;
- their environmental safety is beyond doubt, which is important both for those who will live in an insulated house and for those involved in insulation.
However, the listed advantages cannot be fully attributed to the processing waste of fiberboard and MDF boards. They contain a large amount of dust, which complicates the implementation of insulation and reduces the environmental characteristics of the insulation obtained with their help.
More recently, the required amount of sawdust could be collected in any carpentry workshop, whose management even thanked them for clearing the premises of materials that were considered garbage at that time. Nowadays, wood processing waste is, although inexpensive, still a product that, in addition to individual builders, is widely in demand by smoking and sausage production. In Perm, for example, wood processing enterprises offer sawdust at a price of 10 to 20 rubles per bag.
The disadvantages of sawdust are the following:
- sawdust and shavings must be treated with special substances that prevent them from being damaged by the ubiquitous rodents and insects;
- Preparation of insulation and its installation are quite lengthy processes.
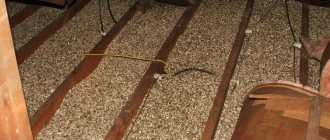
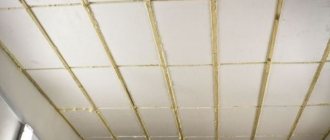
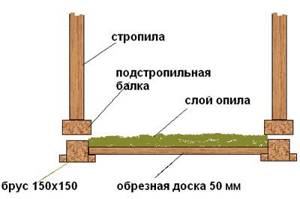
Ceiling insulation with sawdust
It is necessary to insulate the ceiling in a private house from any material, both brick and foam blocks. Because it is through the ceiling that significant heat loss occurs. Average heat loss through the ceiling is 20%. From an economic point of view, the most profitable is insulating the ceiling with sawdust.
Please note that laying wood products is a labor-intensive task. Before installation begins, a lot of preparatory work needs to be done. First of all, such work is aimed at protecting against fire, because wood in any form is extremely flammable. It is highly flammable and has a long burning time.
What materials and tools may be needed:
- sawdust of small and large fractions
- sand, clay or slag
- lime and copper sulfate (you can take boric acid)
- substrate. For this purpose, you can use corrugated cardboard or any other breathable materials with good vapor permeability.
- sealant and foam
- fire retardant and antiseptic for wood. These compounds are necessary if the ceiling boards are not covered with protective material against mold and mildew, fire
- construction stapler and staples for it.
Work should begin with protecting the ceiling beams and boards from possible adverse factors. Most often, high-quality buildings are already built from processed timber. However, if this procedure was missed for some reason, then it is imperative to carry it out now.
Wooden elements must be protected comprehensively, and the following sequence must be observed:
- An antiseptic is applied first, which prevents rot and protects against insects
- Next come fire-bioprotective agents that increase resistance to fire and high temperatures.
- Still others use water repellents to prevent moisture from entering the wood structure. In addition, such products protect the wood from leaching of previously applied solutions.
To achieve higher efficiency, it is worth purchasing all drugs from the same manufacturer.
After carrying out the protective work, you need to seal all seams and joints with foam and sealant. In addition to the cracks in the ceiling, you need to seal any other holes that may be present in the roof structure. This is necessary so that the insulating material does not come into contact with precipitation or strong winds, which can lift the insulating layer. Do not forget to trim the protruding parts of the foam at the same level as the ceiling beams, otherwise there will be voids in these places through which heat will escape.
Next, you can lay a backing, which is needed to prevent small dust from sawdust from falling off the ceiling. This dust can become a source of additional dust in the house. The substrate must have vapor-permeable qualities. If there are no such qualities, then warm air and steam, rising upward, will remain between the boards and materials, and will cause additional condensation. As a result, mold may form due to excessive humidity. As a backing, you can use any cardboard, for example, from old packaging boxes. The main thing is that it must be completely dry.
Clean the ceiling boards from dirt and dust and place cardboard sheets on them in several layers. Lay the underlay overlapping by 15-30 cm to prevent sawdust from getting into the seams. Now you will need a stapler, with which you need to fasten all the joints of the material.
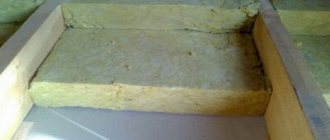
Sawdust should be purchased dry, without foreign odors. They should be treated in advance with fire retardant and antiseptic compounds. After the mass has dried, you can add 10% lime (fluff) and a small amount of copper sulfate (or borax). All this needs to be mixed well.
There are several basic methods for installing thermal insulation from sawdust. They can be poured dry or mixed with cement and diluted with water. Sawdust can be poured either in pure dry form or mixed with cement and diluted with water.
With the dry method, sawdust is poured in two layers:
- large fraction or shavings. This layer should be 10-15 cm thick. It must be compacted well.
- the smallest fraction. The second layer should have the same thickness as the first. And it also needs to be compacted well.
In addition, slag, sand or clay can be placed on top of the sawdust. These materials will save your sawdust from rodents and mold development.
In order to insulate the ceiling using the wet method, you need to buy sawdust that was made at least a year ago. These sawdust will be a little damp. However, check that they are free of mold.
Ratio of chips, water and cement: 20:3:2. The mixture should be made in small volumes because it dries quickly. The resulting solution must be poured between the floor beams onto a substrate or a layer of sand and compacted. The layer thickness should be 5-10 cm. The solution hardens completely and you can move on it.
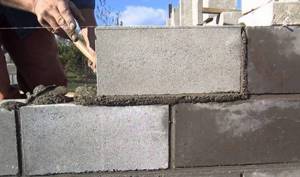
Masonry
The installation of walls from such products is similar to the construction technology from other popular materials. Construction occurs from the corners of the building. It is recommended to install the first row using a cement mixture. Then the material is laid on other corners. During the laying process, be sure to check the evenness using a level. A rope is stretched between the blocks, with its help it is easier to control the evenness of the masonry of the next rows. The mixture is coated on the bottom of the block and on the sides of the product.
If during the laying process it becomes clear that a smaller block is needed to complete the row, then the sawdust concrete can be cut to the required size. During the calculation, it is necessary to take into account the width of the seam. The levelness check is carried out after installation of each product. If necessary, the width of the mixture increases. The mixture is applied using a special spatula.
Each row is installed simultaneously with the dressing. Vertical seams during laying should not coincide. If you need to give strength to the walls, then reinforcement is performed. Reinforcement is done using a special mesh, every 3 rows. It is necessary to install lintels over openings of various types. Channels or wooden beams are used as jumpers. The jumpers must extend beyond the openings by approximately 50 centimeters on both sides. It is recommended to make special grooves at the top of the openings, onto which jumpers are subsequently installed.
The Mauerlat is installed in the last row. It is secured using special metal brackets. After this, floor beams and roof sheathing are mounted on top. All components that are made of wood must be impregnated with a special antiseptic.
Floor insulation with sawdust
Sawdust, as insulation, is excellent for floor insulation. As in the case of the ceiling, sawdust for floor insulation must be pre-treated against rodents, insects and microorganisms. For this it is better to use special ready-made solutions.
The difference between floor insulation and ceiling insulation is that it is very difficult to add insulator that shrinks into the floor structure. Therefore, you need to choose a method in advance in which the mass will not dry out over time. In practice, this means that when insulating a floor, you should use not dry sawdust, but mixed with different components and subsequently hardening.
To prepare this mixture, you need to add gypsum or cement to the sawdust. Maintain the following proportions: 85% sawdust, 5% gypsum and 10% fluff lime or lime paste, which you need to take twice as much as dry lime. Don't forget that gypsum hardens very quickly, faster than cement.
There is no point in drying sawdust before mixing. On the contrary, if the sawdust is dry, it is worth adding a little water. The degree of readiness of the mixture is checked in your hands - if the lump does not crumble or spread, then the composition is ready.
If insulation is carried out in a building that has already been in use, then the existing floor covering will have to be dismantled, the floors will have to be re-treated with an antiseptic with moisture-resistant mastic, and then a backing made of vapor barrier material or film will be installed.
The created mixture of sawdust is placed on the substrate and compacted well. The thickness of the layer should be approximately 10 cm. After compacting, the mass should be left to harden for about 2-3 weeks.
When using dry sawdust, you need to create a raised floor. All wooden parts must be covered with protective agents. Next, a subfloor made of boards is installed on the base, on which waterproofing is laid. Sawdust is poured on top of the hydraulic barrier. The layer should be 10 cm or more. Note that insulation with sawdust is not suitable if you are going to make a screed. Sawdust has low strength and causes serious shrinkage. Before installing the finishing coating, you need to leave the floor for 2-4 days. Over these few days, the sawdust will shrink by 2-3 cm and additional amounts will need to be added.
Be sure to keep in mind that if the sawdust is not given good waterproofing and ventilation (the gap between the finished floor and the layer of insulating material), then it may lose its heat-shielding qualities.
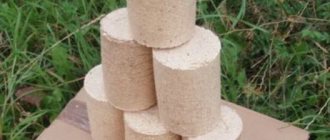
Making blocks yourself
When starting to create blocks from sawdust and cement with your own hands, you need to thoroughly study the entire process and take into account the nuances.
How to create blocks yourself:
- Prepare all the tools and devices for working with the mixture - concrete mixer, hammer crusher, chipping machine, vibropressing machine, vibrating machine, etc.
- Prepare raw materials - buy at least M400 cement at a hardware store, order clean sand, lime (clay can be used), find a lot of sawdust at the factory (preferably dry, if the region is humid - you also need to stock up on mineralizers for processing sawdust, which can be liquid glass or milk of lime).
- Thorough chopping of wood by loading it into a chipper and then into a hammer crusher (to obtain the same fraction).
- Carefully sifting the wood chips to separate debris, soil, bark, etc.
- Impregnation of wood chips - soaking in a mixture of liquid glass and water in a ratio of 1:7. To speed up the process of mineralization and hardening of the material, you can add a little calcium chloride.
- Treatment with slaked lime – disinfection against pests.
- Mixing - to obtain a standard mixture, take 1 ton of Portland cement, 250 kg of lime and 2.5 tons of sand. The volume of chips is determined separately, based on the required characteristics and type of blocks. Everything is mixed in a concrete mixer.
- Pouring the mixture into molds and installing it on a vibrocompression machine.
- Drying - stretching the film over a container with molds, keeping it indoors for 12 days at a temperature of +15 degrees and above (in the cold, hydration will take place much more slowly). The material can be checked periodically - if it is dry, moisten it with water.
Sawdust and cement blocks are an excellent choice for performing many jobs in the field of renovation and construction of low-rise buildings. With the right choice of high-quality material and compliance with the work technology, creating optimal conditions, sawdust concrete will ensure the reliability, strength and durability of the structure.
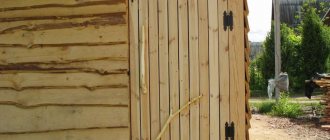
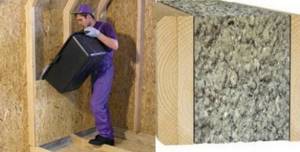
Insulation of walls with sawdust
The most difficult task can be called insulating the walls, because this will require creating a frame. The frame must be filled with sawdust and compacted by hand. Coarse sawdust is suitable for laying in a frame wall. When using a dry laying option, you should take care to thoroughly dry the sawdust so that there is no moisture left in them.
With the wet method, the mixture is prepared from wood chips, lime, gypsum or cement, with the obligatory addition of antiseptics. The thoroughly mixed mass is moistened, poured into the prepared frame and compacted tightly so that the material does not sag. Gypsum, like cement, over time draws out all the available moisture and makes the mass monolithic.
Between the wall and the insulating material, it is imperative to lay a waterproofing material that has vapor-permeable qualities. The effectiveness of insulation and the level of shrinkage depend on the quality of the compaction and the density of the filling. If you do not tamp tightly, voids will appear and heat loss will begin.
The mixture is placed in layers 20-30 cm high and compacted. After this, a second similar layer is poured. And so they repeat the actions at all heights. The thickness of the insulation depends on climatic conditions. For example, in a house for seasonal residence, a thickness of 15 cm is enough, but in a permanent building, a thickness of 25-30 cm is needed. The frame is created from wooden boards with a section of 100x50 mm.
The mass hardens in about 1-2 weeks, and finally sets in about a month. All this time it is worth monitoring so that the air humidity does not exceed 60-70%, and the temperature does not rise above 20-25 degrees. In addition, you need to regularly ventilate the room. After this, you can begin finishing work.
Houses insulated with sawdust are an excellent option. They combine high heat retention rates with low operating costs.
House made of sawdust
In addition to insulation, sawdust is used for the full construction of buildings. However, buildings made of sawdust concrete are rare today. However, experts assure that sawdust concrete is a very promising material that allows you to build economical housing with decent performance indicators.
The manufacturing technology of such material involves the addition of binding components, for example, clay, lime, liquid glass. These additives reduce shrinkage phenomena and reduce the cost of modules. By adjusting the proportions of individual components in relation to the total weight, it is possible to change the density, porosity and strength of the final product.
Practice shows that optimal protection is achieved after lining, however, for example, a sawdust bath can be used without finishing.
The advantages of sawdust concrete include:
- thermal conductivity 0.20-0.30 W/m°C. A wall 40.00 cm thick is similar in warmth to a 90 cm brick wall
- strength 20.0-50.0 kg/cm². This material perfectly resists deformation and shock loads, so it can be used for construction in areas with probable seismic activity
- easy processing. Modules can be milled, nailed, drilled, processed with a hacksaw and saw. Consequently, material consumption is reduced and there is almost no waste
- shrinkage 0.50 – 1.00%mm/m
- frost resistance – 25 cycles
- density 300-1200 kg/m³.
Among the shortcomings we note:
- moisture absorption. This disadvantage can be combated by treating the blocks with special compounds.
- impossibility of constructing multi-storey buildings
- not very attractive appearance without finishing.
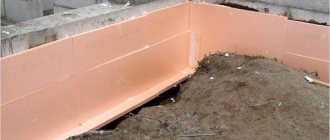
Foundation
The foundation for a monolithic house made of sawdust concrete does not require high strength indicators. The structure is made from a material containing a significant amount of light sawdust and is lightweight. The only requirement that determines the durability of a structure is the correct choice of foundation type.
The best choice when building such houses is a strip foundation
Determining the type of foundation is preceded by geodetic measures, including:
- drilling holes to the depth of soil freezing;
- soil composition analysis;
- determination of groundwater level.
Knowing the depth of the aquifers and the composition of the soil, you can decide on the type of foundation that will ensure the integrity and reliability of the building.
Material calculation
Let's look at an example to find out the average number of blocks required to construct a building. For example, you need to build a house measuring 15x10 m, with a wall height of 3.00 m. The perimeter of the building will be the sum of the lengths of all sides = 15+15+10+10 = 50 m. The area of the building is the perimeter multiplied by the height = 50*3 = 150 m². It is worth considering both the thickness of the masonry and the number of blocks per 1 m2:
- 19 cm - 12.5 pcs
- 39 cm - 25 pcs
- 60 cm - 37.5 pcs.
If you plan to build a house with walls 39 cm thick, the volume of blocks you need will be - 150 * 0.39 = 58.5 m³. And the number of pieces of blocks = 150*25 = 3750 pieces.
This calculation does not take into account the area of the openings. However, this is not critical, because the sawdust concrete safety factor is automatically taken into account.
Selection of masonry mortar
Most often, a special type of glue or cement mortar is used as a masonry mortar. The advantages of cement mortar include the ability to correct imperfect volumes of blocks. However, the disadvantage is the occurrence of so-called cold bridges. Also, when choosing such a mixture, the blocks must be wetted.
You can also mount walls using special glue. It contains special additive components that prevent heat loss through the seams. The maximum permissible seam width is reported by the manufacturer on the back of the package, but most often the width is approximately 0.6 centimeters. Such a solution will be an ideal choice when the product has an ideal shape.
One way or another, the width of the layer must be no more than 0.8 centimeters. If you ignore this advice, the thermal insulation of the house will be compromised.