Insulation technology
Thermal insulation of the blind area and basement helps reduce heat loss and protects the foundation from destruction caused by temperature changes. The insulation technology for these elements is different.
Tools and materials for creating an insulated blind area
To build an insulated blind area around the house with your own hands, you will need the following tools:
- Shovels (bayonet and shovel) - for digging a pit as when insulating the base with polystyrene foam;
- Wheelbarrow - to transport soil;
- A vein, fishing line, or twine - for marking the territory;
- Level - to set the blind area to the required slope;
- Concrete mixer or container for preparing the solution;
- Buckets, trowel.
From the materials we will need the insulation itself - extruded polystyrene foam, clay, sand and fine crushed stone - to create a layer of bedding, wooden blocks and bitumen mastic, cement grade M300-M400, reinforcing mesh, waterproofing - you can use ordinary roofing felt.
Insulation of the blind area
Insulation of the blind area is carried out according to the following scheme:
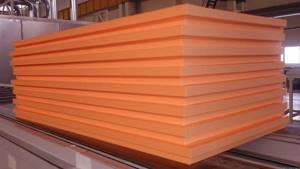
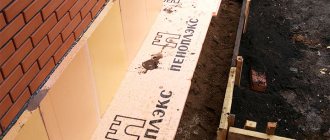
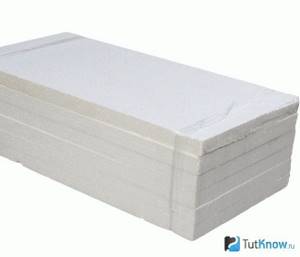
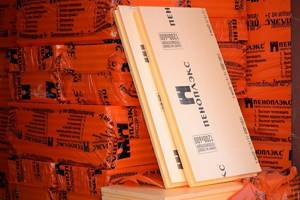
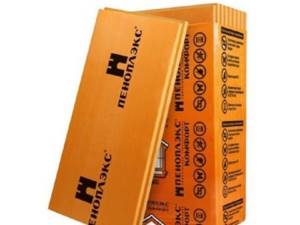
Penoplex is the best option for insulation
- The soil around the foundation is selected to a width of about a meter to a depth of 0.45 m with a slight slope - from 3 to 5%;
- A leveling sand layer is laid and thoroughly compacted, after which the layer thickness should be at least 150 mm;
- Penoplex or extruded polystyrene foam is laid as tightly as possible;
- Lay geotextiles with a minimum density of 150 mm and a width of 2 m in the trench;
- Take a drainage pipe, lay it on geotextiles along the edge of the trench with an outlet into the drainage ditch;
- Pour crushed stone over the pipe and into the gap between it and the edge of the insulation;
- Wrap the drainage pipe in geotextile together with crushed stone, first placing the edge lying on the insulation, and then covering it with the second edge;
- Cover the slabs and pipe with coarse sand to a height of 300 mm and level it, and then compact the surface using a tamper. Markings are made for the curbs, for which a thread is pulled level at a distance of 70 cm from the foundation;
- Storm water inlets are installed by installing a plastic receiving tray under the drainpipe and connecting to it a sewer pipe for external use with an outlet into the gutter;
- Install and concrete curbs on 2 sides;
- Fill the internal space with the required amount of sand and compact it again;
- Paving is done with paving slabs, concrete stone or other material. The height of this layer is 600 mm;
- Add soil along the outer perimeter of the border.
Base insulation
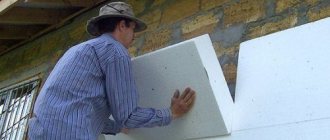
It is best to insulate the base with penoplex or extruded polystyrene foam when laying the foundation, but if this moment is missed, then you can do this during the operation of the house.
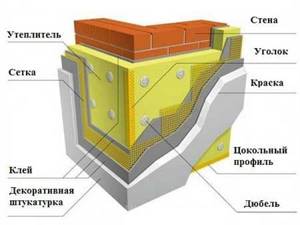
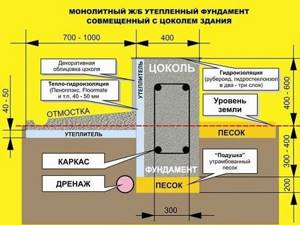
Base insulation scheme
Let's consider the option when the base and walls of the house are in the same plane. Warming is carried out in 10 consecutive steps:
- Make horizontal markings along the entire perimeter, taking into account that the insulation should protrude several centimeters beyond the waterproofing layer;
- They cut the heat-insulating material, focusing on the markings;
- Clean the walls from dirt and dust, prime them;
- Apply a layer of special glue to the base using a notched trowel, choosing a corner as the starting point;
- Apply glue to the slabs and attach them to the surface of the base, seal the joints;
- Drill holes for dowels using a hammer drill and hammer in the fasteners;
- Attach a metal corner around the perimeter of the wall, using the same glue as for the slabs;
- Apply a layer of soil to the slabs;
- Cut the reinforcing mesh according to the dimensions of the slabs, lubricate it with glue and glue it to the heat insulator;
- The base is puttied or covered, and flashings are installed.
Waterproofing
When externally insulating the foundation of a house, it is also important to provide reliable protection from moisture. Therefore, the waterproofing material is laid in two layers: first bitumen mastic, then Technonikol sheets
In the first case, we apply it with a roller in a small layer of up to 5 mm on all walls of the foundation and plinth, allowing time to dry.
After this, you can proceed to the second stage - attaching the sheets. We do this from the bottom up and with an overlap of 10 cm. Lightly melt the front part with a gas burner. Each element must be smoothed to release excess air from it.
It is the combination of these two materials that will prevent excess moisture from getting onto the surface of the foundation.
Installation of an insulated blind area: step-by-step algorithm
The durability of any design depends not only on the quality of the materials used, but also on compliance with the technological process. It is very convenient that if necessary, you can make an insulated blind area yourself, following simple instructions.
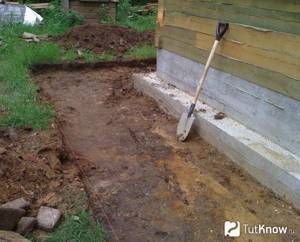
Preparing the base
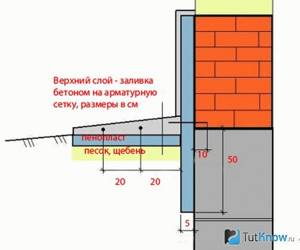
The first step is to select a layer of plant soil 30-40 cm thick along the entire perimeter for the width of the insulation sheet (plus a small margin for the drainage pipe). To ensure water drainage, during excavation work, maintain a slope of the base from the foundation of 5-10% (1%). equal to 1 cm per meter of width). At the same time, storm drainage is installed: stormwater inlets are installed in the corners and drainage pipes are laid. The leveling layer is formed with a sand cushion, with layer-by-layer filling, wetting and compaction of each layer. When finished, the thickness of the pillow should be at least 5 cm, with the obligatory preservation of the original slope.

Laying insulation and drainage membrane
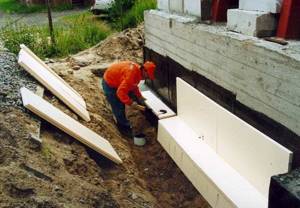
XPS slabs are laid in preparation close to the foundation, thanks to the locking connection (L-edge), a continuous thermal insulation contour is formed without cold bridges. Fixing the insulation is not required; it will be securely pressed by the following layers (membrane, drainage layer, topcoat or backfill), and the L-edges prevent shifts during further work. On top of the insulation, with an overhang of 100-150 mm onto the wall (the height of the overhang is tied to the thickness of the finishing layer), a two-layer profiled membrane with geotextile is laid, designed to create an airtight protective layer, as well as filter and drain water. Laying is carried out along XPS sheets, the connection of the canvas is made by connecting the “spikes” of the profiled membrane to each other, the overlap is four “spikes”.
- Bend back the layer of geotextile from the connected ends.
- Fix the tenons tightly in the grooves.
- Fix the geotextile along the seam with specialized double-sided tape (50 mm wide), thereby sealing the joint.
Fixing the membrane to the wall/base is done either with double-sided adhesive tape or by doweling with fungi (in the absence of waterproofing). In this way, the junction of the blind area and the base of the basement is completely covered, and the absolute tightness of the insulating contour is ensured.
Protective layer device
To ensure good water drainage and protect geotextiles from mechanical damage, gravel (fraction 20-40 mm) is added over the drainage profiled membrane; the layer thickness is 50-60 mm. In the event that a soft, insulated blind area is preferred, the gravel backfill can also act as a finishing layer. There are no fundamental differences, but the thickness of the cushion increases to 100 mm, and curb stones are also installed during the backfilling process.
Finishing layer device
An insulated blind area based on XPS and a profiled two-layer membrane is universal and can be combined with any finishing layer. If soft blind areas are predominantly gravel, or less often lawn, then in monolithic ones, paving stones and its analogues or concrete are usually used as a decorative layer.
- Laying paving stones and similar materials - on top of a protective gravel layer, sand bedding is done, a layer of several mm. The paving stones are laid on a dry mixture of cement and sand, in a ratio of 1:5, starting from the foundation, the seams (minimum 2 mm) are rubbed with the same DSP. After laying the paving stones and curb stones, the blind area is poured generously so that the solution gains brand strength and securely fixes the coating. If the structural pie does not have a profiled membrane and the insulation is covered with plastic film, the paving stones are laid on a compacted sand bed without a gravel layer. As an option, paving stones/analogs are laid on a sand preparation, and the seams are rubbed down with DSP.
- Pouring concrete - with this finishing coating, the profiled membrane is replaced with a polyethylene film laid on top of the insulation boards. Concreting can be carried out either directly on top of the film or on a layer of compacted sand preparation; in this case, the sand is also separated from the concrete by the film. To withstand the standard protective layer, the reinforcing mesh is laid on supports; when concreting, expansion joints must be observed. Caring for the concrete blind area until it completely sets is standard - cover it with film and/or periodically moisten it with water.
What material to choose as insulation?
To insulate the blind area, various thermal insulation materials are used. But the most common are the following:
- Extruded polystyrene foam.
- Expanded clay.
Each of these materials has certain advantages and disadvantages. You need to know about both the first and the second in order to make the right choice.
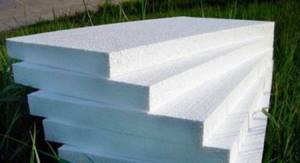
Expanded polystyrene is one of the most common types of foam used in the construction industry. It has extremely low thermal conductivity, is durable, has low moisture absorption and is highly durable; it is not afraid of frequent and severe temperature changes. As a result of the research, it was found that its service life is 60-80 years. To insulate the blind area, it is better to select a material with a higher density; it will be stronger, have lower water absorption, hygroscopicity, vapor and air permeability.
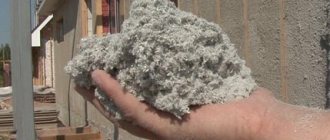
Expanded clay is also a fairly high-quality material. It is cheap, simply poured into a pit near the foundation, is not chemically active, and is not afraid of moisture and temperature changes. The only drawback is the relatively low efficiency - you need to pour a thick layer to provide the required level of thermal insulation to the blind area.
Having studied the basic properties of these materials, you can easily choose the one that is best suited for you. After this, you can safely get to work, having first learned how to insulate the blind area with different materials.
Materials for foundation insulation
A number of different materials are used to make a warm foundation, such as mineral wool, expanded polystyrene, and bulk materials.
General requirements for insulation materials: not to deteriorate under the influence of soil and not to absorb moisture.
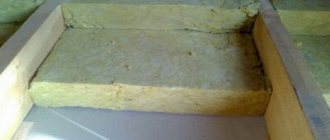
Mineral wool
Glass and stone mineral wool is usually used in the form of layers, which makes it much easier to work with. However, this material is easily subject to deformation and absorbs moisture well, therefore, when the foundation is thermally insulated with mineral wool, it is additionally protected by a specially constructed wall of boards or bricks.
Advantages and disadvantages of the material:
- The advantages of use include low cost, excellent thermal insulation properties, and ease of installation.
- The disadvantages are quite significant: an unpleasant odor when insulating the floors inside the bathhouse, significant deformation. In addition to the above, mineral wool has one more drawback: various rodents very often settle in it, which quickly multiply and subsequently damage the heat-saving layer.
Bulk insulation
Sawdust and expanded clay have been used in construction for many years, but, like any material, they have their pros and cons.
- This material has few advantages: perhaps only very low cost and widespread distribution.
- The disadvantages significantly outweigh the positive qualities of bulk insulation: sawdust and expanded clay rot very quickly, absorb moisture and have low thermal insulation values.
Styrofoam
Often, when insulating the foundation, sheet foam is used.
Advantages of application: low cost, wide availability, good moisture and heat insulation.
Cons: breaks easily due to low strength.
Extruded polystyrene foam
This material has many advantages, which makes its use not only more rational and effective, but also less expensive than other materials. Thanks to its cellular structure, it does not allow moisture to be absorbed inside, which allows the insulation to be used for at least 40 years in a row. Expanded polystyrene is less likely to be damaged by rodents and at the same time has high thermal insulation rates, which makes the bathhouse floor always warm.
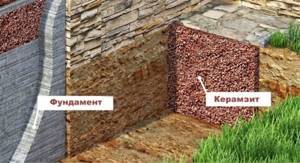
Insulation of the foundation using earth or expanded clay
A warm foundation for a bathhouse can be made using ordinary soil and expanded clay. As a rule, to insulate the foundation with expanded clay, a trench of about 0.5 meters will be required. Thus, you can calculate the required volume of insulation: the length of the entire foundation, multiplied by the width of 0.5 meters and multiplied by the depth of the foundation. The cost of one cubic meter of expanded clay is 1.5 thousand rubles.
In order for the thermal insulation expanded clay layer of the bathhouse foundation to work as expected, it is necessary to make a drainage layer.
The drainage layer is made as follows:
- We dig a trench deeper than the foundation at a distance of a meter from it. The edge of the trench should go into some kind of depression or ditch;
- We lay geotextiles in the trench. The installation is carried out with an overlap on the edges of the trench;
- crushed stone is poured onto the fabric;
- We lay a perforated pipe on top of the crushed stone. We bring its edge into a recess or ditch;
- pour crushed stone on top of the pipe;
- Next, pour in the soil and compact it.
Before directly filling the expanded clay, waterproofing must be done:
- near the foundation itself, a trench is dug to the sand;
- the foundation is cleared of soil;
- prime the concrete base;
- After the primer has dried, we treat the concrete with bitumen mastic.
After this, you can start using expanded clay insulation, and this is done like this:
- sand (15 cm) is poured into a trench dug near the foundation;
- two walls of the trench (foundation and ground) are covered with plastic film;
- now all the free space of the pit is filled with insulation (expanded clay);
- roofing material is laid on top of the expanded clay;
- we make a reinforced blind area on top;
The base is also insulated with expanded clay. A half-brick wall is being erected parallel to the foundation. Insulation is poured into the created space. Waterproofing is done on top and bottom of the thermal insulation layer.
This is how to insulate the foundation of a bathhouse with your own hands using expanded clay. You can see that the insulation procedures are simple, but there is more than enough excavation work.
Insulation of the blind area with foam plastic
Insulating the blind area is a way to protect the foundation from moisture and freezing. It is laid around the perimeter of the building in the form of a pedestrian path. To learn how to do this work using foam plastic as thermal insulation, read this article.
Features of thermal insulation of the blind area with foam plastic
One of the important aspects of building construction is the installation of a blind area, which serves as the main barrier to the penetration of melt or rain water from the roof to the foundation. In the absence of this element, moisture saturates the concrete of the house’s supports, and when it freezes, it can cause its destruction with all the ensuing consequences.
Pros and cons of foam insulation
Polystyrene foam is a fairly common thermal insulation material. It differs from other insulation materials, first of all, in cost. But, despite the low price, foam boards have excellent insulating properties and do not absorb moisture.
No need to lay a deep foundation;
These advantages serve as a good reason for installing an insulated blind area.
Preparatory work for insulating the blind area with foam plastic
It is recommended to insulate the blind area during the warm season of the year. This greatly simplifies the excavation work that precedes the main process.
Technology of insulating the blind area with foam plastic
Before insulating the blind area with polystyrene foam, you need to prepare all the materials and necessary tools. The materials you will need are foam sheets, sand, water, crushed stone and cement, asbestos-cement pipes, slats, bitumen mastic, plastic film, boards for making formwork, reinforcing mesh or individual metal rods. The tools needed for the job are very simple: a shovel, a plaster trowel or spatula, a sharp knife, a building level and a tamper.
That's all. We hope that the presentation of our material will help you to efficiently perform a foam-insulated blind area. Good luck with your work!
Preparatory stage of insulation
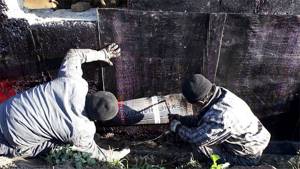
Insulation of the outer side of the foundation After waterproofing,
the outside wall is freed from soil: a trench is prepared along the perimeter of ½ meter along the foundation;- the wall is cleaned with a wire brush, washed, dried and coated with a primer;
- for waterproofing, liquid rubber is applied to the wall using a spatula;
- The foundation is covered with a double layer of roofing felt, it is heated and strengthened using a burner, directing it from bottom to top.
What is included in the insulation layer for the blind area
A foundation blind area insulated in the correct way is a layered structure that includes:
- waterproofing material;
- drainage outlet;
- directly the insulation material itself.
To prevent the soil from being washed away, and to ensure that the walls and foundation remain intact, they must be equipped with a permeable layer.
When we insulate a blind area with our own hands, the layers of insulation are laid in the following order:
- We put geotextiles below. It will be the base on which the entire insulating structure will be formed, and it will also separate the upper bulk fraction and the lower soil;
- bulk clean sand (river or quarry) comes in bulk up to 15 cm;
- insulation is laid on top of a sand cushion (expanded clay, penoplex, polystyrene foam and others);
- PVC layer;
- sand, poured in a layer of 15 cm to level the load on groundwater. Sand, scattered evenly, will prevent failure of the lower layers in dangerous places;
- a separating layer of geotextile between the sand and the final layer;
- the last soft layer based on fine crushed stone will protect the structure from damage. You can also use decorative tiles as a finishing layer, then the blind area will also perform an aesthetic function.
Indications for insulation
Among experienced builders, there is still no clear opinion as to whether it is worth insulating the blind area at all. The following considerations are given as arguments against:
- the blind area is an auxiliary element that serves to drain the foundation and improve the waterproofing of the basement;
- heat loss through the blind area is insignificant in the overall heat balance of the building;
- the costs of materials and work on thermal insulation of the blind area do not justify the resulting savings on heating costs.
All these arguments in themselves do not contradict the facts. However, such an analysis of the situation is incomplete and does not take into account all the factors affecting the strength and longevity of building structures. This can be argued in relation to houses operated in warm regions. There, even in winter, the soil does not freeze to a more or less significant depth, and there is no soil deformation associated with the freezing and thawing of groundwater.
In regions with severe and prolonged cold periods, an uninsulated blind area will be subject to seasonal fluctuations in the soil adjacent to the foundation. They will inevitably sooner or later lead to stress in the concrete screed material, the appearance of cracks and microdefects and, ultimately, to destruction.
Insulating the blind area shifts the freezing point away from the foundation by several tens of centimeters. The crushed stone soil poured into a pit next to the foundation does not freeze in winter, turning into a monolith. It retains the ability to filter and remove moisture to the drainage and does not place additional pressure on the recessed walls of the basement.
As a result, the balance of arguments shifts in favor of insulating the blind area around the house. This set of works is performed every few decades. It allows you to significantly extend the service life of the foundation.
The principle of insulation of building elements
A feature of any foundation is operation in aggressive environments, periodic changes in loads (force, direction) with uneven frost heaving of clay soils. Heaving forces arise exclusively when several conditions are present:
- clay in the soil;
- presence of moisture;
- negative temperatures leading to expansion (volume increase by 9%).
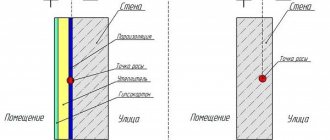
By eliminating any condition, it is possible to minimize or completely eliminate buoyancy forces and bending moments affecting underground reinforced concrete structures. Moisture is removed by drains at the level of the base of the foundation. Clay is removed by replacing 40–80 cm of soil layer with non-metallic material (sand, crushed stone). Expanded polystyrene laid around the house at a depth of 30 - 40 cm allows you to retain geothermal heat.
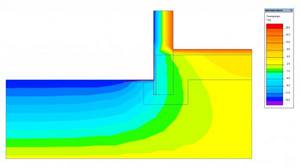
The diagram shows the heat distribution when insulating the entire depth of the foundation and blind area.
Base insulation solves other problems:
- preventing freezing of concrete, which can crack when saturated with moisture;
- protection of the waterproofing carpet when backfilling the sinuses of the pit;
- reduction of tangential swelling forces along the side faces of the foundation strip.
The benefits of exterior insulation for basement walls include moving the dew point outward. After that, moisture is guaranteed not to appear on the inner walls of the basement. Expanded polystyrene is attached to the outer edges of concrete structures, then laid horizontally at the bottom of the trench. The width of the strip around the foundation is 0.6 - 1.5 m, depending on the roofing, the size and design of the blind area, as well as climatic conditions.
All of the recommendations given apply exclusively to heated houses. Buildings for seasonal/periodic residence protect against swelling in a slightly different way:
- continuous thermal insulation carpet (expanded polystyrene XPS) under MZLF, slab foundation;
- warm blind area of increased thickness or width.
The characteristics of the heat insulator are determined according to the tables of the SGT organization standard 36554501-012 dated 2008. If density is practically unimportant for the vertical insulation of the base and the horizontal layer of polystyrene of the blind area, when laying thermal insulation sheets under monolithic structures, preference should be given to high-density XPS modifications to avoid subsidence.
We recommend reading: Insulation of strip foundations from the outside.
Insulation thickness
Extruded polystyrene foam is produced in slabs. They have different brands, thicknesses and dimensions.
| Brand | Thickness, mm | Length, m | Width, m |
| PSB S-35, 20 | 20 | 1,24 | 0,64 |
| PSB S-35, 30 | 30 | 1,2 | 0,6 |
| PSB S-35, 40 | 40 | -«- | -«- |
| PSB S-35, 50 | 50 | -«- | -«- |
| PSB S-35, 60 | 60 | -«- | -«- |
| PSB S-35, 70 | 70 | -«- | -«- |
| PSB S-35, 80 | 80 | -«- | -«- |
| PSB S-35, 90 | 90 | -«- | -«- |
| PSB S-35, 100 | 100 | -«- | -«- |
| PSB S-35, 120 | 120 | -«- | -«- |
| PSB S-35, 150 | 150 | -«- | -«- |
Note! For a blind area, the most suitable option is a slab 50 mm thick and 0.6 m wide. A tape emerges from it, insulating the soil around the house to a width of 60 cm
Regulatory requirements for the blind area
It is curious that the blind area is mentioned only in one updated federal standard, namely SP 82.13330 “SNiP III-10-75 Landscaping”. The requirements for this building structure are presented in clause 6.26, the brevity of which allows us to present it here in full:
“6.26 The blind areas around the perimeter of the buildings must be tightly adjacent to the base of the building. The slope of the blind area must be at least 1% and no more than 10%.
In places inaccessible to the operation of mechanisms, the base under the blind area can be compacted manually until the imprints from the impacts of the tamper disappear and the movement of the compacted material stops.
The horizontal and vertical curvature of the outer edge of the blind area within the straight sections should not be more than 10 mm. The concrete blind area must meet the frost resistance requirements for road concrete.”
Such a meager updated regulatory framework for the construction of blind areas forces one to turn to the standards of organizations developed in the development of federal regulations.
PENOPLEX SPb LLC, together with the Federal State Unitary Enterprise Research Center Construction, developed STO 36554501-012-2008 “Use of thermal insulation from polystyrene foam extrusion slabs PENOPLEX in the design and construction of shallow foundations on heaving soils.” The document can be found here.
Expanded polystyrene as EPS or XPS insulation
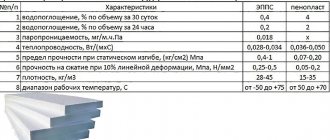
Today, mainly two types of expanded polystyrene are used as thermal insulation: foamed (EPS) and extruded (extruded, XPS). They differ not only in production technology, but also in properties. For foundation insulation, it is preferable to use XPS. Compared to it, EPS has a higher heat transfer coefficient (less effective as a thermal insulation material), is hygroscopic, and less durable. But at the same time, foamed polystyrene foam stands out for its comparatively low price. Its shortcomings can be mitigated by installing an additional layer of waterproofing that protects the material from wet soil, as well as foundation drainage, which helps lower the groundwater level.
Insulation with polyurethane foam
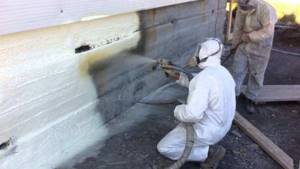
Thermal insulation of a monolithic foundation with polyurethane foam
Polyurethane foam is a fairly quick way to insulate a foundation. Before applying it, no wall preparation or waterproofing is required. Therefore, the time and labor costs at this stage are significantly reduced.
A five-centimeter layer of this material is comparable in thermal insulation properties to 12 cm of expanded polystyrene. The material fits tightly to the wall, there are no cracks or joints.
Its disadvantages are that it does not tolerate ultraviolet radiation, is expensive, and can only be applied with special equipment.
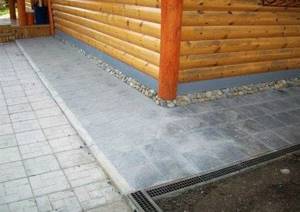
Which blind area is better - made of paving slabs or concrete?
Each of the above types of blind area has its own advantages, disadvantages and construction features. According to statistics and reviews, today the most popular (most often used) blind areas are poured from concrete and laid out from tiles. Therefore, it would be correct within the article to consider what is better, concrete or paving slabs for the blind area?
This question is asked by many craftsmen and users. Practical operating experience indicates the effectiveness of the tiles. The advantages are as follows:
the ability to create a continuous, strong and stable blind area. At the same time, ensuring the integrity of a concrete blind area is much more difficult than a tiled one;
maintainability. The tiles can be dismantled completely or partially. Thus, the process of repairing a blind area or laying communications is significantly simplified. In the case of concrete, it is necessary to destroy part of the blind area, dispose of the concrete fractions, and restore it again after laying. Eliminating tile subsidence or replacing a defective element in a tile blind area is not difficult and will not take much time. And most importantly, the tiles can be reused;
reliability. The tiled blind area drains water well due to the large number of seams. This allows us to assert that it does not deform as a result of soil heaving or water freezing. Water that has frozen on the surface of a concrete blind area can lead to local cracking of the material. At first, these cracks will not pose a threat, but each subsequent flooding will cause the crack to expand and the blind area to collapse. Another nuance is the location where the blind area adjoins the house. As you know, the blind area should not form a single structure from the foundations (should not be connected to it). Soil movement and freeze/thaw cycles will inevitably cause this bond to break. When laying tiles it is easier to ensure the required technological gap. In addition, the destruction of concrete most often occurs precisely at the place where it adjoins the foundation or plinth (the blind area comes off);
insulation of the foundation. The technology for laying paving slabs involves the arrangement of several layers, incl. the use of clay and the possibility of laying insulation. An insulated foundation blind area is an additional protection for the basement and ground floor, which reduces heat loss and ultimately leads to savings on heating the house;
reducing the height of the base. With a rigid blind area (made of concrete), the minimum height of the plinth should be at least 500 mm. For soft (tiles, paving stones, gravel, natural stone), a height of 300 mm will be sufficient. This reduces the cost of installing a plinth;
ease of work, no need for a reinforcing frame, minimum waste, minor dustiness of the work;
additional waterproofing of the foundation blind area. While a concrete blind area protects the foundation only from the influence of surface water (rain or melt), a clay hydraulic lock, which is made to form a cushion for laying paving slabs, allows you to protect the base of the building from groundwater;
more aesthetically pleasing appearance compared to a concrete blind area. A variety of installation options, designs, sizes and colors allows you to create a unique blind area.
The main advantage that led to the use of concrete as a material for the blind area is its low cost. Buying paving slabs and materials for laying them will cost more, even if you do the installation yourself.
Insulation under paving slabs
If paving slabs are used as the final finishing of the blind area, then it is enough to ensure a slope of 3%. Place it on a layer of cement-sand mixture, spread in a layer of 2 to 3 cm.
Final finishing with paving slabs
During the laying process, the tiles are tapped with a rubber hammer to level the surface flat. Upon completion of the work, the DSP is scattered over the surface, then passed over with a broom, sweeping away the excess. Next, pour water so that the mixture located below and caught in the seams between the tiles sets.
Note! The height of the border must be flush with the tiles, otherwise it will retain water. As you can see, only work done correctly will give a positive result.
As you can see, only work done correctly will give a positive result.
What tools are required for installation?
It is best if the junction unit is carried out together with the blind area device. In this case, the home craftsman will need to have a set of tools to perform concrete work. Since the concrete will not wait for anyone, it is best to prepare the tools in advance.
Most of the necessary tools and materials are standard and will not require significant investment:
- Protective clothing: suit, gloves, goggles, respirator, rubber boots.
- Construction rule, cord, pegs and level.
- Wheelbarrow for transporting solution.
- Mixer, shovels and bucket.
- Hammer.
- Boards for formwork
- Fasteners
- Damper tape or other insulator.
Handmade insulation of the blind area
The process of insulating a blind area yourself is simple. It is recommended to strictly follow the recommendations of specialists. Penoplex will not be difficult. It's easy to work with him.
Scheme of thermal insulation of the blind area
Schematic thermal insulation of a blind area with penoplex:
- The area is being prepared. Space is cleared and a trench is dug. The top ball of fertile soil is removed.
- Sand is poured into the bottom of the pit. Watered with water. It is carefully compacted.
- A layer of crushed stone is poured. Compacts.
- Penoplex sheets are laid.
- Reinforcement is being carried out.
- The gap between the wall and the sheets is filled with polyurethane foam.
- Formwork made of boards is being installed.
- The surface is concreted and asphalted. It is necessary to control the slope of 10 degrees.
Marking, excavation work
The marking is done with a metal rod and several wooden pegs. The corners are marked. Marking material is driven in. A cord is stretched around the perimeter of the building. Additional pegs are being installed. The resulting straight line is the main guideline.
You can seal a foundation with a high edge of the blind area. It is recommended to use polyurethane sealant and damping insulating tape.
During the excavation process, you need to correctly set the slope of the future trench. The bottom of the pit is carefully compacted. A regular tamper and log are used.
Installation of formwork
Structurally, the formwork is boards, 4-5 mm thick. They are raised to a height equal to the thickness of the blind area, with an addition of 5 cm. In the corners, individual elements are secured with bolts. This will make it easy to disassemble the structure after the concrete solution has hardened. Additionally, retaining elements are used to prevent the concrete from bursting. Mounted on the outside of the formwork.
Self-created formwork must be done so that expansion joints are formed along the perimeter of the concrete surface. If you do not follow the recommendations, cracks will appear in the foundation over time. The reason is the influence of the soil on the structure due to temperature changes. The distance between individual expansion joints should be up to two meters. Boards 2 cm thick are installed across the blind area. If pouring a concrete screed is not intended, there is no need to make seams.
Subsequent finishing
After insulating the foundation of the house from the outside with penoplex, the surface is plastered. For this purpose, a cement-sand mortar is often used. Before applying the composition, it is necessary to reinforce the surface. Here, as a rule, cement-based adhesive is used.
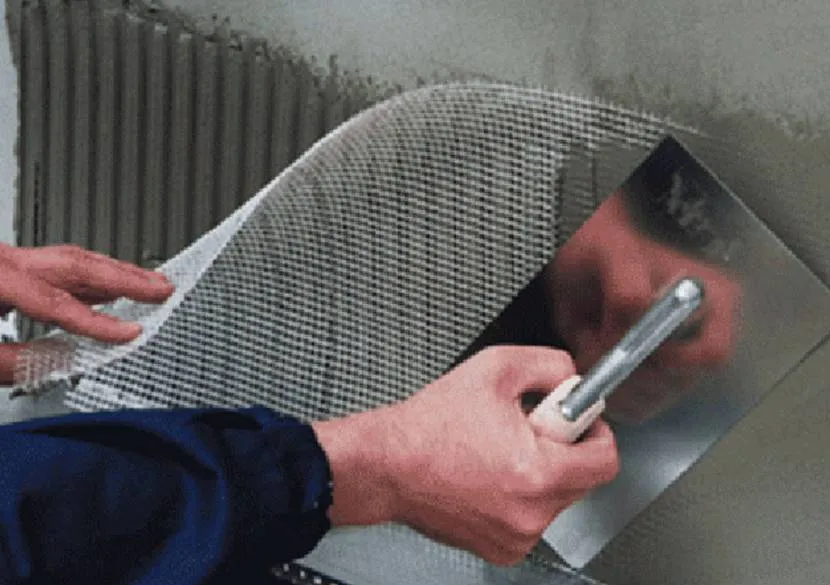
Reinforcement of the foundation with plaster mesh Source elka-palka.ru
The process looks like this:
- a rough surface is created using a brush with metal bristles;
- debris, dust and polystyrene foam chips are eliminated;
- apply the adhesive composition in an even layer using a notched trowel;
- the fiberglass mesh is attached by squeezing the solution through the cells and removing excess;
- After the composition has dried, the surface is leveled with plaster.
The insulated blind area with penoplex technology is reinforced with a metal reinforcing mesh with cells of about 10*10 cm. The concrete screed is formed with a slight slope away from the house at an elevation above ground level.
Advantages and disadvantages of insulating blind areas with penoplex
- The material practically does not absorb moisture. After a long stay in water, it increases by only 0.4% of the panel's weight.
- The samples are superior to competitors in moisture-repellent and heat-insulating properties.
- The insulation has a long service life, which is comparable to the operation of the entire building.
- Penoplex eliminates the main problems associated with frost heaving of the soil in the immediate vicinity of the foundation. The temperature near the base of the house does not fall below zero degrees, so the reasons leading to the destruction of the protective structure or its displacement relative to the base disappear. The foundation will not be subject to load from frozen soil.
- The product is not afraid of harmful aggressive elements, which are abundant in groundwater. Cement mortar and other mixtures are not capable of destroying it.
- The material is easy to cut and modify, despite its high density. The blocks are manufactured with high precision, which speeds up installation work. The heat-insulating layer under the blind area made of this product will reduce the cost of insulating the house.
- Penoplex preserves the integrity of the auxiliary structure, prevents soil subsidence in spring and swelling in winter.
Scheme and procedure for insulation with penoplex
The main task of insulation is to prevent freezing and swelling of the soil.
By following the order and installation rules, everyone will be able to insulate the blind area around the house, even if they are doing it for the first time. First of all, you need to take care of the necessary materials. Need to purchase:
- foam sheets;
- cement, sand and crushed stone;
- slats and polyethylene;
- bitumen and bitumen mastics;
- polyurethane foam;
- metal pipes;
- boards for formwork;
- shovel and plaster trowels.
Stages of the thermal insulation process for the blind area:
- Preparing the area. Space is freed up, trenches are dug and the top fertile layer of soil is removed. The trench should be close to the house. The depth of the trenches is approximately 30 cm. And its width is usually selected taking into account the width of the expanded polystyrene sheet, which is approximately 100 cm. This approach significantly reduces the amount of material waste. It is also necessary to remove all remnants of roots, since the root system easily extracts moisture and, when germinating, can destroy the foundation.
- 15 cm of sand is placed on the cleaned area as a layer. Then the sand layer is compacted and slightly moistened with water.
- The next layer is crushed stone 10 cm thick, which must be thoroughly compacted.
- At the next stage, sheets of insulating material are evenly distributed onto the prepared base of sand and crushed stone. If necessary, a reinforcing mesh is installed on top of it.
- The gaps between the wall and the sheets will be filled with polyurethane foam.
- Along the edge of the trench, I make formwork from boards 10 cm high above the ground level.
- Lay a mixture of concrete or asphalt. It is taken into account that there should be a slope of 10 degrees from the wall. When pouring concrete, through gaps (slots) must be left every 2 m. This is done using thin slats that are inserted into the concrete. After the concrete has hardened, the slats are removed. Then the resulting seam is treated with hot bitumen. If the slats are left in concrete, then they must be lubricated with bitumen mastic.
- Afterwards, along the edge of the blind area you need to make a drainage system. This is done in one of two ways:
First way. Asbestos-cement pipes are laid on the covered sand layer.
Second way. Install a concrete trench on the sandy base of the foundation, which can be given the desired shape using a piece of metal pipe or log.
Brief instructions for insulating the foundation:
- Prepare the foundation: remove construction debris, grease, dust and rust. If there are cracks or holes on the surface of the foundation, then they must be leveled with cement mortar and a level;
- An important step is to waterproof the surface. This is done using water or bitumen mastic. Solvents should not be used; they may destroy polystyrene foam;
- Using penoplex glue, the sheets are attached to the foundation. It is best to arrange them in a checkerboard pattern. Thickness - up to 10 cm.
Owners of strip foundations need to pay attention to the differences in the instructions for installing insulation. First, slabs are laid on the concrete base. Then a durable polyethylene film is glued, which is secured at the joints of the foundation with construction tape
The formwork is prepared and, after reinforcement, it is poured with concrete. After removing the formwork, the foundation needs to be insulated again, so polystyrene foam is again applied to the side walls
Then a durable polyethylene film is glued, which is secured at the joints of the foundation with construction tape. The formwork is prepared and, after reinforcement, it is poured with concrete. After removing the formwork, the foundation needs to be insulated again, so polystyrene foam is again applied to the side walls.
The re-insulated blind area is filled with concrete solution and leveled. Sometimes, in order to give it a beautiful and well-groomed look, the top is decorated with decorative stone.
Insulation of strip foundations, work algorithm
The order of work is as follows:
- The foundation is dug around the entire perimeter. The width of the trench must be at least 1/3 of the overhang of the roof slope. The depth should reach the base of the foundation.
- The foundation is thoroughly cleaned of dirt and soil residues.
- The following work is carried out in stages:
- Waterproofing the foundation in one of the ways;
- Drainage for drainage of groundwater;
- Foundation insulation work;
- Insulation of the blind area.
- After installing the insulation, the trench is filled with crushed stone.
When insulating a strip foundation, you should remember that:
- Sheets of insulation are mounted on the foundation walls using construction adhesive mixtures.
- Under no circumstances should additional fastening be carried out using dowels, since drilling concrete violates the integrity of the structure.
- The coating must be continuous; for this, all joints between the sheets are additionally filled with polyurethane foam.
- Types of waterproofing are selected according to the specific situation on the site. Coating, pasting, plastering and others can be used.
What is a blind area
A blind area is a protective and decorative structural element made in the form of a strip of impermeable covering along the entire perimeter of the building adjacent to the foundation. Although some developers do not attach importance to this element, considering it an unimportant design, such a misconception is fraught with serious problems in the foreseeable future. The main purpose of the protective strip is to drain rain and melt water from the building. Even with a drainage system, not to mention its absence, without a blind area, precipitation falls directly to the foundation, thus the base and base are constantly in a damp environment. Which, in turn, leads to dampening of the load-bearing elements, and then to deformation and destruction. If there is a blind area, especially an insulated one, this is excluded.
Refusal of the blind area, in an attempt to save money within the general construction budget, is an unjustified risk for the house, taking into account our climatic conditions. Leaving the foundation unprotected, you should not be surprised by the appearance of dampness and mold on the walls or cracks. In addition, if there is a blind area, the house looks presentable - you can choose almost any finishing layer. This can be backfilling with crushed stone or screenings, concrete, paving stones and more. Yes, even a lawn, if you want greenery as opposed to the usual paving. The blind area is a universal, multifunctional design:
- protective barrier for the foundation;
- thermal insulation of the base;
- protection of the facade from rain splashes in the basement;
- pedestrian zone in any weather;
- element of architecture or landscape design.
Material selection
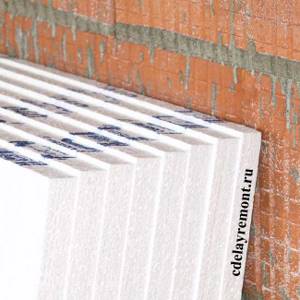
It is optimal to choose extruded polystyrene foam in slabs for insulating the blind area. They are produced in different brands, thicknesses and dimensions. Most of the properties of a material are determined based on its density: the higher it is, the correspondingly higher the strength, less hygroscopicity, moisture absorption and air permeability. Extruded polystyrene foam has the best density and waterproof characteristics. The size of the slabs is 600x1200 mm with a possible thickness of 30 to 100 mm. At the same time, sheets of standard polystyrene foam have a thickness of 20 mm, and for insulation of the middle part of the blind area it is preferable to choose EPP from 50 mm, and for corners from 60 to 120 mm, since in these zones there is always maximum freezing.
How to insulate a blind area
Durable, durable and moisture-resistant materials are used as insulation: expanded clay, polystyrene foam, polyurethane foam (foam rubber) and extruded polystyrene foam (penoplex). Any of the listed materials will reduce soil heaving and prevent the ground around the house from freezing, but the best of them is polystyrene foam, which consists of 90% air bubbles.
In addition to excellent thermal insulation properties, EPP has other advantages:
Healthy! According to research, if you completely immerse an EPP sheet in water for 30 days, during this time it will gain no more than 0.4% moisture.
- Fire resistance (class G1);
- Operating temperature range (from -50 0 C to +75 0 C);
- Low thermal conductivity, about 0.029 W/mK (provided that the thickness of the EPP sheet is at least 5-10 cm);
- Frost resistance;
- High resistance to mechanical loads;
- Lightness;
- Durability (up to 40 years).
Among other things, this material is considered environmentally friendly and chemically resistant to alkaline environments. Thanks to the latter property, polystyrene foam will not be affected by either the components of the cement mixture or groundwater.
The thickness of standard foam sheets is 20 mm, but for insulating the foundation and blind area it is better to choose EPP with a thickness of at least 50 mm for the middle part of the base and from 60 to 120 mm for the corners. The fact is that the corners of the blind area require more insulation, since in these areas the base freezes the most.
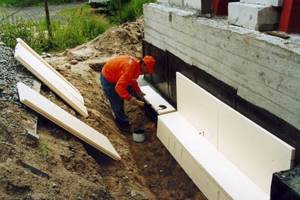
Installation of EPS
When the waterproofing is finished and the bitumen has finally cooled down, insulation of the foundation with polystyrene foam proceeds to the main stage. The thickness of the insulation is determined in accordance with the parameters of the foundation and the climatic characteristics of the region. For example, if the winter in the area where you live is harsh and long, it would be reasonable to lay the thermal insulation in two layers, five centimeters each.
Expanded polystyrene sheets are available both corrugated and smooth. To ensure optimal adhesion to glue, the former are better suited. But if you nevertheless purchased smooth slabs, immediately before installation, treat them with a needle roller.
How to attach?
Fastening polystyrene foam below ground level requires the use of exclusively special glue that does not contain organic solvents. It is applied to the insulation with dotted strokes in the corners and in the center of the sheet. Then the insulation sheet should be firmly pressed against the foundation and held until the glue sets.
Under no circumstances should you fix the thermal insulation in the basement using dowels, as they will damage the moisture-resistant layer. Above ground, the sheets are attached to the wall with hardware three days after installation, when the glue has completely dried. Each sheet contains approximately five dowels, which are driven into holes drilled through the insulating material.
How to lay it?
EPS sheets should be laid from the corner of the house, checking the correct installation using a level. At the corners, it would be better to lay the material in two layers, with a meter extending in each direction from the corner. The slabs are mounted to each other using a connecting locking system at the edges. If there are gaps between the sheets, they are sealed with polyurethane foam sealant.
Thermal insulation protection
Thermal insulation must be protected from rodents and unexpected ground movements. There are two main protective technologies: using geotextiles and roofing felt or reinforced fiberglass mesh. The cost of the glue on which the mesh is attached is quite impressive, so it is permissible to use cement mortar instead.
Backfilling the trench
The trench dug around the perimeter of the house, after completing the insulation work, should be filled in only when all the materials are dry, including the cladding of the basement floor.
This process occurs in several stages:
- the bottom of the trench is covered with a layer of sand up to 150 mm thick;
- the sand should be moistened, leveled and compacted well;
- Expanded clay or gravel is laid on top of the sand layer, the layer thickness is from 200 to 300 mm;
- the excavated soil is poured on top of the gravel cushion and compacted very carefully;
- The trench should not be completely buried; approximately 300 mm should remain to the ground level for the blind area.
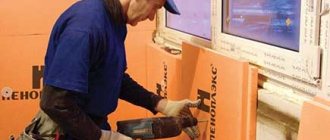
Do-it-yourself technology for insulating the foundation plinth from the outside with penoplex
The most commonly used is bitumen mastic, which is characterized by its low cost and ease of use.
The mastic is applied to the entire area of the base with a brush and left until completely dry. It is not recommended to preheat the material and glue penoplex directly onto it - this design will not last long.
Do not dilute the mastic with acetone or gasoline, since these solvents will destroy the penoplex by reacting with it. Mastic can be purchased in a ready-to-use form or made independently by melting the bitumen in a container and mixing it with used machine oil in a ratio of 1:3, which will give the material greater elasticity and the mastic will not crack even in severe frosts.
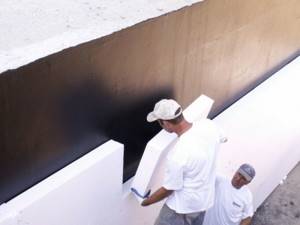
It should be applied in a layer 3-5 mm thick. After application, you must wait until it dries completely. The next stage is gluing sheets of waterproofing, for example TechnoNIKOL, carried out using gas burners, which should be kept at a distance of at least 20 cm from the surface to be treated so as not to damage the material.
Penoplex sheets are laid with an overlap of 8-10 cm on each other, and the joints themselves should be coated with mastic. This way the foundation will be completely protected from moisture.
TechnoNIKOL waterproofing is characterized by increased flexibility and ductility, which are maintained even at sub-zero temperatures. The company achieved plasticity of the material by impregnating waterproofing sheets with polymers.
- Bikrost is the most inexpensive option, but the service life of this material does not exceed 10 years.
- Linokrom, Bicroelast - materials belong to the average price category; with proper use they will last about 15 years.
- Uniflex - this material refers to products that have an above-average price. It consists of five layers made of different materials, so its range of applications is quite wide, and its service life reaches up to 25 years.
- Technoelast is the most expensive material, differing from those listed above in its longer service life (up to 30 years) and excellent quality characteristics.
Now you need to glue the foam boards, for which glue is used, most often acrylic. When gluing the boards, the following requirements are observed:
the glue is applied to the slabs pointwise; after gluing, it must cover at least 40% of the entire area of the material; the slabs are installed vertically, from bottom to top; penoplex must be pressed against the wall for at least 1 minute so that the glue sets properly; the first row of slabs is the lowest, it is laid along the entire perimeter of the foundation; the second row and subsequent rows of slabs are mounted above the first; when laying the material, it is important to ensure that the grooves on the tiles match, which will avoid large gaps between them; For additional fastening, you can use umbrella dowels; it is enough to use 4-6 pieces for each tile.
Important! When insulating the base, all gaps between the plates should be filled with acrylic glue or polyurethane foam.
A layer of fiberglass mesh is placed on top of the penoplex to protect the material from damage. The cladding is carried out using plaster, which enhances the waterproofing and thermal insulation properties of previously installed materials.
Possible variations of thermal insulation material
The market for building materials that perform a thermal insulation function is wide. Popular:
- expanded polystyrene;
- Styrofoam;
- penoizol;
- expanded clay
Let's take a closer look at their characteristics.
Extruded polystyrene foam
It is characterized by high density and low thermal conductivity. The material is strong enough to allow the use of thin sheets. Ecologically pure. Does not harm the body or the environment. Does not absorb water. Resistant to sudden temperature changes. The building material is easy to work with. No specialized set of tools is required for processing.
Penoplex
The main disadvantage is the fire hazard. It does not flare up on contact with fire, but burns well. A leveling coating is required to eliminate the possibility of mechanical influence.
Styrofoam
Shows good thermal insulation qualities. Easy to install, affordable. Can be cut into elements of any shape or design.
Styrofoam
Of the negative properties:
- short service life compared to other insulation materials;
- sheets of low density actively absorb liquid;
- produced in sheets. Butt joints require additional processing;
- instability to mechanical influence. Reinforcing mesh required;
- flammability.
Penoizol
Shows low thermal conductivity. They note the durability of use. Shows resistance to combustion. It is applied by spraying, forming a continuous, seamless layer of material. Requires equipment and specialist help. The cost of insulation is high.

Penoizol
The downside is destruction from excess moisture levels. Presence of toxic compounds in the composition.
Expanded clay
It is durable, fireproof, and moisture resistant. Harmless. Does not have a toxic component. Made from clay and slate. Accessible. Working with building materials is easy. You need to pour expanded clay into the trench.
Expanded clay
Suitable sand, crushed stone, gravel. The last type is optimal for blind areas. Absorbs less liquid, frost-resistant.
The best choice is penoplex
Penoplex is superior to analogues in operational and technical parameters. The structure is porous. But unlike polystyrene foam, the cells do not break down into granules. Each is filled with gas and insulated, providing a high degree of thermal insulation. The building material is dense and durable.
Has a small mass. Easy to cut. Doesn't crumble. The sheets are joined using the tongue-and-groove method, which simplifies working with the material. Available in several variations.
Materials for thermal insulation
Various materials are used to insulate strip foundations. Often found in construction practice:
Styrofoam
Foam plastic, produced in accordance with GOST 15588-2014 “Polystyrene foam boards. Technical specifications" made of foamed polystyrene. Supplied in the form of slabs (sheets) 100 cm wide and up to 200 cm long. The most commonly used foam is PSB (pressless suspension polystyrene foam) with a thickness of 50 mm. GOST 15588-2014 allows its use in the operating temperature range from -100 to +80 °C.
The thermal conductivity coefficient of polystyrene foam is 0.038-0.041 W/m*K (K-Kelvin).
When choosing the thickness of thermal insulation from foam plastic, proceed from the following criteria:
- For regions with winter temperatures of 10-20 degrees below zero, the thickness of the foam layer should be at least 50 mm;
- For winter with a temperature of minus 20-30 degrees - at least 100 mm;
- At minus 30-45 degrees - at least 150 mm.
Insulation of the foundation from the outside consists of thermal insulation of its outer part and base.
Polystyrene foam is applied over waterproofing, which is bitumen, roofing felt or other waterproofing materials. Most often, foam plastic is glued to bitumen mastic with special adhesives.
When laying foam plastic sheets in several layers, the seams between the sheets of the inner and outer layers are not allowed to coincide. The outer slab of material must move at least 10 cm relative to the joint seam between adjacent lower slabs to ensure that “cold bridges” do not occur. Covered joints increase the effectiveness of the thermal barrier.
Extruded polystyrene foam
Extruded (or extruded) expanded polystyrene (EPS) differs from traditional foam in its production technology, which uses extrusion processes. Structurally, EPPS differs from PSB due to stronger molecular bonds that provide high strength characteristics. Eps foam from Penoplex and TechnoNIKOL companies is popular on the Russian market. This material is optimal in terms of quality/cost criteria for thermal insulation of underground structures. The service life is estimated at 50 years. Thanks to the presence of grooves on the plates, the installation of thermal insulation is simplified while simultaneously sealing the fastening of the sheets to each other.
Thermal conductivity coefficient: 0.03-0.033 W/mK, which is slightly better than polystyrene foam. Accordingly, the thickness of the heat-insulating layer of EPS is almost the same as for polystyrene foam. The insulation process is identical to the installation of polystyrene foam.
Polyurethane foam
By spraying a layer of polyurethane foam up to 50 mm thick on the outside of the foundation, we achieve complete filling of all irregularities, seams and recesses of the strip foundation. The technology of applying an insulating layer on a surface has appeared relatively recently and requires the use of special equipment. The thermal conductivity coefficient of polyurethane foam is 0.023-0.03 W/mK.

Foam glass
Foam glass is a good option for insulating the foundation, but it costs three times more than EPS, so we will leave it as an option for the prospect of cheaper technology.
Expanded clay
Expanded clay has a porous structure that prevents the penetration of cold air. Expanded clay should only be used in conjunction with waterproofing to ensure optimal thermal balance in the building. This method has only one advantage - it is low price. There are a lot of disadvantages, but the most significant one is that expanded clay picks up moisture over time and stops working as insulation. And even in dry form, its heat-insulating properties do not shine - the thermal conductivity coefficient is 0.1 W/mK.
When can you insulate yourself, and when should you turn to professionals?
The blind area is one of the simplest elements in the construction of a private house. Any homeowner who knows how to work with their hands can handle it themselves. The main thing is to follow the technology of the device and correctly create a “layer cake” from building materials inside the structure.
There are 3 types of blind area:
- Tough. It is based on pouring concrete or paving. The participation of specialists is recommended here, since the technology is labor-intensive and will require hiring equipment and auxiliary tools.
- Semi-rigid.
The final covering here is made of paving slabs, which lie on a concrete base. Laying out the material and pouring the base require certain skills; it is not always possible to carry out the process efficiently the first time on your own. - Soft blind area. The technology does not involve concrete, so this process is easier to do yourself.
Accordingly, you can insulate the blind area with your own hands with a soft coating that does not require the participation of equipment and concrete work. For other types of coating, the intervention of professionals may be required, but if you act carefully and according to the instructions, insulation and installation of the coating yourself is possible for everyone.
Do or pay?
Now you know enough to decide what kind of blind area you need. Further material will help you understand the details, and in order to decide whether to take on the work yourself or order it from builders, we inform you: the price of just the work of constructing a blind area in Central Russia ranges from 2000-2500 rubles / sq. m. m for soft crushed stone up to 3300-4200 rub./sq. m for concrete monolithic. We emphasize: this is only work, the purchase of materials with delivery is the owner’s, so there is no need to count on wholesale discounts.
This is due to the fact that a normal customer, a normal designer and normal builders make the blind area at the same time as the entire structure. A finished house without a blind area is unfinished, but how much do builders like to finish unfinished projects and whether such work is profitable for them, you can ask any of them. Perhaps expand your knowledge of Russian, in parts not reflected in general-purpose dictionaries.