For a long time, flat roofs were used only on secondary commercial facilities as the simplest and cheapest structures .
For residential buildings, a similar design was used only in areas with suitable climatic conditions. But now this happens everywhere.
Often, attempts to build flat roofs in unsuitable regions led to the subsequent construction of a more convenient pitched roof.
With the advent of reliable and high-quality insulators and insulation materials (TechnoNIKOL), installing a flat roof for residential premises has ceased to be a risky and unpredictable activity .
Moreover, a well-equipped flat roof provides many interesting possibilities for use, creates an additional area with limited access for outsiders, you just need to reliably insulate and isolate the ceiling from water.
Internal location of insulation
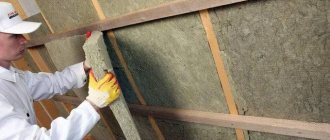
When figuring out how to insulate a flat roof from the outside, do not forget that insulation can also be done from the inside. This solution is especially relevant if there is an unused or technical attic space. In this option, all the necessary materials are attached to the ceiling from the inside. However, this does not relieve the need for external waterproofing.
This method of insulation is less effective than external insulation, but in some cases it may be the only possible one. Here, all the components of the structure and their arrangement will correspond to classic external insulation, with the only difference being that they will be located not from bottom to top, but from top to bottom, in the reverse order.
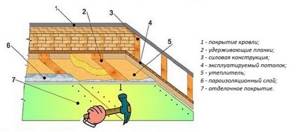
The only difference is the creation of a heat-insulating structure in residential premises, when the outer side of the assembled pie will act as a ceiling. In this case, the external component of the assembled “pie” will be a decorative coating. This can be either a suspended ceiling or any other solution that is more suitable in appearance or suits the taste of the owner of the house.
Useful video
In this video you will learn how to properly insulate a flat roof:
Comments: Comments to the post Insulation of flat roofs are disabled
A flat roof is an inexpensive and practical way to equip any structure. Often it is erected above multi-storey residential buildings, industrial facilities, garages and extensions (verandas, terraces). In the case of residential buildings, the flat roof must be insulated, otherwise it will be of little use. This is exactly what we will talk about in today’s article – insulating a flat roof with your own hands.
How to insulate a concrete roof with your own hands
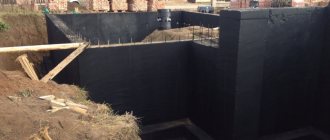
To prevent condensation, it is necessary to protect cold concrete structures from warm air, which contains a lot of moisture. When the air cools, moisture vapor precipitates in the form of condensation. Insulation of reinforced concrete slabs can be done inside and outside, but the stages of work, types of thermal insulation and finishing materials will differ. Let's look at insulating a flat concrete roof step by step.
How to insulate a concrete roof from the outside
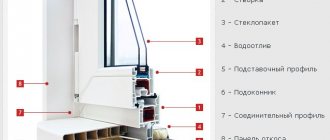
The structure of a sandwich panel with polystyrene foam insulation
The simplest and most reliable way to insulate a flat roof from the outside is to use sandwich panels. As can be seen from the photo, such a panel consists of two sheets of galvanized or painted corrugated board, between which there is polystyrene foam. On the one hand, sandwich panels are reliably protected from moisture and mechanical damage and can withstand heavy loads, and on the other hand they have low thermal conductivity.
Laying sandwich panels will require the use of construction equipment, which will significantly increase the cost of the work. A simpler option, when you can insulate a concrete roof yourself, is to use expanded polystyrene with roll waterproofing, for example, roofing felt. This technology is shown in the video at the end of the material. Such insulation of slabs can last for many years, the main thing is to check the waterproofing.
How to insulate a concrete roof from the inside
Photo. How to insulate a concrete ceiling and ceilings with foam plastic
It will be much easier and cheaper to insulate this structure from below, provided that you do not have to dismantle the expensive finishing on the ceiling. The easiest and most inexpensive way to insulate any surface is to use foam boards, despite the fact that it is a highly flammable material. If you plan to sheathe the ceiling in the future, this will not be a serious problem, especially if you use plasterboard sheets for finishing.
You can use non-flammable basalt thermal insulation, but attaching it to the ceiling will be much more difficult. It will be necessary to make an additional frame from profiles, as well as protect the mineral wool with a vapor barrier. In the video at the end of the article, we have selected a video clip for you, where one of the craftsmen shares his method of insulating a concrete garage roof from the street, using polystyrene foam boards, plywood sheets and roofing felt for thermal insulation.
Insulation technology
It's time to tell you how to insulate a flat roof yourself. Since the disadvantages of bulk insulation do not allow us to talk about them as the best options for arrangement, we will touch on the use of mineral wool boards and extruded polystyrene foam.
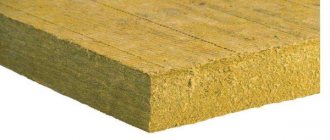
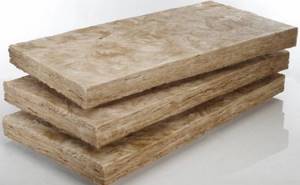
Mineral wool slabs
Let us immediately make a reservation that not all mineral wool slabs can be used to insulate a flat roof in use or a classic soft roof. Basalt slabs are best suited for this purpose; the fibers in them are directed in different directions - this allows them to withstand high loads. Of course, you can protect fragile insulation with a screed (dry or wet), but this will create additional load on the supporting structures.

Mineral wool insulation technology:
- The base for installation is reinforced concrete floor slabs or metal profiled sheets.
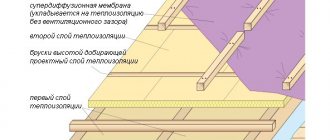
- Regardless of the type of base, before laying the insulation, it is covered with a vapor barrier membrane. If you neglect this point, over time the mineral wool slabs will become saturated with condensation and will no longer retain heat, and the waterproofing laid on top of them will become adorned with “blisters”. Vapor barrier membranes come in single- and double-sided versions. In the first case, you need to leave literally 3-4 cm of free space between the membrane and the base so that the condensate can evaporate freely. When using a double-sided membrane, it is not necessary to leave a ventilation pocket. As an alternative to membranes, you can use conventional construction polyethylene or weld-on materials (bitumen, polymer bitumen). As a result, the vapor barrier should cover all horizontal and vertical planes, and the coating should be installed just above the level to which the insulation will reach.
- Mineral wool boards should be laid in one or two layers. In the second case, you need to calculate in advance the thickness of the future roofing pie and, if necessary, enhance the thermal insulation with a layer of thin and high-strength slabs. This is usually done in northern regions, where the level of humidity and temperature fluctuations are so great that they damage conventional insulation materials.
- The slabs are attached to the base with telescopic dowels or glued to bitumen - the method depends on the type of base. Dowels are best used for corrugated sheets, but they are also suitable for concrete slabs, however, fasteners for concrete are more expensive than for metal. If you prefer a mechanical fastening method, the vapor barrier should be built-up. Gluing insulation onto bitumen is quite troublesome and expensive, but this method is recommended for insulating roofs with concrete bases. A layer of bitumen is applied to the surface and the slabs are glued end to end. If you need to create a second layer of insulation, coat the surface of the first layer with bitumen and glue additional slabs onto it “in a staggered manner” (so that the joints of the second layer do not coincide with the joints of the first).
- If the insulation was fixed mechanically, then the waterproofing on top of it should be fixed in the same way, that is, using dowels.
Video about insulating a flat roof with mineral wool:
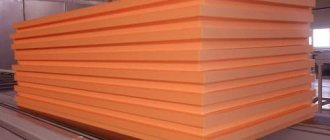
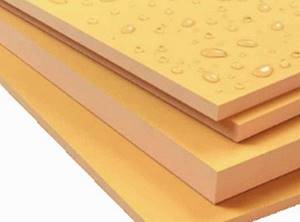
Extruded polystyrene foam
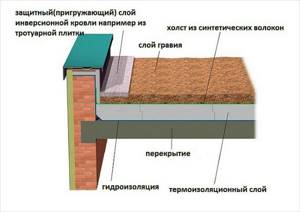
Extruded polystyrene foam is highly durable and waterproof, and therefore is most often used for insulating inversion roofs. The slabs have slot locks that provide a very dense surface, but for greater reliability, it is recommended to glue all joints with construction tape.
The beauty of polystyrene foam is that working with it is very simple and quick:
- First, the slabs are laid on the base slab, gluing the joint gaps with construction tape. If it is necessary to lay the second layer, the slabs are installed “in a staggered manner.”
- Geotextiles are laid on top of the polystyrene foam insulation, designed to protect the lower layers of the cake from contamination and mechanical damage.
- A 5-10 cm layer of gravel or crushed stone is poured onto the geotextile. Sometimes, for additional drainage, a profiled membrane is laid between the geotextile and the powder.
- Finally, crushed stone or gravel is poured with a screed and the finishing coating is laid. If you plan to plant lawn grass or flowers on the existing roof, an additional layer of geotextile should be laid on top of the backfill, and then 15-20 cm of fertile soil should be poured.
Insulating a flat roof is not so easy, but this measure is considered necessary if you want to live in a warm house and not overpay for heating.
Minuses
If you insulate the ceiling with extruded polystyrene foam, you should also be aware of its minor disadvantages. There are only two of them:
Complete isolation of the room. This means that when sticking polystyrene foam onto the ceiling, the created layer will not allow air to pass through and the room will need good ventilation. Release of toxic substances during combustion. The insulation itself will not burn, but in case of fire it heats up to a high temperature and begins to release harmful substances
However, if a fire occurs, this nuance will not be the most important.
The remaining disadvantages of such insulation can be considered the same for all types of polystyrene insulation boards.
How to insulate a flat roof of a house with your own hands
Insulating flat roofs on your own is possible for everyone. If you delve into the matter well, prepare properly and follow all the instructions step by step, then you can do this work almost at a professional level.
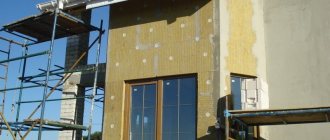
Insulating a flat roof from the outside
To insulate the roof with your own hands, use any of the classic installation methods described above. A feature of insulation can only be the type of insulated roof base (reinforced concrete or corrugated steel sheet) and the technique for attaching the heat-insulating layer.
Methods for attaching thermal insulation board:
- mechanical method;
- ballast method;
- glue method.
Mechanics. Thermal insulation boards are fixed mechanically using special sliding fasteners. They are long, complex anchor designs, with self-tapping screws screwed into the base. The telescopic mount goes through the entire thickness of the construction pie, and the plastic flat heads rigidly hold the entire structure. For reinforced concrete slabs, special anchors are used, and for cement screeds, plastic sleeves are used.
Ballast. Thermal insulation boards are laid on a flat roof and covered with a layer of waterproofing, and then, on top of it, a layer of gravel (expanded clay) is poured. If the roof is operational, then instead of a loose layer after waterproofing, plastic supports are installed on the roof surface for laying tiles. All elements of the roofing pie lie absolutely free (ballast). Fastening is carried out only around the perimeter of the roof, at the exit points of the chimney, ventilation and drainage system.
Glue. Heated bitumen mastic is used as glue in this method of roof insulation. Thermal insulation slabs are glued to the base (reinforced concrete panel). It is necessary that the adhesive adhesion of both surfaces be at least 30% of the entire roof area. All other layers of the roofing pie are attached in the same way. It should be remembered that all work must be carried out on a dry day, otherwise the insulation will absorb moisture and lose all its useful qualities.
Insulating a flat roof from the inside
Physically insulating the roof from inside the house is not very convenient, since most of the work requires holding your hands up. However, this process also has its advantages - insulation is carried out regardless of weather conditions, and there is no risk of the thermal insulation material getting wet.
The classic method of insulating a roof from the inside of a house is done in the following order:
- A lath is made from timber on the ceiling. The dimensions of the wooden beam must match the thickness of the insulation board, and the width of the step between the beams must match its width. The insulation board is easy to cut; if necessary, it can be cut to any size.
- Next, insulation boards (mineral wool or expanded polystyrene) are attached to the finished sheathing. For this purpose, glue, bitumen mastic, and a stapler are used.
- After all the intermediate areas between the lathing slats are filled with insulation, proceed to the stage of waterproofing the ceiling. A vapor barrier film is secured to the sheathing bars using a construction stapler.
- Then the ceiling is covered with plasterboard, a suspended ceiling is made, or one is combined with the other. Further finishing of the ceiling is carried out according to our own design.
By following the rules for insulating the roof from the inside, you can be absolutely sure that the house will be warm, dry and comfortable. A roof made with your own hands “conscientiously” will become a reliable outpost and a source of special pride for the owner.
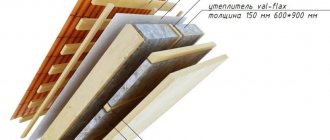
Single-layer and double-layer thermal insulation
Insulation of a flat roof can be done by laying one or two layers.
Single-layer thermal insulation system
Its main distinguishing feature is that it is based on insulation for flat roofs of the same density. When planning the creation of an exploitable roof, as already mentioned, a concrete screed is laid over the heat-insulating layer. The use of such a system is advisable in case of repair of an old structure or during the construction of warehouses, industrial buildings, garages.
Double-layer thermal insulation system
Its structure is completely different. The top layer should be made on the basis of an insulating material characterized by increased density and significant strength. Its main task is to redistribute mechanical load. The thickness of this layer should be 30-50 mm.
The purpose of the bottom layer is to perform the main heat-insulating function. Its thickness remains within the range of 70-170 mm.
Today, the construction market offers new generation materials that combine the quality characteristics of both layers. The upper edge of such insulation is characterized by significant rigidity, while the lower edge is much softer. Installation of such slabs takes very little time and is not associated with any difficulties.
Outdoor installation
With this approach, all layers of insulation and waterproofing are located on the outside of the ceiling. Accordingly, it is necessary to create a heat-saving “pie” that can withstand all temperature and climate changes. There are two main types of flat roofs, insulated differently:
- Classic
- Inversion
A classic roof is insulated according to a standard scheme and the layers are laid in the following order, counting from bottom to top:
- Floor slab
- Vapor barrier film
- Insulation
- Waterproofing
This scheme has a significant drawback - external waterproofing requires periodic maintenance and repair. It is produced every two to three years and this entails additional costs, although such a roofing device is slightly cheaper than the other option - the inversion one.
This type of roofing is considered more expensive to install, but it withstands temperature changes better and does not require such frequent repairs. Its fundamental difference from the classic version will be a different scheme for laying layers and arrangement:
- The first will be, as in the previous case, the floor slab
- Then - screed
- Next comes waterproofing
- Next is insulation
- A special film is placed on top - a filter.
- Cover the pie with expanded clay or gravel, at least 50 millimeters thick
This solution allows you to protect the waterproofing gasket and significantly increase its service life.
The importance of vapor barrier for high-quality roof insulation
The vapor barrier layer laid on the base must have excellent vapor-retaining properties in order to prevent vapors rising from the interior to the roof from penetrating the insulation. As you know, as insulation becomes saturated with moisture, its thermal conductivity decreases. In addition, steam accumulations lead to the formation of swellings in the waterproofing carpet, which over time provoke the destruction of the coating. For this reason, the issue of choosing a vapor barrier must be taken very seriously. It comes in two types:
Film - polyethylene or polypropylene film is used for insulation. The main disadvantage of these materials is the presence of seams: moisture can seep through them.
Fused - created on the basis of materials of the welded type - for example, bitumen or polymer bitumen. The absence of seams when constructing such a vapor barrier guarantees the tightness of the coating. Its other advantages are the significant thickness of the deposited layer and increased tensile strength.
PIR boards
A flat roof, without a doubt, will withstand the weight of objects standing on it and pedestrian loads and will serve for a long time without repair if you use PIR slabs as insulation, which are produced by TECHNONICOL, PirroGroup, Isobud, Lissant, ProfHolod. This is a new generation material based on polyisocyanurate foam (one of the types of rigid polyurethane foam). It appeared on the Russian market not long ago, so it is worth recalling that PIR boards have the lowest thermal conductivity among modern insulation materials: λ = 0.021–0.023 W/(m • K). While for extruded polystyrene foam slabs λ = 0.031–0.033 W/(m • K), and for stone wool slabs λ = 0.034–0.046 W/(m • K). The structure of the material is formed by closed cells filled with gas of low thermal conductivity (from 0.016 to 0.022 W/(m • K), which is noticeably lower than the thermal conductivity of air (0.0266 W/(m • K). This structure provides high efficiency and excellent thermal insulation characteristics, guaranteeing maximum thermal protection even with a small thickness of insulation.
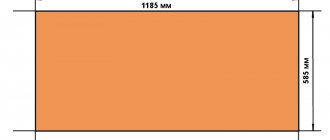
The high compressive strength of PIR boards allows them to be used in flat roof systems, where they demonstrate the required resistance to foot traffic. The cost of 1 m² of thermal insulating PIR boards F/F with a size of 2385 × 1185 mm and a thickness of 40 mm is from 505 rubles, which is slightly higher than that of other thermal insulation products.
PIR is one of the most modern environmentally friendly insulation materials. It has characteristics that are extremely important when building a private house with a flat roof. Firstly, the low thermal conductivity of the PIR board allows you to reduce the amount of insulation and the overall weight of the roof structure. Secondly, the service life of such insulation is more than 50 years. It is not afraid of moisture, is durable, and does not trample, which is of paramount importance at the stage of arrangement and operation of the roof, including those equipped for a green recreation area. The main thing when installing insulation boards is to carefully adjust them to each other, avoiding gaps, the presence of which is fraught with heat loss, freezing and condensation formation. Keep in mind: rigid PIR boards follow the unevenness of the base, and this, of course, reduces the aesthetic perception of the work performed. Therefore, insulation should only be laid on a leveled surface.
Vladimir Shalimov
Leading technical specialist at TECHNONICOL
The process of installing a drainage membrane in an inversion system
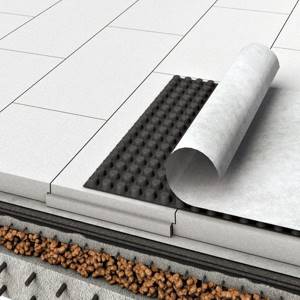
A layer of gravel is poured onto the reinforced concrete base, a screed is poured, it is covered with two layers of rolled waterproofing, on top of which a Planter geo (TECHNONICOL) drainage membrane is laid with geotextile facing up. When connecting rolls, the geotextile of the bottom is separated from the base by the required amount for “joining” with the next sheet
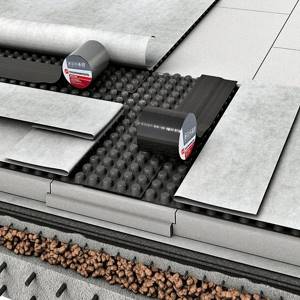
As new canvases are laid, overlapping edges are formed on the long and short sides. To ensure that the drainage fabric is “continuous”, the seams are secured with Planterband tape.
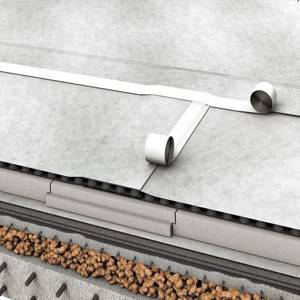
And geotextiles - with double- or single-sided adhesive tape for geotextiles, obtaining a whole filter layer
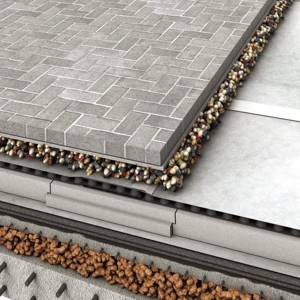
For the ballast layer (from 40 mm), gravel of fractions 20–40 mm and weighing at least 50 kg/m² is used. It can be used as a finish on an unused roof, and when used, ceramic tiles or paving stones are laid on gravel
Photo: TECHNONICOL (5)
Thermal insulation materials
When constructing a layer of thermal insulation, a variety of materials are used: they all differ in physical and mechanical properties and method of installation.
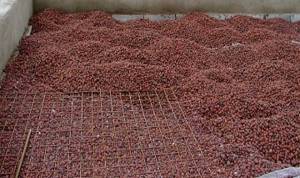
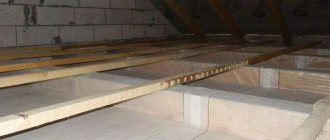
The most affordable insulation, still used in private and urban construction, is the use of backfill materials. The main ones are perlite sand and expanded clay . The main and, perhaps, the only advantage of using these materials is their low cost. In all other properties, they cannot compete with modern gas-filled polymers and fiber insulation.
Absolute horizontality of flat roofs is unacceptable.
In accordance with technological requirements, they must have a minimum slope of 2-4 degrees. clay as insulation , it is extremely difficult to level the surface in such a way as to create a smooth slope and achieve the same thickness of the screed along the entire roofing plane. Working with expanded clay significantly increases costs and increases construction duration.
Insulation based on mineral wool in most cases does not have a sufficient level of strength to create a full-fledged base for a waterproofing carpet. For this reason, in order to strengthen it, new constructive solutions are needed. In this case, a screed device is used above the insulation. It helps to distribute the load evenly and create a base of the required rigidity for laying a waterproofing carpet. There are two types of screeds:
- Prefabricated screed - created from flat or asbestos slate sheets covering the insulation. The installation of such a coating is quite expensive and significantly increases the cost of the work carried out.
- Wet screed is essentially a simple cement-sand mortar. It is a more budget-friendly option, but has one big drawback: its use can lead to dampening of the insulation. For this reason, when choosing this method, a separating layer based on kraft paper or glassine is placed under the screed.
Another disadvantage of this method is the significant drying time of the cement-sand composition. If waterproofing is applied to a mixture that has not completely dried, bubbles appear on the surface of the finished roof, significantly reducing the service life.
The obvious fact is that screed is by no means an ideal way to obtain a rigid base if you choose not very durable insulation. In addition to increasing the financial costs associated with construction, it also increases the weight of the coating, increasing the load on the floors.
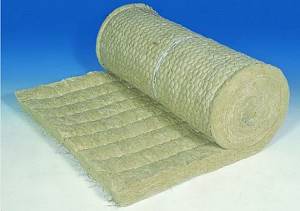
For this reason, it is recommended to choose very durable thermal insulation slabs made from mineral wool, which is obtained from basalt rocks. Their production uses a special technology with double fiber orientation, which significantly increases their rigidity.
Rigid slabs based on basalt fiber have a number of advantages:
- ease of installation;
- excellent thermal insulation properties;
- increased fire safety.
- A significant disadvantage of fibrous materials is their significant hygroscopicity. If the waterproofing layer is damaged due to cracks formed in the screed, moisture penetrates into the insulation layer. As materials with a fibrous structure become wet, they lose their thermal insulation characteristics, resulting in insulation becoming of lesser quality.
The listed materials are used for insulation of flat roofs of classical design.
When insulating inversion roofs, materials such as foam glass or extruded polystyrene foam are used. Their advantages over mineral wool are non-hygroscopicity and high mechanical strength.

Foam glass is a relatively new heat-insulating material that has become widespread in the creation of flat structures due to its exceptional qualities.
The distinctive properties of foam glass are:
- resistance to high temperatures;
- mechanical strength;
- resistance to ultraviolet rays;
- non-susceptibility to biocorrosion;
- excessively long service life (it is practically unlimited);
- preservation of the geometric shape is achieved due to the low coefficient of thermal expansion.
The gables of a house made of timber - useful tips on choosing material and construction.
You will find maximum useful information about the design of a hip roof in this article.
Copper roofs: why it is beautiful and profitable, read at
As a result of the presence of the last of these qualities, the mechanical loads exerted on the waterproofing membrane are significantly reduced, as a result of which the material retains its quality characteristics throughout its entire service life.
- Its disadvantage is considered to be its high price compared to other insulation materials.
Extruded polystyrene foam (or extruded polystyrene foam) is a new advancement in the field of thermal insulation technology. The material has a uniform structure and is composed of completely closed small cells (0.1-0.2 mm). During its production, polystyrene granules are mixed under high pressure and at high temperature, a special foaming agent is introduced into the composition, and then extruded from the extruder. We can confidently say that in terms of quality characteristics this material has no analogues in the world. Extruded polystyrene foam has:
- the lowest thermal conductivity among analogues;
- resistance to chemical agents;
- increased compressive strength;
- resistance to the formation of mold and mildew;
- steam and waterproof.
According to the results of a number of studies, the degree of water absorption of the material is a maximum of 0.2 percent by volume. It is also important that moisture does not penetrate inside: only the cells located on the surface are filled. Thanks to this quality, when installing thermal insulation on a flat roof, there is no need for additional protection of the material.
Flat roof: right and wrong
Flat roofing in Russia has a worse reputation. According to ordinary people, it must leak, because rain moisture and snow have nowhere to go compared to a pitched rafter roof. Water must certainly accumulate and test the strength of the waterproofing layer every second. And this means constant repairs, waste, effort, nerves...
Where does the stereotype come from? From the very recent past.
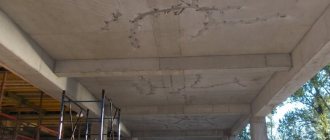
In the USSR, flat roofs were used in the construction of multi-story administrative and utility buildings, as well as residential buildings from three to twelve floors. Until now, in advertisements for searching for an apartment they write the sacramental: “Not the last floor,” because it is firmly entrenched in the mind that the roof will leak, the ceiling will get wet and turn black. Proven by practice. In those days, the issue of energy efficiency of buildings was not on the agenda, and therefore no one was particularly concerned about how to get rid of the disadvantages and turn them into advantages. Year after year they patched up roofing felt, whitewashed the ceilings, scolded the material, the hands and those who came up with the idea of building flat roofs, and that was all.
Meanwhile, already in those years it was possible to build truly aesthetic and practical roofs, including in the private sector. Moreover, such a roof has a number of advantages over pitched roofs:
- the final area is significantly smaller, which means the consumption of materials is also reduced;
- there is no need to erect complex rafter structures, and there is no need to ventilate the attic;
- it is easier to work on construction: all manipulations are carried out on a plane, and not at a serious slope;
- more convenient to use: you can walk on it, you can mount solar collectors, antennas, external air conditioning units on it, and also organize an additional recreational area - solarium, barbecue, even a swimming pool;
- there is no risk of snow melting, and there is no need to clear the roof of it: with the correct construction technology, the snow cover will become an additional heat-insulating layer, and in the spring it will melt and neatly flow in rivulets into, again, a properly organized drain;
- gives more options for architectural solutions.
Strictly speaking, a flat roof is not flat at all, it has a slight slope of 2 to 4% to drain water. The slope can be centripetal, then moisture flows from the edges to the center, like in a kitchen sink, and enters the internal drain pipe. Or there may be a reverse slope, when the edge of the roof is 2-4% below the central point, the ridge. Then rain or melt water goes into gutters and drainpipes located on the facade. Therefore, a properly constructed roof should not leak.
The second mandatory condition for a “correct flat roof”, which previously was not taken into account at all, is insulation. After all, from 30 to 40% of heat loss occurs through the roof: warm air collects under the ceiling, and if it does not meet a barrier, it easily leaves your home.
Another side of this coin: it is the warm air from the room that heats the ceiling and melts the snow accumulated outside. Alone, waterproofing can withstand this pressure for some time, and then the layer begins to deteriorate and requires replacement. At the same time, the ceilings are covered with black and white painting of fungus.
Therefore, although the installation of a flat roof is more budgetary, you cannot save on technology. All layers of the roofing pie must be in place and made of materials of proper quality. But what it will be like depends on which design you choose. They are distinguished based on:
- Constructive division into attic and non-attic. From the names it is clear that we are talking about whether you want to equip the under-roof space or not.
- Functional division into exploited and non-exploited. Installing a roof on which people will actively walk, on which they will install furniture, appliances, lay lawns and install swimming pools, is significantly different from installing a roof that will not be inhabited in the future.
- Divided according to the method of insulation into traditional and inversion. That is, the layers are laid in the usual or reverse order.
All classifications are closely related and influence each other. For example, a green roof that is in use, that is, on which a plant carpet will appear, requires inversion laying of the “pie”. And the attic allows you to use both methods.
Whatever problems you solve, constructive or functional, the basis for the execution of any option will be insulation. It serves not only its intended purpose - with its help, the same slope of 2-4% is formed, and also ensures the strength of the top layer. So you need to take the choice as responsibly as possible.
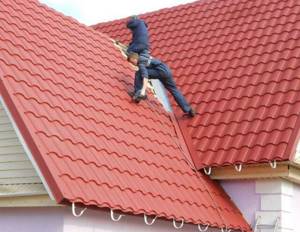
Installation stages
Let's figure out how to properly install metal tiles so that they last a long time. When laying the membrane to protect against moisture, it should be taken into account that it should remain with a slight sag, about 20 mm. In this way, it will be possible to ensure the drainage of condensed moisture, thereby protecting the rafter system and other roofing elements from rotting. To allow water to evaporate in a timely manner without stagnating and thereby creating an unfavorable environment, care should be taken to include in the design a ventilation gap, which is placed between the moisture-repellent film and the roof ridge.
This technology for installing metal tiles implies that the clearance will allow air flows to easily circulate in the space under the roof, removing all condensation. The laid membrane must be free of ruptures and other damage. To secure it, it is best to use a construction stapler. The layers of the membrane are laid with a slight overlap, and its edges are sealed with tape.
The design of the roof with a cold attic is such that it can be used in regions with any climatic conditions. Quite a lot of people believe that this type of roofing is not applicable to northern regions, although in fact this is not the case. Often, cold attic spaces are most often installed in such regions. The attic itself is insulated, and the cold roof does not in any way affect the internal microclimate of the upper floors. You don’t even have to use the attic, because laying a layer of insulation between the top floor and the under-roof space eliminates all the nuances that affect heat loss.
When installing a cold roof made of metal tiles, it is necessary to take care of the thermal insulation of ventilation openings, chimneys and exits to the attic. In this case, you will not have to worry about the accumulation of condensation, icing, heat loss, or the flow of rain and melt water.
Classification of insulated flat roofs
The external simplicity of a flat roof can lead to deep bewilderment for home craftsmen who want to quickly erect a roof over private property. Those who consider flat roofing a budget option will also be surprised.
If the roof is built wisely: with the proper number of waterproofing layers, with insulation of the required thickness, with parapets, drainage and its heating, in the end it will cost quite a lot, but also work flawlessly.
Flat roofs of the following categories are subject to insulation:
- Combined, they are also without attics. Their roof structure is combined with the ceiling. Insulation is carried out by laying thermal insulation with accompanying layers on top of the base. The advantage of combined systems is that they practically do not require winter clearing of snow cover. After all, the ceiling is regularly heated from the inside. Minor snow deposits can be easily removed by the natural force of the wind, which is why it is recommended to equip such roofs not with parapets, but with lattice fencing. Disadvantage: the condition of the roof is difficult to monitor. The slightest damage will result in leaks, followed by serious restoration of the roofing pie.
- Attics, which have two subtypes within the category. The attic floor of the first subtype is supplemented with a light superstructure on top. It is clear that in such cases the ceiling should be insulated. In the scheme of the second subtype, the attic superstructure and the ceiling are independent structures. This means that insulation is acceptable for both of them. The advantage of attic structures is the free monitoring of the condition of the roof and the timely detection of impending leaks. Owners can dry out the roofing pie by simply ventilating the attic. Among the significant advantages is the ability to carry out insulation upon completion of roof construction. The disadvantage lies in the impressive cost, which, however, pays off through long-term operation and rare repairs.
The second category of attic roofing systems means that the insulation can be located either within the superstructure or above the ceiling. However, the second option for laying insulation for a flat roof is a priority.
According to the second scheme, an air chamber is formed between the roofing and the thermal insulation system. This is an attic that divides the structure into two parts with different temperature backgrounds.
The difference between the external and internal temperatures of the attic roof will not be as significant as it is with structures without an attic. The temperature change will not be so sharp and destructive. Plus a minimum of condensation, which is the secret to the longevity of attic roofs.
How to lay insulation ↑
- Placing rigid roof insulation on a flat roof begins from the low area of the roof, more precisely from its corner. If for some reason the slope of the structure was not observed during construction work, then you need to start from the installation sites of the gutter or water intake funnels.
- Thermal insulation boards are placed on the profiled sheets in such a way that the corrugations and their long sides are mutually perpendicular. In this case, fastening can be done through different ridges.
- Plates in multilayer thermal insulation are arranged according to the principle of brickwork, that is, the seams are staggered. In addition, the seam lines and crosshairs in the upper tier cannot coincide with those in the lower row.
Below is one of the options for cutting and laying insulation.
Mounting options
To fix the insulation layer on a flat roof, the following methods are used:
- Fastening is done using so-called telescopic fasteners. They consist of a flange with a smooth outer surface and a tubular rod. The various standard sizes of disc dowels available on the market allow you to fasten roofing pies of various thicknesses.
- Anchors are driven into concrete floors and secured to the screed with screws with plastic sleeves.
- To calculate the required number of fasteners for an insulated flat roof, the default condition is taken as a basis: two units of fasteners for each slab.
- For concrete roofs, the coating and insulation are fixed simultaneously. If the base is made using profiled sheets, separately.
- In certain areas (roof penetrations, lines connecting to vertical planes, etc.), the installation step of fasteners is reduced.
- All layers of the roofing cake, including thermal insulation, are glued to hot mastic, most often bitumen-polymer. The insulation must be glued evenly. In this case, the total area of contact between the heat-insulating material and the base must exceed one third of it.
- If the roofing pie is completed with bitumen or bitumen-polymer material, then the installation of the roofing system cannot be carried out during the rainy period, since excess moisture will accumulate in the insulation without the ability to escape outside. But when using a roofing membrane as a finishing coating, you can glue it throughout the year, since the membrane allows excess moisture accumulated in the insulation to pass through.
ballastnie-krishi-1 ballastnie-krishi-2
Ballast.
The insulation is laid on a flat roof and covered with a waterproofing carpet. A mixture of gravel and pebbles is poured over the waterproofing layer or paving slabs are laid on plastic supports. The components of the roofing pie lie freely. The pie is fixed exclusively around the perimeter, as well as around the roof penetrations.
Green roofs are also classified as ballast roofs. Although it should be noted that the roof with landscaping is inverse, so the order of the layers of the roofing cake differs from the traditional one. The insulation is laid on top of the waterproofing, which simultaneously functions as a vapor barrier. The thermal insulation layer is covered with a geodrainage polymer membrane, on which a soil-vegetative layer is arranged.
Installation of thermal insulation from the inside
Installing insulation slabs from the inside of a building with a flat roof is physically not very convenient, but practical. After all, installation can be carried out in almost any weather. And there is no need to rush to complete the work in a day, because the insulation does not get wet.
The algorithm for installing thermal insulation is as follows:
- Along the line where the ceiling meets the wall, a plank of wooden block is screwed in, the thickness of which on one or both sides is equal to the thickness of the insulation.
- The same bar is attached on the opposite side.
- We screw a block, both or one of the sides of which is equal to the thickness of the insulation board, along the line where the ceiling and wall join.
- We install a similar bar made from a bar on the opposite wall.
- Rigid polystyrene foam boards are perfect for internal insulation.
- The ceiling is conventionally divided into strips.
- The polystyrene foam board is glued to the ceiling and plank using bitumen mastic and pressed tightly. The marked strip is completely filled with polystyrene foam. If necessary, the outer slabs are trimmed.
- On the side of the completed strip of polystyrene foam boards, pressing tightly, another strip is screwed.
- Next, the insulation strip is formed and glued again.
- Alternating these two operations: screwing the bars and gluing the thermal insulation, fill the ceiling plane.
- Fixing them with a stapler, a plastic film is attached to the planks and the ceiling is finished with some convenient covering material, for example, plasterboard.
Related Posts
- Beautiful roofs of houses with an attic and a balcony: photos, interesting ideas (103 photos)
- Isover thermal insulation overview
- Insulation of a veranda in a wooden house
- Roof height in relation to the width of the house and how to calculate the height of the ridge for different types of roofing
- Sloping roof rafter system: nuances of calculations and design + examples of construction
- Insulating the attic from the inside if the roof is already covered: step-by-step instructions
- Insulating the attic with foam plastic
- Covering the roof of a house
- Mineral wool, its characteristics and insulation composition
- Properties and types of dowel mushrooms for fastening insulation
- Subtleties of attic floor insulation
- Izovol
- Baswool insulation: characteristics and scope of application
- The roof of the Sudykina structure
- Mansard roof: design features and layout
- Insulation of a house made of 150x150 timber from the outside
- Insulation of a concrete floor in an apartment
- How to properly insulate a garage outside and inside with your own hands step by step
- "penoplex" under a warm water floor, the advantages of the material, methods and technology for its installation
- Step-by-step process of covering roofs with soft roofing
- Do-it-yourself insulation of walls with polystyrene foam - detailed instructions
- TechnoNIKOL
- Choosing non-flammable insulation for walls and ceilings: tips and tricks
- Foil insulation: types, properties and possibilities of use
- Hut house: review of ready-made design projects and 80 comfortable and modern implementations
Read with this
- Beautiful roofs of houses with an attic and a balcony: photos, interesting ideas (103 photos)
- Isover thermal insulation overview
- Insulation of a veranda in a wooden house
- Roof height in relation to the width of the house and how to calculate the height of the ridge for different types of roofing
- Sloping roof rafter system: nuances of calculations and design + examples of construction
- Insulating the attic from the inside if the roof is already covered: step-by-step instructions
- Insulating the attic with foam plastic
- Covering the roof of a house
- Mineral wool, its characteristics and insulation composition
- Properties and types of dowel mushrooms for fastening insulation